The 7 Best PowerPoint Animation Tips
Adding animation to your PowerPoint will help you make a dynamic presentation. Here's how you can use animation in PowerPoint efficiently.
If you’re working on an important presentation, you want to make sure everyone in the audience is paying attention to you. Besides having all the relevant information and a good speech, you can add animations to your PowerPoint slides as a tool to engage the audience.
Using animations, you can keep your audience focused through a lengthy meeting and highlight important details, so they’re easier to remember. We’ve put together a quick list of animation tips to help you create a dynamic PowerPoint presentation.

PowerPoint Animation Types
You can use PowerPoint tools to animate pictures, text, tables, shapes, and other objects to build an engaging presentation . Let’s take a quick look at the animation type, so you have an idea of which type better fits your presentation.
- Entrance animations : You should use them when you want new information or objects to show up within the slide.
- Emphasis animations : You can use them to animate already displayed objects to have your audience focus on them.
- Exit animations : These animations determine how objects leave the slide. For example, an object could fade out or fly out of the screen.
- Motion path animations : An object will move within the slide on a predetermined path. There are six types of motion paths that you could use: Lines , Arcs , Turn , Shapes , Loops , and Custom paths. So, you shouldn’t have any problems when it comes to moving objects any way you want.
Now, let's take a look at how you can make the most out of PowerPoint animations.
1. Plan Ahead
Before you start working on your presentation, draw an outline of how it should look. Think about how your idea can reach your audience and how the different animation types will help you achieve your goal. Also, planning ahead is one of the most efficient ways to save time when creating a PowerPoint presentation.
2. Know When to Add Animations
No matter how excited you are to make your PowerPoint presentation stand out , you shouldn’t animate anything until you’ve finished adding every piece of information and object.
Think about it. You’ve animated a picture, but now you need to resize it, so its details are more visible. The resized picture might cover a piece of text or other objects when it enters or moves around the slide, so you’ll have to edit the slide once again.
3. Rename All Objects
If you add a lot of pictures, icons, or text, it’s easier to lose track of them, and you might have a hard time identifying the object that you want to animate or edit. To avoid losing time, you should rename every object right after you insert it.
To do it, select the Home tab. Then, head to the Editing menu and click Select > Selection Pane . To rename the object, double-click on its current name, and the name field will become editable.
4. Keep It Simple
If you want to prepare a professional presentation , less is more. You don’t need to animate everything in your presentation as it might confuse the audience. Instead, think about the most important parts and use animation to make them really stand out.
Take a look at each slide and decide what your audience should focus on. Once you’ve found it, you can use an emphasis animation to spotlight that piece of information. If there are multiple elements that you want to animate, don’t have them moving at the same time. Instead, give them some progression.
Also, having too many types of animations will distract your audience from the idea that you’re trying to share. If there are too many objects moving on your screen, your audience’s focus will be all over the place, and some of them might even quit following your slides. This is why you shouldn’t use more than three animation types throughout your presentation.
5. Adjust the Animation Speed
Depending on the animation, you’ll have to adjust its speed. You can’t have a Spin animation and the object bolting across the screen without any chance for your audience to see it. To adjust the speed, select the object or text that you've animated. Then, in the Animations tab, open the Start menu and select the duration and when it should start.
If you select With Previous , the animation will start at the same time as the previous animation. If you select After Previous , the animation will start right after the previous effect finishes. You can set a Delay value to have a small break between effects. For better control, you should select the On Click option.
6. Set the Eye Flow
Think about how your audience will visualize the information. If there’s a lot of displayed information, they might scan it, instead of listening to you. Think where your audience focus should be and use animations to stimulate that focus.
7. Preview Your Animations
As you work on your PowerPoint presentation and add animations, you should constantly check how they look. But pressing F5 and having the slideshow start from the beginning will take a lot of time if you have many slides and animations. Instead, there’s a quicker way to check how the animations on certain slides look.
You’ll notice that the slides with animations have a little star next to them. If you click the star icon, the animations will start playing. Additionally, you can go to the Animations tab and click Preview to view the animations on the selected slide.
Once you’ve finished your presentation, press F5 and watch the entire slideshow. Observe the animations’ pace. Does your audience have enough time to get the entire information? Is the screen too crowded with too many objects moving at the same time? In this case, you may want to adjust the pace or even remove some animations.
Become a PowerPoint Animations Master
With these PowerPoint animation tips, you are now set to captivate your audience’s attention. It may take a while to figure out which animation you should use, but it will help you better control how you deliver information to your audience.
If you’re confident that you’ve put together the best PowerPoint presentation but are worried about speaking in public, there are a few apps that could help you beat this fear.
Home Blog PowerPoint Tutorials PowerPoint Animations: Animate Text, Objects, and Slides in Your Presentations
PowerPoint Animations: Animate Text, Objects, and Slides in Your Presentations

Working with graphic assets can bring a degree of expectancy when delivering a presentation, such as in the case of PowerPoint animations. They can help add emphasis to slide content and reveal parts of the slide gradually to help presenters discuss topics sequentially.
As a presenting software, PowerPoint provides all kinds of animations for emphasis, entrance, exit, and to create a set motion. Join us today to learn all about animations in PowerPoint and unleash your creative potential.
Table of Contents
How PowerPoint Animations Can Benefit Presentation Design
Understanding powerpoint animation basics, types of animations in powerpoint, how to animate text on powerpoint, animating objects for visual impact, crafting seamless slide transitions in powerpoint, mastering advanced animation techniques in powerpoint, dos and don’ts of powerpoint animations, real-world use cases of animated presentation slides, recommended animated powerpoint templates, enhanced engagement and understanding through animations.
Dynamic presentations can have many benefits. The importance of such animations is often only realized by people familiar with PowerPoint. As we’ve seen in our guide on visual communication , graphical elements can make concepts more understandable. In the case of animations, we can use the transitions between slides or elements to split concepts and make them clearer.
Audience engagement is another factor, as eye-catching slides often include surprise elements hidden behind animations. These elements attract the audience’s interest and increase retention rate. In this case, animations serve as powerful presentation aids for the speaker.
Capturing Audience Attention
PowerPoint animations are more likely to capture the audience’s attention than static slides. The moving objects on-screen are the type of visuals people are likely to find attention-grabbing instead of trying to read through static slides or looking at static images. On this behalf, storytelling techniques boost their efficacy in connecting with the audience by implementing animations and transitions rather than sticking to static slides.
Emphasizing Relationships Between Elements
Whenever we work with contrasting values, like pros and cons slides , animations help the presenter highlight areas of interest or disclose the opposite values section by section. This, in turn, structures the speech for real-time interaction with the graphical assets rather than having the audience read the slide and lose focus on the speech.
Interactive Presentations
As mentioned before, presenters can craft compelling stories through the careful use of animations in PPT. What is often overlooked is the link between interactive presentations and animations. For instance, a speaker can deliver different outcomes of the presentation by selecting one path whose outcome is revealed through an animation. This “wow” factor induces surprise and creatively presents case scenarios.
Another option is when introducing your team in presentations. Rather than using static slides, incorporating animations gives more rhythm to the presentation and invites the public to interact with the speaker.
Getting Started with Animation in PowerPoint
To start with animations in PowerPoint, select an object you wish to animate and go to the Animations tab to choose an animation to add to the slide element. When adding animations to multiple objects in a slide, you should consider the sequence you wish to use to animate objects.

Accessing Animation Features
When accessing animation features, you will come across various animation types. By expanding the Animations menu, you can select animations for entrance, exit, emphasis, and motion paths to create a path for your animated sequence. You can also click to instantly preview an animation for the selected object or switch to slideshow mode to see how the animation will appear.

Adding Animations to Text and Objects
Once an animation is added to a text or object, a number is assigned. This number shows the sequence in which the object will be presented. For example, the object will be the first to be animated on screen, followed by two, three, and so on.

You can adjust the sequence of animations, triggers, and other settings from the Animation Pane in PowerPoint.

Timing and Sequence in Animations
The Timing menu in the Animations pane provides options to set the duration of the animation, the time to delay the animation on the screen (if necessary), and to assess if the animation starts on click, with the previous or after the last animation. How you select these animations will help you adjust the time and sequence of the animations. For example, you can use ‘ with previous’ option to show two animated objects simultaneously.

Entrance, Exit, and Emphasis Animations
Some of the most commonly used animation types fall under three categories: entrance, exit, and emphasis animations.
Entrance Animations
The Entrance Animations are meant to start or introduce objects. You can explore all entrance-related animations by going to Animations -> Animation (menu) -> More Entrance Effects . This will reveal all entrance animations you can click to preview for a selected object. These often consist of basic animations with effects like appear, fly-in, float-in, strips, wheel, circle, box, dissolve-in, split, wedge, wipe, plus, diamond, checkerboard, blinds, etc. The animations can be divided into three categories: basic, subtle, and moderate. These categories help identify the type of effects in each category according to how prominent they might be on screen.

Exit Animations
The Exit Animations are meant to help exit a slide or animated sequence to close a topic or subtopic, or to conclude the on-screen animations for a slide. These animations are similar to the Entrance Animations with the same effects. You can use these animation types for an exit sequence using effects like blinds, circles, checkerboard, box, plus, split, wedge, wipe, diamond, dissolve out, contract, swivel, fade, zoom, basic zoom, collapse, float up, etc.
Like the Entrance Animations, you can go to Animations -> Animation (menu) -> More Exit Effects to preview the animations and to see the three categories for basic, subtle, or moderate animations.

Emphasis Animations
Other than basic, subtle, and moderate, the Emphasis Animations come with an additional category, ‘exciting.’ Emphasis animations in PowerPoint provide visual aids for emphasizing content within slides. The effects for these animation types in PowerPoint are also quite different from the entrance and exit-themed effects. Effects like fill color, grow/shrink, transparency, line color, teeter, color pulse, object color, desaturate, darken, lighten, blink, wave, and others can help emphasize an object within a slide to make it pop out before the audience.

Exploring Motion Path Animations
If primary effects aren’t what you want, it’s time to switch to Motion Paths . These are animated effects in PowerPoint that showcase objects across a specific path. In other words, these are elaborate animations that drag objects on the screen based on a particular shape or path, such as a 4,5, 6, or 8-point star, crescent moon, circle, diamond, football, heart, octagon, pentagon, square, trapezoid, teardrop, right triangle, arc (down, right, left, up), curvy right, bounce right, etc.
Motion Paths are divided into four categories. The basic effects consist of shapes, whereas, Line Curves provide lines and curves to animated objects. Similarly, the special category contains more elaborate effects such as inverted square, loop de loop, peanut, bean, curved square, etc.

Choosing Appropriate Animation Styles
When choosing animation styles, picking a style that best resonates with your presentation slides is important. The animations’ names and categories can help you identify what might work for you. Furthermore, after adding an animation, you can go to Effect Options to view the various directions and options used to refine the animation to build your sequence further. Depending on the animation type, you can pick variations of the animation, directions, colors, transparency, points to edit or lock, or other options for selected effects. The image below shows the variations for the Wheel animation in PowerPoint via Effect Options .

Similarly, if you select Transparency from Emphasis Effects, you can choose how transparent the object will appear on the screen. Likewise, many color-themed effects enable picking a custom color to animate an object.

Since Motion Paths are unique, you will get options to edit points, lock paths, reverse the direction of the default animated sequence, etc.

Now that you know how to animate in PowerPoint, it’s time to explore making written content more interesting using animations.
Start by opening a blank PPT file and adding a placeholder text. The idea is to learn how text interacts with animation effects without working with complex graphic layouts.

Select the text and switch to the Animations tab. In there, pick an animation effect of your preference. You will get a preview of the effect applied – which will show the number of the animation order once completed.

Animations for text, like any other animation, can be controlled in terms of behavior by accessing the panel at the right-most section of the Ribbon.

Additionally, we can expand the animations panel to select from the different effects offered by PowerPoint.

Animating Text Elements on PPT Templates
Animating text elements to highlight key aspects of your slides can be a great way to create engaging presentations. The Animated 3D 4 Steps & Core PowerPoint Template shown below are among the Animated PowerPoint templates at SlideModel that animate objects and text elements for emphasis while retaining a clear layout.
As visible from the animated sequence from the Animation Pane in the image below, the slide deck uses animated text boxes with a mix of other slide elements to create a sequence where a four-step diagram is highlighted with supported text to help elaborate each part of the diagram in an animated sequence. We can add, remove, or modify the included effects via the Animation Pane.

Balancing Text Animations for Impact
By balancing text animations, you can have maximum impact when highlighting content for your slides. The animations can be triggered to start simultaneously to reveal all the text after a sequence of objects, before objects appear, or one by one to reveal the diagram contents gradually.

Animating Images, Shapes, and Charts
When animating shapes and images, you can use a variety of animation types for entrance, exit, and emphasis, and to make the content pop out. However, charts require subtle animations, and it’s best to use basic effects to reveal charts, such as Appear and Disappear .
The Animated Network Diagram PowerPoint Template is an example of how to animate shapes.

The template’s title slide reveals shapes and icons in the form of a diagram in an animated sequence.
You can also include images in such a template to customize the given diagram and animate it to reveal the image simultaneously or after a set of objects has already been revealed.

If you are including a chart in your slide that is to be animated, make sure the animation corresponds to other elements that might also be animated. For example, you can trigger the chart to be revealed after the slide title with a simple Appear effect. In such a case, the chart can be displayed altogether or gradually, in animated form.

Applying Object Animations Strategically
When placing slide objects, you must apply the animations strategically to avoid revealing information out of sequence. Furthermore, it is also worth considering how your effects appear. For example, in the image of the diagram below, would you prefer the diagram to appear floating upward or downward? Such considerations and other vital elements, such as your branding needs, are important to ponder when setting your animated sequence.

Enhancing Presentation Flow with Transitions
While Animations for PowerPoint are one way of making your slides engaging, PowerPoint Transitions is another. You can access them via the Transitions tab in PowerPoint and apply transitions between slides.

While many legacy transitions provide basic effects when switching between slides, some of the more recent additions to this menu, such as Morph Transition , enable the creation of elaborate animations by using Transitions to animate your slides. The below example shows a slide with the Morph transition, giving an animated effect to the diagram.

Maintaining Coherence Between Slides
When applying Transitions, it is essential to maintain coherence between slides by ensuring they don’t overlap with any added Animations. To do this, you should preview your slide deck to see how it might appear once all the animated effects have been included in your slides. Like PowerPoint Animations, you can also use Effect Options for Transitions to set a sequence or direction that best suits your needs.

Layering for Complex Animation Effects
Using layers of multiple objects and slides can easily create advanced animation effects. This can be done using not only PowerPoint animations but also transitions. The Animated Pendulum Swing PowerPoint Templates from the SlideModel archive of animated templates use Transitions like Morph to create animated sequences. The below example shows a swinging pendulum created using Morph.

Combining and Triggering Animations
Depending on the number of elements within a slide and the animations used, you can use triggers to customize and set sequences for slide elements to animate. The example below shows the selected pendulum’s various linking options for the on-click trigger. By placing your slide objects to be connected and triggered with different parts of your slide, you can create and customize animated sequences that can be pretty attention-grabbing.

PowerPoint Animation Painter
If you thought you had to start from scratch to animate each slide of your presentation, you are sorely mistaken. Much like the Format Painter option in PowerPoint, we can find Animation Painter , which is accessible via the Ribbon under the Advanced Animation control options.

This tool helps us duplicate animations between elements of the same slide or copy animation effects from one slide to another. As a format copying tool, it requires at least one animation effect to be placed otherwise the option is grayed out.
Creative Experimentation
Experimenting with Animations in PowerPoint can be pretty helpful to avoid making monotonous presentations. Experimentation does not necessarily require making slides from scratch, but you can also use ready-made templates such as the 3D animation PowerPoint Templates at SlideModel. Alternatively, some slide deck templates offer a considerable range of animation effects intended for maximum audience engagement, which users can quickly customize by editing placeholder areas for text, images, and logos.
Below is a list of do’s and don’ts of PowerPoint Animations for making presentations that best use animated effects.
Maintain Animation Moderation
It is essential to maintain moderation when using animations, as the use of too many animations on a single slide or presentation can make the content confusing.
Use of Appropriate Animations
Try to use appropriate animations for slide objects. The animation should suitably show if the object is to enter, exit, be emphasized, or be highlighted using a motion path.
Avoid Animation Overload
Avoid flashy animated sequences unless your presentation is meant for an audience that might find engaging, such as children in a classroom session.
Subtle can be Just as Engaging
Sometimes, subtle animations can be just as engaging as an animation with an elaborate effect. This can, in fact, be a better option than using animations that might be visually overpowering or difficult to follow due to elaborate effects.
Ensure Visual Consistency
As discussed earlier, it is vital to maintain consistency in using animated effects. Be it Animations or Transitions, using flashy effects or too many diverse effects can hurt how the audience perceives your content, as it might become confusing, visually overpowering, or unprofessional. In such a case, the audience might quickly lose interest in the presentation, leading to Death by PowerPoint.
Less is More
The design language of visual designs over the past decade or more has been intended to use fewer effects and graphical elements with ample space to make the interface look clean. Be it Modern UI or Material design apps, this design language has been evident across desktop and mobile UIs. Using the same concept, you can design your slides with fewer animations and graphical elements to make your content more visually appealing.
Turning PowerPoints into Millions
Courtney Allen, a professional PowerPoint designer who came out of a BFA in graphic design from Boise State University, had all but PowerPoint as a part of her portfolio. She started her freelancing career via Upwork, making over a thousand PowerPoints for clients, bringing in as many as $2 million. She suggests using simple designs and animations to make the most out of PowerPoint presentations.
Guy Kawasaki Pitch Deck
Guy Kawasaki, a former Apple employee, whose famous 10-slide pitch deck has inspired a variety of PowerPoint templates. This rule was designed for startups and business presentations, focusing on pitching a concept to investors. While this isn’t directly related to using animations in presentations, it is an example of making the best use of minimalist content in a few slides. You can learn more about the Guy Kawasaki pitch deck from our article about the 10/20/30 rule for PowerPoint presentations .
How not to use an Animated PowerPoint Presentation in Court!
Presentations with animations aren’t always a great idea. In 2014, a court in the United States criticized a PowerPoint presentation by the prosecutor, which led to the court throwing the case out. The presentation was made with sound effects and animations, with flashy elements like the bullseye. Some of the significant mistakes made by the prosecutor included ‘visual advocacy,’ where the defendant was marked with the word ‘guilt’ in the slide deck. Not to mention, the animated presentation seemed to be aimed at influencing the court using visual aids. Something that did not sit well with the court.
Use of PowerPoint by the US Military
The US Military has often been accused of Death by PowerPoint for preparing what some call the worst PowerPoint slides ever created. The issue became so profound that in 2011, it was revealed that an executive communications manager at Microsoft, Dave Karle, was tasked with ensuring that the US military could finally start using the software properly. After discussions with top military officials, an updated military presentation method was created, consisting of a number of presentation templates, tips, and graphics and more than 6000 map symbols.
In this section, you can check some ready-made templates that can be easily customized for your presentation’s purposes. All these templates feature professionally made animation effects with native PowerPoint tools.
1. Multi-Purpose Animated PowerPoint Slide Deck

Those looking for how to animate in PowerPoint now have a ready-made solution to create mind-blowing presentations in a couple of minutes. This slide deck contains 26 slides in a broad selection of topics. We can present facts, introduce our team, our company, display charts with animated effects, and so much more. Check it out now!
Use This Template
2. Animated 8-Step Social Media Carousel PowerPoint Template

Bring dynamism to your social media posts by implementing this vivid social media carousel template. With eye-catching animated effects, this template emulates the typical carousel posts we can find on platforms like LinkedIn or Instagram.
3. Problem Solving Animated PowerPoint Template

Bring professional graphics to troubleshooting sessions with your team. This template, filled with PowerPoint animations, offers a user-friendly approach to conventional problem-solving situations in which the team has to observe the Issue Matrix, suggest possible solutions, and prepare an implementation plan and its corresponding process flow diagram. Thanks to its high-quality animation effects, the speaker can introduce the facts individually, without diverting attention from the speech.
4. Animated Company Profile Presentation Template for PowerPoint

We’ve seen this template as one of the examples of animations for PowerPoint. It is a 21-slide solution offering all the tools required for a corporate-styled company profile presentation, specifically tailored for service businesses.
5. Corporate Company Profile Animated PowerPoint Template

An alternative option for company profile presentations, featuring a minimalistic graphic layout with a broad variety of animation effects. Check these 12 slides and customize them with information relevant to your organization – we bring complex animation effects in a ready-made format. Colors and placeholder images can also be replaced.
6. Animated Roadmap PowerPoint Template

Bring more action to any planning meeting using this animated PowerPoint roadmap template. After a clear path overview, each milestone slide contains animation effects to introduce relevant information to the topic. It is a new take on traditional roadmap presentations that allows the speaker to pace themselves regarding how to disclose the information about the strategy to embark on.
7. Animated Pros & Cons Comparison Slide Template for PowerPoint

We mentioned the advantages of using PowerPoint animations to discuss contrasting values of a situation. Well, this animated Pros & Cons slide is the ideal tool for that purpose, offering a generalist view, then two accompanying slides for Pros & Cons, respectively, with animated effects to introduce additional information per point.
Using animations to make visually appealing and engaging presentations requires ensuring that your content corresponds with your added animated effects. It is always best to use animations in moderation and to keep your slides minimalist while unleashing your creativity as a presenter. Using ready-made PowerPoint templates can also help give you a good starting point to begin experimenting with animations and effects. This can also be useful for people new to PowerPoint Animations to explore what is doable with an animated slide deck, using animated sequences tailored for customization.
Whether you’re using an animated template or making one from scratch, a preview in slideshow mode can save you a lot of trouble with potential issues tied to animated effects. Last but not least, using animations in PowerPoint isn’t always necessary, and you can even go for a simple slide deck with a handful of slides. What matters is that you should be aware of the information being presented, and the visual aids should be just to aid your slides and not meant to be the whole package on their own.

Like this article? Please share
Animations, Microsoft PowerPoint, PowerPoint Tools Filed under PowerPoint Tutorials
Related Articles

Filed under PowerPoint Tutorials • April 9th, 2024
How to Remove Notes from PowerPoint
Make alternative versions of your presentation files by learning how to remove notes from PowerPoint. Step-by-step guide with screeshots.

Filed under PowerPoint Tutorials • April 2nd, 2024
How to Round Corners in PowerPoint
Learn how to add rounded corners to shapes and images in PowerPoint. Elevate your presentations with sleek designs. Expert tips and step-by-step guides.

Filed under PowerPoint Tutorials • March 26th, 2024
How to Translate in PowerPoint
Unlock the experience of PowerPoint translation! Learn methods, tools, and expert tips for smooth Spanish conversions. Make your presentations global.
Leave a Reply
- PRO Courses Guides New Tech Help Pro Expert Videos About wikiHow Pro Upgrade Sign In
- EDIT Edit this Article
- EXPLORE Tech Help Pro About Us Random Article Quizzes Request a New Article Community Dashboard This Or That Game Popular Categories Arts and Entertainment Artwork Books Movies Computers and Electronics Computers Phone Skills Technology Hacks Health Men's Health Mental Health Women's Health Relationships Dating Love Relationship Issues Hobbies and Crafts Crafts Drawing Games Education & Communication Communication Skills Personal Development Studying Personal Care and Style Fashion Hair Care Personal Hygiene Youth Personal Care School Stuff Dating All Categories Arts and Entertainment Finance and Business Home and Garden Relationship Quizzes Cars & Other Vehicles Food and Entertaining Personal Care and Style Sports and Fitness Computers and Electronics Health Pets and Animals Travel Education & Communication Hobbies and Crafts Philosophy and Religion Work World Family Life Holidays and Traditions Relationships Youth
- Browse Articles
- Learn Something New
- Quizzes Hot
- This Or That Game New
- Train Your Brain
- Explore More
- Support wikiHow
- About wikiHow
- Log in / Sign up
- Computers and Electronics
- Presentation Software
- PowerPoint Insertions
How to Add Animation Effects in Microsoft PowerPoint
Last Updated: January 31, 2022 Tested
This article was co-authored by wikiHow Staff . Our trained team of editors and researchers validate articles for accuracy and comprehensiveness. wikiHow's Content Management Team carefully monitors the work from our editorial staff to ensure that each article is backed by trusted research and meets our high quality standards. The wikiHow Tech Team also followed the article's instructions and verified that they work. This article has been viewed 449,650 times. Learn more...
You can animate text and other objects in a PowerPoint slide to add flair to your presentation. Follow these steps to learn how create animation effects in PowerPoint, as well as how to animate the transitions from one slide to another.
Animating Text or Objects

- To select a whole text box, click on the border of the text box. Powerpoint automatically distinguishes text separated by a paragraph or bullet break.
- If your Powerpoint has no objects to animate, you will need to add some .

- You can click through the animations to see a demonstration and view more animations by scrolling with the arrows on the right of the animations box.
- Entrance animations will change how an object enters the page.
- Exit animations will change how an object leaves the page.
- Emphasis animations will add movement or highlights to bring attention to an object.
- Paths determine a course of movement for an object on the page.

- This step can be repeated multiple times to add as many animations to an object as you like.

- This can be a useful tool for staying organized when working with multiple animations.

- “On Mouse Click” will hold the animation until you click the mouse.
- “After Previous” will automatically start the animation after any previous animation (or when the slide appears if there are no other animations)
- “With Previous” will play the animation at the same time as the previous animation on that slide.

- The delay begins after the selected animation action. That is if “On Click” is selected, the delay will start after the click.

- You can also click and drag animation listings in the animation pane.

- Choosing to add a sound manually will open up a window to browse for sound files on your computer, so you will need to have one handy.

Animating Page Transitions

- Select “None” on the left to remove a selected transition.
- A slide can only have one transition at a time.

- ”On Mouse Click” is selected by default.

- A higher duration means a slower transition.
- This setting only adjusts the duration of the transition, not of the slide itself.

- Choose “No Sound” from the same menu to remove any added sound effect.

Adding Animated Images and Videos to a Presentation

- You can click and drag the image to move it around on the slide once it's added.

- You must be connected to the internet during your presentation for online objects to display.

- Embedded videos can only play if you are connected to the internet during your presentation.

Community Q&A

- Click “Apply to all” on the Transitions tab to use the selected transition for all slides in a presentation. [3] X Research source Thanks Helpful 0 Not Helpful 0
- The activation, timing, and duration options can also be accessed in the Animation Pane by clicking the down arrow next to a listed animation and selecting the option from the menu. Thanks Helpful 0 Not Helpful 0

You Might Also Like

- ↑ https://support.office.com/en-us/article/Apply-multiple-animation-effects-to-one-object-9bb7b925-ab0f-47d4-bc11-85d939194bed?ui=en-US&rs=en-US&ad=US
- ↑ http://www.thewindowsclub.com/add-sound-effects-to-powerpoint-animations
- ↑ https://support.office.com/en-us/article/Add-edit-or-remove-transitions-between-slides-in-PowerPoint-2016-for-Mac-937604f5-93f8-4f96-9232-8d55d7f0bead
About This Article

- Send fan mail to authors
Is this article up to date?

Featured Articles

Trending Articles

Watch Articles

- Terms of Use
- Privacy Policy
- Do Not Sell or Share My Info
- Not Selling Info
wikiHow Tech Help:
Tech troubles got you down? We've got the tips you need
- PowerPoint Themes
- Latest PowerPoint Templates
- Best PowerPoint Templates
- Free PowerPoint Templates
- Simple PowerPoint Templates
- PowerPoint Backgrounds
- Project Charter
- Project Timeline
- Project Team
- Project Status
- Market Analysis
- Marketing Funnel
- Market Segmentation
- Target Customer
- Marketing Mix
- Digital Marketing Strategy
- Resource Planning
- Recruitment
- Employee Onboarding
- Company Profile
- Mission Vision
- Meet The Team
- Problem & Solution
- Business Model
- Business Case
- Business Strategy
- Business Review
- Leadership Team
- Balance Sheet
- Income Statement
- Cash Flow Statement
- Executive Summary
- 30 60 90 Day Plan
- SWOT Analysis
- Flow Charts
- Gantt Charts
- Text Tables
- Infographics
- Google Slides Templates
- Presentation Services
- Ask Us To Make Slides
- Data Visualization Services
- Business Presentation Tips
- PowerPoint Tutorials
- Google Slides Tutorials
- Presentation Resources
How To Add Animation To PowerPoint? Easy PowerPoint Animation Tutorial
Adding animations to your PowerPoint presentations can enhance and make them more engaging. Animations can be used to highlight or emphasize a point or to show a series of steps. This blog provides a step-by-step guide on how to add animation to PowerPoint presentations.

Have you ever felt your audience needed to be more engaging even after delivering good presentations? Do you think there’s something that you should have included in your presentation? You might have created a PowerPoint deck but felt it needed more spark to engage your audience. Then, you need to understand how to add animation to PowerPoint.
You’re not alone. The truth is that animation in PowerPoint can transform a presentation from a flat design to a dynamic and visually appealing one. Adding animation can seem daunting or downright impossible if you’re not well-versed in the software.
In this blog, we will provide a detailed guide on how to add animations to PowerPoint, with clear and concise steps. By the end of this blog, you’ll have the knowledge and skills to bring your PowerPoint presentations to life and keep your audience engaged from beginning to end. So, let’s get started with how to add animation in PowerPoint.
Why Should You Add Animations In PowerPoint Presentations?

Learning how to do animations in PowerPoint presentations can significantly enhance their overall quality. There are several compelling reasons to consider including it in your upcoming presentation. Below are a few reasons why you should learn how to add animation to PowerPoint presentations:
It Grabs Your Audience’s Attention
Using animated elements in your presentation can seize your audience’s interest and enhance engagement. The motion displayed on the screen can help diversify the mundane nature of slides crowded with text and pictures.
Emphasizes Important Points
You can use animations to highlight key points or emphasize specific data. For example, if you’re presenting a graph, you can use animation to draw attention to the most critical data points and help your audience better understand your message.
Enhances Understanding
Animated elements can help your audience better understand complex concepts. Visualizing how something works or demonstrating a process can also make it easier for them to follow.
Creates A Memorable Experience
A presentation with animation can be more memorable than one without. Incorporating animations into your presentation can distinguish it from others and create an unforgettable impact on your viewers.
Show Off Your Creativity
Adding animation to your presentation is an opportunity to showcase your creativity and design skills, add a personal touch, and make your presentation unique.
How To Add Animation To PowerPoint For Elements (Text, Image, Shape)?
Suppose you’re looking to add some spark to your presentation. In that case, adding different types of animations in PowerPoint slides can effectively make them more engaging and dynamic. One effective method to make your presentation more exciting and captivating is incorporating animation into your text, images, and shapes.
But thinking about how to add animations to PowerPoint to different elements in your presentation? This PowerPoint animation tutorial will guide you. Follow the below steps:
- Open your MS PowerPoint presentation and navigate to the slide where you want to add animation.
- Choose the item you wish to animate, then click on the ‘Animations’ tab in the top menu.
- Choose the animation you want to apply from the list of available options.
- To view the animations applied to an object, click on ‘Animation Pane.’ You can also re-arrange the animations in any order you prefer.
- You can initiate the animation by clicking either ‘with previous’ or ‘after previous.’ Use the timing options to set the animation’s start time. Additionally, you can set the duration and delay before the animation begins to customize it according to your needs.
- To adjust the animation’s details, such as its direction or timing, click ‘Animation Pane’ in the ‘Advanced Animation’ group on the ‘Animations’ tab.
- If you want to animate multiple items with the same animation, select the object, choose the animation, and select ‘Effect Options’ to decide whether you want the animation to happen simultaneously or to each item separately.
Types Of Animation Effects
Now, you have learned how to add animation to PowerPoint. But do you know the types of animations in PowerPoint that you can use? They are as follows:
- Entrance Effects : Use these effects to make your elements start or enter your presentation with animation. Some of the examples of this effect are Appear, Fade, Fly in, Zoom, etc.
- Exit Effects : These effects are used to show the exit of your elements from the slide. Some examples of this effect are Disappearance, fade, fly out, etc.
- Emphasis Effects : This effect can highlight or emphasize an element. Spin, Grow, Shrink, and Magnify are examples of this effect.
- Motion Path Effects : These effects add motion to your elements. You can move them in a certain way. The motion paths that you can use are Lines, Turns, and Zigzag, or you can define custom paths.
- Action Effects : Make your elements do some action, like triggering a hyperlink or playing a sound when clicked.
How To Add Animation To PowerPoint Slides Or Slide Transitions?
- Open MS PowerPoint and open the presentation to which you want to add transitions.
- Navigate & select the slide where you want to apply a transition. You can select a single slide or multiple slides. To do this, hold the control key and click.
- Go to the “Transitions” tab at the top of the PowerPoint window.
- Click on the transition effect that you like. See their preview by hovering on the effect.
- You can also customize the options by adjusting the duration of the transition, adding sound effects, and setting other parameters.
- You can also apply the same transition to other slides. After selecting a transition effect, click the “Apply To All” button in the “Transitions” tab.
- Preview and save your presentation.
We discussed how to add animation to PowerPoint presentations. Adding animation to PowerPoint can significantly impact the overall quality of your presentation. Animation can grab your audience’s attention, emphasize important points, enhance understanding, create a memorable experience, and showcase creativity. By using animation thoughtfully and effectively, you can take your presentation to the next level and make it truly outstanding.
Check out SlideUpLift’s PowerPoint Templates to create visually appealing presentations.
How to remove an animation effect?
Select the texts and objects from which you want to remove the animations. Then, click the “Animation Styles” button and select “None”.
How do I control the timing and duration of animations?
Go to the “Navigation Pane.” It has options to adjust the start time, duration, and delay of each animation effect.
how to add multiple animations to one object in PowerPoint
Yes, it is possible. Select all the objects and go to the “Animations” tab. From there, you can adjust the settings to apply to all the objects.
Do animations distract my audience?
Animations can also distract your audience if misused. Try using them sparingly. Also, ensure that animations enhance your message instead of detracting from it.
Table Of Content
Related presentations.

Animated Business Strategy Template

Animated 30 60 90 Day Plan Template

Animated Roadmap PowerPoint Template
Related blogs.

10 Bad PowerPoint Slides Examples to Avoid

10 Best Animated PowerPoint Templates

10 Best Business PowerPoint Templates for Presentations

10 Best Free PowerPoint Templates
Tags and categories, privacy overview.
Necessary cookies are absolutely essential for the website to function properly. This category only includes cookies that ensures basic functionalities and security features of the website. These cookies do not store any personal information
Any cookies that may not be particularly necessary for the website to function and is used specifically to collect user personal data via ads, other embedded contents are termed as non-necessary cookies. It is mandatory to procure user consent prior to running these cookies on your website.
- Video Marketing
- Case Studies
- Create a video

How to create animated presentations [Easiest Way for 2023]

Guru - November 22, 2022 - Leave your thoughts. 11 min read
animaker deck , animated presentations , online presentation maker , presentation maker
It's no secret that traditional presentations can get boring for the audience as they often include many sentences, subheadings, and images—and that's just the beginning.
You also don’t want it to look like a high school science project: all over-the-top formatting and an overwhelming amount of text.
So how can you make your presentation more engaging? Well, don’t worry anymore, we have got an alternative for you!
This is where animated presentations come in.
In this article, we have compiled the quickest and easiest steps to create an animated presentation using Animaker Deck .
Introduction to Animaker Deck
With Animaker Deck, you can create your own animated characters and use tons of pre-built templates, millions of stock assets, real-time collaboration, and more!
It can do everything that Powerpoint can do and much more!
If you want to ensure your presentation keeps people engaged and interested, it’s time to change things up a bit from the usual way of creating a presentation.
So why wait? Let’s jump right into the steps!
Signing up with Animaker Deck
Understanding the user interface.
- Ways to create an animated presentation in Animaker Deck
Creating an animated presentation from scratch
Creating an animated presentation from templates, previewing & presenting the slides, sharing your work-of-art.
Click here to log into Animaker if you're already a registered user. If you are new to Animaker, you can sign-up and create an account with Animaker Deck for free.
Before we start to create a presentation, let’s spend some time understanding the user interface of the Animaker Deck app.

On the left side, we have the Library section . Under the library section, you can access the Templates, Characters, Properties, Text, Background, Images, and Upload features with a single click.
Moving on, to the right, we have the Slides section , where you can re-arrange the slides, duplicate the slides, delete the slides, and even make edits to the slides, such as transition effects.
In the center, we have a Workspace displaying the selected slide. Here you will add fonts, and images, change the background and other properties and make all the slides customizations.
And at the top, you will find options to Share, Import, and Present the slide deck.
We shall look into each option in depth in the upcoming steps.
Ways to create an animated presentation in Animaker Deck:
There are two ways to create an animated presentation in Animaker Deck
Customizing the Background
Introducing characters, using properties, adding text .
2. Creating an animated presentation from templates
Selecting a template
- Editing the text
Customizing the Character
Editing the background images.
Let's get started right away!
One way of creating an animated presentation in Animaker Deck is from scratch on a blank canvas. Here’s what we will cover:
Using the Backgrounds feature, you can easily search and apply backgrounds according to your preferences.
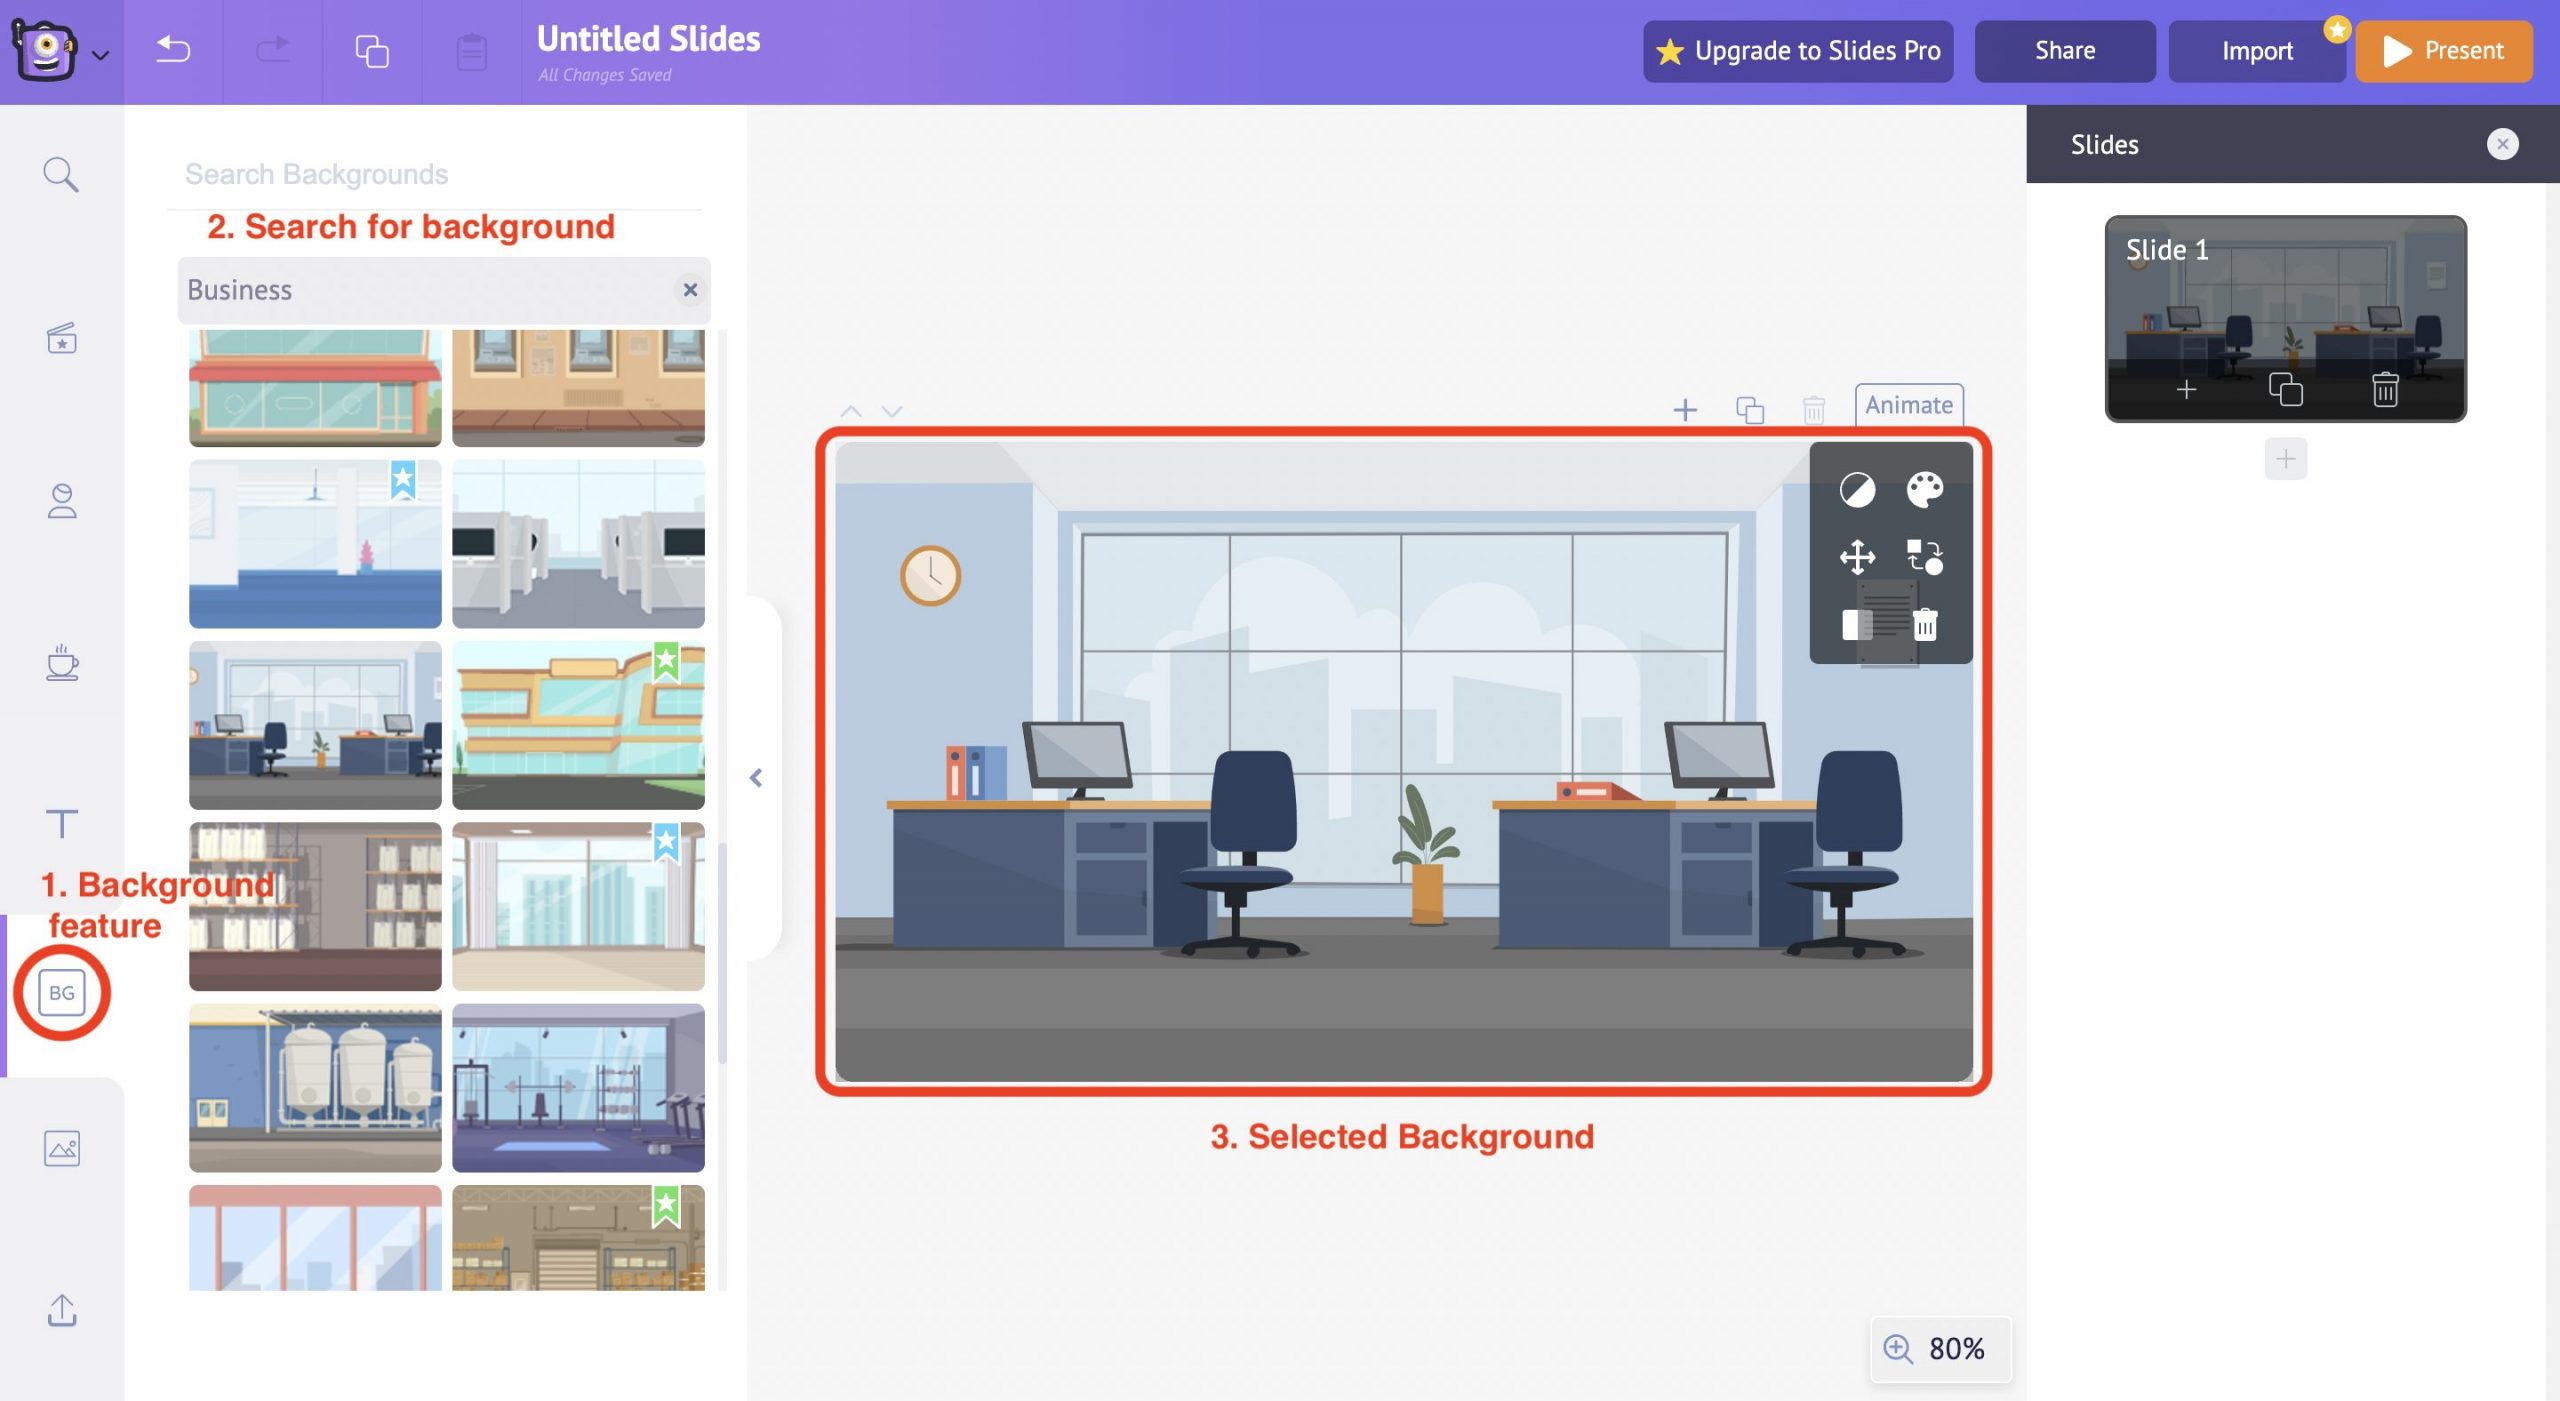
The best part is that you can customize the background colors to match your slide style.
For instance, let’s say you want to create an intro slide for your business. First, choose a suitable background for your slide from the Library.
Once you find and select a suitable background, it will appear in the central workspace. Also, you will notice a few options pop up in the workspace. It is called an “item menu.”
You can customize the colors, add filters, swap elements, and resize and delete the elements in the slide from these options.
Do all the presentations you have made so far lack personality?
You can now infuse life into the slides with the help of Animated Characters.
With Animaker Deck, you can create your personalized characters or use the built-in characters from the Library section, whichever fits your scenario.
In this instance, let’s choose one from the built-in character library.

The selected character will appear in the slide, along with the item menu. Use the options in the item menu to customize the character per your preferences.
Also, you can find the Actions and Expressions section on the right side of the workspace. Apply a suitable action and expression to your character from the available options.
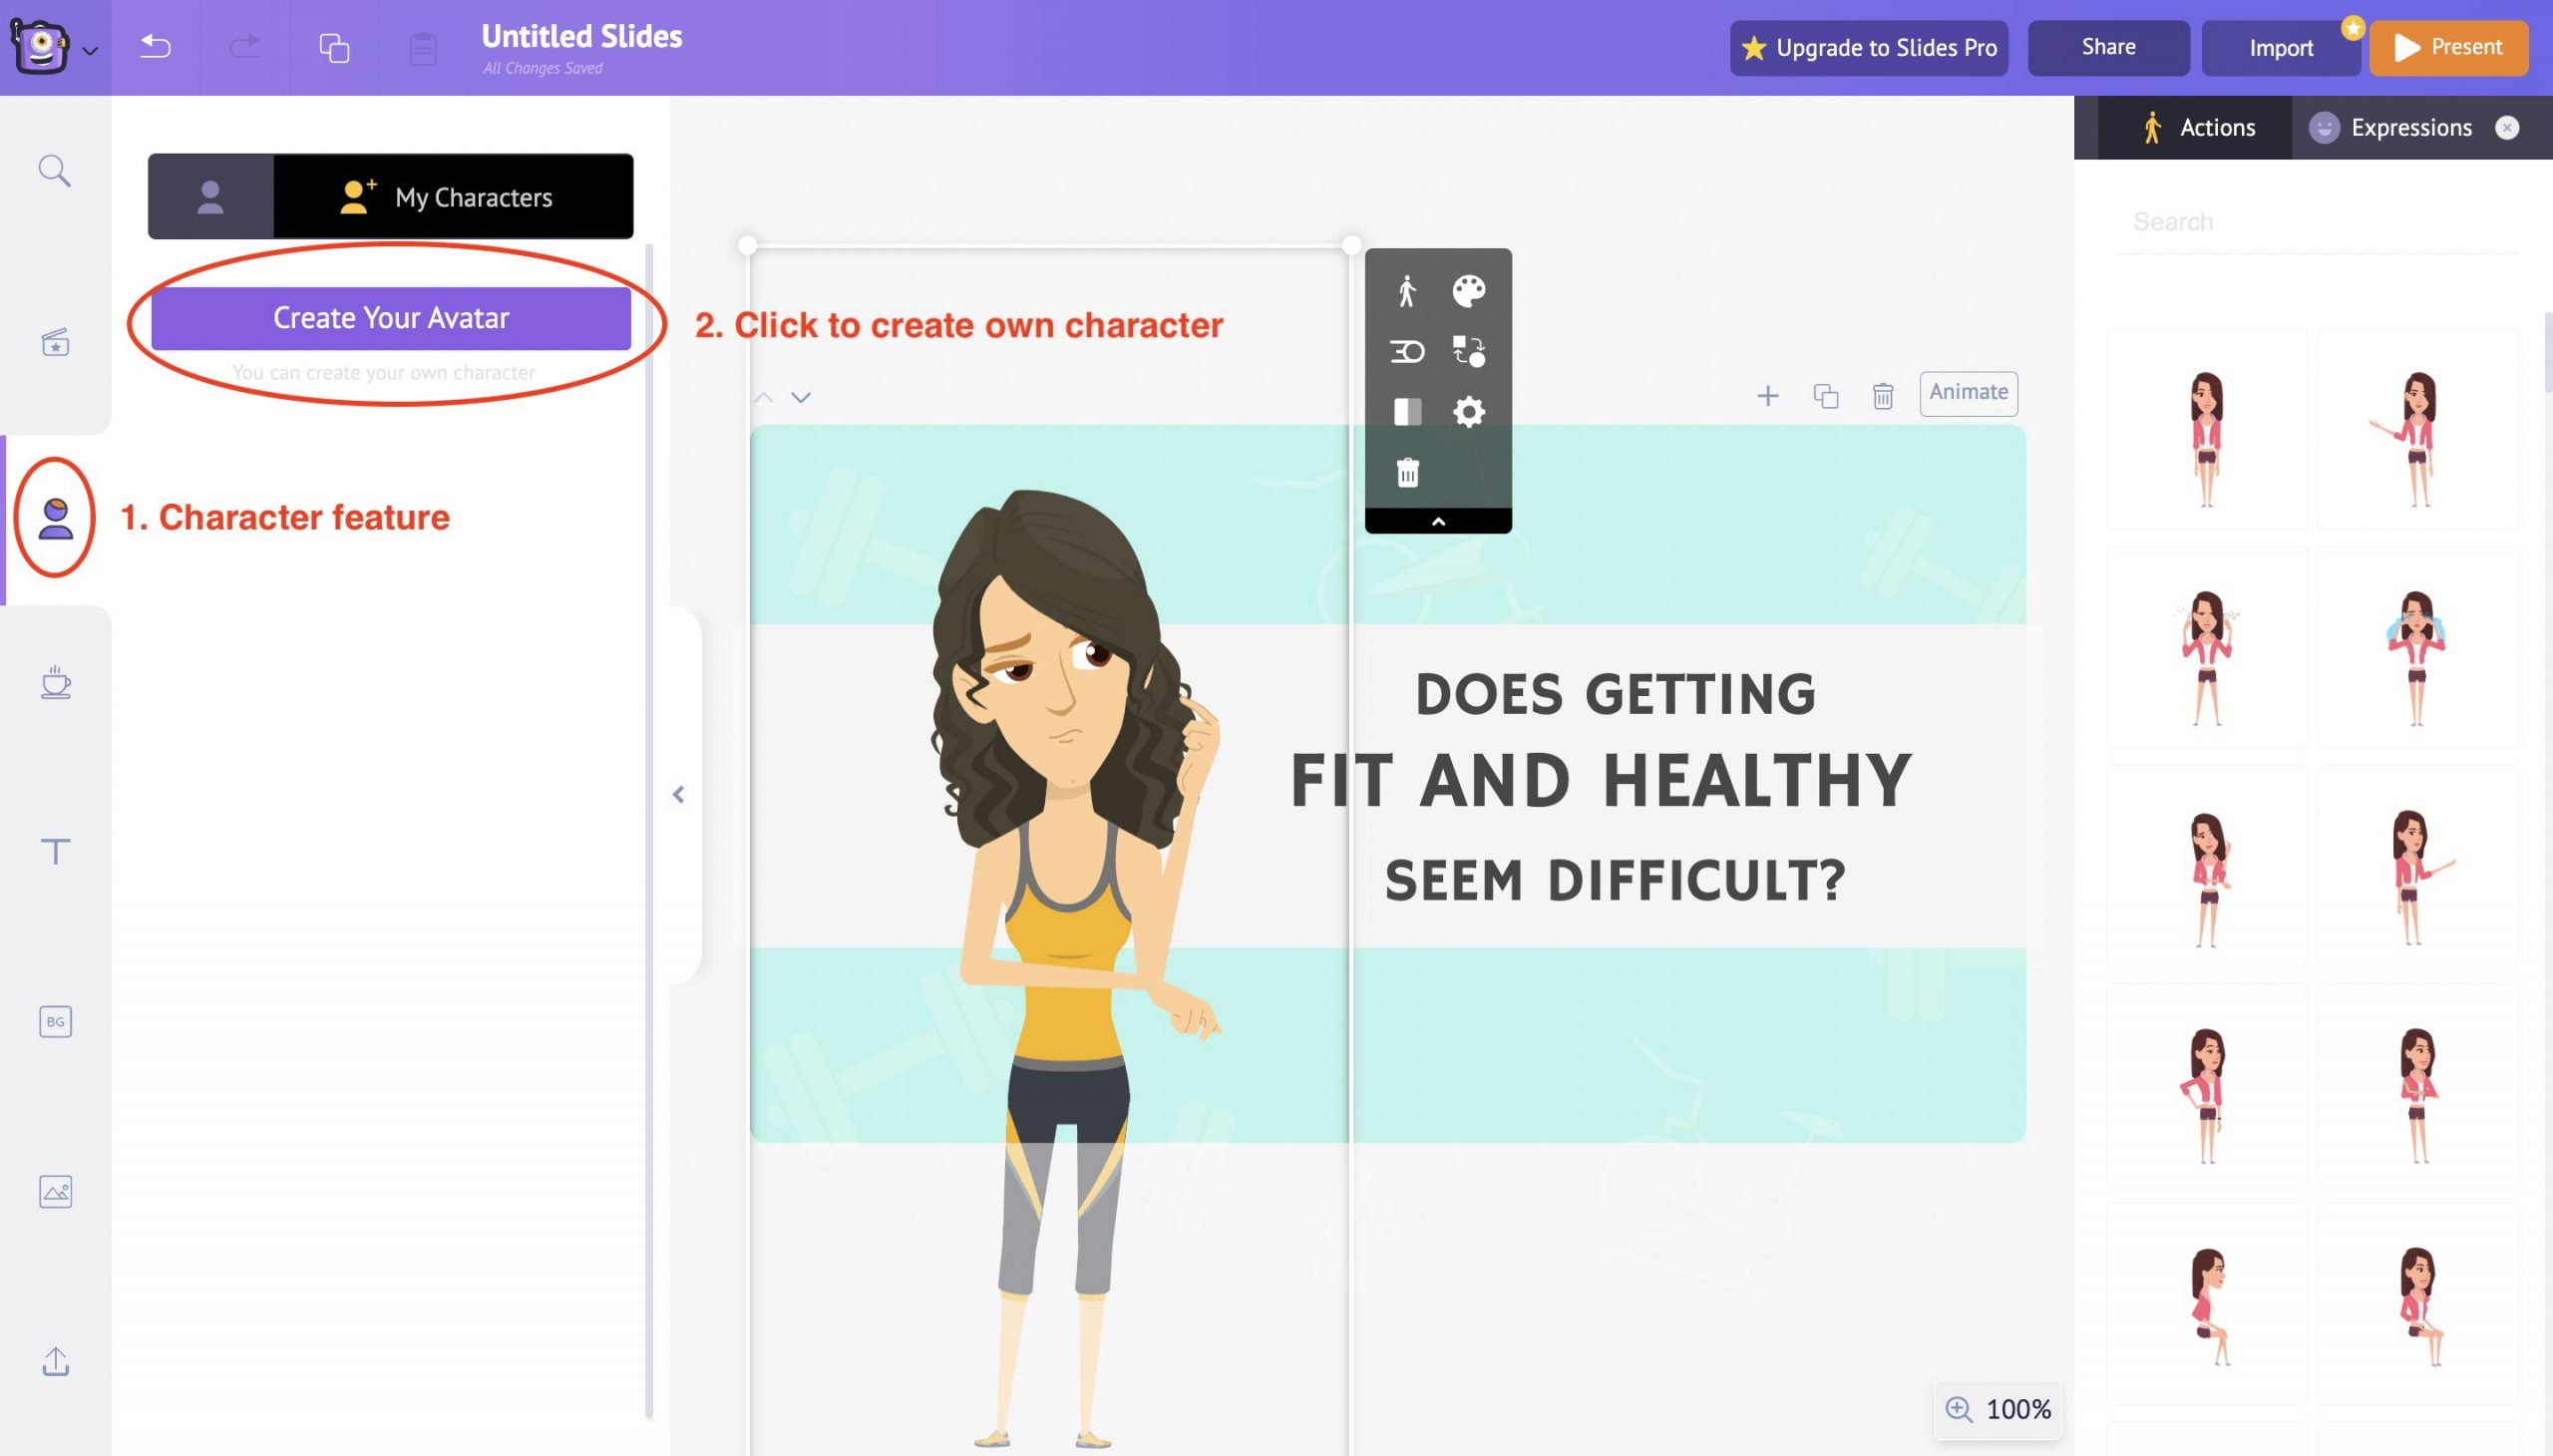
If you are not happy with the pre-built characters, you can even create and introduce your own custom characters into the slide deck.

Use the Create Your Avatar button under the Characters feature to create your own custom character.
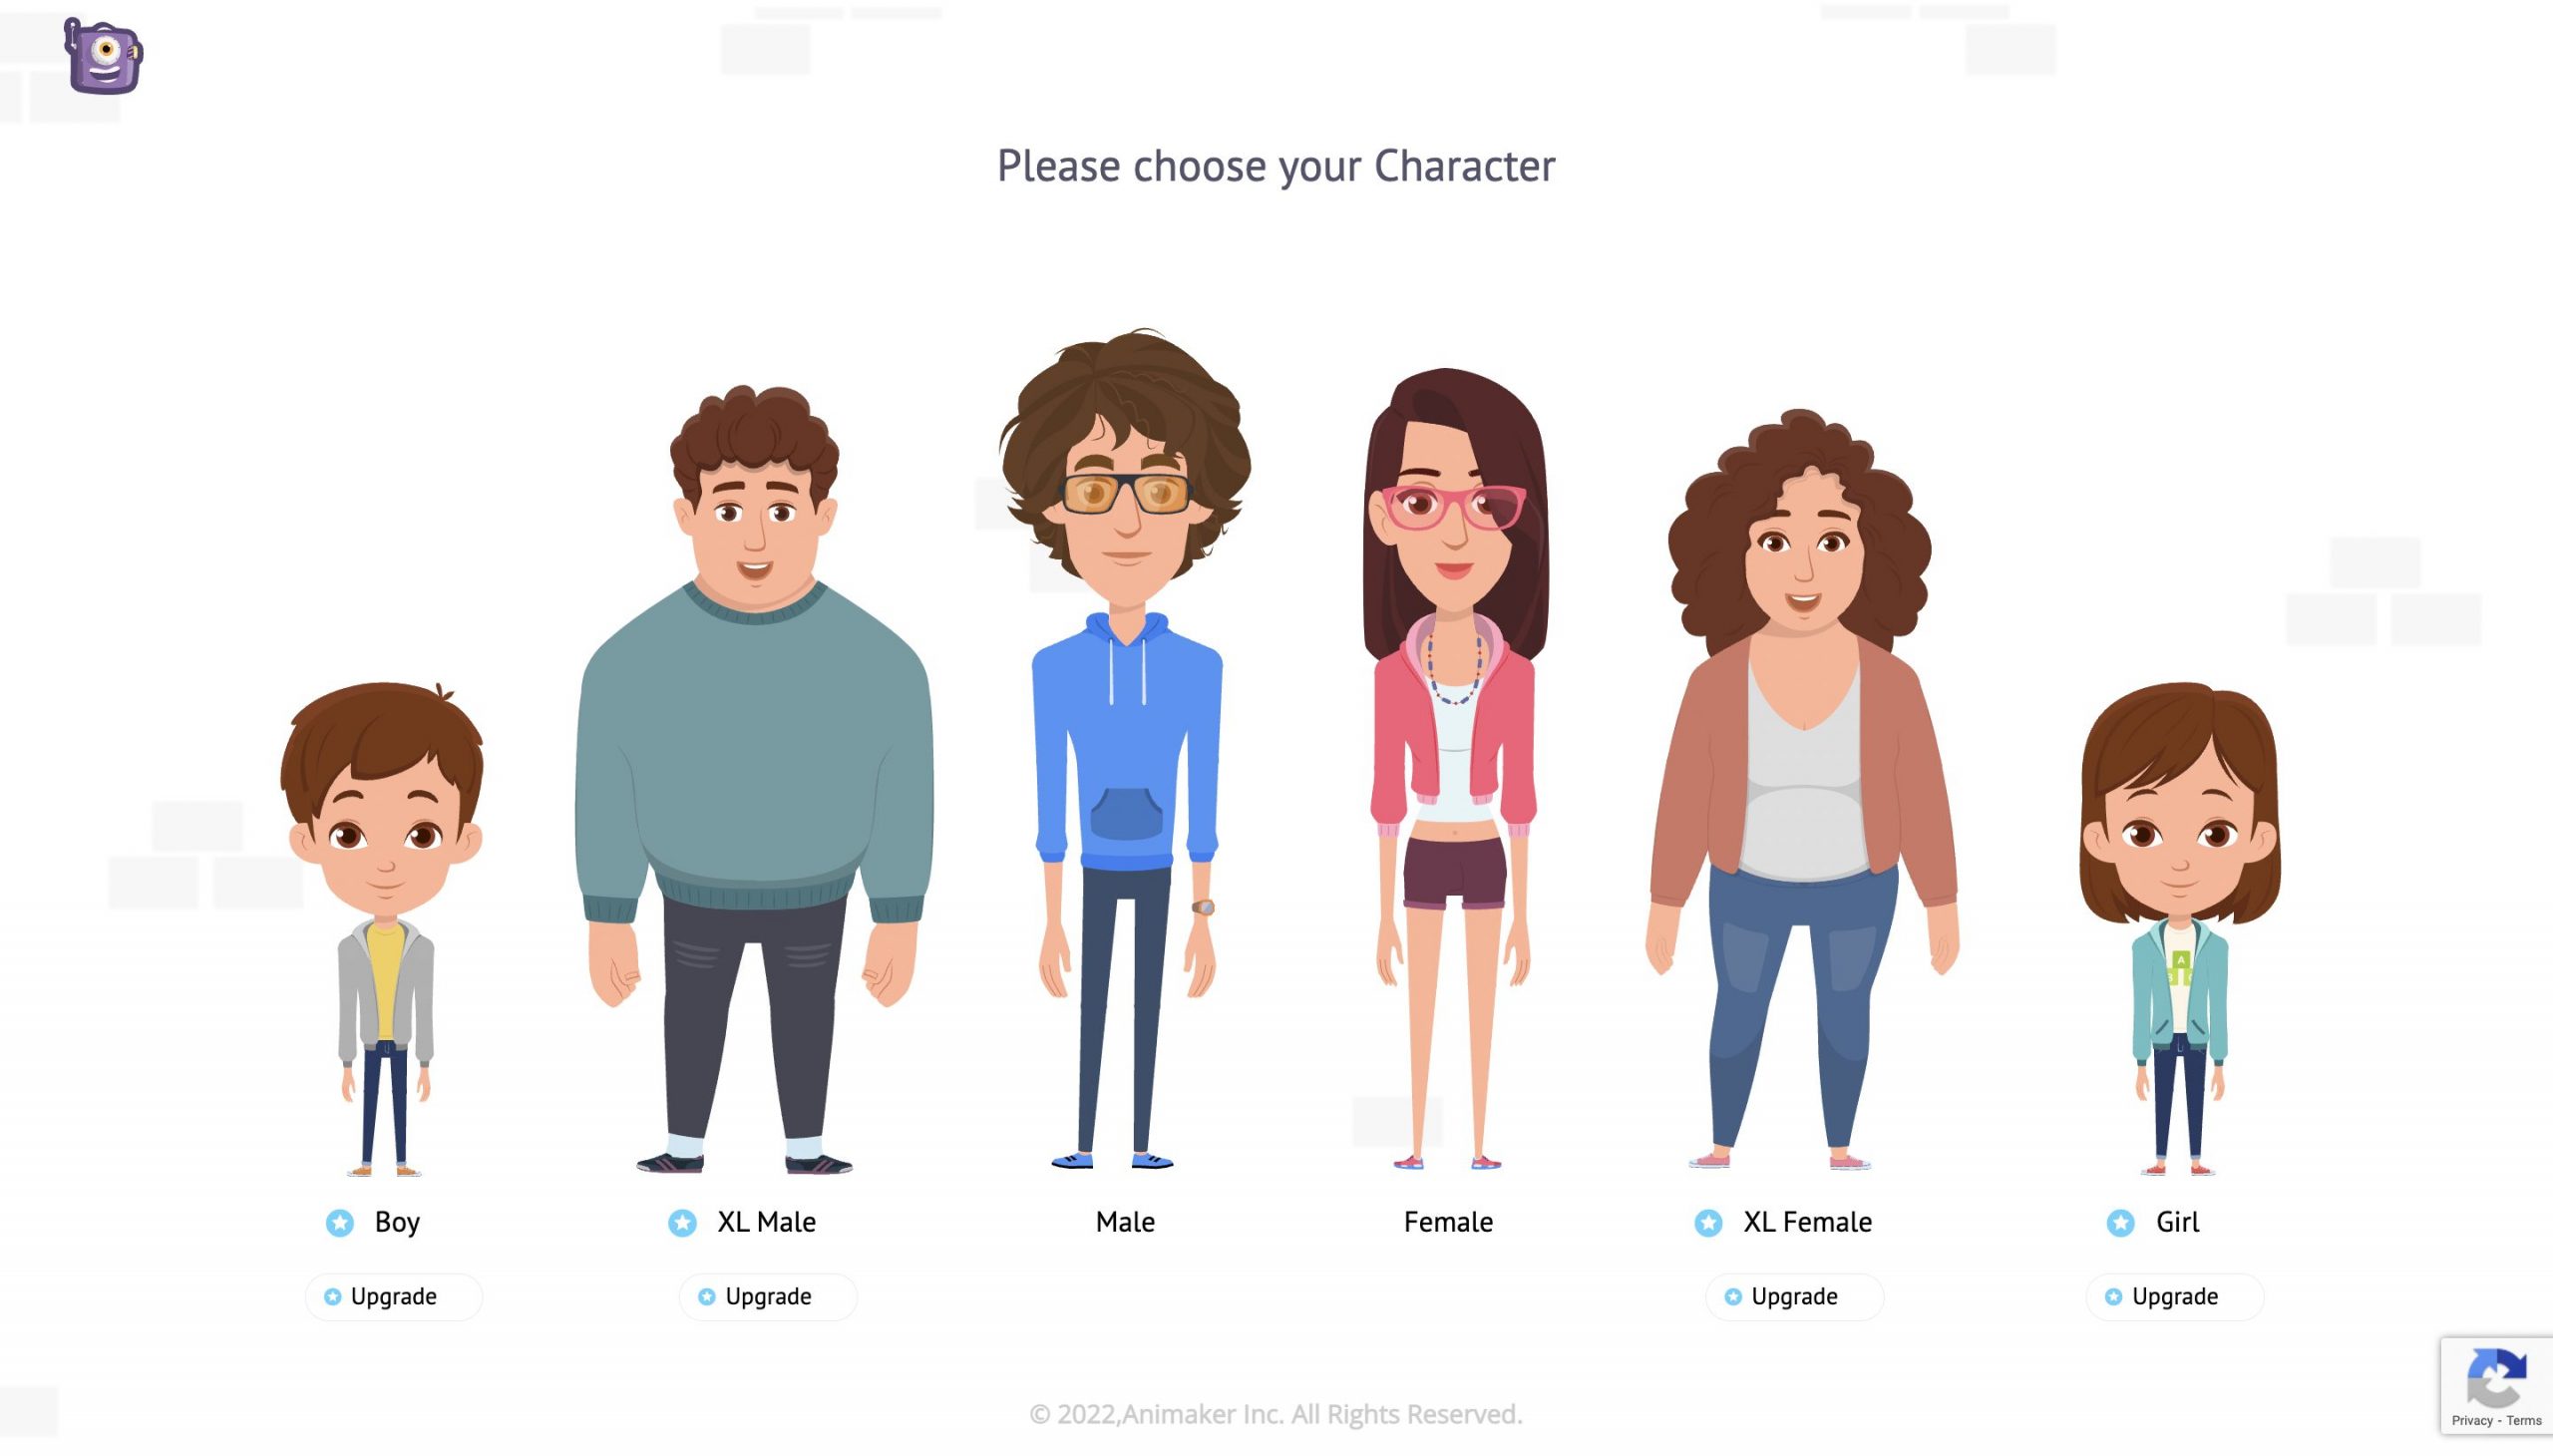
Animaker Deck offers you options to create a character between Young Adults and Children.
Pick the one as per your preference. Once you select the type, you will be taken to the character customization screen.
Here you can customize each and every aspect of your character, starting from head to toe.
This is the cherry on top of the Animaker Deck app. This way, you can introduce yourself as a character in your presentation as well.
Once you have finished the customizations, save your character and refresh the project. You can find the newly created character in the My Characters tab under the Character feature.
Animaker Deck is loaded with tons of Properties. Icons, Graphs, Charts, Numbers, Illustrations, or anything you name, are covered under the properties section.
Now, let’s add a speech bubble to the character. You can do this by searching for a speech bubble under the properties section in the library.
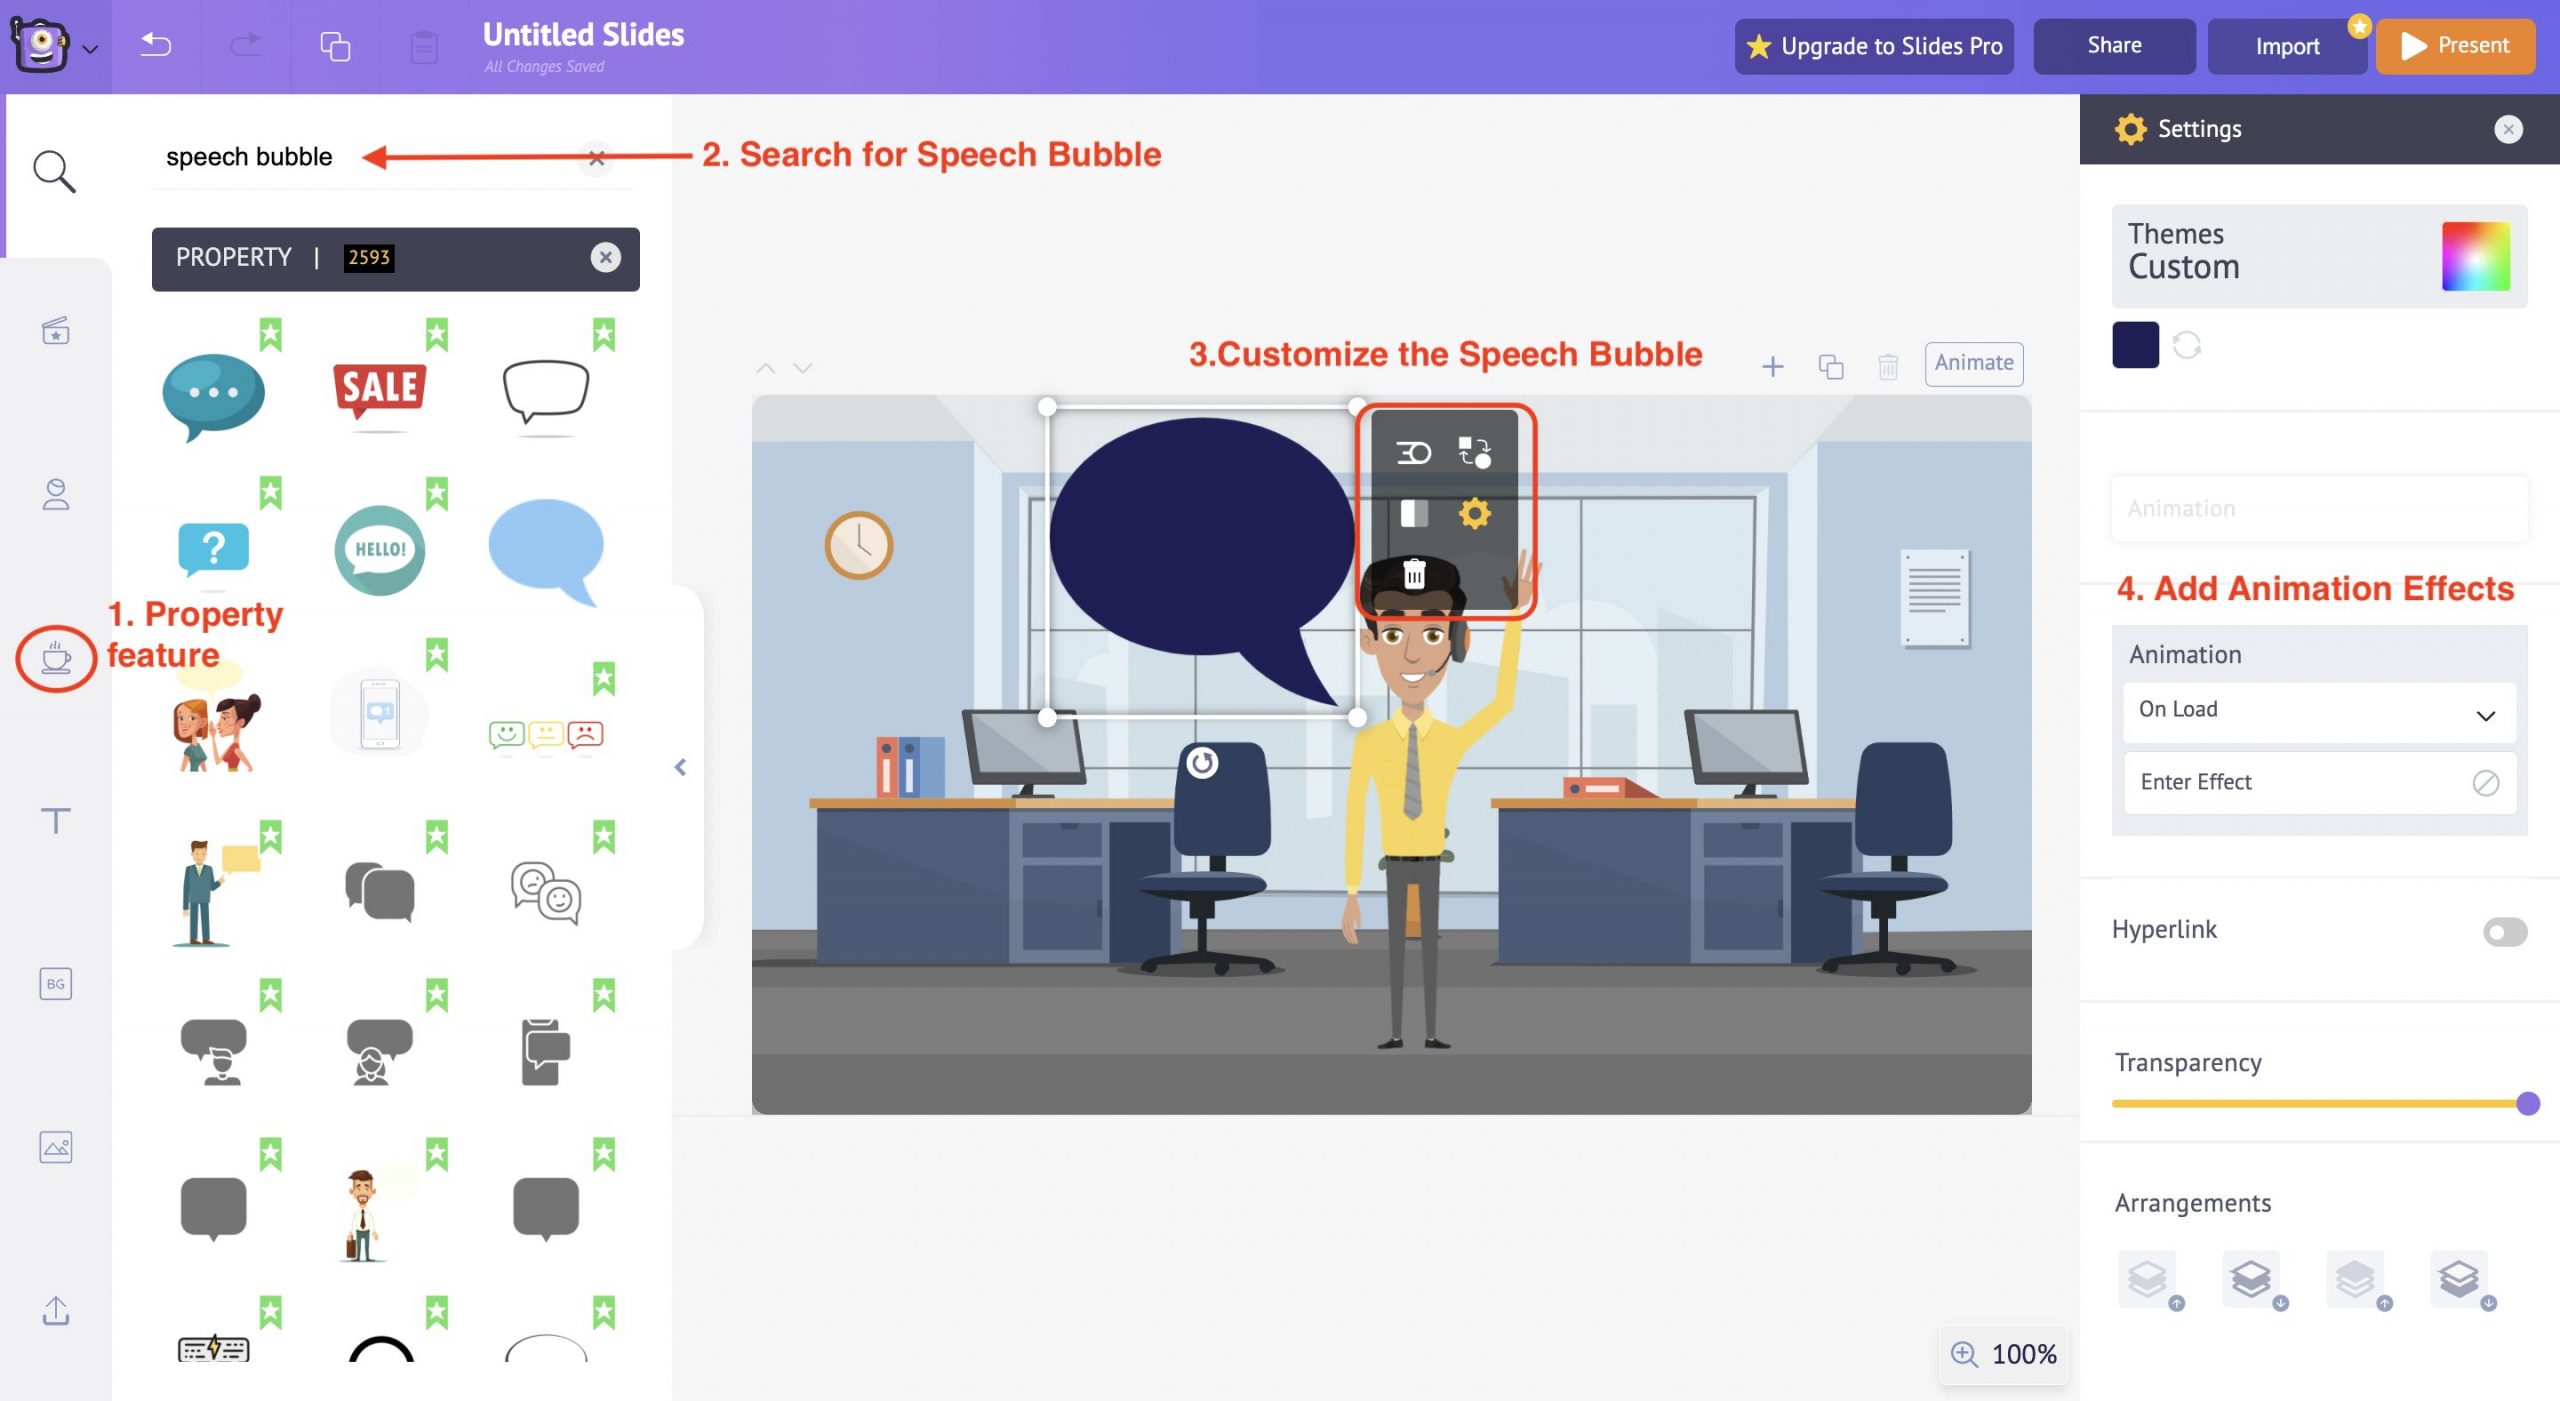
Once you select the speech bubble, it will appear in the workspace. Use the item menu options to customize the size and color.
You can also add animation effects to the speech bubble from the options available on the right side of the workspace.
Introducing entry and exit animations to the properties in the slide adds extra appeal to the presentation overall.
Using the Text feature, you can add text to your slides in two ways.
One is to choose and edit from the built-in text templates designed along with animation effects, and the second is to enter the text manually with text boxes.
Select a suitable text design from the Text feature under the library section.
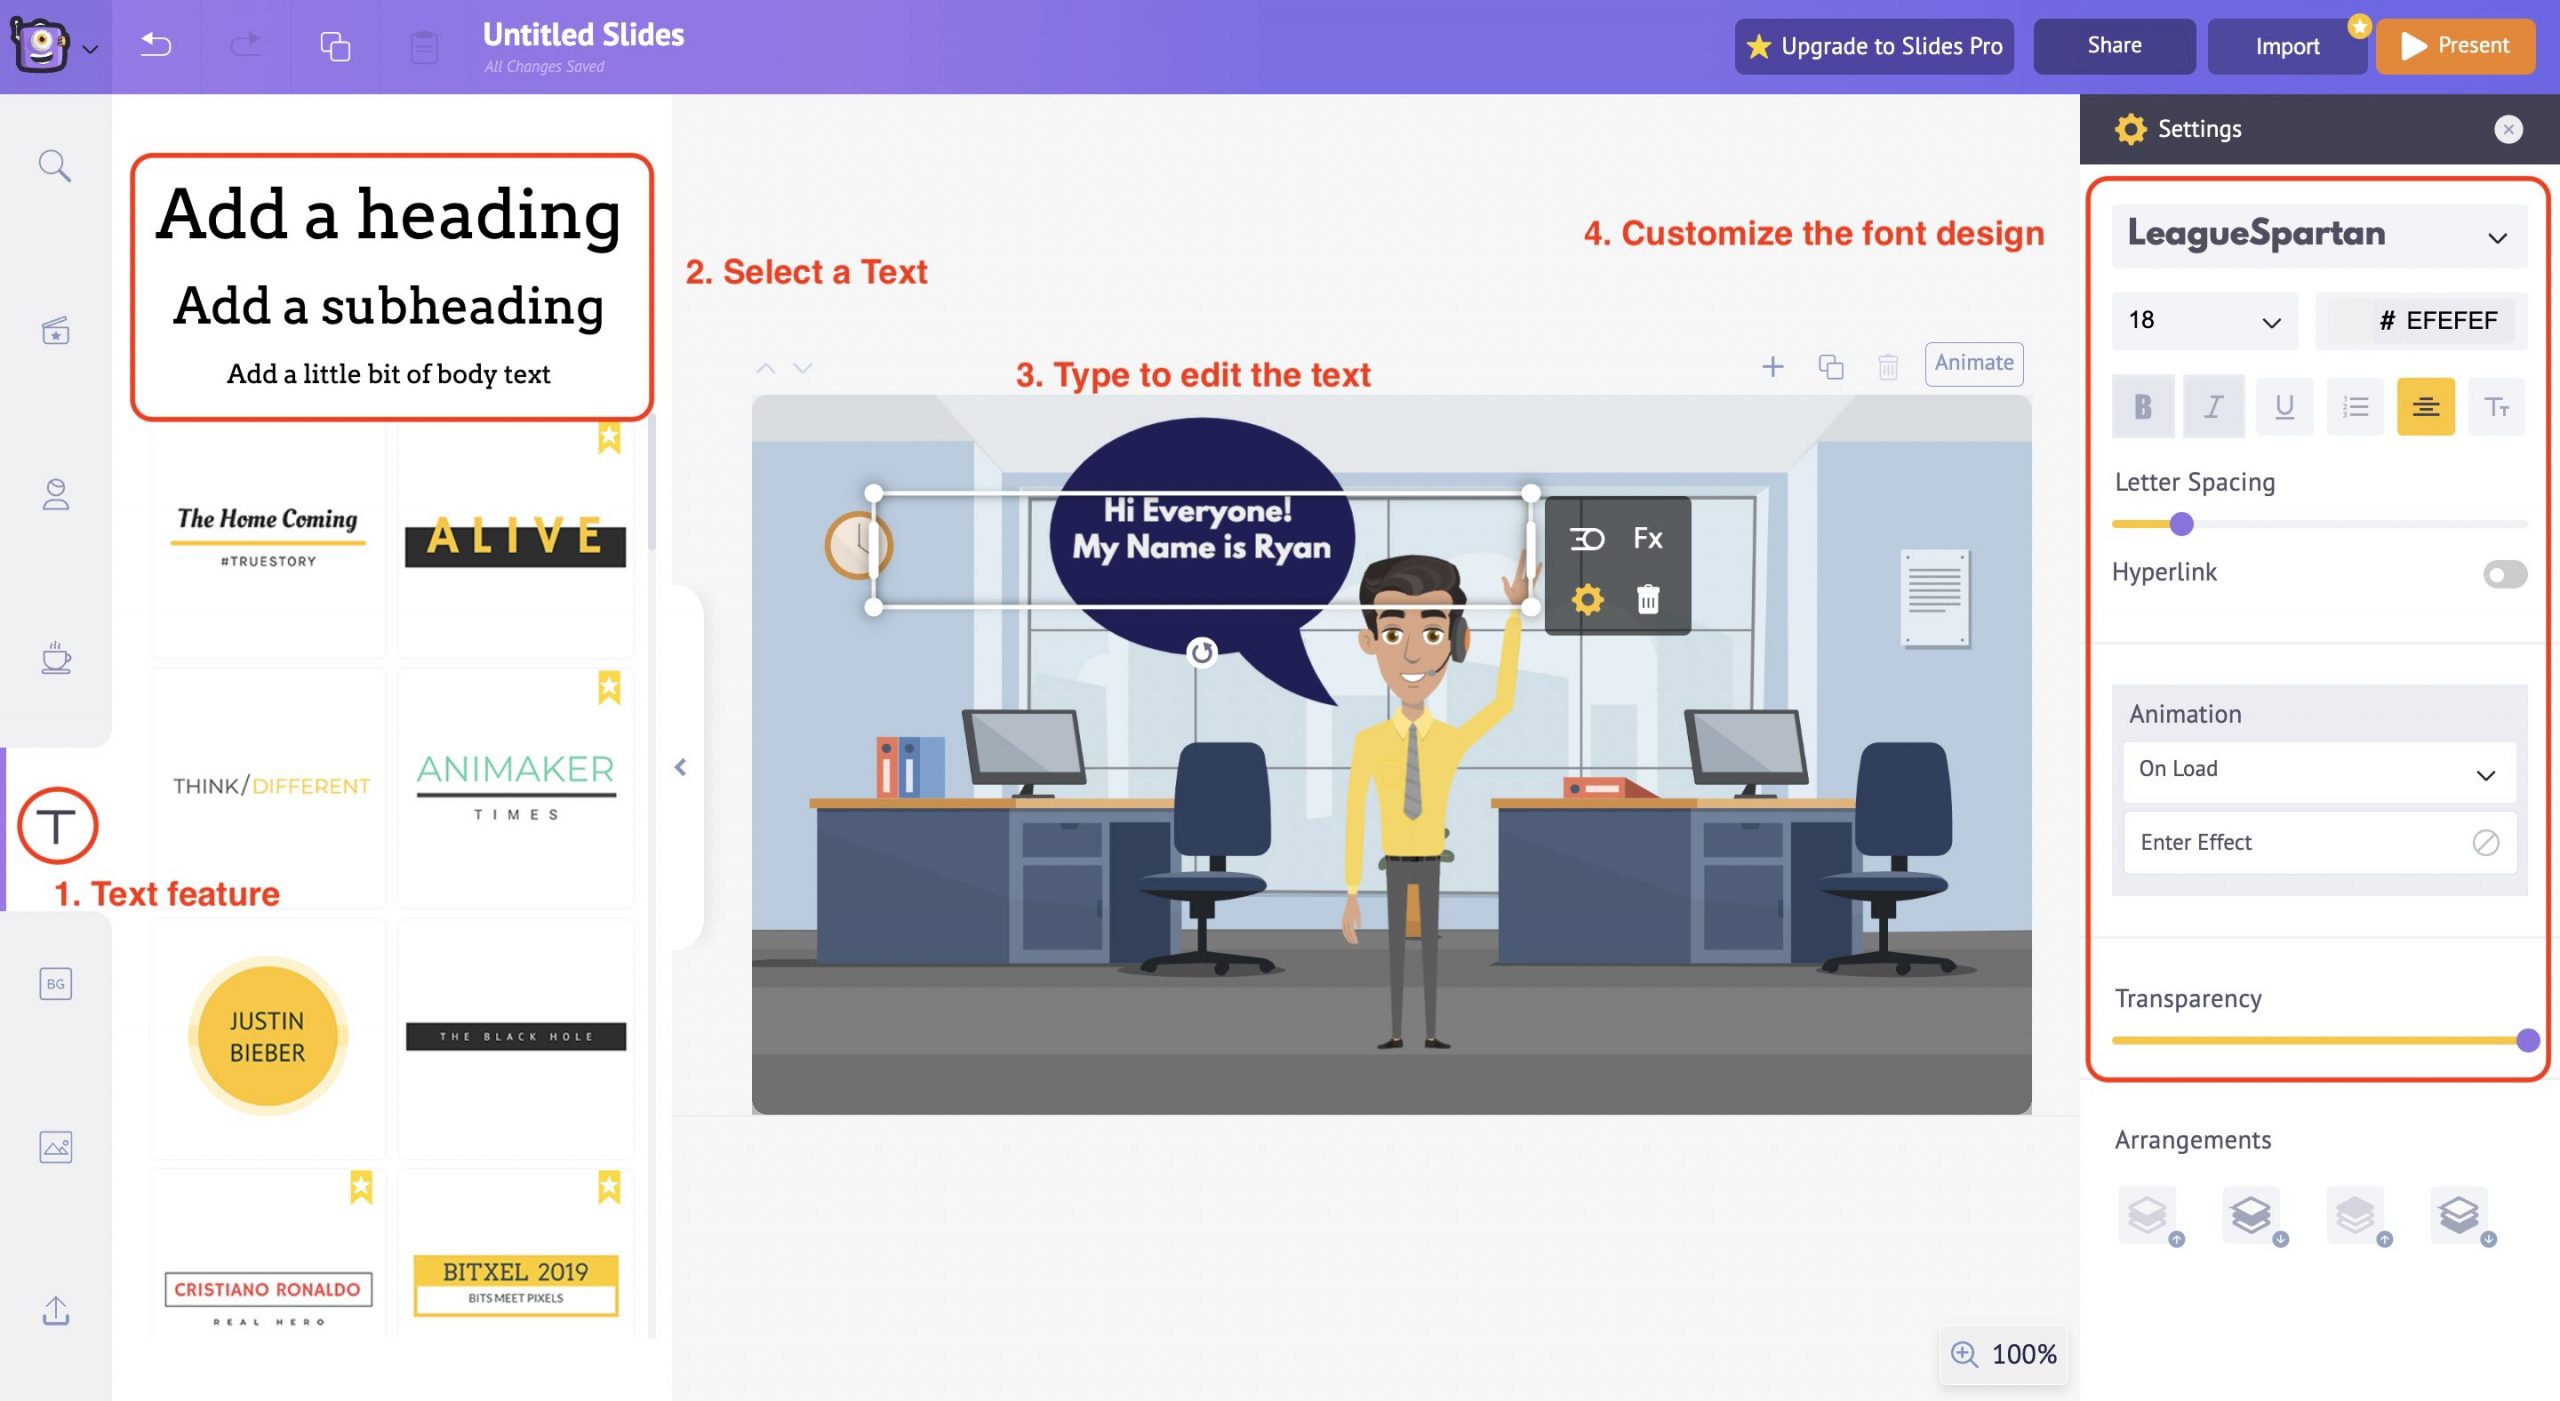
Once you select the text design, it will appear in the workspace; now, you can type in the required text and use the item menu options to customize the color, font style, size, and alignment and adjust the case sensitivity of the text.
In this instance, we have used the empty text box design and entered the text manually. You can also use the built-in text design templates and edit them accordingly.
Also, it is possible to add animation effects to the text just like we did to the properties earlier.
You can even adjust the transparency of the text by using the transparency slider beneath the animation effects on the right side of the workspace.
This way, Animaker Deck gives a complete customization option for the users to edit and change the slides according to everyone’s preferences.
Another way of creating an animated presentation is from pre-built templates.
Here’s what we will cover:
Animaker Deck offers more than 50 professionally designed templates to choose from.
Use these templates to inject fresh ideas into your static slides!
The templates feature is on the left side under the library section.
Go carefully through the different templates and select a suitable one for your use case. Then click Add all.
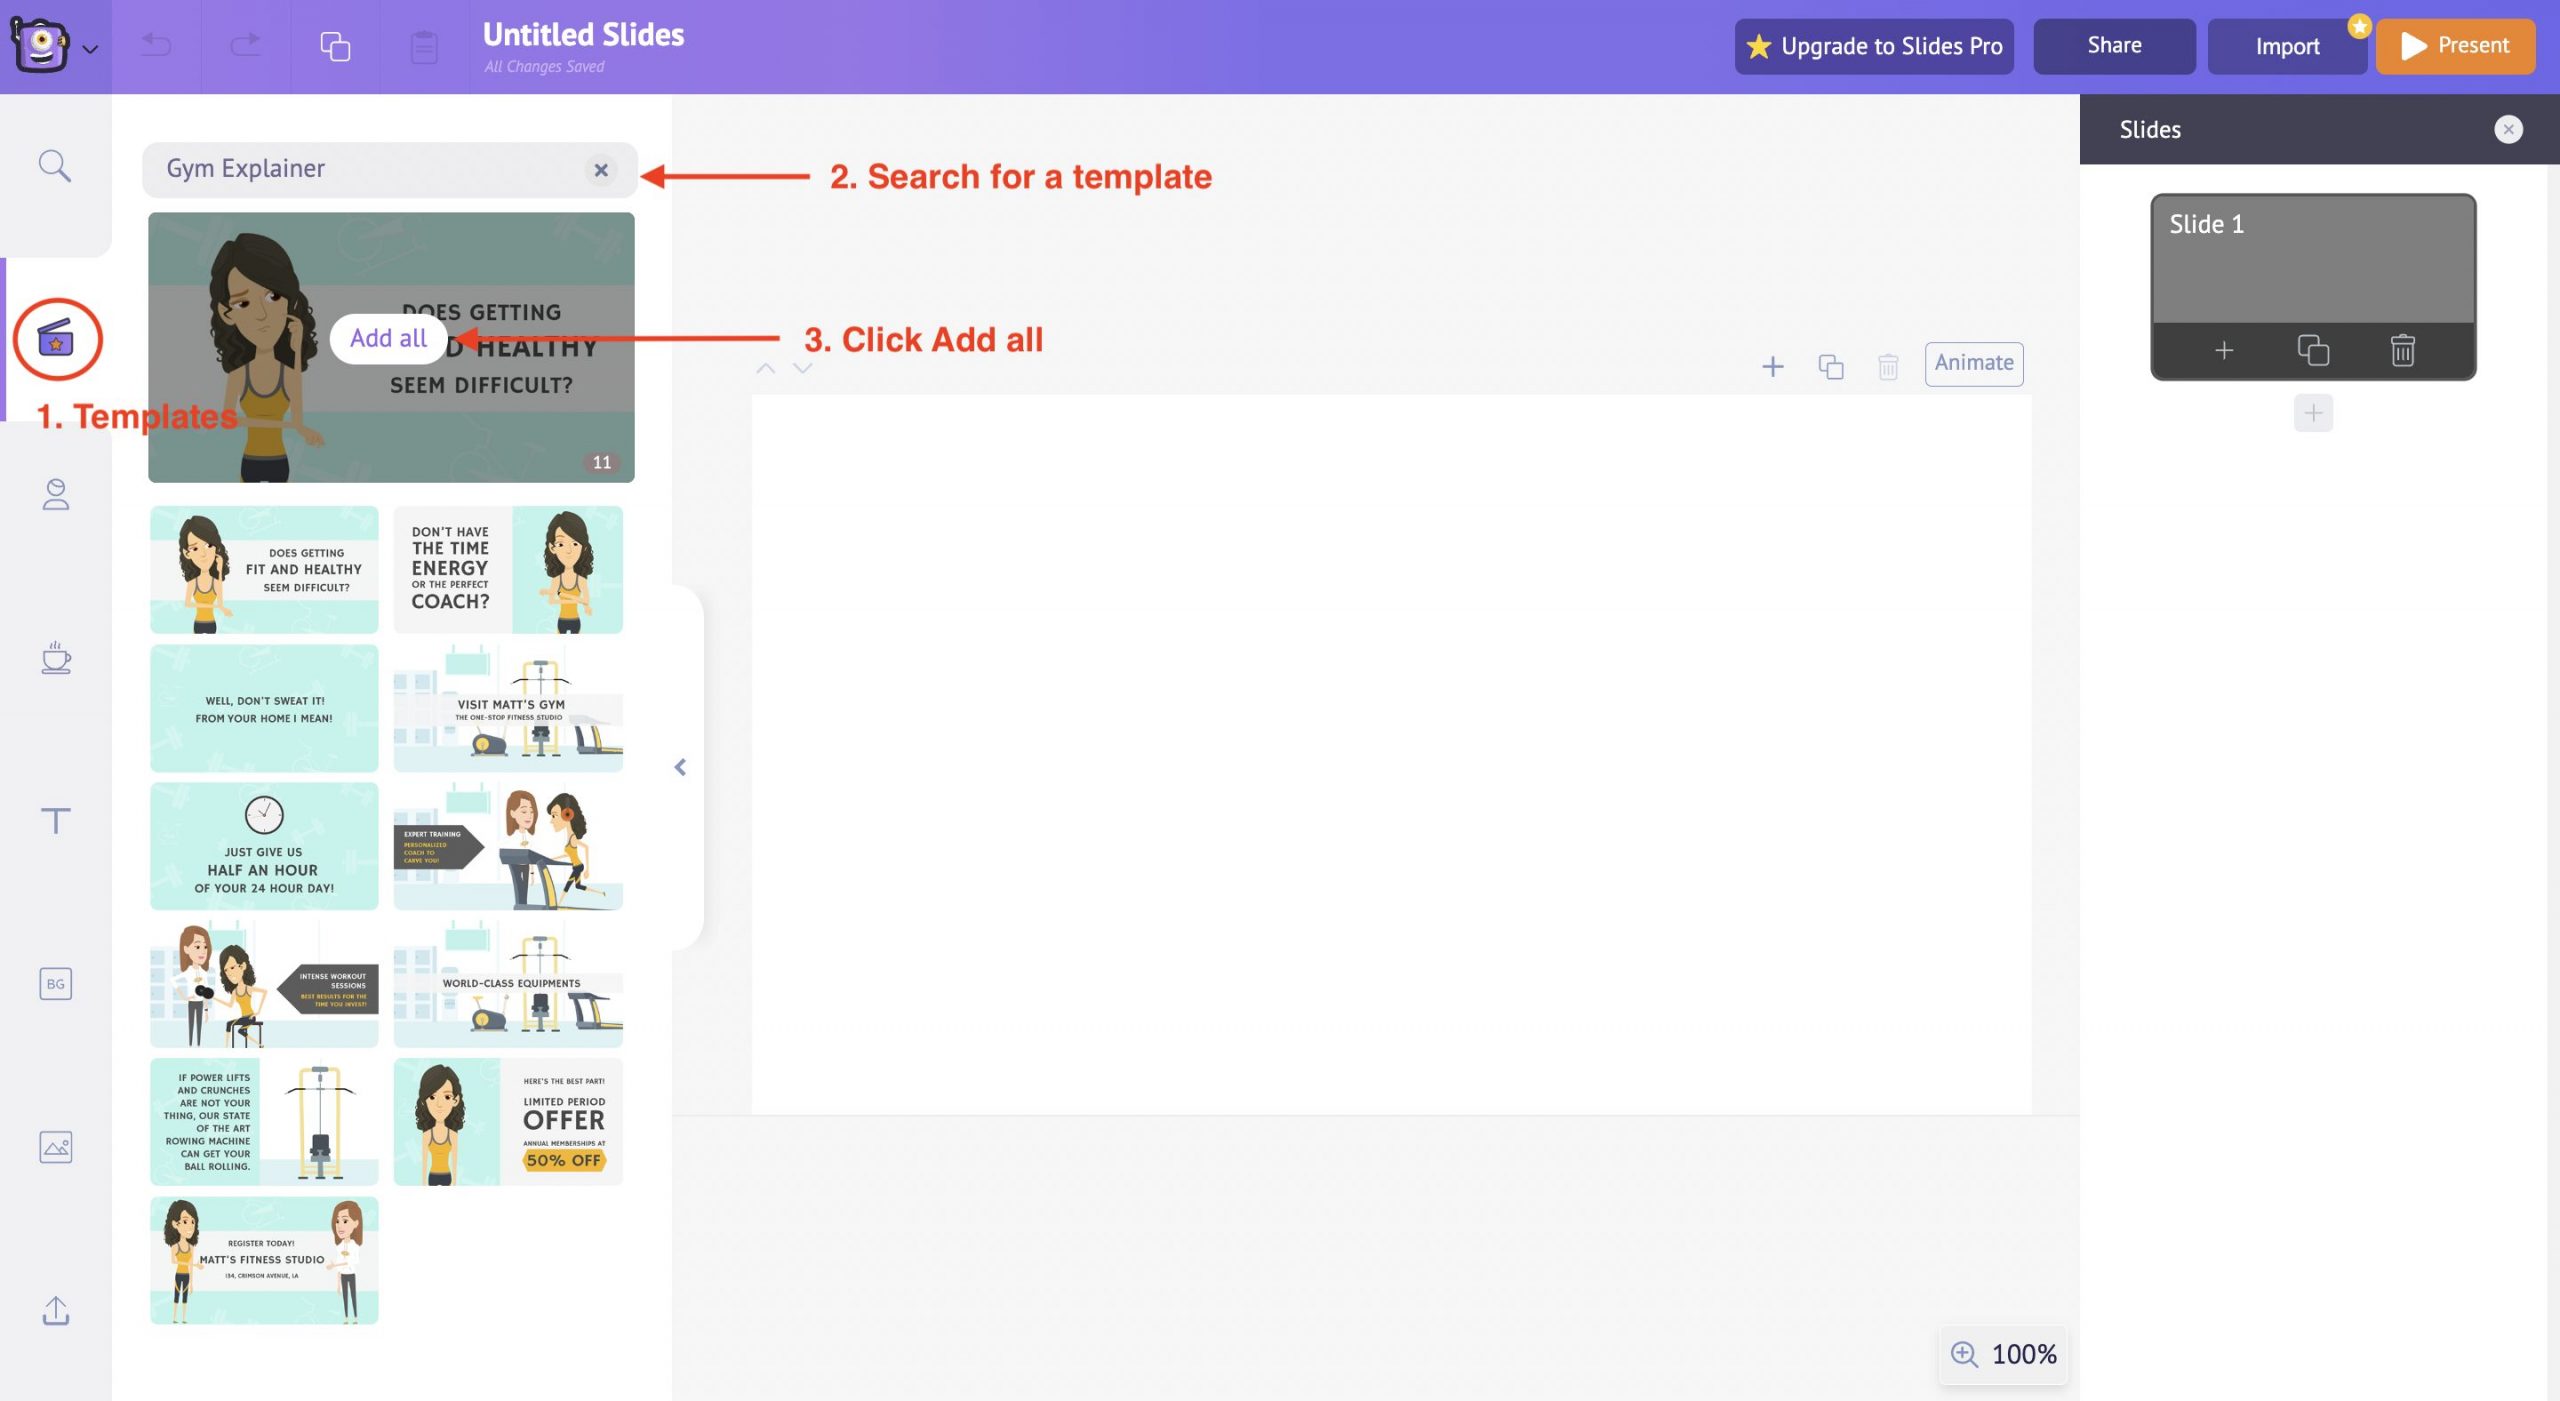
A pop-up window will appear, asking you to overwrite; click confirm to insert the template.
Once you have clicked the confirm button, all the slides will be inserted into the project.
Now the best part about creating an animated presentation from templates in Animaker Deck is that every aspect of the template is completely customizable. The three main aspects of the template that you can customize as per your preferences are
- Background Images
Editing the Text
Select the Text that you want to edit. Then click on the Settings option from the item menu. You can find different options to customize the text on the right side.
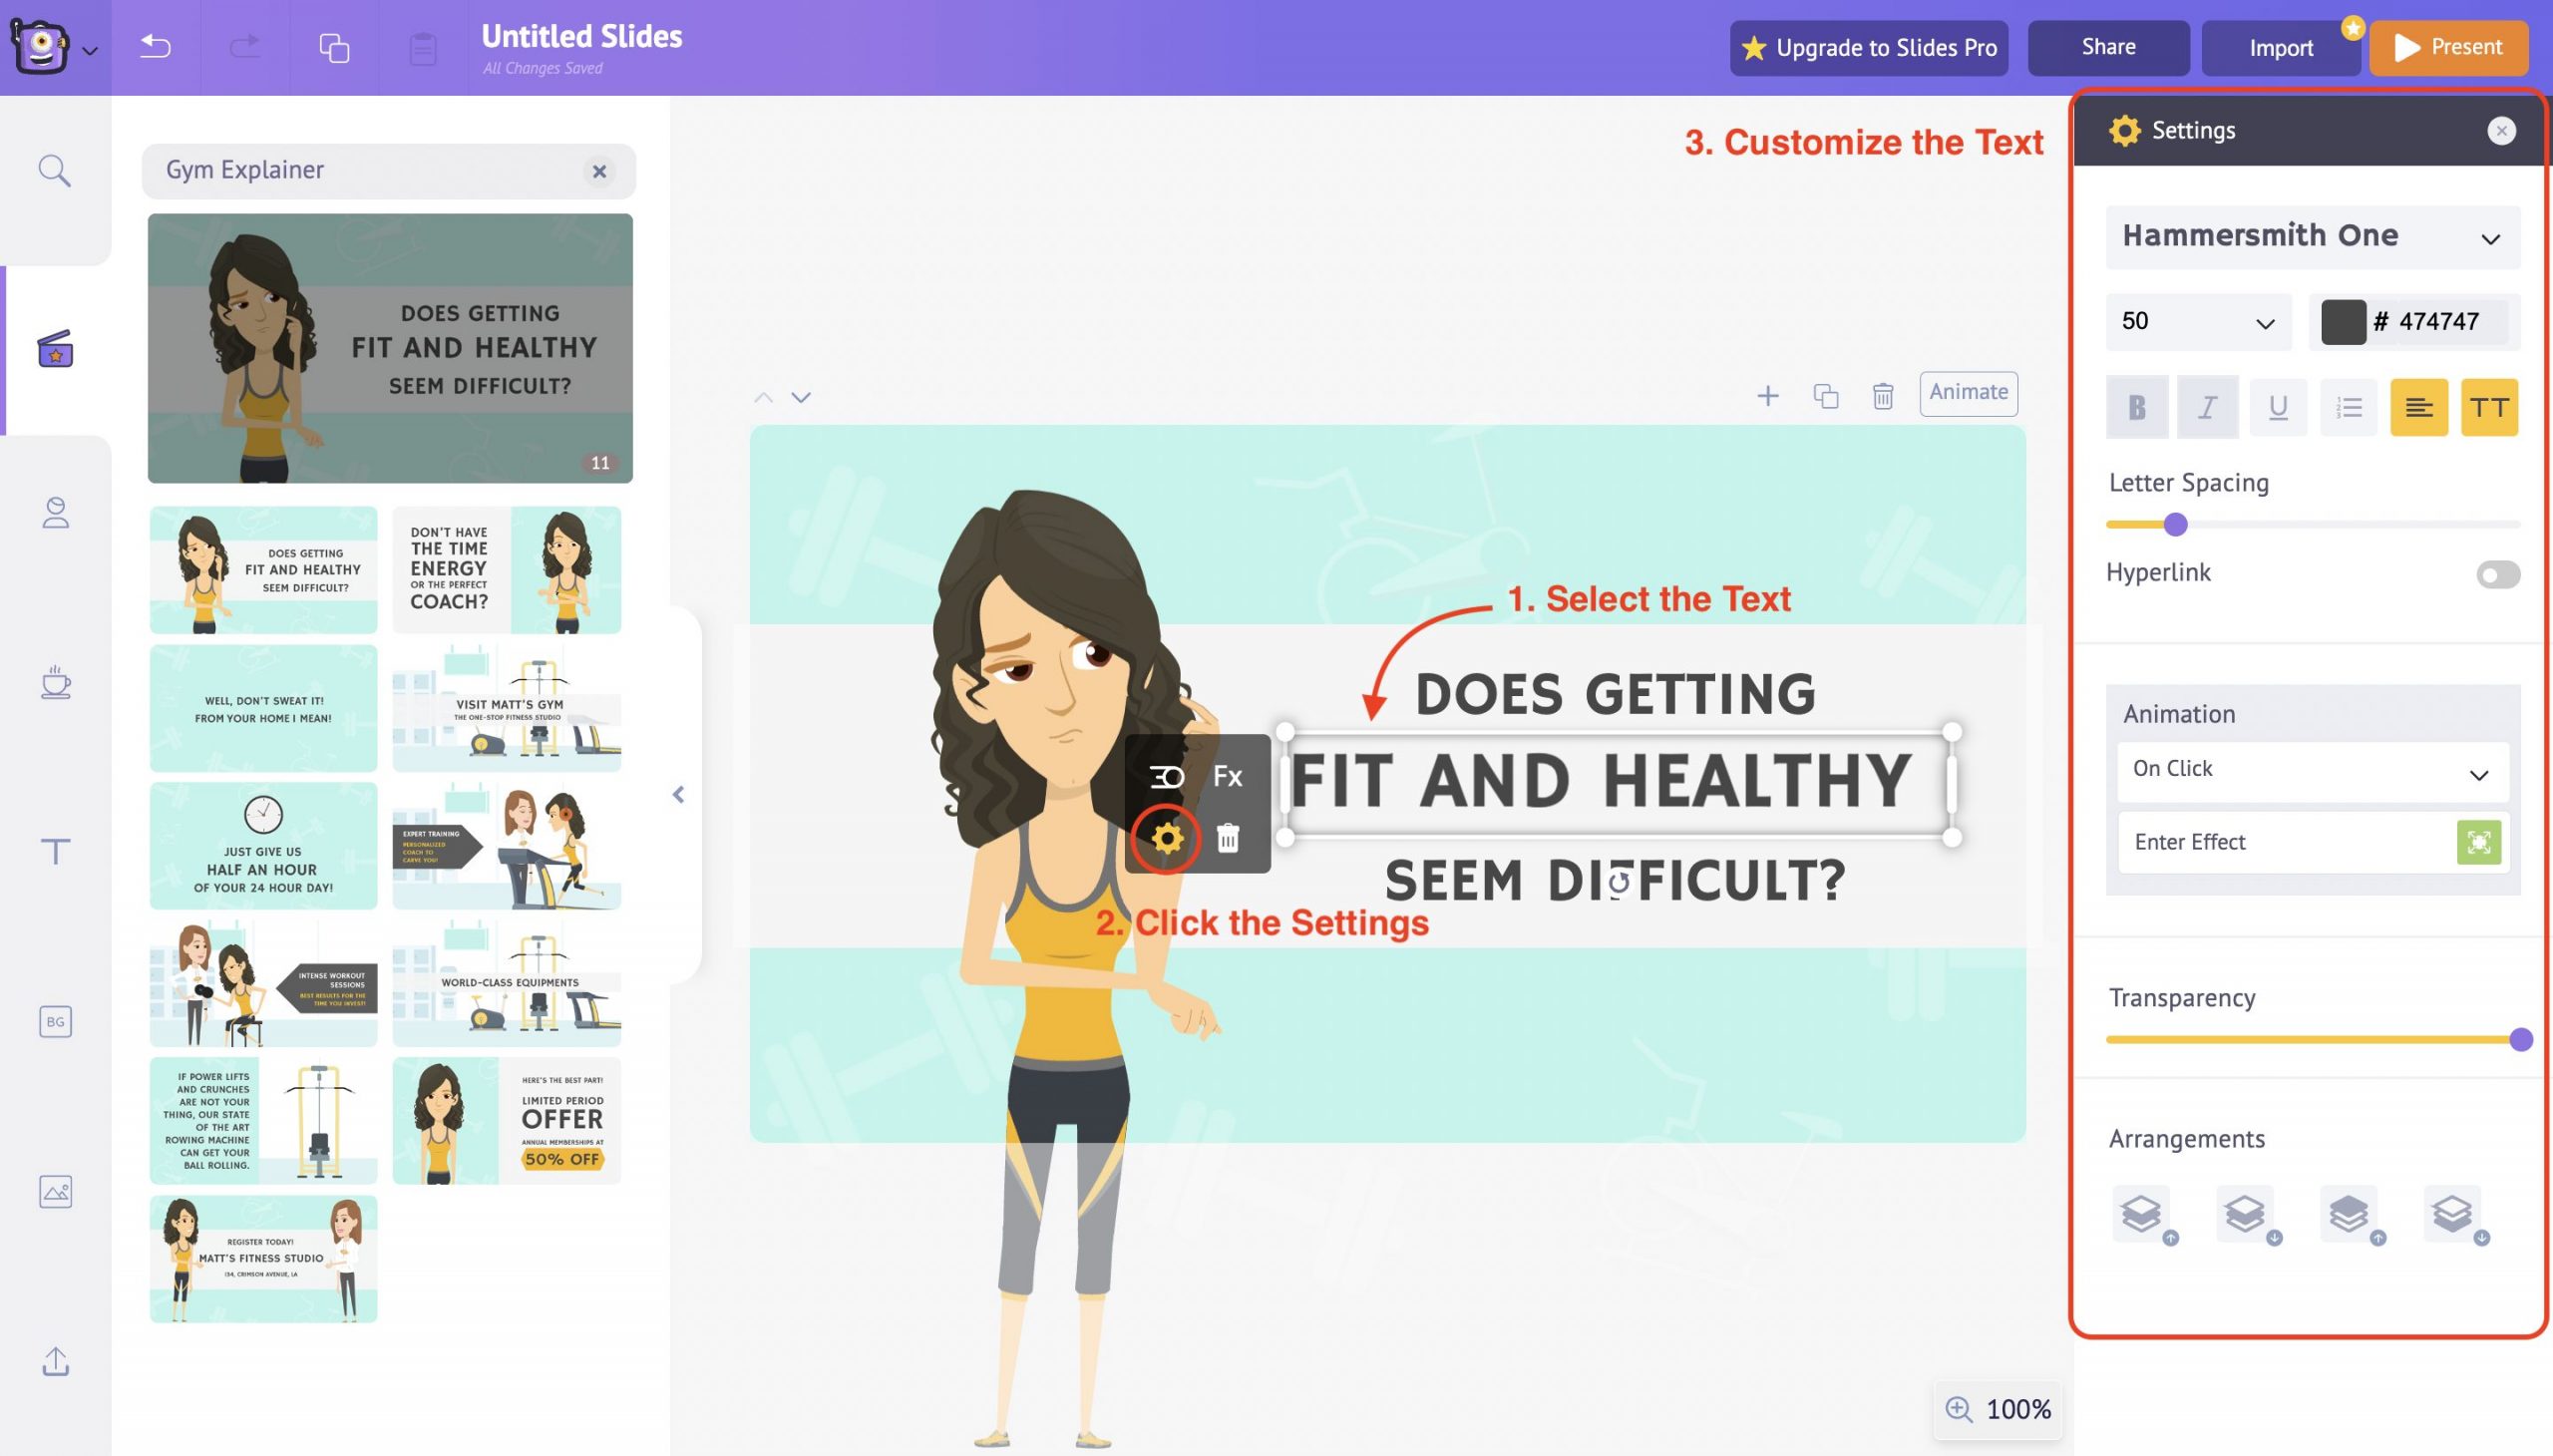
For instance, you can choose a different font, change the font’s color, and adjust the line spacing. You can also make the text a Hyperlink by toggling the Hyperlink button.
Use all these options to edit the text according to your preference.
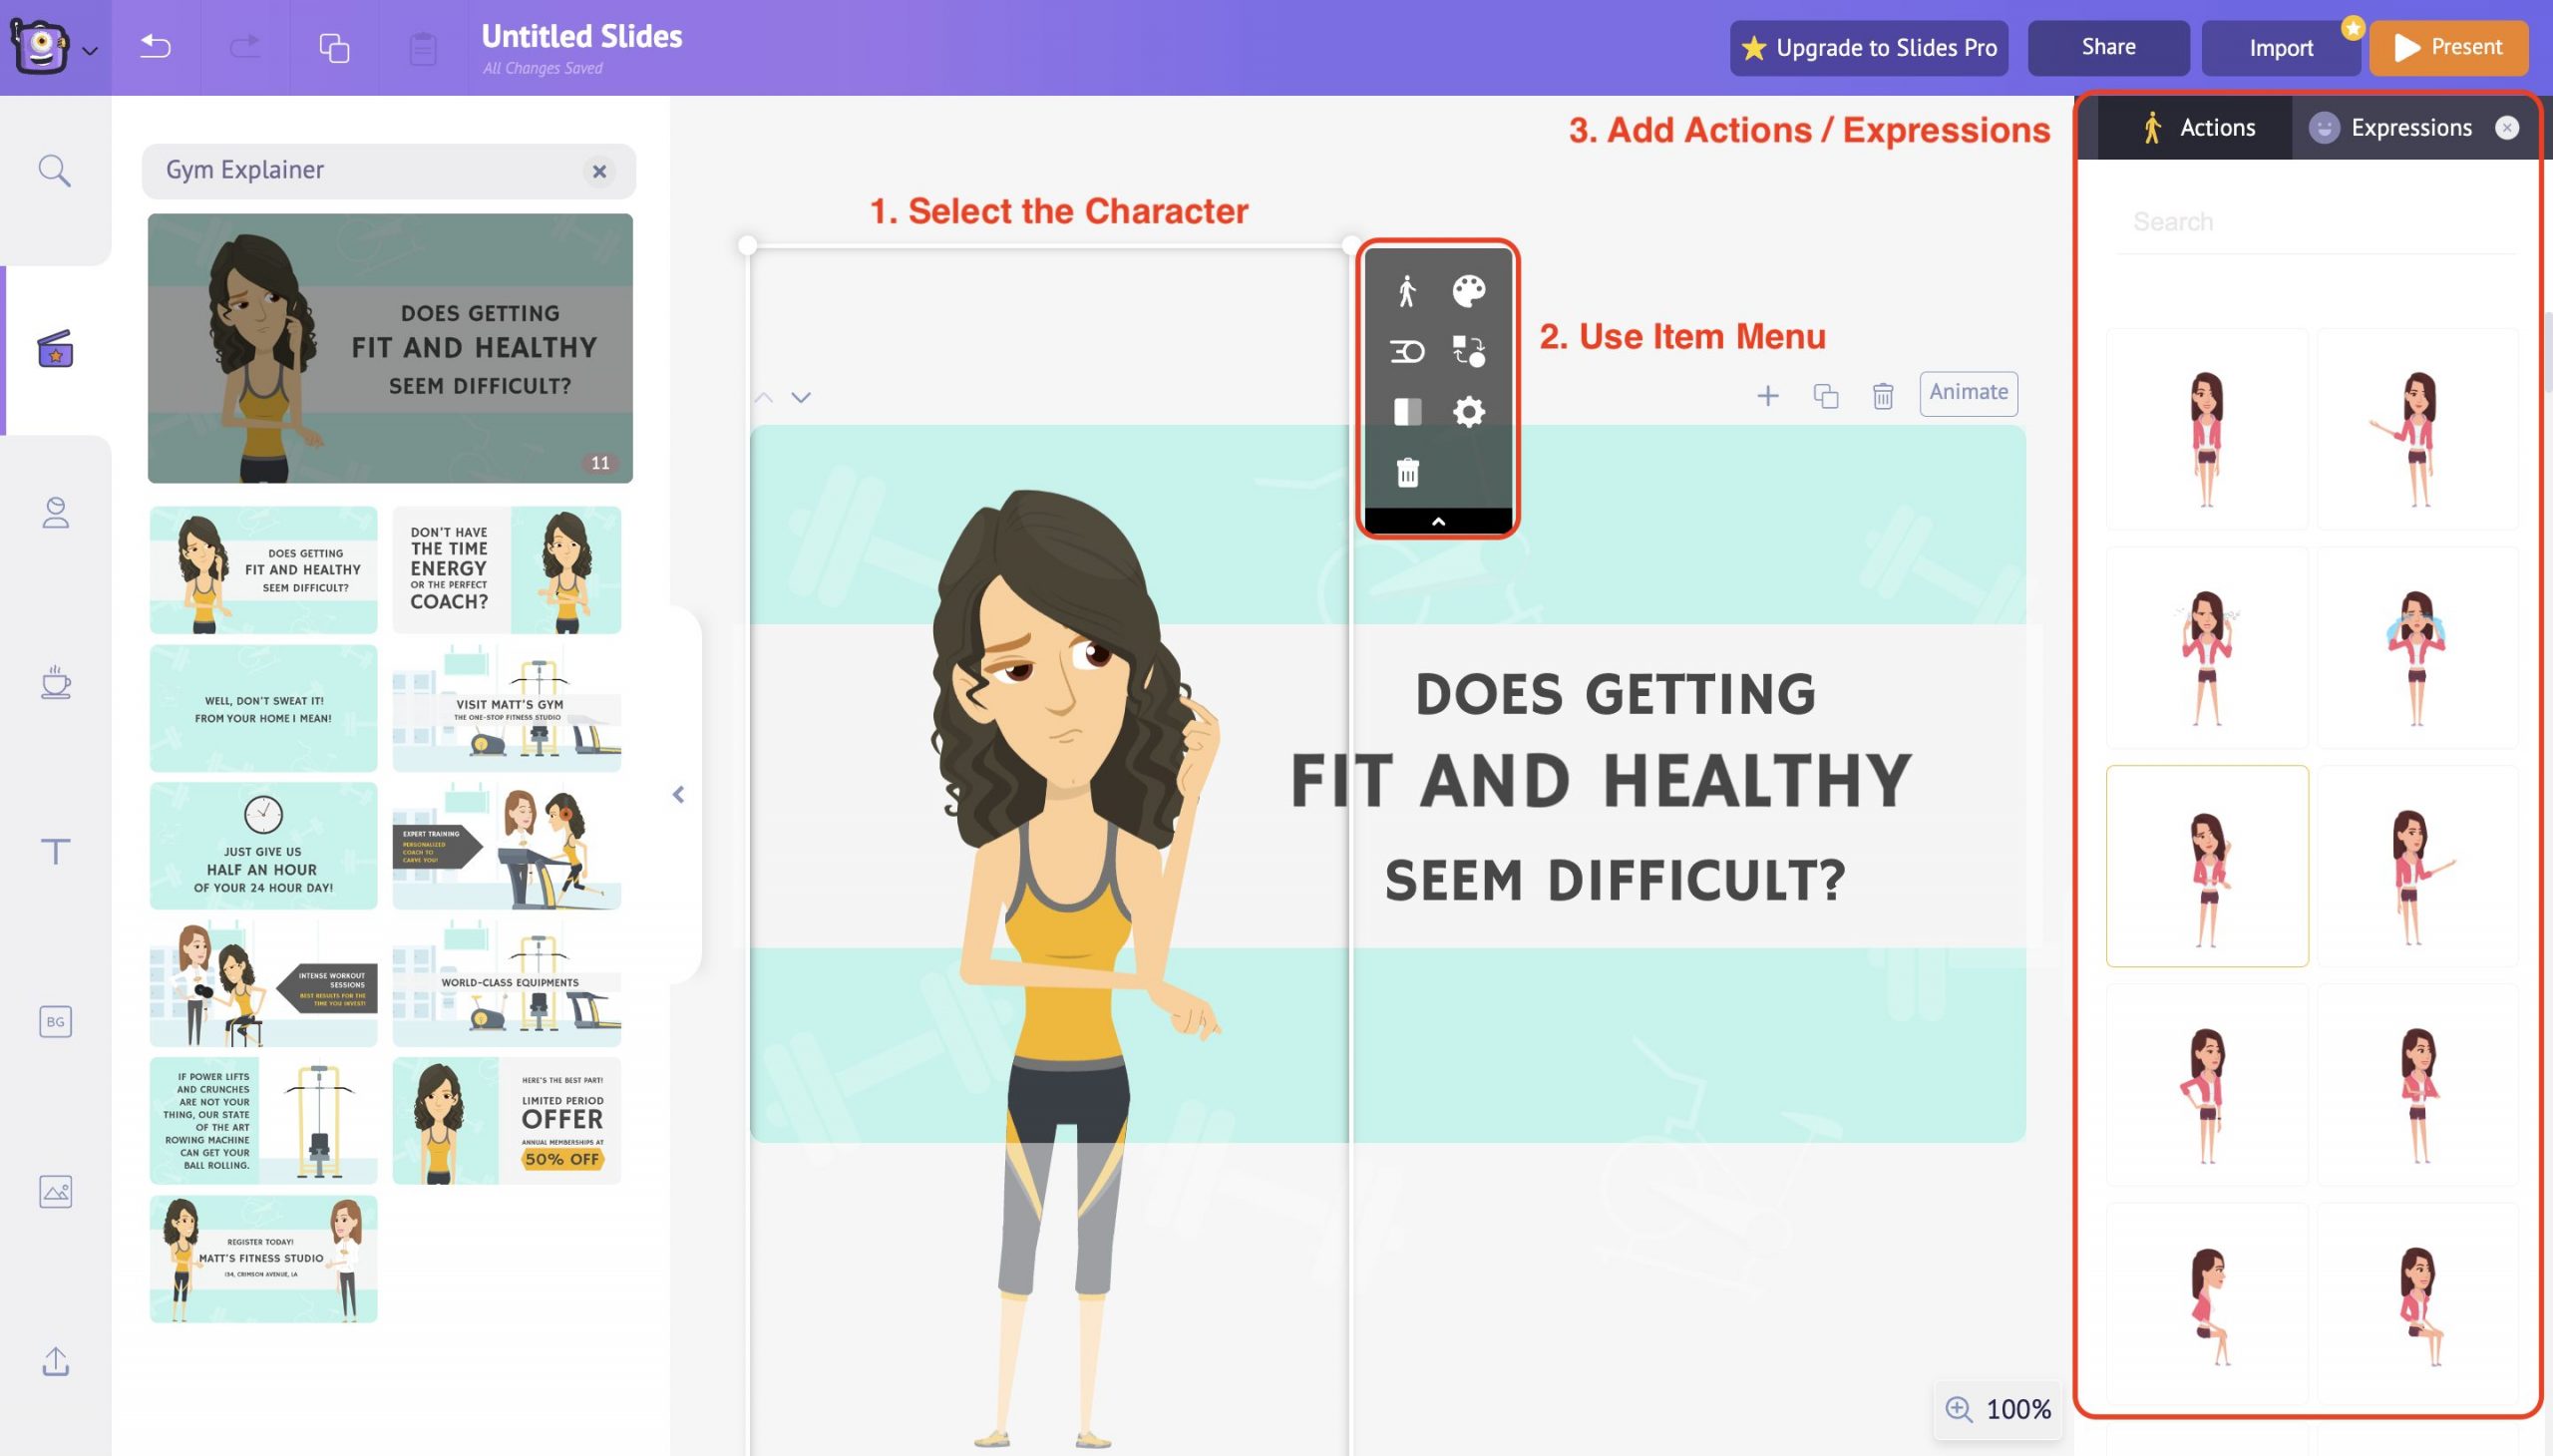
Select the Character and use the item menu to customize it. You can alter the color of the character and its attire as per your preference.
You can also introduce actions and expressions to the character and bring life to your presentation. Simply select an action under the action tab, and it will reflect in character immediately. It’s that easy to animate your characters.
Also you can even introduce your own custom characters into the slide deck.
Animaker Deck, in partnership with GIPHY, PEXELS & PIXABAY, provides access to thousands of quirky gifs and iconic images which can be used in your slides with a single click.
You have the flexibility to even customize the existing background image in the template as per your preference.
Select the Background image and use the Item Menu options to edit the elements present in the background image.
For instance, you can alter the color of the elements, resize them, group them together or delete them.
Also, you can introduce animation effects to the background image to lit up the presentation.
However, if you are still unhappy with the customizations, Animaker Deck has covered you with the Upload option.
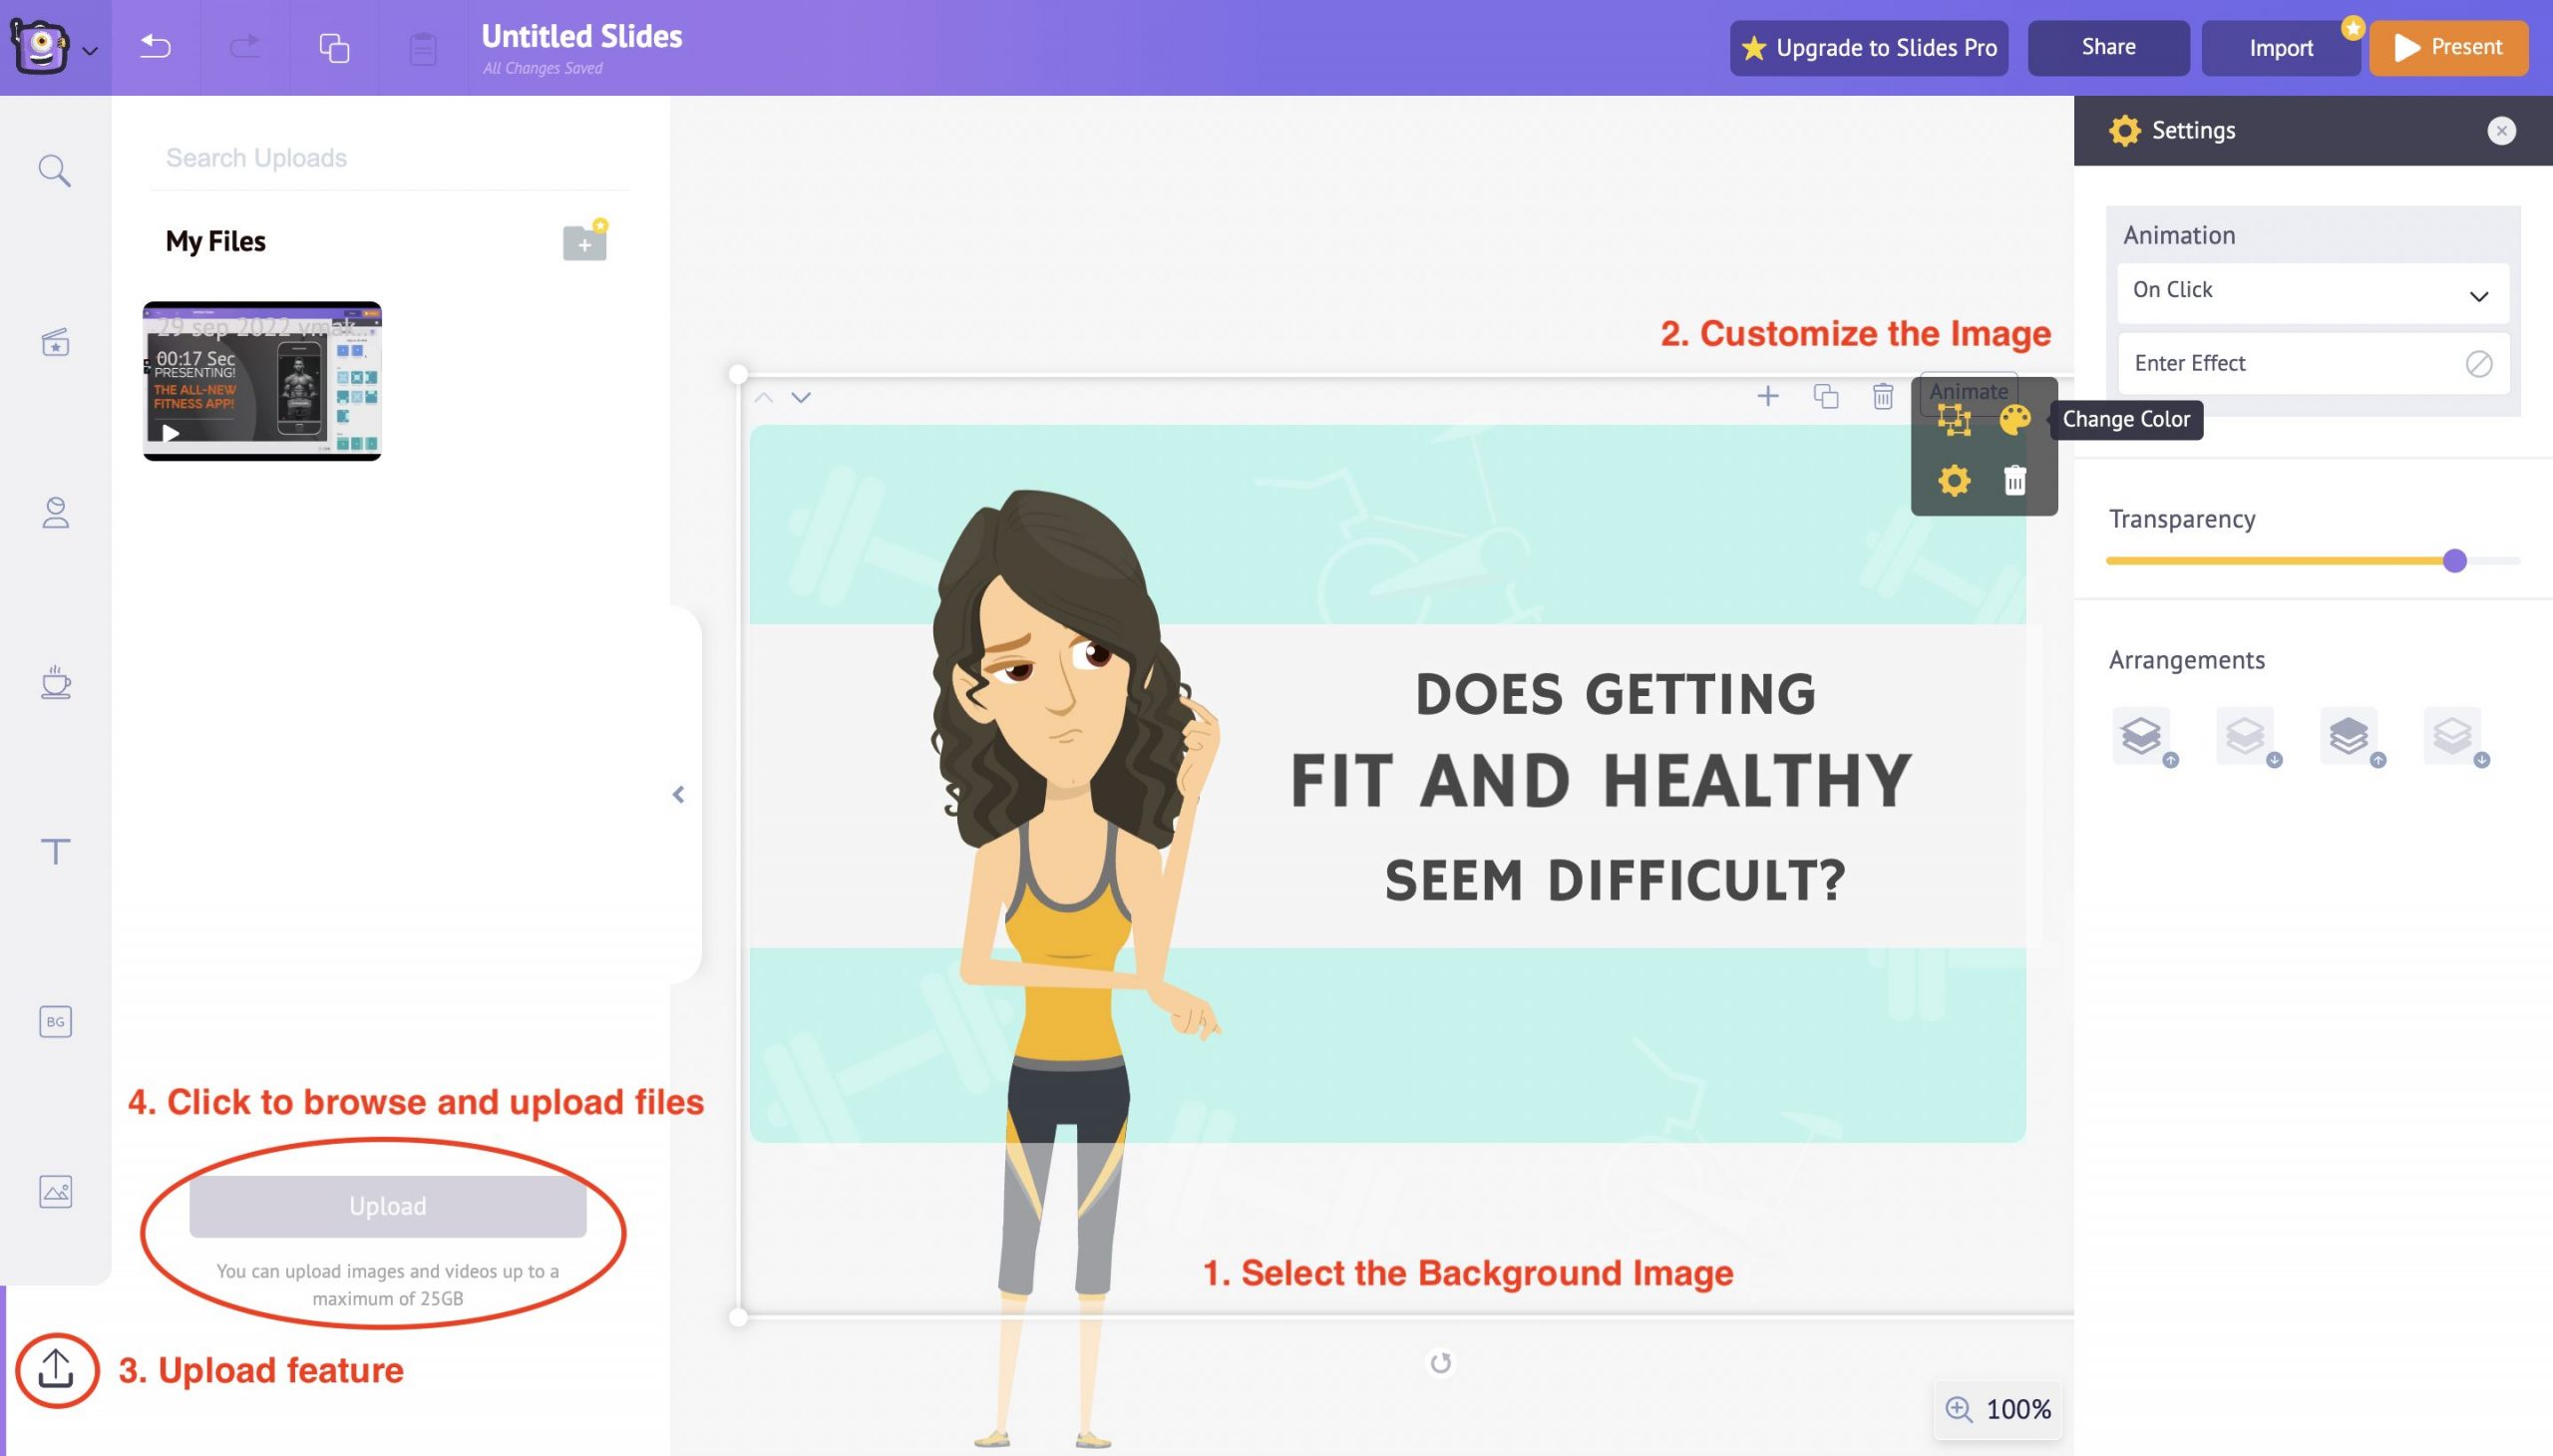
Animaker Deck offers up to 25 GB of storage space for you to upload your custom files onto the slide decks.
That’s some steal, right?
You can upload your own custom images and images into the slide decks by using the Upload feature in the library section.
Click on the Upload button to browse files from your local disc and upload them directly to your project.
Another simpler way of customizing your background is by playing around with the colors.
You can use solid colors as a background, or even better, you can use gradient colors matching your presentation style.
You can add up to five colors and create a gradient-style background on your own!
This way, you get complete control over the selected template and customize it as per your needs.
Once you’ve finished customizing the template, click on the present button to preview the entire presentation.
Once you have added the character, text, and properties and selected the suitable background, it’s time to preview how everything looks together when presented.
To do this, head to the Present option in the top menu. Clicking on the Present button will allow you to preview the slide in fullscreen.
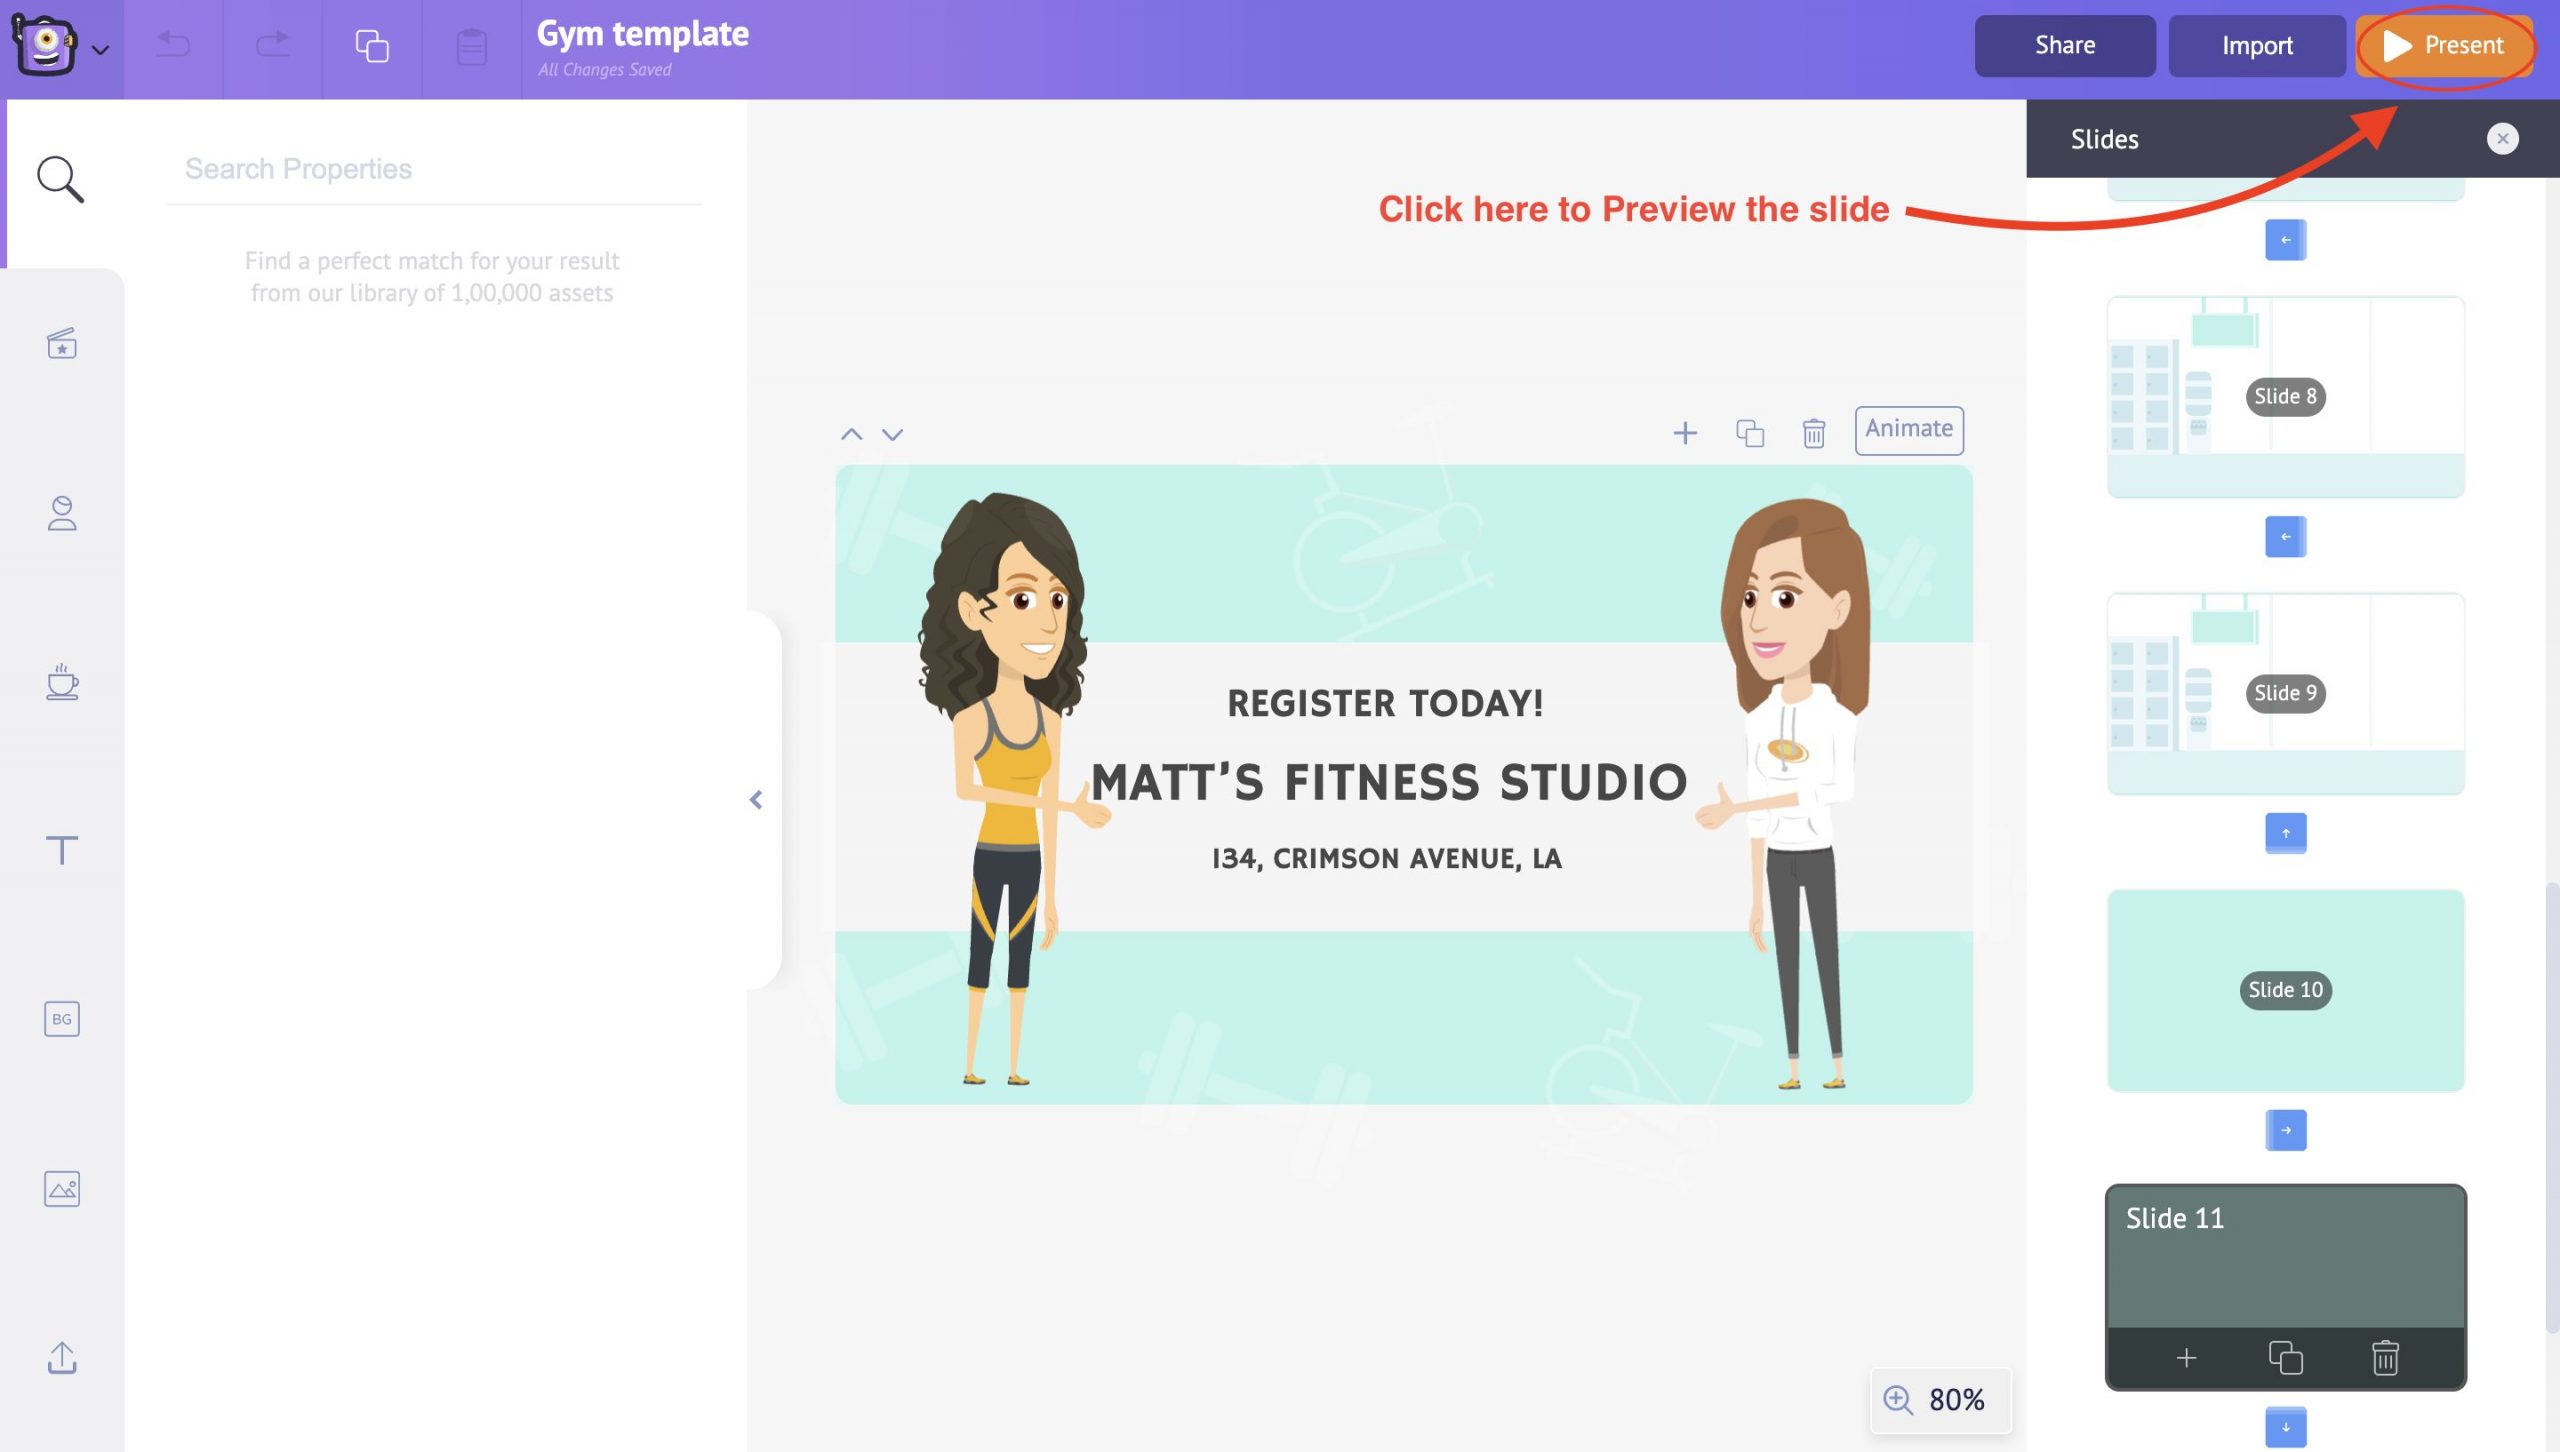
This way, you can check and alter the slide's contents accordingly. It’s that simple to create an animated presentation from scratch in Animaker Deck.
Similarly, you can add more slides and customize them according to your use cases.
If you are working in a team, the next step is to get your presentation reviewed by your tea members. A collaborative review process can help elevate your presentation’s quality.
Use the Share button in the top right to share the presentation with your team. All you need to do is enter your colleagues' email addresses and choose between copy and edit links.
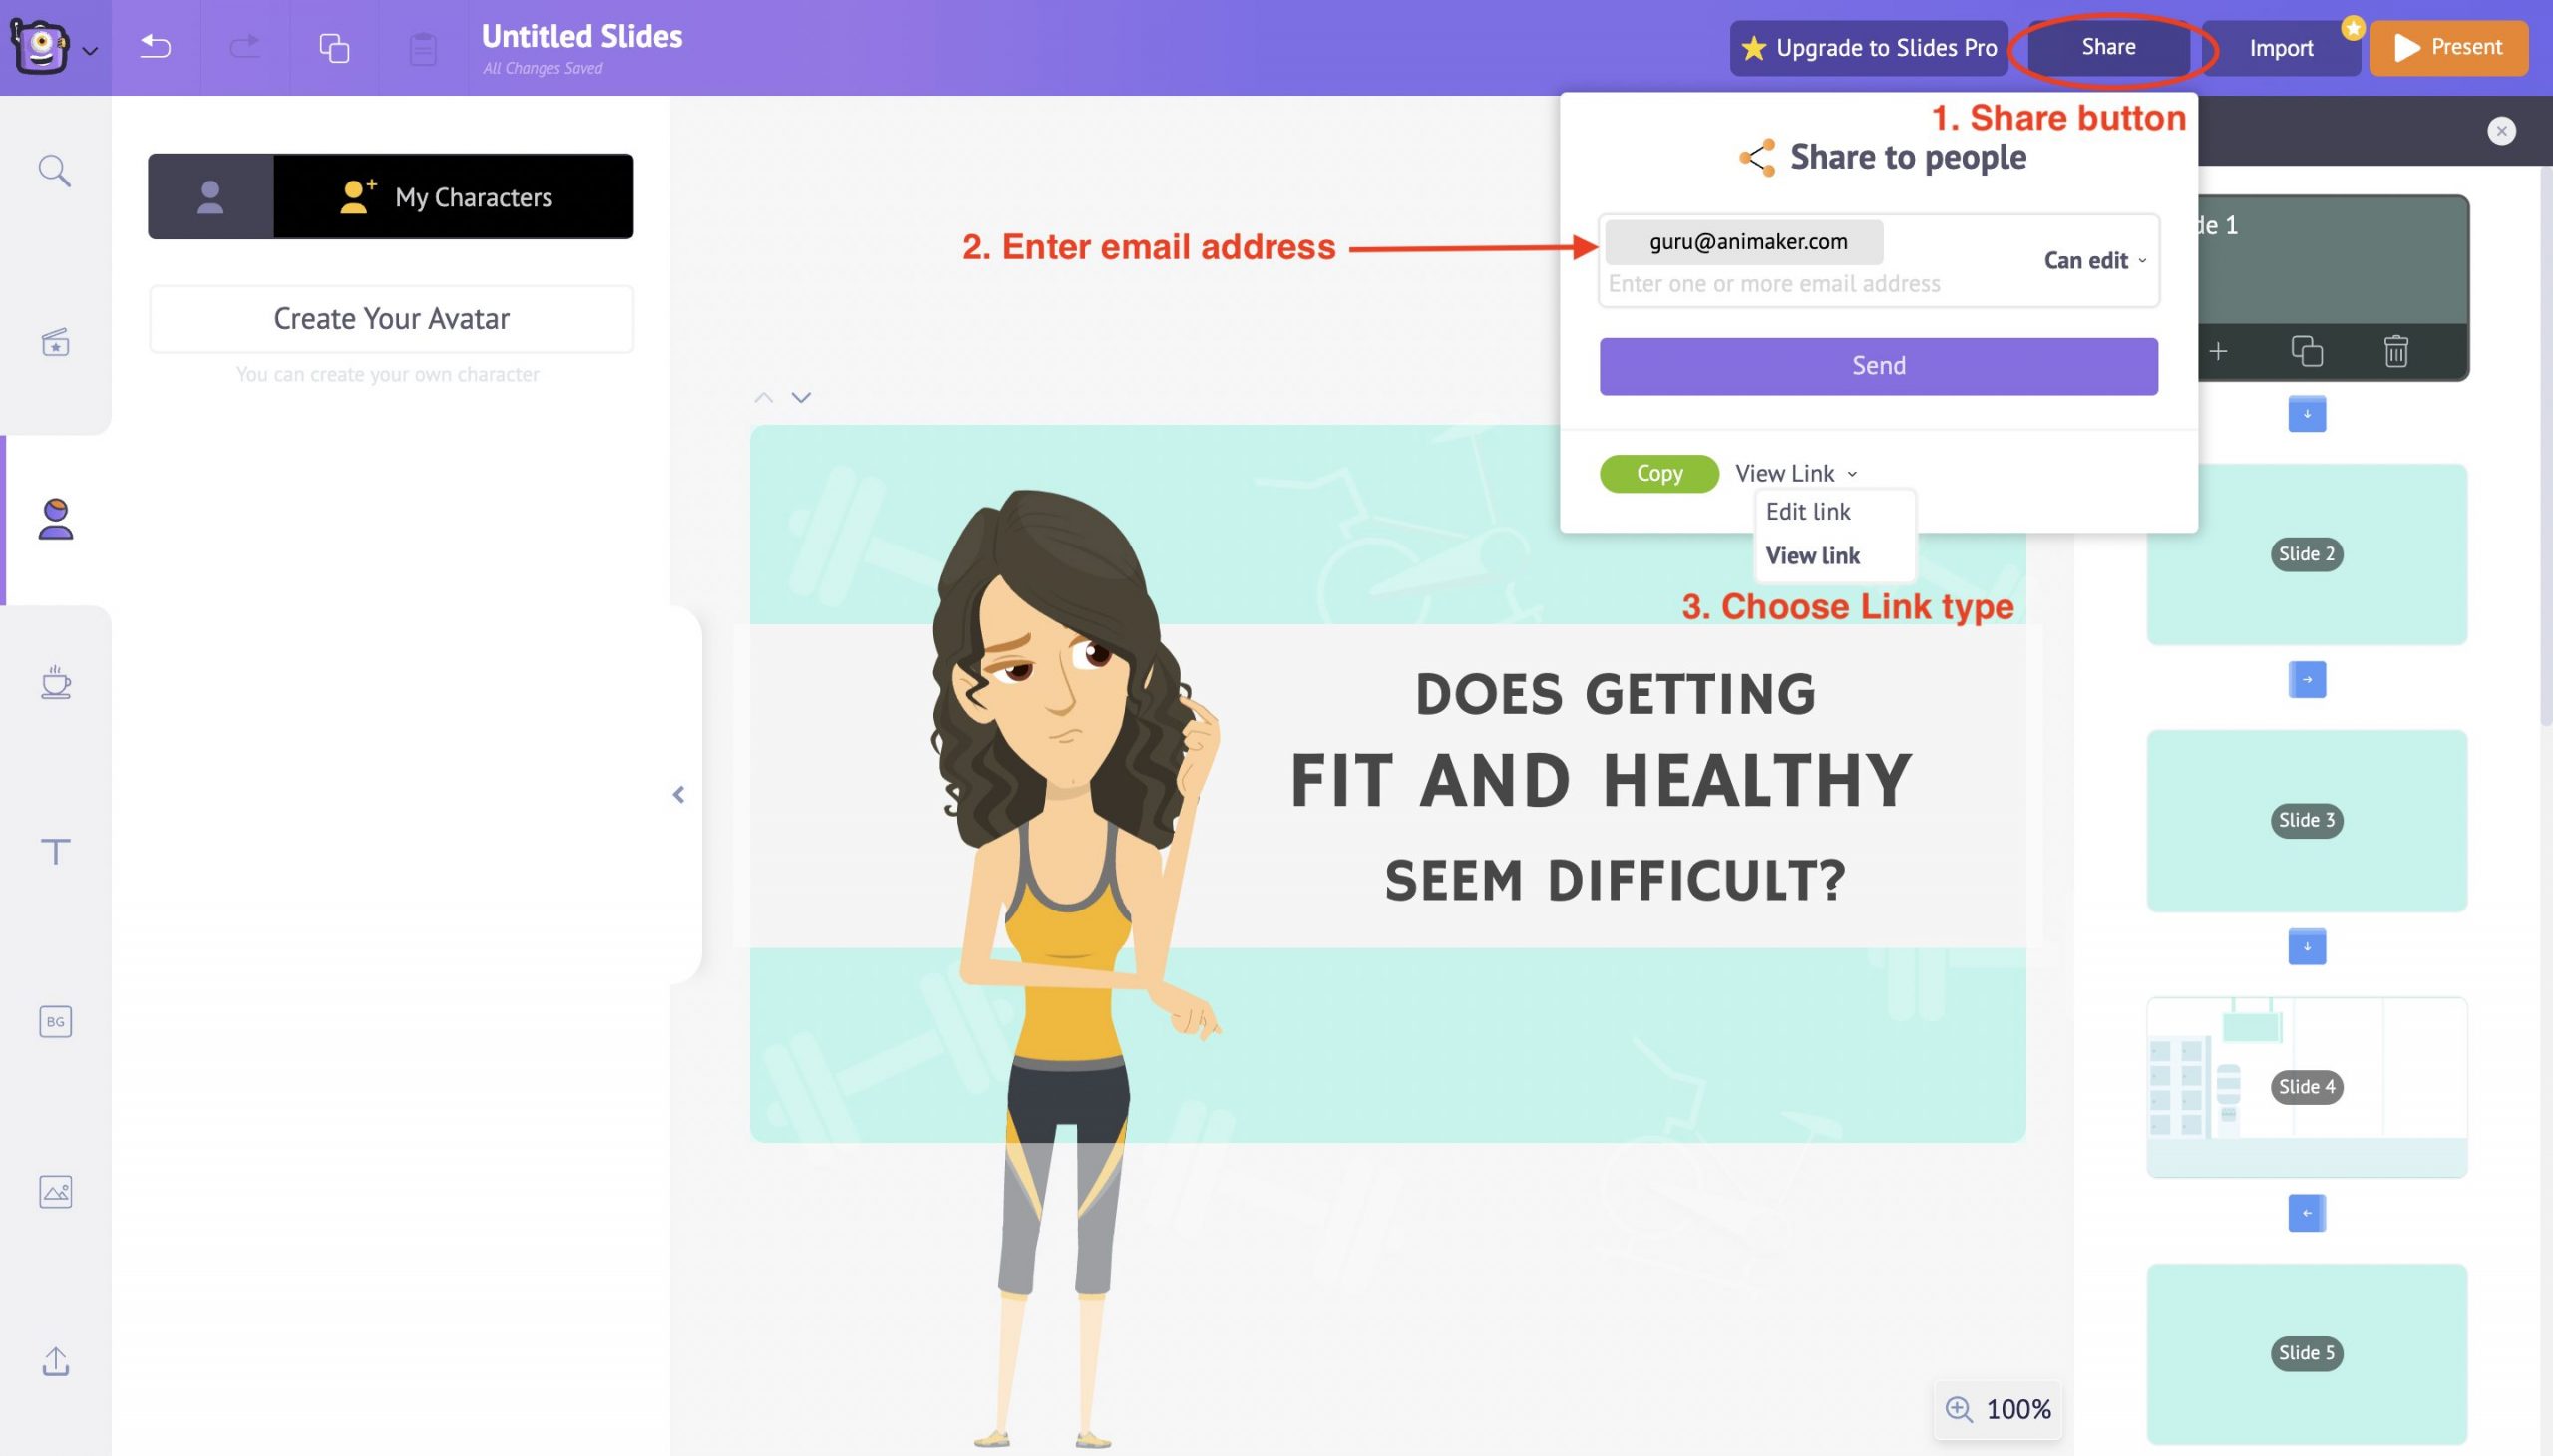
Animaker Deck makes it easy for you to collaborate with your entire team and edit your slide decks together in real-time.
Also, there’s an option to preview the created slide decks with the help of the Present button in the top right corner.
Use this present button to review all the changes, animations, and other transition effects made (if any) throughout the slide.
And that’s a wrap!👏
You have now successfully learned how to create kick-ass animated presentations in a jiffy.
With the advent of influential online presentation makers like Animaker Deck, creating professional-looking animated presentations has become easier and more affordable than ever before.
It is only the beginning! The world of presentations awaits you!
Get started and sweep your audiences right away!
[thrive_link color='purple' link='https://accounts.animaker.com/register/animaker/?trackId=zgvjaw7u9hsi8la&path=/moments/createTemplateDeckProject?templateId=blank' target='_blank' size='medium' align='aligncenter'] Take me to Animaker Deck! [/thrive_link]
Related Posts

Pro-Hacks & Tips to improve your Animaker videos!

Nostalgia marketing: How can startups use cartoon videos to target today’s millennials

How to Animate your text in under 5 minutes!
Subscribe to get awesome DIY tips that could break the boundaries of other DIY tools.
Create Engaging Animated Videos On Your Own
Our drag-and-drop builder makes it easy for anyone to create pro-level animated videos using pre-made templates and ready-to-go assets with zero technical skills.
Easy steps to add a GIF to PowerPoint

Table of Contents
Whether you’re presenting at work, school, or to an audience, animated GIF files are one quick way to add fun, humor, and personality to any PowerPoint presentation. These short animations can break up the monotony of text blocks and make complex ideas easier to understand. This guide will show you where to find the perfect GIF (for free!) and how to add a GIF to PowerPoint.
What are animated GIFs?
Animated GIFs are short, silent, looping image sequences that offer a fun and expressive way to communicate. They can inject humor, convey emotions, illustrate concepts, or add a touch of personality to online conversations.
Unlike videos, GIFs present a continuous cycle of animation, delivering a visual punch without the need for audio. Because they’re small files and don’t need sound, GIFs are perfect for presentations.
Although most GIFs are used for memes and fun, the format can also make complex visualizations come to life.
💡GIF stands for Graphics Interchange Format (.gif)
How to add a GIF to PowerPoint: 2 ways
After you’ve found a GIF you want to use, navigate back to Microsoft PowerPoint and open your PPT/PPTX file. Then, choose the slide where you want to insert the GIF.
You can use two simple methods to insert the GIF into your PowerPoint slides.
Method 1: Copy and paste from the internet
- Find a GIF you like online, for example, from GIPHY .
- Right-click on the GIF and select ‘ Copy ’.
- Open PowerPoint and navigate to your slide
- Right-click on a space within the slide and select ‘Paste’ (or ctrl+v or command+v).
Method 2: Add a GIF from your device
This method requires you to save or download the GIF to your laptop, computer, or device.
- In the current slide, select the ‘ Insert ’ tab on the ribbon → click ‘ Picture ’
- Select ‘ This Device ’ (Windows) or ‘ Picture from File ’ (Mac)
- Search for the location of the animated GIF on your device, then click the Insert button in the popup window

And you’re done! Go into Slide Show mode to see how the animated GIF looks on the PowerPoint slide.
Where to get GIFs for PowerPoint
Here are the most popular websites to get GIFs for free:
- Reaction GIFs
- Reddit (r/gGIFs)

How to set a GIF as a background in PowerPoint
Did you know you could also set a GIF as a background for one or all of your PowerPoint slides? Follow these steps:
- Select or navigate to the slide within Microsoft PowerPoint
- Right-click within the slide and select ‘ Format Background ’
- Under Fill options, select ‘ Picture or texture fill ’
- Now click on the Insert tab → ‘ From a File ’
- Select the GIF file (with the .gif extension), then click ‘ Insert ’ in the popup window
You now have a GIF as the background of the current slide. To use the same background for all your other slides, go to the Format Background panel and select ‘ Apply to All ’.
💡 Tip: GIF image not animating? Ensure you’re in ‘ Slide Show ’ mode to preview and see it play.
Tips for using animated GIFs in presentations
Searching for and adding GIFs can be fun, but moderation is key! Here are some tips for adding a well-chosen GIF to your PowerPoint slides:
- Quality matters: Look for clear, high-resolution GIFs. Avoid low-quality, pixelated GIFs that look unprofessional.
- Keep it relevant: Ensure they directly support your message or clarify a concept.
- Be mindful of size: Giant GIF files slow down your slides, so aim for a manageable file size.
- Don’t overdo it: Use GIFs strategically for maximum impact. Having one on every slide will likely be distracting.
💡Tip: If you can’t find the right GIF, consider making your own!
This simple guide shows you how to find and insert the perfect GIFs to enhance your PowerPoint presentations. In a few easy steps, you can add a touch of visual flair to improve your message and captivate your audience.
We’ve also included websites where you can find GIFs for free and tips on using GIFs in your presentations. Whether you want a touch of fun or a more straightforward way to explain something, GIFs are a simple and easy way to add energy to your slideshow presentation.
How do I create or make a GIF?
You can create, edit animations, and optimize GIFs on ezgif.com for free by uploading photos or converting videos into GIFs.
How do I pause a GIF in PowerPoint?
You can’t pause a GIF in PowerPoint as they’re designed to loop. However, here’s a workaround to give the impression of stopping or pausing a GIF:
- Create a static image: Take a screenshot of the GIF’s first frame and save it as an image.
- Layer the images: Place the still image directly over the GIF on your slide.
- Animate for control: Add an “Appear” animation to the still image and set it to trigger when you click.
- The GIF will play automatically during your presentation. When you want it to appear paused, click anywhere on the slide, and the still image will replace it.
Another option is to convert the GIF into a video so that you can use PowerPoint’s built-in video playback controls to pause, stop, and start the animation.
Can you loop GIFs?
GIFs have a built-in “loop count” setting that lets creators control the number of times the animation repeats. The default is usually infinite loops, but you can often customize this during the GIF creation process.
Some newer versions of PowerPoint also allow you to adjust the loop count (edit animation) after inserting the GIF into your presentation.
Are GIFs the same as stickers?
Not quite. Stickers are similar to GIFs but designed specifically for use within messaging platforms or dedicated sticker apps. Their file format might differ. Stickers are usually much shorter and smaller in size than GIFs.
Save Time and Effortlessly Create Presentations with SlidesAI


Animate a picture on your slide
To add some spirit to your presentation, you can add an animation effect to a picture or to shapes on your slides.
In this example, we’ll animate two pictures:
Select the first picture.
On the Animations tab, select an animation effect. For example, select Fly In .

Click Effect Options , and then pick a direction for the animation. For example, From Left .

Select the second picture that you want to animate.
On the Animations tab, pick Fly In .
Click Effect Options and pick From Right .
Tip: You can change the order of the animations by selecting a picture and, under Reorder Animation on the ribbon, clicking Move Earlier or Move Later .
To test the animations you just applied to the two pictures, select the Slide Show button located at the bottom-right corner of the browser window:

In slide show view, click a slide to start each animation.
Tip: To remove an animation effect, in Normal view, select the picture, and on the Animations tab, click None .
More about animation:
Animate text or objects
Animation effects available in PowerPoint for the web

Need more help?
Want more options.
Explore subscription benefits, browse training courses, learn how to secure your device, and more.

Microsoft 365 subscription benefits

Microsoft 365 training

Microsoft security

Accessibility center
Communities help you ask and answer questions, give feedback, and hear from experts with rich knowledge.

Ask the Microsoft Community

Microsoft Tech Community

Windows Insiders
Microsoft 365 Insiders
Was this information helpful?
Thank you for your feedback.

How to Create an Animated GIF in Microsoft PowerPoint
I f you want to spruce up your PowerPoint presentation with animated GIFs, you’ve landed on the right article. Animated GIFs are a great way to captivate your audience and leave a lasting impression. In this tutorial, we’ll walk you through a step-by-step process of creating animated GIFs from a video, custom animations, and multiple slides. Let's dive in.
How to Create an Animated GIF From a Video in PowerPoint
The easiest way to create animated GIFs in PowerPoint is from a video. Here's how to go about it.
- Start with a blank slide—right-click on a slide, click Layout , and select Blank .
- Navigate to the Insert tab, click Media , select Video , and click This Device if the video is saved on your computer.
If your video fails to play, check out our guide on how to fix microsoft powerPoint not playing videos to fix the issue.
- With the video selected, navigate to the Playback tab and select Trim video .
You can also use the red & green clips or the reverse & forward buttons to adjust the video length.
Adding text or a callout to your video is a great way to add context and keep things interesting.
- Under the Insert tab, click Shapes , and select any of the shapes under Callouts .
- Drag your mouse on the slide to draw the callout, then move the yellow circle on the callout to point it in your desired direction.
- With the callout selected, you can change its Shape Fill and Shape Outline colors under the Shape Format tab.
- Double-click on the callout to add some text and format it with options under the Font group of the Home tab.
- When you’re all set to export the file, click File and Save As , or simply use the Ctrl + Shift + S shortcut to open the Save As dialog box.
- Choose a file location, enter a File name , select Animated GIF Format as the Save as type , and click the Save button when you’re done.
How to Create a Custom GIF From Animations in PowerPoint
Instead of extracting clips from videos to make a GIF, you can create one from scratch directly inside PowerPoint using animations. Here's how:
- Set a custom slide size for your GIF—navigate to the Design tab, select Slide Size , and Custom Slide Size .
- In the dialog box that appears, enter your custom dimensions and click OK . (For this example, we’ll stick with the default slide size.)
- Add the elements you want to animate onto the slide. These could be text, images, icons, or illustrations. (For this example, let’s use some icons from the PowerPoint library.)
- So under the Insert tab, click Icons .
- Select the icons you want to add to the slide and click Insert .
- After inserting the icons (or other graphics of your choice), you can adjust their size, colors, and positions. You can also add a drop shadow to any graphic to add depth and enhance its appearance.
- Now, it’s time to add the animations. You can apply some free cool animations to the elements from the built-in animation library. After adding your desired animations, the file is ready for export.
- To export the file, navigate to the File tab.
- Click Export and select Create an Animated GIF .
- Set the GIF quality
- Make the GIF transparent
- Set the duration spent on each slide
- Specify the slides to include in the GIF
- When you’re done, click the Create GIF button.
- In the dialog box that appears, choose a file location, enter a name for your GIF, and click the Save button.
How to Create a Custom GIF From Multiple Slides
Asides animations, you can create a custom GIF by looping through a bunch of slides. Let's walk through the steps:
- Add the content you want to include in the GIF onto the slides. (For this example, we’ll be using four stickers.)
- Arrange the content as desired on each slide.
- Navigate to the Export GIF settings, adjust the settings to fit your requirements, and click the Create GIF button.
How to Insert a GIF in Microsoft PowerPoint
- To insert a GIF in PowerPoint, drag and drop the file directly onto a slide. Or you can navigate to the Insert tab, click Pictures , and select This Device .
- Select your GIF and click the Insert button to add it to your slide.
- You can crop it, modify its appearance, and position it as you like.
Transform Your Presentations With Animated GIFs in PowerPoint
There you have it—everything you need to know to create animated GIFs in Microsoft PowerPoint. Take some time to practice these techniques and experiment with them to create the perfect GIFs for your presentation.
However, remember not to overdo it—using them sparingly and purposefully will have a greater impact. Alongside this, there are more ways to build engaging presentations in PowerPoint.

How-To Geek
Forget the powerpoint app for animations, use powerpoint for the web instead.
The PowerPoint app animation pane can be... a pain!
Quick Links
Why the powerpoint app is bad for animations, why powerpoint for the web is much better, tips for using animations in powerpoint for the web.
Using PowerPoint's animations increases your presentation's professionalism and helps you to emphasize certain elements within your slides. However, compared to the online version of PowerPoint, the animation pane in the Microsoft 365 app is confusing, unclear, and difficult to manage.
The main drawback of the animation pane on the Microsoft 365 PowerPoint app is its lack of clarity. When you add animations, you are offered a mixture of symbols and icons that—unless you're a seasoned PowerPoint expert—are confusing and unclear.
As you can see in the screenshot below, there are numbers and vague icons to the left of each animation, and different colored boxes in varying positions to the right. And if you have animations grouped together, you have to click on the gray bar to see them individually.
What's more, to make changes to the animation—such as the timing or the type of effect—you have to click on the drop-down box and then decide which is the best option (from the many available) to take you where you want to go.
It's also not immediately clear exactly what each animation is when you glance at the animation pane—you have to take the time to hover over the animation in the pane or click on the description to remind yourself of what you've chosen for each element on your slide. And when you do, you're only given minimal details.
Finally, all of the above confusions become even worse if you have dozens of animations on each slide.
It seems that Microsoft recognized that the Animation Pane in the app was substandard, so they took the opportunity to improve these features in the web-based version of the program.
First, you don't have to decode the confusing symbols and icons anymore. The words On Click have replaced the mouse icon, the name of the animation (in this case, Fly In) has replaced the colored star icon, and the duration of the animation is also displayed (in the app version, you'd have to go through two clicks to find this important information). Microsoft has also done away with the pointless colored boxes that were supposed to tell you the timing sequence of the animations.
However, the best feature of the web-based workflow is that you can click on any of the animations in the Animation Pane to view more details, so viewing and changing your animation options is much easier than in the app.
After you've clicked on an animation in the Animation Pane, you can:
- See and change the animation type.
- Decide whether the animation should appear when you click or after a certain time following the previous animation.
- Change the animation duration
- Add a delay.
In the app-based version of PowerPoint, these options were all accessible via a lottery of drop-down options and dialog boxes, so the PowerPoint for the web's Animation Pane saves you time and presents everything to you much more clearly.
It's also much easier to add more than one animation to an item when using the web version of PowerPoint. Simply select the element you want to add another animation to, and click "Add" at the top of the Animation Pane. Likewise, you can easily delete an existing animation by clicking the trash icon next to the relevant item in the Animation Pane.
To animate an item that doesn't already have animations, just select the item on your slide and the same "Add" button will become active for you to click.
Overall, the web-based interface is much more user-friendly and a huge improvement on the PowerPoint app, especially when it comes to using the Animation Pane.
We have a few quick tips to know when you start using animations.
Reorder Your Animations
To reorder your animations in the Animation Pane, click and drag the animation card up or down via the six dots next to the relevant animation.
View More Animations
By default, the Animation Pane offers some of the more commonly-used entrance animations when you want to animate an item. However, to see more animations, click "View More Animations," which will show more entrance, exit, and emphasis animations.
Animate Items Together
To apply the same animation to multiple items on your slide, click the first item, hold Ctrl, and then select the other items. Then, click "Add" in the Animation Pane, and choose the animation you want to use. When you present your slideshow, all the items you selected will appear, exit, or be emphasized in the same way and at the same time.
Now that you can master animations on PowerPoint for the web, check out these PowerPoint tips to make sure your presentation is professional and easy for your audience to follow.

- SUGGESTED TOPICS
- The Magazine
- Newsletters
- Managing Yourself
- Managing Teams
- Work-life Balance
- The Big Idea
- Data & Visuals
- Reading Lists
- Case Selections
- HBR Learning
- Topic Feeds
- Account Settings
- Email Preferences
How to Make a “Good” Presentation “Great”
- Guy Kawasaki

Remember: Less is more.
A strong presentation is so much more than information pasted onto a series of slides with fancy backgrounds. Whether you’re pitching an idea, reporting market research, or sharing something else, a great presentation can give you a competitive advantage, and be a powerful tool when aiming to persuade, educate, or inspire others. Here are some unique elements that make a presentation stand out.
- Fonts: Sans Serif fonts such as Helvetica or Arial are preferred for their clean lines, which make them easy to digest at various sizes and distances. Limit the number of font styles to two: one for headings and another for body text, to avoid visual confusion or distractions.
- Colors: Colors can evoke emotions and highlight critical points, but their overuse can lead to a cluttered and confusing presentation. A limited palette of two to three main colors, complemented by a simple background, can help you draw attention to key elements without overwhelming the audience.
- Pictures: Pictures can communicate complex ideas quickly and memorably but choosing the right images is key. Images or pictures should be big (perhaps 20-25% of the page), bold, and have a clear purpose that complements the slide’s text.
- Layout: Don’t overcrowd your slides with too much information. When in doubt, adhere to the principle of simplicity, and aim for a clean and uncluttered layout with plenty of white space around text and images. Think phrases and bullets, not sentences.
As an intern or early career professional, chances are that you’ll be tasked with making or giving a presentation in the near future. Whether you’re pitching an idea, reporting market research, or sharing something else, a great presentation can give you a competitive advantage, and be a powerful tool when aiming to persuade, educate, or inspire others.
- Guy Kawasaki is the chief evangelist at Canva and was the former chief evangelist at Apple. Guy is the author of 16 books including Think Remarkable : 9 Paths to Transform Your Life and Make a Difference.
Partner Center
Got any suggestions?
We want to hear from you! Send us a message and help improve Slidesgo
Top searches
Trending searches

41 templates

el salvador
32 templates

49 templates

21 templates

16 templates

28 templates
Math Presentation templates
Create enjoyable presentations with these entertaining google slides themes and powerpoint templates featuring designs revolving around numbers and math. they are free and completely customizable., related collections.

29 templates

133 templates

Middle School
80 templates

High School
150 templates

52 templates

Premium template
Unlock this template and gain unlimited access
Multiplying Integers
Download the Multiplying Integers presentation for PowerPoint or Google Slides and teach with confidence. Sometimes, teachers need a little bit of help, and there's nothing wrong with that. We're glad to lend you a hand! Since Slidesgo is committed to making education better for everyone, we've joined hands with educators....

Discrete Mathematics: Combinatorics and Probability - 11th Grade
Download the Discrete Mathematics: Combinatorics and Probability - 11th Grade presentation for PowerPoint or Google Slides. High school students are approaching adulthood, and therefore, this template’s design reflects the mature nature of their education. Customize the well-defined sections, integrate multimedia and interactive elements and allow space for research or group...

Math Mystery Escape Room
One of the most recent booms in games for all ages are escape rooms. You and a group of friends are locked in a room and you must solve puzzles to escape. How about trying an educational and digital version of it, aimed at kids? The theme of this new...

Math Subject for High School - 9th Grade: Systems of Equations and Inequalities
Ah, math, the most polarizing subject—either you love it or hate it. With Slidesgo, you can be sure your students will love it! Using visual resources such as slides during a class is helpful and can turn complex concepts into something more comprehensible. Our template has an organic design, which...

Fractions: Addition and Subtraction of Mixed Numbers
Download the Fractions: Addition and Subtraction of Mixed Numbers presentation for PowerPoint or Google Slides and teach with confidence. Sometimes, teachers need a little bit of help, and there's nothing wrong with that. We're glad to lend you a hand! Since Slidesgo is committed to making education better for everyone,...

Complex Analysis - Bachelor of Science in Mathematics
Download the Complex Analysis - Bachelor of Science in Mathematics presentation for PowerPoint or Google Slides. As university curricula increasingly incorporate digital tools and platforms, this template has been designed to integrate with presentation software, online learning management systems, or referencing software, enhancing the overall efficiency and effectiveness of student...

Card Game to Improve Mental Arithmetic Skills
Download the Card Game to Improve Mental Arithmetic Skills presentation for PowerPoint or Google Slides and teach with confidence. Sometimes, teachers need a little bit of help, and there's nothing wrong with that. We're glad to lend you a hand! Since Slidesgo is committed to making education better for everyone,...

Dividing Integers
Download the Dividing Integers presentation for PowerPoint or Google Slides and teach with confidence. Sometimes, teachers need a little bit of help, and there's nothing wrong with that. We're glad to lend you a hand! Since Slidesgo is committed to making education better for everyone, we've joined hands with educators....

Geometry: Circles and Angle Relationships - 10th Grade
Download the Geometry: Circles and Angle Relationships - 10th Grade presentation for PowerPoint or Google Slides. High school students are approaching adulthood, and therefore, this template’s design reflects the mature nature of their education. Customize the well-defined sections, integrate multimedia and interactive elements and allow space for research or group...

Isometric Style Math Lesson for Middle School using Pear Deck
Download the Isometric Style Math Lesson for Middle School using Pear Deck presentation for PowerPoint or Google Slides. If you’re looking for a way to motivate and engage students who are undergoing significant physical, social, and emotional development, then you can’t go wrong with an educational template designed for Middle...

Math Subject for Elementary - 5th Grade: Fractions I
Who says Maths have to be boring? Introduce elementary school students to the wonders of fractions with this cool template. Its fun and approachable design is filled with colors and makes each slide look like a page ripped out from a spiral notebook. Also, its many color illustrations add a...

Advanced Topics in Combinatorics - Doctor of Philosophy (Ph.D.) in Mathematics
Download the Advanced Topics in Combinatorics - Doctor of Philosophy (Ph.D.) in Mathematics presentation for PowerPoint or Google Slides. As university curricula increasingly incorporate digital tools and platforms, this template has been designed to integrate with presentation software, online learning management systems, or referencing software, enhancing the overall efficiency and...

Statistics and Data Analysis - 6th Grade
Download the Statistics and Data Analysis - 6th Grade presentation for PowerPoint or Google Slides. If you’re looking for a way to motivate and engage students who are undergoing significant physical, social, and emotional development, then you can’t go wrong with an educational template designed for Middle School by Slidesgo!...

Math Tutoring Academy
Download the Math Tutoring Academy presentation for PowerPoint or Google Slides. Are you looking for a way to make your school or academy stand out among the competition? This template is designed to showcase all the fantastic aspects of your center. With perfect slides that allow you to easily add...

HS Electives: Sociology Subject for High School - 9th Grade: Concepts in Probability and Statistics
If Slidesgo's templates are downloaded by 7 out of 9 people in France and 8 out of 10 in Brazil, how probable it is for a new user from those countries to download one of our presentations? Grab this example and take it to your high school lessons thanks to...

Comparing Fractions (Cross Multiplication)
Download the Comparing Fractions (Cross Multiplication) presentation for PowerPoint or Google Slides and teach with confidence. Sometimes, teachers need a little bit of help, and there's nothing wrong with that. We're glad to lend you a hand! Since Slidesgo is committed to making education better for everyone, we've joined hands...

Math Subject for Elementary - 4th Grade: Operations and Algebraic Thinking
If Slidesgo has released ten templates in an hour and that's three times as many as the ones released an hour ago, how many were released in these two hours? Math, that polarizing subject! We are back with a new template for lessons on operations and algebraic thinking. Introduce your...

Problem-solving and Reasoning - Mathematics - 4th Grade
Download the Problem-solving and Reasoning - Mathematics - 4th Grade presentation for PowerPoint or Google Slides and easily edit it to fit your own lesson plan! Designed specifically for elementary school education, this design features vibrant colors, engaging graphics, and age-appropriate fonts; elements that capture the students' attention and make...
- Page 1 of 28
New! Make quick presentations with AI
Slidesgo AI presentation maker puts the power of design and creativity in your hands, so you can effortlessly craft stunning slideshows in minutes.

Register for free and start editing online
IMAGES
VIDEO
COMMENTS
Add animation and effects to text, pictures, shapes, and objects in your PowerPoint presentation. ... There are different ways to start animations in your presentation: On Click - Start an animation when you click a slide. With Previous - Play an animation at the same time as the previous animation in your sequence.
15 Easy PowerPoint PPT Animation Tips, Effects, & Tricks for Beginners in 2023. Let's cover 15 of the best animation in PowerPoint templates. These PowerPoint slide animation techniques are a shortcut to mastery. Before we dive in, it helps to know: PowerPoint animations are controlled with the Animation Pane. 1.
In this PowerPoint slide animation tutorial, you will learn how to organize and animate your presentation contents so that it grabs the attention of your aud...
This menu makes it easy to choose an animation to add to an object. On the Animations tab, you can simply click on one of the animation thumbnails to apply it to a selected object. Download this PowerPoint Design template on Envato Elements. Click on the part of the slide that you want to animate.
In this step-by-step tutorial, learn how to use animations in Microsoft PowerPoint. Learn animation fundamentals, layer on multiple animations, adjust the du...
Welcome to our step-by-step tutorial on creating dynamic and fully customizable PowerPoint slides! 🌟 In this easy-to-follow animated PowerPoint tutorial, yo...
To add entrance animations to any object in PowerPoint, here's what you need to do: Click on the object you want to animate. In this example, we will use a blue smiley face. (Caption: The blue smiley face we will be animating for this tutorial) 2. Select the animation you want to use.
2. Survey Your PowerPoint Animations Before Starting. Many of the recommended templates include more than one PowerPoint animation. It always helps to survey your slides by reviewing all the active animations before you start.. Click on the Animations tab in PowerPoint to show all the objects that have animations. (Image source: Envato Elements. Click on Animations on PowerPoint's ribbon.
3. Rename All Objects. If you add a lot of pictures, icons, or text, it's easier to lose track of them, and you might have a hard time identifying the object that you want to animate or edit. To avoid losing time, you should rename every object right after you insert it. To do it, select the Home tab.
Animate text or objects. You can animate the text, pictures, shapes, tables, SmartArt graphics, and other objects in your PowerPoint presentation. Effects can make an object appear, disappear, or move. They can change an object's size or color. Effects can respond to mouse clicks or other actions, giving an interactive feel to your presentation.
How not to use an Animated PowerPoint Presentation in Court! Presentations with animations aren't always a great idea. In 2014, a court in the United States criticized a PowerPoint presentation by the prosecutor, which led to the court throwing the case out. The presentation was made with sound effects and animations, with flashy elements ...
11. Add a sound effect to an animation. In the Animation Pane, click the down arrow next to an animation and select "Effect Options" from the context menu. Go to the "Effect" tab in the window that appears and choose from the menu under "Enhancements" to select a sound effect from a list or add one manually.
Step 3: Add Custom Animations to Your Animated PowerPoint. Your animated PowerPoint templates and all Visme presentation templates have plenty of different styles of animation possibilities. With Visme, add all these types of animations to any element in a slide. Enter Animations. Fade in.
In this PowerPoint tutorial, you are going to learn and see something new and different. Here, I will show you how to make an attractive and eye catchy anima...
Open your MS PowerPoint presentation and navigate to the slide where you want to add animation. Choose the item you wish to animate, then click on the 'Animations' tab in the top menu. Choose the animation you want to apply from the list of available options. To view the animations applied to an object, click on 'Animation Pane.'.
Select the animated object and go to the Animations tab. Click the Effect Options drop-down arrow to view your choices. Note that not all paths offer extra effects, but most let you reverse the path direction. Along with changing the direction of your motion path, you can edit the points. Click the Effect Options drop-down arrow and pick "Edit ...
Go carefully through the different templates and select a suitable one for your use case. Then click Add all. A pop-up window will appear, asking you to overwrite; click confirm to insert the template. Once you have clicked the confirm button, all the slides will be inserted into the project.
Select the drawing or part of it, click "Add Animation" in the Advanced Animation section of the ribbon, and choose the additional effect. Keep in mind that animations display in the order you apply them. To adjust this order, select the animation number and use the Move Earlier or Move Later button on the right side of the ribbon.
Follow these steps: Select or navigate to the slide within Microsoft PowerPoint. Right-click within the slide and select ' Format Background '. Under Fill options, select ' Picture or texture fill '. Now click on the Insert tab → ' From a File '. Select the GIF file (with the .gif extension), then click ' Insert ' in the popup ...
Click Effect Options, and then pick a direction for the animation. For example, From Left. Select the second picture that you want to animate. On the Animations tab, pick Fly In. Click Effect Options and pick From Right. Tip: You can change the order of the animations by selecting a picture and, under Reorder Animation on the ribbon, clicking ...
To export the file, navigate to the File tab. Click Export and select Create an Animated GIF. In the GIF settings on the right, you can: Set the GIF quality. Make the GIF transparent. Set the ...
In this PowerPoint tutorial, I have showed how to design an animated PowerPoint presentation slide. Here, I have used only a single slide to represent four ...
To apply the same animation to multiple items on your slide, click the first item, hold Ctrl, and then select the other items. Then, click "Add" in the Animation Pane, and choose the animation you want to use. When you present your slideshow, all the items you selected will appear, exit, or be emphasized in the same way and at the same time.
When in doubt, adhere to the principle of simplicity, and aim for a clean and uncluttered layout with plenty of white space around text and images. Think phrases and bullets, not sentences. As an ...
To Create something similar in 3D check out the tutorial below https://youtu.be/VWdaxQ-RFukDownload PowerPoint templates, music and order resources from Env...
Download the Discrete Mathematics: Graph Theory and Networks - 12th Grade presentation for PowerPoint or Google Slides. High school students are approaching adulthood, and therefore, this template's design reflects the mature nature of their education. Customize the well-defined sections, integrate multimedia and interactive elements and ...
In this video, you'll learn the basics of animating text and objects in PowerPoint 2019, PowerPoint 2016, and Office 365. Visit https://edu.gcfglobal.org/en/...