Critical PowerPoint Shortcuts – Claim Your FREE Training Module and Get Your Time Back!

How to Print PowerPoint with Notes (Step-by-Step)
- PowerPoint Tutorials
- Shortcuts & Hacks
- January 22, 2024
In this article, you’ll learn how to print your PowerPoint slides with speaker notes as handouts the way you want them.
Don’t get frustrated with PowerPoint… just get creative. That way you can get out of the office and make it to Happy Hour.
Just keep in mind that, like many things in PowerPoint, there is a variety of ways to print your notes, each producing its own result. I cover each method below.
NOTE: If you are distributing your slides to other people, I highly recommend customizing your handouts with your company information before you print them. This not only makes your handouts look more professional, but it also makes it easier for people to get in touch with you.

For help turning your PowerPoint notes (without or without note text) into PDF handouts, read our guide here .
Table of Contents
How to print powerpoint with notes (basics).

The most common way to print PowerPoint notes is with the thumbnail image of the slide at the top of the page, and the notes directly beneath (as pictured above). To print your notes like this, simply:
- Hit Ctrl+P for Print (or click File then Print)
- Open the Print Layout options
- Select the Notes Page layout
- Click Print
If you want to print your notes only (without the thumbnail image), see further below.
As you can see in the live preview on the right in the picture above, I have already formatted the Notes Master to include my company’s logo, and my contact information.
If you have lots of speaker notes for a particular slide, the text may run off onto a second or third page. If this happens, keep in mind that your slide thumbnail only appears on the first page of notes.
Also keep in mind that the page number at the bottom of your handouts represents the slide number in your presentation, not the number of pages you are printing.
That means that if you have ten (10) pages of speaker notes for slide number 2 in your deck, each of those ten pages of speaker’s notes will have a number 2 on them.
To learn how to print multiple slides on one page in PowerPoint, read our guide here .
NOTE: If you are distributing your notes as handouts before or after your presentation, I recommend customizing your Notes Master .
Take your PPT skills to the next level
Formatting the notes master for professional handouts.

To customize your notes page before you print it in PowerPoint first navigate to the Notes Master view.
- Click the View tab
- Select the Notes Master
The View tab in PowerPoint is also where you can find the Handout Master view (discussed further below), and the Slide Master view. These master views control the default formatting of your slides, handouts, and notes.

Once you are in the Notes Master view, you can select which placeholders you want to include in your handouts. In this view, you can also add any images, shapes, or other design elements to jazz up your handouts. I recommend adding things like:
- Your company logo
- Your email address (or contact information)
- Your company website
When it comes to formatting your handouts, more is not better. I recommend adding enough to make your handouts look professional and make it easy for people to contact you.
Printing PowerPoint Notes with multiple slides per page
To print your PowerPoint notes as handouts with multiple slides per page, you need to first export your PowerPoint slides to Microsoft Word using the Create Handouts command.

To convert PowerPoint to Word using the Create Handouts command, simply:
- Click the File tab
- Select Export
- Select Create Handouts
- Click the Create Handouts command
- Select Notes next to slides
Doing so turns your PowerPoint presentation into a Word document, with all your slides and speaker notes in a table format that you can then update and edit in Microsoft Word. The length of your notes affects how many slides you can have on a single page in Word.

Table of Contents: If you have a lot of slides you are converting into a Word document, you can make your Word document easier to read and navigate by inserting a table of contents. To learn how to make a table of contents in Word, read our guide here .
How to print PowerPoint notes only
Yes, you can print just your PowerPoint notes (no slide thumbnail images) without messing up your presentation. I don’t recommend deleting things on your Notes Master, simply follow the steps listed below.
To see how to pull this off using a combination of the Create Handouts command and the Outline View in PowerPoint, see the short PowerPoint video tutorial below (it will make the most sense that way).
1. Push your PowerPoint slides to Microsoft Word
The first step is to push your slides and speaker notes into Microsoft Word. To do that, follow these steps:
- From within PowerPoint open the File menu
- Click Export on the left
- Select Create Handouts in the middle
- Click Create Handouts on the right
- Select Notes next to slides
PowerPoint then exports all your slides and speaker notes to Word in a table format. To make it easier to edit our table, let’s add borders to it.
2. Add table borders to your table to see what you are working with

Once PowerPoint finishes exporting your slides to Microsoft Word, I recommend adding table borders to see what you are working with. To do that, simply:
- Select the table in Word
- Click the Table Design tab
- Choose a table border style
While this is an optional step, it makes formatting your notes in Word a lot easier.
3. Format your PowerPoint notes in Word
As a last step, you simply need to make the formatting adjustments you want to your notes. These can include:
- Delete the thumbnail image column
- Resize the column widths
- Paste your slide title names in from the Outline View in PowerPoint
- Customize your handouts with your contact information
- Continue formatting in order to get your desired result
How to print PowerPoint with comments

Assuming you have comments in your presentation, you can print those in either the Handout view or the Outline view.
To print your PowerPoint slides with comments:
- Hit Ctrl+P for print
- Open the Slide Layout options
- Choose how many slides you want per page (I recommend 6 or 9 so you don’t waste paper)
- Select Print Comments
- Click Print
It’s important to note that PowerPoint comments always print on the second page. Your first page will be the handouts themselves (with the comments marked on the slide). The second will be the actual comments.
As this tends to waste a lot of printer paper and ink, I recommend using the 9-slide layout unless you have a specific reason to do otherwise.
How to print PowerPoint with lines for notes
There are two different ways to print your slides as Handouts with lines for notes:
The easy way: This involves directly printing your slides from PowerPoint with the default blank lines for taking notes.
The customizable way: This involves converting your PowerPoint slides to Word, where you can then adjust and customize the lines for your notes.
Both options are covered below.
1. The easy way

To print your slides with non-customizable lines for notes (in PowerPoint):
- From within PowerPoint, hit Ctrl+P for print
- Open the Slide Layout options
- Choose the 3-slide layout with lines (you’ll see a live preview on the right)
NOTE: You can customize this layout using the PowerPoint Handout Master the way I described above .
2. The customizable way

To print your slides with customizable blank lines for notes (Converting PowerPoint to Word):
- Navigate to the File tab
- Click Export
- Click on the Create Handouts button
- Select either Blank lines next to slides or Blank lines below slides (depending on what you want)
Once your slides export to Microsoft Word, you can do whatever you want with the lines. For example, you can decrease the paragraph spacing to add more lines if you like. You can also format them and make them bold.
To expand your knowledge and learn more about exporting your PowerPoint slides to Microsoft Word (and the different options you have), read our guide here .
Printing an outline of PowerPoint
Before you get too excited about printing your PowerPoint outline, it’s important to note that only information that is within your content placeholders prints. That means that text inside regular shapes and text boxes doesn’t appear.
On top of that, an outline can only print text. That means that none of your graphics, charts or pictures show up in your printed document.
There are two different ways to print your outline: You can directly print your outline out of PowerPoint, or you can export your outline to Microsoft Word so that you can edit it before you print it. Choose the option below that works best for you.
1. Directly printing your outline from PowerPoint

To print your PowerPoint slides as an outline only outline, simply:
- Hit Ctrl+P on to open the print options
- Open the Slide Layout options
- Select Outline
Note: If you don’t see all the content in your outline (you only see the slide titles, for example) that means that your Outline View is collapsed.
To expand your Outline View, simply:
- Navigate to the View tab
- Click on the Outline View
Within the Outline View (click into that actual Outline View on the left), hit the expand keyboard shortcut: Alt+Shift+9 . To learn more about working in the Outline view in PowerPoint, read our guide here .
2. Exporting an editable version of your Outline to Microsoft Word

If you want to customize your PowerPoint outline in Microsoft Word before you print it, simply:
- Click on the Create Handouts button
- Select Outline only
Pushing your outline into Microsoft Word like this allows you to customize and edit the outline before you print it.
So those are all the different ways you can print your notes in PowerPoint.
If you intend to print your notes as handouts for a business meeting or client presentation, I highly recommend formatting your Notes Master and/or Handout Master.
That way you can include your contact information and/or your company formatting, making your handouts look more professional.
If you enjoyed this in-depth PowerPoint tutorial, you can learn more about our online training courses and other presentation resources here .
🔒 Unlock the PowerPoint Shortcuts Trusted by Industry Leaders KKR, American Express, HSBC, and More!
Join over 114,880 professionals from diverse fields including consulting, investment banking, advertising, marketing, sales, and business development who have supercharged their PowerPoint game with our proven methods.
✅ Customize compelling presentations effortlessly.
✅ Master time-saving techniques for faster deck creation.
✅ Boost your career prospects with top-notch PowerPoint skills.
Get FREE access to the Critical PowerPoint Shortcuts module of our premium training course by entering your name and email below.
DISCLAIMER: PC Users Only!
We respect your privacy and will keep your info safe and confidential.
Related Articles
About the author.

This Post Has 2 Comments

Thank you for this useful guide! Is there a way to print the outline with the notes per slide, too?

Hi Juliah and thanks for the question. Unfortunately not. The notes are tied to the slides and not the outline, so there’s no way that we know of to print the outline + notes together.
Comments are closed.
Popular Tutorials
- How to Strikethrough Text (l̶i̶k̶e̶ ̶t̶h̶i̶s̶) in Word, Excel & PowerPoint
- How to Make Animated Fireworks in PowerPoint (Step-by-Step)
- Strikethrough Shortcut (l̶i̶k̶e̶ ̶t̶h̶i̶s̶) for Word, Excel & PowerPoint
- How to Create a Flash Card Memory Game in PowerPoint (Like Jeopardy)
- Keyboard Shortcuts Not Working: Solved
PowerPoint Tutorial Categories
- Strategies & Opinions
- Presentation Design
- Pictures, Icons, Videos, Etc.
- New Features
- Miscellaneous
- Charts & Data Viz
We help busy professionals save hours and gain peace of mind, with corporate workshops, self-paced courses and tutorials for PowerPoint and Word.
Work With Us
- Corporate Training
- Presentation & Template Design
- Courses & Downloads
- PowerPoint Articles
- Word Articles
- Productivity Resources
Find a Tutorial
- Free Training
- For Businesses
We help busy office workers save hours and gain peace of mind, with tips, training and tutorials for Microsoft PowerPoint and Word.
Master Critical PowerPoint Shortcuts – Secure Your FREE Training Module and Save Valuable Time!
⌛ Master time-saving expert techniques.
🔥 Create powerful presentations.
🚀 Propel your career to new heights.
We value your privacy – we keep your info safe.
Discover PowerPoint Hacks Loved by Industry Giants - KKR, AmEx, HSBC!
Over 114,880 professionals in finance, marketing and sales have revolutionized their PPT skills with our proven methods.
Gain FREE access to a full module of our premium PowerPoint training program – Get started today!
We hate spam too and promise to keep your information safe.
You are currently viewing a placeholder content from Facebook . To access the actual content, click the button below. Please note that doing so will share data with third-party providers.
How to Print Out in PowerPoint With Comments On: A Step-by-Step Guide
Printing out a PowerPoint presentation with comments is a handy feature for reviewing feedback or preparing for meetings. To accomplish this, you’ll need to access the ‘Print’ settings in PowerPoint and adjust the layout to include comments. It’s a straightforward process that can be completed in a few clicks.
After completing this action, you’ll have a physical copy of your presentation that includes all the comments made by you or others. This can serve as a valuable resource for making revisions or as a reference during discussions.
Introduction
PowerPoint presentations are a staple in the business and academic worlds. They serve as visual aids, help to convey information clearly, and can be a powerful tool for persuasion. But what happens when you need to share the feedback on your presentation with others, or you want to have a hard copy to review offline? That’s where printing your PowerPoint with comments comes in handy.
Being able to print out PowerPoint slides with comments is crucial for various reasons. For one, it allows you to see the feedback in the context of the slide they’re referring to, making it easier to understand and implement changes. It’s also essential for meetings and presentations where you might need to discuss the comments with colleagues or clients. Essentially, anyone who uses PowerPoint and receives feedback on their presentations can benefit from knowing how to print their slides with comments.
Step by Step Tutorial: How to Print Out in PowerPoint With Comments On
Before diving into the steps, let’s clarify what we’ll achieve. By following these steps, you’ll be able to print your PowerPoint slides along with any comments that have been added. This is perfect for reviewing feedback or preparing for a meeting where you might need to discuss the comments.
Step 1: Open your presentation in PowerPoint
Open the PowerPoint presentation that includes the comments you want to print.
This step is pretty self-explanatory, but it’s crucial. Make sure you have the correct presentation open and that all the comments you want to include are saved.
Step 2: Click on ‘File’ and then ‘Print’
Navigate to the ‘File’ tab in the top-left corner of PowerPoint and click on ‘Print’.
The ‘Print’ menu is where you’ll find all the settings needed to include comments in your printout.
Step 3: Under ‘Settings’, click on ‘Full Page Slides’
In the ‘Print’ menu, you’ll see a ‘Settings’ section. Click on the dropdown that usually says ‘Full Page Slides’.
This will open up more printing options for your presentation.
Step 4: Choose the ‘Print Layout’
In the dropdown menu, select ‘Notes Pages’ to print the slides with the comments on the side.
When you select ‘Notes Pages’, you’re telling PowerPoint that you want to include the notes pane, which is where the comments are displayed, in your printout.
Step 5: Click ‘Print’
After selecting ‘Notes Pages’, just click on ‘Print’, and your presentation, along with the comments, will begin printing.
Make sure your printer is set up correctly before clicking ‘Print’ to avoid any mishaps.
| Benefit | Explanation |
|---|---|
| Clarity | Printing with comments provides clarity for revisions. |
| Reference for Discussions | Helpful during meetings to discuss feedback. |
| Physical Record | Creates a physical record of feedback for future reference. |
| Drawback | Explanation |
|---|---|
| Consumes More Paper | Printing comments uses more paper than printing slides alone. |
| Time-Consuming | Reviewing and printing comments can be time-consuming. |
| Potentially Confusing Layout | Comments may not always print in a clear or organized manner. |
Additional Information
When printing out PowerPoint slides with comments, there are a few things to keep in mind. Firstly, the comments will print out on the notes pages, which means each slide will be accompanied by a full page of notes. This can consume a lot of paper, so it’s a good idea to review and consolidate comments before printing.
Another tip is to make sure that the comments are properly formatted and easy to read. You can adjust the font size and style of the comments in the ‘Notes Master’ to make them more print-friendly. Additionally, keep in mind that not all printers are created equal, so you may need to adjust your printer settings to ensure the best quality printout.
Lastly, if you’re printing comments for a meeting or presentation, consider organizing them in a way that makes them easy to refer to during the discussion. This might mean printing out a separate copy for each participant or creating a summary of the most critical comments to focus on.
- Open your presentation in PowerPoint.
- Navigate to ‘File’ and click on ‘Print’.
- Click on the dropdown under ‘Settings’ and select ‘Full Page Slides’.
- Choose the ‘Print Layout’ by selecting ‘Notes Pages’.
- Click ‘Print’ to print your presentation with comments.
Frequently Asked Questions
Can i print comments from powerpoint online.
Yes, you can print comments from the online version of PowerPoint by accessing the ‘Print’ menu and following similar steps.
Can I customize the way comments are printed?
Yes, you can customize the printout by adjusting settings in the ‘Notes Master’ section.
Can I print comments without the slides?
No, comments are printed on the notes pages alongside the slides.
What if my comments don’t print correctly?
Ensure your printer settings are correct and that the comments are formatted properly in PowerPoint.
Can I save the presentation with comments as a PDF instead?
Yes, you can save your presentation as a PDF with comments by choosing ‘Save As’ and selecting ‘PDF’.
Knowing how to print out in PowerPoint with comments on can significantly enhance your ability to review and share feedback efficiently. Whether you’re preparing for a big meeting, collaborating on a group project, or just need a clear way to see all the suggestions for your presentation, this feature is incredibly useful.
Remember, it’s not just about printing; it’s about creating a tangible record of the valuable input you’ve received. So next time you get feedback on a PowerPoint presentation, don’t just skim through it on your computer screen—print it out, mark it up, and make those comments count!

Matthew Burleigh has been writing tech tutorials since 2008. His writing has appeared on dozens of different websites and been read over 50 million times.
After receiving his Bachelor’s and Master’s degrees in Computer Science he spent several years working in IT management for small businesses. However, he now works full time writing content online and creating websites.
His main writing topics include iPhones, Microsoft Office, Google Apps, Android, and Photoshop, but he has also written about many other tech topics as well.
Read his full bio here.
Share this:
Join our free newsletter.
Featured guides and deals
You may opt out at any time. Read our Privacy Policy
Related posts:
- How to Save Powerpoint as PDF with Notes
- Can I Convert My Powerpoint to Google Slides?
- How Do I Print Just the Notes in Powerpoint 2010?
- How to Drag Slides From One PowerPoint to Another: A Step-by-Step Guide
- How to Print Comments Only in MS Word: A Step-by-Step Guide
- How to Show Speaker Notes in Google Slides
- How to Set Time for Slides in Powerpoint
- How to Check Word Count on Powerpoint 2010
- How to Make a Powerpoint Slide Vertical in Powerpoint 2013
- How to Print a Google Doc with Comments: A Step-by-Step Guide
- How to Unhide a Slide in Powerpoint 2013
- How to Print an Outline of the Presentation in Powerpoint
- How to Change the Font on All Slides in Google Slides
- How to See Notes on PowerPoint on the Laptop: A Step-by-Step Guide
- How to Insert Slides from Another Presentation in Powerpoint 2010
- How to Convert a PowerPoint to Word and Edit with Ease
- How to Change Hyperlink Color in Powerpoint 2010 (An Easy 5 Step Guide)
- How to Print Word 2019 Documents Without Comments Easily
- How to Delete Multiple Slides in Google Slides
- How to Print 4 Slides Per Page in Google Slides
Byte Bite Bit
How to Print PowerPoint with Notes: A Step-by-Step Guide
Preparing for a presentation often requires us to print our PowerPoint slides with speaker notes included. Printing your PowerPoint with notes ensures you have all the extra details right at your fingertips during your presentation. This can be a game-changer, helping you deliver your content smoothly and confidently. 🖨️✨

Let’s talk about the different ways we can do this. We can choose to print our notes directly from PowerPoint by navigating to File > Print and selecting Notes Pages under Print Layout. This method is quick and efficient, making it easy to review our notes alongside the relevant slides. Alternatively, we can export our notes to Word, offering more flexibility in formatting and editing before printing.
For those of us using Macs, the process is just as straightforward. We go to File > Print, then choose “Open PDF in Preview” from the PDF dropdown menu, and save it. The end result is a neatly formatted document ready for printing.
- 1.1 Selecting the Right Layout Options
- 1.2 Incorporating Speaker Notes
- 1.3 Printing Slides and Handouts
- 2.1 Choosing Between Color and Grayscale
- 2.2 Adjusting Orientation and Scale
- 3.1 Printing Notes Pages and Speaker Notes
- 3.2 Customizing Slides for Different Audiences
- 4.1 Exploring Microsoft 365 and PowerPoint Subscription Options
- 4.2 Using PowerPoint Across Different Devices and Platforms
Preparing Your Presentation
When preparing to print a PowerPoint with notes, we need to select the appropriate layout options, incorporate our speaker notes effectively, and understand the process of printing slides and handouts.
Selecting the Right Layout Options
It’s crucial to choose the right layout options to ensure that our notes appear as desired. We need to access the Print Layout settings.
First, open our PowerPoint file and navigate to File > Print . We’ll see a variety of options, including full-page slides, handouts, and notes pages.
To print with notes, we’ll choose Notes Pages from the drop-down menu. This layout includes slide thumbnails and speaker notes on the same page, offering a handy reference for presentations.
Making sure to check our printer settings (such as orientation and paper size) is essential to avoid any mishaps.
Incorporating Speaker Notes
Adding speaker notes can be straightforward. In the main editing screen, we go to the slide where we want to add notes. At the bottom, there’s a pane where we can type our notes.
These notes are vital as they help us remember key points without cluttering the slides with too much text.
It’s a good idea to review and edit our notes for clarity and brevity. We can include bullet points, bold text, and other formatting to highlight important information. Ensuring that our notes are concise and well-organized can greatly enhance the flow of our presentation.
Printing Slides and Handouts
After finalizing our presentation and notes, it’s time to print. Returning to File > Print , we choose our printer. Under Settings , we select Notes Pages again to confirm our layout.
We have several options:
| Prints every slide with notes | Comprehensive view | |
| Prints specific slides | Focuses on key parts | |
| Multiple slides per page | Saves paper, easier to distribute |
For those distributing handouts, selecting a multiple-slides-per-page layout under the Handout Layout can be more efficient. Once everything is set, we simply press Print .
Ensuring that we have enough ink and paper in the printer is a small but often overlooked step to guarantee smooth printing.
Optimizing Print Settings
Properly optimizing print settings can significantly affect the quality and readability of your printed PowerPoint slides with notes. This involves making crucial decisions between color and grayscale output and tweaking the orientation and scale for the best presentation.
Choosing Between Color and Grayscale
When we’re printing our PowerPoint slides with notes, one of the first choices we face is whether to use color or grayscale. Color prints are vibrant and can make certain elements, like charts and graphs, stand out. This can be especially important in presentations where the distinction between colored segments is significant.
Grayscale , on the other hand, is more economical. It uses less ink and can make text just as readable as color prints.
Adjusting Orientation and Scale
Getting the orientation and scale right ensures the slides and notes fit neatly on the page. For orientation , we usually choose between portrait or landscape.
- Landscape orientation is common as it matches the typical slide aspect ratio.
- Portrait orientation might be better for detailed notes or more text-heavy presentations.
Scale adjustments help fit the content perfectly onto the page without cutting off important parts.
- Use the fit to page option in the print dialog box.
- Alternatively, manually adjust the scale percentage for custom sizing.
Remember, keeping our print settings optimized can make a big difference in the presentation’s effectiveness!
Advanced Printing Techniques
When printing PowerPoint slides with notes, there are advanced techniques that can enhance your presentations. These include printing notes pages and formatting slides for different audiences to meet specific needs.
Printing Notes Pages and Speaker Notes
For efficient handling of slide notes, we can print notes pages and speaker notes. Notes Pages include the slide thumbnail and accompanying notes. To do this, we often go to File > Print and select Notes Pages under Print Layout options. This setup is excellent for delivering slides to an audience while keeping reference comments handy.
Another valuable technique is printing speaker notes . When speaker notes are printed, they are visible only to us, helping streamline our presentation delivery by using notes as prompts. This customization helps maintain fluency without breaking eye contact with the audience, making the presentation seem more natural.
Customizing Slides for Different Audiences
We can customize slides to suit diverse audiences for tailored and effective communication. Changing the theme or template can make the presentation more engaging for a particular group. To do this, we go to the Design tab and choose a theme aligning with our audience’s preferences or needs.
Selecting specific slides for different audiences also proves beneficial. For example, by going to File > Print , we can opt to print the “Current Slide” or “Selected Slides” only, allowing us to exclude irrelevant content.
In the Notes Page View , we can adjust notes to suit the context of our audience. This means editing notes directly within PowerPoint to emphasize points that matter most to the specific group we’re addressing. Tailoring our presentation in this way can greatly enhance its impact and relevance.
Leveraging Microsoft PowerPoint Features
Microsoft PowerPoint offers a range of features and subscription options across different devices and platforms. Let’s take a closer look at everything from Microsoft 365 subscription benefits to using PowerPoint on various devices like Windows, Mac, and the web.
Exploring Microsoft 365 and PowerPoint Subscription Options
Microsoft 365 provides several subscription plans, offering access to PowerPoint along with other tools like Microsoft Word and Excel. We benefit from frequent updates, cloud storage, and enhanced security features. Through a subscription, we can access PowerPoint for Microsoft 365 , which always includes the latest features and improvements.
- Automatic updates.
- OneDrive cloud storage for easy collaboration.
- Advanced design tools not available in standalone versions.
By subscribing, users also gain access to features not found in older versions such as PowerPoint 2016 , PowerPoint 2019 , or PowerPoint 2021 .
Using PowerPoint Across Different Devices and Platforms
PowerPoint isn’t just for Windows PCs anymore. We can now use it on a variety of devices and platforms, including Macs , the web , and even mobile devices. This versatility is a game-changer for those who need to work on the go or collaborate with others who may not be using the same type of device.
Windows and Mac Users :
- Enhanced functionality with full desktop features.
- Compatibility across PowerPoint 2013 to the current versions.
Web and Mobile Access :
- Access presentations anywhere using PowerPoint for the web .
- Edit and share slides on smartphones and tablets through dedicated apps.
This broad availability ensures that we can work on our presentations regardless of the device we have on hand.
Related posts:
- How to Present PowerPoint with Notes: Master Speaker Tips
- How to Create a PowerPoint Template: Step-by-Step Guide for Beginners
- How to Insert PDF into PowerPoint: A Step-by-Step Guide for Seamless Integration
- How to Play PowerPoint Slides Automatically Without Clicking: Step-by-Step Guide
- How to Embed Excel into PowerPoint: A Step-by-Step Guide
- How to Add Hyperlink in PowerPoint: A Step-by-Step Guide
- How to Do a Voice Over on PowerPoint: Easy Steps for Professionals
- How to Add Notes to PowerPoint: Enhance Your Presentations with Ease
- How to Add Music to PowerPoint: Step-by-Step Guide for Seamless Presentations
- How to Create an Org Chart in PowerPoint: Step-by-Step Guide for Beginners
- How to Wrap Text in PowerPoint: A Step-by-Step Guide
Leave a Comment Cancel reply
Save my name, email, and website in this browser for the next time I comment.
- Best Mac Apps
- Unknown Caller
How to print a PowerPoint presentation with notes

PowerPoint makes it easy to give a great presentation thanks to intuitive software that lets anyone craft an eye-catching deck. What's even better, however, is the option to use Presenter View. This lets you leave notes for yourself that can be viewed on your computer screen while everyone else is only seeing your presentation.
Print PowerPoint slides with notes on Windows
Print powerpoint slides with notes on mac, print powerpoint slides with notes on the web, what you need.
Microsoft PowerPoint
Microsoft account for PowerPoint on the web (optional)
However, if you're worried about a technical hiccup taking down your slide or don’t want to be glued to the computer, you'll probably want to print out your PowerPoint presentation with notes. This lets you see both your slides and your presenter notes, giving you an analog way to carry on the presentation without the need for a monitor.
Interested in the feature? Here's how to print a PowerPoint presentation with notes on Windows, Mac, or directly from the web.
Printing your presentation in PowerPoint on Windows takes only a few steps. If you want notes with your slides, it’s a simple setting.
Step 1: Open PowerPoint to the presentation you want to print.
Step 2: Select the File tab.
Step 3: Choose Print and select your printer in the Printer drop-down if necessary.
Step 4: In the first drop-down box below Settings , pick which slides you want to print. You can print them all, the current slide, or a custom range.
Step 5: Click the next drop-down box for Print layout and select Notes page . You’ll see a preview on the right.
Step 6: Adjust any other settings you’d like before printing, such as switching Portrait orientation to Landscape orientation or Color to Grayscale .
Step 7: Click Print .
If you use Microsoft PowerPoint on Mac, you can print your slides with notes a just a few steps, like on Windows.
Step 1: Open PowerPoint on your Mac to the presentation you’d like to print.
Step 2: Click File > Print from the menu bar.
Step 3: In the pop-up window, choose your printer in the Printer drop-down box at the top if necessary.
Step 4: Choose which slides you’d like to print. You can print all slides, specific numbers, selected slides, or a custom range.
Step 5: Click the Layout drop-down box and choose Notes . You’ll see a preview on the left.
Step 6: Optionally, adjust any other settings you’d like such as Orientation , Output , or Scale .
Maybe you’re using PowerPoint on the web and prefer to print from there.
Step 1: Visit PowerPoint on the web , sign in, and open your presentation.
Step 3: Choose Print and pick Print notes pages .
Step 4: In the small pop-up window, select Open PDF to view your presentation file.
Step 5: Depending on your web browser, click the Print button or download the file to print on your computer.
For additional PowerPoint features , check out Microsoft’s implementation of real-time closed captioning .
Editors’ Recommendations
- How to download Microsoft PowerPoint
- How to share an external hard drive between Mac and Windows
- How to embed a video in PowerPoint
- How to install Android apps on Windows 11
- How to build a PC from scratch: A beginner’s guide
- How-To Guides

Adding a signature to your Apple Pages doc is one of the best ways to solidify your authorship. It’s also a nice calling card if you plan on sharing your Pages file with others, or if you decide to export it to PDF. Fortunately, creating and inserting a signature in Pages for macOS, iOS, and iPadOS isn’t very difficult. To help speed things along, we’ve put together our own step-by-step guide to teach you how to start adding Pages signatures pronto!
Oh, social media. Sometimes it’s just too much, folks. If you’re finding yourself in a position where shutting down your Instagram account for a period of time sounds good, Meta’s powers that be have made it pretty simple to deactivate your Instagram account. It’s also quite easy to completely delete your Instagram, although we wouldn’t recommend this latter option if you plan on returning to the platform at a later date.
Google Chrome is fairly plain, but there are ways to make it your own and liven it up. One way to customize it is by refreshing the overall look with a new theme. Not only can you change the New Tab background but you can also change the overall colors of your tabs, bookmarks bar, and more.

How to Print a PowerPoint Presentation with Notes

Print PowerPoint Presentations with Speaker Notes
by Avantix Learning Team | Updated May 30, 2022
Applies to: Microsoft ® PowerPoint ® 2010, 2013, 2016, 2019, 2021 and 365 (Windows)
You can print PowerPoint presentations with notes with or without slide thumbnails. You can control the way notes or speaker notes are printed in three ways – by editing the Notes Master which affects all slides, by editing single notes pages in Notes Page view or by changing formatting in the Notes pane in Normal View.
In Notes Master View, you can control the position and formatting of all notes pages and add or edit headers, footers, dates, page numbers and even company logos. In Notes Page View, you can control the position and formatting of single notes pages and you can also add other objects such as shapes, pictures, tables, charts and SmartArt. You can't draw shapes or insert pictures in the Notes pane in Normal View but you can draw shapes or add pictures in Notes Page View. Pictures and other objects that you add in Notes Page View appear on printed notes pages but not in Normal View.
Recommended article: How to Export PowerPoint Speaker Notes to Microsoft Word
Do you want to learn more about PowerPoint? Check out our virtual classroom or in-person PowerPoint courses >
Formatting changes made in different views in PowerPoint will appear in the preview area when you click the File tab in the Ribbon, select Print and then choose the option to print Notes Pages.
To move between different views, use the View tab in the Ribbon as shown below:

Print a PowerPoint presentation with notes and slide thumbnails
To print a PowerPoint presentation with notes and slide thumbnails (one per page):
- Click the File tab in the Ribbon and then click Print.
- Under Settings, click the arrow next to Full Page Slides and then in the Print Layout area, click Notes Pages. The preview on the right will display the current notes page. If you've inserted headers, footers, page numbers and a company logo, they will display in the preview. Formatting and any objects you've added in Notes Page view will also appear.
- To specify the page orientation, click the arrow next to Portrait Orientation and then click Portrait Orientation or Landscape Orientation.
- If you want to print your notes and slide thumbnails in color, select a color printer, click the arrow next to Color and then click Color.
- Select any other options you'd like in the Settings area.
- Click Print.
Below are the PowerPoint Print settings:

Print a PowerPoint presentation with notes but without slide thumbnails (notes only)
If you want to print the presentation without the default slide thumbnails, you will need to delete the thumbnail for each slide in its Notes Page. Before proceeding, you may want to make a copy of your presentation and work in the copy.
To print a PowerPoint presentation with notes but without slide thumbnails:
- In Normal View, display the slide with the thumbnail you want to delete.
- Click the View tab in the Ribbon and in the Presentation Views group, click Notes Page.
- To delete the slide thumbnail on the notes page, click the slide thumbnail and then press Delete.
- Repeat for each slide.
Resize the notes area of a single notes page
A default notes page consists of a slide thumbnail on the top half of the page and a section of the same size for notes on the bottom of the page. If you'd like to increase the space for your notes, you can resize these areas.
To increase the space for notes for a single notes page:
- In Normal View, display the slide to which you want to increase the space for notes.
- If you want to increase or decrease the size of the slide thumbnail or notes placeholder on the notes page, drag a sizing handle on the slide thumbnail or notes placeholder in the same way that you would resize other PowerPoint objects. Use a corner handle when resizing the slide thumbnail so you do not distort it. You do not need to use a corner sizing handle for the notes placeholder.
- If you need to move the slide thumbnail or notes placeholder, click the border (not a handle) of the thumbnail or placeholder and drag or press the arrow keys on your keyboard.
- If you want to delete the slide thumbnail on the notes page, click the slide thumbnail and then press Delete.
Below is a default notes page in Notes Page View:

Add objects on a single notes page
You can add objects on a single notes page (which will print but will not appear in Normal View).
To add an object on a single notes page:
- Click the Insert tab in the Ribbon and add the desired shape, picture, table, chart or SmartArt.
- Resize and format the object as necessary.
- Move the object to the desired location.
Resize the notes area of all notes pages
You can also resize the notes area of all notes page using the Notes Master:
- Click the View tab in the Ribbon and in the Master Views group, click Notes Master.
Do not delete the slide thumbnail in the Notes Master View as it has no effect and will still preview.
Below is the default notes page in Notes Master View:

Change font size for all notes pages
You can change font size in the Notes Pages View or in the Notes pane in Normal View. However, to change the font size for the notes for all notes pages:
- Select the desired level in the notes outline and change the font size. You can change the font size using the font size menu in the Home tab in the Ribbon or by right-clicking and selecting a font size in the mini toolbar that appears.
It's best to change the font by changing the font theme through the Design tab in the Ribbon (this is hidden in the Variants drop-down gallery in 2013 and later versions of PowerPoint). If you change the font theme, this will affect the entire presentation (both slides and notes) and is best set when you first create your presentation. Otherwise, users may manually apply fonts on each slide which would override the theme.
Print a logo on all notes pages
To add an object such as a logo to all the notes pages in your presentation (and print it), you will need to edit the Notes Master:
- Click the Insert tab in the Ribbon and click Picture(s).
- Navigate to the folder with the picture / logo you want to insert and double-click it.
- Resize the picture by dragging its handles.
- Position the picture by dragging it (usually by its middle area).
It's best not to delete placeholders (such as header and footer) to accommodate the logo. Instead, move the placeholders to an alternate location.
Print headers and footers on all notes pages
As long as placeholders appear in the Notes Master, you can insert slide numbers, a date and text using the Header & Footer command.
To print headers and footers on all notes pages (assuming you want to print notes only):
- Click the View tab in the Ribbon and click Notes Master in the Master Views group. Note the placeholders in this view. If necessary, move the placeholders to alternate locations by dragging their borders. It's best not to delete header, footer, date or page number placeholders.
- Click the Insert tab in the Ribbon and click Header & Footer in the Text group. A dialog box appears.
- If necessary, click the Notes and Handouts tab in the dialog box.
- Ensure the check box for Page number is checked. You can also check Header, Footer and Date if required. If you check Header and / or Footer, enter text you want to appear in the header or footer text boxes. This could include your company name, your name, your contact information and / or the name of the presentation.
- Click Apply to All.
Below is the Header & Footer dialog box:

You can also print PowerPoint speaker notes in a Microsoft Word document. If you'd like to explore this option, check out the article How to Export PowerPoint Speaker Notes to Microsoft Word .
Subscribe to get more articles like this one
Did you find this article helpful? If you would like to receive new articles, join our email list.
More resources
How to Add and Format Notes in PowerPoint
How to Export PowerPoint Speaker Notes to Microsoft Word
How to Hide and Unhide Slides in PowerPoint (with Shortcuts)
How to Quickly Remove All Speaker Notes in PowerPoint (PC or Mac)
3 Ways to Change the Font on All Slides in a PowerPoint Presentation
Related courses
Microsoft PowerPoint: Intermediate / Advanced
Microsoft PowerPoint: Design for Non-Designers
Microsoft PowerPoint: Animations Bootcamp
Microsoft Excel: Intermediate / Advanced
VIEW MORE COURSES >
Our instructor-led courses are delivered in virtual classroom format or at our downtown Toronto location at 18 King Street East, Suite 1400, Toronto, Ontario, Canada (some in-person classroom courses may also be delivered at an alternate downtown Toronto location). Contact us at [email protected] if you'd like to arrange custom instructor-led virtual classroom or onsite training on a date that's convenient for you.
Copyright 2024 Avantix ® Learning
You may also like

How to Insert or Type E with an Accent Mark in PowerPoint (È, É, Ê, Ë, è, é, ê, or ë)
You can insert or type e with an accent mark in PowerPoint using built-in tools or keyboard shortcuts (including Alt code shortcuts). The letter e can be inserted with an accent in both upper or lower case in text boxes or placeholders on slides, the slide master or layouts. The following are common accents in upper or lower case – È, É, Ê, Ë, è, é, ê, or ë.

How to Fade a Picture or Part of a Picture in PowerPoint (Using a Gradient)
You can fade a picture in PowerPoint by drawing a rectangle shape on top of the picture and then filling the rectangle with a gradient from opaque to transparent. This technique is often used to fade an image into the background of a slide. Since the rectangle is placed on top of the image and then text may be placed on top of the rectangle, you may need to reorder the objects.

How to Lock an Image, Shape or Other Object in PowerPoint
You can now lock an image, shape or other object in PowerPoint. Objects can be locked in Normal View or Slide Master View. Only PowerPoint 365 users can lock objects to prevent moving and resizing. This is helpful if you want to select and move other objects on the slide or prevent others from moving or resizing an object. You can lock items using the context menu or the Selection Pane.
MORE POWERPOINT ARTICLES >
Microsoft, the Microsoft logo, Microsoft Office and related Microsoft applications and logos are registered trademarks of Microsoft Corporation in Canada, US and other countries. All other trademarks are the property of the registered owners.
Avantix Learning |18 King Street East, Suite 1400, Toronto, Ontario, Canada M5C 1C4 | Contact us at [email protected]
Our Courses
Avantix Learning courses are offered online in virtual classroom format or as in-person classroom training. Our hands-on, instructor-led courses are available both as public scheduled courses or on demand as a custom training solution.
All Avantix Learning courses include a comprehensive course manual including tips, tricks and shortcuts as well as sample and exercise files.
VIEW COURSES >
Contact us at [email protected] for more information about any of our courses or to arrange custom training.
Privacy Overview
Pin it on pinterest.
- Print Friendly
How to Print Notes from PowerPoint: A Complete Guide
When preparing presentations, it’s often helpful to print your slides along with accompanying notes for reference or distribution. Printing notes from PowerPoint is a straightforward process, whether you need them for personal use, handouts, or meetings. In this guide, we will walk you through the steps to print notes from PowerPoint effectively, ensuring your slides and notes are formatted correctly.
Why Print Notes from PowerPoint?
PowerPoint notes allow you to elaborate on your slides, providing additional context that may not be visible to your audience during the presentation. Printing these notes ensures you have all the information you need at hand, whether you’re the presenter or the audience.
How to Print Notes from PowerPoint: Step-by-Step Guide
1. open your powerpoint presentation.
Before you can print your notes, open the PowerPoint presentation file from which you want to print the notes.
2. Navigate to the “File” Tab
Once your presentation is open, click on the “File” tab in the top-left corner of the screen. This will bring up the file menu where you can access various options related to your document, including printing.
3. Select “Print” from the File Menu
In the file menu, look for and select the “Print” option. This will open the print settings for your PowerPoint presentation.
4. Choose “Notes Pages” in Print Settings
Under the “Settings” section in the print dialog box, you’ll find a dropdown menu labeled “Print Layout.” Click on this dropdown and select “Notes Pages.” This option ensures that both the slides and the accompanying notes are printed on each page.
5. Configure Additional Print Settings
Before printing, you can customize other settings to suit your needs. These settings include:
- Number of Copies: Specify how many copies you want to print.
- Color or Grayscale: Choose between color, grayscale, or pure black and white.
- Orientation: Select either portrait or landscape orientation.
6. Preview Your Print
Always preview your print to ensure everything is in order. PowerPoint offers a print preview option that allows you to see how your notes will appear on the printed page.
7. Click “Print”
Once satisfied with your settings, click the “Print” button. Your printer will start printing your slides along with the notes.
Best Practices for Printing PowerPoint Notes
Formatting your notes for better readability.
Before printing, consider formatting your notes to make them easier to read. This might involve:
- Adjusting Font Size: Ensure your text is large enough to read comfortably.
- Using Bullet Points: Organize information with bullet points to make it more digestible.
- Highlighting Key Points: Use bold or italicized text to emphasize important details.
Choosing the Right Paper Size
When printing notes, the paper size you choose can impact the overall look and feel of your printed material. Here are common paper sizes and their use cases:
| A4 | Standard size for most documents |
| Letter | Common in the United States |
| Legal | Ideal for longer documents |
Printing in Color vs. Grayscale
Color printing can make your slides more visually appealing, especially if your presentation includes graphs or images. However, printing in grayscale or black and white can be more economical and sufficient for text-heavy presentations.
Adjusting Margins and Layout
To make the best use of space, adjust the margins and layout in the print settings. Narrower margins can fit more content on each page, while different layouts might better suit your specific needs.
Saving Your Notes as a PDF
If you prefer a digital version, you can save your notes as a PDF instead of printing them. To do this, simply select “Save as PDF” in the print dialog box instead of sending the document to a printer.
Common Issues When Printing Notes from PowerPoint and How to Fix Them
Notes not appearing on printed pages.
If your notes are not appearing on the printed pages, ensure that you’ve selected the “Notes Pages” option in the print layout settings. Double-check your preview to confirm that the notes are visible.
Text Cut Off or Misaligned
If your notes are cut off or misaligned, try adjusting the font size or the margins. You may also want to switch between portrait and landscape orientations to see which one fits your content better.
Printer Not Responding
Sometimes the issue might be with your printer. Ensure that your printer is properly connected and has enough ink and paper. Restarting both your printer and computer can also resolve connectivity issues.
How to Print Multiple Slides Per Page with Notes
In some cases, you may want to print multiple slides on a single page along with their notes. Here’s how you can do it:
1. Select “Handouts” Instead of “Notes Pages”
In the print layout settings, choose “Handouts” instead of “Notes Pages.” This option allows you to print multiple slides on one page.
2. Choose the Number of Slides per Page
After selecting “Handouts,” another dropdown menu will appear, letting you choose the number of slides per page. Options typically range from 1 to 9 slides per page.
3. Customize Your Handouts
You can further customize your handouts by adjusting the layout, adding headers or footers, and choosing whether to include notes alongside each slide.
4. Print or Save as PDF
Once everything is set up, you can either print your handouts directly or save them as a PDF for digital distribution.
Benefits of Printing Notes from PowerPoint
Enhanced presentation delivery.
Printing notes from PowerPoint enhances your presentation delivery by allowing you to have detailed information at your fingertips. This is particularly helpful during lengthy presentations or when you’re discussing complex topics.
Better Audience Engagement
Handing out printed notes to your audience can improve engagement, as they have the opportunity to follow along more closely and take notes directly on the handout.
Easier Review and Revision
Printed notes also make it easier to review and revise your presentation. You can quickly spot areas that need improvement or additional clarification when you see the content laid out on paper.
Accessibility for All Audiences
Printed notes can also cater to audience members who prefer or require physical copies of materials, ensuring that your presentation is accessible to everyone.
Printing Notes in Different Versions of PowerPoint
Printing notes in powerpoint 2016 or later.
The steps outlined above apply to PowerPoint 2016 and later versions . If you’re using one of these versions, you should have no trouble following along.
Printing Notes in PowerPoint 2013
For PowerPoint 2013 , the process is quite similar. The main difference is the layout of the menu options, but the overall steps remain consistent.
Printing Notes in PowerPoint 2010
In PowerPoint 2010 , the “File” tab is replaced by the “Office Button” in the top-left corner. From there, you can follow the same steps to access the print settings and select “Notes Pages.”
Printing Notes in PowerPoint for Mac
If you’re using PowerPoint for Mac , the process is almost identical. The main difference is in the user interface design, but the options remain the same.
Troubleshooting Tips for PowerPoint Printing Issues
Ensure your software is updated.
Outdated software can lead to compatibility issues. Make sure your PowerPoint is updated to the latest version to avoid any printing problems.
Check Printer Compatibility
Some older printers may not be fully compatible with the latest versions of PowerPoint. If you’re experiencing issues, consider updating your printer drivers or using a different printer.
Optimize File Size
Large PowerPoint files can sometimes cause printing issues, especially if they include high-resolution images. Compressing your images or breaking down your presentation into smaller sections can help.
Final Thoughts
Printing notes from PowerPoint is a simple yet powerful feature that enhances your presentation experience. Whether you’re preparing for a meeting, creating handouts, or just need a physical copy for yourself, following the steps outlined in this guide will ensure your notes are printed correctly and effectively.
Remember to always preview your print, adjust your settings for the best results, and troubleshoot any issues that may arise. By doing so, you’ll ensure that your printed materials are as polished and professional as your digital presentation.
Frequently Asked Questions
How do i print notes from powerpoint.
To print notes from PowerPoint, go to the “File” tab, select “Print,” choose “Notes Pages” under the print layout options, and click “Print.”
Can I print multiple slides per page with notes in PowerPoint?
Yes, you can print multiple slides per page along with notes by selecting “Handouts” in the print layout options and choosing the desired number of slides per page.
Why are my notes not appearing when I print from PowerPoint?
If your notes are not appearing, ensure you’ve selected “Notes Pages” in the print layout settings. Double-check the print preview to confirm that your notes are included.
How can I print my PowerPoint notes in color?
To print your notes in color, select the “Color” option under the print settings before clicking “Print.” Ensure your printer has sufficient color ink.
Can I save my PowerPoint notes as a PDF instead of printing them?
Yes, you can save your notes as a PDF by selecting “Save as PDF” in the print dialog box instead of sending the document to a printer.
What should I do if my PowerPoint notes are cut off when printed?
If your notes are cut off, try adjusting the font size, margins, or orientation in the print settings to ensure everything fits properly on the page.
- Recent Posts

- How to Make Background Transparent in PowerPoint - August 25, 2024
- How to Compress a PowerPoint on Mac: Easy Steps - August 25, 2024
- How to Force Quit PowerPoint: Troubleshooting Guide - August 25, 2024
Similar Posts
How to make a picture transparent in powerpoint: expert tips.
Learn how to make a picture transparent in PowerPoint with our easy-to-follow guide. Enhance your presentations with professional-looking transparent images.
How to Introduce Yourself Effectively in PowerPoint
Master the art of self-presentation with our guide on how to introduce yourself in PowerPoint, ensuring a memorable first impression.
Making PowerPoint Tape: Creative Design Tutorial
Unleash your creativity with a step-by-step guide on how to make powerpoint tape for engaging presentations. Easy tutorials for vivid visuals.
How to Trim a YouTube Video in PowerPoint: Easy Guide
Learn how to trim a YouTube video in PowerPoint with this easy step-by-step guide. Optimize your presentations by focusing on the most important video content.
How to Indent Bullet Points in PowerPoint: Guide
Master your presentation skills by learning how to indent bullet points in PowerPoint with this easy step-by-step guide. Enhance your slides today!
Recovering Unsaved PowerPoint Files on Mac
Learn how to recover powerpoint file not saved mac with quick steps to restore your important presentations on macOS.
Leave a Reply Cancel reply
Your email address will not be published. Required fields are marked *
Save my name, email, and website in this browser for the next time I comment.
© 2024 pptbliss.com - All Rights Reserved
How To Print In PowerPoint With Lines For Notes
Have you ever wished you could easily add lines for notes to your PowerPoint printouts? In this tutorial by Oregon-based teacher Regina Griffin, you’ll learn step-by-step how to do just that. From opening your PowerPoint presentation to customizing the lines in the notes area, she covers it all. Plus, she’ll show you how to print in PowerPoint with lines for notes, making your presentations even more organized and professional. Let’s dive in and enhance your PowerPoint skills!
Key Takeaways:
Why do you need lines for notes in your powerpoint printouts.
Adding lines for notes in your PowerPoint printouts is essential for enhancing the readability and organization of your presentation material. It allows the audience to jot down key points, annotations, and ideas during the presentation.
Incorporating lines for notes in PowerPoint printouts elevates the overall learning experience. Participants are more likely to stay focused and attentive when they have the opportunity to actively engage with the material. This interactive approach fosters a deeper connection between the audience and the content, resulting in a more impactful and memorable presentation.
How to Add Lines for Notes in PowerPoint
Begin by opening your PowerPoint presentation and navigating to the slide where you want to add notes. Locate the ‘Shapes’ option in the toolbar and select the line tool. Click and drag to draw a line on the slide – this can be used as a visual divider for your notes section. To customize the line, right-click on it, choose ‘Format Shape,’ and adjust properties like color, thickness, and style to match your design aesthetic. Repeat this process for all slides where you want to include note lines.
Step 1: Open the PowerPoint Presentation
Utilizing folders and subfolders within PowerPoint for organizing your presentations can significantly enhance efficiency and workflow. By grouping related projects, you can quickly locate the specific file you need and maintain a structured approach to managing your work.
Step 2: Click on the ‘View’ Tab
After opening your PowerPoint presentation, navigate to the ‘View’ tab located in the toolbar at the top of the application. The ‘View’ tab provides options for customizing the display settings and layout of your slides.
The ‘Grid and Guides’ feature in the ‘View’ tab enables you to align elements on your slides precisely, ensuring a polished and organized appearance. You can also utilize the ‘Zoom’ tool to magnify specific areas of your slide for detailed editing or presenting purposes.
Step 3: Select ‘Notes Master’ from the ‘Presentation Views’ Group
When you enter the ‘Notes Master’ view, you gain full control over the formatting and layout of the notes area. This feature allows you to make changes that will apply to all slides in your presentation that have speaker notes. For instance, you can adjust the font style, size, and color to ensure readability. You can include your company logo or branding elements for a professional touch.
Modifying placeholders and content positioning in the ‘Notes Master’ view can greatly improve the organization and visual appeal of your notes pages. By resizing placeholders or adding additional elements like headers, footers, or date stamps, you can create notes that complement your slides seamlessly.
Step 4: Click on the Notes Area
Step 5: click on the ‘insert’ tab.
To add lines for notes in PowerPoint, navigate to the ‘Insert’ tab on the PowerPoint toolbar. The ‘Insert’ tab provides various tools and features for adding new elements to your slides, including shapes for creating lines.
Step 6: Select ‘Shapes’ and Choose the ‘Line’ Shape
Utilizing the ‘Line’ shape can greatly enhance the structure and clarity of your notes on each slide. These lines serve as visual separators, helping to differentiate between sections and key points. They can be customized in terms of color, thickness, and style to match the overall design scheme of your presentation. By strategically placing lines, you can create grids, highlight important details, or even emphasize specific content effectively. This simple yet powerful tool can transform the way your information is perceived by your audience.
Step 7: Draw a Line Across the Notes Area
By customizing the color, thickness, and style of the line, you can tailor the appearance to match your presentation aesthetic.
Consider using dashed or dotted lines for a subtle delineation or solid lines for a more prominent separation. Experiment with different line orientations and placements to find the layout that best suits your needs.
Step 8: Customize the Line as Needed
To tailor the line for notes to your specific requirements, utilize the customization options available in PowerPoint. Adjust the line thickness, color, and style to match the aesthetics and readability of your presentation.
How to Print PowerPoint Slides with Lines for Notes
One key aspect to consider when printing PowerPoint slides with lines for notes is choosing the appropriate print layout options. In PowerPoint, you can customize the print settings to include lines next to each slide for attendees to jot down key points or reflections. This feature helps the audience stay engaged and focused during the presentation, as they can easily follow along and make personal notes.
Step 1: Click on the ‘File’ Tab
Once you access the ‘File’ tab, look for the ‘Print’ option on the left-hand side of the screen. Clicking on ‘Print’ will open up a range of print-related features that allow you to configure the print settings according to your preferences. Within the print dialog box, you can select the printer you wish to use, specify the number of copies, choose the layout, and even opt for printing in grayscale if needed. This level of customization ensures that your presentation is printed exactly how you want it to be.
Step 2: Select ‘Print’ from the Menu
By paying attention to these details, your printed slides will be professional and easy to read, enhancing your presentation experience.
Step 3: Click on the ‘Print Layout’ Dropdown Menu
Step 4: choose ‘notes pages’ from the options.
Under the ‘Print Layout’ dropdown menu, opt for the ‘Notes Pages’ format to instruct PowerPoint to include designated areas for notes alongside the slide content. This selection ensures that your printouts feature lines for notes as part of the handout.
Step 5: Adjust Printer Settings and Click ‘Print’
Before finalizing the print job in PowerPoint, make any necessary adjustments to the printer settings to ensure the desired output quality and layout. Once satisfied with the configurations, click on the ‘Print’ button to initiate the printing process.

Frequently Asked Questions
Can i print my powerpoint slides with lines for notes, yes, you can print your slides with lines for notes by adjusting the print settings., how do i access the print settings in powerpoint, to access the print settings, go to the file menu and select print. this will open up the print options for your presentation., what are the benefits of printing with lines for notes, printing with lines for notes allows you to have a physical copy of your presentation with space for writing notes and reminders during your presentation., can i customize the lines for notes when printing, yes, you can customize the lines for notes by adjusting the line spacing and font size in the print settings., is there a limit to the number of lines for notes that i can print, no, there is no limit to the number of lines for notes that you can print. you can choose to have as many or as few lines as you need for your presentation., can i print my powerpoint slides with lines for notes in black and white, yes, you can print your slides with lines for notes in black and white by adjusting the color settings in the print options. this can save ink and make your notes easier to read., similar posts, how to view notes in powerpoint while presenting on teams, how to scale text in powerpoint, how to translate in powerpoint, how to adjust indent after bullet in powerpoint, how to convert text into shape in powerpoint, how to add music from youtube in powerpoint.
- Microsoft Office Training
How to Print a PowerPoint with Notes
How to add speaker notes in Powerpoint & print

Microsoft Office Training Features:
Interactive bite-sized lessons
Get Certified
Accurate skill assessments
Customizable, LMS-ready content
4.9 out of 5 on G2

You can add speaker notes to your presentation as a reminder of what to talk about on each slide.
Turn on the Notes Pane and Enter Notes
You’ll need to turn on the Notes pane before you can add slide notes.
- Click the View tab on the ribbon.
The Notes pane appears at the bottom of the window.
You can turn the Notes pane off by clicking the Notes button again.

View the Notes Page
If you want to use your presentation notes as handouts for your audience, you may want some more control over the formatting of your notes.
- On the View tab, click Notes Page .
- Click the Notes text box.

- Apply any formatting to the notes.
The formatting for only this page of notes is updated.
Print the Notes Page
The notes page is a great tool for creating resources to use while presenting, or for creating detailed handouts for your audience.

- Click Print .
- Click the Full Page Slides list arrow.

A preview appears at the right.

The presentation is sent to the printer.

FREE Quick Reference
Free to distribute with our compliments; we hope you will consider our paid training.
- LinkedIn-ready certificate
- Skill assessments
- Bite-sized, interactive lessons
- Saved progress
3 Easy Ways To Print Your PowerPoint Presentation Notes
- By Illiya Vjestica
- - February 13, 2020

Here are three simple ways to print your PowerPoint presentation notes. Let’s begin.
We’re often taught that you should never turn your back to an audience when presenting, and that is why using presentation notes can be important for the audience. Reading straight off your slides is also considered a big no-no. But what if there was a way to keep track of your talk without glancing over at your presentation for a quick reminder of what comes next?
Thankfully there is.
Adding presentation notes to your PowerPoint slides is a great solution. It allows you to keep the vital information on the screen – ensuring your slides aren’t stuffed full of text – while the more in-depth information is available off-screen for you to follow.
Having your notes in this format can help you to deliver a more streamlined, in-depth and impactful presentation – particularly if you have them printed off and to hand. This way they’ll serve as a sort of script that you can follow to ensure that all the key information from your talk is shared effectively while acting as a useful way for you to communicate ideas that might not feature on your slides.
You can also share them with your audience if necessary in the form of a brochure or handout, which is a big plus when it comes to increasing retention rates. This is especially beneficial for more technical presentations or for those which require your audience to remember a lot of information.
Let’s take a look at how to print off your PowerPoint presentation with notes.
1. How to print your PowerPoint with Notes
Let’s start with the simplest option, shall we? If you choose to print your PowerPoint notes in the standard manner, you’ll end up with pages of notes accompanied by the thumbnails of the slides they correspond to, helping you to deliver your speech clearly and easily.
There are some things to bear in mind, though. If you have lots of notes for a particular slide that cover several pages, for instance, the slide thumbnail they correspond to will only appear on the first page. Make sure you’re organised, then, and try to keep your notes as concise as possible to avoid getting lost.
That being said – if short and snappy notes aren’t possible for your talk – there is a little trick you can use. Check out the page number at the bottom of each page. These actually match up to the slide number in your presentation – not the number of pages you are printing – so serve as a useful reference point to help you keep track of where you are.
Here’s how to print out your PowerPoint presentation notes as standard:
- Either go to File > Print to open up your PowerPoint print options, or press CTRL + P
- Go to Settings > Print Layout
- Select the Notes Page Print Layout and click Print

2. How to create PowerPoint notes and print them with Notes Master
Notes Master helps you to customise your presentation even more, and you may find it to be a simpler option when it comes to creating notes that are in-line with your slides. Here are some quick instructions on how to use the tool and to print your PowerPoint presentation notes out afterwards:
1. Select ‘Normal View’ for your PowerPoint
2. Select the ‘View tab’, then select ‘Notes Master’

3. Format the ‘Notes Master’ as you would a PowerPoint slide – this will be self-explanatory

4. Close the ‘Master View’ when you are finished editing the ‘Notes Master’
4. Click ‘Print’ to take you to the ‘Print Options’ page
5. Click ‘Settings’, then open the ‘Print Layout’ options

6. Select the ‘Notes Page’ Print Layout and ‘Print’
3. How to print PowerPoint presentation notes as a customised handout
It’s entirely possible to print your PowerPoint presentation notes as a handout for your audience with accompanying thumbnail image of each slide. Your audience can have all your notes with handy slide numbers so they know where they are in the presentation. Here’s how you can pull this off:
1. Select ‘File Menu’ from the PowerPoint menu
2. Select ‘Export’

3. Click ‘Create Handouts’
4. Click Notes next to slide (this will push all your PowerPoint presentation notes into Microsoft Word)

5. Click Select ‘Table Design’ from the Word menu
6. Select the Design tab from the Word menu

7. Customise the handout design to your own liking and feel, changing the colours and typography.

8. Go to ‘File’ then ‘Print Options’ select ‘Print’ you can choose whether you would like your notes either ‘Landscape’ or Portrait’
Microsoft have also put together further instructions if you want to style and customise your presentation handouts in PowerPoint.
A noteworthy presentation
So there you have it. In our opinion, these are the best ways to print out your PowerPoint presentation notes for a clear, effective and engaging talk.
If you need any help with planning your presentations in the future or want to find out more about what we can do, contact us here .
Create stunning presentations with our templates, toolkits and guides.

Illiya Vjestica
Share this post:, related posts.

What are the Best Colours for Your PowerPoint presentation?

10 Powerful Examples of How to End a Presentation
2 thoughts on “3 easy ways to print your powerpoint presentation notes”.
Pingback: How Do I Print A Presentation? The 16 New Answer - Chiangmaiplaces.net

Unfortunately the export to Word function doesn’t appear to work on the MAC version of PowerPoint which is a shame as you can export as a pdf or rich text, but not MS Word. Unless there is another way?
Leave a Comment Cancel Reply
Your email address will not be published. Required fields are marked *
We use cookies to enhance your experience. By continuing to visit this site, you agree to our use of cookies
How to print PowerPoint with notes
- Written by: Richard Goring
- Categories: PowerPoint design , PowerPoint productivity
- Comments: 2

What’s the weirdest thing people do in PowerPoint? Yes, the answer could be to make Christmas cards , or even worse, Valentine’s Day cards , but in general it’s printing the slides . At BrightCarbon we promote the use of PowerPoint as a presentation tool, where visual slides support a presenter and use graphics, diagrams, and animations to explain the key points. These types of slides often don’t print well because of layers and animations, and they certainly aren’t self-explanatory. But sometimes you do need to print PowerPoint slides, or print PowerPoint slides with notes, or even print multiple slides on one page . So, if do you need to do that, how do you do it?
The best, and possibly easiest, thing to do is not print your slides, but print the Notes Pages in PowerPoint. Notes Page is a special view that shows the slide and the speaker notes on the same page. This allows you to have a more visual slide to explain the point when presenting, and then a detailed set of notes for your audience to use as reference material.
- Go to the File tab in the top left of the ribbon (or use Ctrl + P )
- Choose Print from the menu
- Under Settings , click the Print Layout drop-down (which says Full Page Slides by default) and select Notes Pages .

The nice thing about using the Notes Page to print PowerPoint with notes is that there is a separate, dedicated view for it, so you don’t have to compromise on the design of your main slide, but it’s all contained in a single file.
Go to the View tab on the ribbon, then select Notes Page on the left to see the standard layout with a slide at the top and speaker notes underneath.
You can simply print it as is, but of course there’s so much more that you can do to print PowerPoint with notes that look good and give off a sense of professionalism. Watch this video tutorial or scroll down for step-by-step instructions and even more detail.
How to create a PowerPoint notes master
How to add notes in powerpoint, how to reset a powerpoint notes page, problems with powerpoint notes pages, how to print notes in powerpoint or save as pdf, changing default print settings.
Print PowerPoint notes in grayscale or black and white
How to export PowerPoint speaker notes to Word
If you want to alter the layout of the PowerPoint Notes Page, you can do so in the Notes Master (to the right of the Notes Page button on the ribbon). Here you can update the formatting of all the Notes Pages in your deck which includes backgrounds, arrangement of the placeholder content elements (header, slide image, footer, date, body text, and page number), adding a grid using guides, and even adding custom elements, such as extra graphics, logos, and other non-placeholder content. You can even set a different brand style to your presentation with a new color and font theme. In fact, you’ll have to copy these over from your main presentation if you want to keep things consistent. You can also change the Notes Page orientation from portrait to landscape.
This means that, when you print notes in PowerPoint, you can create a completely custom and beautifully designed Notes Page to act as a dedicated handout, rather than the usual tedious affair of a slide thumbnail thrown on the slide with a load of notes haphazardly arranged underneath.

What you can’t do in the Notes Page view, which seems foolish, is change the page size. You may be tempted by the Slide Size button on the left of the Notes Master tab, but that changes the size of your presentation slides, so don’t use it! It will affect your whole presentation, mess up content and, if you’ve not removed the variants from your slide master (by saving as a .potx template file), then it will also alter the colors and fonts too. The paper size is set by your default printer settings. To change it, you have to change the print settings, which are in File > Print > Printer > Printer Properties . Remember to choose the printer from the drop-down menu too, as each printer in the list has different settings. I suspect the reason you have to navigate this path to Mordor to change the paper size is that no one expects you to do it, but at least now you know you can.
Occasionally things go wonky and the PowerPoint notes pages change size or are all different sizes. It’s an obscure bug, but can happen if you open the file in PowerPoint for the web. Fortunately, the excellent Steve Rindsberg has a quick solution to fix Notes Page size problems .
Back to the notes pages themselves, as well as changing the Notes Master, you can also go to the Notes Page in the View tab and add notes in PowerPoint by personalizing each individual page. This won’t impact your presented slides, but it allows you to create something perfect for printed handouts.
The standard layout for the PowerPoint Notes Page uses the Notes Master. You can alter any of the text in the main notes placeholder to add notes in PowerPoint, which will also transfer through to the speaker notes of your slides. You can alter the formatting of the notes so that they look better or are easier to read, but only basic formatting like bold, italics, and underline, plus bulleted and numbered lists will transfer to the slide speaker notes in PowerPoint. You can also alter the color, size, and font of text, and things like the margins, line spacing, and paragraph spacing, but this won’t transfer to the slide speaker notes. It’s worth noting that any changes in formatting you make to the slide speaker notes – like changing the color or font – will be reflected in the Notes Page, even though you can’t see these changes in the speaker notes view.

You can take it further by deviating from the standard PowerPoint notes template. For example, it may be that you have a key messages slide, or an agenda, contacts, or data slide, where there isn’t anything of value to be added with the speaker notes, and it’s better to see the slide as large as possible on the page when printed. Well, this is your opportunity. You can alter the size and position of any of the six placeholder element types. It’s easy to make the slide fill the page and remove the notes completely. You can also add additional custom elements onto each notes page. This might include additional information, data tables, highlights, ink annotations, or punchlines for key points. You’re essentially created a dedicated, custom notes page to print PowerPoint with notes, without affecting the presentation slides at all.

However, only content in the body placeholder of the notes page will appear in the speaker notes (and likewise anything in the speaker notes will appear in the notes page body placeholder). Custom formatted notes content like you can see in this example, with separate text boxes or visual representations of data, won’t appear in the speaker notes. One workaround is to put the body placeholder off the edge of the page. This means it won’t be seen when you print PowerPoint with notes or save handouts as a PDF, but all the content is still there in your speaker notes. With all this customization you’re essentially creating a second document, so be wary of the time requirement. On the upside, it’s all in one file and there are no version control issues.

If you have a lot of notes for a single slide, you may be frustrated that they extend beyond the body text placeholder into your carefully selected margins or go off the edge of the page entirely. You can use the text formatting options to shrink text to the size of the text box ( Right-click > Format Shape > Text Options > Text Box > Shrink text on overflow ). On any individual text boxes where the text spills out beyond the placeholder, you’ll get a small AutoCorrect control appearing at the bottom left of the placeholder, allowing you to choose to AutoFit Text to Placeholder for that particular page. However, if you miss this, all is not lost, as PowerPoint, rather ingeniously, will recognize that you have text outside of the text placeholder, and when you print the notes pages, it will put that overflow text onto a second page, starting at the top with no slide thumbnail, but in line with your standard text box placeholder. Usefully (probably) it numbers both pages the same, so you won’t get additional page numbers from the extra overflow pages. That means you don’t have to force your audience to read tiny text just because you have a lot of it.

It’s also worth noting that you can’t change the presentation slide itself in the Notes Page view, and also that any changes you make to the slides will impact the thumbnail image of the slide that’s in the notes page. So you can’t have a layered slide for presenting and a flat slide for printed notes all on the same slide, unfortunately (unless you go to a lot of effort to create a flat summary version as a top layer that disappears instantly and so isn’t seen during the presentation).
If you alter a notes page and then decide you want to reset it to the original layout, you need to use the Reapply Master function. As far as I can tell, the only way to do this is on a blank area of the notes page right-click , choose Notes Layout , then Reapply Master from the pop-up menu. This will reset the notes page to the default in the notes master. That includes resetting the position of moved objects, restoring deleted elements, and removing any custom formatting from the text.
If you want to do this to every notes page in the deck, we’ve got a quick fix to reapply master to ALL PowerPoint notes pages .
There are a number of problems with PowerPoint notes pages that it’s worth knowing about.
You can’t add hyperlinks to objects in Notes Pages. However, if your text includes a URL, then the text itself will turn into hyperlink. If you really want to add hyperlinks to PowerPoint notes pages, you can create an object with a hyperlink in the Normal view (standard presentation editing) and then copy/paste that into the notes page, and the hyperlink will work. It seems bizarre, but there you are.
As noted above, it’s confusing that you can’t change the notes page size anywhere in the PowerPoint interface. In the Notes Master, there’s a group called Page Size where you can change the orientation of the page and the size of the slide, but it’s the size of the presentation slide , not the notes page . Doing this could ruin your actual presentation. To change the page size itself, you have to go to File > Print > Printer > Printer Properties > Mordor > Paper Quality > Mount Doom > Paper Sizes .
Print setup
If you do change your notes page size, then it’s per printer, not for the document. And so you end up changing the notes page for all subsequent presentations that you open. If you go on to choose another printer, or decide to print to PDF, then it changes the notes page size again. And of course, this will cause problems sharing the file with others, especially if they’re in a different country and use a different paper size (Letter in the US and A4 everywhere else, for example).
Placeholder scaling
When you change notes page size, the scaling of the placeholder elements is odd. It seems like it doesn’t like the slide image placeholder especially, which scales differently and ends up partially off the page, so ideally change the notes page size right at the start, before you do anything else.
No outline on slide image
All the slide images have a thin black line around them, which is OK, but doesn’t look great. However, applying ‘no outline’ to the slide image in the notes page makes the slide image disappear completely. If you want to remove the outline, you can apply an outline with 100% transparency, which means the line is invisible. No, I don’t understand it either.
Guides are a really useful way to ensure alignment, especially to a grid. But in the PowerPoint notes pages, the guides function is pretty much unusable. At least sensibly. If you create guides, their position is based on the size of the presentation slide, not the page. So if a slide is 13.3”x7.5”, then guide positions are measured using that boundary. You can’t have a guide that is more than 7.5” from the top of the page (but the standard portrait letter page is 10” tall, so guides cannot be dragged into the bottom quarter of the page). Also, the 0/0 centre point of the horizontal and vertical guides is somewhere near the right-hand edge of the page, about a third of the way from the top. If you’re OK with just using guides to create a grid of vertical bars, and happy to work out the odd position measurements, then you’re golden, but it feels somewhat incomplete, which is a shame.
When you want to print notes in PowerPoint, go to the File tab in the top left of the ribbon (or use Ctrl + P ), and then choose Print from the menu on the left-hand side. Here you have a number of options, but the key ones are under settings in the middle on the left, where you need to click the Print Layout drop-down (which says Full Page Slides by default) and select Notes Pages . This will print out the notes pages that you’ve formatted, or you can choose to just print PowerPoint Full Page Slides , or Handouts .
You can choose to print all the slides or notes pages, just the ones you’ve selected (in the normal view) or type specific slide or page numbers to print. In this same drop-down menu, you can also choose whether to print hidden slides. This can be useful if you have hidden detail slides that you don’t want to present, but you’d like to print notes in PowerPoint for all the slides in your deck.
There are also options for one- and two-sided printing (which will depend on your printer’s capabilities), and also collation options. You can also choose to print in color or using the grayscale or black and white settings. Find more details on that below .
Remember to choose your printer using the button at the top of the list. Clicking the drop-down menu will allow you to change printer. Be really careful when doing this, as the default paper size may change for the new printer, which will ruin the layout of the notes pages – scaling is often glitchy and if you’ve lined things up beautifully then you’ll be disappointed. You can also use this drop-down menu to print PowerPoint with notes as PDF using Microsoft Print to PDF . However, be warned, the PDF printer page size is slightly different from the standard printer one. More specifically, the margins for the page size are different. For physical printers, PowerPoint takes into account a half inch border around the page, knowing that printers generally won’t work edge to edge. But for PDF that’s not needed, so those margins are removed. You need to think carefully about what you want your notes to look like. If you want them to look like they do on-screen, then go into Settings > Print Layout , and select Scale to Fit Paper . Or if you want it to look like a printed page, with the default print margins (perhaps because you want to print it later), then deselect Scale to Fit Paper and you’ll get the full margins all around.
If altering all these print settings seems a bit tedious, and you regularly do the same thing each time, you can choose default print settings to suit you. Go to the File tab on the ribbon, choose Options on the bottom left then select Advanced from the pop-up window menu. Next, scroll all the way down (don’t worry, we’re almost there!), and you’ll find two sets of printing options. The standard ‘ Print’ functions may not be useful, but below it, there’s ‘ When printing this document ’. The standard PowerPoint behavior is to use whatever settings you last used, so if you print lots of different types of documents then you have to constantly change things. Alternatively, these settings allow you to set the default printing settings for each presentation file you have open. So it might be that one particular presentation is only ever printed with notes in grayscale, while another is full slides in color.
It’s the same collection of settings as outlined in the printer options above, but you just set them for each document, which can cause slightly less frustration.

Print PowerPoint PowerPoint notes in grayscale or black and white
If you’re printing in color, you will hopefully see if the contrast ratios are correct clear, as the screen is showing what will be printed – although it’s always worth checking to see if there are any accessibility issues with it, for example is the color contrast high enough to be legible for people with common forms of color blindness . Our free BrightSlide add-in has a built-in color contrast checker for PowerPoint that can be really useful. However, if you’re printing in grayscale then it can be a bit more problematic, because you don’t know how the printer will interpret the colors you’ve chosen. Fortunately, PowerPoint gives you some neat tools to manage this and give you a grayscale specific print version of your slides that doesn’t impact your color presentation at all.
Go to the View tab on the ribbon and choose the Grayscale option. Now, you can see what the slide will look like when printed in grayscale. You also get a new tab on the ribbon called Grayscale . The commands on this ribbon allow you to change the grayscale formatting of any object on the slide without changing the color formatting when you’re presenting. So, if something doesn’t look right, you can make it darker or lighter, black or white, or even choose not to show the object. This is great if you want to make sure you get the best print from a black and white printer.

It’s worth noting that there are a couple of quirks. If you have text in a shape, or a textbox with a fill color, then these settings only apply to the fill color of the object, not the text. However, if you have a plain textbox with no fill color, then the settings apply to the text itself. Also, there is a ‘ Don’t Show ’ option, which is great to remove ink-heavy content like images or big blocks of color, especially in the background. Irritatingly, if there is text typed into the object, then choosing Don’t Show will hide the object, but not the text. This feels odd, given that the ‘ White ’ option essentially does the same thing if you’re using a white background (makes the object fill or a picture appear white, so it’s invisible when printed on paper). And when printing in grayscale or black and white, any slide background fill is automatically removed. However, graphics on the slide master aren’t, so just be aware that you may not get quite the result you want, depending on how the slide master was built.
To hide all graphics from the background and the slide master, right-click on the slide and choose Format Background from the pop-up menu. In the window that appears on the right, there’s a check box to Hide background graphics . This is a setting for each slide individually AND it affects your presentation slides, so be careful about using it, or reset when you’re done printing.
And all of this is also available in the Black and White settings, which can be helpful for even more frugal use of ink, or to create an ultra-high-contrast version, essentially giving you two custom versions of your presentation that can be used for printing, but don’t impact the actual presentation slides.
Of course, it could be that all you want is to export your speaker notes to Word and print those, rather than print PowerPoint slides with notes. You can do this in PowerPoint by:
- Go to the File tab in the ribbon and select Export on the left-hand side
- Choose Create Handouts in the grey menu bar
- Click the Create Handouts button on the right
- Then choose Notes below slides from the pop-up menu
This will produce a Word document with a thumbnail of each slide with speaker notes underneath. The nice thing about this is that if you change the slides, then they will change in the Word document. But the speaker notes don’t, which may or may not be helpful. The big issue is that it’s Word, and dealing with images in Word can often be tricky if you want to format things precisely. So think about whether you’ll want to format this document further.

If you want to export speaker notes to other programs, our free BrightSlide add-in for PowerPoint allows you to do exactly that. On the BrightSlide tab in the ribbon, go to Review on the right-hand side, then Speaker Notes , and Export to Text File , Export to Excel File , and even Export to Word File . You’ll get an automatically generated Text, Excel, or Word document with the speaker notes of every slide. In Word you’ll get the title from each slide added with Heading 1 formatting, allowing you to easily navigate through it all. BrightSlide will also give you a total word count for the notes or allow you to delete all speaker notes from PowerPoint.

And there you have it, plenty of options showing you how to print PowerPoint with notes. But just because you can doesn’t necessarily mean you should print notes in PowerPoint for every presentation. Consider what will be most helpful to your audience, and perhaps consider more dedicated and specific handouts for them instead. You can go even further, as demonstrated by Nolan Haims, who has done some lovely print work using PowerPoint. For example, this report on non-profit funding in the age of Covid that he created for the Center for Effective Philanthropy, and a funding report in spreads that you can see in his portfolio.

Richard Goring
Related articles, how to create powerpoint templates that work.
- PowerPoint design
Without a proper PowerPoint template, presentations can be a bit of a mess. Here are the building blocks for developing a PowerPoint template that works!

Presentation design principles for better PowerPoint design
- PowerPoint design / PowerPoint productivity
- Comments: 17
By applying some key principles of presentation design, you can make your PowerPoint design really standout and deliver both a more ‘popping’, but also more effective presentation.

How to create visual presentations and eLearning
- PowerPoint design / Visual communication
- Comments: 4
Most presentations are a cascade of text-heavy Death-by-PowerPoint slides. Online learners suffer the torture of brochures converted to click-through-eLearning. Most people now recognize that using visuals is the way to go. But how do you make visual presentations and eLearning that work? We think there are six steps you need to follow.

Good morning,
Would you please orient me o how to design and create colored pages in power point with writing in it. i want to insert them in my facebook page.
Thanks in advance Youness,
Hi Youness. Probably the best way is to change the background colour of your slide and then add a text box over the top. Go to the ‘Design’ tab on the ribbon, then ‘Format Background’ on the right-hand side. That will give you he ability to apply a solid fill colour of your choice. And you then put any content you like on top of that colour.
Leave a Reply Cancel reply
Save my name and email in this browser for the next time I comment.
Join the BrightCarbon mailing list for monthly invites and resources
We delivered this to over 100 people today, and everyone LOVED the presentation and story. We have received wonderful feedback, and have four opportunities already. Sarah Walker Softchoice

How-To Geek
How to print just the speaker notes for a powerpoint presentation.

Your changes have been saved
Email is sent
Email has already been sent
Please verify your email address.
You’ve reached your account maximum for followed topics.
The Best Google Pixel 9 Pro XL Cases of 2024
How to clean up your facebook feed, 6 ways to get the most out of your quest vr headset, quick links, how to print notes pages, how to print notes pages without slide thumbnails.
You've got your speaker notes set up in your PowerPoint presentation, and now you want to print a copy for quick reference. Here's how to print speaker notes for a PowerPoint Presentation---with and without slide thumbnails.
Open up your PowerPoint presentation and click the "File" menu on the Ribbon.

On the sidebar that opens, click the "Print" command.

On the Print pane to the right, click the "Full Page Slides" button.

You'll see a bunch of different printing options on the drop-down menu. Click the "Notes Pages" option.

This generates a printout of all your slides, with one slide thumbnail per page and any notes accompanying that slide. If that's what you need, select your printer and click the "Print" button.
If your presentation is lengthy or you have a lot of speaker notes, you can also print out those notes without printing thumbnails of the slides themselves.
Switch over to the "View" tab on the Ribbon and then click the "Notes Page" button. This switches you to the Notes Page view. On each page, you'll see a thumbnail of the slide and any accompanying notes.

Select the thumbnail on each page and delete it.
Don't worry! This does not delete the slide itself from your main presentation---just the thumbnail on the notes page. Repeat this step for each notes page.

Swing on over to the "File" tab and click the "Print" command.
Select the printer you want to use, make sure the "Notes Pages" option is selected, and then click the "Print" button.

If you've deleted the slide thumbnails from your notes pages and want to put them back, switch to the slide sorter view, right-click a thumbnail there and choose the "Copy" command, and then paste the thumbnail on the notes page where you want it.
- Microsoft Office
- Office 2016
How to Print a PowerPoint Presentation? [A Complete Guide!]
By: Author Shrot Katewa
If you use Microsoft PowerPoint to create your presentations, there will be a point in time when you will need to print the presentation that you have created! Regardless of whether you print a physical copy or a PDF version of your presentation, you need to know the steps required to print a PowerPoint presentation!
To print a PowerPoint presentation, click on the “File” tab. Then, click on the “Print” tab in the “Backstage View”. Choose the slides that you need to print, adjust the settings, select the printer, and click on the “Print” button.
In this article, we shall understand the process to print a PowerPoint presentation in further detail. We will look at things like how to print your presentation with notes, how to create handouts, and how to print multiple slides on a single page!
That, and much more in this detailed article on printing a PowerPoint presentation!
So, let’s get started, shall we?
1. How to Print a PowerPoint Presentation?
Let’s get straight to the important part of this article! How exactly does printing in PowerPoint work?
Microsoft PowerPoint offers a simple and quick printing feature. By default, one slide will print on a single sheet of paper. However, there are options provided that can help you save paper by printing multiple slides on a single sheet of paper. We shall take a look at all these settings in a little while.
You can also choose to print notes along with the slides. This can be super helpful when you want to prepare for your presentation and you don’t have access to the soft copy of the presentation file!
But, how exactly does the process to print a presentation work? Let’s explore the step involved for both Windows and Mac in the below sections –
1a. How to Print a PowerPoint File on PC
In a Windows PC connected to a printer, you can print a PowerPoint file very easily. All you have to do is follow the 3 simple steps.
Step-1: Click on the “File” tab
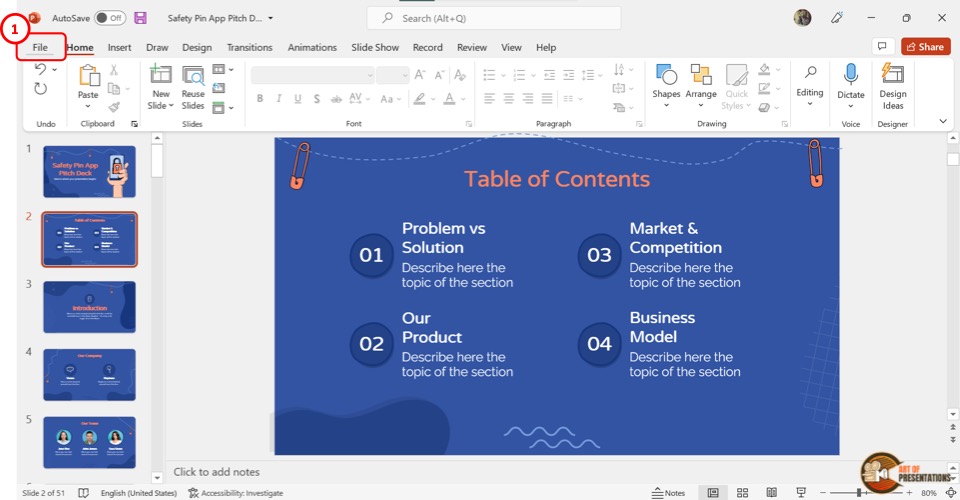
In the Microsoft PowerPoint document, click on the “File” tab. It is located on the left side of the menu bar at the top of the screen.
In the “File” menu, click on the “Print” option from the sidebar on the left side of the screen.
Step-2: Select preferred settings
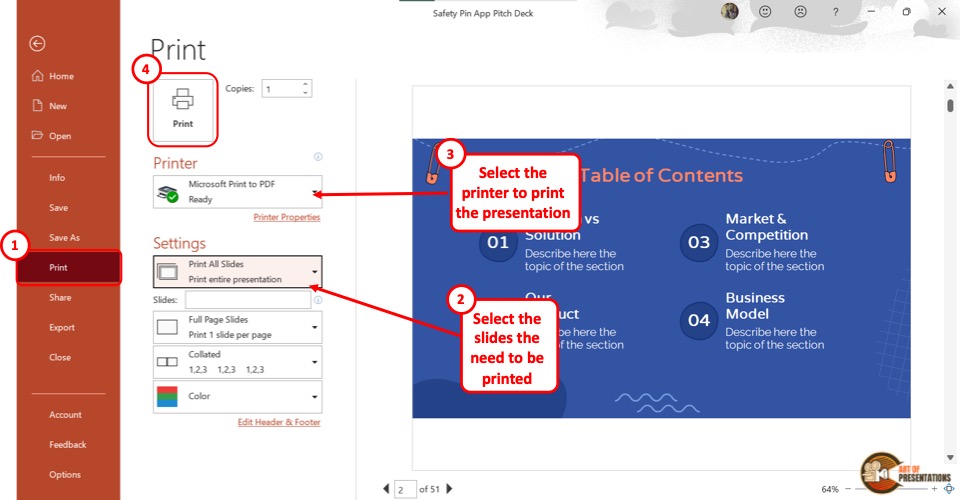
The “Print” option will show you a print preview as well as print settings on the screen. Under the “Settings” option, you can select your preferred settings.
If you don’t have a printer connected to your computer, you may need to first set it up. If you don’t know how to do that, check out this article on how to set up your printer .
Click on the “Print All Slides” box to select the specific slides that you want to print. You can also click on the “Full Page Slides” button to select the number of slides you want to print on each page.
Step-3: Click on the “Print” button
Now all you have to do is click on the “Print” button at the top of the screen to print a copy of your PowerPoint presentation (as shown in step 2).
1b. How to Print a PowerPoint Presentation on Mac?
Microsoft PowerPoint has a quite simple process for printing a presentation on Mac. Follow the 4 easy steps.
Step-1: Click on “File”
In the menu bar located at the top of the screen, click on the “File” tab to access the dropdown menu. Select the “Print” option from the dropdown menu. This will open a “Print” dialog box.
Step-2: Click on the “Show Details” option
The next step is to click on the “Show Details” option located at the bottom of the “Print” dialog box.
Step-3: Select your preferred settings
Now all you have to do is change the settings according to your preference. You can select how many copies to print by clicking on the “Copies” box.
There are also other settings that you can change like “Paper Size” , “Layout” and “Orientation” . You can also click on the “Slides” option to select which slides to print.
Step-4: Click on the “Print” option
The final step is to click on the “Print” option in the right corner at the bottom of the “Print” dialogue box.
2. Shortcut to Print a PowerPoint Presentation
For printing out a PowerPoint presentation very quickly, you can use the shortcut keys. All you have to do is follow the 2 easy steps.
Step-1: Press the “Ctrl+P” keys
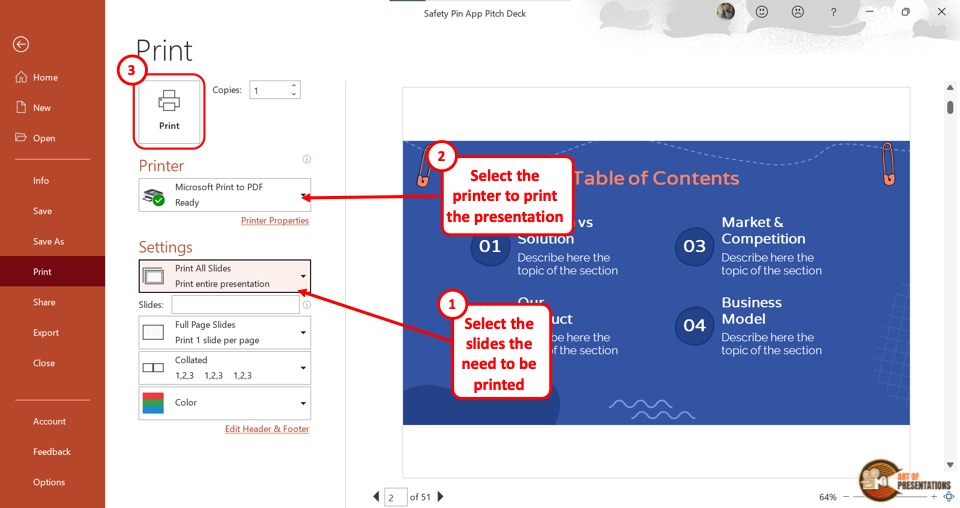
The first step is to open the PowerPoint presentation that you want to print. Then press the “Ctrl+P” keys on your keyboard to open the “Print Preview” screen.
Alternatively, you can press the “Ctrl+Shift+F12” keys on your keyboard to access the print option.
Step-2: Click on “Print”
Now all you have to do is click on the “Print” button at the top of the “Print Preview” screen. This will print the presentation slides with the default settings.
3. How to Print Multiple Slides Per Page?
Using the “Handouts” feature in Microsoft PowerPoint, you can print multiple slides per page. All you have to do is follow the 3 quick steps.
Step-1: Click on the “File” menu
The first step is to click on the “File” option in the menu bar located at the top of the screen. In the “File” menu, click on the “Print” option from the sidebar on the left side of the screen.
This will open the “Print Preview” screen.
Step-2: Click on the “Full Page Slides” box
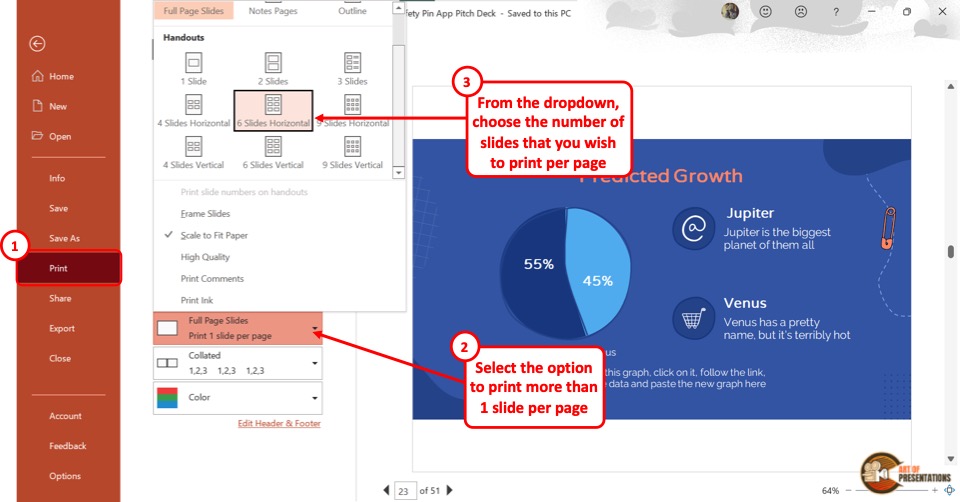
Now you have to click on the “Full Page Slides” box under the “Settings” option in the “Print Preview” screen. This will open a dropdown menu. Click on any option under “Handouts” that you prefer. There are nine different options to choose from.
You can print from one to nine slides per page.
Step-3: Click on “Print”
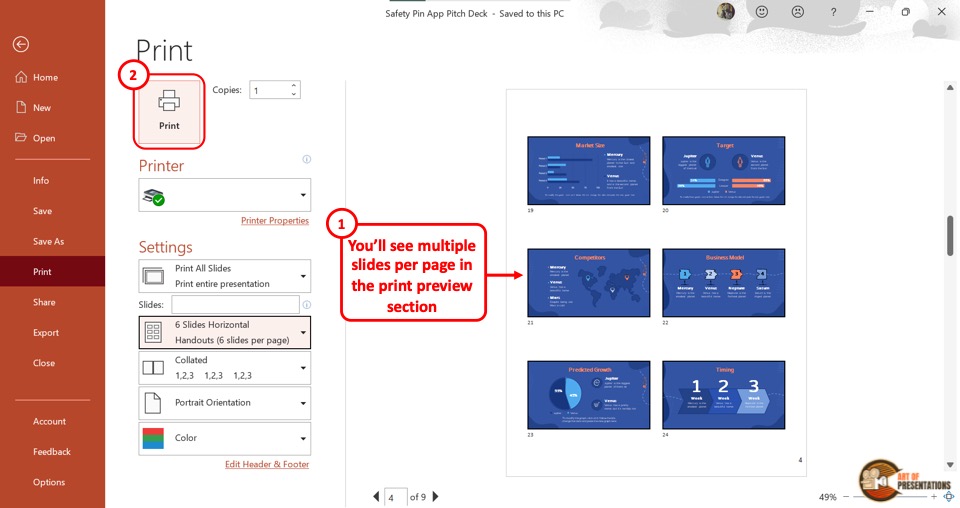
After selecting your preferred number of slides per page, all you have to do is click on the “Print” button at the top of the screen to print the PowerPoint presentation.
4. How to Print PowerPoint Slides with Notes?
Microsoft PowerPoint offers the feature to take notes for each slide. These notes can be helpful for both the presenter and the audience.
The steps for printing PowerPoint slides with notes are slightly different on PC and Mac.
To print PowerPoint slides with notes on PC, follow the 3 easy steps.
Step-1: Click on the “Print” option
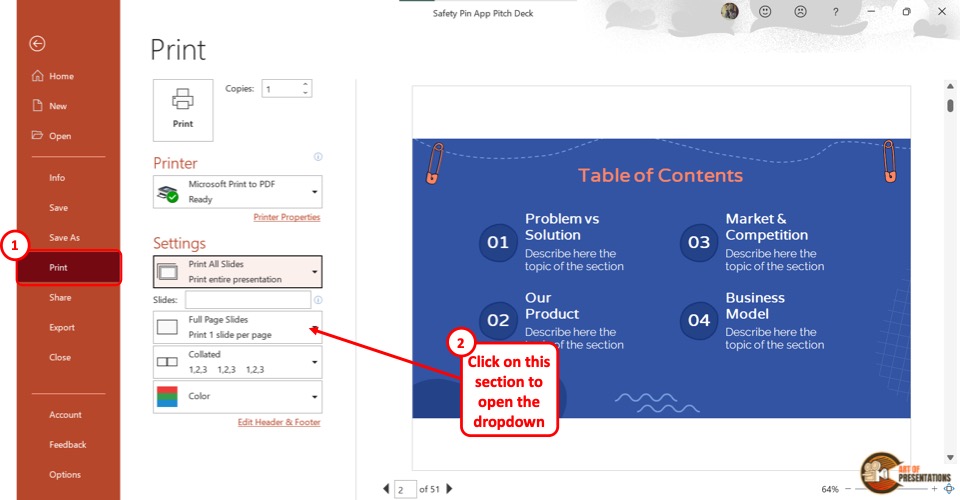
In the Microsoft Powerpoint presentation, click on the “File” tab from the menu bar. Then click on the “Print” option to access the print settings.
Step-2: Click on the “Notes Pages” option
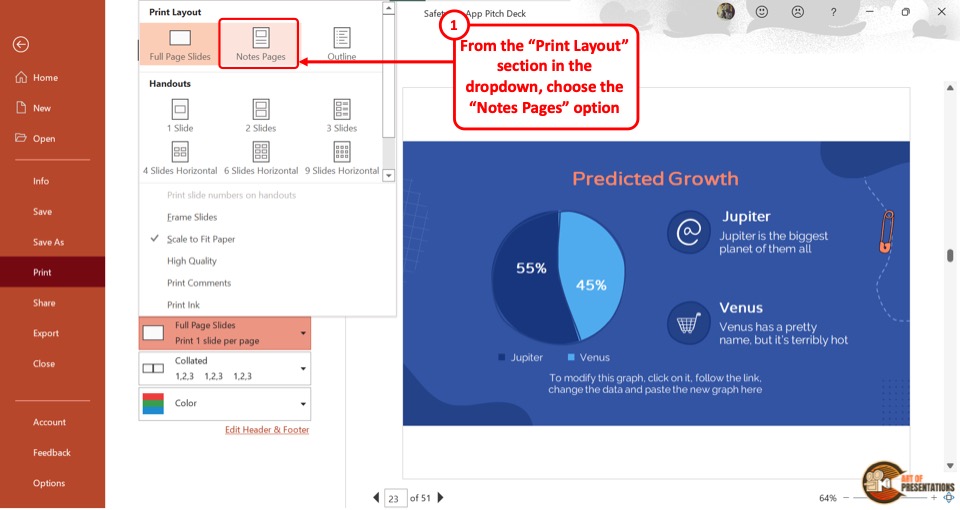
Under the settings option, click on the “Full Page Slides” box to open a dropdown menu. Under the “Print Layout” option, click on the “Notes Pages” button.
You can see the slide as well as the notes on the “Print Preview” screen.
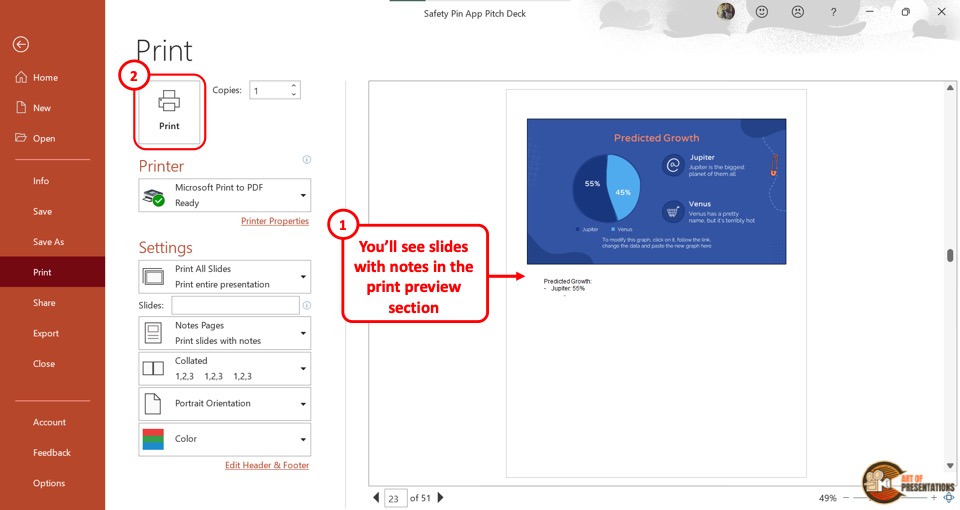
The final step is to click on the “Print” button at the top of the screen to print the slide along with the notes.
To print PowerPoint slides with notes on Mac, follow the 4 simple steps.
On a Mac device, you have to first open the PowerPoint presentation. Then click on the “File” tab located at the top left corner of the screen. From the dropdown menu, click on the “Print” option.
This will open a dialog box.
In the dialog box, click on the “Show Details” option located at the bottom. You will now be able to see the settings for printing the PowerPoint presentation slides.
Step-3: Click on the “Notes” option
The next step is to click on the “Layout” option in the dialog box to open a dropdown menu. Click on the “Notes” option from the dropdown menu to include the notes with the slides.
Step-4: Click on “Print”
Now all you have to do is click on the “Print” button located at the bottom right corner of the dialog box to print the slides with notes.
5. Printing Multiple Slides Per Page with Notes
Microsoft PowerPoint provides a “Create Handouts” option which you can use to fit notes with multiple slides on a single page.
Here’s a step-by-step process to print multiple slides per page with notes –
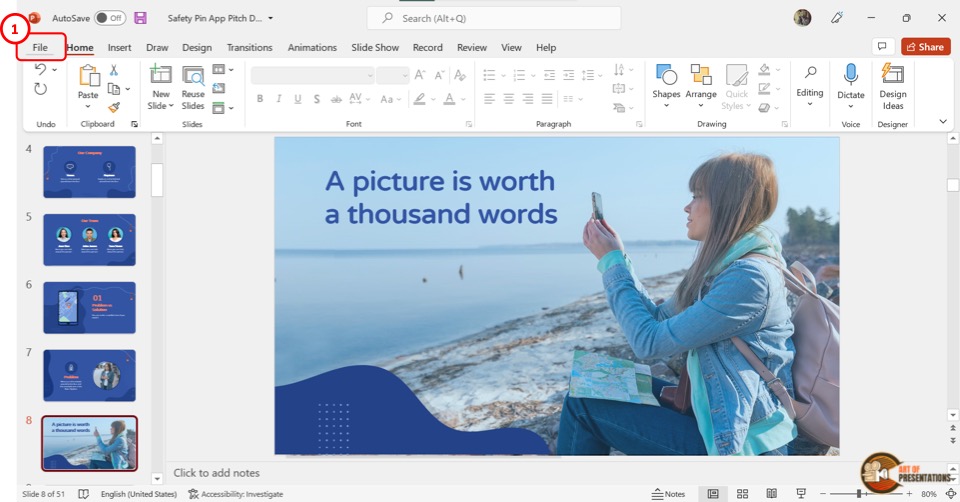
The first step is to click on the “File” menu in the menu bar located at the top of the screen. In the “File” menu, click on the “Export” option in the sidebar located on the left side of the screen.
Step-2: Click on the “Create Handouts” option
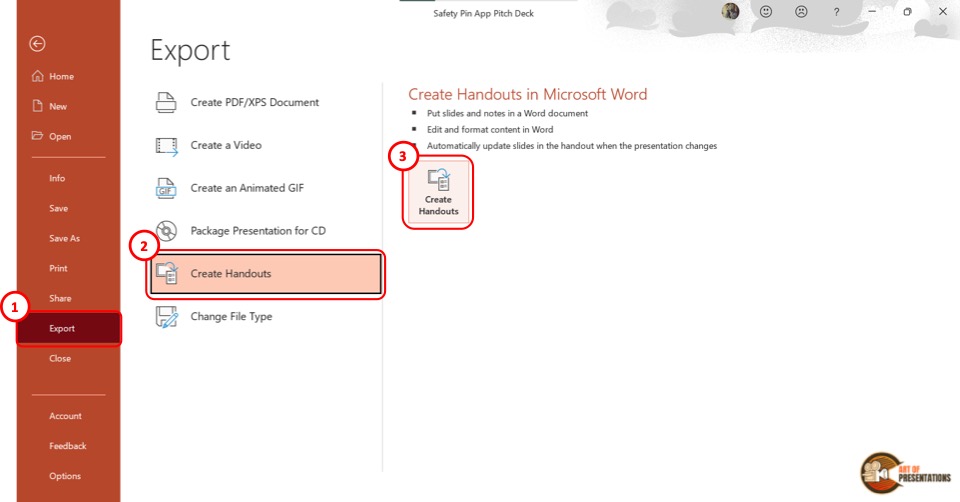
In the “Export” screen, click on the “Create Handouts” option at the secondary sidebar on the left side. Then you have to click on the “Create Handouts” button located in the middle of the screen.
This will prompt a dialog box.
Step-3: Select the “Notes next to slides” option
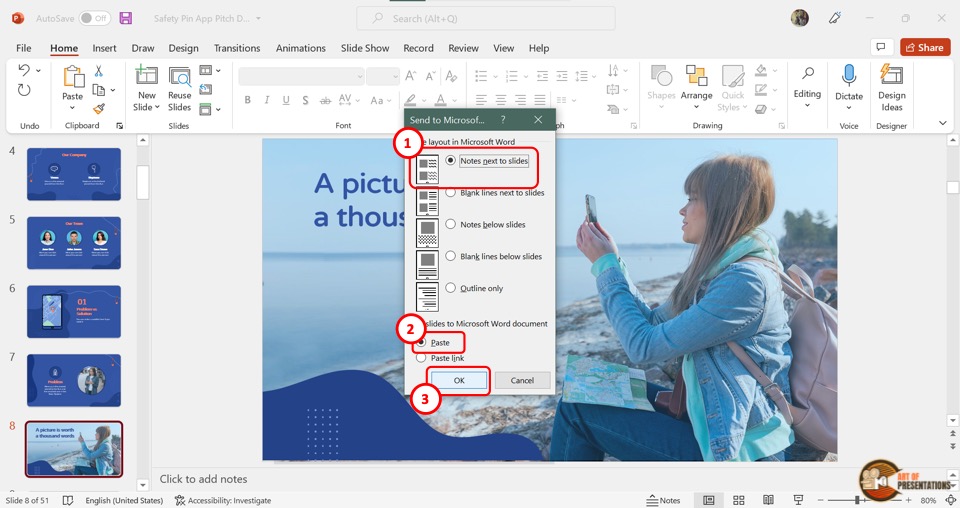
In the “Send to Microsoft Word” dialog box, you have to select two options. First, click on the “Notes next to slides” option under the “Page layout in Microsoft Word” settings.
Then click on the “Paste” option under the “Add slides to Microsoft Word document” settings.
Step-4: Click on the “OK” button
Now all you have to do is click on the “OK” button at the bottom of the dialog box (as shown in the image in step 3).
This will open a new Microsoft Word Document containing multiple slides per page along with notes.
Step-5: Click on “File”
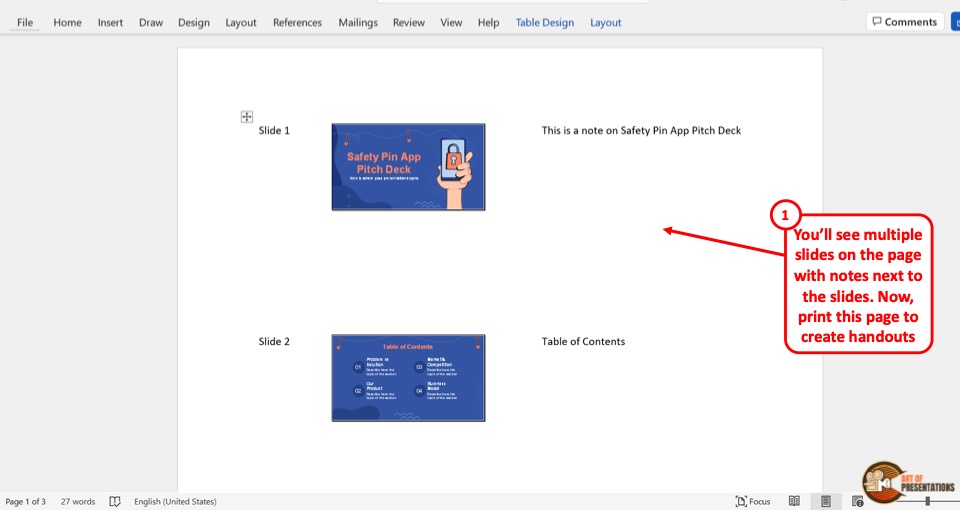
In the Microsoft Word document, you can preview the slides as well as the motes. You can also edit the notes and the slide arrangement.
Then click on the “File” tab in the menu bar at the top of the screen and click on the “Print” option.
Step-6: Click on the “Print” button
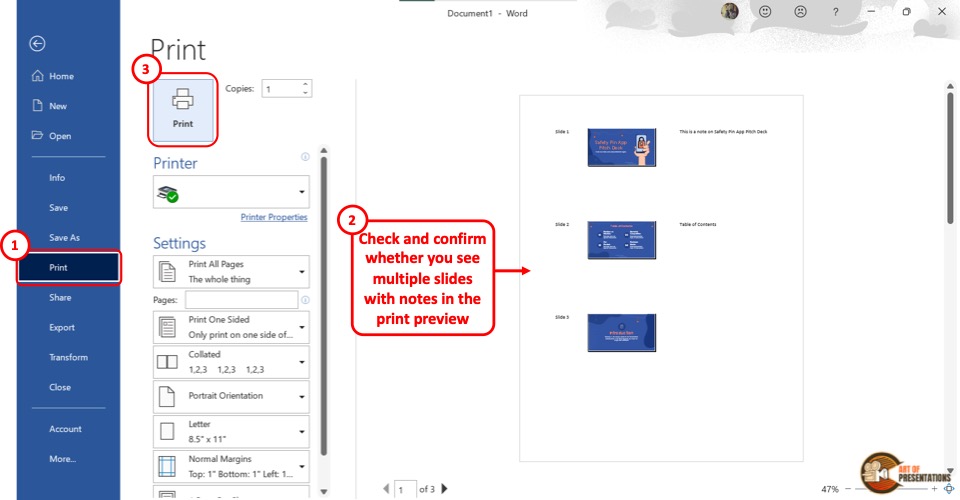
In the “Print” screen, you can change the settings options according to your preference. Now all you have to do is click on the “Print” button to print the multiple slides per page with notes.
6. Can You Print Just Slide Notes in PowerPoint?
In Microsoft PowerPoint, there is currently no feature that allows you to print just slide notes without the slides. However, you can remove the slide thumbnails manually before printing the notes pages.
Here’s how to do it –
In the menu ribbon at the top of the screen, click on the “File” tab. Then click on the “Export” option in the sidebar located at the left side of the screen.
The next step is to click on the “Create Handouts” option from the sidebar in the “Export” screen. Then click on the “Create Handouts” button under the “Create Handouts in Microsoft Word” option.
Step-3: Click on the “Notes below slides” option
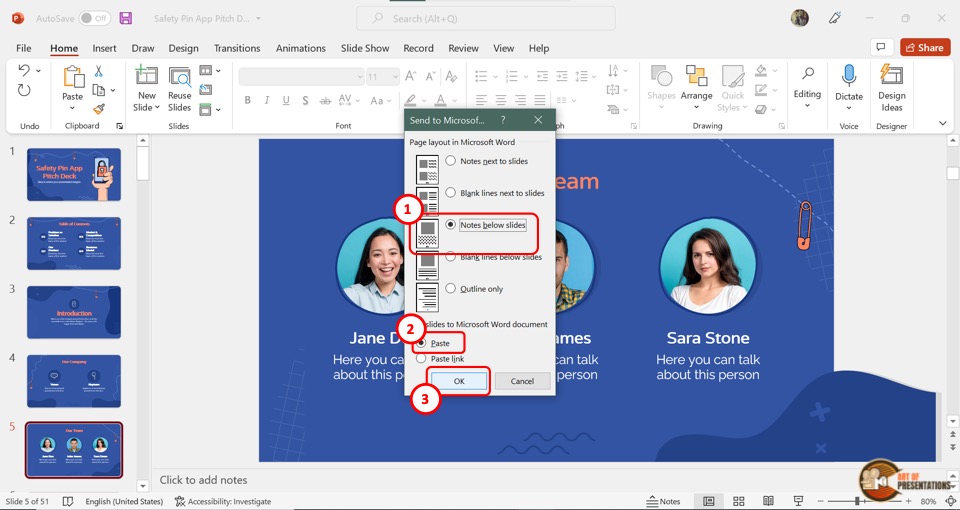
In the “Send to Microsoft Word” dialog box, click on the “Notes below slides” option under “Page Layout in Microsoft Word” .
Then select the “Paste” option under “Add slides to Microsoft Word document” .
This will open a new Microsoft Word document containing all the slides and the notes below each slide.
Step-5: Delete the slide thumbnails

In the Microsoft Word document, you have to delete each slide thumbnail manually. To do so, click on each image and press the “Delete” key on your keyboard.
Alternatively, you can press the “backspace” key on your keyboard. Repeat the process until you have deleted all the slide thumbnails.
Step-6: Click on the “Print” option
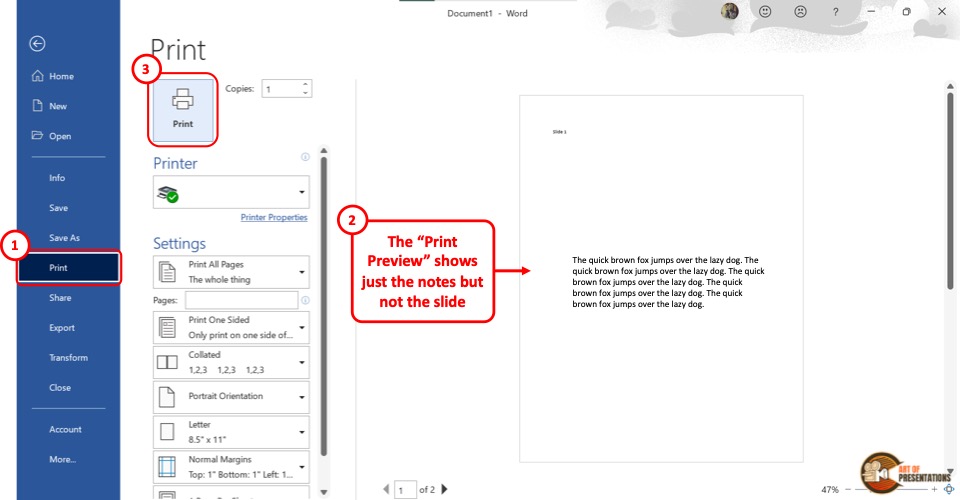
The final step is to click on the “File” tab and select the “Print” option from the sidebar on the left side of the screen in the “File” menu.
Now all you have to do is click on the “Print” button at the top of the screen to print just the notes without the presentation slides.
7. How to Print PowerPoint as an Outline?
Microsoft PowerPoint allows you to print only the slide outline of a presentation without printing the slide itself. To print the PowerPoint presentation as an outline, follow the 3 simple steps.
The first step is to click on the “File” tab in the menu ribbon located at the top of the screen. In the “File” menu click on the “Print” option to open the “Print Preview” screen.
Step-2: Click on the “Outline” option

The next step is to click on the “Full Page Slides” box under the settings. From the popup menu, click on the “Outline” option under the “Print Layout” section.
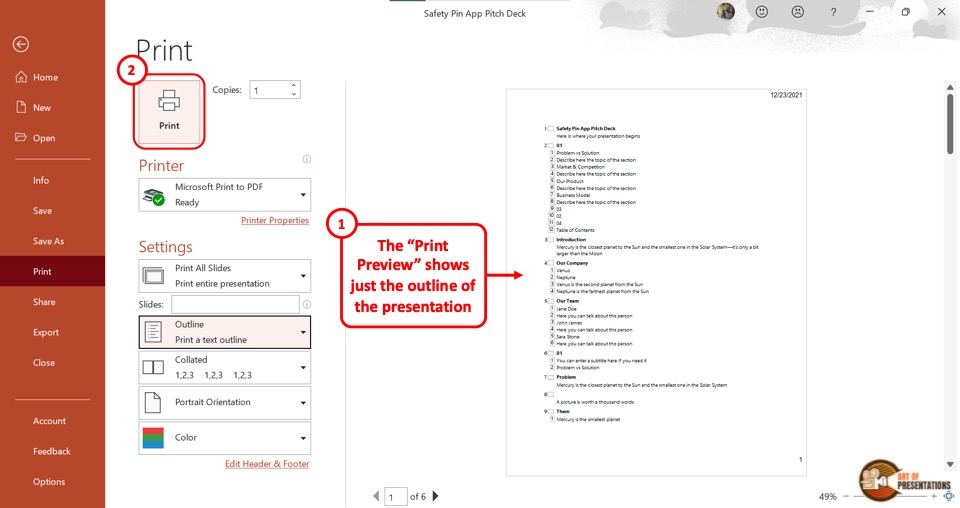
In the “Print Preview” screen, you can see the slide outline. Now all you have to do is click on the “Print” button at the top of the screen to print the presentation as an outline.
8. How to Print PowerPoint as a Handout?
Printing a PowerPoint presentation as a handout helps you compile multiple slides on a single sheet of paper. This is helpful when you have to distribute paper copies of your presentation among the audience.
To print a presentation as a handout, follow the steps mentioned below –
The first step is to click on the “File” tab in the menu ribbon located at the top of the screen. In the “File” menu, click on the “Print” option.
Step-2: Click on the “Print Layout” option
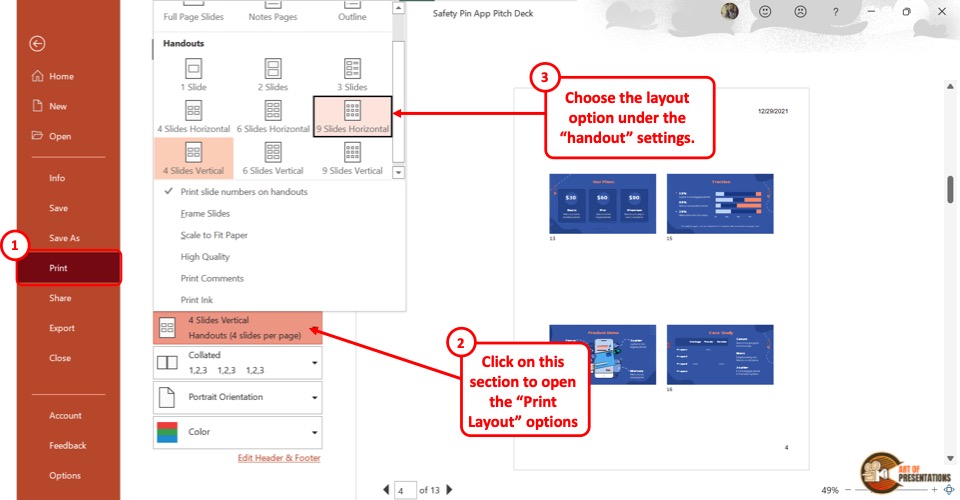
The next step is to click on the “Print Layout” option. It is the second box in the “Settings” section of the “Print” menu.
In the “Print Layout” pop-up menu, you will see 9 different layouts under the “Handouts” section. Click on your preferred handout layout.
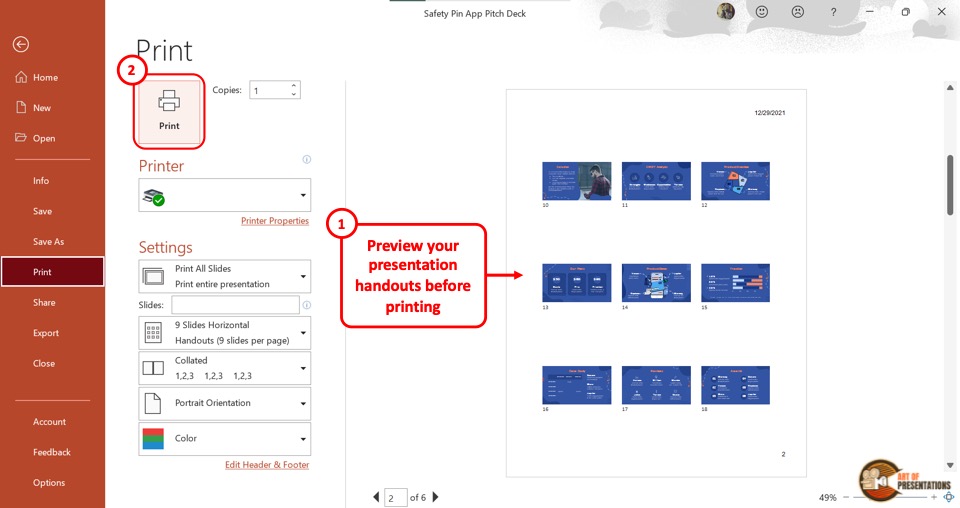
The final step is to click on the “Print” button at the top of the screen. Make sure that you are connected to a printer to print the PowerPoint as a handout.
8a. Adding Slide Numbers on Handouts
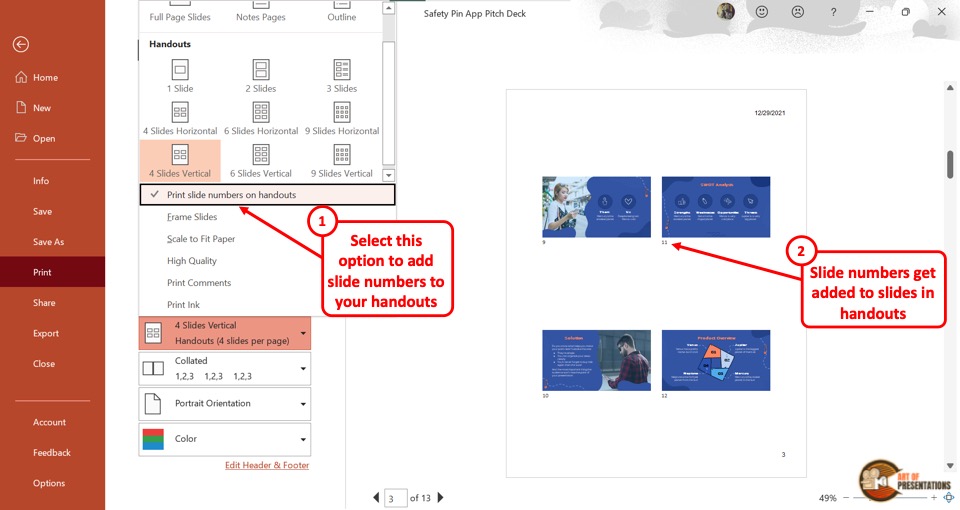
After selecting a handout layout, you can add the slide numbers on the handouts. All you have to do is click on the “Print slide numbers on the handouts” option under the layouts in the “Print Layout” pop-up menu.
A checkmark will appear on the left side of the option. You can also see the slide number showing under each slide on the preview screen.
8b. How to Frame Handout Slides
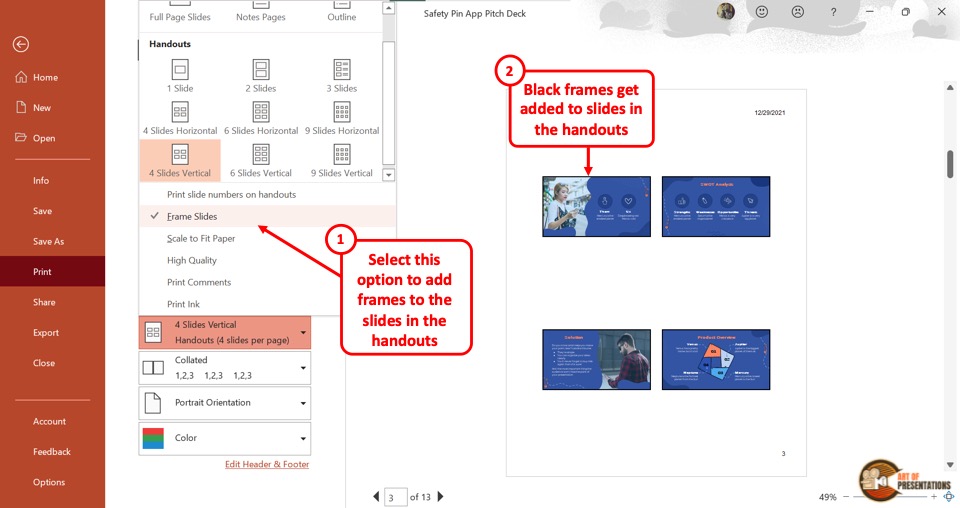
To frame handout slides, you have to first select a handout layout from the “Print Layout” option. Then click on the “Frame Slides” option under the layouts.
You will notice a checkmark showing on the left side of the “Frame Slides” option. Black frames will appear around each slide on the preview screen.
9. How to Print PowerPoint Full Page?
Microsoft PowerPoint offers various layouts for printing the presentation slides. You can print the presentation using the “Full Page Slides” option, where each paper will be printed with single slides on them.
Here’s what you need to do to print full-page slides –
Step-1: Click on the “File”
First, you have to open the “Print” screen. To do so, click on the “File” tab in the menu ribbon. Then click on the “Print” option from the sidebar in the “File” menu.
Step-2: Click on the “Full Page Slides” option
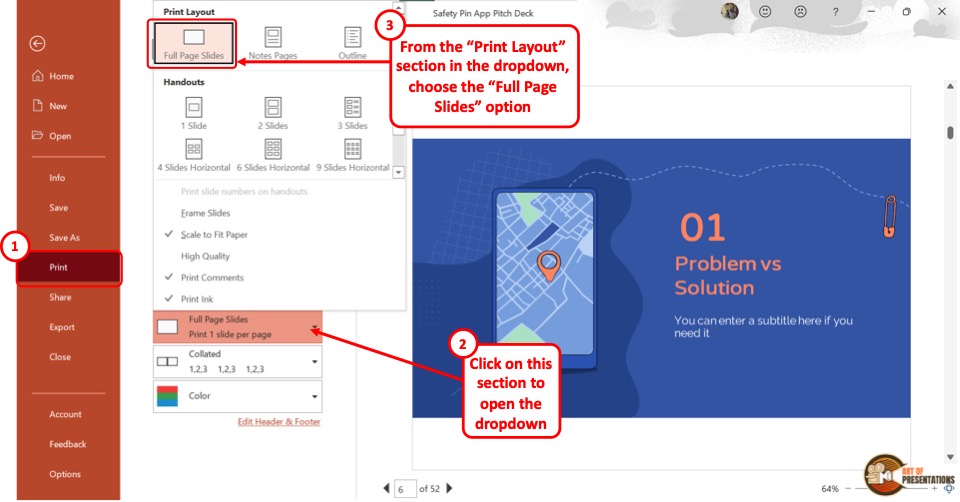
In the “Print” screen, click on the “Print Layout” option which is the second option under the “Settings” section. In the pop-up menu, click on the “Full Page Slides” option.
You can see the full page on the preview screen on the right side.
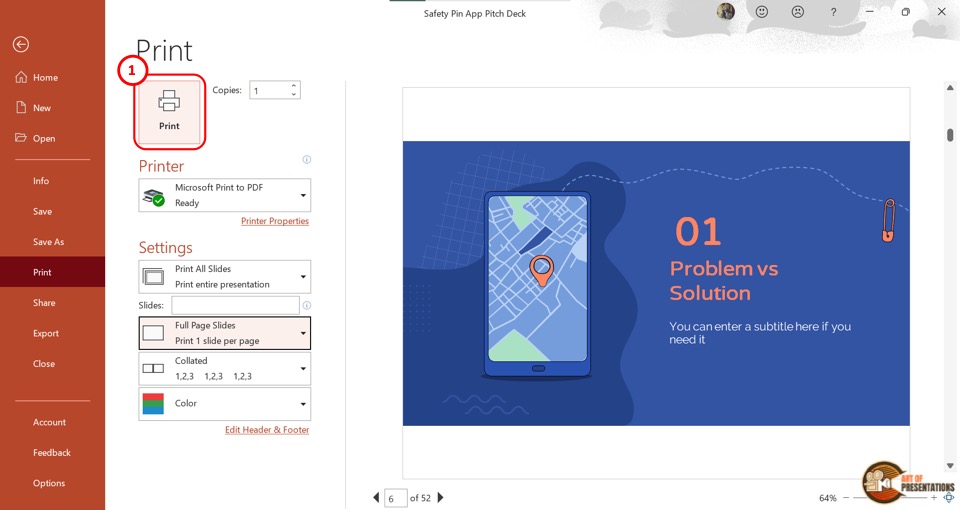
Finally, you have to ensure that the device is connected to a printer. Then click on the “Print” button at the top of the screen to print the full page slides.
Shortcut Method
In the “Print” option of Microsoft PowerPoint, the default setting for printing the slides is to print the full page. So all you have to do is press the “Ctrl+P” keys on your keyboard to open the “Print” screen.
Then click on the “Print” button at the top of the screen.
10. How to Print PowerPoint with Comments?
In Microsoft PowerPoint, the editor as well as other reviewers can leave comments on the objects in a slide. To print a PowerPoint presentation with the comments alongside the slides, follow the 3 simple steps.
Step-1: Open the “Backstage View” using the “File” Tab
In the open PowerPoint presentation, click on the “File” tab from the menu ribbon. Then you have to click on the “Print” option in the “File” menu.
Step-2: Click on the “Print Comments” option
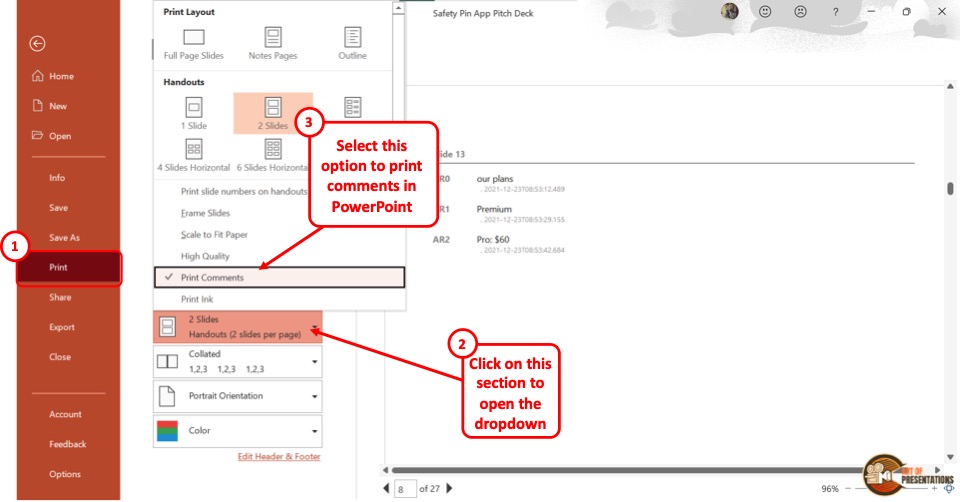
In the “Print” menu, click on the “Print Layout” option which is the second option in the “Settings” section. This will open a pop-up menu. Click on the “Print Comments” option from the pop-up menu.
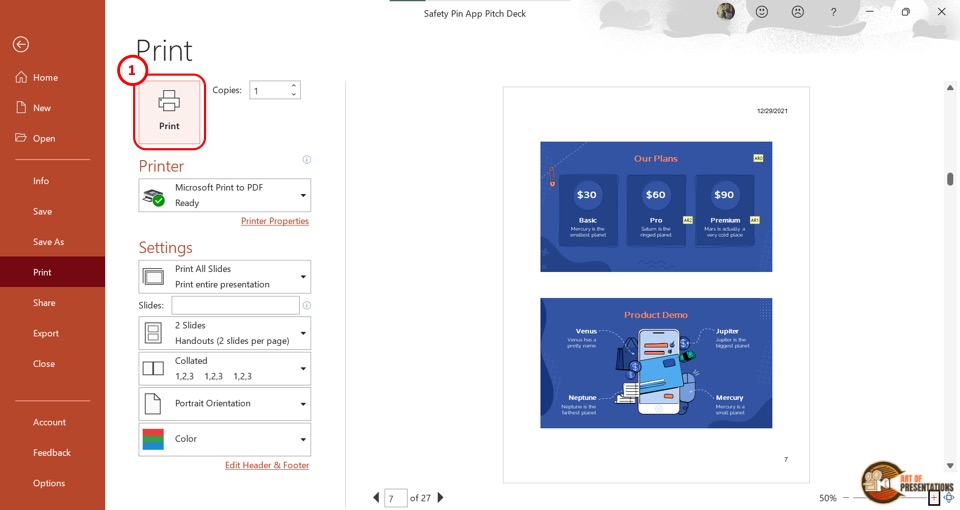
On the preview screen, the comments in a slide will show on a separate page after that slide. Now all you have to do is click on the “Print” button to print the presentation slides with comments.
11. How to Print PowerPoint Slides as a Booklet?
Sometimes, printing a presentation as a booklet may be more convenient. Unfortunately, Microsoft PowerPoint currently does not have any feature that allows you to print the PowerPoint slides as a booklet.
However, you can commonly find this feature in your printer device. All you have to do is click on the “Printer Properties” option in the “Printer” section of the “Print” screen and look for any booklet feature.
If the printer does not have any feature to print booklets, you can save the PowerPoint document as a PDF file. Follow the steps in section 14 to print the PowerPoint as PDF. Then use the “Print as Booklet” option in the PDF viewer.
12. How to Print PowerPoint Presentation in Portrait?
In Microsoft PowerPoint, you can change the orientation of the slides to print them in “Landscape” or “Portrait” .
To print a PowerPoint presentation in portrait orientation, here’s what you need to do –
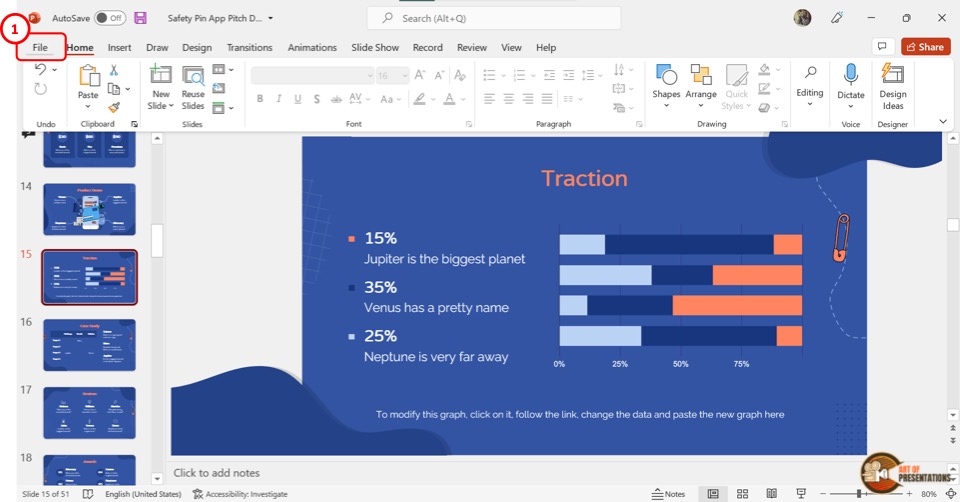
In the menu bar at the top of the screen, click on the “File” tab located in the left corner. In the “File” menu, click on the “Print” option. Alternatively, you can press the “Ctrl+P” keys on your keyboard.
Step-2: Click on the “Portrait Orientation” option
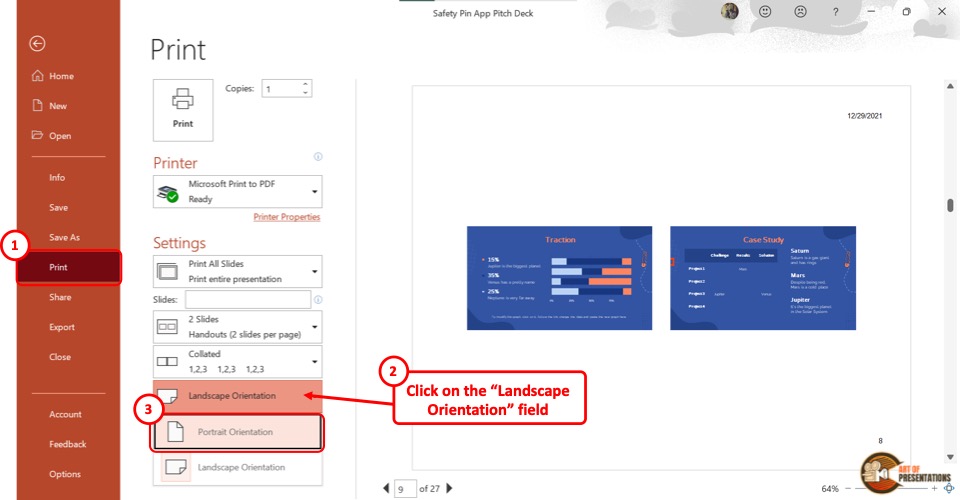
In the “Print” menu, click on the “Orientation” box. It is the fourth option in the “Settings” section. Then click on the “Portrait Orientation” option from the dropdown menu.
In PowerPoint, the “Portrait Orientation” is the default orientation.
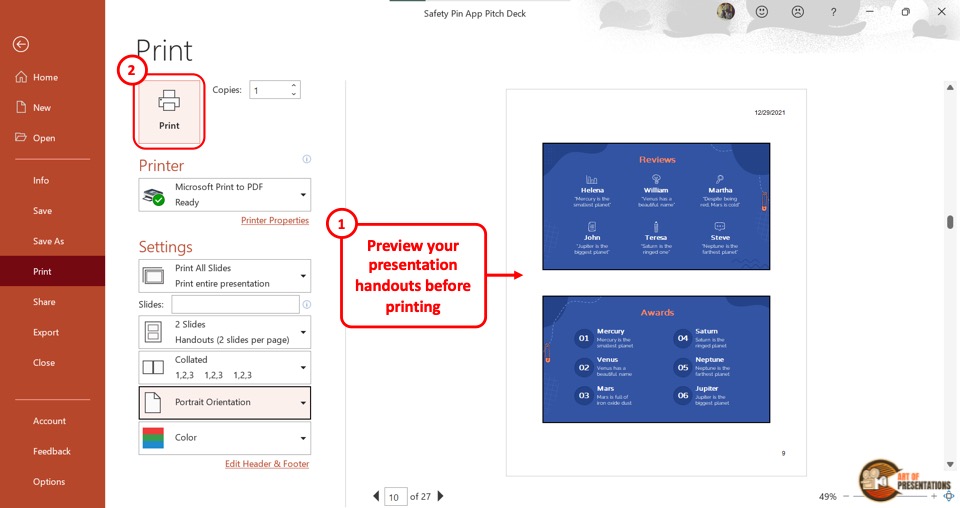
You can now see the slides in portrait orientation on the preview screen on the right side. All you have to do is click on the “Print” button. This will print the slides in portrait orientation.
13. How to Print PowerPoint Presentation with Ink Annotations?
Ink Annotations are drawings or handwritten notes on slides. You can show or hide the ink annotations in a PowerPoint presentation using the “Draw” tab.
You can also print your presentation along with ink annotations. Here’s how to do that –
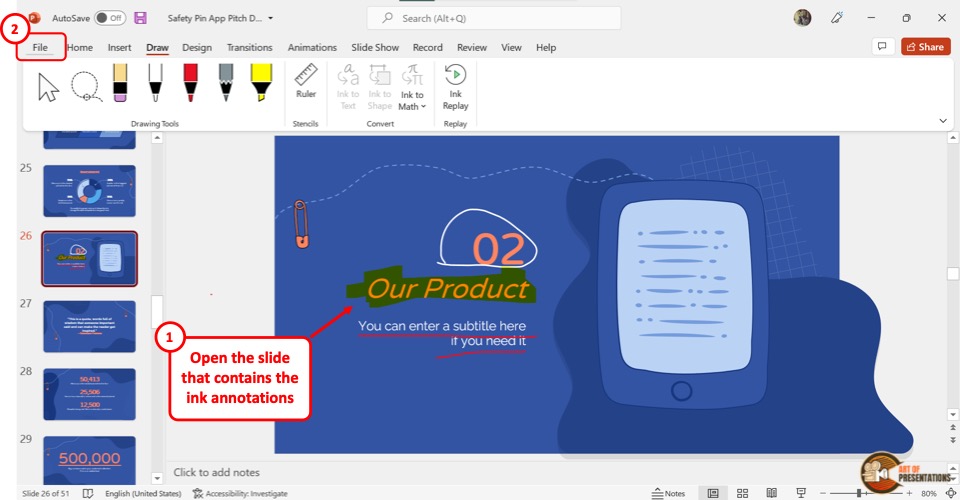
The first step is to open the “Print” screen. To do so, press the “Ctrl+P” keys on the keyboard. You can also click on the “File” tab from the menu ribbon and then click on the “Print” option from the sidebar of the “File” menu.
Step-2: Click on the “Print Ink” option

The next step is to click on the “Print Layout” option. In the “Settings” section, the “Print Layout” option in the box that shows “Full Page Slides” .
In the “Print Layout” pop-up menu, click on the “Print Ink” option at the bottom. A checkmark will appear on the left side of the “Print Ink” option and the ink annotations will show on the preview screen.
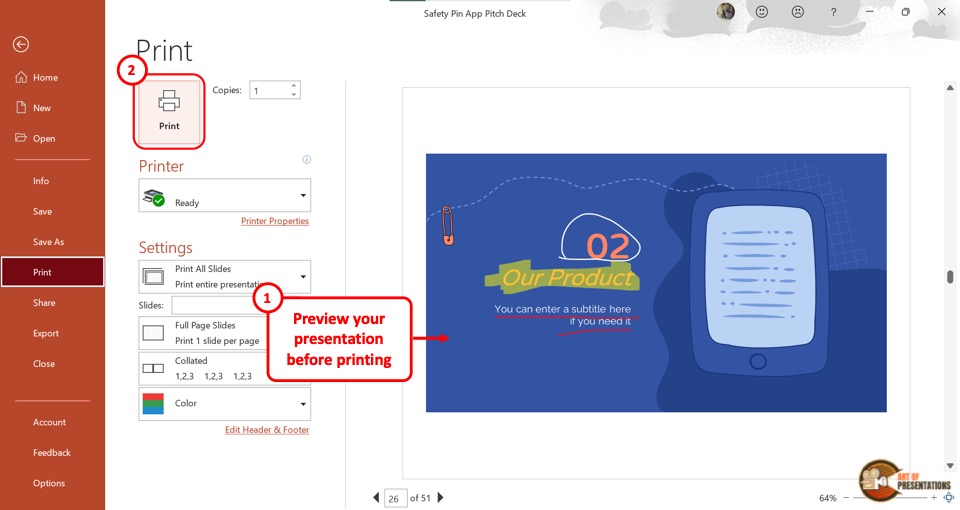
Finally, you have to ensure the device is connected to a printer. Then click on the “Print” button to print the slides with ink annotations.
14. How to Print PowerPoint as a PDF?
In Microsoft PowerPoint, you can use the “Microsoft Print to PDF” option to save your presentation as a printable PDF document. To do so, follow the 4 easy steps mentioned below –
You have to first click on the “File” tab located at the left corner of the menu ribbon. This will open the “File” menu. Click on the “Print” option in the sidebar on the left side of the “File” menu.
Alternatively, you can press the “Ctrl+P” keys on your keyboard.
Step-2: Click on the “Microsoft Print to PDF” option
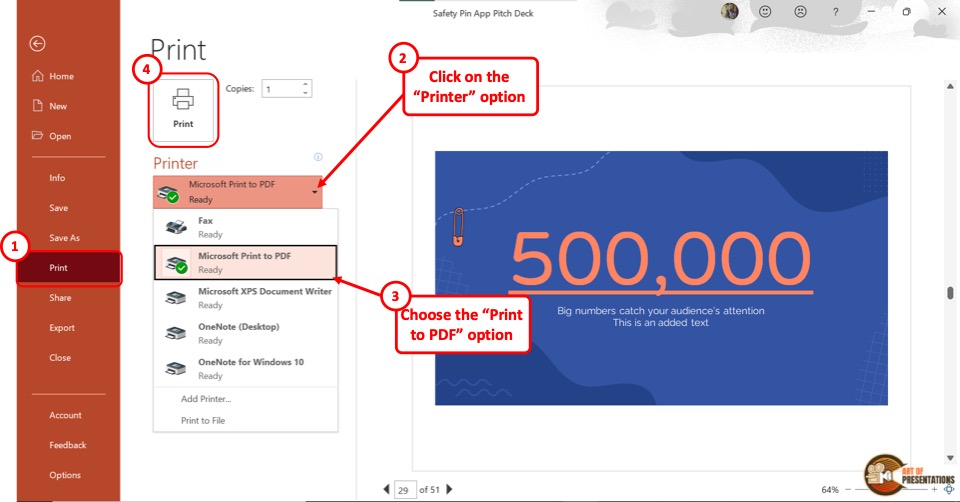
Now you have to click on the box under the “Printer” option. This will open a dropdown menu. Click on the “Microsoft Print to PDF” option from the dropdown menu.
Now all you have to do is click on the “Print” button at the top of the “Print” screen (as shown in the image in step 2). This will prompt a dialog box.
Step-4: Click on the “Save” option
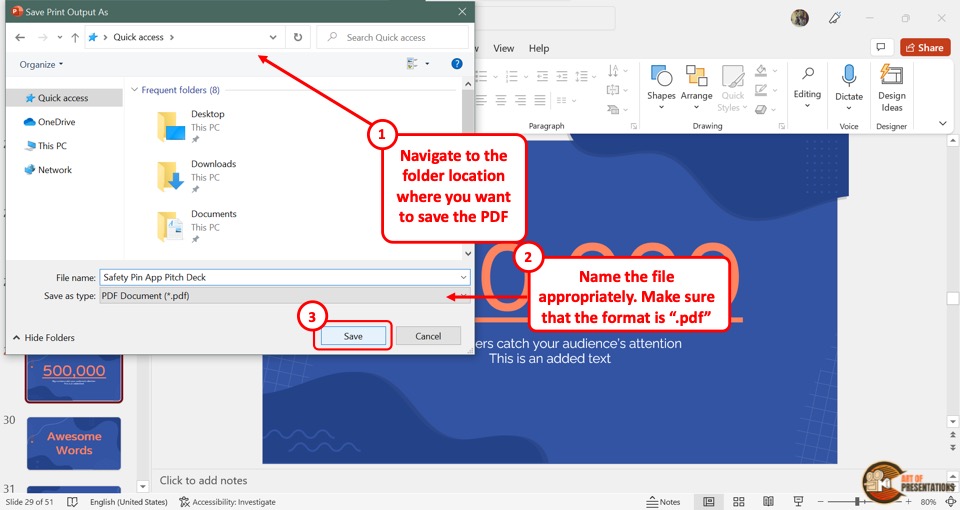
In the “Save Print Output As” dialog box, select the preferred file location for the PDF. Then click on the “Save” option at the bottom of the dialog box to save the PowerPoint presentation as a PDF file.
- WordPress Tutorials
- Graphic Design
- Presentations
- Shopify Knowledge Base
- Theme Collections
How to Print Powerpoint with Notes: Powerpoint Tutorial
Why print powerpoint with notes on slides.
- Use PPT Taskbar to Add Notes
- Use Notes Page View to Add Comments
- How to Print PowerPoint Slides with Notes
Bonus: Review of Best Selling PPT Presentation Templates

How to print powerpoint with notes? When introducing your pitch to colleagues, business partners, or even investors, you may want to improve the communication further. For this, you can print out the presentation together with the author’s notes left on the slides. This way, you provide the attendees with some detailed information, in addition to what is displayed on the slides, so that they can get a fuller picture of your pitch.
In this article, we are going to show you how to print PowerPoint with notes. But before that, let’s find out how you can first add them to slides and consider the reasons why you may even need to print PowerPoint with comments. Let’s get started.
There may be quite a lot of reasons why you might want to print out your PPT pitch with notes. Here, let’s consider just a few of the most common reasons.
- It allows for reading notes from the physical copy rather than from the screen.
- Often the audience doesn’t have access to a dual-screen setup and can see only the slides, whereas you have access to both slides and notes on the second screen.
- It may be mandatory for a certain project (in school or at work) and you are obligated to share the notes with the audience.
If at least one of the reasons resonates with you, this tutorial is 100% a must-read. So, let’s move on further and learn how to add notes to the presentation and then print it along with the comments.

How to Add Notes to Powerpoint
If you feel like you have no idea about how to add notes to the slides, this quick start guide will be useful. There are actually two simple methods and we are going to consider them both.
#1. Use PPT Taskbar to Add Notes
This specific approach is lightning fast. All you have to do is just find the “Notes” button at the bottom of your presentation screen, click on it, and start entering your comments in the text box when the panel appears.

Here, you have a chance to adjust the text. Although, if you want to change the size, consider the following method.

#2. Use Notes Page View to Add Comments
On the PowerPoint ribbon, find the View tab, go to Notes Page view, and click on the same-name button.

At Notes Page view, you can change the font size, color the text, attach images, charts, as well as editing the background color if needed.

If you prefer minimalism, we recommend choosing the “Grayscale” or “B&W” options.

For even more control over the notes and their appearance, navigate to View > Master Views and select “Notes Master” section. Here, you get access to changing the design and layout of the notes page, choosing settings for your page, and more.

Now that you have an idea about how to add notes to your presentation slides and make them look the way you like, it’s high time to discover how to print powerpoint with notes and make communication with the audience even more comfortable.
How to Print Powerpoint with Notes
Printing PowerPoint with notes is quite a streamlined process that doesn’t require any technical knowledge or extensive skills. By following the next steps, you will be able to print PowerPoint with comments in the twinkling of an eye. So, let’s get to this short, step-by-step guide:
- Open up PowerPoint, choose the file you want to print, and click on the “Print” button.

- Under the Settings drop-down menu, opt for several slides that need to be printed. For Custom Range option, make sure to include the slides for printing.
- Go to the Notes Pages for determining the format for a printed copy. After choosing the Print Layout, you’ll see a preview screen on the right-hand side from the settings menu.
- Choose to print the slides on one side or both sides of the paper. After that, opt for “Collated” or “Uncollated” option depending on the order you want to have the slides printed.
- Select the orientation between Portrait and Landscape as well as color options for the printed copy.
- Once done, go back to the top of the printing section and push the “Print” button.
2019 Pitch Deck PowerPoint Template

This modern-looking and clean template is perfect for those of you who strive for minimalism when it comes to providing a product, service, or business presentation. With this template, you can easily focus on the content which makes it a great solution for corporate and business clients. Here’s what you will find inside the package of this specific pitch deck template:
- 230+ unique slides
- 12 additional color theme options
- Image placeholder with drag-and-drop functionality
- Help Guide onboard
- Map, stats, and other slides
Infographic Pack - Presentation Asset v2.1 PowerPoint Template

Infographic Pack is one of the biggest collections of slides with infographics, diagrams, charts, mockups, and more. With this template, you will have everything needed for building a professionally-looking presentation focusing on its main idea and message you want to deliver. For more details about the other features, go to the following list:
- New 2019 calendar infographic
- Added animation version
- Over 20k total and 11k unique slides
- Fully resizable elements
- 45 color variations and 8k+ icons
Business Infographic Presentation - PowerPoint Template

Zero is suitable for annual reports, business plans, business meetings, and other corporate purposes. The template is fully editable so that you can customize it according to your needs. On top of that, it is not mandatory that you have any special skills to edit the look of the presentation template. So, if you require a perfect solution for your pitch deck, Zero with its superb features will greatly work for you.
- Over 200 multipurpose, clean, and creative slides
- Custom animation for each object
- 7 color schemes with light and dark backgrounds
- Custom-made 3D infographic in PPT
- Normal and widescreen mode, etc.
21 Easy Tips To Create A Powerful Presentation For Your Business [Free Ebook]
By clicking the button you agree to the Privacy Policy and Terms and Conditions .
How to Print Powerpoint with Notes FAQ
Supposing that the PowerPoint slide is open, go to the File tab and select Print. Then in the Settings section click the second field (by default it is called Full Page Slides), then in the Print Layout section click Notes Pages. So, to print slides with your notes, click Print.
Although many printers have their own option to select color or black and white printing, you may choose the appropriate field in the printer dialog box in PowerPoint. This option is available for all-purpose printer device drivers. Click the View tab and select “Black and White” in the Color/Gray Shades section. Then, when the Black and White tab opens, select the option you want to leave in the Change Selected Object section .
You must be guided by the purpose of your presentation. If it is a business report, the business presentation there must be infographics, charts, tables, etc. If it is an entertaining presentation, then check for included fonts, icons, color schemes. And the most important thing is, of course, compatibility with different versions of PowerPoint. If you cannot select a template, then use TemplateMonster . There are really a lot of stunning and unusual templates that you will not find on the Internet so easily
Printing PowerPoint presentation with notes has doubtlessly a lot of benefits and we hope that you’ll try it next time you introduce your new pitch to your colleagues, business partners, or even investors. The process is fast and simple, it won’t take you too much time, but will help to enhance communication and demonstrate your care about the audience feeling comfortable. Hope You've found answer how to print powerpoint with notes
PPT Tutorial: How to Embed Fonts in PowerPoint
100 Best Business Presentation Templates 2020. Cool! Great! Awesome!
How to Use PowerPoint Pictures in a Smart Way?
10 Popular Fonts You Should Absolutely Avoid Using In Presentations

Self-taught copywriter specialized in web design, marketing, and traveling. Graduated with a degree in German and English translation. Obsessed with guides, listings, and long-read blog posts. Open for new information and strives to explore more undisclosed subjects. Social Media Accounts: Fb , Twitter , LinkedIn .
Get more to your email
Subscribe to our newsletter and access exclusive content and offers available only to MonsterPost subscribers.

Related Posts
21 easy tips to create a powerful presentation for your business [free ebook], best digital products award 2023 – honored by templatemonster, making a successful presentation: how to print google slides with notes.
Genuine software, legally FREE - no cracking required!
Edit Word, Excel, and PPT effortlessly
Read, edit, and convert PDFs with the powerful PDF toolkit.
Microsoft-like interface, easy to use.
Windows • MacOS • Linux • iOS • Android

- Articles of Office solution
How to Print Powerpoint Slides with Notes Multiple Per Page: A Step-by-Step Guide
PowerPoint presentations can be a powerful tool for communication, but printing them into the format you want such as with notes multiple per page can be tricky. In this article, we'll provide a step-by-step guide on how to do it, so you can save paper and time without sacrificing clarity.
Part 1. What are powerpoint slides with notes and use cases?

PowerPoint slides with notes are a great way to keep track of your thoughts and ideas while presenting. The speaker notes section at the bottom of each slide allows you to add additional information, explanations, or cues that are not visible to the audience.
Use cases for PowerPoint slides with notes:
To help the presenter remember important points. Speaker notes can be used to remind the presenter of key messages, statistics, or other important information that they need to convey to their audience.
To provide additional context or explanation. Speaker notes can be used to provide additional information or explanation that is not included on the slides themselves. This can be helpful for complex topics or for audiences that may need more detail.
To prompt the presenter with questions or talking points. Speaker notes can be used to prompt the presenter with questions or talking points to help them stay on track and deliver a more engaging presentation.
To share the presentation with others as a reference. Speaker notes can be printed out or shared electronically with others as a reference. This can be helpful for students, colleagues, or clients who need to review the presentation materials later.
Part 2. How to print powerpoint slides with notes multiple per page
PowerPoint Slides with notes can bring a lot of efficiency to every user. So, here is the question: How to print powerpoint slides with notes multiple per page. Don’t worry, let me teach you about it.
Printing PowerPoint Slides with Notes on Windows:
Step 1: Open your PowerPoint presentation.

Step 2: Click on the "File" tab in the top-left corner of the PowerPoint window.

Step 3: Select "Print" from the options on the left-hand side.

Step 4: Under the "Settings" section, you will see a drop-down menu next to "Full Page Slides." Click on it to open the menu.

Step 5: Choose "Notes Pages" from the drop-down menu. This option will print one slide per page with its accompanying speaker notes.

Step 6: You can adjust other printing settings such as the number of copies, color or grayscale, and the printer.

Step 7: Click the "Print" button to start printing your slides with notes.

Congratulations, you have successfully printed your powerpoint slides in notes on multiple pages.
Printing PowerPoint Slides with Notes on macOS:

Step 2: Click on the "File" menu in the top-left corner of the PowerPoint window.

Step 3: Select "Print" from the dropdown menu.

Step 4: In the print dialog that appears, locate the "Layout" option. It may be labeled differently depending on your version of PowerPoint.

Step 5: In the Layout settings, you should find a dropdown menu that allows you to choose how many slides per page you want to print. Select the option that includes notes (usually "Notes").

Step 6: You can adjust other printing settings like the number of copies, paper size, and orientation.

Step 7: Click the "Print" button to start printing your PowerPoint slides with notes.

Congrat, now you have learned how to print PowerPoint Slides with Notes on macOS and Windows.
Part 3:How to print powerpoint slides with notes multiple per page for free with WPS Office
Beside Microsoft Office, I will offer you another app that can print powerpoint slides with notes multiple per page for free. This is the WPS Office. So, what is WPS?

WPS Office is a free and open-source office suite that is compatible with Microsoft Office. It includes a word processor, spreadsheet, presentation software, and a PDF reader, so you can easily open, edit, and save files. It is also easy to use, even for people with no prior experience with office suites.
Not only that, WPS Office is a powerful office suite that offers a wide range of features. It is a good alternative to NeoOffice, especially for students and businesses on a budget.
Take a quick look at some of the features of WPS:
● Free to use Word, Excel, and PPT. Powerful PDF toolkit
● Rich template store
● Rich functions, there are resume assistants, smart forms, screen recording, file repair and other small tools integrated in the product
● The light weight of the product is only 200M, and it occupies a small amount of computer memory.
● The MAC version of WPS Office is very powerful. Microsoft office ignores the experience of mac users, which can be made up by wps office
● Support online documents (WPS AirPage), multi-person collaborative editing
● WPS office also supports Linux system, Android, and ios systems. To use WPS office products on different systems, you only need to log in to the same account, and all files can be synchronized

You feel WPS Office is the best choice for you and want to download? Please visit this official website: https://www.wps.com and download now.
Now, let's proceed with a step-by-step guide on how to print PowerPoint slides with notes multiple per page for free using WPS Office.
Printing PowerPoint Slides with Notes Using WPS Office:
Step 1: Open your PowerPoint presentation using WPS Office Presentation.

Step 2: Click on the "Menu" button in the top-left corner.

Step 4: In the Print dialog that appears, you will find various settings.

Make sure you have selected the correct printer and all the settings
Step 5: Look for the "print what" option.

The specific wording and format may be different based on your WPS version.
Step 6: In the Print what, select the option that includes notes. It's often labeled as "Notes pages" or something similar.

Step 7: You can further adjust settings like paper size and orientation if needed.

Step 8 : Review the print preview to ensure it matches your desired output.

Always preview your document before printing to avoid wasting paper and ink.
Step 9 : Click the "OK" button to start printing your PowerPoint slides with notes.

Double-check your printer settings, and ensure that WPS Office is up to date if encounter any error
Additional Tips:
You can adjust the margins and other layout settings for your handouts in the Handout Master view. To do this, click the View tab and then click Handout Master.
To preview your handouts before printing, click the Preview button in the Print dialog box.
Use Word, Excel, and PPT for FREE, No Ads.
Edit PDF files with the powerful PDF toolkit.
Microsoft-like interface. Easy to learn. 100% Compatibility.
Boost your productivity with WPS's abundant free Word, Excel, PPT, and CV templates.
1.How to save a PowerPoint as PDF with multiple slides per page and notes?
Answer: You can save a PowerPoint presentation as a PDF with multiple slides per page and notes by following these steps:
Open your PowerPoint presentation.
Click on "File" and select "Save As" or "Export."
Choose the PDF format from the available options.
In the settings, look for options related to handouts or notes. Select the one that includes both slides and notes.
Customize other settings like page layout, quality, and security if needed.
Click "Save" or "Export" to save your PowerPoint as a PDF with slides and notes.
2. How do I format all notes in PowerPoint?
Answer: To format all notes in PowerPoint, including font size, you can follow these steps:
Click on the "View" tab.
Select "Normal View" or "Notes Page View" to access the notes section.
Click within a note to activate the text box.
Highlight the text you want to format.
Go to the "Home" tab.
Use the formatting options in the "Font" group to adjust font size, style, color, and other text formatting settings.
Apply the desired formatting changes to the selected text.
3. How can I add speaker notes to my PowerPoint slides?
Answer: To add speaker notes, open your PowerPoint presentation, go to "Normal View," and below each slide, you'll find a notes section where you can type your speaker notes.
4. Can I convert my PowerPoint notes into Word for further editing?
Answer: Yes, you can copy and paste your speaker notes from PowerPoint into Microsoft Word for further editing or sharing.
5. How do I change the default font for notes in PowerPoint?
Answer: In PowerPoint, go to the "View" tab, select "Notes Master," and adjust the font settings there to change the default font for your speaker notes.
This article provides a step-by-step guide for printing PowerPoint slides with notes multiple per page to save time and paper. It emphasizes the importance of speaker notes and presents instructions for both Windows and macOS users.
Additionally, it introduces WPS Office as a free alternative to Microsoft Office and offers guidance on using WPS Office for this purpose. The article includes helpful tips and highlights the benefits of this approach for presenters.
- 1. How to Delete Multiple Slides in PowerPoint - A Comprehensive Guide
- 2. How to Select Multiple Slides in Google Slides (Easy & Fast)
- 3. How to Export Notes from PowerPoint (Step-by-Step)
- 4. How to Turn PowerPoint into Notes (Step-by-Step)
- 5. How to Export PowerPoint Notes to Word Mac (Step-by-Step Guide)
- 6. Ways to Count and Control Words per Page

15 years of office industry experience, tech lover and copywriter. Follow me for product reviews, comparisons, and recommendations for new apps and software.

How To Print Google Slides With Notes
Published: July 31, 2023
Printing Google Slides with notes is a useful feature when you want to have a physical copy of your presentation and include additional information for reference. Whether you’re a student preparing for a presentation or a professional creating a handout for a meeting, this guide will walk you through the steps to print Google Slides with notes.
Google Slides is a web-based presentation tool that allows you to create, edit, and share slideshows online. With its intuitive interface and collaborative features, it has become a popular choice for users who want to create visually appealing presentations.
One of the key features of Google Slides is the ability to add speaker notes to each slide. Speaker notes allow you to provide additional information or reminders that can help you deliver a more engaging presentation. When printing Google Slides with notes, you have the option to include these speaker notes alongside the slides.
By printing your Google Slides with notes, you can have a physical copy of your presentation that includes all the essential information. This can be particularly helpful in situations where you need to distribute handouts or when you want to review your presentation offline.
In this step-by-step guide, we will outline the process of printing Google Slides with notes. Whether you are using Google Slides for personal or professional purposes, this guide will help you make the most of this powerful presentation tool.
Step 1: Open Google Slides
Before you can print your Google Slides with notes, you need to open the Google Slides application. Here’s how to do it:
1. Open a web browser on your computer.
2. Go to the Google Slides website ( https://slides.google.com ).
3. Sign in to your Google account if you haven’t already.
4. Once you’re signed in, you’ll be directed to the Google Slides homepage.
If you already have a Google Slides presentation created, you can open it by clicking on the presentation title from the homepage or by navigating to the Google Drive where your presentation is saved.
If you don’t have a presentation yet, you can create a new one by clicking on the “Blank” option or selecting a template from the available options.
Google Slides offers a wide range of templates and themes to choose from, so you can customize your presentation to fit your style or purpose.
Once you have opened or created your Google Slides presentation, you’re ready to move on to the next step, where we’ll explore how to access the printing options.
Step 2: Go to the File Menu
Now that you have your Google Slides presentation open, it’s time to access the file menu where you’ll find the printing settings. Here’s how to do it:
1. At the top left corner of the screen, you’ll see the toolbar. Click on the “File” option in the toolbar.
2. A drop-down menu will appear with various options.
3. From the drop-down menu, click on the “Print” option. This will open the Print settings and preview window.
The File menu in Google Slides provides a range of options for managing your presentation, including saving, exporting, and printing. By selecting the “Print” option, you can configure the printing settings to include your speaker notes.
It’s important to note that the specific location of the File menu may vary slightly depending on the device or web browser you’re using. However, you can always locate it at the top left corner of the Google Slides interface.
Now that you have accessed the Print settings and preview window, we can move on to the next step where we’ll explore the layout options for printing your Google Slides with notes.
Step 3: Click on Print Settings and Preview
Once you’ve opened the “Print” option from the File menu, you’ll be taken to the Print settings and preview window in Google Slides. This step allows you to configure the printing options before generating a physical copy of your presentation with speaker notes. Here’s what you need to do:
1. In the Print settings and preview window, you’ll see an overview of your slides on the right-hand side of the screen.
2. On the left-hand side of the screen, you’ll find a panel with various settings and options.
3. Take a moment to review the slides in the preview pane to ensure they appear as you intended. You can use the navigation arrows to navigate through the slides.
4. In the settings panel, you have the option to customize the layout, range, and other print settings for your presentation.
The Print settings and preview window provide you with the flexibility to adjust the settings according to your requirements. For example, you can choose to print all slides or a specific range of slides, adjust the scale of the slides, and control other print settings.
Additionally, in this step, you’ll find options to configure the layout settings for your printed handouts, including the orientation (portrait or landscape), number of slides per page, and the inclusion of speaker notes.
By default, Google Slides will include the speaker notes along with the slides when you choose to print with notes. However, if you prefer to exclude the speaker notes, you can uncheck the corresponding option in the settings panel.
Once you have reviewed and adjusted the print settings and previewed your slides, you’re ready to proceed to the next step where we’ll explore the layout options for printing your Google Slides with notes.
Step 4: Select the Layout Options
After accessing the Print settings and preview window in Google Slides, you can now customize the layout options for printing your presentation with speaker notes. Here’s how you can do it:
1. In the Print settings and preview window, locate the “Layout” section in the settings panel on the left-hand side of the screen.
2. Under the “Layout” section, you will find options to choose the orientation (portrait or landscape) and the number of slides per page.
3. Select the desired orientation by clicking on the “Portrait” or “Landscape” option.
4. Choose the number of slides you want to include per page using the drop-down menu next to the “Slides” option.
The layout options allow you to customize how your slides and speaker notes will appear on the printed page. You can choose the orientation that best fits your needs and adjust the number of slides per page to conserve paper or provide a more compact layout.
Additionally, under the “Layout” section, you may find other options like “Paper size” and “Scale.” These options enable you to select the paper size for printing and adjust the scale of the slides if needed.
It’s important to choose the layout options that ensure the legibility and clarity of your speaker notes and slides when printed. Consider the purpose and audience of your printed handouts to determine the most suitable layout for your presentation.
Once you have selected the desired layout options, you’re ready to proceed to the next step where we’ll explore how to include the speaker notes when printing your Google Slides.
Step 5: Check the “Include Speaker Notes” Box
In order to print your Google Slides with speaker notes, you need to ensure that the “Include Speaker Notes” option is selected in the Print settings and preview window. Here’s how you can do it:
1. Look for the “Include Speaker Notes” checkbox in the settings panel of the Print settings and preview window.
2. Check the box next to “Include Speaker Notes” to enable the printing of speaker notes.
When the “Include Speaker Notes” option is checked, Google Slides will include your speaker notes alongside the corresponding slides when you print your presentation. This allows you to have a comprehensive handout that includes additional information, reminders, or cues to support your verbal presentation.
Speaker notes are a valuable aspect of creating engaging and informative presentations. They provide you with a space to add relevant details, expand on key points, and remember important talking points during your presentation.
By including speaker notes in your printed handouts, you can enhance the understanding and retention of the presentation content for the audience. They can refer to the speaker notes as a helpful reference while reviewing your presentation or when following along during the actual presentation.
Once you have checked the “Include Speaker Notes” box, you have successfully set up the option to print your Google Slides with speaker notes. Now, you’re ready to proceed to the next step where we’ll configure other essential printing settings.
Step 6: Configure Other Printing Settings
In addition to selecting the layout options and including speaker notes, there are a few other printing settings you can configure to customize your Google Slides printout. Here’s how you can configure these settings:
1. In the Print settings and preview window, review the additional settings available in the settings panel.
2. Explore options such as “Color,” “Copies,” “Margins,” and “Paper size” to adjust according to your preferences.
3. Choose whether you want to print in color or black and white by selecting the appropriate option under the “Color” setting.
4. Adjust the number of copies you want to print by entering the desired quantity in the “Copies” field.
5. Set the margins for your printed slides by selecting a preset option or customizing the values in the “Margins” section.
6. Select the paper size that matches the size of the paper you plan to use for printing.
These additional printing settings allow you to further tailor the physical copy of your Google Slides presentation to meet your specific requirements. You can choose whether to print in color or black and white, adjust the number of copies, set the margins to ensure nothing is cut off, and select the appropriate paper size for the printout.
It’s important to note that the available options may vary based on your printer and operating system settings. Therefore, it’s recommended to review the settings and adjust them as needed to optimize the quality and appearance of your printed handouts.
Once you have configured the other printing settings according to your preferences, you’re now ready to proceed to the final step, where we’ll review the print preview and initiate the printing process.
Step 7: Preview and Print
After configuring the necessary printing settings, it’s essential to preview your Google Slides printout to ensure everything appears as intended before initiating the printing process. Here’s what you need to do in this final step:
1. Take a moment to review the print preview of your slides and speaker notes on the right-hand side of the Print settings and preview window.
2. Use the navigation arrows or the slide thumbnails to navigate through the pages of your presentation and ensure no important information is missing.
3. Pay close attention to the layout, formatting, and legibility of your slides, speaker notes, and any other content present in your presentation.
4. If you notice any issues or errors, you can go back and make adjustments to the printing settings and layout options to rectify them.
5. Once you are satisfied with the preview and confident that all the necessary information is present and correctly formatted, it’s time to initiate the printing process.
6. Click on the “Print” button in the Print settings and preview window to start the printing.
7. Follow the prompts provided by your operating system and printer to complete the printing process.
By following these steps, you’ll be able to preview your Google Slides printout and ensure the quality and accuracy of your physical handouts. Taking the time to review the print preview helps prevent wasted resources and ensures that you have a professional and polished final output.
Remember to have your printer properly set up and have enough paper and ink or toner cartridges before initiating the printing process to avoid any interruptions or delays.
Once you have successfully printed your Google Slides with speaker notes, you can distribute them to your audience, share them digitally, or use them as a reference for your presentation.

Related Stories
How To Make Google Slides Portrait
How To Change The Slide Size In Google Slides
How To Print Double-Sided On A Mac
14 Amazing Epson Photo Scanner for 2024
Access Gmail Tasks On Mobile Or Desktop Browser
How To Make Google Docs Landscape
15 Best Flip Pal Mobile Scanner for 2024
PPTX File (What It Is And How To Open One)

5 Most Profitable CS2 Skins You Can Buy

Avoiding Common Mistakes When Choosing Movers from Boston to DC

From Homemaker to OnlyFans Star: The Journey of a Housewife from Spain

How to Merge PDF Files Without Losing Quality: Tips and Tricks

How to File a Wrongful Death Claim in Texas?

Top 100 Christmas Songs for the Best Christmas Music

The Life and Career of Dean Haglund: A Journey from Canada to the Paranormal and Beyond

16 Best Ad Blocker For Every Browser and Device

Different Types of Aesthetics: 30 Outfit Ideas to Step Up Your OOTD Game

Monopoly Man Monocle and 10 Other Popular Examples of the Mandela Effect
PowerPoint is not printing correctly on Windows 11/10
1] test printing in another software, 2] reinstall the printer driver, 3] export the powerpoint presentation as a pdf, 4] change the page layout, 5] run sfc scan, 6] update or repair microsoft office, why is my powerpoint not printing correctly, how do i repair powerpoint in windows 11, nishantgola@twc.
- Print slides, notes, or handouts Video
- Prepare a basic handout Video
- Edit headers and footers Video
- Print Notes Pages as handouts Video
- Print handouts in Word Video

Print slides, notes, or handouts

Minimize slide text and put notes in the notes section, out of your audience’s site. And print them with or without slide thumbnail images.
Edit page numbering, footers, and headers for Handouts in PowerPoint
Change, delete, or hide headers and footers on slides, notes, and handouts
Create and print speaker notes
Video: Work with handout masters
Print your handouts, notes, or slides
You finished creating your presentation, and now you want to print it as a handout for your audience.
PowerPoint gives you several choices for handouts. To start, you click FILE , Print to open print view.
In print view, your options for page layout and printing are on the left, and a preview of the handout is on the right.
To see the page layout choices, click the Page Layout button.
These are the layouts. They include Full Page Slides , shown in the preview, here as well as layouts with multiple slides per page.
Let's look at the 3 Slides layout. It has three slides on the page as well as lines for audience notes.
Another type of handout is the Notes Pages .
The notes page includes not only the slide, but also your speaker notes.
When you plan to use the notes page as a handout, you'll type the notes you intend for the handout in the notes pane, below the slide.
This approach is a great way to keep from overloading the slide with information.
If you put details in the notes pane, your audience can get those in the handout.
Another thing to consider when you print handouts is page orientation.
With a Portrait Orientation , the page is laid out vertically.
With a Landscape Orientation , the page is laid out horizontally.
You'll also decide whether to print the handouts in color, or in one of the black and white formats– Grayscale or Pure Black and White .
And, you'll choose headers and footers for the handout, things like date and page number.
You click Edit Header & Footer to do that.
Another option for handouts is to print them in Microsoft Word. To do that, you would click Export , Create Handouts .
When you click Create Handouts again, you get these layout choices for printing and formatting the handouts in Word.
Up next: Print a basic handout .

Need more help?
Want more options.
Explore subscription benefits, browse training courses, learn how to secure your device, and more.

Microsoft 365 subscription benefits

Microsoft 365 training

Microsoft security

Accessibility center
Communities help you ask and answer questions, give feedback, and hear from experts with rich knowledge.

Ask the Microsoft Community

Microsoft Tech Community

Windows Insiders
Microsoft 365 Insiders
Was this information helpful?
Thank you for your feedback.
How to Print from Canva Yourself or With A Service [2024]

Canva is the most popular freemium online graphic design tool out there. Despite being (humorously?) seen as inferior to “real” graphic-design software like Photoshop , it offers a vast array of image and video editing options that include presentations, social media posts, poster design, AI image generation , and more.
While most print their designs by simply downloading it locally and using their printer, what many don’t know is that Canva offers a special custom print service. That’s why today, we’ll be taking a closer look at how you can print on Canva and the precise nuances of either option.
Table of Contents
Methods of printing with canva, ⤷ printing on windows, ⤷ printing on macos, 2. printing using canva’s special service, printing yourself vs. printing with canva (or other services), showcase your finest works.

If we were to break down printing on Canva at the top-most level, there is only one divide. Hence, there are 2 methods of printing with Canva:
- Printing using your device’s built-in app
- Printing using Canva’s special printing service
1. Printing using your device’s built-in application
A method that has been used ever since printing became commonplace, this involves downloading the design you created in Canva and printing it using the built-in application on your device. We’ll be addressing Windows and macOS devices in particular.
But first, here’s how to create and download your design on Canva on to your device:

Some of these features may require you to have Canva’s paid plan . Anyways, now that the design has been downloaded, all that’s left is to print it.

Canva also offers a paid printing service for professional prints for all kinds of things: yard signs, banners, water bottles, mugs, clothes, etc. This way you can technically just hand over your design to Canva themselves to print it for you. However, this feature is only available in select regions and the options can also vary on the region.
To have Canva print your design, follow these steps:

If your design does not satisfy the required size for that object, this message will be displayed to you.

After placing your order, you will receive an email confirmation message. You can also modify or cancel your order for 2 hours after placing it.
Printing by yourself is pretty common but when you want to get designs custom printed, things get a bit more complicated. You have to rely on third-party service s for this job and there’s no guarantee for whether the quality will be up to the mark or not. Canva is reliable and safe , with the best quality guaranteed. They also offer a refund or reprint, if contacted within 30 days after receiving the order.

Other services like PsPrint are also great options, which also offer professional prints for a wide range of options, while being trusted. However, the main disadvantage would be the limited design options. Since Canva is primarily a graphic design tool , you can create almost anything on it. However, services like PsPrint do not offer much in the way of designs, and rely upon you already having ready-made ones.
| Features | Canva | PsPrint |
|---|---|---|
| Varies on the material you’re printing on | Varies on the material you’re printing on | |
| Depends on the option you choose; the minimum being 2-3 days and the maximum being 7-14 days | Depends on the option you choose; the minimum being the next business day and the maximum being 6-7 business days | |
| Covers most international regions | US, Alaska, Puerto Rico and Hawaii only | |
| Extremely customizable | Relies on you having a ready-made custom design or you can use their standard designs with slight alterations | |
| Within 30 days of receiving the order | Within 7 days of receiving the order |
READ MORE: The Ultimate Guide to Designing and Printing Your Own T-Shirt at Home ➜
While it is a freemium service, it’s hard to believe that Canva offers so much even without its premium plan. Even their printing service is pretty affordable, and given the quality as per user reviews, well worth it. If you’re an artist or a graphic designer, we recommend using Canva’s print service to immortalize your best designs.
You have two options: download your Canva design and print it locally or use Canva’s print service for custom printing orders.
Delivery times vary: free shipping takes 1-2 weeks, standard delivery around a week, and express (business) shipping a few days.
PDFs retain formatting better than images and offer more options when it comes to printing, ensuring your final product looks as intended.
Canva stands out for its user-friendly interface and extensive customization options, unlike other services with limited design and customization capabilities.

Kamil Anwar
- System Analyst | Microsoft Certified Professional |
Related Articles

The 9 Best Alternatives to Doublelist You Need to Try in 2024

How to Factory Reset Beats Solo3 & Solo4 Headphones [2024]

How to Get Rid of Online Blackmailers in 2024 [5 Easy Ways]

Soundbar vs. Speakers: Which is the Best Audio System in 2024?

Jump Drive vs Flash Drive: What Sets Them Apart? [2024]

How to Make a Hard Drive Projector: Advanced Guide [2024]
IMAGES
COMMENTS
Print your presentation. Select File > Print. For Printer, select the printer you want to print to. For Settings, select the options you want: Print All Slides: To print each slide on a single sheet or change to just print a range of slides. Slides: From the drop-down, choose to print all slides, selected slides, or the current slide.
Discover how to print your PowerPoint slides with notes as handouts correctly, so you can get out of the office and make it to Happy Hour.
Printing a PowerPoint with notes is worth a few minutes if you want to review the presentation on paper. If you're wondering how to print notes in PowerPoint without the slides, check out our tutorial.
Learn how to print your PowerPoint slides with comments included. Follow our step-by-step guide for easy printing with added notes.
Preparing for a presentation often requires us to print our PowerPoint slides with speaker notes included. Printing your PowerPoint with notes ensures you have all the extra details right at your fingertips during your presentation. This can be a game-changer, helping you deliver your content smoothly and confidently.
Want a backup of your presenter notes in case your computer goes down? Here's how to print a PowerPoint presentation with notes and put your mind at ease.
To print slide notes, either for a speaker or as handouts for your audience, select Notes Pages under Print Layout. This option prints one slide per page with all your notes below. Choose how to organize your printed sheets: Under Settings, select the down arrow next to Collated or Uncollated and then choose your preference. Choose a color ...
Learn how to print your PowerPoint with notes for your next presentation. Follow our step-by-step guide to keep all important notes intact.
Print a PowerPoint presentation with notes and slide thumbnails. To print a PowerPoint presentation with notes and slide thumbnails (one per page): Click the File tab in the Ribbon and then click Print. Under Settings, click the arrow next to Full Page Slides and then in the Print Layout area, click Notes Pages.
Print your presentation. Select the File > Print. For Printer, select the printer you want to print to. For Settings, select the options you want: Slides - from the drop-down, choose to print all slides, selected slides, or the current slide. Or, in the Slides box, type which slide numbers to print, separated by a comma.
Learn how to print notes from PowerPoint with this step-by-step guide. Customize settings for optimal results and troubleshoot common printing issues.
3. When printing, select "Notes Pages" in the "Print Layout" menu and adjust printer settings for optimal output. Why Do You Need Lines for Notes in Your PowerPoint Printouts? Adding lines for notes in your PowerPoint printouts is essential for enhancing the readability and organization of your presentation material.
The notes page is a great tool for creating resources to use while presenting, or for creating detailed handouts for your audience. Click the File tab. Click Print. Click the Full Page Slides list arrow. Select Notes Page . A preview appears at the right. Click Print . The presentation is sent to the printer.
Printing off your PowerPoint presentation notes can serve as a handout to keep your audience engaged and help you stay on track.
How to print PowerPoint with notes The best, and possibly easiest, thing to do is not print your slides, but print the Notes Pages in PowerPoint. Notes Page is a special view that shows the slide and the speaker notes on the same page. This allows you to have a more visual slide to explain the point when presenting, and then a detailed set of notes for your audience to use as reference material.
Print notes pages with slide thumbnails. Click File > Print. Under Printer, choose the printer you want. Under Settings, next to Full Page Slides, select the down arrow, and under Print Layout, select Notes Pages. Click Print. Note: You can only have one slide and accompanying notes per printed page.
You've got your speaker notes set up in your PowerPoint presentation, and now you want to print a copy for quick reference.
In this article, we shall understand the process to print a PowerPoint presentation in further detail. We will look at things like how to print your presentation with notes, how to create handouts, and how to print multiple slides on a single page!
Choose the printer, together with the number of copies, and go to the Settings. Under the Settings drop-down menu, opt for several slides that need to be printed. For Custom Range option, make sure to include the slides for printing. Go to the Notes Pages for determining the format for a printed copy.
This is a step-by-step guide on how to print PowerPoint slides with notes multiple per page in 2023. Learn how to save paper and time by printing multiple slides on a single page, with or without speaker notes.
It's actually simpler to print slides without speaker notes than with them—in fact, there is only one way to print speaker notes with slides. Click File > Print. Under Settings, click the second box (which defaults to say Full Page Slides ), then under Print Layout, click Notes Pages. Notes Pages prints one slide per page, with speaker ...
Learn how to print your Google Slides presentations with notes included, ensuring you have a hard copy of your presentation and all accompanying notes for reference.
To export a PowerPoint presentation as a PDF, open the presentation and go to File > Export. Now, select the Create PDF/XPS Document option from the left side and then click on the Create PDF/XPS ...
Minimize slide text and put notes in the notes section, out of your audience's site. And print them with or without slide thumbnail images. Want more? Edit page numbering, footers, and headers for Handouts in PowerPoint. Change, delete, or hide headers and footers on slides, notes, and handouts. Create and print speaker notes.
⤷ Printing on Windows. Open up the File Explorer and navigate to your Downloads folder. Double-click on the downloaded design to open it. You design should be a PDF file; By default, the PDF file should open up on Microsoft Edge.Click on the printer icon to open up the Print menu. Click on the printer icon