How to Animate Pictures on Powerpoint: A Step-by-Step Guide
Animating pictures in PowerPoint is simpler than you might think! All you need to do is insert the picture you want to animate, choose an animation style from the animations tab, and customize the animation settings to your liking. Once you’ve done that, you can preview the animation and make any necessary adjustments. With these quick steps, you’ll have your pictures moving and grooving in no time!

Step by Step Tutorial on How to Animate Pictures on Powerpoint
Animating pictures can add a dynamic flair to your PowerPoint presentation, grabbing your audience’s attention and keeping them engaged. Let’s dive into the steps on how you can make your images come to life.
Step 1: Insert the picture you want to animate
First, click on the ‘Insert’ tab and select ‘Pictures’ to add your image to the slide.
After selecting your desired picture, it will appear on your slide. You can adjust the size and position of the image as needed before you start animating it.
Step 2: Choose an animation style
Next, click on the ‘Animations’ tab and select an animation style from the gallery.
PowerPoint offers a variety of animation styles, such as fade, fly-in, float, and more. Hover over each style to see a preview and decide which one best suits your presentation.
Step 3: Customize the animation
Once you’ve picked an animation style, click on ‘Effect Options’ to customize it further. You can change the direction, speed, and start timing of the animation.
Customizing your animation ensures that it aligns with your presentation’s pace and theme. You can make the animation as subtle or as dramatic as you like.
Step 4: Preview the animation
After setting up your animation, click on ‘Preview’ to see how it looks. Make sure it works as you intended.
If the animation doesn’t look right, don’t worry! You can always go back and tweak the settings until you’re satisfied with the result.
After you complete these steps, your picture will be animated in your PowerPoint presentation. The animation will play when you reach the slide in presentation mode, adding a professional touch to your slideshow.
Tips for Animating Pictures on Powerpoint
- Use animations sparingly to avoid overwhelming your audience.
- Keep your audience in mind – choose animations that enhance the message you’re trying to convey.
- Test your animations on different devices to ensure they work smoothly.
- Ensure your animations are timed well with the flow of your presentation.
- Remember that less is often more – a simple animation can be more effective than a complex one.
Frequently Asked Questions
What types of pictures can i animate in powerpoint.
You can animate most image formats in PowerPoint, including JPEG, PNG, and GIF.
Animations can add life to any picture, so feel free to get creative with the images you choose to animate. Just make sure they’re relevant to your presentation.
Can I animate multiple pictures at once?
Yes, you can select multiple pictures and apply the same animation to all of them simultaneously.
Selecting multiple images can save you time, especially if you want a uniform animation effect across several pictures.
Can I control the timing of the animation?
Absolutely! You can set when the animation starts, how long it lasts, and if it repeats.
Controlling the timing is crucial for ensuring your animations fit within the overall flow of your presentation.
Is it possible to add sound effects to my animation?
Yes, you can add sound effects to your animations by going to the ‘Animations’ tab and selecting ‘Animation Pane.’
Adding sound effects can enhance the impact of your animations, but use them judiciously to avoid distracting your audience.
Can I animate a picture to move across the slide?
Yes, you can use motion paths to animate a picture to move in a specific direction or path across the slide.
Motion paths can make your presentation more interactive and visually appealing, but make sure the movement makes sense in the context of your slide.
- Insert the picture you want to animate.
- Choose an animation style.
- Customize the animation.
- Preview the animation.
Animating pictures in PowerPoint is a fantastic way to spice up your presentations and keep your audience engaged. It’s a feature that, when used correctly, can emphasize key points, illustrate concepts, and add a professional polish to your slides. Remember, the key to effective animations is subtlety and relevance – they should enhance your presentation, not detract from it.
As you get more comfortable with PowerPoint’s animation features, feel free to experiment with different styles, timings, and effects. Keep in mind the tips provided to ensure your animated pictures have the desired impact. And if you ever find yourself stuck or in need of inspiration, there’s a wealth of resources and tutorials available online to help you master the art of PowerPoint animations.
Whether you’re presenting a business proposal, teaching a class, or sharing a personal story, animated pictures can help you leave a lasting impression on your audience. So go ahead and give it a try – you might be surprised at how much life a little motion can bring to your next presentation!

Matthew Burleigh has been writing tech tutorials since 2008. His writing has appeared on dozens of different websites and been read over 50 million times.
After receiving his Bachelor’s and Master’s degrees in Computer Science he spent several years working in IT management for small businesses. However, he now works full time writing content online and creating websites.
His main writing topics include iPhones, Microsoft Office, Google Apps, Android, and Photoshop, but he has also written about many other tech topics as well.
Read his full bio here.
Share this:
Join our free newsletter.
Featured guides and deals
You may opt out at any time. Read our Privacy Policy
Related posts:
- How to Copy the Animation in a PowerPoint: A Step-by-Step Guide
- How to Remove Animations From PowerPoint: A Step-by-Step Guide
- How to Set Time for Slides in Powerpoint
- How to Rotate Animation in PowerPoint: A Step-by-Step Guide
- How to Make an Object Disappear After Animation in PowerPoint
- How to Save Powerpoint as PDF with Notes
- How to Show One Point at a Time in PowerPoint: A Step-by-Step Guide
- How to Make Things Appear in Powerpoint with Clickable Buttons
- How to Add Page Numbers in Powerpoint 2010
- How to Remove Animation from Powerpoint 2010
- How to Loop a Slideshow on Powerpoint 2013
- How to Make a Powerpoint Slide Vertical in Powerpoint 2013
- How to Delete a Slide in Powerpoint 2010
- How to Unhide a Slide in Powerpoint 2013
- How to Rotate a Slide in PowerPoint: A Step-by-Step Guide
- How to End Powerpoint on Last Slide in Powerpoint 2010
- How to Make a Picture Fly in on Google Slides
- How to Hide a Slide in Powerpoint 2010
- How to Create a Pop-Up in PowerPoint: Step-by-Step Guide
- How to Convert PowerPoint Presentations to HTML: A Step-by-Step Guide
Critical PowerPoint Shortcuts – Claim Your FREE Training Module and Get Your Time Back!
How to Create Moving Backgrounds in PowerPoint (Step-by-Step)
- PowerPoint Tutorials
- December 3, 2017
In this tutorial, I’ll show you how to combine two PowerPoint animation tricks together to create moving backgrounds for your images in PowerPoint.
Animation trick #1: A combination of the Fly In and Split animations to create an interesting reveal effect.
Animation Trick #2 (Bonus): How to use a motion path on a background image to create a rolling background effect/
In the example I build out in this tutorial, I’ll show you how to reveal a majestic tower against a bright blue sky and then make the sky move in the background.
See the looping graphic below.
You are currently viewing a placeholder content from Vimeo . To access the actual content, click the button below. Please note that doing so will share data with third-party providers.
[Watch] Create Moving Backgrounds Tutorial
You are currently viewing a placeholder content from Youtube . To access the actual content, click the button below. Please note that doing so will share data with third-party providers.
To learn more about creating PowerPoint backgrounds, and where you can get free ones, read our guide here .
Part #1: Setting up your picture
1. find a picture with good contrast.
The first step in this PowerPoint animation tutorial is to find a picture that has a nice clean contrast with the background (you don’t want your center object to be touching anything or blending into the background).
For this example, I’m going to use the picture of the tower below.

2. Remove the picture’s background
With your tower (or other image) selected, in PowerPoint 2010 or PowerPoint 2013, navigate to the Picture Tools Format Tab, and select Remove Background.

To remove the background, you want to adjust the frame around the center object of your picture, in this case the tower. The purple area is what will be removed from the image; the colored area is what will remain within the image.
Depending on your picture, you might need to use the “Mark Areas to Keep” and “Mark Areas to Remove” commands to correctly remove the background.
Once the background is all purple, select keep changes.

Once you are done removing the background, you should be left with just the center object of your picture.

Part #2: Building your reveal animation framework
1. turn on the g ridlines.

2. Frame your picture

3. Adding your background image

4. Stretch your background image

5. Fill in the left side of your slide

6. Group the sky with the background rectangle

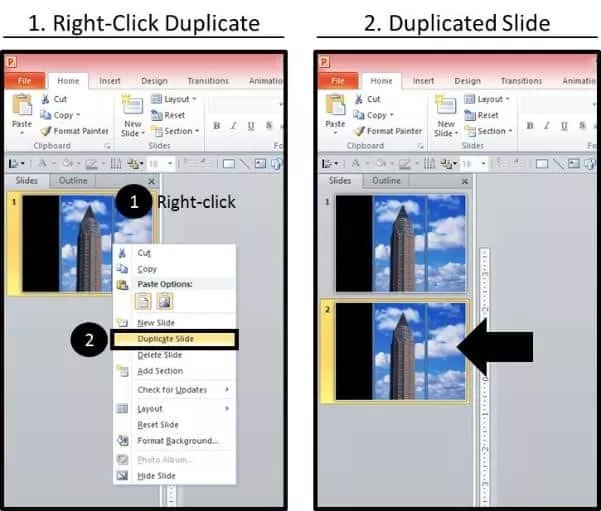
7. Duplicate your slide
8. Crop your background image

Part 3: Adding the PowerPoint animations
1. add the fly in animation to move your background.

2. Add effect options to the Fly In animation

3. Open the Animations Pane and adjust the Fly In animations

4. Add a Split animation

- Set the animation to Start With Previous so that it lines up with the frame animations we previously set
- Set the Duration to .5 seconds
- Set the Delay to 1.0 seconds

5. Add a black background to the right side of the second slide

6. Adding a Motion Path to the background image

7. Add a screen on the left side of the slide

Bonus moving background tricks
1. copy and paste the sky animation.

2. Copy and paste the Sky animation

3. Extend the window frame across the slide

4. Remove the window

5. Change the color tone of the sky
As you can see, what’s great about these techniques is that you can reuse these pieces or swap the out for others once you make them.
You can add a different sky (or a different background entirely) behind the window or the tower, for instance, once you have the background removed.
Or, you can use the sky with another window, such as a plane window, for example. You can also change the picture you’re revealing – so you can replace the tower picture for anything else that’s the same size if you add the same Split animation with the same timings.
Play around with these yourselves and see what other combinations you can come up with! If you enjoyed this tutorial, you can learn more ways to boost your PowerPoint skills here .
What’s next?
Related articles, about the author.

Popular Tutorials
- How to Strikethrough Text (l̶i̶k̶e̶ ̶t̶h̶i̶s̶) in Word, Excel & PowerPoint
- How to Make Animated Fireworks in PowerPoint (Step-by-Step)
- Strikethrough Shortcut (l̶i̶k̶e̶ ̶t̶h̶i̶s̶) for Word, Excel & PowerPoint
- How to Create a Flash Card Memory Game in PowerPoint (Like Jeopardy)
- Keyboard Shortcuts Not Working: Solved
PowerPoint Tutorial Categories
- Strategies & Opinions
- Shortcuts & Hacks
- Presentation Design
- Pictures, Icons, Videos, Etc.
- New Features
- Miscellaneous
- Charts & Data Viz
We help busy professionals save hours and gain peace of mind, with corporate workshops, self-paced courses and tutorials for PowerPoint and Word.
Work With Us
- Corporate Training
- Presentation & Template Design
- Courses & Downloads
- PowerPoint Articles
- Word Articles
- Productivity Resources
Find a Tutorial
- Free Training
- For Businesses
We help busy office workers save hours and gain peace of mind, with tips, training and tutorials for Microsoft PowerPoint and Word.
Master Critical PowerPoint Shortcuts – Secure Your FREE Training Module and Save Valuable Time!
⌛ Master time-saving expert techniques.
🔥 Create powerful presentations.
🚀 Propel your career to new heights.
We value your privacy – we keep your info safe.
Discover PowerPoint Hacks Loved by Industry Giants - KKR, AmEx, HSBC!
Over 114,880 professionals in finance, marketing and sales have revolutionized their PPT skills with our proven methods.
Gain FREE access to a full module of our premium PowerPoint training program – Get started today!
We hate spam too and promise to keep your information safe.
You are currently viewing a placeholder content from Facebook . To access the actual content, click the button below. Please note that doing so will share data with third-party providers.
How To Insert An Animated GIF In PowerPoint
A great way to grab their attention
Using different media types during a PowerPoint presentation helps keep the audience entertained. Inserting an animated GIF in PowerPoint can capture attention and add humor when well-placed and relevant to the topic.
This article will show you how to insert and use animated GIFs in PowerPoint presentations to demonstrate an activity, convey a message, or grab the audience’s attention.

Insert an Animated GIF In PowerPoint From Your Computer
- Start by opening PowerPoint and navigating to the slide where you want to add the animated GIF. Click on Insert in the top navigation and double click on Pictures .

- If you have an animated GIF on your computer, choose the file from its location and click Open .
- Navigate to Slide Show from the top bar navigation. Click on From Current Slide to see the animated GIF in action. It won’t show the movement from the slide view.

- When you play the slideshow during a presentation, the GIF is animated automatically.

Insert an Animated GIF In Powerpoint From Online Image Search
- If you don’t have a GIF on your computer, you can use the online image search to locate one. Go to the slide where you want to add the GIF.
- Click on Insert in the top navigation and choose Online Pictures (PowerPoint 2013 and later.)

- Search in the popup box for an image to use in your presentation. You can narrow your search by typing gif .

- By default, Creative Commons only is checked off. You only want to use images that are legal in your presentation so keep it checked.
- Select the image you want to use and click Insert to add it to your slide. Narrow your search even more by using specific keywords. For example, typing office GIF will only show animated images related to an office.

Notice the animated GIFs from the online option bring with them the image sources. It’s best to keep them in your presentation to protect yourself legally, even though they are under Creative Commons License.
How To Control Animated GIF Loops
An animated GIF is like a mini-movie. GIFs have a minimum of two images in separate frames. The number of frames determines the animation. While the length of the animation depends upon the number of times the frames loop.
Many GIFs, such as the bottom one above in the screenshot , are set to loop continuously. This can be very distracting in a PowerPoint presentation.
To limit how long the animation lasts, try using an online GIF editor such as ezgif.com or giphy.com . You can also try editing your GIF in CC Photoshop .
- Let’s use ezgif . Click on GIF Resizer.

- Upload your GIF to the website or insert the URL of the image.

- This step will show you every frame used to animate the image and how long it lasts.

- Scroll down to Loop Count under GIF options.

- Enter the number of times you want the GIF to loop and click the blue Make a GIF button . Download the edited GIF to your computer and then insert it into your presentation.
Edit The Animated GIF In PowerPoint
You can resize and move a GIF inside your PowerPoint presentation just as you can with an image. Drag one of the four corners of the GIF so that you don’t distort the aspect ratio.

To rotate the image, drag the circular anchor above the image until it is where you want it.

There are several other image editing options, such as adding shadows, borders, and reflections. Some effects might affect the animation. Play the Slide Show from the current slide to make sure you didn’t cancel the animation.
Adding a Frame To Animated GIFs
To add a frame around an animated GIF you’ve created , click on the image and select Format from the top bar navigation under Picture Tools .

As seen in the screenshot above, there are several frame options. Below are examples of a few of them with our animated GIF.

Notice in the screenshot above that the white frame doesn’t animate. So, again, always check any image effects you add to an animated GIF to make sure you don’t break it.
How To Make An Animated GIF
Let’s use the same online free tool to create a GIF that we used to edit one – ezgif . Create your own animated GIF by uploading a sequence of different image files. You can use JPG, BMP, GIF, TFF, PNG, Zip image archives and mix different formats and sizes. Ezgif will convert them automatically for you.
- Start by clicking Browse under Select images . Hold down the Ctrl key when choosing multiple photos.

- Once you have selected the images you want to use, click Open. Before creating the GIF, adjust some of the settings, including the frame order and animation speed. Don’t forget to set the number of times you want the animated GIF to loop; otherwise, it will loop continuously.

- If your uploaded images are not the same size, click Resize to crop and match them to the smallest one automatically. It’s better to make an image smaller than larger so as not to distort or make it blurry.
- Click the blue button that says Upload and make a GIF! After generating the GIF, you can crop, resize, and optimize it.
Check out the other tools ezgif provides. They are all free to use and can help add some fun to your PowerPoint presentations. There are plenty of ways you can create your own unique GIF’s. You could even try turning your iOS Live Photos Into GIF Images.
Why Add Animated GIFs To PowerPoint Presentations?
GIFs are in-between static images and videos. They are smaller files, take up less space on your computer, and add a few seconds of enjoyment. Those few seconds can help re-engage viewers who might be losing interest. Adding a familiar or funny animated GIF will make your presentation memorable to your audience.
Spruce up your PowerPoint by adding some funny GIFs. Lighten up the mood of what might otherwise be a mundane presentation. They will also help your audience relate to you by making you appear more approachable. Don’t overdo it.
When used in moderation, adding animated GIFs to your PowerPoint will sprinkle something unique into your presentation and help your audience remember its content and message.

David has a background in small business and lives in Australia. He is a WordPress and Ubuntu Developer who enjoys design, CSS and tech tool integration. Read David's Full Bio
Read More Posts:

Leave a Reply
Your email address will not be published. Required fields are marked *

How to Add Animation in PowerPoint (Animate Pictures, Shapes, Text and Other Objects)

Add Animation in PowerPoint to Create More Engaging Presentations
by Avantix Learning Team | Updated August 8, 2023
Applies to: Microsoft ® PowerPoint ® 2013, 2016, 2019, 2021 and 365 (Windows)
You can add animation to pictures, text and other objects in PowerPoint to create more engaging presentations. Animations can be entrance, exit, emphasis or motion path and can start on click or automatically when you run a slide show. Since animations add movement, they can help to focus attention. The key is to engage, not distract, your audience. You can add animation in Normal View or Slide Master View.
Recommended article: 10 Ways to Compress PowerPoint Presentations to Reduce File Size
Do you want to learn more about PowerPoint? Check out our virtual classroom or in-person classroom PowerPoint courses >
There are 4 types of animation in PowerPoint:
- Motion Path
Although you can also apply transitions between slides in PowerPoint (like Morph), transitions are different from animations and occur between slides when you run a slide show.
Add animation using the Animations Gallery
The easiest way to apply a single animation effect is to use the Animations Gallery on the Animations tab in the Ribbon:

The expanded Animations Gallery appears when you click the More down arrow:

Add multiple animations to an object
If you are adding more than one animation effect to an object, you must use the Add Animation command in the Advanced Animations group, not the Animations Gallery.
Add an entrance animation
The most common type of animation to add to an object is an entrance animation. Common entrance animations are Fade, Fly In or Wipe.
To add an entrance animation to a picture, shape or other object:
- In Normal View or Slide Master View, select a picture, shape or other object. For text objects, click in the text box or placeholder or click its edge.
- Click the Animations tab in the Ribbon.
- In the Animations group, click the More down arrow on the bottom right of the Animations Gallery.
- Click an entrance animation in the Entrance group.
- If you would like to select an entrance effect that does not appear in the Entrance group, click More Entrance Effects at the bottom of the gallery. A dialog box appears.
- Click the entrance effect you want to apply.
You can also apply an entrance animation by clicking Add Animation on the Animations tab in the Advanced Animation group.
The Change Entrance Effect dialog box includes several other entrance animations (some are only available in specific versions):

Add an exit animation
You can also add exit animations to objects. Common exit animations are Fade, Fly-Out or Disappear.
To add an exit animation to a picture, shape or other object:
- Click an exit animation in the Exit group.
- If you would like to select an exit effect that does not appear in the Exit group, click More Exit Effects at the bottom of the gallery. A dialog box appears.
- Click the exit effect you want to apply.
You can also apply an exit animation by clicking Add Animation on the Animations tab in the Advanced Animation group.
The Change Exit Effect dialog box includes several other exit animations (some are only available in specific versions):

Add an emphasis animation
You can apply emphasis animations to some objects in PowerPoint. Emphasis animations are normally used for text, shapes or images. Common emphasis animations are Grow/Shrink, Fill Color or Font Color. Emphasis animations are enabled only for the type of object you select. For example, you can only apply Font Color to a text object.
To add an emphasis animation to a picture, shape or other object:
- Click an emphasis animation in the Emphasis group.
- If you would like to select an emphasis effect that does not appear in the Emphasis group, click More Emphasis Effects at the bottom of the gallery. A dialog box appears.
- Click the emphasis effect you want to apply.
You can also apply an emphasis animation by clicking Add Animation on the Animations tab in the Advanced Animation group.
The Change Emphasis Effect dialog box includes several other emphasis animations (some are only available in specific versions and for certain types of objects):

Add a motion path animation
A motion path is a path that is followed during an animation. For example, you can have an object move along a straight line path down and to the right on a slide.
To add a motion path animation to a picture, shape or other object:
- In Normal View or Slide Master View, select a picture, shape or object.
- Move the picture, shape or object you want to animate to the desired starting location.
- Select the picture, shape or object. For text objects, click in the text box or placeholder or click its edge.
- Click a motion path animation in the Motion Paths group.
- If you would like to select a motion path effect that does not appear in the Motion Paths group, click More Motion Path Effects at the bottom of the gallery. A dialog box appears.
- Click the motion path effect you want to apply.
- Click OK. A path will appear. In 2013 and later versions, a second copy of the object appears.
- Depending on the type of motion path you selected, drag the end copy or point to a new location.
You can also apply a motion path animation by clicking Add Animation on the Animations tab in the Advanced Animation group.
Motion paths can be used in advanced animation sequences. In this article, we are focusing on simple motion paths.
To resize or redirect a motion path:
- Drag the green start point to a new location.
- Drag the red end point to a new location.
The Change Motion Path dialog box includes several other motion path animations:

Preview animation effects
After you add an animation effect, you can click the Preview or Play button on the Animations tab in the Ribbon to preview it. You can also preview animations by running a slide show (click the Slide Show button on the bottom right of your screen). By default, animations are set to play on click.
Set Effect Options
You can also set different Effect Options for animations. Effect Options change depending on the animation effect you selected. For example, if you selected the Fly In entrance effect, options would include From Top, From Left, From Right and so on.
To set an effect option for an animation effect:
- Select a picture, shape or object. For text objects, click in the text box or placeholder or click its edge. We'll assume here that there is one animation applied to the object.
- Click Effect Options. A drop-down menu appears.
- Click an option.
The following Effect Options appear for the Fly In animation:

Control the way animations start
Although animations are set by default to start on click, you can start them in other ways.
To control the way an animation starts:
- In the Animations group, select an option from the Start drop-down menu in the Timing group. You can select On Click, With Previous or After Previous. With Previous or After Previous will run based on a previous animation.
Note the Start setting is set by default to On Click:

Control the speed or duration of animations
When you apply an animation, a duration or speed is automatically set for the animation (in seconds). The default duration is different for each animation effect. The initial duration is often fast and you may want to increase the duration to slow it down.
To set a speed or duration of an animation:
- Select an picture, shape or object. For text objects, click in the text box or placeholder or click its edge. We'll assume here that there is one animation applied to the object.
- In the Animations group, enter a time for the animation in the Duration area of the Timing group. You can click the up and down arrows to change the duration or type a duration.
Note the Duration in the example below:
Editing animations using the Animation Pane
When you apply multiple animations to an object, it's best to display the Animation Pane so you can easily edit the animations.
To edit animations using the Animation Pane:
- Click Animation Pane in the Advanced Animations group. The Animation Pane appears on the right side of the screen.
- Click the animation effect you want to edit.
- Select the desired options on the Animations tab in the Ribbon or click the down arrow to the right of the animation effect and select options for the animation. You can also select Effect Options and choose more options in the Effect Options dialog box.
The Animation Pane will display the animations you have applied. If you have applied an entrance and exit effect, two animation effects will appear in the Animation Pane. You can click the animation effect in the Animation Pane and click the arrow to the right to display a drop-down menu with options or you can select options in the Ribbon for that effect.
In the Animation Pane, a green star appears beside entrance animations and a red star appears beside exit animations as follows:

Remove animations
To remove animations from pictures, shapes or objects on a slide:
- Select a picture, shape or object. For text objects, click in the text box or placeholder or click its edge.
- Shift-click any other objects with animations you want to remove.
- In the Animations group, click None in the Animations Gallery.
Animation can help engage your audience and focus attention and it's not difficult to use in PowerPoint presentations.
Subscribe to get more articles like this one
Did you find this article helpful? If you would like to receive new articles, JOIN our email list.
More resources
How to Insert Slide Numbers in PowerPoint
How to Make an Object Appear and Disappear in PowerPoint
How to Quickly Remove All Animations in PowerPoint Presentations
How to Use Morph in PowerPoint to Design Engaging Presentations
How to Remove the Background of an Image in PowerPoint (2 Ways)
Related courses
Microsoft PowerPoint: Intermediate / Advanced
Microsoft PowerPoint: Design for Non-Designers
Microsoft PowerPoint: Animations Bootcamp
Microsoft Excel: Intermediate / Advanced
VIEW MORE COURSES >
Our instructor-led courses are delivered in virtual classroom format or at our downtown Toronto location at 18 King Street East, Suite 1400, Toronto, Ontario, Canada (some in-person classroom courses may also be delivered at an alternate downtown Toronto location). Contact us at [email protected] if you'd like to arrange custom instructor-led virtual classroom or onsite training on a date that's convenient for you.
Copyright 2024 Avantix ® Learning
You may also like

How to Insert or Type E with an Accent Mark in PowerPoint (È, É, Ê, Ë, è, é, ê, or ë)
You can insert or type e with an accent mark in PowerPoint using built-in tools or keyboard shortcuts (including Alt code shortcuts). The letter e can be inserted with an accent in both upper or lower case in text boxes or placeholders on slides, the slide master or layouts. The following are common accents in upper or lower case – È, É, Ê, Ë, è, é, ê, or ë.

How to Fade a Picture or Part of a Picture in PowerPoint (Using a Gradient)
You can fade a picture in PowerPoint by drawing a rectangle shape on top of the picture and then filling the rectangle with a gradient from opaque to transparent. This technique is often used to fade an image into the background of a slide. Since the rectangle is placed on top of the image and then text may be placed on top of the rectangle, you may need to reorder the objects.

How to Lock an Image, Shape or Other Object in PowerPoint
You can now lock an image, shape or other object in PowerPoint. Objects can be locked in Normal View or Slide Master View. Only PowerPoint 365 users can lock objects to prevent moving and resizing. This is helpful if you want to select and move other objects on the slide or prevent others from moving or resizing an object. You can lock items using the context menu or the Selection Pane.
Microsoft, the Microsoft logo, Microsoft Office and related Microsoft applications and logos are registered trademarks of Microsoft Corporation in Canada, US and other countries. All other trademarks are the property of the registered owners.
Avantix Learning |18 King Street East, Suite 1400, Toronto, Ontario, Canada M5C 1C4 | Contact us at [email protected]
Our Courses
Avantix Learning courses are offered online in virtual classroom format or as in-person classroom training. Our hands-on, instructor-led courses are available both as public scheduled courses or on demand as a custom training solution.
All Avantix Learning courses include a comprehensive course manual including tips, tricks and shortcuts as well as sample and exercise files.
VIEW COURSES >
Contact us at [email protected] for more information about any of our courses or to arrange custom training.
Privacy Overview
Pin it on pinterest.
- Print Friendly
Animated GIFs in PowerPoint: Your Tutorial
Looking for a way to liven up your PowerPoint presentation’s content? How about using a GIF? Animated images are everywhere these days. So why not use GIFs for your presentation content, too?
GIFs are guaranteed to grab your audience’s attention. They’re a fun and entertaining way to highlight your content and key messages. Plus, GIFs have smaller file sizes than videos , which saves you loading time. Learn how to create GIFs and insert them into your presentation.
What is an animated GIF?
GIF stands for graphics interchange format. This is a type of bitmap image format that supports up to 8 bits per pixel, allowing an image to have access to a 255-color palette. GIF files are perfect for images with a small color palette and, of course, animations. Also, the file size is usually smaller than JPEG files.
Most GIF files are animated. That is, they’re not static images, like JPEG files, but repeat automatically after a few seconds. Other GIFs only once and stop on the last image.
Why use GIFs?
GIFs are a great choice if you want to liven up your presentation and use movement to attract your audience’s attention. There are so many possibilities for using GIFs:
- GIFs instead of videos → smaller file size and shorter loading time
- Animated logos
- Animated pictograms
- Illustrating trends, data, processes

Always be mindful of using GIFs appropriately. Since GIFs always draw attention, they should be carefully selected so as not to distract from the content of your presentation . To use GIFs effectively, it is advisable to use them sparingly and strategically incorporate them at the right points in the presentation.
Ideally, GIFs should be placed at key points to emphasize important elements or visualize complex concepts. Additionally, it is recommended to use GIFs that have a clear connection to the message of the presentation and support the topic.
GIFs in Various Industries
GIFs can be used in a variety of industries and professional fields to enhance presentations and make content more engaging.
In the marketing industry , animated logos or GIFs can be used to illustrate trends and statistics. Additionally, GIFs can reinforce their brand message. In education , GIFs can visually represent complex concepts and support the learning process. Even in technical or scientific presentations, GIFs can be used to explain processes or procedures in a visual manner.
The versatility of GIFs allows them to be effectively used in diverse contexts. In casual and informal presentations, humorous or entertaining GIFs can be used to amuse the audience and lighten the mood. In sales or business presentations, GIFs can be employed to present products or services in an engaging way and pique the interest of potential customers.
How to create a GIF
So, you’ve decided to insert a GIF into your PowerPoint? Then you have come to the right place. There are several ways to create a GIF, which we will show below.
Create a GIF directly in PowerPoint
GIFs contain a series of images that are displayed in sequence quickly enough to create an animation. To create these in PowerPoint itself, you can use a transition or, as we’ll explain below, use the slide transition, Morph .
1. Before you start creating, you need to determine the shape and size of your GIF . If you are using a standard widescreen slide, the GIF will also adopt the 16:9 aspect.
2. Open the PowerPoint slide on which you want to insert the GIF.
3. Click on the Design In the Customize group you can set your slide size by clicking Slide Size > Custom Slide Size… .
4. Now insert your desired object, in our case an icon, by going to the Insert tab and selecting Icons in the Illustrations group.

Tip: You can find more professional icons from PresentationLoad for your business here .
5. Choose an icon and create a duplicate of the slide in the thumbnail view by pressing Ctrl+Shift+D (A Morph transition needs two slides with the same object).

6. Now go to the slide with the duplicate and make any changes you want to the icon. For example, change the position, the color or text .
7. Click on the duplicate icon and go to Transition > Morph in the Transition to This Slide group.

8. Stay on the Transitions tab and go to Effects Options . There you can choose how you want the transition to work.
9. Select Objects , as in our example.
10. Click Preview in the Transitions tab to see what your Morph transition will look like.
11. Now go to File > Export and select Create Animated GIF .

12. Select the file size you want and click Create GIF .

13. In the same window, you can also choose how many Seconds to spend on each slide .
14. A progress bar for your GIF file will appear in the status bar at the bottom. This normally takes only a few seconds.
Our GIF looks like this:
Create a GIF in Photoshop
Looking to create your own content and use custom images to make a GIF for your key messages? No problem. Photoshop allows you to turn your own images into GIFs. This is how you do it:
For this tutorial, you need the Photoshop image editor and some experience using it.
1. Remember to use a tripod when taking pictures so that they are taken from the same perspective.
2. Modify each captured image the way it should appear later in the GIF sequence.
3. Make sure all your pictures have the same number of pixels .
4. Import the pictures to a Photoshop file under File > Scripts > Load Files Into Stack . This opens a window. Click Browse to find your pictures. Hold down the Shift key , select your photos, click Open and OK . Your photos will now be imported into a single layer file. On the right side, you’ll see several new layers. These will become the frames of your GIF.
5. Now it’s time to design a frame animation. To do this, go to Window > Timeline at the bottom of your workspace.
6. Click the arrow on the button in the middle of the panel and select Create Frame Animation . Your first photo will now be inserted into the timeline for you.
7. To convert layers into animation frames, go to the upper-right corner of the Timeline panel and click the menu icon. Now select Make Frames From Layers .
8. If your photos are playing in reverse order, go back to the Timeline menu icon again and select Reverse Frames .
9. Click under each frame and select how long it should appear for before switching to the next frame. A transition of one to five seconds is optimal.
10. You can also set an infinite loop for your GIF, copy, paste, and flip the images. Before copying and pasting, set the playback time so you don’t have to set it again for each copy. To copy the images, click on the first image, hold down the Shift key and click on the last image. Then go to the right menu and click Copy Frames . Then switch to Paste Frames in the same menu.
11. When the Paste Frames window opens, be sure to select Paste After Selection . Now you can reverse the frames.
12. Go back to the menu and click on Reverse Frames (as in point 8). Two identical frames should now appear in the center. Delete one of them so that your GIF doesn’t lag.
13. You can preview your GIF by clicking the play button at the bottom of the timeline window.
14. Now save your file as a GIF. First make sure the infinite loop is set to Forever (in the bottom left corner). Now select File > Export > Save for Web (Legacy) to save it.
This quick guide can also be found as a video here .
Find animated GIFs on the internet
Want to insert a GIF into PowerPoint but don’t want to create your own? You can find GIFs on the web using PowerPoint’s online image search .
In PowerPoint, go to Insert > Pictures > Online Pictures… . or Insert Clip Art for older PowerPoint versions. Go to the search box and type animated GIF . Now you can select a GIF from the category you want.
Tip: There is a wide range of online tools and resources available that allow you to create and download GIFs. These tools often offer easy-to-use interfaces and various editing options to customize the desired GIF. Some tools also provide features to optimize the GIF file size to reduce loading times.
Additionally, there are websites that offer a variety of high-quality and royalty-free GIFs that can be used in presentations. Using such resources saves time and allows you to find or create engaging GIFs for your presentation.
How to insert a GIF in PowerPoint
Now that you know how to create GIFs, let’s show you how to insert them into PowerPoint:
For Windows:
1. Select the slide where you want to insert the GIF.
2. Now go to Insert > Pictures . This will open the Insert Picture From drop-down menu.
3. Select the file you want from one of the locations in the drop-down menu and click Insert .
2. On the Home tab under Insert , go to Picture > Picture from File .
3. In the window that opens, browse for the file you want and click Insert .
How to play animated GIFs
You’ve inserted your GIF on a slide and it still appears as a just a picture. Don’t worry, with just a few clicks, you can play back your GIF.
1. Go to the Slide Show tab.
2. In the Start Slide Show group, click From Current Slide .
3. The GIF file will now play in a continuous loop.
1. Go to the Slide Show menu.
2. Now select Play from Current Slide .
How to adjust the animation loop frequency
Your GIF is now inserted into PowerPoint and playing in an endless loop. To set how often it plays , use the online editor at ezgif.com .

Go to the GIF frame extractor on ezgif.com and upload your GIF file. You can set the repetition by selecting Split to frames > Edit animation > Loop count > Make a GIF! Save the new file and paste it into the presentation again.

Some limitations when using GIFs
Keep the following points in mind when using a GIF in PowerPoint:
- GIFs start automatically when you switch to a slide. This means that it’s not possible to control playback with a mouse click, so keep this in mind during your presentation.
- GIFs have only 256 colors , which can reduce the image quality for photos.
- You can’t create transparent areas with a GIF.
- You can’t crop a GIF.
- Large File Size: To use GIFs effectively in presentations, it’s important to optimize their file size . Large GIFs can slow down loading times and impact the presentation. By reducing the color palette, using compressed images, and limiting the animation duration, the file size of GIFs can be reduced without significantly compromising visual quality. Optimizing the file size ensures smooth playback of GIFs and enhances the user experience during the presentation.
Conclusion : GIFs liven up a presentation
If you want something entertaining to catch your audience’s eye and attention , choose a GIF.
You don’t always have to turn to elaborate videos. A GIF is a great way to illustrate a process or even your key messages . And thanks to its small file size, you won’t have to deal with long loading times . You can also customize your animated GIF by adjusting its loop frequency however you like . Plus, they’re fun and easy to create!
Use an animated GIF; you won’t regret it.
If you have any questions about GIFs or PowerPoint in general, feel free to reach out to us at [email protected] . We’re here to assist you.
Are you looking for professionally designed slide templates to support your key message ? Visit our shop for a wide range of slides on various (business) topics available for download. Explore our shop today! ► Go to Shop
You may also be interested in other articles:
- PowerPoint Animations
- Insert a PDF in PowerPoint
- Define the Core Message of Presentations
- Control Your Audience’s Attention
Share this post
- share
- save

Design Thinking: Problem Solving with a Difference

Why Corporate Mission Statements Are So Important

7 Tips & Learnings from the Apple Keynote
How-To Geek
How to insert an animated gif into a powerpoint presentation.
During a presentation, a mix of different media types keeps things entertaining, and a well-placed animated GIF is no exception.
Quick Links
Insert a gif in powerpoint.
During a presentation, a mix of different media types keeps things entertaining, and a well-placed animated GIF is no exception. You can use them to convey a message, demonstrate an activity, capture the audience’s attention, or just add some humor.
Inserting a GIF in a PowerPoint slide is just as easy as inserting any other image. Go ahead and locate the GIF that you'll be using. In this example, we'll use this awesome Final Fantasy VI GIF.
Next, go ahead and open up the PowerPoint presentation and navigate to the slide into which you'll insert the GIF. Once there, head over to the “Insert” tab and click the Pictures” button.
In the window that opens, browse to the location of the GIF, select it, and then click “Insert.”
The GIF will now appear in the slide.
In the regular slide view, the GIF will appear static; it won't animate until the actual presentation. To make sure it's working correctly, head over to the “Slide Show” tab and click the “From Current Slide” button (or press Shift+F5).
You should now see the GIF in action.
When it comes to formatting, you have the same options as you do with a regular image. Play around with the different options until you have the perfect GIF for your PowerPoint presentation!
- Animate pictures, art, and more Video
- Animate text Video
- Animate pictures and shapes Video
- Animate charts and SmartArt Video
- Create custom animations Video

Animate pictures and shapes

The process of animating any object is the same: select what you want to animate, add an animation, then choose effect options. The same holds true for pictures and shapes.
The process of animating any object is the same: select what you want to animate, add an animation, and then choose effect options.
Let's think about what we can do with this slide. The point of the slide is to introduce each person.
So, let's do that by using an Entrance animation to bring in each picture.
Select the first picture, go to the ANIMATIONS tab and open the gallery.
We could do a motion animation, like Fly In . But let's try a simple Fade animation instead.
That's nice, because it supports the design. Let's also do something with the shapes behind each picture.
For these, we need to use an Emphasis animation because the shapes will already be on the slide.
There is Wave again. It is interesting, but we need something a bit more subtle. Like Fill Color .
And in Effect Options , change the color to orange. That'll work.
Next, we need to copy these animations and options to the other pictures and shapes.
Here is an easy way to do that. Select the first picture. Then, double-click the Animation Painter .
Now, all you have to do is click the other pictures, and the animation and settings are copied.
Click Animation Painter again to turn it off.
Now, we'll do the same for the shapes.
All the animations are in place, but we are not done yet. Click Preview .
The animations play correctly, but not in the right order.
To fix that, open the Animation Pane .
This is an essential tool for working with animations.
It lists all the animations in the order they occur, and the names of the objects that are being animated.
It is also a timeline that shows how long each animation runs, and it shows how each animation is triggered (or starts).
Notice that the names of the objects are not necessarily related to where they appear on the slide.
Click an object to see which animation is associated with it. For example, the first picture is the first animation, but its name is Picture 3.
First, let's put the animations in the right order. To do that, click an animation and drag it to a new position.
We want the first picture to animate with the first shape; the second picture with the second shape; and the third picture with the third shape.
Click here to preview the animation. It looks like everything is running in the right order.
But next, we need to change when the animations play.
Currently, each animation is set to start with a mouse click.
That means, we need to click once to run a picture, then again to run the shape, then again to run the next picture, and so on.
What we want is for each picture to start with a click, and for the shapes behind each picture to start at the same time.
So here is how we fix that.
Right-click the first shape, and select Start With Previous .
Now, the shape animation will start when the picture animation starts. Let's also do that with the two remaining shapes.
Press Shift+F5 to run the current slide.
When we click, the picture fades in and the shape changes colors. And that goes for the second and third picture and shape too.
Almost perfect. But, let's do one more thing.
These bars in the timeline display the duration of each animation.
Click the right border of each shape, and drag it to the left to shorten the duration of the color change.
Use the screen tip to set an end time of one second.
Of course, you can do a lot more with shapes, pictures, clip art and all the other objects, but now you have a good start.
Up next, let's take a quick look at some interesting things you can do with charts and SmartArt.

Need more help?
Want more options.
Explore subscription benefits, browse training courses, learn how to secure your device, and more.

Microsoft 365 subscription benefits

Microsoft 365 training

Microsoft security

Accessibility center
Communities help you ask and answer questions, give feedback, and hear from experts with rich knowledge.

Ask the Microsoft Community

Microsoft Tech Community

Windows Insiders
Microsoft 365 Insiders
Was this information helpful?
Thank you for your feedback.
Just $59.95 for a limited time (normally $99.95).

Power up Your Presentations with Dynamic PowerPoint Animations
Add fun and alluring PowerPoint animations to your presentations; your audience will thank you with their focus and attention. Use Animations in PowerPoint, Google Slides, Social Posts, and More!
Get started now and begin downloading unlimited animations for all your projects.
It's Time to Let Your Presentations Shine, Get Started Now!
The animation wow factor.
Boost your Viewer Engagement and Focus
Our PowerPoint animations add a significant increase to viewer engagement. Add even more engagment! Get access to tools and add your message, logo, and images to specially designed animations. Check out our collection of customizable animations.
Your success is our mission
Don't Let Presentation Design Consume Your Time
A perfect solution! Let us provide you with the best tools and vibrant animated designs to help you create captivating presentations faster and easier.
Leverage Animations for PowerPoint and More
Download as gifs in Powerpoint, Google Slides, and Keynote. Also, get these animations as Quicktime movie files for use in many popular video editing programs. In addition to your presentations, use these animations in social media posts, training videos, blog articles, and more.

Both Presenter and the Audience Will Benefit
Dramatically increase your viewers' probability of remembering your specific point or message. From teachers to students to business professionals, any presenter will benefit from using these highly engaging PowerPoint animations .

WE ARE HERE TO HELP!
If you have any unanswered questions about our templates, don't hesitate to contact us. We can help you get on your way to creating some dynamic and impactful presentations. Get a head start on your presentation design with our library of professional PowerPoint templates .

PowerPoint Animation Tutorial
Learn more about using our animations in your PowerPoint slides.
- How to Modify, Download, and Insert Animations into Powerpoint
What are PowerPoint animations ? PowerPoint animations are terrific ways to bring your presentations to life by adding character animations or animated elements to your PowerPoint presentations.
If you are looking for animated PowerPoint elements, check out our collection of animated PowerPoint templates here.
If you're looking for a way to create excellent marketing or presentation videos with animation, check out our Slideclips online video maker.

Your presentations are going to be amazing! See Plans and Pricing

© 2009-2021 Eclipse Digital Imaging, Inc.
Quality PowerPoint Templates , Animations, videos, and 3D Clipart. PowerPoint® is a registered trademark of Microsoft Corporation.
Notification Title!
This is the message.
Got any suggestions?
We want to hear from you! Send us a message and help improve Slidesgo
Top searches
Trending searches

suicide prevention
8 templates

computer network
75 templates

spring season
28 templates

cybersecurity
6 templates

46 templates

18 templates
Animated Presentation templates
Enjoy our wonderful animated presentation templates for google slides and powerpoint and customize them to your liking to give an entertaining pitch..

Premium template
Unlock this template and gain unlimited access
Dividing Integers
Download the "Dividing Integers" presentation for PowerPoint or Google Slides and teach with confidence. Sometimes, teachers need a little bit of help, and there's nothing wrong with that. We're glad to lend you a hand! Since Slidesgo is committed to making education better for everyone, we've joined hands with educators....

Spring Woods
Download the "Spring Woods" presentation for PowerPoint or Google Slides and start impressing your audience with a creative and original design. Slidesgo templates like this one here offer the possibility to convey a concept, idea or topic in a clear, concise and visual way, by using different graphic resources. You...

Comparing Fractions (Cross Multiplication)
Download the "Comparing Fractions (Cross Multiplication)" presentation for PowerPoint or Google Slides and teach with confidence. Sometimes, teachers need a little bit of help, and there's nothing wrong with that. We're glad to lend you a hand! Since Slidesgo is committed to making education better for everyone, we've joined hands...

Athletics Newsletter
Download the "Athletics Newsletter" presentation for PowerPoint or Google Slides. Attention all marketers! Are you looking for a way to make your newsletters more creative and eye-catching for your target audience? This amazing template is perfect for creating the perfect newsletter that will capture your audience's attention from the get-go....

Animated Raven Literature Lesson
Prepare an original literature class with this template for high school teachers. It is based on the work The Raven, by the American writer and poet Edgar Allan Poe. It is interactive and has animated elements. You can include exercises to test your pupils' knowledge after explaining the lesson. It...
Animated Intro for Social Media Platforms
Are you describing how your company is going to publish content on social media? Are you defining what, when and how everything is going to be published for the next quarter? You can do so with this new template, that has been created for PowerPoint only. What is its special...

Fractions: Addition and Subtraction of Mixed Numbers
Download the "Fractions: Addition and Subtraction of Mixed Numbers" presentation for PowerPoint or Google Slides and teach with confidence. Sometimes, teachers need a little bit of help, and there's nothing wrong with that. We're glad to lend you a hand! Since Slidesgo is committed to making education better for everyone,...
Motion Graphics App Pitch Deck
You have designed the perfect app for motion graphics, how can you present it now very visually and still keeping your company’s essence? Check out this template for PowerPoint! It’s perfect for an app pitch deck for your product. The 3D shapes floating over the soft slides will make your...
Elegant Workplan
Developing a successful business plan can be challenging, but with the right tools at your disposal, it becomes much simpler. This template is a comprehensive document that allows you to outline your business goals, strategies, and financial projections in a professional and aesthetically pleasing way. The full suite of resources...

Animation Studio Business Plan
Download the "Animation Studio Business Plan" presentation for PowerPoint or Google Slides. Conveying your business plan accurately and effectively is the cornerstone of any successful venture. This template allows you to pinpoint essential elements of your operation while your audience will appreciate the clear and concise presentation, eliminating any potential...
Consulting with Morph Transition
You help companies maximize their performance, you help them identify potential areas of improvement, you help them optimize their costs. Ah, what would many businesses do without consultants... And what would many consultants do without Slidesgo? Today is the day we publish this template created exclusively for PowerPoint. Along with...
Organic Shapes Design for Business
Explore the world of creativity with this design. This ingeniously designed template is an ideal match for PowerPoint presentations that demand vibrancy and intuitiveness. It comprises a variety of animated, simple, and interactive elements that bring an enthralling visual experience. Elevate your presentation's appeal with this unique combination of simplicity...
Interactive Digital Marketing Canvas
Ready to change the way you see marketing? Here's a digital and interactive marketing canvas, created entirely in PowerPoint, where each slide is a place in which to create magic, marketing magic. The palette is full of energetic colors, and everything is totally customizable. Run one of the most popular...

Creative Animated Book
Imagine being in charge of your own book, designing it, telling a story, drawing its characters… now take all of that creativity and unload it on this template for Google Slides and PowerPoint! Its colorful, funny slides attract everyone’s attention and will be the perfect background for your story. But...

Multiplying Integers
Download the "Multiplying Integers" presentation for PowerPoint or Google Slides and teach with confidence. Sometimes, teachers need a little bit of help, and there's nothing wrong with that. We're glad to lend you a hand! Since Slidesgo is committed to making education better for everyone, we've joined hands with educators....

Creative and Bold Theme for Marketing
Download the "Creative and Bold Theme for Marketing" presentation for PowerPoint or Google Slides and take your marketing projects to the next level. This template is the perfect ally for your advertising strategies, launch campaigns or report presentations. Customize your content with ease, highlight your ideas and captivate your audience...

Contemporary Art Museum Project Proposal
Download the "Contemporary Art Museum Project Proposal" presentation for PowerPoint or Google Slides. A well-crafted proposal can be the key factor in determining the success of your project. It's an opportunity to showcase your ideas, objectives, and plans in a clear and concise manner, and to convince others to invest...
Graphic Design Project Proposal
If you are looking for an outstanding template for your graphic design project proposal, you came to the right place! We have the perfect theme for you. Get creative out there with our animations!
- Page 1 of 24
New! Make quick presentations with AI
Slidesgo AI presentation maker puts the power of design and creativity in your hands, so you can effortlessly craft stunning slideshows in minutes.

Register for free and start editing online
Animated Moving Pictures For Powerpoint
- #25Extra-Credit-Points
- #happy-valentines-day-2024
- #have-a-nice-day
- #I-Love-You
- #birthday-greetings
- #Thanks-Too-Everyone
- #easter-bunny
- #its-your-birthday
- #Batman-Cape
- #Thumb-Up-Smile
- #Smile-Wolf-Png
- #Slaap-Lekker
- #Animated-GIF
- #happy-birthday
- #pöses-Engelchen
- #Gato-Animado
- #Gato-Bailando
- #Thanks-Giving-Friends
- #cross-my-heart
- #Pernis-Cloud
- #Ada-Elementz
- #Global-Warming
- #colebeasley
- #Cheers-To2022
- #Yahav-Levy
- #Thanks-Gifs
- #kapilbalhara
- #Betty-Boop
- #Wednesday-Hump-Day-Motivation
- #Love-you-my
- #coloured-led-lamps
- #Animated-Bear
- #Pants-Bear
- #Happy-Weekend
- #Chhota-Bheem
- #Lion-Running
- #peach-goma
- #Animated-Stickers
- #Good-Morning
- #Monkey-Baby
- #Hula-Shantae
- #thanksgiving
- #Animated-Sticker
- #Alice-Sticker
- #Alice-Animated
- #blah-blah-blah
- #Jagyasini-Singh
- #You-Rock-Gif
- #Monday-Feels
- #Izumi-Reina
- #i-eat-caterpilers
- #caterpillars
to upload to Tenor
Upload your own GIFs
- #jorrparivar
- #Digital-Pratik
- #3D-animated-gifs
- #Super-Simple-Songs
- #happy-turkey-day
- #Happy-Mothers-Day
- #Thank-You-For-Watching
- #Happy-Fathers-Day
- #Relaxation
- #james-trivette
- #löysätohtori
- #Jason-Voorhees
- #Friday-The13th
- #Thanks-To-You
- #Happy-xmas-PMO
- #hello-how-are-you
- #Animated-G-If
- #blueycapsules
- #good-night
Moving Pictures
Moving pictures for powerpoint presentations.

If you need to make powerful animated presentations using PowerPoint then you can consider to use moving pictures for PowerPoint presentations. There are many resources where you can download free moving cliparts for PowerPoint but if you are taking seriously the task of presenting a PowerPoint to an important audience and look for high quality …
Animated PowerPoint Template With Fly-In Marquee Lights Effect

Whether you need to create a winning, captivating presentation for this afternoon or a few weeks from now, you can definitely find this next template useful. Any presentation needs a little animation here and there, to liven it up and keep your audience glued to your presentation. Animations can be straightforward and fast, or slow …
Animated Images for PowerPoint Presentations

Often we need to decorate our PowerPoint presentations with animated GIF and other animated images to represent different situations, gestures as well as scenarios. Fortunately we can do that by using animated GIF and other animated cliparts. Even if PowerPoint comes with a nice gallery where you can download free moving pictures for PowerPoint presentations, …
We will send you our curated collections to your email weekly. No spam, promise!
IMAGES
VIDEO
COMMENTS
Click Effect Options, and then pick a direction for the animation. For example, From Left. Select the second picture that you want to animate. On the Animations tab, pick Fly In. Click Effect Options and pick From Right. Tip: You can change the order of the animations by selecting a picture and, under Reorder Animation on the ribbon, clicking ...
In the Insert tab of the ribbon, click Pictures. In the Insert Picture From dialog box, navigate to the location of the animated GIF you want to add. Select the file, and then click Insert. To play the animation, select the Slide Show tab on the ribbon, and then, in the Start Slide Show group, select From Current Slide.
Step 1: Insert the picture you want to animate. First, click on the 'Insert' tab and select 'Pictures' to add your image to the slide. After selecting your desired picture, it will appear on your slide. You can adjust the size and position of the image as needed before you start animating it.
To apply a motion path animation to make an object move across a slide on click: Select an object. For text objects, click in the text box or placeholder or click its edge. Click the Animations tab in the Ribbon. In the Animations group, click the More down arrow on the bottom right of the Animations Gallery.
Training: Add animation and effects to text, pictures, shapes, and objects in your PowerPoint presentation. Watch this video to learn how.
With the animated sky now all set up, you can quickly reuse it to additionally create a moving sky background outside of a window. 1. Copy and paste the Sky animation. Copy and paste the sky animation from the previous slide onto a new slide. 2. Copy and paste the Sky animation.
Start by opening PowerPoint and navigating to the slide where you want to add the animated GIF. Click on Insert in the top navigation and double click on Pictures. If you have an animated GIF on your computer, choose the file from its location and click Open. Navigate to Slide Show from the top bar navigation.
In Normal View or Slide Master View, select a picture, shape or object. Move the picture, shape or object you want to animate to the desired starting location. Select the picture, shape or object. For text objects, click in the text box or placeholder or click its edge. Click the Animations tab in the Ribbon.
Go to the Insert tab and select the Pictures drop-down box in the Images section of the ribbon. Choose where you'd like to add the image from: Photo Browser, Picture From File, Stock Images, or Online Pictures. Select the image on the slide and head to the Picture Format tab. Click "Animate as Background" on the right side of the ribbon.
2. Now go to Insert > Pictures. This will open the Insert Picture From drop-down menu. 3. Select the file you want from one of the locations in the drop-down menu and click Insert. For macOS: 1. Select the slide where you want to insert the GIF. 2. On the Home tab under Insert, go to Picture > Picture from File. 3.
niceseoguy/Imgur. Next, go ahead and open up the PowerPoint presentation and navigate to the slide into which you'll insert the GIF. Once there, head over to the "Insert" tab and click the Pictures" button. In the window that opens, browse to the location of the GIF, select it, and then click "Insert.". The GIF will now appear in the ...
In this step-by-step tutorial, learn how to use animations in Microsoft PowerPoint. Learn animation fundamentals, layer on multiple animations, adjust the du...
Social Media JOB OPPORTUNITIES! (Work from home | No experience required): Click here to learn more: shorturl.at/jKSX2 SUBSCRIBE to get NEW Tutorials Ev...
In this step-by-step tutorial video, learn how to add amazing looking moving backgrounds in Microsoft PowerPoint.Other PowerPoint tutorials:- How to use laye...
PowerPoint 2013 training. Animate pictures, clip art, text, and other objects. Animate pictures and shapes. Create a flow chart. Overview Transcript. The process of animating any object is the same: select what you want to animate, add an animation, then choose effect options. The same holds true for pictures and shapes.
Step 3: Add Custom Animations to Your Animated PowerPoint. Your animated PowerPoint templates and all Visme presentation templates have plenty of different styles of animation possibilities. With Visme, add all these types of animations to any element in a slide. Enter Animations. Fade in.
Animate text and pictures on slides. In the context of PowerPoint, animation refers to the movement of an element on a slide. When used appropriately, animated slide elements can both capture the audience's attention and effectively convey information. You can animate any individual objects on a slide, including text containers, pictures, and ...
Leverage Animations for PowerPoint and More. Download as gifs in Powerpoint, Google Slides, and Keynote. Also, get these animations as Quicktime movie files for use in many popular video editing programs. In addition to your presentations, use these animations in social media posts, training videos, blog articles, and more.
Download the "Creative and Bold Theme for Marketing" presentation for PowerPoint or Google Slides and take your marketing projects to the next level. This template is the perfect ally for your advertising strategies, launch campaigns or report presentations. Customize your content with ease, highlight your ideas and captivate your audience...
In this PowerPoint Tutorial you will learn how to animate photos in PowerPoint and make them look alive. With the help of a couple of PowerPoint animations a...
With Tenor, maker of GIF Keyboard, add popular Animated Moving Pictures For Powerpoint animated GIFs to your conversations. Share the best GIFs now >>>
By using Presenter Media addin you can insert moving cliparts for PowerPoint or change the current template of your presentation to a really nice PowerPoint template for a given topic. For example, if you are preparing a business or finance presentation then you can download the free business animated cliparts with special gestures and postures ...
Often we need to decorate our PowerPoint presentations with animated GIF and other animated images to represent different situations, gestures as well as scenarios. Fortunately we can do that by using animated GIF and other animated cliparts. Even if PowerPoint comes with a nice gallery where you can download free moving pictures for PowerPoint ...