
Free Numbers PowerPoint
Download this Numbers PowerPoint and use it in class today. Below you will find a numbers PPT for teaching numbers 1 to 10 and one for teaching numbers 1 to 20 . These numbers PowerPoint lessons are ideal for teaching kids, kindergarten, pre-school students, and other beginner English language learners about the cardinal numbers. Each number PowerPoint below includes the numbers and words in English plus some fun colorful pictures. See below to download these Numbers PowerPoint lessons and check the bottom of the page for related resources.
Numbers PowerPoint 1 to 10
Numbers powerpoint 1 to 20, related resoures.
For more lesson materials for teaching numbers in English, check out these related resources: Numbers Worksheets Number Flashcards Ordinal Numbers PowerPoint Ordinal Numbers In English Classroom Games With Numbers Numbers One To Hundred Spelling
- Math Article
Number System
The number system or the numeral system is the system of naming or representing numbers. We know that a number is a mathematical value that helps to count or measure objects and it helps in performing various mathematical calculations. There are different types of number systems in Maths like decimal number system, binary number system, octal number system, and hexadecimal number system. In this article, we are going to learn what is a number system in Maths, different types, and conversion procedures with many number system examples in detail . Also, check mathematics for grade 12 here.
What is Number System in Maths?
A number system is defined as a system of writing to express numbers. It is the mathematical notation for representing numbers of a given set by using digits or other symbols in a consistent manner. It provides a unique representation of every number and represents the arithmetic and algebraic structure of the figures. It also allows us to operate arithmetic operations like addition, subtraction, multiplication and division.
The value of any digit in a number can be determined by:
- Its position in the number
- The base of the number system
Before discussing the different types of number system examples, first, let us discuss what is a number?
What is a Number?
A number is a mathematical value used for counting or measuring or labelling objects. Numbers are used to performing arithmetic calculations. Examples of numbers are natural numbers, whole numbers, rational and irrational numbers, etc. 0 is also a number that represents a null value.
A number has many other variations such as even and odd numbers, prime and composite numbers. Even and odd terms are used when a number is divisible by 2 or not, whereas prime and composite differentiate between the numbers that have only two factors and more than two factors, respectively.
In a number system, these numbers are used as digits. 0 and 1 are the most common digits in the number system, that are used to represent binary numbers. On the other hand, 0 to 9 digits are also used for other number systems. Let us learn here the types of number systems.
Types of Number Systems
There are various types of number systems in mathematics. The four most common number system types are:
- Decimal number system (Base- 10)
- Binary number system (Base- 2)
- Octal number system (Base-8)
- Hexadecimal number system (Base- 16)
Now, let us discuss the different types of number systems with examples.
Decimal Number System (Base 10 Number System)
The decimal number system has a base of 10 because it uses ten digits from 0 to 9. In the decimal number system, the positions successive to the left of the decimal point represent units, tens, hundreds, thousands and so on. This system is expressed in decimal numbers . Every position shows a particular power of the base (10).
Example of Decimal Number System:
The decimal number 1457 consists of the digit 7 in the units position, 5 in the tens place, 4 in the hundreds position, and 1 in the thousands place whose value can be written as:
(1×10 3 ) + (4×10 2 ) + (5×10 1 ) + (7×10 0 )
(1×1000) + (4×100) + (5×10) + (7×1)
1000 + 400 + 50 + 7
Binary Number System (Base 2 Number System)
The base 2 number system is also known as the Binary number system wherein, only two binary digits exist, i.e., 0 and 1. Specifically, the usual base-2 is a radix of 2. The figures described under this system are known as binary numbers which are the combination of 0 and 1. For example, 110101 is a binary number.
We can convert any system into binary and vice versa.
Write (14) 10 as a binary number.

Base 2 Number System Example
∴ (14) 10 = 1110 2
Octal Number System (Base 8 Number System)
In the octal number system , the base is 8 and it uses numbers from 0 to 7 to represent numbers. Octal numbers are commonly used in computer applications. Converting an octal number to decimal is the same as decimal conversion and is explained below using an example.
Example: Convert 215 8 into decimal.
215 8 = 2 × 8 2 + 1 × 8 1 + 5 × 8 0
= 2 × 64 + 1 × 8 + 5 × 1
= 128 + 8 + 5
Hexadecimal Number System (Base 16 Number System)
In the hexadecimal system, numbers are written or represented with base 16. In the hexadecimal system, the numbers are first represented just like in the decimal system, i.e. from 0 to 9. Then, the numbers are represented using the alphabet from A to F. The below-given table shows the representation of numbers in the hexadecimal number system .
Number System Chart
In the number system chart, the base values and the digits of different number systems can be found. Below is the chart of the numeral system.

Number System Conversion
Numbers can be represented in any of the number system categories like binary, decimal, hexadecimal, etc. Also, any number which is represented in any of the number system types can be easily converted to another. Check the detailed lesson on the conversions of number systems to learn how to convert numbers in decimal to binary and vice versa, hexadecimal to binary and vice versa, and octal to binary and vice versa using various examples.
With the help of the different conversion procedures explained above, now let us discuss in brief about the conversion of one number system to the other number system by taking a random number.
Assume the number 349. Thus, the number 349 in different number systems is as follows:
The number 349 in the binary number system is 101011101
The number 349 in the decimal number system is 349.
The number 349 in the octal number system is 535.
The number 349 in the hexadecimal number system is 15D
Number System Solved Examples
Convert (1056) 16 to an octal number.
Given, 1056 16 is a hex number.
First we need to convert the given hexadecimal number into decimal number
= 1 × 16 3 + 0 × 16 2 + 5 × 16 1 + 6 × 16 0
= 4096 + 0 + 80 + 6
= (4182) 10
Now we will convert this decimal number to the required octal number by repetitively dividing by 8.
Therefore, taking the value of the remainder from bottom to top, we get;
(4182) 10 = (10126) 8
Therefore,
(1056) 16 = (10126) 8
Convert (1001001100) 2 to a decimal number.
(1001001100) 2
= 1 × 2 9 + 0 × 2 8 + 0 × 2 7 + 1 × 2 6 + 0 × 2 5 + 0 × 2 4 + 1 × 2 3 + 1 × 2 2 + 0 × 2 1 + 0 × 2 0
= 512 + 64 + 8 + 4
Convert 10101 2 into an octal number.
10101 2 is the binary number
We can write the given binary number as,
Now as we know, in the octal number system,
Therefore, the required octal number is (25) 8
Convert hexadecimal 2C to decimal number.
We need to convert 2C 16 into binary numbers first.
2C → 00101100
Now convert 00101100 2 into a decimal number.
101100 = 1 × 2 5 + 0 × 2 4 + 1 × 2 3 + 1 × 2 2 + 0 × 2 1 + 0 × 2 0
= 32 + 8 + 4
Video Lesson on Numeral System

Number System Questions
- Convert (242) 10 into hexadecimal. [ Answer: (F2) 16 ]
- Convert 0.52 into an octal number. [ Answer: 4121]
- Subtract 1101 2 and 1010 2 . [ Answer: 0010]
- Represent 5C6 in decimal. [ Answer: 1478]
- Represent binary number 1.1 in decimal. [ Answer: 1.5]
Also Check: Binary Operations
Computer Numeral System (Number System in Computers)
When we type any letter or word, the computer translates them into numbers since computers can understand only numbers. A computer can understand only a few symbols called digits and these symbols describe different values depending on the position they hold in the number. In general, the binary number system is used in computers. However, the octal, decimal and hexadecimal systems are also used sometimes.
More Topics Related to Number Systems
Frequently asked questions on number system, what is number system and its types.
The number system is simply a system to represent or express numbers. There are various types of number systems and the most commonly used ones are decimal number system, binary number system, octal number system, and hexadecimal number system.
Why is the Number System Important?
The number system helps to represent numbers in a small symbol set. Computers, in general, use binary numbers 0 and 1 to keep the calculations simple and to keep the amount of necessary circuitry less, which results in the least amount of space, energy consumption and cost.
What is Base 1 Number System Called?
The base 1 number system is called the unary numeral system and is the simplest numeral system to represent natural numbers.
What is the equivalent binary number for the decimal number 43?
How to convert 30 8 into a decimal number.

Put your understanding of this concept to test by answering a few MCQs. Click ‘Start Quiz’ to begin!
Select the correct answer and click on the “Finish” button Check your score and answers at the end of the quiz
Visit BYJU’S for all Maths related queries and study materials
Your result is as below
Request OTP on Voice Call
Leave a Comment Cancel reply
Your Mobile number and Email id will not be published. Required fields are marked *
Post My Comment
This is wonderfull
It’s soo helpful and wonderfull
This is very very wonderful.
This is an amazing app
Very helpful 😊👍👍
Very impressive this is.
This is very wonderful app
This app is very helpful for all students and teachers
Very useful it is wonderful app
It’s really help me I m living byjus app
BYJU’S teacher is very intelligent
It is very very helpful. It is amazing and wonderful app
I love it it really helped me a lot
I like this site because it’s very amaizing for learning
Excellent job
- Share Share
Register with BYJU'S & Download Free PDFs
Register with byju's & watch live videos.

- PRO Courses Guides New Tech Help Pro Expert Videos About wikiHow Pro Upgrade Sign In
- EDIT Edit this Article
- EXPLORE Tech Help Pro About Us Random Article Quizzes Request a New Article Community Dashboard This Or That Game Popular Categories Arts and Entertainment Artwork Books Movies Computers and Electronics Computers Phone Skills Technology Hacks Health Men's Health Mental Health Women's Health Relationships Dating Love Relationship Issues Hobbies and Crafts Crafts Drawing Games Education & Communication Communication Skills Personal Development Studying Personal Care and Style Fashion Hair Care Personal Hygiene Youth Personal Care School Stuff Dating All Categories Arts and Entertainment Finance and Business Home and Garden Relationship Quizzes Cars & Other Vehicles Food and Entertaining Personal Care and Style Sports and Fitness Computers and Electronics Health Pets and Animals Travel Education & Communication Hobbies and Crafts Philosophy and Religion Work World Family Life Holidays and Traditions Relationships Youth
- Browse Articles
- Learn Something New
- Quizzes Hot
- This Or That Game New
- Train Your Brain
- Explore More
- Support wikiHow
- About wikiHow
- Log in / Sign up
- Computers and Electronics
- Presentation Software
- PowerPoint Presentations
How to Insert Slide Numbers in PowerPoint
Last Updated: January 22, 2024 Fact Checked
How to Add Slide Numbers
How to format slide numbers.
This article was co-authored by wikiHow staff writer, Nicole Levine, MFA . Nicole Levine is a Technology Writer and Editor for wikiHow. She has more than 20 years of experience creating technical documentation and leading support teams at major web hosting and software companies. Nicole also holds an MFA in Creative Writing from Portland State University and teaches composition, fiction-writing, and zine-making at various institutions. This article has been fact-checked, ensuring the accuracy of any cited facts and confirming the authority of its sources. This article has been viewed 44,008 times. Learn more...
This wikiHow guide teaches you how to number the slides in your PowerPoint presentation on your Windows PC or Mac. You can add slide numbers easily on the Insert tab and change the look and position of each number on your master slide.
Things You Should Know
- To add slide numbers to your presentation, click the "Insert" tab, select "Header & Footer," check the box next to "Slide number," and click "Apply All."
- The position, font, size, and color of your slide numbers is determined by your slide master.
- To format your slides, click the "View" tab, select "Slide Master," click the first master slide, and edit the placeholder (the hashtag symbol) as needed.

- If you don't want a slide number to appear on the first (title) slide, check the box next to "Don’t show on title slide" at the bottom-left corner.
- All slides, including hidden slides, are included in the slide count. You'll also see slide numbers when you print your presentations. [2] X Trustworthy Source Microsoft Support Technical support and product information from Microsoft. Go to source

- If slide numbers aren't showing up, the slide number placeholder was removed from your slide master . Skip down to this method to learn how to insert them if they're not showing up.
- To remove all slide numbers, return to Insert > Header & Footer , uncheck "Slide Number," and click Apply to All .
- To remove just one slide number, select the slide in the left panel, go to Insert > Header & Footer , uncheck "Slide Number," and click Apply .

- Click the Insert tab, then click Text Box in the toolbar.
- Click and drag a text box in any blank area of the slide. You can always reposition it later.
- Click inside the text box.
- Click Slide Number in the toolbar. You'll now see the hash symbol in the text box—the slide number placeholder.

- Click the Home tab.
- Click the slide number placeholder to select it.
- To change the color, click the "A" with a line under it in the toolbar, then select a color.
- To change the font face and size, use the drop-down menus in the toolbar.
- You can also make slide numbers bold, italicized, or underlined as you would other text. [3] X Trustworthy Source Microsoft Support Technical support and product information from Microsoft. Go to source
- To return to your presentation, click Normal on the View tab.
Expert Q&A
- You can also change the position of headers, footers , text boxes, and other elements when editing the master slide. Thanks Helpful 0 Not Helpful 0

You Might Also Like

- ↑ https://support.microsoft.com/en-us/office/add-page-numbers-date-and-time-or-footer-text-to-all-slides-in-powerpoint-for-mac-abb23f0c-760a-46ef-940e-be5074d3f287
- ↑ https://support.microsoft.com/en-au/office/change-the-fonts-in-a-footer-on-a-slide-ad433255-2de8-441e-99c8-b26a99b04d74
About This Article

To add slide numbering to your PowerPoint presentation, start by opening your presentation in PowerPoint. Then, click the "Insert" tab and select "Header & Footer" on the toolbar. Check the box next to "Slide number"—the preview in the upper-right corner of the window will update to display where the slide number will appear on each slide. If the first slide in your presentation is a title slide and you don’t want a number on it, place a checkmark next to "Don't show on title slide." Click "Apply to All" to add the slide number to each slide in your presentation. If the slide number doesn't look right on one of your slides, you can move it to a different location—just hover the mouse cursor over the slide number until it turns to a crosshair, then click-and-drag it somewhere that looks a little better. You can also change the position of your slide number on all slides at once by editing the Slide Master. Click the "View" tab, click "Slide Master" on the toolbar, and then click your Slide Master at the top of the left panel. Hover the mouse cursor over the slide number until it turns to a crosshair, then drag it to another location. Another thing you can do while editing the Slide Master is to change the size, font, or color of the slide number—double-click the slide number to select it, highlight the number, and then use the font face, size, and color options on the small menu above your cursor. Click "Close Master View" when you're finished. Any changes you made to the slide numbers in the Slide Master will apply to all slides in the presentation. Did this summary help you? Yes No
- Send fan mail to authors
Is this article up to date?
Featured Articles

Trending Articles

Watch Articles

- Terms of Use
- Privacy Policy
- Do Not Sell or Share My Info
- Not Selling Info
Keep up with the latest tech with wikiHow's free Tech Help Newsletter
The Essential Guide to Presenting Numbers in an Engaging Way
- In Business , Chris Atkinson , Communication , Engagement , Leadership

The Essential Guide to Presenting Numbers in an Engaging Way:
A systemic organisational deficiency we seem to accept without a second thought.
Recently I was asked by a global client to help their European finance team present their subject in ways that are more engaging for their audience. As I started to develop the session, I realised on almost every course I have run, there has been one or two people from financial or technical functions who found the content harder to adapt to their situation. Because in general these issues were met with humour and laughter (people saying things like “I’ve got the boring subject!”) I overlooked the genuine commercial need that exists. It’s not just finance either, if you look at meeting agendas I would guess that more than 50% of meeting time is dominated by managers presenting their departmental numbers, KPIs or other metrics and so on.
I have come to the conclusion…
We are terrible at presenting numbers, KPIs and data!!
It is an organisational deficiency that we seem to accept without a second thought – “it’s okay, it’s a boring subject anyway” – “I wouldn’t expect finance to inspire me” – “I’ve got the boring bit to talk to you about” – “these are just the numbers, I’m not trying to inspire or engage”. Well no, that’s not okay. Organisations live and die by the numbers. Measures and KPIs are the front line tools for evaluating performance. The cost of people either not engaging, not caring or not being properly informed because ‘the content is boring’ is unthinkable; the subsequent business impact – even more so.
So I write here today to try and turn the tide on this epidemic, to make a stand for all of those people in your audience who have given their time to listen to you speak and most importantly to argue that if we can present numbers in an engaging way we can transform our organisations.
WE CAN DO BETTER!
Last year I wrote a book on how to engage and inspire audiences, it was well received and as a result I have been invited to speak, write and be interviewed on the subject of engaging audiences. As I reflect on this, I believe I have often cited the soft topics as examples of how to engage and inspire – the team talks or leadership presentations. I sincerely hope this is a step towards taking the proven principles of my book and using them to address some of the harder topics (more dry or technical subjects).
4 Techniques to Transform Numbers
- Find Interesting Angles – Useful when the information is routine, repeating or likely to be ‘skimmed’ over
- Use Comparisons – Useful when the numbers are big or abstract or hard to visualise
- Use Analogies – Useful when the presentation is complex, boring or technical
- Paint a picture – Useful when introducing a change of process, new system, new ways of working etc.
Technique 1: Find Interesting Angles
This is probably the safest and easiest first step for people who are cautious about getting too creative. Most ‘reporting’ type presentations feature a standardised series of graphs or data showing the current results, often these are the same from person to person or department to department (just with different numbers). The impact is that few people, except the speaker and the boss, will be that interested in what is being said. Moreover, if all you are doing is presenting data, why not simply ask people to review this information on the company intranet or circulate the slides? Beyond ‘we’ve always done it that way’ – the reason why these types of presentation exist is generally;
- Because people can’t be trusted to actually look at the information of their own accord
- The group hope for some form of open dialogue, accountability or debate around the figures
In fact, this second reason is a good one but this is why the standardised slide decks WILL…NOT….WORK for a presentation! You can certainly report in a standardised way and publish figures to colleagues in a standardised way but if you are investing the time/money to gather everyone in a room then surely your intention is to engage and stimulate them?
Here are some common examples:
So my first suggestion is to do some investigation into the numbers to find interesting ways to view the ‘normal’ data. Maybe search for overlooked insights, specific trends or hidden facts. These new perspectives will not only be far more interesting for your audience but could even redefine your strategy entirely. I recently facilitated a workshop on quality strategy with a global automotive manufacturer, during our discussion the group started to question their standard practice of prioritising the most serious quality (fault) issues first. They wanted to know what percentage of the total fault landscape these most serious issues accounted for. As they dug into the data they found examples of many single smaller issues which were occurring many hundreds of times but had minimal impact so never got prioritised. When they positioned quality through this perspective it, almost turned everyone’s thinking upside down – this is not about right or wrong, it is about the immediate engagement of the group into that quality conversation.
Here is another example.

Imagine your corporate data is similar to this PGA Tour Statistics for 2017-18, rows of columns and data. Our tendency is to simply skim read the top/bottom/largest/smallest and so on.
Let’s look at these two quite different people from this list:
- Phil Mickelson – #2 – $3,159,197
- Austin Cook – #20 – $1,610,277
Phil Michelson basically earned twice as much money as Austin Cook… and these aren’t small sums!! But if we dig deeper into the numbers there is a really interesting figure in the statistics
- Phil Mickelson – Average 69.3
- Austin Cook – Average 69.9
The difference between these two golfers is, on average, 0.6 of a stroke! So if I was presenting this data to a group of people, I might start a discussion about what is the difference causing Phil to earn so much more money (for reference Phil played 4 fewer events than Austin). Basically, there seems to be very little separating these two in their game BUT a huge difference in their financial outcome.

I’m not a golf expert so please take this example in the spirit of what I’m trying to show especially if I’ve made a mistake here… my point is that you can surely find similar interesting perspectives to create engagement, debate and vibrant discussion.
Technique 2: Use Comparisons
This is also quite a safe idea to experiment with and relatively easy to use. The issue here is that numbers and percentages are often hugely abstracted from the real world. Many people simply do not relate to raw numbers, they don’t have enough real-world meaning and as a result, they are hard to conceptualise. The larger and more complex the organisation, the truer this becomes, even the average manager will struggle to truly grasp figures that equate to millions of parts or cost etc. The impact of this abstraction is that the figures take on a sense of irreality and do not have the desired emotional impact on the audience.
Numbers often don’t have enough real-world meaning and, as a result, they are hard to conceptualise
If you want to ensure your numbers land heavily with your audience, it can be helpful to translate the numbers into other equivalents that might have more resonance to your audience. The comparison you choose to make will depend on what things you believe your audience would be emotionally affected by. Let me give you an example, a large packaging client of mine was having issues with waste at one of their sites. The ‘waste’ levels were a critical KPI and were at 11% which was simply too high, the target was under 9% for that financial year. They tried to explain to the front line teams that 11% equated to £1,100,000 pounds of wasted raw materials which they had to shred. In fact, the weight of this material was 1311 tonnes! Every day they threw away 5.2 tonnes of material! This was wasteful, logistically inconvenient, and expensive.
No matter how much they communicated these figures they never really gained traction until one manager equated the figures… he worked out that…
EVERY YEAR they shred the equivalent of 6 Ferrari 458 Italias
Then he compared the weight of the wastage they dispose of to…
2 large aircraft …. plus 3 jumbo jets! (he used a very clever dramatic reveal of the 3 jumbos after the 2 planes, in fact 2 planes alone seemed shocking enough)
This dramatic comparison really engaged the front line teams who could suddenly visualise both the financial figures and physical weight of the waste they were creating.
In the UK, there is a long-running joke that many things are compared to the size of Wales. “It is a truth, universally acknowledged, that every British journalist when faced with a disaster such as a forest fire, flood, earthquake, tidal wave or hurricane that has created widespread devastation of a sufficiently noteworthy extent, will inform us that an ‘area the size of Wales’ has been subjected to said devastation. If the facts warrant it, the journalist may refer to multiples of this standard unit of measure such as an ‘area twice the size of Wales’ or even occasionally to fractions thereof, such as an ‘area half the size of Wales’. In Australia they use the “size of Sydney Harbour”, in Denmark “the size of Fyn” (one of the islands); in the US they choose a state.” https://www.dailypost.co.uk/whats-on/size-of-wales-why-what-13328892
Technique 3: Use Analogies
This technique is especially useful where you need to not simply present results but rather explain a process that could be perceived as technical, complex or boring to the audience. In other words where they need to understand the actual system or process being used.
Analogies are often confused with metaphors. They are similar but metaphors will not be useful for our purposes here. A metaphor is a short comparison such as “this new system will be the Rolls Royce of technology”. Our aim in using analogies is to carry the weight of the boring, complexity of your subject – a metaphor cannot do that.
Analogies compare the similarities between two dissimilar subjects, most helpful is when you compare the unknown (your complex, boring technical subject) to the known (something familiar and every day). You need to be able to explain more than 50% of your technical subject through the language of your analogy – crucially it is this that transforms your topic from something heavy and boring to something engaging and lighter. At some point, the analogy will not be able to go any further and you can transition across to your technical subject – often I recommend saying “in the same way….” before then making the links from the analogy to the technical topic.
When done right your 60-minute presentation on ‘Hedge Accounting’ transforms to an engaging, and possibly even entertaining, conversation about the ups and downs of supporting your favourite sports team!
I have a word of caution here, it takes patience and creativity to find the right analogy for a technical subject. Once you found one it also takes time and patience to craft the story you want to tell using the analogy. There are analogies that I hear all the time, it doesn’t make them bad it just makes them slightly less fun to listen to and therefore slightly less effective. Here are some common ones I’m sure you have heard before.
Common analogies:
When you think of possible analogies try to have some fun with the idea, pick something unusual or if you want to use something every day then exaggerate the situation. Instead of buying a house, try saying imagine you want the lottery and were buying a MULTI-MILLION DOLLAR house. This simple change will make the analogy (your ‘story’) more interesting and more engaging to listen to. Simple twists on the normal can really transform an analogy.
Steve Jobs is credited with coming up with a now commonplace analogy of “the desktop”. Back in 1984 the computer was an intimidating object, complex, technical and unfamiliar. Jobs envisaged the “desktop” as a way to make the machine more familiar, more accessible. “Just as you could write words on a piece of paper and retrieve those words later by holding that paper and reading it, so could you store and retrieve words in a virtual ‘document’ on your computer. Just as you could organise those papers into folders for storage and easy retrieval, so could you organise those documents in virtual ‘folders’ on your computer. And just as you could move your real-life folders around the surface of your desk at home, so could you move these folders and documents along a ‘desktop.’ Your computer screen and its contents were fundamentally like something you already knew: your physical desk. It was meant to teach new users, squeamish about the virtual world, that you could use a Macintosh’s graphical interface the same way you used something you were familiar with: the top of your real, physical desk.” https://www.fastcompany.com/3037014/how-steve-jobss-mastery-of-analogies-sent-apple-sky-rocketing
Technique 4: Paint a Picture
The final option uses a technique called ‘word pictures’. It is most appropriate when you are trying to communicate a process change or a discuss a new system. All too often in these circumstances, the speaker’s technical expertise is their downfall because they give too much detail and unnecessary background information. They misjudge the most important purpose of their presentation – namely to engage and motivate people to support the change and adapt their behaviours. So whilst at some point in the presentation some details will be needed, this technique can be used alongside the detail to really inspire or motivate.
The technique sounds incredibly simple but in practice takes some skill to really bring to life. Firstly you outline the problem and give examples of common frustrations. This creates agreement that there is a problem and puts you, as the speaker, empathically on their side. The stronger they agree that there is a problem the more they will listen to you subsequent ‘picture’.
The ‘word picture’ starts with just one word…
IMAGINE…
After the word ‘imagine…’ you paint a vivid picture of the new world once the process/system is fully operational and working perfectly. The key to success is to make this story highly descriptive, motivational and appealing but be warned it must always stay within the realms of the real world; if you start to sound like fantasy or a dreamer you’ve lost! Be sure you are describing a real-world story, think in terms of sensory information, what would the audience see, hear, feel, be able to do and so on.
This technique is particularly effective because people’s emotions are fuelled by the vividness of the outcomes, their ability to visualise the results. The question of ‘HOW’ is a much more cognitive one and therefore comes secondary in people’s thinking. If you can win their hearts you have achieved the hardest part of the battle.
I recently worked with a member of a finance team responsible for SAP implementation within a complex framework of a European division of a packaging company. There was a lot of content to inform people about the roll-out and in fact a number of the messages needed to be about the anticipated challenges and disruptions. I suggested they use this technique along the following lines:
“Who here in the audience spends too much time creating reports for managers or sending KPIs to head office? *(assume all hands go up)* If you were asked to compare the current inventory levels against supplier payments for the last 18 months, right now that would take you hours and probably you’d have to chase people in different departments to get the accurate figures, right? So now imagine, with this new system if you were able to produce that report instantly simply by selecting that dates and corresponding SAP areas. Imagine that your weekly inventory management report, your procurement analytics, your lost working days information, your profit/loss report, your quality audit results and in fact every other major report you currently do …was no longer your responsibility. How much time would that save you? What would you do with your time if you didn’t have to sit at your desk compiling information every day/week month? So now picture that your manager can simply access all of this data in real time, in team meetings you can log into the system and show the most up to date data. Imagine never getting any calls from head office because there is nothing you can produce by hand that they can’t access directly!”
We can develop your teams to present in a more compelling and dynamic way. People need support, encouragement and coaching in order to make the necessary changes in these areas (existing habits are often deeply embedded in our cultures). Therefore, if this is an issue in your organisation, PLEASE do connect with us.
Author: Chris Atkinson
SPECIAL OFFER: 50% off the author’s book! It has been 12 months since Chris published his book, the response has been incredible over the last year. The book is a great starting point for learning about this topic and we would love for you to read it. Please follow this link and use the discount code: 50CEBOOK

You may also like
Chris atkinson talks about motivation beyond money.
- by Kate Tuck
- in Chris Atkinson

Empathy Is The Most Important Leadership Skill According To Research

How to prioritise when everything is a priority – a test

Leaders need to fundamentally change their ways of working
Critical PowerPoint Shortcuts – Claim Your FREE Training Module and Get Your Time Back!
How to add slide numbers in PowerPoint (Step-by-Step)
- PowerPoint Tutorials
- Shortcuts & Hacks
- January 11, 2024
Adding slide numbers in PowerPoint should be an easy and straightforward task, but it is not. The way that PowerPoint manages your slide numbers is confusing.
While confusing and frustrating, the last thing you want to do – and I have done this before myself – is manually add the page numbers to the slides yourself.
Manually adding slide numbers is a classic 101 timewaster that you will instantly regret for two reasons.
The first reason is, manually doing anything in PowerPoint that PowerPoint can automatically do for you (even if it requires a little research), is never an effective use of your time. If you want to have a life outside of the office slaving away in PowerPoint, you will want to push as many of these types of tasks as possible back on to PowerPoint.
The second reason is, after you manually add your slide numbers in PowerPoint, you will have to manually update them again as you add or remove slides from your presentation. If you thought it was tedious to manually add the slide numbers in the first place, believe me when I say that it is ten times as tedious to have to manually update them again, and triple-check that all your slides are numbered correctly.
Follow along with me below and see the advanced trouble shooting video at the bottom of the page if you are still having issues.
NOTE: When printing your slides as handouts, be aware that it is your slide number (NOT the page number) that displays for each page of the speaker notes you print. To learn how to add speaker notes to PowerPoint (and some of the tricks to working with them), read my guide here .
Table of Contents
[watch] how to add slide numbers in powerpoint.
You are currently viewing a placeholder content from Youtube . To access the actual content, click the button below. Please note that doing so will share data with third-party providers.
Adding slide numbers in PowerPoint is one of those things that should be simple and easy (like it is in Microsoft Word) …but it’s not.
And just so we are on the same page, in this article you can use the term slide number and page number interchangeably. They are the same thing in this case.
While a lot of people can “properly” add them to the PowerPoint Slide Master , they still can’t get them to properly show up in the Normal View . And if you work in the professional services industry, this is something you’ll want to get right! The last thing you want to do is torpedo the overall quality of your presentation simply because you can’t get your slides properly numbered.
Take your PPT skills to the next level
Setting up your slide numbers in the slide master view.
When you are adding slide numbers to PowerPoint, or troubleshooting your slide numbers, the first place to check is your Slide Master.
That is because the Slide Number field is driven and controlled by your Slide Master.
Continue reading to see how this is done. If your Slide Numbers are already set up properly on your Slide Master, you move to the next section.
1. Navigate to your Slide Master
In all versions of Microsoft PowerPoint, the slide numbers (or page numbers) for your presentation are driven from the Slide Master View. As such, this is one of the best places to check first if you are having trouble adding slide numbers in PowerPoint, or if your slide numbers are not properly displaying.

To navigate to the Slide Master view in PowerPoint, simply:
- Navigate to the View tab in your Ribbon
- Select the Slide Master command
If you frequently need to use your Slide Master, you can use the Shift + Normal icon shortcut to jump to the slide master.
2. Navigate to your Parent Slide (the big slide)

In the Slide Master view, navigate to the Parent slide on the top left. This will be the first and largest the slide listed on the left side of your screen.
3. Open the Master Layout dialog box to find the Slide Number field

To open the Master Layout dialog box in PowerPoint, simply:
- Navigate to the Slide Master tab in your Ribbon
- Click Master Layout to open the dialog box
The Master Layout dialog box is where you set the Title, Text, Date, Slide number, and Footer for your PowerPoint presentation. To expand your knowledge and learn how to create a template in PowerPoint, read our guide here .
NOTE: PowerPoint is a contextual program, in that it only displays tabs for the views you are in, or the objects you have selected. If you do not see the Slide Master tab in the ribbon, that means that you have not properly navigated to your Slide Master yet. See step #1 above.
4. Select the Slide Number field
In the Master Layout dialog box, make sure you have a check mark next to Slide number . Selecting this option adds the slide number object to the Parent Slide, that you can then use to automatically add and update all the slides numbers in your presentation (instead of manually adding them yourself).
You can additionally add the Title, Text, Date and/or Footer objects if you don’t already have them on your Parent Slide. These are the fields you will want to set up and properly format if you are building a PowerPoint template for your team or company.
After you select which elements you want to appear on your slides, click OK .

5. Place and format your Slide Number
With the slide number added to your Master Slide , you can now format and/or place it wherever you want. In this case, I’ve placed mine in the upper right-hand corner of my slide.
Where you place it on your Parent Slide determines where the numbers show up (by default) on all of your Child Slides. In the below picture, you can see I placed my slide number in the upper right hand corner of my slide.

NOTE: By default, your slide numbers populate to all the Child Slides (the little slides in the Slide Master view) in your presentation. If they do not, you will need to cycle through the Child Slide layouts and delete the old page numbers individually, and then click the Footers icon in the Ribbon to add them back (another area where slide numbers in PowerPoint can be a pain).
To learn how to set up and format the Parent Slide and Child Slides for your PowerPoint template , read my guide here .
6. Close out of the Slide Master view

Before you exit out of the Slide Master view, I recommend double-checking that your slide numbers are properly set up both on the Parent Slide, and all the individual Child Slides. If you accidentally missed one, now is the time to catch it.
Once you are sure the slide numbers are all where they are supposed to be, you can click out of the Slide Master View:
- Click the Slide Master tab
- Select Close Master View
Applying your slide numbers in the Normal View
Once you’ve set up and formatted the Slide Number field in the Slide Master view, you are ready to move on and add them to your presentation.
As an analyst or associate who is in charge of the deck, it is important to keep in mind that just because the Slide Number field is properly set up in the Slide Master, DOES NOT mean they will automatically show up in your presentation.
Continue reading to see the next steps to make sure your slide numbers properly display in PowerPoint.
1. Open the Slide Number dialog box

Now that you have setup (or double-checked) that your slide numbers are set up properly in the Slide Master view, now we can add them here in the Normal View of PowerPoint (woo-hoo). Let’s start by opening the Header and Footer dialog box as follows:
- Navigate to the Insert tab
- Select the Slide Number command
You can alternatively use the Alt + Shift + D keyboard shortcut to open the Header and Footer dialog box. If you want to learn additional PowerPoint shortcuts like this that will save you time, read my shortcut guide here .
Regardless of how you get to the Header and Footer dialog box, this is the best and proper place to add, remove, and/or manage your presentations:
- Date and time
- Slide numbers
The goal again is to get PowerPoint to do the heavy lifting for you here. Even if this dialog box is new and a little confusing to you, it is worth getting this right as it will save you a ton of time in the future.
2. Apply your Slide Numbers

NOTE: The option to “Don’t show on title slide” can easily catch you off guard. That’s because the title slide in PowerPoint is NOT what you probably think it is. For more information, on what the title slide actually is in PowerPoint, read my guide here .
Within the Header and Footer dialog box, make sure there is a checkmark next to the Slide number .
With it selected, you get a preview of where your slide numbers will appear in the upper right-hand corner of the dialog box. After that, select either:
- Apply , applies your slide number to the individual slide you are working on.
- Apply to All , applies slide numbers to all of the slides within your presentation (assuming that each of the Child Slide layouts has your slid number on it).
Assuming you want to add slide numbers to all your slides in PowerPoint, click Apply to All . Clicking Apply to All, PowerPoint automatically adds the slide numbers to all your slides, based on the formatting and positioning you set up on the slide master.
As you can see in the picture below, the slide numbers now display (just as I set them up on the Slide Master).

Troubleshooting slide numbers that won't show up
If you followed along with me above and you still can’t get your slide numbers to properly display in PowerPoint, I have you covered.
In the following video, I highlight a few extra steps you can take to make sure your page numbers show up in PowerPoint.
If you still can’t figure out what is happening with your slide numbers, leave a comment or send me a note and I will do my best to help you out.
Final thoughts
You did the right thing by looking up how to add slide numbers in PowerPoint. The worst possible thing you can do is get so fed up with the PowerPoint page numbering system, that you manually add them yourself.
Another good point to remember is that you can use the Header and Footer dialog box to quickly remove all the slide numbers from your presentation. Simply unselect the Slide number option and click Apply to All and PowerPoint will automatically remove them all from your presentation.
While we all wish that adding page numbers in PowerPoint was as easy as it is in Word, that’s why you are paid the big PowerPoint bucks.
If you enjoyed this slide number tutorial and want to take your PowerPoint skills to the next level, check out our online training courses and other PowerPoint tutorials here .
🔒 Unlock the PowerPoint Shortcuts Trusted by Industry Leaders KKR, American Express, HSBC, and More!
Join over 114,880 professionals from diverse fields including consulting, investment banking, advertising, marketing, sales, and business development who have supercharged their PowerPoint game with our proven methods.
✅ Customize compelling presentations effortlessly.
✅ Master time-saving techniques for faster deck creation.
✅ Boost your career prospects with top-notch PowerPoint skills.
Get FREE access to the Critical PowerPoint Shortcuts module of our premium training course by entering your name and email below.
DISCLAIMER: PC Users Only!
We respect your privacy and will keep your info safe and confidential.
Related Articles
- Bar chart trick: Right aligning categories (PPT, Word, and Excel)
- PowerPoint settings: program level vs. presentation level
- Set Up Slide Show: Customize how your PPT presentations run
- What is the Popup Toolbar in PowerPoint?
- Strikethrough Shortcut (l̶i̶k̶e̶ ̶t̶h̶i̶s̶) for Word, Excel & PowerPoint
About The Author

This Post Has 9 Comments

Thanks for your guidance but it doesn’t completely work. I have one Master and two layouts. It will only add the page number to one of the layouts. No matter how many times I try to insert the slide number and apply to all, when ever I add a new slide, it only puts the slide number on one layout but not the other! Very frustrating because I followed all of your steps perfectly.

Thank you thank you thank you. Have been desperately trying to populate a submaster with slide numbers for a day now. The trick of RE-clicking on Title and Footers boxes up in the Maser Slide menu, while selecting my submaster slide, finally did the trick !

So happy to be able to help, Fran! Those little slide numbers can be tricky, despite appearances. Cheers!

Great vid. thanks.
Thanks for commenting, and happy this was a help to you! Cheers!

Thanks for the super-concise speed training on this – I was starting to pull my hair out! Again Microsoft prove they are the most clumsy legacy software developers on the planet!!
Hi Mathias! Glad to have been able to help. Yes, this is still a trickier issue than it should be, but luckily, there is a solution! Cheers

WOW! What an amazing and fast video. I will definitley bookmark this site!!
So happy to hear that, Anna! Thank you and let us know if there’s any other nagging problem we can solve for you. Cheers
Comments are closed.
Popular Tutorials
- How to Strikethrough Text (l̶i̶k̶e̶ ̶t̶h̶i̶s̶) in Word, Excel & PowerPoint
- How to Make Animated Fireworks in PowerPoint (Step-by-Step)
- How to Create a Flash Card Memory Game in PowerPoint (Like Jeopardy)
- Keyboard Shortcuts Not Working: Solved
PowerPoint Tutorial Categories
- Strategies & Opinions
- Presentation Design
- Pictures, Icons, Videos, Etc.
- New Features
- Miscellaneous
- Charts & Data Viz
We help busy professionals save hours and gain peace of mind, with corporate workshops, self-paced courses and tutorials for PowerPoint and Word.
Work With Us
- Corporate Training
- Presentation & Template Design
- Courses & Downloads
- PowerPoint Articles
- Word Articles
- Productivity Resources
Find a Tutorial
- Free Training
- For Businesses
We help busy office workers save hours and gain peace of mind, with tips, training and tutorials for Microsoft PowerPoint and Word.
Master Critical PowerPoint Shortcuts – Secure Your FREE Training Module and Save Valuable Time!
⌛ Master time-saving expert techniques.
🔥 Create powerful presentations.
🚀 Propel your career to new heights.
We value your privacy – we keep your info safe.
Discover PowerPoint Hacks Loved by Industry Giants - KKR, AmEx, HSBC!
Over 114,880 professionals in finance, marketing and sales have revolutionized their PPT skills with our proven methods.
Gain FREE access to a full module of our premium PowerPoint training program – Get started today!
We hate spam too and promise to keep your information safe.
You are currently viewing a placeholder content from Facebook . To access the actual content, click the button below. Please note that doing so will share data with third-party providers.
How-To Geek
How to add slide numbers in powerpoint.
If you want to keep track of your PowerPoint presentation slides, you could think about adding page numbers. Here's how.
Quick Links
Add slide numbers to a powerpoint presentation, remove slide numbers from a powerpoint presentation, format slide numbers in powerpoint.
When you're presenting a PowerPoint presentation, it can be easy to lose track of what slide you're currently on---especially if it's a large one. To help, you can add slide numbers in PowerPoint to know your position.
You could, of course, add slide numbers manually to each of your slides using text boxes. This isn't an option we'd recommend because any changes you make (for instance, by adding new slides) would require you to update your slide numbers manually, too.
Instead, you can add slide numbers that update automatically on all of your slides, including any hidden slides. By default, these slide numbers will appear in your slide footer, but you can move and format your slide numbers by editing the "Slide Master" for your presentation.
To add slide numbers, open a PowerPoint presentation with several slides added and then click the "Insert" tab.
From here, you'll need to select the "Header & Footer" button in the "Text" section.
This will bring up the "Header and Footer" options box. To add slide numbers to your PowerPoint slides, click the "Slide Number" checkbox in the "Slides" tab.
Press the "Apply to All" button to add slide numbers to all of your slides.
Once applied, your slide numbers will appear on each of your slides in the bottom-right corner. If you've split your PowerPoint presentation into sections, you'll need to repeat this action for each section.
To remove slide numbers from a PowerPoint presentation , you can follow similar steps to those shown above.
Related: How to Remove Slide Numbers from PowerPoint Slides
Press Insert > Header & Footer to bring up the PowerPoint header and footer options. In the "Header and Footer" box, uncheck the "Slide number" checkbox option.
You can remove the page number from only the currently selected slide by clicking "Apply" or to all of your slides by clicking the "Apply to All" button instead.
You can format your slide numbers using the PowerPoint Slide Master to make them appear in a different font, size, color, or position.
Related: How to Create a Slide Master in Microsoft PowerPoint
To do this, click View > Slide Master from the ribbon bar.
This will load the Slide Master editing screen. You'll see the current position of your page number as a text box in the bottom-right section of the slide.
You can move the text box to another position to move your slide number across all of your slides.
To edit the text formatting of the slide number, select the text box and then select the "Home" tab on the ribbon bar.
You can then edit the text formatting options using the available options in the "Font" and "Paragraph" sections.
For instance, pressing the "Bold" button will make the slide numbers appear in bold across all slides.
Once you've formatted your slide numbers, return to the "Slide Master" tab on the ribbon bar and then select the "Close Master View" button.
Your slide numbers will update with new formatting across all of your slides, depending on the changes you made.
Improve your practice.
Enhance your soft skills with a range of award-winning courses.
How to Structure your Presentation, with Examples
August 3, 2018 - Dom Barnard
For many people the thought of delivering a presentation is a daunting task and brings about a great deal of nerves . However, if you take some time to understand how effective presentations are structured and then apply this structure to your own presentation, you’ll appear much more confident and relaxed.
Here is our complete guide for structuring your presentation, with examples at the end of the article to demonstrate these points.
Why is structuring a presentation so important?
If you’ve ever sat through a great presentation, you’ll have left feeling either inspired or informed on a given topic. This isn’t because the speaker was the most knowledgeable or motivating person in the world. Instead, it’s because they know how to structure presentations – they have crafted their message in a logical and simple way that has allowed the audience can keep up with them and take away key messages.
Research has supported this, with studies showing that audiences retain structured information 40% more accurately than unstructured information.
In fact, not only is structuring a presentation important for the benefit of the audience’s understanding, it’s also important for you as the speaker. A good structure helps you remain calm, stay on topic, and avoid any awkward silences.
What will affect your presentation structure?
Generally speaking, there is a natural flow that any decent presentation will follow which we will go into shortly. However, you should be aware that all presentation structures will be different in their own unique way and this will be due to a number of factors, including:
- Whether you need to deliver any demonstrations
- How knowledgeable the audience already is on the given subject
- How much interaction you want from the audience
- Any time constraints there are for your talk
- What setting you are in
- Your ability to use any kinds of visual assistance
Before choosing the presentation’s structure answer these questions first:
- What is your presentation’s aim?
- Who are the audience?
- What are the main points your audience should remember afterwards?
When reading the points below, think critically about what things may cause your presentation structure to be slightly different. You can add in certain elements and add more focus to certain moments if that works better for your speech.

What is the typical presentation structure?
This is the usual flow of a presentation, which covers all the vital sections and is a good starting point for yours. It allows your audience to easily follow along and sets out a solid structure you can add your content to.
1. Greet the audience and introduce yourself
Before you start delivering your talk, introduce yourself to the audience and clarify who you are and your relevant expertise. This does not need to be long or incredibly detailed, but will help build an immediate relationship between you and the audience. It gives you the chance to briefly clarify your expertise and why you are worth listening to. This will help establish your ethos so the audience will trust you more and think you’re credible.
Read our tips on How to Start a Presentation Effectively
2. Introduction
In the introduction you need to explain the subject and purpose of your presentation whilst gaining the audience’s interest and confidence. It’s sometimes helpful to think of your introduction as funnel-shaped to help filter down your topic:
- Introduce your general topic
- Explain your topic area
- State the issues/challenges in this area you will be exploring
- State your presentation’s purpose – this is the basis of your presentation so ensure that you provide a statement explaining how the topic will be treated, for example, “I will argue that…” or maybe you will “compare”, “analyse”, “evaluate”, “describe” etc.
- Provide a statement of what you’re hoping the outcome of the presentation will be, for example, “I’m hoping this will be provide you with…”
- Show a preview of the organisation of your presentation
In this section also explain:
- The length of the talk.
- Signal whether you want audience interaction – some presenters prefer the audience to ask questions throughout whereas others allocate a specific section for this.
- If it applies, inform the audience whether to take notes or whether you will be providing handouts.
The way you structure your introduction can depend on the amount of time you have been given to present: a sales pitch may consist of a quick presentation so you may begin with your conclusion and then provide the evidence. Conversely, a speaker presenting their idea for change in the world would be better suited to start with the evidence and then conclude what this means for the audience.
Keep in mind that the main aim of the introduction is to grab the audience’s attention and connect with them.
3. The main body of your talk
The main body of your talk needs to meet the promises you made in the introduction. Depending on the nature of your presentation, clearly segment the different topics you will be discussing, and then work your way through them one at a time – it’s important for everything to be organised logically for the audience to fully understand. There are many different ways to organise your main points, such as, by priority, theme, chronologically etc.
- Main points should be addressed one by one with supporting evidence and examples.
- Before moving on to the next point you should provide a mini-summary.
- Links should be clearly stated between ideas and you must make it clear when you’re moving onto the next point.
- Allow time for people to take relevant notes and stick to the topics you have prepared beforehand rather than straying too far off topic.
When planning your presentation write a list of main points you want to make and ask yourself “What I am telling the audience? What should they understand from this?” refining your answers this way will help you produce clear messages.
4. Conclusion
In presentations the conclusion is frequently underdeveloped and lacks purpose which is a shame as it’s the best place to reinforce your messages. Typically, your presentation has a specific goal – that could be to convert a number of the audience members into customers, lead to a certain number of enquiries to make people knowledgeable on specific key points, or to motivate them towards a shared goal.
Regardless of what that goal is, be sure to summarise your main points and their implications. This clarifies the overall purpose of your talk and reinforces your reason for being there.
Follow these steps:
- Signal that it’s nearly the end of your presentation, for example, “As we wrap up/as we wind down the talk…”
- Restate the topic and purpose of your presentation – “In this speech I wanted to compare…”
- Summarise the main points, including their implications and conclusions
- Indicate what is next/a call to action/a thought-provoking takeaway
- Move on to the last section
5. Thank the audience and invite questions
Conclude your talk by thanking the audience for their time and invite them to ask any questions they may have. As mentioned earlier, personal circumstances will affect the structure of your presentation.
Many presenters prefer to make the Q&A session the key part of their talk and try to speed through the main body of the presentation. This is totally fine, but it is still best to focus on delivering some sort of initial presentation to set the tone and topics for discussion in the Q&A.

Other common presentation structures
The above was a description of a basic presentation, here are some more specific presentation layouts:
Demonstration
Use the demonstration structure when you have something useful to show. This is usually used when you want to show how a product works. Steve Jobs frequently used this technique in his presentations.
- Explain why the product is valuable.
- Describe why the product is necessary.
- Explain what problems it can solve for the audience.
- Demonstrate the product to support what you’ve been saying.
- Make suggestions of other things it can do to make the audience curious.
Problem-solution
This structure is particularly useful in persuading the audience.
- Briefly frame the issue.
- Go into the issue in detail showing why it ‘s such a problem. Use logos and pathos for this – the logical and emotional appeals.
- Provide the solution and explain why this would also help the audience.
- Call to action – something you want the audience to do which is straightforward and pertinent to the solution.
Storytelling
As well as incorporating stories in your presentation , you can organise your whole presentation as a story. There are lots of different type of story structures you can use – a popular choice is the monomyth – the hero’s journey. In a monomyth, a hero goes on a difficult journey or takes on a challenge – they move from the familiar into the unknown. After facing obstacles and ultimately succeeding the hero returns home, transformed and with newfound wisdom.
Storytelling for Business Success webinar , where well-know storyteller Javier Bernad shares strategies for crafting compelling narratives.
Another popular choice for using a story to structure your presentation is in media ras (in the middle of thing). In this type of story you launch right into the action by providing a snippet/teaser of what’s happening and then you start explaining the events that led to that event. This is engaging because you’re starting your story at the most exciting part which will make the audience curious – they’ll want to know how you got there.
- Great storytelling: Examples from Alibaba Founder, Jack Ma
Remaining method
The remaining method structure is good for situations where you’re presenting your perspective on a controversial topic which has split people’s opinions.
- Go into the issue in detail showing why it’s such a problem – use logos and pathos.
- Rebut your opponents’ solutions – explain why their solutions could be useful because the audience will see this as fair and will therefore think you’re trustworthy, and then explain why you think these solutions are not valid.
- After you’ve presented all the alternatives provide your solution, the remaining solution. This is very persuasive because it looks like the winning idea, especially with the audience believing that you’re fair and trustworthy.
Transitions
When delivering presentations it’s important for your words and ideas to flow so your audience can understand how everything links together and why it’s all relevant. This can be done using speech transitions which are words and phrases that allow you to smoothly move from one point to another so that your speech flows and your presentation is unified.
Transitions can be one word, a phrase or a full sentence – there are many different forms, here are some examples:
Moving from the introduction to the first point
Signify to the audience that you will now begin discussing the first main point:
- Now that you’re aware of the overview, let’s begin with…
- First, let’s begin with…
- I will first cover…
- My first point covers…
- To get started, let’s look at…
Shifting between similar points
Move from one point to a similar one:
- In the same way…
- Likewise…
- Equally…
- This is similar to…
- Similarly…
Internal summaries
Internal summarising consists of summarising before moving on to the next point. You must inform the audience:
- What part of the presentation you covered – “In the first part of this speech we’ve covered…”
- What the key points were – “Precisely how…”
- How this links in with the overall presentation – “So that’s the context…”
- What you’re moving on to – “Now I’d like to move on to the second part of presentation which looks at…”
Physical movement
You can move your body and your standing location when you transition to another point. The audience find it easier to follow your presentation and movement will increase their interest.
A common technique for incorporating movement into your presentation is to:
- Start your introduction by standing in the centre of the stage.
- For your first point you stand on the left side of the stage.
- You discuss your second point from the centre again.
- You stand on the right side of the stage for your third point.
- The conclusion occurs in the centre.
Key slides for your presentation
Slides are a useful tool for most presentations: they can greatly assist in the delivery of your message and help the audience follow along with what you are saying. Key slides include:
- An intro slide outlining your ideas
- A summary slide with core points to remember
- High quality image slides to supplement what you are saying
There are some presenters who choose not to use slides at all, though this is more of a rarity. Slides can be a powerful tool if used properly, but the problem is that many fail to do just that. Here are some golden rules to follow when using slides in a presentation:
- Don’t over fill them – your slides are there to assist your speech, rather than be the focal point. They should have as little information as possible, to avoid distracting people from your talk.
- A picture says a thousand words – instead of filling a slide with text, instead, focus on one or two images or diagrams to help support and explain the point you are discussing at that time.
- Make them readable – depending on the size of your audience, some may not be able to see small text or images, so make everything large enough to fill the space.
- Don’t rush through slides – give the audience enough time to digest each slide.
Guy Kawasaki, an entrepreneur and author, suggests that slideshows should follow a 10-20-30 rule :
- There should be a maximum of 10 slides – people rarely remember more than one concept afterwards so there’s no point overwhelming them with unnecessary information.
- The presentation should last no longer than 20 minutes as this will leave time for questions and discussion.
- The font size should be a minimum of 30pt because the audience reads faster than you talk so less information on the slides means that there is less chance of the audience being distracted.
Here are some additional resources for slide design:
- 7 design tips for effective, beautiful PowerPoint presentations
- 11 design tips for beautiful presentations
- 10 tips on how to make slides that communicate your idea
Group Presentations
Group presentations are structured in the same way as presentations with one speaker but usually require more rehearsal and practices. Clean transitioning between speakers is very important in producing a presentation that flows well. One way of doing this consists of:
- Briefly recap on what you covered in your section: “So that was a brief introduction on what health anxiety is and how it can affect somebody”
- Introduce the next speaker in the team and explain what they will discuss: “Now Elnaz will talk about the prevalence of health anxiety.”
- Then end by looking at the next speaker, gesturing towards them and saying their name: “Elnaz”.
- The next speaker should acknowledge this with a quick: “Thank you Joe.”
From this example you can see how the different sections of the presentations link which makes it easier for the audience to follow and remain engaged.
Example of great presentation structure and delivery
Having examples of great presentations will help inspire your own structures, here are a few such examples, each unique and inspiring in their own way.
How Google Works – by Eric Schmidt
This presentation by ex-Google CEO Eric Schmidt demonstrates some of the most important lessons he and his team have learnt with regards to working with some of the most talented individuals they hired. The simplistic yet cohesive style of all of the slides is something to be appreciated. They are relatively straightforward, yet add power and clarity to the narrative of the presentation.
Start with why – by Simon Sinek
Since being released in 2009, this presentation has been viewed almost four million times all around the world. The message itself is very powerful, however, it’s not an idea that hasn’t been heard before. What makes this presentation so powerful is the simple message he is getting across, and the straightforward and understandable manner in which he delivers it. Also note that he doesn’t use any slides, just a whiteboard where he creates a simple diagram of his opinion.
The Wisdom of a Third Grade Dropout – by Rick Rigsby
Here’s an example of a presentation given by a relatively unknown individual looking to inspire the next generation of graduates. Rick’s presentation is unique in many ways compared to the two above. Notably, he uses no visual prompts and includes a great deal of humour.
However, what is similar is the structure he uses. He first introduces his message that the wisest man he knew was a third-grade dropout. He then proceeds to deliver his main body of argument, and in the end, concludes with his message. This powerful speech keeps the viewer engaged throughout, through a mixture of heart-warming sentiment, powerful life advice and engaging humour.
As you can see from the examples above, and as it has been expressed throughout, a great presentation structure means analysing the core message of your presentation. Decide on a key message you want to impart the audience with, and then craft an engaging way of delivering it.
By preparing a solid structure, and practising your talk beforehand, you can walk into the presentation with confidence and deliver a meaningful message to an interested audience.
It’s important for a presentation to be well-structured so it can have the most impact on your audience. An unstructured presentation can be difficult to follow and even frustrating to listen to. The heart of your speech are your main points supported by evidence and your transitions should assist the movement between points and clarify how everything is linked.
Research suggests that the audience remember the first and last things you say so your introduction and conclusion are vital for reinforcing your points. Essentially, ensure you spend the time structuring your presentation and addressing all of the sections.
How to Number Slides in PowerPoint

Do you ever find yourself losing track of where you are in a long PowerPoint presentation? It can be frustrating, but luckily there are ways to number your slides in PowerPoint to help you stay on track and keep your audience engaged. In this article, we will cover everything you need to know about numbering slides in PowerPoint, from why it is important to the different methods you can use to customize your page numbers.
Table of Contents
Why Numbering Slides in PowerPoint Matters
Numbering your slides is important because it helps you keep track of where you are in your presentation. It also helps your audience follow along and makes it easier to reference specific slides. Additionally, numbering your slides can give your presentation a more professional look and feel. By adding page numbers, you can signal to your audience that you have meticulously planned and crafted your presentation.
Another benefit of numbering your slides is that it can help you identify any missing or duplicate slides. When you have a large presentation with many slides, it can be easy to accidentally skip a slide or include a duplicate. By numbering your slides, you can quickly identify any gaps or duplicates in your presentation and make necessary adjustments.
Furthermore, numbering your slides can be especially helpful when collaborating with others on a presentation. If you are working with a team, numbering your slides can ensure that everyone is on the same page and can easily reference specific slides during discussions or revisions. It can also make it easier to divide up the work and assign specific slides to team members.
Different Ways to Number Slides in PowerPoint
There are several methods you can use to number your slides in PowerPoint, including adding page numbers, formatting your slide master, and using automation. Let’s explore each of these methods in more detail.
Adding Page Numbers to PowerPoint Presentations
Adding page numbers to PowerPoint presentations is a quick and simple way to help keep track of your slides. To add page numbers, go to the Insert tab, click on Header & Footer, and then check the box for Slide Number. From here, you can choose where you want the page numbers to appear and the font and size of your choice.
Customizing the Look of Page Numbers in PowerPoint
Customizing the look of your page numbers is a great way to make your presentation stand out. You can change the font, size, color, and position of your page numbers to match the look and feel of your presentation. Click on the Format button in the Header & Footer dialog box to customize your page numbers.
Using the Slide Master to Number Slides in PowerPoint
The Slide Master is a powerful tool in PowerPoint that allows you to customize your entire presentation’s design. By formatting the Slide Master, you can add page numbers to your presentation in a consistent and professional way. You can also customize the look of your page numbers and apply them to all slides in your presentation.
How to Start Page Numbers from a Specific Slide in PowerPoint
If you want to start your page numbers from a specific slide in your presentation, go to the Insert tab, click on Header & Footer, and then select the slide number box. Click on the “Start at” option, and then enter the number of the slide you want to start your page numbering from.
Removing Page Numbers from Certain Slides in PowerPoint
Removing page numbers from certain slides in your presentation is possible, but it requires a manual process. To remove page numbers from a slide, go to the slide in question, click on the slide number, and then press the Delete key on your keyboard.
Automating Page Numbers in PowerPoint
If you have a large presentation with many slides, manually adding and formatting page numbers can be time-consuming. Fortunately, PowerPoint offers an automation feature that can do this for you. To use this feature, go to the Insert tab, click on Header & Footer, and then check the box for Slide Number. From here, click on the “Apply to All” button to automatically add page numbers to all slides in your presentation. You can also customize the look of your page numbers using the Format button.
Troubleshooting Common Issues with Numbering Slides in PowerPoint
While adding page numbers to your PowerPoint presentation is usually straightforward, there are some common issues you may encounter. These include page numbers not showing up, the wrong page numbers appearing on slides, and page numbers not aligning properly. Check your slide master and make sure you have inserted the page numbers properly to fix these issues.
Another common issue with numbering slides in PowerPoint is when the page numbers appear in the wrong location on the slide. This can be frustrating, especially if you have a lot of slides in your presentation. To fix this issue, you can adjust the placement of the page numbers by going to the slide master and moving the text box that contains the page number to the desired location.
If you have tried all of the above troubleshooting steps and are still experiencing issues with numbering your slides, it may be helpful to reach out to PowerPoint support for further assistance. They can provide additional guidance and help you resolve any issues you may be experiencing.
Tips for Consistent and Professional Slide Numbering in PowerPoint
To achieve consistent and professional slide numbering in PowerPoint, here are some tips to keep in mind:
- Choose a font and size that matches the overall design of your presentation.
- Make sure your page numbers are placed in a consistent location on each slide.
- Use the Slide Master to format your page numbers.
- Proofread your page numbers before presenting to avoid mistakes or formatting errors.
Another important tip to keep in mind when numbering your slides in PowerPoint is to consider the order of your presentation. It’s important to number your slides in a logical and sequential order that makes sense to your audience. This can help them follow along with your presentation and stay engaged. Additionally, if you plan on sharing your presentation with others, numbering your slides can make it easier for them to reference specific slides or sections of your presentation.
Best Practices for Using Slide Numbers Effectively in PowerPoint Presentations
When using slide numbers in your PowerPoint presentations, keep in mind that they are meant to be a helpful reference tool for you and your audience. Avoid overcrowding your slides with too much information, and make sure that your slide numbering is consistent throughout your presentation. Finally, make sure your slide numbers are large enough to be seen by everyone in your audience, but not so large that they distract from your message.
Another important consideration when using slide numbers is to decide where to place them on your slides. Some presenters prefer to place them in the footer, while others prefer to place them in the top corner of the slide. Whichever location you choose, make sure it is consistent throughout your presentation. Additionally, consider using a different color or font for your slide numbers to make them stand out and be easily recognizable.
Advanced Techniques for Numbering Slides with Complex Layouts in PowerPoint
If you have a complex slide layout, such as one with multiple columns or images, you may need to use advanced techniques to properly number your slides. This could involve using automation or creating custom templates. Consider seeking help from a PowerPoint expert if you find yourself struggling to properly number your slides.
Another technique for numbering slides with complex layouts is to use the “Slide Master” feature in PowerPoint. This allows you to create a consistent numbering system across all slides in your presentation, even if they have different layouts. To access the Slide Master, go to the “View” tab and click on “Slide Master.” From there, you can add a numbering placeholder and customize its appearance. This technique can save you time and ensure that your presentation looks polished and professional.
Saving Time with Automation: How to Automatically Number Slides in PowerPoint
If you have a large PowerPoint presentation, it can be time-consuming to manually number each slide. Thankfully, Microsoft PowerPoint has a built-in tool that allows you to automatically number your slides. To do this, go to the Insert tab, click on Header & Footer, and then check the box for “Slide number.” From here, select the “Apply to All” button to apply the page numbers to all slides in your presentation.
This feature not only saves time, but it also ensures that your presentation is organized and easy to follow. Additionally, if you need to make changes to the order of your slides, the automatic numbering will update accordingly. This can be especially helpful if you are presenting to a large audience and need to refer back to specific slides. Overall, taking advantage of automation tools in PowerPoint can greatly improve your productivity and the quality of your presentations.
Comparing Different Methods of Slide Numbering in PowerPoint
Each of the methods we have discussed has its strengths and weaknesses, depending on the nature of your presentation. For example, adding page numbers can be quick and easy but may not provide the level of customization you need for a complex presentation. Using the Slide Master is a powerful way to format your entire presentation’s design, but can be time-consuming. Consider weighing the pros and cons of each method and choosing the one that best fits your presentation’s needs.
Another method of slide numbering in PowerPoint is to use the Header and Footer feature. This allows you to add not only slide numbers, but also other information such as the date, time, and your company logo. This method is useful if you want to add a professional touch to your presentation and make it look more polished. However, it can also be time-consuming to set up and customize.
If you want to make your slide numbers stand out, you can also use animations and transitions. For example, you can make the slide number appear in a unique way when the slide is first displayed, or you can make it move across the screen as you transition to the next slide. This method can be visually appealing and engaging for your audience, but it should be used sparingly and only when it enhances the overall message of your presentation.
Examples of Creative and Unique Slide Numbering Ideas
Adding creative and unique slide numbering can help make your presentation stand out and engage your audience. Some ideas might include using non-traditional numbering systems or incorporating images or icons into your page numbers. Always keep in mind the overall look and feel of your presentation and make sure your page numbers fit the aesthetic you’re going for.
Now that you know how to number slides in PowerPoint, you can create more professional and organized presentations that will keep your audience engaged and informed.
By humans, for humans - Best rated articles:
Excel report templates: build better reports faster, top 9 power bi dashboard examples, excel waterfall charts: how to create one that doesn't suck, beyond ai - discover our handpicked bi resources.
Explore Zebra BI's expert-selected resources combining technology and insight for practical, in-depth BI strategies.

We’ve been experimenting with AI-generated content, and sometimes it gets carried away. Give us a feedback and help us learn and improve! 🤍
Note: This is an experimental AI-generated article. Your help is welcome. Share your feedback with us and help us improve.

How to Add & Fix Slides Numbers in PowerPoint? [An EASY Guide!]
By: Author Shrot Katewa
![How to Add & Fix Slides Numbers in PowerPoint? [An EASY Guide!]](https://artofpresentations.com/wp-content/uploads/2021/12/Featured-Image-Slide-Numbers-in-PowerPoint.webp "presentation of number")
Isn’t it annoying when you add a new slide within a sequence of slides in your PowerPoint presentation, and all your slide numbers go for a toss! If you are in this boat, then you’ve come to the right place!
Adding slide numbers can be confusing even after you’ve been using PowerPoint for quite some time. However, with the proper process of adding slides numbers in PowerPoint, you won’t go wrong. But, the question really is, what is the correct way to add slides numbers in PowerPoint?
To add slide numbers in PowerPoint, click on the “Insert” tab and click on the “Slide Number” option from the ribbon. Then, enable the “Slide Number” checkmark. Finally, click on the “Apply to All” option to apply slide numbers to all slides in your presentation.
This article will walk you through the complete details of adding slide numbers in PowerPoint in a step-by-step manner with visual references so that you can easily understand the process! You’ll also learn to add slide numbers in the “1 of X slides” format.
Furthermore, I’ll also show you how to exclude slide numbers from specific slides. In the end, I’ll help you troubleshoot some of the most common issues that you may be facing with slide numbers in PowerPoint. That, and much more!
So, let’s get started!
1. Adding Slide Numbers the Wrong Way! [Don’t Do This!]
First, let’s talk about what you shouldn’t do!
The easiest (and most common incorrect way) to add a slide number is by manually adding a text box on each slide, manually inputting the slide number, and placing it at the bottom of the slide. However, this is the wrong way to add slide numbers to your PowerPoint presentation.
If you add slide numbers this way, you have to add the slide number to each slide individually. Moreover, if you decide to place a new slide in the middle of your presentation, it messes up the sequence numbers for all the slides you just inserted slide numbers. Don’t do this!
The following part of this article discusses the different ways you can add slide numbers to your PowerPoint presentation efficiently.
2. How to Add Slides Numbers in PowerPoint? [Correct Way]
There are multiple ways to add slide numbers in PowerPoint. However, I’ll share the most straightforward method in this article with you.
A quick heads up – if you prefer watching the tutorial rather than reading about it, then check out my video below with the step-by-step instructions. However, if you prefer to read the instructions, continue with the article below.
Adding a Slide Number in PowerPoint Using the “Insert” Tab
Although you will see people talk about using the “Slide Master” to add slide numbers to your presentation, using slide layouts in PowerPoint can be confusing!
The easiest method is to use the “Insert” tab to add slide numbers to your slide. You can use this method even if you are a beginner!
So, what do you need to do? Let’s take a look –
Step-1: Insert a Blank Slide Layout
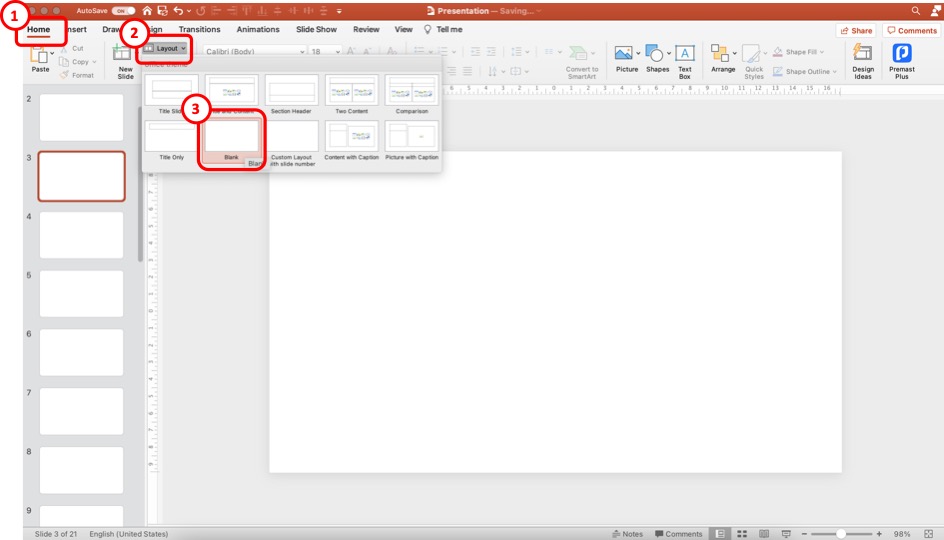
The first step of the process is to insert a blank slide in your presentation. This step is only optional. It is not necessary to do this every time. Don’t do this step, especially if you use a presentation template. But, for the sake of explanation and practice, this will be a helpful step.
Click on the “Home” tab to add a blank slide layout. Then, click on “ Layout “, and from the options, click on the “ Blank ” slide option.
This will convert the slide layout of your current slide to a blank layout. You can also add a slide to your presentation and then convert it to a blank slide layout using the steps I just mentioned.
Step-2: Click on the “Slide Number” option
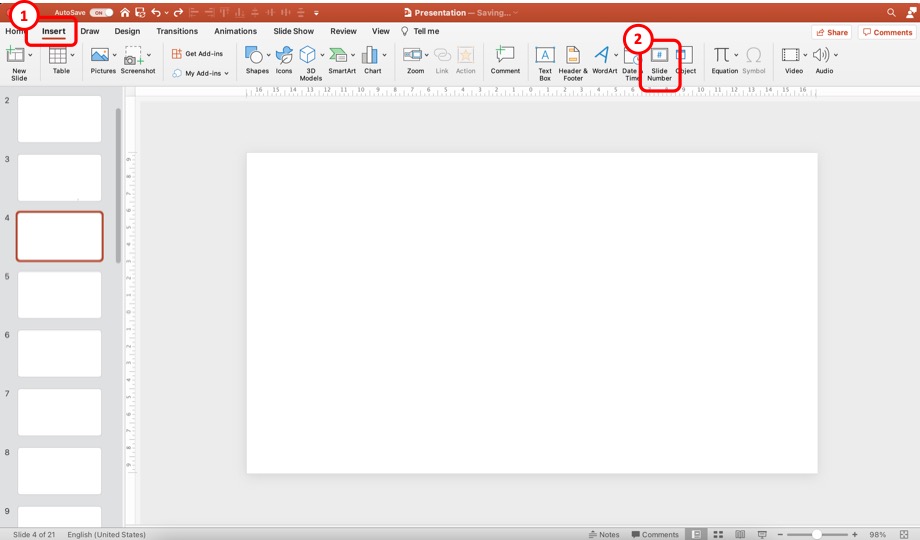
Now, click on the “ Insert ” tab. Then, from the options, click on the “ Slide Number “. This will open a new pop-up window with more options.
Step-3: Add the Slide Numbers to the Slides
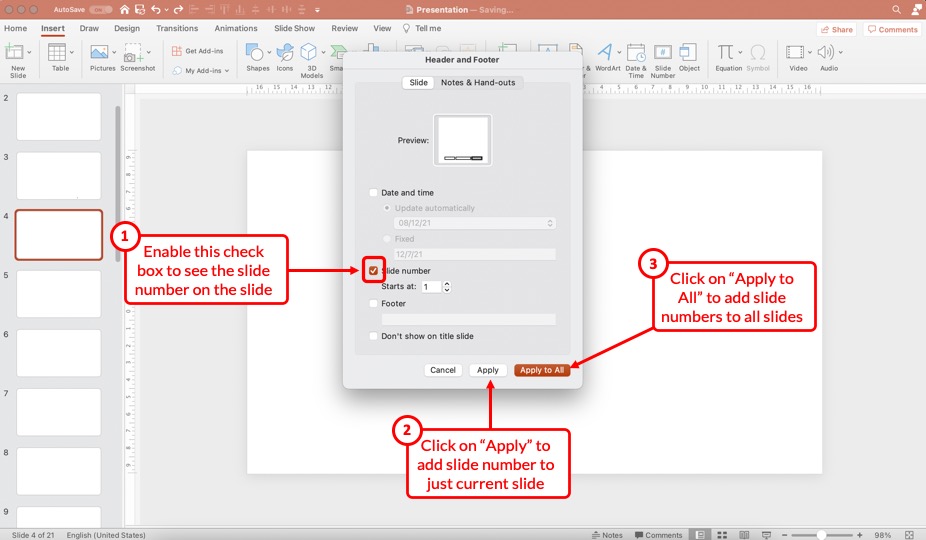
First, make sure that you enable the “Slide Number” option in the next step. Next, make sure that add a checkmark to the check box. You can choose to start the number at “ 1 “.
Then, click on the “ Apply ” option to add the slide number to just the current slide. However, if you wish to add slide numbers to all the slides, click on the “ Apply to All ” option.
Don’t worry. We’ll look at how to disable slide numbers for specific slides slightly later in the article.
Step-4: Duplicate the Slide with the Slide Number
This is, again, an optional step.
Once you have the slide number added by clicking on “Apply” in the previous step, you need to copy and paste the slide in PowerPoint .
Make sure that you format the slide number on this slide before you start duplicating this slide. (check the rest of the article to know how to format the slide number)
However, duplicating the slide with a slide number is only helpful when starting with a new presentation. If you already have a bunch of different slides that have been designed especially using a presentation template, this step 4 won’t work.
If you are in that situation, select the “Apply to All” option in step 3. Then, check the section below to format the slide number in PowerPoint.
3. How to Remove Slide Number from Specific Slides
If you don’t want specific slides to show the slide number, you can easily toggle it off.
To remove slide numbers from specific slides in PowerPoint, first, select the slide. Then, click on the “Insert” tab, and click on the “Slide Number” button. Next, “Uncheck” the slide number option in the pop-up that appears, and click on “Apply” to remove the slide numbers from the selected slides.
I’m hopeful that the process mentioned above is self-explanatory. Nevertheless, here’s a step-by-step process to disable slide numbers for specific slides in your PowerPoint presentation.
Step 1 – Select the Slides to Remove the Slide Number
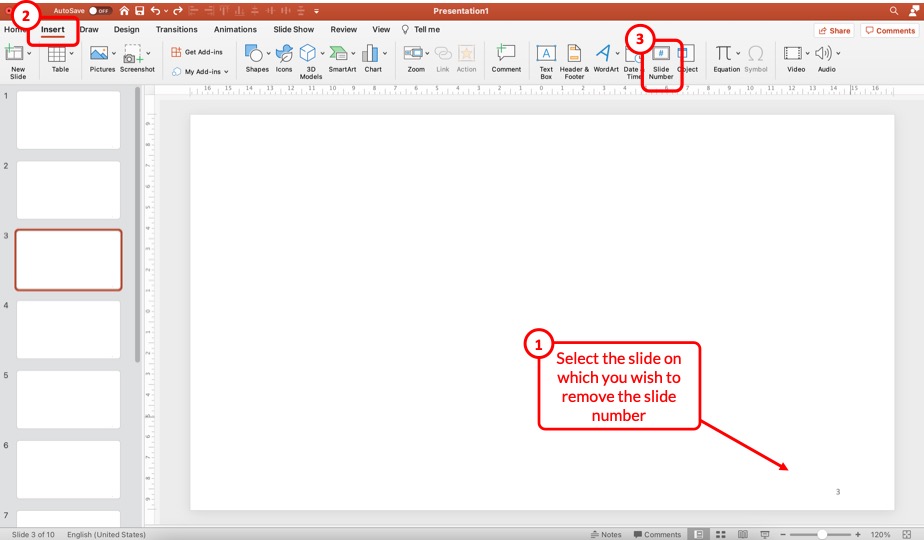
First, select the specific slides on which you wish to remove the slide numbers. You can use the “Ctrl” on your keyboard (or Cmd key for Mac) and click on the slides on the left part of the screen to select multiple slides at once.
Then, click on the “ Insert ” ribbon, and click on the “ Slide Number ” option from the ribbon. This will open a pop-up.
Step 2 – Uncheck the Slide Number Option

From the pop-up window that appears, uncheck the box for the “ Slide Number ” option and click on “ Apply “. This will remove the slide number just on the selected slides.
4. How to Remove Slide Number from Title Slide in PowerPoint?
One common problem that you may encounter once you add the slide numbers to all your slides is that the title slide of your presentation also now shows a slide number!
Most of us usually don’t want the slide number visible on the title slide. So, how do you remove the slide number from the title slide of your PowerPoint presentation?
Well, there are three different methods you can use. Let’s take a look at them one by one.
Method 1 – Manually Removing the Slide Number
The easiest way is to remove the slide number from the title slide manually. Simply select the slide number on the title slide and hit the “Delete” key on your keyboard, and the slide number will be deleted.
This method works well for the title slide only since the title slide will always remain as the first slide in the presentation and won’t change its position in the sequence.
If you use this method on other slides, chances are you may want to move the slides around and may want the slide numbers back on the slide later. And, that may just complicate things for you. Instead, just follow the steps mentioned in the previous section to delete slide numbers on other slides.
However, sometimes, PowerPoint just doesn’t allow you to select the slide number field on the slide! In such a scenario, you can’t just delete the slide number.
This is where the other two methods come in handy!
Method 2 – Uncheck the Slide Number Option on the Title Slide
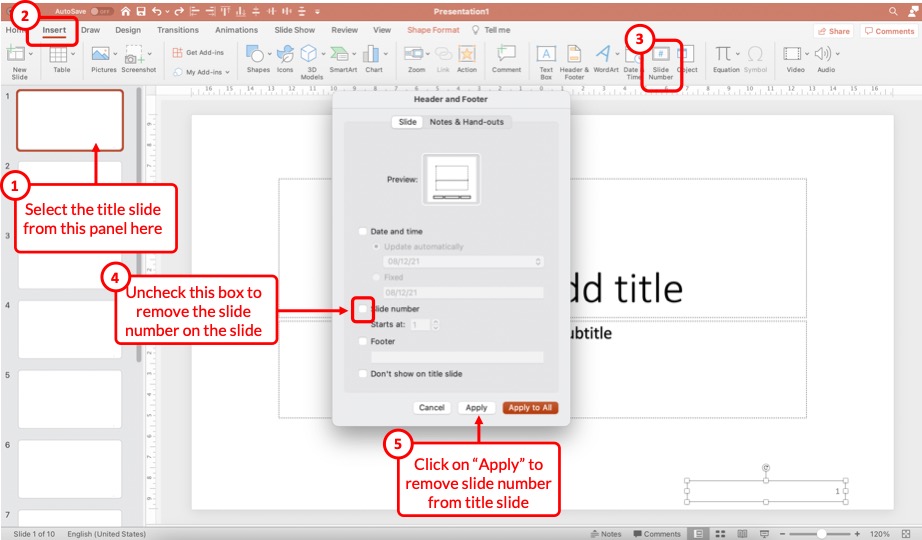
This method works just the same way as per the steps described in the previous section (section 3 above) of the article that describes the process to remove slide numbers from specific slides.
All you need to do is select the title slide by clicking on it. Then, click on the “ Insert ” tab. Next, click on the “ Slide Number ” option. From the pop-up that appears, uncheck the box for “Slide Number”, and click on “ Apply “.
Just as before, this will remove the slide number from the selected slide.
Method 3 – Use the “Don’t Show on Title Slide” Option

You can also use the “Don’t show on title slide” option when adding the slide numbers to your presentation in order to avoid the slide number on the title slide!
To do so, repeat the steps of adding the slide number to your presentation. Then, enable the checkmark on the “Don’t show on title slide” option to remove the slide number from the title slide.
5. How to Remove Slide Numbers on All Slides in PowerPoint?
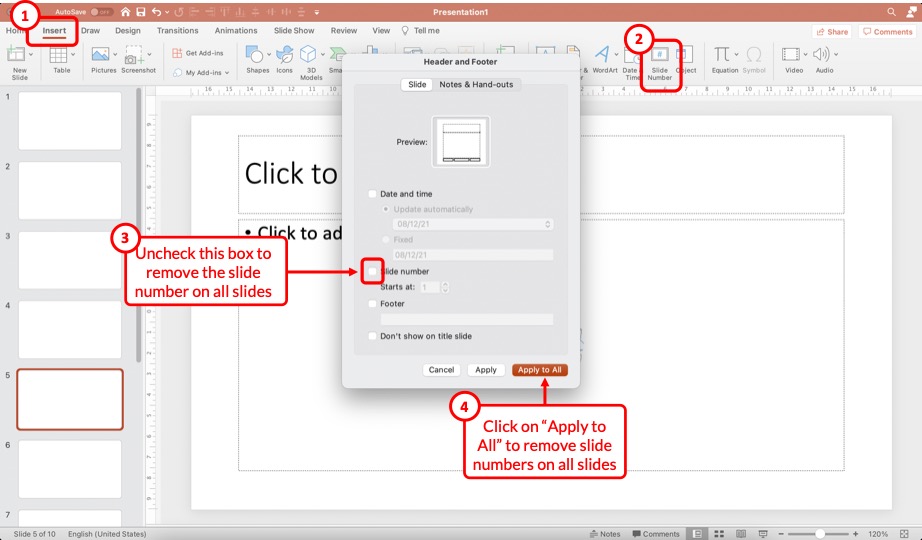
Removing slide numbers from all slides is just as easy as adding slide numbers to your slides!
To remove slide numbers from your PowerPoint presentation, click on the “Insert” tab. Then, click on the “Slide Number” option. From the pop-up that appears, uncheck the box for “Slide numbers”, and click on the “Apply to All” option.
Check the steps on the image shared above in case you need any further clarification.
Once all the steps are complete, you will notice that the slide number disappears from all slides!
6. How to Make Slide Numbers “1 of X Slides” in PowerPoint?
If you have a really long presentation that contains more than 50 slides, then you may want to use the “1 of X Slides” format! [Where “X” is the total number of slides that your presentation contains]
Doing so allows the audience to estimate the number of slides remaining in the presentation. So, how do you do that?
Let me share with you a ninja tip in this section! Here’s a step-by-step explanation of what you need to do!
Step 1 – Insert a Text Box on the Slide
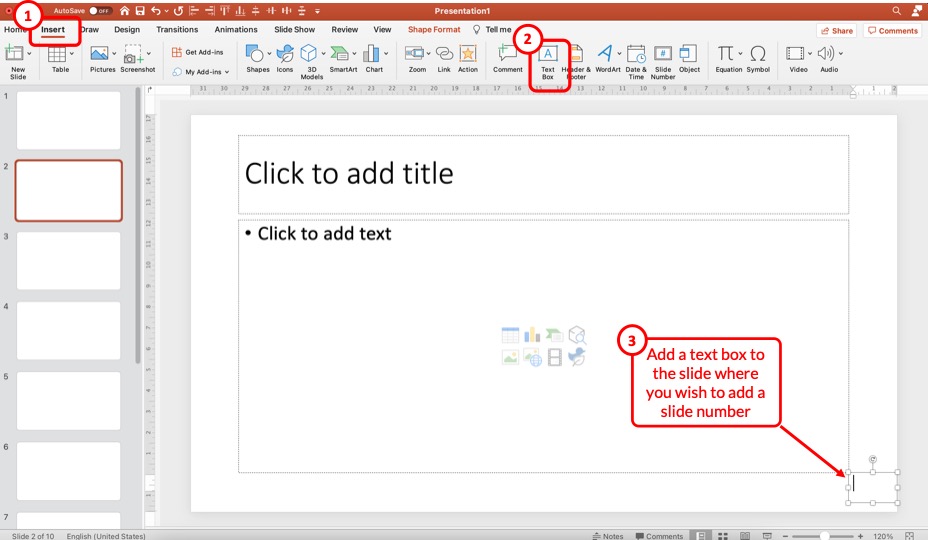
The first step is to insert a text box on the slide. To do that, click on the “ Insert ” tab. Then, click on the “ Text Box ” option from the ribbon. Next, just drag the cursor on the bottom right corner of your slide (or wherever you wish to have the slide number).
Step 2 – Insert the Slide Number
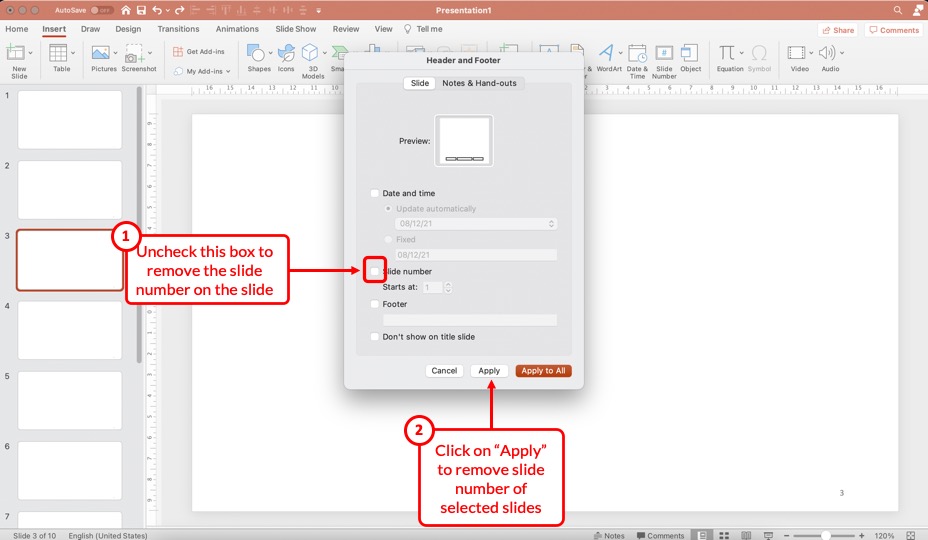
The next step is to insert the slide number. But, don’t add the slide number manually.
Instead, first, click inside the text box to make it active. Then, click on the “ Insert ” tab and click on the “ Slide Number ” option from the ribbon.
This will automatically insert the slide number inside the text box.
Step 3 – Add Text After the Slide Number
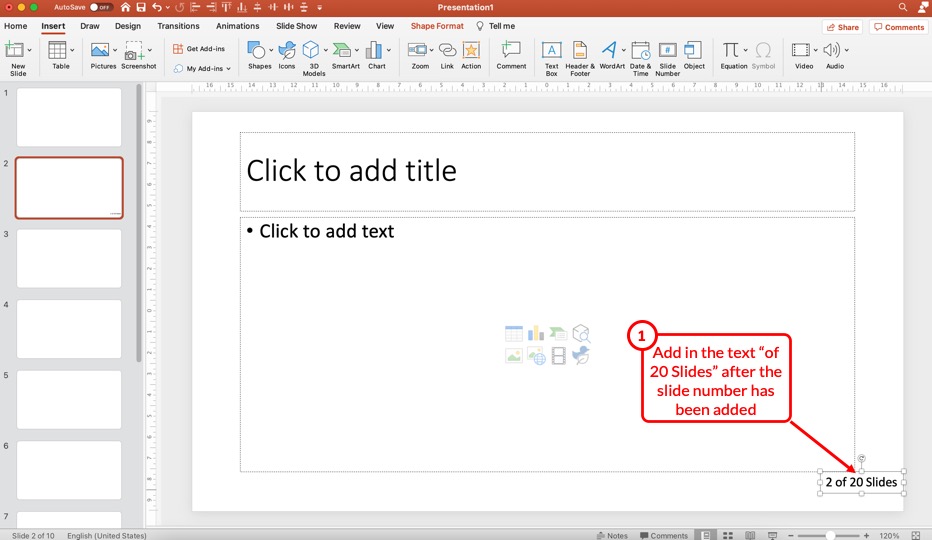
Now, simply add the text that you wish to appear after the slide number. In this case, I’ve added “of 20 Slides” after the slide number (as shown in the image above).
Step 4 – Copy and Paste the Text Box
Now, all you need to do is simply copy and paste this text box on all the slides!
Once you copy and paste the text box on other slides, you will notice that the slide number within the text box will change with the changing slide. However, “of 20 Slides” will remain constant!
Thus, it is advised to add such a slide number format to all slides once you’ve completed creating the presentation as it will provide you with a clear understanding of the exact number of slides in your presentation.
Don’t worry! Even if you move the slides around and change the sequence, the slide numbers will still change with the specific slide!
7. How to Format Slide Numbers in PowerPoint?
Formatting slides numbers is quite easy if you know what to do!
PowerPoint allows you to change the font color, font size, and even the font that is used for the slide numbers. Formatting a slide number works just like formatting text in PowerPoint .
There are two key processes to know when formatting a slide number in PowerPoint! Let’s take a look at both of them –
7.1 How to Format Slide Numbers for a Specific Slide Layout?
Formatting slide numbers of a specific slide layout will affect only those slides that use a particular type of slide layout. Here’s what you need to do –
Step 1 – Add Slide Numbers to the Slides
The first step is to add the slides numbers to your slide. Obviously, in order to edit the slide numbers and see the effect, the slide numbers need to be present on the slide.
So, if you haven’t added the slide numbers already, follow the steps mentioned earlier in the article and add the slide numbers first.
Step 2 – Check the Slide Layout
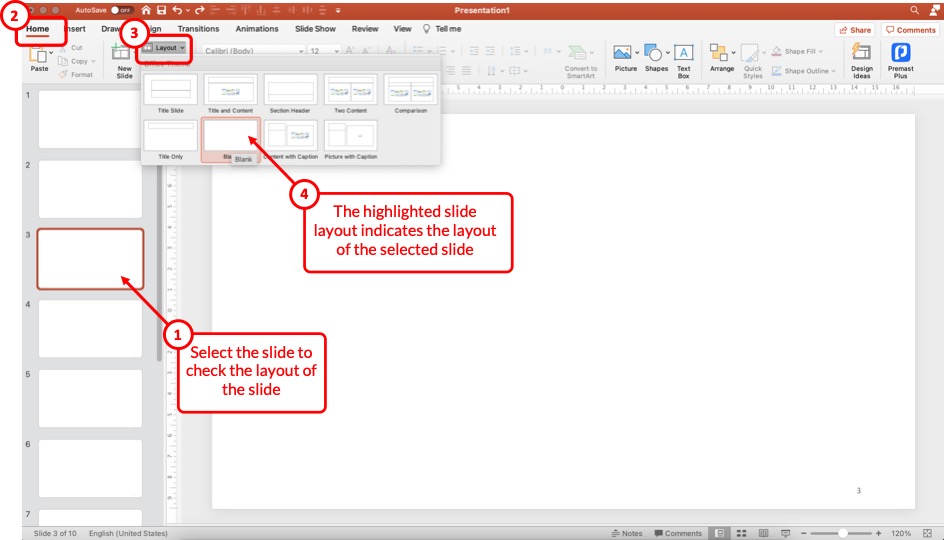
The next step that we need to take is to check the slide layout that is currently in use for the specific slide on which we intend to format the slide number.
To check the slide layout, first, select the slide. Then, click on the “ Home ” tab and click on the “ Slide Layout ” option from the ribbon.
The highlighted slide layout will indicate the layout the current slide uses.
Step 3 – Open the Slide Master View
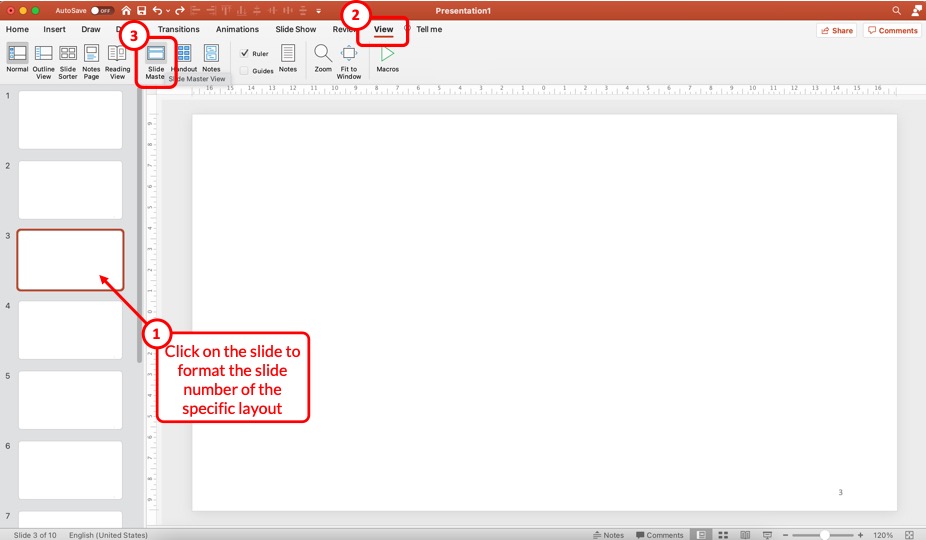
In the next step, we need to open the Slide Master View in PowerPoint .
To do that, first, click on the slide for which you wish to change the slide number format. Then, click on the “ View ” tab, and click on the “ Slide Master ” option from the ribbon.
This will open the slide master view in PowerPoint.
Slide 4 – Format the Slide Number for the Specific Slide Layout
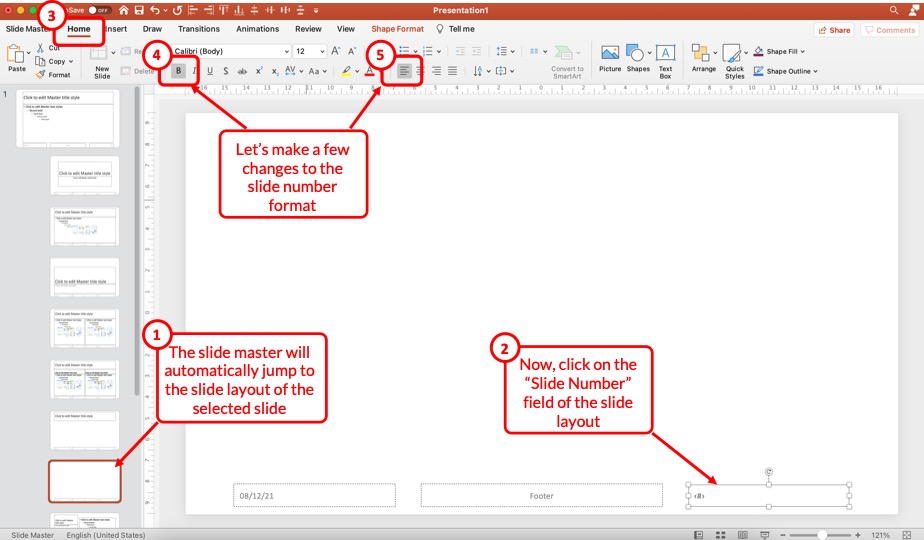
Now, first, make sure that you have the correct layout selected. By default, PowerPoint will open the slide layout of the slide that was selected before opening the slide master view.
Then, to make changes to the format of the slide number, select the slide number field present on the slide. Click on the “ Home ” tab, and make the changes as per your preference.
You can change the font, text alignment, text styles, font size, and much more! For the sake of this example, let’s change the alignment to left, and add a “Bold” style.
Slide 5 – Exit the Slide Master
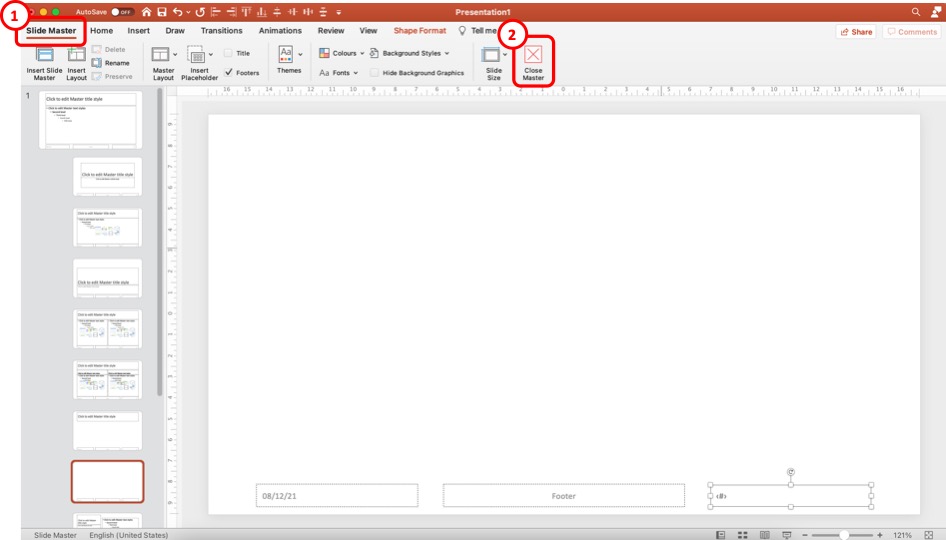
Once you’ve made the desired formatting changes, click on the “ Slide Master ” tab once again, and click on the “ Close Master ” option to exit the slide master.
Once you exit the slide master and open the normal view, you will notice that the formatting of the slide number on the current slide layout is different from other slides.
7.2 How to Format Slide Numbers on All Slides in PowerPoint?
If you wish to change the format of the slide number on all slides instead of specific slide layouts, you can do so just as easily. And, no! You don’t need to individually change the format of slide numbers on each slide!
Here’s what you need to do to change the slide numbers on all slides in PowerPoint –
Step 1 – Open the Slide Master View
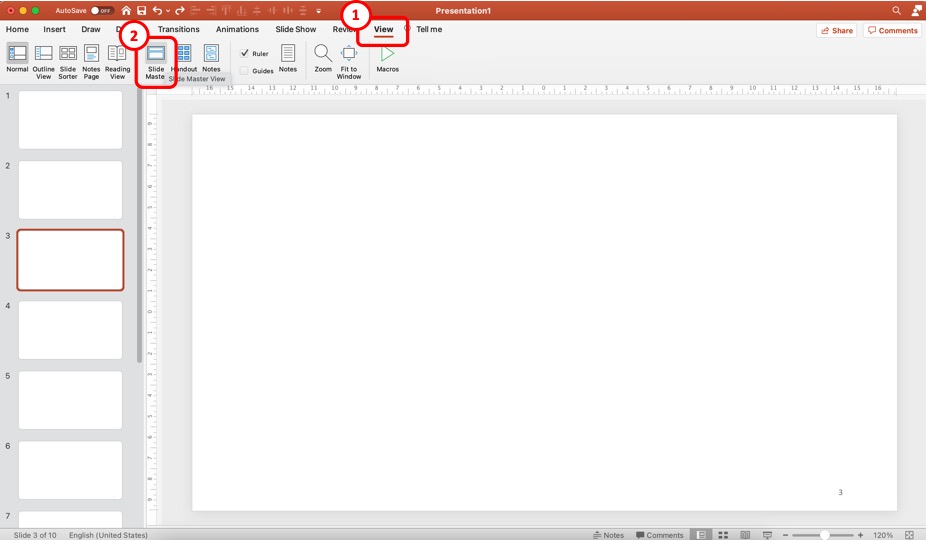
First, you need to open the slide master view in PowerPoint. Just as before, click on the “ View ” tab. Then, click on the “ Slide Master ” option from the ribbon.
Step 2 – Format the Slide Number Field on the “Master Slide”
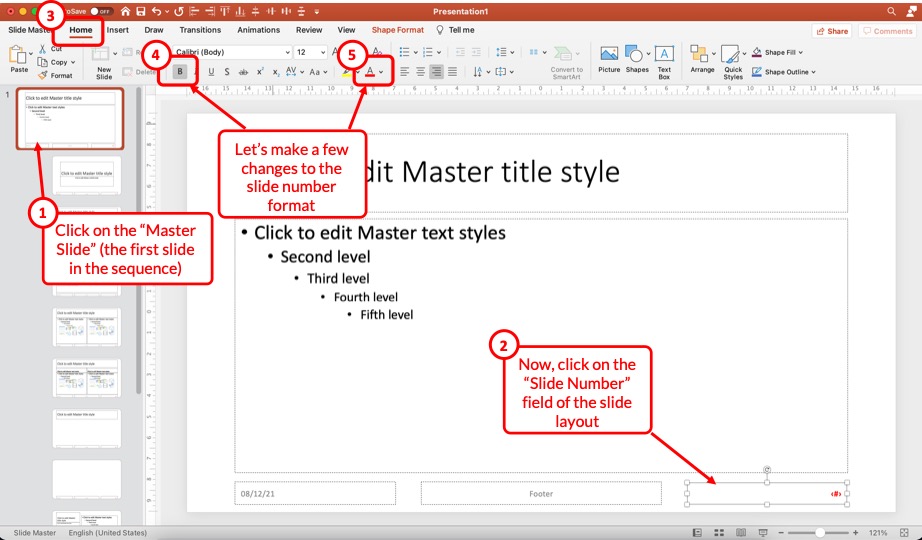
Once you open the slide master view, click on the “ Master Slide ” i.e. the first slide in the sequence (which is also larger in size than the other slides).
Next, make sure you select the slide number field on the bottom right of the slide. Then, click on the “ Home ” tab. Here you can make all the formatting changes that you need.
For the sake of this example, I’ll click on the “ Bold ” option and change the font color to red.
You can see the change taking place on the selected slide number field on the master slide.
Step 3 – Exit the Slide Master
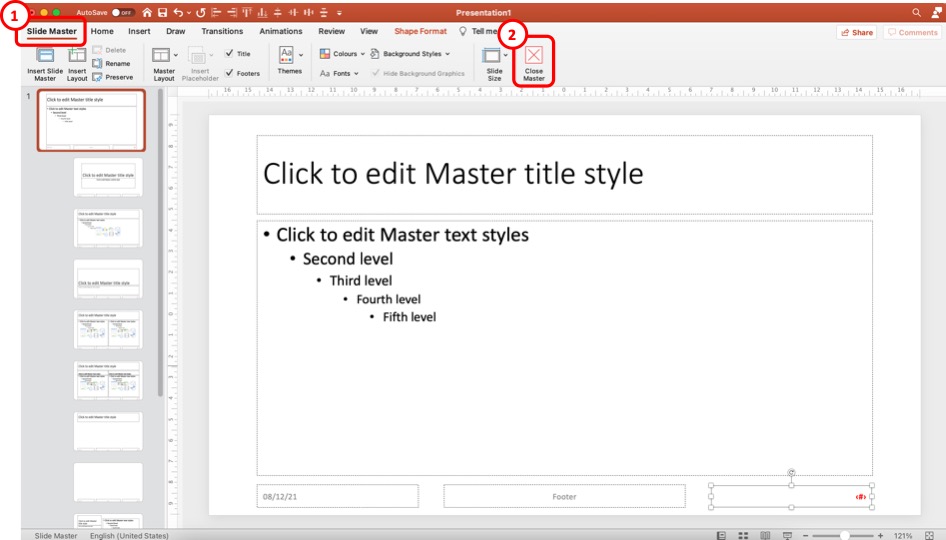
The last step is to exit the slide master.
Once you have made all the changes to the slide number formatting, click on the “ Slide Master “. Then, click on the “ Close Master ” options.
When you return to the normal view, you will notice that the formatting changes have been applied to all the slide numbers in your presentation.
Using the method described above, you can make changes to font color, font size, type of font, text alignment, and other formatting changes that you can normally make to text in PowerPoint!
8. How to Change the Position of Slide Numbers in PowerPoint?
To change the position of the slide numbers in your PowerPoint presentation, at first, select the text box of the slide number. After that click and hold the text box and drag it to your preferred position anywhere on the slide.
Once you’ve dragged it to where you want the slide numbers to be let go of the mouse button and the position of the slide number will change accordingly.
In order to change the position of slide number on all the slides, make sure that you use the method described in the previous section of the article (section 7.2)
9. Troubleshooting Slides Numbers in PowerPoint
While adding slide numbers to your PowerPoint presentation you may encounter some difficulties as some users of PowerPoint has.
There may be problems like the slide numbers not, showing the slide number may not be showing as “#”, you may have difficulty removing the slide number, or maybe you want the slide number to start from 0.
All these issues and possible reasons why you are encountering them are described in the following section.
9a. Slide Numbers Not Showing in PowerPoint
Sometimes you may find it difficult to add slide numbers to your PowerPoint presentation. Some of the reasons why you’re having this problem and possible ways to get around them are described below.
1. There may be a shape inserted over your slide number: Sometimes, there may be a shape or an image placed over the location where you inserted your slide number.
To solve this issue, click on the area where the slide number should be, and if there is a shape over it, “Right-click” on the shape and select the “Send to Back” option.
2. Make sure you have used the right layout: Some layouts don’t include the “ Slide Number ” placeholder in the slide. In that case, you won’t be able to see the slide number in slides using that layout.
To get around this issue, either insert a slide number placeholder in that layout or use a different layout that has a page number placeholder.
9b. Slide Number Showing as “#”
If the slide number is not showing as “#” in your PowerPoint presentation, then the presentation may be using multiple layouts.
To resolve this issue either use a different layout or manually insert a “ Footer ” in your PowerPoint presentation. After that that you should be able to see the “#” sign in the slide number placeholder.
9c. Can’t Remove Slide Number in PowerPoint?
You can’t remove slide numbers from your PowerPoint presentation by simply deleting them. This would only remove the slide number from the single slide where you deleted the slide number.
To remove slide number from all the slides in your PowerPoint, follow the instructions of excluding a slide from being number described earlier in this presentation, but instead of selecting the “ Apply ” button, select the “ Apply all ” button.
9d. Make Slide Number Start at 0
To make the slide number start from zero, follow the instructions given below.
Step-1: Select the “Customize Slide Size” option
The first step of the process is to select the “ Customize Slide Size ” option. To do that simply go to the “ Design ” tab from the ribbon of your presentation, click on the “ Slide Size ” button located in the “ Customize ” section of the “ Design ” tab.
After that, a dropdown menu will appear on your screen. From the dropdown menu, click on the “ Customize Slide Size ” option.
Step-2: Type in 0 in the “Number starts from” box
Finally, type in ‘0’ in the “ Number starts from ” box which is the last box in the “ Slide Size ” pop-up window, and then hit the “ Ok ” button. This will make the slide numbering start from zero.
Credit to drobotdean (on Freepik) for the featured image of this article (further edited)

Show the slide number and total number of slides on every slide
PowerPoint can automatically add numbers to your slides, but it can't automatically show a count (such as "slide 2 of 12"). You have to do that manually. This article describes how.
On the View tab, in the Master Views group, click Slide Master , and then click the slide master thumbnail.

On the Insert tab, in the Text group, click Text Box , and then drag to draw the text box on the slide master where you want the slide number to appear all slides.
With the cursor still in the text box, on the Insert tab, in the Text group, click Slide Number .
In the text box, place your cursor before the <#> , and then type Slide .
If you don’t know the total number of slides in your presentation, and you want an easy way to find out, do the following:
On the View tab, in the Presentation Views group, click Normal .

Note: Because this procedure adds slide numbers to the slide master, the slide numbers can't be deleted from or edited in individual slides and they won't appear in the Header and Footer dialog box.
Vote for this feature
If you want PowerPoint to be able to include the total number of slides, please send us your feedback to help us prioritize new features in future updates. See How do I give feedback on Microsoft Office? for more information.

Need more help?
Want more options.
Explore subscription benefits, browse training courses, learn how to secure your device, and more.

Microsoft 365 subscription benefits

Microsoft 365 training

Microsoft security

Accessibility center
Communities help you ask and answer questions, give feedback, and hear from experts with rich knowledge.

Ask the Microsoft Community

Microsoft Tech Community

Windows Insiders
Microsoft 365 Insiders
How to describe my digital skills.
You can list, and organise, your digital skills in your Europass profile . You can create a list of all of your digital skills, including tools and software you can use, as well as projects or achievements you are proud of. You can describe the tools you use in your job or studies, as well as the tools you use in your spare-time (e.g. social media, blogging, gaming). You can also organise your skills in different groups, e.g. create a group of digital tools you use for design; or digital skills that you use in your job, or even a list of digital skills you would like to develop.
Share this page

- State & Local Tax Revenues: 2023 Fourth Quarter Analysis
- Coastal Construction: Outsized Multifamily Construction Compared to Single-Family
- Which Local Markets Track National Trends the Most: Multifamily Focus
- U.S. Financial Accounts Fourth Quarter Wealth Data
Eye On Housing
National Association of Home Builders Discusses Economics and Housing Policy
Open Construction Jobs Rising
- Supply-side Issues

Due to tightened monetary policy, the count of total job openings for the entire economy has trended lower over the last year. This is consistent with a cooling economy that is a positive sign for future inflation readings. However, the number of open jobs for the aggregate economy was relatively unchanged in February per the Bureau of Labor Statistics Job Openings and Labor Turnover Survey (JOLTS).
In February, the number of open jobs for the economy ticked up to 8.76 million. This is lower than 9.85 million reported a year ago. NAHB estimates indicate that this number must fall back below 8 million for the Federal Reserve to feel more comfortable about labor market conditions and their potential impacts on inflation.
While the Fed intends for higher interest rates to have an impact on the demand-side of the economy, the ultimate solution for the labor shortage will not be found by slowing worker demand, but by recruiting, training and retaining skilled workers. This is where the risk of a monetary policy mistake had some risk of arising. Good news for the labor market does not automatically imply bad news for inflation.
The number of open construction sector jobs increased for the most recent data, rising from 425,000 in January to 441,000 in February. The count was 409,000 a year ago during a period of weaker home construction. The construction job openings rate increased slightly to 5.1% in February. The recent, increasing trend for unfilled construction jobs indicates an ongoing skilled labor shortage for the construction sector.
The construction sector layoff rate increased to 2.6%, compared to 2.1% a year ago, an indication of some labor market churn. The hiring rate increased to 4.9% in February, compared to 4.7% from a year ago.
Share this:
2 thoughts on “ open construction jobs rising ”.
Curious about this sentence
The construction job openings rate increased slightly to 5.1% in January. Shouldn’t that be in February – as this is the February JOLTS construction job analysis.
You are correct. fixed.
Leave a Reply Cancel reply
Your email address will not be published. Required fields are marked *
Notify me of follow-up comments by email.
Notify me of new posts by email.
Free All-in-One Office Suite with PDF Editor
Edit Word, Excel, and PPT for FREE.
Read, edit, and convert PDFs with the powerful PDF toolkit.
Microsoft-like interface, easy to use.
Windows • MacOS • Linux • iOS • Android

- Articles of PPT
How to Add Slide Numbers in PowerPoint A Comprehensive Guide
Creating engaging and organized PowerPoint presentations is crucial for effective communication. One essential element is slide numbers, which provide a clear path through your content. In this guide, we'll walk you through the process, ensuring a seamless experience for both you and your audience.
Part 1: What Are Slide Numbers

Slide numbers are a way to reference and navigate through a presentation. They typically appear in the footer or header of each slide, but can also be placed in different locations on the slide. Slide numbers can be used for a variety of purposes, including:
Helping the presenter stay on track and organized
Allowing the audience to follow along and take notes
Making it easy to reference specific slides during the presentation or later on
Giving the presentation a more professional look and feel
Number Format:
Slide numbers can be formatted in a variety of ways, including:
Arabic numerals: 1, 2, 3
Roman numerals: I, II, III
Alphabetic characters: A, B, C
Custom formats: For example, you could use slide numbers to represent different sections of your presentation, such as "Section 1.1," "Section 1.2," and so on.
Slide numbers are an important part of any presentation. They make it easier for the presenter and audience to follow along and reference specific slides.
Part 2: A step-by-step guide on adding Slide Numbers in PowerPoint
Creating a seamless and informative presentation involves incorporating slide numbers for easy navigation. Follow these steps to effortlessly add slide numbers to your PowerPoint presentation:
To add slide numbers in PowerPoint:
Step 1: Open your PowerPoint presentation.

Step 2: Click the Insert tab.

Step 3: In the Text group, click Slide Number.

Step 4: In the Header and Footer dialog box, click the Slide tab.

Step 5: Select the Slide number check box.
Step 6: If you don't want a number to appear on the title slide, also select the Don't show on title slide box.
Step 7: Click Apply to All.

Your slide numbers will now appear on each slide in the bottom-right corner.
To customize the slide numbers:
Step 1: Click the Slide Number button in the Header and Footer dialog box.
Step 2: In the Slide Number dialog box, you can change the font, size, color, and alignment of the slide numbers.

Step 3: You can also choose to display the slide number with or without the total number of slides in the presentation.
Step 4: Click OK when you're finished.
To update slide numbers after adding or removing slides, click the Slide Number button in the Header and Footer dialog box and select Update Slide Number.
To add slide numbers to specific slides, select the slide(s) you want to add slide numbers to and then click the Slide Number button in the Header and Footer dialog box.
If you're using a template, note that the slide numbers may already be formatted for you. However, you can still customize them as needed.
Part 3: How to Removing Slide Numbers in PowerPoint
When it comes to removing slide numbers in PowerPoint, you have two options: you can either temporarily hide them or permanently remove them. Follow these steps with accompanying images for both methods:
Temporarily Hiding Slide Numbers
Step 1: Open your PowerPoint presentation and go to the slide containing the numbers you want to hide.
Step 2: Click on the slide to select it.
Step 3: Navigate to the "Insert" tab in the ribbon at the top.
Step 4: Select "Header & Footer" from the drop-down menu.

Step 5: In the Header and Footer dialog box, uncheck the box next to "Slide number."

Step 6: Click "Apply" to hide the slide numbers on the selected slide.
This method allows you to quickly hide slide numbers for a clean and focused presentation. However, remember that if you need to bring them back, you'll have to revisit the Header and Footer settings.
Permanently Removing Slide Numbers
Step 2: Navigate to the slide sorter view by clicking on the icon at the bottom-right corner of the PowerPoint window.

Step 3: Select the slides from which you want to permanently remove slide numbers.
Step 4: Right-click on the selected slides and choose "Delete Slide."

Step 5: Confirm the deletion if prompted.
This option provides a clean slate for specific slides, ensuring an uncluttered look. Just be cautious, as this action is irreversible. Always consider if it aligns with your overall presentation strategy.
Part 4: Solving Common Problems with Slide Numbering in PowerPoint
Slide numbers can sometimes be a bit finicky. Here are solutions to some of the most common issues you might encounter:
Slide Numbers Not Appearing: If your slide numbers aren't showing up, it could be due to a few reasons. First, make sure they're enabled in the Header and Footer settings. Check if they're set to appear on the title slide as well. Additionally, ensure that there's no overlapping text or graphics obscuring the numbers.
Slide Numbers Not Updating: Sometimes, after making significant changes, slide numbers may not update automatically. To fix this, click on the "Insert" tab, go to "Header & Footer," and then tick the box that says "Slide Number." After that, click "Apply to All" to update all slides.
Slide Numbers Appearing on Specific Slides Only: This issue might arise if certain slides have unique master layouts. To rectify this, select the affected slides, go to the "View" tab, and choose "Slide Master." From there, ensure that the slide numbers are set to appear uniformly across all slides.
Part 5. Versatile Powerpoint Tool - WPS Office

WPS Office is a modernized powerful office tool suite that offers a variety of features, including a word processor, spreadsheet, presentation software, and PDF editor. It is available for free download and use, and it is compatible with a wide range of devices, including Windows, Mac, Android, and iOS.
WPS Office is a great alternative to Microsoft Office, and it offers a number of advantages, including:
Free to use: WPS Office is free to download and use for personal and commercial purposes.
Powerful PDF toolkit: WPS Office includes a built-in PDF editor that allows you to create, edit, and convert PDF files.
Rich template store: WPS Office offers a rich template store with a wide range of templates for presentations, documents, and spreadsheets.
Rich functions: WPS Office offers a wide range of features and functions, including support for macros, formulas, and charts.
Light weight: WPS Office is a lightweight application that does not require a lot of system resources.
Support online documents: WPS Office supports online documents, which allows you to access and edit your documents from anywhere with an internet connection.
Safe and stable: WPS Office is a safe and stable application that is regularly updated with new features and security patches.
I have been using WPS Office for several months now, and I have been very impressed with its features and functionality. I find WPS Office to be a very user-friendly application, and it is easy to learn how to use.
WPS Office has all of the features that I need to create and edit presentations, documents, and spreadsheets. I especially appreciate the built-in PDF editor, which allows me to edit PDF files without having to purchase a separate application.
Use Word, Excel, and PPT for FREE, No Ads.
Edit PDF files with the powerful PDF toolkit.
Microsoft-like interface. Easy to learn. 100% Compatibility.
Boost your productivity with WPS's abundant free Word, Excel, PPT, and CV templates.
Can I add slide numbers to only some slides?
Yes, you can indeed add slide numbers to specific slides in PowerPoint. Simply follow these steps:
Step 1: Select the slides to which you want to add slide numbers.
Step 2: Go to the "Insert" tab in the PowerPoint ribbon.

Step 3: Click on "Slide Number" in the "Text" group.
Step 4: Check the box that says "Slide Number".
Step 5: Optionally, you can choose to apply to "All" slides or "Selected" slides.
This flexibility allows you to customize slide numbering to suit your specific presentation needs.
How do I change the format of slide numbers?
To change the format of slide numbers in PowerPoint, follow these steps:
Step 1: Go to the "Insert" tab in the PowerPoint ribbon.
Step 2: Click on "Slide Number" in the "Text" group.

Step 3: In the "Header and Footer" dialog box, click the "Slide Number" checkbox if it's not already checked.
Step 4: Click the "Format" button.
This comprehensive guide has walked you through the importance of adding slide numbers in PowerPoint presentations, aiding in navigation and organization for both presenters and audiences. The step-by-step tutorial covers everything from initial setup to customizing slide numbers, ensuring a seamless process. The guide also addresses common problems related to slide numbering, providing practical solutions. A standout feature is the introduction of WPS Office , a powerful and modern office tool with advantages like free access to essential software, a robust PDF toolkit, and a rich template store. Lightweight and secure, WPS Office offers a versatile alternative for optimized presentations.
- 1. A Comprehensive Guide to Slide Carnival[2024]
- 2. How to Extract Numbers from Cells With Letters and Numbers in Excel (3 Easy Steps)
- 3. How to Unhide a Slide in PowerPoint Comprehensive Guide
- 4. How to Create a Master Slide in PowerPoint (Step-By-Step Guide)
- 5. How To Change Slide Size In Keynote: A Comprehensive Guide
- 6. How to Use a Master Slide in PowerPoint (Step-By-Step Guide)

15 years of office industry experience, tech lover and copywriter. Follow me for product reviews, comparisons, and recommendations for new apps and software.
Android Police
How to curve text in google slides.
Grab everyone's attention with curved text in presentation slides
Google Slides offers formatting options to tweak text, photos, videos, and other elements in a presentation. However, it lacks a few important add-ons. For instance, unlike PowerPoint, there isn't a built-in way to curve text in Google Slides. If you want to make your presentation stand out among the rest, use the tricks below to curve text in Google Slides.
Adding curved text is a neat way to elevate your presentation. Still, don't go overboard with curve text in Google Slides. It may create unnecessary distractions and make it hard for your audience to read a slide. Instead, highlight a few headings or text you want to separate from the other paragraphs.
Although Google Slides is available on mobile platforms like iPhone and Android phones , we focus on the web version in the steps below.
Curve text in Google Slides using PowerPoint
There are a couple of ways to curve text in Google Slides. If you have a Microsoft 365 subscription plan, use the PowerPoint desktop app to curve text and copy it into Google Slides. In another trick, you can use a web tool like Canva or InkPx to get the job done. Let's start with PowerPoint.
- Open Microsoft PowerPoint on Windows or Mac.
- Create a new presentation and go to any slide.
- Resize a text box and enter the text you want to add in Google Slides.
- Expand the text effects icon and click Transform .
- Check your curved text in action. Drag the white dots around the text box to resize it.
- Open a presentation in Google Slides and select a slide where you want to add curve text.
PowerPoint offers dozens of curved text styles. You'll have no trouble finding a style that matches your presentation tone and theme.
How to delete a text box in Google Slides
Use an online tool to curve text in google slides.
PowerPoint requires a paid Microsoft 365 plan. If you don't have a subscription, use the tools below to generate and upload curved text in Google Slides.
Curve text using Canva
Canva is one of the best graphic design tools available. The web app offers several editing tools to create curved text in a design. You can download the image with a transparent background and upload it to Google Slides. Follow the steps below.
- Use the top menu to tweak text style, color, size, and more.
The ability to download an image with a transparent background requires a Canva Pro subscription.
How to add transparency to an image in Google Slides
Curve text using inkpx.
InkPx is a web tool for creating curved text. You can make one and upload it on Google Slides.
- Visit InkPx .
- Enter text and pick a color, style, and size. Then, tweak the radius, spacing, and other details.
- Pick a PNG or JPG image type and save the image.
- Launch a presentation in Google Slides.
- Select your image and open it in Google Slides.
Unlike Microsoft PowerPoint and Canva, InkPx is free to download and use. And unlike other web tools, you don't need to create an account to use the service.
Make your presentation stand out
Aside from curve text, there are other ways to make an interesting pitch. However, creating an engaging presentation from scratch can be time-consuming. Check the top Google Slides templates to get started and complete an applaud-worthy presentation in no time.

R news and tutorials contributed by hundreds of R bloggers
Data visualization reloaded: equipping your reports with the ultimate r package arsenal.
Posted on March 28, 2024 by Numbers around us in R bloggers | 0 Comments

In the vast and ever-expanding universe of data, the ability to not just see but truly understand the stories hidden within numbers becomes paramount. This journey of comprehension isn’t unlike the iconic moment from The Matrix , where Neo, standing amidst the endless possibilities of the digital realm, declares his need for “Guns, lots of guns.” In the context of our exploration, these “guns” are not weapons of destruction but powerful tools of creation and insight — data visualization packages for R, each with its unique capabilities to transform raw data into compelling narratives.
Our quest is navigated through the versatile landscapes of Quarto and R Markdown (Rmd), platforms that serve as the backbone for our reports. Whether you’re drafting an interactive web document, a static PDF, or a neatly formatted Word file, these tools are the canvases upon which our data stories will unfold. But a canvas alone does not make art — it’s the brushes, colors, and techniques that bring a scene to life. Similarly, our chosen R packages — each a brushstroke of genius — allow us to paint intricate pictures with our data.
This article will serve as your guide through this arsenal of visualization packages. From the foundational ggplot2 to the interactive plotly, the geospatial leaflet, and the detailed gt for tabular artistry, we'll cover a spectrum of tools that cater to every analyst's, researcher's, and data storyteller's needs. We'll delve into how each package can be utilized within Quarto and R Markdown to create reports that not only convey information but also engage and enlighten your audience.
As we embark on this journey together, remember that the power of these tools lies not just in their individual capabilities but in how they can be combined to tell a cohesive, compelling story. By the end of this exploration, you’ll be equipped with a diverse and potent arsenal, ready to tackle any data visualization challenge that comes your way.
Let the journey begin.
The Foundation with ggplot2
At the heart of our data visualization arsenal lies ggplot2, a package that has revolutionized the way we think about and create graphics in R. Inspired by Leland Wilkinson's Grammar of Graphics, ggplot2 allows users to assemble plots layer by layer, making the creation of complex visualizations both intuitive and accessible.
ggplot2 shines in its ability to break down and understand data visualization as a series of logical steps: data selection, aesthetic mapping, geometric objects, and statistical transformations. This structured approach enables users to craft nearly any type of graphic, from simple scatter plots to intricate layered visualizations. The package's extensive customization options—through scales, themes, and coordinates—further empower users to tailor their visuals to the precise narrative they wish to convey.
For reports in Quarto or R Markdown, ggplot2 acts as the foundational tool for data visualization. Its versatility is unmatched, offering crisp, publication-quality graphics for static outputs (PDF, DOCX) and adaptable visuals for dynamic HTML documents. Whether you're creating a formal report, a comprehensive academic paper, or an engaging web article, ggplot2 provides the necessary tools to visually articulate your data's story.
To illustrate the power of ggplot2, let's create a simple yet elegant scatter plot:

This code snippet highlights ggplot2's simplicity and elegance, creating a plot that is both visually appealing and informative. As we proceed to explore more specialized packages, ggplot2 remains our trusted foundation, enabling us to build upon it and enhance our reports with diverse visual narratives.
Enhancing Interactivity with plotly
In the dynamic world of web-based reporting, plotly stands out as a beacon of interactivity. It builds upon the static beauty of ggplot2 plots by adding a layer of engagement through interactive elements. Users can hover over data points, zoom in on areas of interest, and filter through datasets directly within their plots, transforming a static visualization into an interactive exploration.
plotly offers a wide range of interactive chart types, including line charts, bar charts, scatter plots, and more, all with the added benefit of user interaction. It's particularly adept at handling large datasets, making it possible to explore and interpret complex data in real-time. The package's ability to integrate with ggplot2 means that users can easily elevate their existing visualizations from static to dynamic with minimal effort.
For HTML reports created in Quarto or R Markdown, plotly enhances the reader's experience by making the data exploration an integral part of the narrative. This level of interactivity invites the audience to engage with the data on a deeper level, facilitating a more personalized exploration of the findings. It's especially useful in scenarios where understanding data nuances is crucial, such as in exploratory data analysis or when presenting results to a diverse audience.
Here’s how to transform a ggplot2 plot into an interactive plotly plot:
This code demonstrates the ease with which a static ggplot2 visualization can be converted into an interactive plotly graph. By incorporating plotly into your data storytelling toolkit, you unlock a world where data visualizations are not just seen but experienced.
Mapping Data with leaflet
Geospatial data visualization is a critical aspect of storytelling in many fields, from environmental science to urban planning. leaflet for R brings the power of interactive mapping to your reports, allowing you to create detailed, dynamic maps that can be embedded directly into HTML documents. Based on the Leaflet.js library, it is the premier tool for building interactive maps in the R ecosystem.
With leaflet, you can layer multiple data sources on a single map, customize map appearances, and add interactive features like pop-ups and markers. It supports various map types, including base maps from OpenStreetMap, Mapbox, and Google Maps. Whether you're tracking migration patterns, visualizing climate change data, or showcasing demographic trends, leaflet makes geospatial data accessible and engaging.
For Quarto or R Markdown reports destined for the web, leaflet maps offer a dynamic way to present geospatial data. Unlike static maps, leaflet enables readers to zoom in and out, explore different layers, and interact with the data points directly. This interactivity enhances the user's engagement and understanding, making leaflet an invaluable tool for reports that include location-based analysis or findings.
Creating an interactive map with leaflet is straightforward:

This example demonstrates how to create a basic interactive map showing specific locations. With leaflet, the complexity and depth of your geospatial visualizations are limited only by your imagination.
Interactive Tables with DT
In the realm of data presentation, tables are indispensable for displaying detailed information in a structured manner. DT (DataTables) is an R package that integrates the jQuery DataTables plugin, transforming static tables into interactive exploration tools. It enables users to search, sort, and paginate tables directly within HTML reports, enhancing the user's ability to engage with and understand the data.
DT offers a plethora of features to make tables more interactive and user-friendly. Highlights include automatic or custom column filtering, options for table styling, and the ability to include buttons for exporting the table to CSV, Excel, or PDF formats. These functionalities are particularly useful in reports that contain large datasets, allowing readers to navigate and focus on the data that interests them most.
For reports generated in Quarto or R Markdown with an HTML output, DT provides a superior way to present tabular data. It bridges the gap between static tables, which can be overwhelming and difficult to navigate, and the need for dynamic, accessible data presentation. Whether you're summarizing survey results, financial data, or scientific measurements, DT tables can significantly improve the readability and usability of your reports.
Here’s a simple example of how to create an interactive table with DT:

This code snippet demonstrates how to convert a subset of the mtcars dataset into an interactive table, complete with pagination and adjustable column widths. By integrating DT into your reporting toolkit, you can ensure that even the densest data tables become navigable and insightful components of your narrative.
The Grammar of Tables with gt
While DT focuses on interactivity for data tables, the gt package brings unparalleled levels of customization and styling to table creation in R. Standing for "Grammar of Tables," gt allows you to create highly detailed and beautifully formatted tables that communicate information clearly and effectively, akin to how ggplot2 revolutionizes plot creation.
gt enables you to craft tables that go beyond mere data presentation; it allows you to tell a story with your data. From adding footnotes, coloring cells based on values, to creating complex layouts with grouped headers and spanning labels, gt provides a comprehensive suite of tools for enhancing the aesthetic and functional aspects of tables in your reports.
In Quarto or R Markdown reports, regardless of the output format (HTML, PDF, or DOCX), gt tables can significantly elevate the visual standard and readability of your presentations. Especially in PDFs and printed documents, where interactive elements are not feasible, the detailed customization gt offers makes your tables not just data containers but key narrative elements of your report.
To demonstrate the capabilities of gt, let's create a simple yet styled table using a subset of the mtcars dataset:

This code snippet highlights how gt not only allows for the structuring and presentation of tabular data but also for the artistic expression within data reporting, making your tables both informative and visually appealing.
Bringing Plots to Life with ggiraph
In the quest to make reports more engaging, ggiraph emerges as a powerful ally, enabling the transformation of static ggplot2 graphics into interactive visual stories. ggiraph allows elements within ggplot2 plots, such as points, lines, and bars, to become interactive, supporting tooltips, hover actions, and even hyperlinks. This interactivity enriches the user experience, allowing for a deeper exploration and understanding of the underlying data.
The ggiraph package shines when you want to add a layer of engagement to your data visualizations. With it, viewers can hover over specific elements to see more details or click on parts of the graph to access external resources. This capability is invaluable for online reports, where reader engagement and interactivity are paramount.
For HTML-based reports created with Quarto or R Markdown, ggiraph enhances the storytelling potential by making data visualizations a two-way interaction channel. This feature is especially useful for exploratory data analysis, educational materials, or any report aiming to provide an immersive data exploration experience. While ggiraph excels in web environments, the static versions of these enriched plots still retain their aesthetic and informational value in PDF or DOCX outputs.
Here’s a basic example of how to create an interactive plot with ggiraph, making use of a simple ggplot2 bar chart:

This example assumes a scenario where clicking on a point in the scatter plot (simplified here as clicking on a category) would dynamically update the histogram to show the distribution of values for that category.
Seamless Plot Compositions with patchwork
While ggiraph brings individual plots to life with interactivity, patchwork is the tool for harmoniously combining multiple ggplot2 plots into a cohesive composition. patchwork simplifies the process of arranging multiple plots, allowing for complex layouts that maintain a unified aesthetic. It's akin to assembling a visual symphony from individual notes, where each plot plays its part in the overarching data narrative.
patchwork excels in its flexibility and ease of use, offering a syntax that is both intuitive and powerful. It allows for the vertical, horizontal, and nested arrangement of plots, and gives you control over spacing, alignment, and even shared legends. This capability is invaluable when you need to compare different aspects of your data side by side or tell a multi-faceted story through a series of visualizations.
In both Quarto and R Markdown reports, regardless of the output format, patchwork enables you to create visually appealing and informative plot arrangements. For static reports (PDF, DOCX), these compositions can help convey complex information in a digestible format. For HTML reports, while patchwork does not add interactivity to the plots themselves, the strategic arrangement of visual elements can guide the reader’s exploration of the data.
To demonstrate the power of patchwork, let's create a composition of two simple ggplot2 plots:

This example illustrates how patchwork seamlessly combines two distinct ggplot2 plots into a single, coherent visual statement. By arranging plots in a thoughtfully designed layout, you can enhance the storytelling impact of your data visualizations in reports.
Mastering Your Data Visualization Arsenal
Our journey through the landscape of R packages for enhancing reports in Quarto and R Markdown mirrors the pivotal scene from The Matrix , where an array of tools is summoned with a clear mission in mind. In our narrative, these tools — ggplot2, plotly, leaflet, DT, gt, ggiraph, and patchwork—form a robust arsenal, each offering unique capabilities to make our data reports not just informative, but compelling and engaging.
- ggplot2 laid the foundation, offering a versatile platform for creating a wide range of plots with deep customization options, ensuring that every chart precisely conveys its intended message.
- plotly and ggiraph introduced interactivity, transforming static images into dynamic conversations, inviting readers to explore and interact with the data on their terms.
- leaflet allowed us to map our narratives, providing geographical context and making location data more accessible and understandable.
- DT and gt revolutionized how we present tabular data, turning dense tables into clear, engaging visual elements of our reports.
- patchwork taught us the art of composition, enabling us to weave individual plots into coherent visual stories that guide the reader through our analyses seamlessly.
Each of these packages can be seen as a different type of “firearm” in our data visualization arsenal, equipped to tackle specific challenges and objectives in the realm of digital reporting. Whether we’re aiming for clarity, engagement, interactivity, or all of the above, our toolkit is now fully stocked to bring any data story to life.
As we conclude this exploration, remember that the true power of these tools lies not just in their individual capabilities but in how they can be combined to tell a cohesive, compelling story. Just as Neo chose his arsenal for the mission ahead, you now have the knowledge to select the right tools for your data visualization needs, ensuring your reports are not only seen but remembered.
The landscape of data storytelling is vast and ever-changing, but with this arsenal at your disposal, you’re well-equipped to make your mark. So, take these tools, explore their potential, and start crafting data stories that resonate, inform, and inspire.
Data Visualization Reloaded: Equipping Your Reports with the Ultimate R Package Arsenal was originally published in Numbers around us on Medium, where people are continuing the conversation by highlighting and responding to this story.
Copyright © 2024 | MH Corporate basic by MH Themes
Never miss an update! Subscribe to R-bloggers to receive e-mails with the latest R posts. (You will not see this message again.)
Got any suggestions?
We want to hear from you! Send us a message and help improve Slidesgo
Top searches
Trending searches

solar eclipse
25 templates

education technology
180 templates

32 templates

28 templates

thanksgiving
38 templates

The Numbers from 1 to 10
Premium template.
To keep enjoying the content of these slides, you must be a Premium user. Become Premium from €1.67 per month!
The Numbers from 1 to 10 Presentation
Premium google slides theme and powerpoint template.
Learning the numbers from 1 to 10 will be a fun task with our recently created Google Slides and PPT lesson. Teachers and designers have come together to create an interactive and engaging lesson for young learners. Not only does this lesson include real content, but it also includes printable exercises that encourage students to practice writing and identifying numbers. Students will be able to actively participate in this lesson and will leave feeling confident in their ability to count from 1 to 10.
Features of this template
- Designed for Elementary
- 100% editable and easy to modify
- 37 different slides to impress your audience
- Contains easy-to-edit graphics such as graphs, maps, tables, timelines and mockups
- Includes 500+ icons and Flaticon’s extension for customizing your slides
- Designed to be used in Google Slides and Microsoft PowerPoint
- A4 format optimized for printing
- Includes information about fonts, colors, and credits of the resources used
- Available in different languages
What are the benefits of having a Premium account?
What Premium plans do you have?
What can I do to have unlimited downloads?
Don’t want to attribute Slidesgo?
Gain access to over 22200 templates & presentations with premium from 1.67€/month.
Are you already Premium? Log in
Available in
Related posts on our blog.

How to Add, Duplicate, Move, Delete or Hide Slides in Google Slides

How to Change Layouts in PowerPoint

How to Change the Slide Size in Google Slides
Related presentations.

Unlock this template and gain unlimited access

REG - Murray Intnl Trust - Investor Presentation – 11am, Friday 5 April 2024
Murray International Trust PLC (the "Company")
Legal Entity Identifier (LEI): 549300BP77JO5Y8LM553
Murray International Trust PLC Online Presentation - Friday 5 April 2024
Murray International Trust PLC is pleased to announce an online presentation for existing and potential shareholders taking place on Friday 5th April 2024 from 11:00 to 12:00. You can register for the event here:
https://www.workcast.com/register?cpak=5256427455674976
This online event will begin with a brief introduction by Chair Virginia Holmes, followed by a more detailed presentation from Managers Samantha Fitzpatrick, Martin Connaghan and Bruce Stout. Attendees will have the opportunity to ask questions about the Annual Report during the session.
The Annual Report for the year ended 31 December 2023, is available to download in the 'literature' section on the Murray International Trust website (www.murray-intl.co.uk). If you have any questions related to the report, please raise them during registration, and the Board and/or Manager will do their best to address them during the meeting. Additionally, you can submit questions via email to [email protected]. Please note that, due to time constraints, it may not be possible to answer all questions raised.
For further information, please contact:
Charles Mearns
abrdn Holdings Limited
Secretaries
Tel: 0131 372 9368
RNS may use your IP address to confirm compliance with the terms and conditions, to analyse how you engage with the information contained in this communication, and to share such analysis on an anonymised basis with others as part of our commercial services. For further information about how RNS and the London Stock Exchange use the personal data you provide us, please see our Privacy Policy. END MSCDZGGDKFRGDZM
Tips for smooth travels as record number of Americans expected to fly this year
Around 4.7 billion people are expected to fly this year.
(InvestigateTV) — In its February 2024 Air Travel Consumer Report , the U.S. Department of Transportation (DOT) reported that 83.8% of all flights arrived on time, fewer passengers were bumped and less bags were lost.
Teresa Murray with the U.S. Public Interest Group (PIRG) said airline performance has been improving.
“Things are better now, and they were better in 2023 than they were in the year before so that’s great news,” Murray said. “Cancelations have improved significantly but if you’re on one of the tens of thousands of flights that’s canceled or delayed, then it’s still a problem for you!”
She said the DOT has been pushing for the airlines to be more accountable for issues.
“In part through pressure, all of the top ten airlines will give you free rebooking on their own airline and then free meals,” Murray explained. “And then nine out of the ten will provide free hotels if you’re stranded overnight because of a cancelation or a delay that is within the control of that airline.”
But Murray says bumping people, whether by choice or not, is still a big problem for airlines.
She said last year 26,000 people were bumped involuntarily and 307,000 were bumped voluntarily.
To avoid being bumped, Murray said passengers should get to the airport early. Since some airlines bump by check-in time, those who arrive early are less likely to be impacted.
“It does seem to matter with bumping still, you know, it’s a big problem. And I mean, if you don’t want to be bumped and you get bumped involuntarily, then you’re ticked off and it does seem to matter when you get there,” Murray observed. “So, we still recommend that people get there, you know, go through security then. Then the airline knows that you’re there.”
She shared several other tips for smooth airline travel:
- Download the airline’s app at least a few days ahead of time for real-time notifications
- Consider putting a tracker in your checked bag
- Be aware of passenger rights, just in case a flight is canceled, or a bag is lost
Murray also noted that passengers should be aware under consumer laws, they have fewer recourse options when booking through a third-party as opposed to booking directly with an airline.
If someone has problems during their trip, they can file a consumer complaint with the DOT.
Copyright 2024 Gray Media Group, Inc. All rights reserved.

‘We want accountability’: Family views Summerville bodycam footage of 13-year-old’s arrest

‘We just want my brother back’: Family of Orangeburg double homicide victim speaks out as investigation continues

3 million South Carolinians impacted by security breaches in 2023, SCDCA report says

Storm damage, power outages reported across the Midlands

Here’s why the LSU women were absent during the National Anthem
Latest news.

Deadly earthquake rocks Taiwan; search and rescue efforts ongoing

Subway customer tackles man he says assaulted, spit at employee

Subway customer called a hero for tackling man allegedly assaulting employee

US official calls Israeli strike that killed 7 aid workers unacceptable

Mother turns in 2 sons accused of shooting at police: ‘I don’t play no games’
Nominal Differences in Acute Symptom Presentation and Recovery Duration of Sport-Related Concussion Between Male and Female Collegiate Athletes in the PAC-12
Affiliations.
- 1 Department of Integrative Physiology, University of Colorado Boulder, UCB 354, Boulder, CO, 80309, USA. [email protected].
- 2 Cumberland Biological and Ecological Researchers, Longmont, CO, USA.
- 3 Family Medicine, University of Washington, Seattle, WA, USA.
- 4 Department of Family Medicine, University of Colorado Anschutz Medical Campus, Aurora, CO, USA.
- 5 Psychology and Neuroscience (CU Boulder), Physical Medicine and Rehabilitation (CU Anschutz School of Medicine), Aurora, CO, USA.
- 6 Department of Integrative Physiology, University of Colorado Boulder, UCB 354, Boulder, CO, 80309, USA.
- PMID: 38564117
- DOI: 10.1186/s40798-024-00699-4
Background: Sport-related concussion (SRC) is a heterogenous injury that often presents with varied symptoms and impairment. Recently, research has focused on identifying subtypes, or clinical profiles of concussion to be used in assessing and treating athletes with SRC. The purpose of this study was to investigate sex differences in clinical profiles, recovery duration, and initial symptom severity after SRC in a cohort of collegiate athletes in the Pacific-12 Conference (Pac-12).
Methods: This prospective cohort study examined post-SRC symptoms, recovery, and return-to-play times using data from the Pac-12 CARE Affiliated Program and Pac-12 Health Analytics Program. Clinical profiles reported by student-athletes were defined by the number (> 50%) of specific symptoms frequently reported for each profile. Generalized linear mixed models were used to examine associations among sex, clinical profiles, time-to-recovery, and return-to-play times.
Results: 479 concussion incidents met inclusion criteria. The probabilities of initial presentation of each clinical profile, initial injury severity scores, and recovery times within a profile did not differ between sexes (p = 0.33-0.98). However, both males and females had > 0.75 probabilities of exhibiting cognitive and ocular profiles. Initial injury severity score was a strong nonlinear predictor of initial number of clinical profiles (p < 0.0001), which did not differ between sexes. The number of clinical profiles was also a nonlinear predictor of time-to-recovery (p = 0.03) and return-to-play times (p < 0.0001).
Conclusions: Initial symptom severity was strongly predictive of the number of acute clinical profiles experienced post-SRC. As the number of clinical profiles increased, time-to-recovery and time to return-to-play also increased. Factors other than sex may be better associated with acute symptom presentation post-concussion as no sex differences were found in reported clinical profiles or recovery. Understanding the number and type of clinical profiles experienced post-SRC may help inform concussion diagnostics and management.
Keywords: Athletes; Clinical profiles; Return-to-play; Sport-related concussion; Time-to-recovery.
© 2024. The Author(s).
IMAGES
VIDEO
COMMENTS
The tips for how to present data in presentations were written using Windows and Office 365. If you've got a different operating system or a different version of PowerPoint, your steps may be slightly different. 1. Assess Your Data. Charts come in all shapes and sizes.
Download this Numbers PowerPoint and use it in class today. Below you will find a numbers PPT for teaching numbers 1 to 10 and one for teaching numbers 1 to 20. These numbers PowerPoint lessons are ideal for teaching kids, kindergarten, pre-school students, and other beginner English language learners about the cardinal numbers. Each number ...
Presenting large numbers and complex data creates unique challenges in presentations. In this video, I'll show you a creative way to present the information ...
In this video you will find a creative way to present your numbers to make your numbers memorable. This is especially useful in business presentations. These...
This PowerPoint pack includes all of the PowerPoints for the individual numbers 0-10. Each PowerPoint is a colorful and interactive way of introducing individual numbers to your children. If you've found these PowerPoints useful, we would recommend our All About Numbers 11-20 PowerPoints. Used as a whole class for number of the day/week and for ...
Here are six tips for using numbers in your presentation: 1. Tell your story 2. Less is more 3. Hide numbers in a story 4. Simplify 5. Think like a teacher 6. Show your personality.
A number system is defined as a system of writing to express numbers. It is the mathematical notation for representing numbers of a given set by using digits or other symbols in a consistent manner. It provides a unique representation of every number and represents the arithmetic and algebraic structure of the figures.
Free Google Slides theme and PowerPoint template. We all use numbers every day and always have, without stopping to think how and when numbers first appeared. If your elementary students are inquisitive about this topic, you can use this presentation for Google Slides and PowerPoint created by an educator to explain all about the Egyptian ...
Once you have downloaded the PPT, you will be able to enable editing. Please note, PowerPoint and Google Slides have different functionalities, so the resources may have some differences. Our Numbers 11-20 PowerPoint & Google Slides is a fun and engaging way to help students to identify numbers 11 through 20.
Things You Should Know. To add slide numbers to your presentation, click the "Insert" tab, select "Header & Footer," check the box next to "Slide number," and click "Apply All." The position, font, size, and color of your slide numbers is determined by your slide master.
4 Techniques to Transform Numbers. Find Interesting Angles - Useful when the information is routine, repeating or likely to be 'skimmed' over. Use Comparisons - Useful when the numbers are big or abstract or hard to visualise. Use Analogies - Useful when the presentation is complex, boring or technical.
1. Open the Slide Number dialog box. Now that you have setup (or double-checked) that your slide numbers are set up properly in the Slide Master view, now we can add them here in the Normal View of PowerPoint (woo-hoo). Let's start by opening the Header and Footer dialog box as follows: Navigate to the Insert tab.
Add slide numbers or notes page numbers. On the View tab, in the Presentation Views group, click Normal. On the left of your screen, in the pane that contains the slide thumbnails, click the first slide thumbnail in your presentation. On the Insert tab, in the Text group, click Header & Footer. If you want to add slide numbers, click the Slide ...
To add slide numbers, open a PowerPoint presentation with several slides added and then click the "Insert" tab. From here, you'll need to select the "Header & Footer" button in the "Text" section. This will bring up the "Header and Footer" options box. To add slide numbers to your PowerPoint slides, click the "Slide Number" checkbox in the ...
This clarifies the overall purpose of your talk and reinforces your reason for being there. Follow these steps: Signal that it's nearly the end of your presentation, for example, "As we wrap up/as we wind down the talk…". Restate the topic and purpose of your presentation - "In this speech I wanted to compare…". 5.
Adding Slide Numbers. Open your presentation in PowerPoint. Go to the Insert tab. Insert tab. In the Text group, click Header & Footer. A new window will open. Header & Footer button. Header & Footer buttonCheck "Slide number" to enable it. You'll see a little box highlighted in black on the preview.
In PowerPoint you can add or remove automatic slide numbers, hide numbering on the title slide, and move slide numbers. You can also add the date and time to slides. If you'd like to suggest improvements to the slide numbering feature, you can do that by clicking Help > Feedback > I have a suggestion. Select a heading below to open it and see ...
This adorable Google Slides & PowerPoint template with illustrated numbers comes with loads of ideas, matching and coloring activities and more to help the kids make the connection between the written digit and a number of objects. Easy to edit, almost ready to use and informative and entertaining to look at - what more can you ask?
To use this feature, go to the Insert tab, click on Header & Footer, and then check the box for Slide Number. From here, click on the "Apply to All" button to automatically add page numbers to all slides in your presentation. You can also customize the look of your page numbers using the Format button.
Step-2: Click on the "Slide Number" option. Now, click on the " Insert " tab. Then, from the options, click on the " Slide Number ". This will open a new pop-up window with more options. Step-3: Add the Slide Numbers to the Slides. First, make sure that you enable the "Slide Number" option in the next step.
Place your cursor after the <#>, and then type of x, where x equals the total number of slides in your presentation (for example, <#>of 10if you have 10 total slides in your presentation). Numbering slides this way doesn't automatically calculate the total number of slides in your presentation, so you'll need to enter the total manually, in place of the x.
You can list, and organise, your digital skills in your Europass profile. You can create a list of all of your digital skills, including tools and software you can use, as well as projects or achievements you are proud of. You can describe the tools you use in your job or studies, as well as the tools you use in your spare-time (e.g. social ...
The number of open construction sector jobs increased for the most recent data, rising from 425,000 in January to 441,000 in February. The count was 409,000 a year ago during a period of weaker home construction. The construction job openings rate increased slightly to 5.1% in January. The recent, increasing trend for unfilled construction jobs ...
Follow these steps to effortlessly add slide numbers to your PowerPoint presentation: To add slide numbers in PowerPoint: Step 1: Open your PowerPoint presentation. Open PowerPoint. Step 2: Click the Insert tab. the Insert tab. Step 3: In the Text group, click Slide Number. click Slide Number. Step 4: In the Header and Footer dialog box, click ...
Create a new presentation and go to any slide. Select Insert at the top and click Text box . Resize a text box and enter the text you want to add in Google Slides. Expand the text effects icon and ...
DT (DataTables) is an R package that integrates the jQuery DataTables plugin, transforming static tables into interactive exploration tools. It enables users to search, sort, and paginate tables directly within HTML reports, enhancing the user's ability to engage with and understand the data. DT offers a plethora of features to make tables more ...
Premium Google Slides theme and PowerPoint template. Learning the numbers from 1 to 10 will be a fun task with our recently created Google Slides and PPT lesson. Teachers and designers have come together to create an interactive and engaging lesson for young learners. Not only does this lesson include real content, but it also includes ...
REG - Murray Intnl Trust - Investor Presentation - 11am, Friday 5 April 2024. Apr 3, 202408:51 PDT. MYI. RNS Number : 2172J Murray International Trust PLC 03 April 2024. Murray International Trust PLC (the "Company") Legal Entity Identifier (LEI): 549300BP77JO5Y8LM553. Murray International Trust PLC Online Presentation - Friday 5 April 2024.
Around 4.7 billion people are expected to fly this year. (InvestigateTV) — In its February 2024 Air Travel Consumer Report, the U.S. Department of Transportation (DOT) reported that 83.8% of all ...
Initial symptom severity was strongly predictive of the number of acute clinical profiles experienced post-SRC. As the number of clinical profiles increased, time-to-recovery and time to return-to-play also increased. Factors other than sex may be better associated with acute symptom presentation po …