THAT ART TEACHER
Sharing my classroom with the world.


Distance Learning Shading Lessons

This post will describe and provide guided tutorials for five distance learning shading lessons that can also be done in a traditional classroom or at home.
I have been back at work for two confusing weeks of professional development training for our “new normal” (anyone else sick of this term already?). Our student start date was pushed back and the eyes of our parents and communities were on us.
Two weeks seemed like forever and one second simultaneously. At the end of this time I knew I would be mad at myself if I didn’t have so much accomplished, however everyday a new seemingly impossible task with thrown our way.
Basically, I had to be prepared to teach face to face but socially distanced, have Canvas (if you don’t know what this platform is be thankful and don’t ask any questions) up and ready for distance learning (which could happen at any time) have fourteen days of emergency paper and pencil plans ready in case I needed to quarantine, send out digital units for art students who chose Virtual Learning for the semester, create a packet of offline learning that is comparable to what the distance learning students will be doing if and when we shut down, and be ready to send work home to students who have to quarantine.
If you are wondering, the run on sentence is intentional. I think it is an accurate representation of my life right now.
Driving to work the first day back I decided that I was not going to let myself dwell on the negative or what I can’t control. I am fortunate to love my career and have really supportive coworkers, fellow art teachers, parents and administration. I’ll save my personal beliefs and fears for another post on another day. I am still on the fence about how to use my voice. Do I remain positive and inventive, or do I say enough?
I’ll keep you posted.
An obvious choice for a paper and pencil work is focusing on value and shading. I LOVE shading and my students always respond to it with excitement. Kids understand that knowing how to shade will make your drawings look awesome. Nothing elevates a drawing like adding some value.
I tackled many of the tasks described above with this in mind.
All of the lessons I plan on using in whatever scenario will start with this:
Value Scale & Shading Exercise

This is my re-vamped value scale and shading exercise tutorial. I have an older tutorial that did not have a voice over that I would use to reinforce what we did together in class. This updated tutorial is useful because I wanted to have a really detailed resource for students that would NOT be physically in my classroom when learning this skill. I still plan on using the older tutorial for a visual review in the classroom.
Overlapping Values Artwork

This Overlapping Values drawing exercise will be useful for ANY of the distance learning scenarios listed above. It’s also really fun and rewarding and would be a great “what do I do when I’m finished?” assignment for face to face instruction. This can be done very simply with one shape and three values, or you can make it more complex. Overlap as many times as you feel comfortable shading and change your shapes up, too!

Shaded Rock Pattern
This tutorial is great for students who are quarantined or as a whole class distance learning shading lesson. I have been in person this entire school year with the exception of a few weeks, so I also use it as a “what do I do when I’m finished” activity. I’m using inexpensive pencils and paper, so if you have drawing pencils the results will be even better!

Eye Self-Portrait

My first Distance Learning Unit (when or if we transition to that…#2020) is this Eye Self-Portrait Artwork. Students love drawing eyes and making them come to life with shading. Adding self-portrait symbols only increase the personal authenticity of this artwork and lead to great conversation starters about self-portrait artists. Frida Kahlo is my favorite. Students love to pick out the symbols she used and they never overlook her uni-brow.
After students complete the value scale and sphere shading assignment, we will move on to drawing eyes .

Once these exercises have been complete we will move on to the background and self-portrait symbols. I plan to break each task into bi-weekly 20-30 minute chunks that students can manage doing at home while/if we are in distance learning.
In a traditional face to face classroom, I still plan to teach this Eye Self Portrait Lesson :

How to Shade Water Droplets

Want students to feel successful with shading? Try shading water drops.
This is the first shading exercise I am using for students at my school site who are doing virtual learning for an entire semester. They will be facilitated and assessed by a non-art teacher that is employed by my district. I think this will be a fun artwork to help students to feel successful with just a pencil. It is also very parent and non-art teacher friendly since I will only be providing the content and not facilitating the process.

Perspective Drawing Distance Learning Shading Lessons
Not everyone enjoys teaching perspective, but I think they make great sketchbook assignments. I don’t teach a whole unit based on perspective drawing but I love having it up my sleeve for extension activities or secondary sketchbook exercises.
The two tutorials below use shading and are in my bag of tricks and waiting for whatever my 2020 school year throws at me!

Art teachers: I am here for you. This year will be a whirlwind and we are in this together.
What distance learning shading lessons are you planning to teach in 2020? I’d love to hear from you!
Subscribe so you never miss a post! 🙂
Enter your email address
- Share on Facebook
- Share on Twitter
- Share on Pinterest
Share this:

Leave a Reply Cancel reply

Published by
Sierra machado.
HI! My name is Sierra Machado and I am an art educator in Oklahoma. This is a creative space dedicated to the craft of teaching and art making. My goal is to inspire young artists, encourage and support fellow art educators and to push myself to create more art. View all posts by Sierra Machado
Discover more from THAT ART TEACHER
Subscribe now to keep reading and get access to the full archive.
Type your email…
Continue reading
You must be logged in to post a comment.
Shading Techniques: Six Methods to Master Shading
Shading techniques enable artists to create a range of values and a contrast between highlights and shadows. Different shading techniques will produce different kinds of textures, patterns and results.
A drawing is a combination of line and tone. Shading is what takes a drawing from looking two dimensional, to appearing as if it has volume and form. Shading techniques give the artist more control over the values produced, whilst creating texture and depth.
Below are six common shading techniques that artists use to achieve rich tonal variation, with deep shadows and bright highlights. Discover tips for how to master each technique yourself.
Disclaimer: Fine Art Tutorials is a reader supported site. When you make purchases through links on this site, we may earn a small commission at no extra cost to you.
Tonal Shading

Tonal shading is the process of altering the pressure applied to the pencil to create shadows and highlights.
This is the easiest and most intuitive shading technique, that most people use when they start learning to draw.

By applying an even amount of pressure to create a smooth mark, artists can block in large areas with consistent values. Apply more pressure and create darker marks, then reduce the pressure for lighter midtones. For the highlights in a drawing, you can let the white of the paper show through.

The benefit of this technique is that you can create a smooth appearance. For drawings that have smooth surfaces, skin texture or for realistic drawing styles , this technique would be most suitable.
Tonal shading is an excellent technique to use with mediums such as charcoal and graphite . This is because they have soft leads that enable the artist to vary tone with the pressure applied. Artists can also use powdered graphite or charcoal and brush it on the paper. With this, artists can achieve lighter and more even tones for smooth results.

Hatching is a shading technique that involves creating thin, parallel lines. These can be used to create areas of light or shadow in your artwork. This technique can be varied by changing the length and angle of the lines, as well as adjusting their thickness and spacing.
The hatching technique can also be used to create movement and direction in landscapes or figures. If you are using mediums like pen, ink, silverpoint, or etching, hatching is a great way to create variation in values.

Parallel hatching appears clean and tidy, with uniform, straight lines. This consistency and repetition creates harmony in the shaded areas of the drawing, which can add interest to the composition of the piece.
Vary the darkness, thickness or density of the lines to create areas that appear darker or lighter. You can change the direction of hatched lines for different sections of the shadows in the drawing to add variety to the piece. Choose to follow the general plane of the contours of the form, or guide the viewer towards a focal point with the line direction.

Hatching is a technique that has been used by many famous artists, such as Rembrandt, Leonardo da Vinci and Albrecht Dürer. All of these artists made use of hatching in their artworks to add texture and depth. In this etching by Rembrandt, you can see hatched vertical lines to show the planes of the houses. Then he used diagonal lines to show the flat land, which emulates the texture of grasses. Rembrandt also used cross hatching to build shadow tones.
Cross Hatching

Cross hatching is similar to hatching, but it involves crossing two sets of thin, parallel lines to create a more detailed and textured look. This technique can be used in many ways, from creating subtle shadows and shading to creating bolder textures in your artwork .

Draw the parallel lines closer together to create the appearance of shadow and further apart for the midtones and highlights. You can also vary the amount of pressure applied to the pencil to create darker or lighter areas, dark lines closer together represent a dark shadow area.
Cross hatching is a great way to add extra depth and contrast to your drawings, as it allows you to create multiple layers of tonal variation. It can also be used to create dramatic effects in landscapes, portraits or figures.
To improve your cross hatching skills, start by simply drawing a series of lines. Try to make each line you draw look uniform and consistent. Then, try drawing longer lines, keeping them uniform. Apply pressure to create a series of uniform dark lines. When your lines have uniformity, then move on to challenging yourself to creating the perfect gradient with cross hatched lines. Start by outlining a square or circle shape, then shading the darkest area with marks that are close together and darker in value. Slowly transition to the midtones by applying less pressure to the pencil and spacing the cross hatched marks out more.
Contour hatching

Contouring, or contour hatching is similar to cross hatching. However, instead of drawing crossed, straight parallel lines, draw the lines so that they curve to the contours of the volume of the form that you are trying to represent.

Contour hatching is a shading technique that better portrays the volume of a figure or scene. It adds texture and rhythm to a drawing (and you can use the technique with pen, ink or etching materials), but it adds a sense of realism by showing the complexities of the curvature of the form. Where parallel hatching and cross hatching has a flat effect, contour hatching better communicates the planes of a subject or object.

Contour hatching can be parallel, or crossed and you can layer hatched lines. Vary the direction, darkness and pressure applied to create different effects. Contour hatching can be used in an abstract way to improve the composition of a piece, to represent movement. However it’s more commonly used to depict realism in form.

Stippling is a shading technique that involves creating small dots of varying densities to create tonal variations in your artwork. This technique also works well when used together with other shading techniques, as it helps to add extra texture and depth to your drawings.

This technique involves repeatedly dotting the page, with dots in closer proximity representing darker values. It can take a long time to use dots for shading, however once you get into the flow of creating the dotting action, it can be quite meditative. The results can be striking—when the viewer steps away, the dots appear to blur together, creating shadow and highlight tones, however, get up close and see patterns of individual dots.

Scumbling is a shading technique that involves scribbling in circular motions to create textured shaded areas. The holes in the circles let the white backdrop of the paper show through, which creates the appearance of light. For darker areas, apply more pressure and create multiple layers of scumbles.
The beauty of this technique is that it allows you to capture subtle details that would otherwise be difficult to achieve with other techniques. Additionally, scumbling can be used to create soft gradations of light and shadow in your artwork, which can help to create more realistic looking drawings. If you want your drawing to look full of life and rhythm, the scumbling technique can introduce enough variety to create a unique appearance.
The benefit of using different shading techniques
By using techniques such as hatching, cross hatching, stippling and scumbling, artists can achieve not only depth in their tones and a large value range, but also texture, movement , rhythm and harmony.
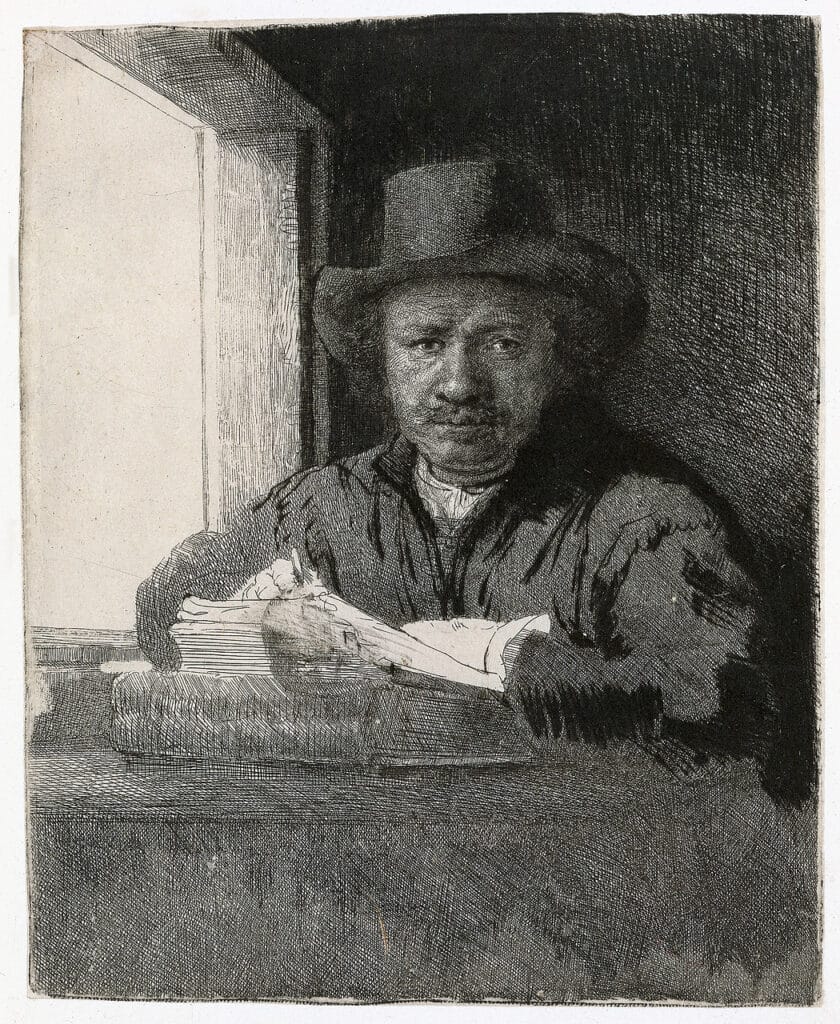
You can use shading techniques like hatching with mediums other than pencil or charcoal, like pen or ink. Artists such as Leonardo da Vinci used the hatching technique because he worked in silverpoint medium. Then, Rembrandt produced multiple etchings over the course of his lifetime in which he used hatching and cross hatching techniques. The etched hatched marks in his Self Portrait Drawing at a Window swirl in short movements to create the shadows of the drawing. This movement and rhythm of this piece lead the viewer’s eyes around the drawing and create an intensity of emotion.
Shading techniques create value
The purpose of shading, is to create a value range in an artwork. Values refer to the relative lightness or darkness of a colour, irrespective of its hue or saturation. Creating a value range, then is about creating light and shadows in an artwork. To create a high contrast between the lightest and darkest values, the tonal shading technique is the most effective. Apply pressure to a soft pencil or charcoal stick to create the darkest values, and leave a lighter touch for the lightest values.
What is shading?
Shading is a technique used by an artist to create tonal variations in their drawings or paintings. By applying shading, an artist can achieve the desired level of contrast between light and dark values.
Shading is a specific method that forms a part of the drawing process, that is used to create the appearance of volume and form. It can transform the depiction of a subject or object, from appearing two dimensional and simply made of contour lines, to appearing three dimensional.
Shading techniques differ from drawing techniques , as shading techniques describe how the artist creates a value range in their piece, to create the appearance of light, dark and volume.
Shading tips
- Start with light pressure, then gradually build the darker values. This way, if you make a mistake, it will be easier to erase. Starting tentatively results in more accurate finished pieces.
- Explore different materials and tools to create various textures. Pastels, charcoal, chalk and ink pens can all help to achieve certain effects.
- Be aware of the edges in your artwork– soft edges blur the boundary between two tones, whereas hard edges provide a more precise definition of where one stops and another begins.
- Experiment with different values and textures to create interesting effects. You can use a combination of techniques, such as hatching and cross hatching, to achieve the desired result.
- Get a value scale to help you determine value relationships better. Spend time looking at your reference, to determine where the darkest values are, the midtones, reflected light, light values and brightest highlights are and their relationship to one another.
How to hold the pencil for different shading techniques
To create long, sweeping, even strokes with a pencil or charcoal stick, the best way to hold the pencil is with the overhand grip. This turns the pencil on its side, so the plane angle between the paper and lead is less than around 10°. By holding the pencil like this, the artist can maximise contact with the pencil lead and paper, rather than using the tip. This works especially well with charcoal or graphite that has been sharpened to a long point and it applies to the tonal shading technique.
The tripod grip is reserved for creating detail. This grip will work best with the stippling technique, the hatching or scumbling techniques, if you want to use the tip of the pencil to create thin lines. This is the most common way to hold a pencil and is the grip that you most likely use for writing.
Practise these shading techniques to improve your drawings
Knowing of and understanding these techniques is the first step to improving drawing. However, it’s only with practice that any artist can improve their accuracy and develop their individual flair. These shading techniques in their most basic form are easy to practise, if you don’t have much time to commit, then start by shading basic shapes.
When you have more time, grab a sketchbook and combine your knowledge of shading techniques with some drawing exercises . This way you can put your skills to the test and move from simple shapes to more complex values.
In conclusion, shading techniques are an essential part of any artist’s toolkit. By experimenting with different techniques, you can create amazing visuals that bring your artwork to life. So don’t be afraid to experiment and explore these techniques to see which one works best for you!
How to Shade for Complete Beginners

You can make a flat line drawing jump right off the page or push things far away into the distance!
In order to shade better, here are 3 things you’ll need to learn…
- Pressure control
- How to shade smoothly
- Understand how light behaves
There are more, but let’s keep things simple! I’m going to walk you through all 3 topics and then we’ll shade something together, step by step!
This blog post is a written version of my video tutorial below:
Let’s begin!
Pressure Control
Realistic shading is done by creating a series of values/shades ranging from light to dark. The harder I press down on my pencil, the darker the strokes will be.
Portraits displaying a limited value range, can end up looking very flat. While portraits with a wider value range will pop:

To have good pressure control, practice shading from one end of your sketchbook to the other while pressing harder and harder until the values get darker gradually.
Another way to practice is to draw a long rectangle and divide it into several squares. Fill the squares from right to left, start with the darkest value you can possibly make and work your way towards the lightest.

It’s important to maintain a consistent pressure between each back and forth stroke or each individual stroke. This will take some practice and concentration to develop the muscle memory for. Here’s an example of what I mean:

If you’re interested in the tools I use and want to learn more about the different pencil types. Check this page out.
Some tools can make shading easier for you, but you absolutely DO NOT need any special pencils to get started. Because you can draw and shade realistically with pretty much anything that can make light to dark marks! Here, let me show you! I’m gonna draw using this random stick I found in my kitchen. Once it’s burnt, I can use it just like a regular pencil. And it erasable too!

My point, is that any old pencil will do. There is no reason why you can’t start shading today. Really, the most important thing is just to start!
How to Shade Smoothly
To shade smoothly, try to keep your pencil strokes close together. Eliminate major gaps between your strokes while maintaining good pressure control.
Now, it’s difficult to eliminate gaps if your pencil is sharp . So what you can do is wear the pencil down until the tip is dull or use the side of the lead to draw so your strokes come out thicker:

If you’re shading a large area and want to avoid dark stripes (the ones that form when your strokes overlap each other), avoid using the writing grip while pivoting at the wrist. When you pivot from the wrist, your stroke length is very limited:

Instead, try using an overhand grip and pivot from your elbow and shoulder to achieve much longer strokes:

This is very useful for shading large areas such as backgrounds. Just remember to keep your strokes close together, eliminating gaps that can make your drawing look scratchy.
Understand How Light Behaves
Have you ever tried shading something over and over without it looking even close to your subject? For most beginners, shading is probably a guessing game. That’s totally what is was for me! Until I learned a few basics about light.
Things just started making more sense!
Knowing where to correctly add light or shadow can make a really big difference in how realistic your artwork will come across.
I’m going to use a sphere to point out the different elements of light because the patterns are a lot easier to point out than a complex form such as… a nose for example.
Here we have a plain wooden ball, with a light source coming down from the top left.

We have two distinct sides, the light side which is facing the light source and the shadow side which is turned away from the light.

So as you can see, we have two types of light. Direct light and reflected light .
That’s why shadows are rarely all black. There are so many things in the environment that light can reflect off of: walls, nearby objects or even dust particles floating around in the air!

Do keep in mind that black surfaces absorb light , so in the example image below, the core shadow is no longer visible:

Looking at the image below, can you tell which areas are lit by reflections and where the core shadows are?

Answer…..

As mentioned earlier, light rays can reflect off of many things in the environment, but they have a difficult time bouncing their way into tight spaces such as the area where the ball touches the table. This is called an occlusion shadow .
And where a form blocks light from reaching another, that’s called a cast shadow . In this case, the ball is blocking light from reaching the table.

The cast shadow can tell you where the light source is coming from. All you have to do is trace the edges against your object, like so:

You can also flip this around…If you’re drawing an entire scene from your imagination, you can specify a light source and create a set of lines resting against the edges of your object to find the cast shadow’s length.
How many cast shadows can you find in the image below?

Let’s take a closer look at the light side of the ball.
On this side, there are only 3 things I need to point out. There’s the core light which is the area facing the light directly. Then there’s the highlight which is actually a reflection of the light source. This is the brightest point on an object. The edges of a highlight can appear soft on matte surfaces like this wooden ball or hard on shiny surfaces such as a polished plastic ball.
And as unintuitive as it seems, the highlight can change position depending on where you’re standing.
The very last thing are mid-tones or half-tones . Mid-tones are the darkest values on the light side of the ball where the edges start curving away from the light source. These areas of the ball receive less and less light the more they angle away.

Can you point out the core light, highlight and mid-tones on the nose?

Shade With Me: Step by Step Shading for Beginners!
Let’s shade an apple together without looking at any reference images. With our basic knowledge of how light behaves, we can essentially draw from our imagination ! It’s a great way to actively think about how light behaves.
First sketch your apple. It doesn’t have to be perfect at all just try to get something down on your sketchbook. Try to keep your outlines as light as possible. My sketch is extra dark so you guys can see it better.
You can use any pencil you want :) To learn more about the different pencil types, click here .

If you look closely, I started out by drawing a very light circle and then used that as a base to draw the apple.
We want it to be sitting on a table, so draw the edge of that table behind your apple. Then erase any unneeded lines.

The next step is to determine where the light is coming from. Let’s have one shining down from the top left. Draw a little flashlight or sun just to remember where the light source is.

Where the apple blocks light from reaching the table, let’s draw a cast shadow. You can use a ruler to find the cast shadow’s length. Just align the ruler to your light source and the edge of the apple. Now we know how long to draw the cast shadow. I’m just going to draw a long oval shape on the table’s surface.

Where the dotted lines touch the apple, we have our boundary between the light and shadow side.

Once you’re done visualizing, draw a core shadow. My core shadow is thinner on the left side because there are more reflections on that side (yours might look different depending on the apple’s surroundings).
Make sure the thickest section of the core shadow is darkest.

Where the apple touches the table, there is less light. So let’s shade that area darker.

Now that I’ve taken care of those two areas, I’m going to fill in the rest of the shadow side by laying down a flat layer of graphite that is much lighter in value.

Now the apple looks a lot rounder!
If you’re shading an object with a matte surface, an abrupt or immediate transition can indicate a sharp edge while a gradual transition can indicate a round edge.

Let’s shade the cast shadow now. The further the cast shadow is from the apple, the more open it is to being hit by reflected light rays, so I’m gonna shade the area directly under the apple darker and then lighter as the shadow stretches away.

How bright do you want the light side of your apple to be? It’s totally up to you! Pick a light value and then shade the entire space flatly. Just focus on your pressure control and stroke spacing.

The next thing we need to do is blend the two distinct sides of our apple so it all comes together nicely.
Where the form turns away from direct light, add your mid-tones which will immediately make the surface appear rounder.

The more the surface of the apple turns away from direct light, the darker it becomes.

When you’re done, use an eraser to indicate the highlight.

Step 12: Bonus
If you want your drawing to pop out, exaggerate your values to create depth (make dark areas darker, light areas even lighter).
You can only go so dark with graphite pencils. If you wanna achieve a deep black, try adding charcoal to the drawing.

Outlines can make a drawing look cartoony, so if you want your apple to look more realistic, make sure the outlines blend in with your shading or erase them as you go along.
Definitely try to make your initial sketches as light as possible so they don’t show through in the end. If they’re too dark to erase, you can add a dark background until they disappear!
Place a few objects on a table under a single light source. These objects can be various fruit, vegetables, eggs, etc.
Observe the patterns of light and shadow on each object as you move the light around to try and understand what you’re looking at. Then draw the scene in a fairly organized manner. For example, start with the core shadow first, then the occlusion shadow etc.
Sometimes it can help to pick an object up and turn it around to study it from different angles.

Share to Unlock

▰▰▰▰▰▰▰▰▰▰▰▰▰▰▰▰▰

😊 Thank you for sharing!
Here is your PDF download link:
Click here to download the PDF version of this tutorial :)
▰▰▰▰▰▰▰▰▰▰▰▰▰▰▰▰▰ ▰▰▰▰▰
Darlene created RFA In 2013 with the goal of sharing simple yet detailed drawing tutorials with other artists on the world wide web. She is a self taught pencil portrait artist and Youtuber.
Related Posts

How to draw a realistic eye

How to draw a nose from the front – 7 easy steps

How to draw lips – 10 easy steps
21 thoughts on “how to shade for complete beginners”.

This is seriously so helpful, thank you!♡ I’ve been drawing since a very young age, then had a bit of a gap when adulthood hit (🥲), but I have found I miss any dearly and couldn’t figure out how to get back into it. This is wonderful help and I’m beyond excited to get back to the sketchpad, thank you so much!

thank you for this i really needed it you did a great job of explaining what to do and how to do it

Best explanation I have ever read and i’ve been looking for ages. thank you very much!

Wow, thanks so much

All your tutorials are very clear and easily understood. Your technique is excellent which makes the things you say very credible. Ssssoooooo all I can say is keep up the great work you are already doing!!

Awesome refresher! Better formal structure than I got at Art School. Going to use this for my students.
Leave a Comment Cancel Reply
Your email address will not be published. Required fields are marked *
Save my name, email, and website in this browser for the next time I comment.
Notify me of follow-up comments by email.
Notify me of new posts by email.
art shading project
All Formats
Resource types, all resource types.
- Rating Count
- Price (Ascending)
- Price (Descending)
- Most Recent
Art shading project

Drawing Art Curriculum Art Projects , Art Lessons, Shading Worksheets High School
Shading Art Activities, Worksheet, Project on Cross Hatching, Value in Drawing

Elementary Art Lesson | Tints & Shades Ice Cream | Summer Art Project
Drawing and Shading Ribbons Art Project Middle School or High School Art

Drawing and Shading Art Project Bundle - High School Visual Art - Middle School

Pablo Picasso PowerPoint and Cubism Art Project - Ink Shading Art Lessons
Middle or High School Art Project : Drawing Basics, Line Quality, & Shading

Counter- Shading Flower Art Project
Mystery Grid Drawing - Shaded Santa Claus Art Project

High School Art Project Drawing and Shading Bundle - Colored Pencil and Graphite

Middle or High School Intro to Art : Shading Unit 6 Activities, 2 Projects , More

High School Art Project Beginner Drawing and Shading in Graphite

Art Lesson & Project - Intro to Shading - 6/7/8 - Google Drive Folder

- Google Drive™ folder

Charcoal Drawing Project : Value, Shading Intro Lessons/ Unit High School art

Metallic Shading Name Emblem Art Project - Colored Pencil Techniques

Tints & Shades : An Autumn Silhouette Art Project
Art Lesson/ Project - Shading Lighthouse- 6/7/8 - Google Drive Folder

Art Lesson/ Project - Shading Still Life - 6/7/8 - Google Drive Folder

Drawing and Shading Folded Paper - High School Art Project - Value and Shading
- Google Apps™

Cubism and Ink Shading Art Project inspired by artist Pablo Picasso

Pencil Drawing and Shading w/ Value Art Project for Middle School & High School

Penguin Directed Drawing Activity - Element Of Art - Value Shading Project
- Google Slides™

High Contrast Drawing and Shading on Toned Paper Art Project (Butterfly)

Element Of Art Value Lesson - Value Scale Activity - Shading and Blending Project
- We're hiring
- Help & FAQ
- Privacy policy
- Student privacy
- Terms of service
- Tell us what you think
TeachKidsArt
a resource for teachers & families
Line Designs with Shading
By Cheryl Trowbridge 35 Comments
- White paper
- Black “F” Sharpies
- Colored pencils
Directions: 1. Draw a curvy line across your paper. 2. Make about 8 dots, unevenly spaced , on your line. 3. Next, connect the dots with curved lines. (The lines from the dots at each end should go off the paper, rather than curve back down to the line.) 4. Then, from each of these curved lines, build up a “column” of more curved lines (or “rings”), stacked on top of each other. Build one complete column at a time across the top half of your paper. If your columns start to slant or get smaller or larger, all the better! We found it easiest to develop every other one, and then connect the spaces in between. (When you fill in these “in-between” columns, make sure that each successive “ring” that you add connects at its ends to the ring below it.) 5. When the top half of your paper is finished, spin your paper around and repeat steps 3 and 4 until your entire paper is filled and all your columns are connected. 6. Finally, choose a color scheme (I chose “color families”, above) and color each of your columns, pressing harder on each side and lighter in the middle, to give it more of a 3D look!

You may also like...

Looks great! :) Glad the kids love it!!!!!
These look wonderful- I had a go myself inside a circle- looks great too. Very addictive!! Thanks for sharing! Jenny Kay
harika çal??malar ve harika payla??m…
Te?ekkürler, Alanay!
I like your circle idea, Jenny Kay! I'll have to try that!!
i am soooo trying this with my students next yr!
My bilingual fifth graders are STILL working on this project. . . you should see how long we've just been working on the shading concept. The thing is they love to start things. . .hate to finish them so I've been rewarding anyone who sticks with it and finishes their shading. . . lame I know! But it's the last few weeks. It would totally go over well with another class I'm sure. I hope they feel proud when they see what they've created. . . we'll see.
Hang in there, Art Project Girl! I'm sure your students will be proud of their finished projects! None of my students finished in one (50 min.) class, either. But most were motivated to finish it on their own, since that was our last art class for the year. I think their classroom teachers were happy for them to have a quiet activity (shading their drawings) they could keep in their desks and pull out as they finished other stuff!
I'm with Lori – I definitely want to do this next year – it's already bookmarked.
K-Sue of http://k-sue-smarties.blogspot.com/
Thanks for the moral support! I won't let them abandon this because at this point I think they need to feel pride in finishing:) I'm usually not a stickler but. . . It is artWORK not art recess right?
Hahaha! I love that, Art Project Girl!! I will have to remember that quote next year for my students… “It is artWORK not art recess right?” Brilliant!! :)
So cool! I'm going to get my own kids to try these this summer.
Hello, I am Lynda, an art teacher from Australia. i have just had a good look around your blog and feel very inspired by it. So, I am now following. I hope you can visit my blog too and see some of the things I do with my boys. By the way have you done any Chinese artworks with you classes?
Hi Lynda! I enjoyed looking around your blog, too! I found some great ideas I'll definitely be trying out! As for projects inspired by China, I have two right now: http://teachkidsart.blogspot.com/search/label/China Stay tuned for more to come!!
I had all three of my kids try this last week- my 11 year old loved it the most and finished but even my 6 year old tried his hand at it. I saw tubular critters in the design and added eyeballs which made it a whole different creation. Thank you for sharing! Let me know if there is a way I can share their work with you…
Love this and I want to try it myself. I have a degree in Art Ed, but I am a stay at home mom and photographer. I love these ideas for my kids. I gave your blog an award on my artblog today. GO check it out!
Christine, I would LOVE to see your kids' work!! You can email me at cbtrowbridge[at]gmail[dot]com. And Danett, I enjoyed looking through your blog – what a beautiful family! So glad you can share the joy of art with them!! :)
were you all talkin turkey up there?? I lived in Istanbul for a summer…loved it!!
Haha – yes, Mr. E.! Thanks to Google translator!! :)
We made these at a Music Theatre Summer Camp, the kids loved them!!! thanks!
I will have my kids work on these next week! Can't wait to share their creations with you. I picked up your email address from a few comments up. :)
Your blog is so well organized and VERY inspiring!! Thank you for sharing your ideas and talent!
Great stuff. Gonna try it!
Doing this tonight with my new art students, just trying it myself and it's fun! I say they look like stripy socks. Thanks for a great blog. Blessings. x
Really enjoyed doing this my Gr. 6-7 students (and doing it myself). I appreciate your excellent directions, too. Here are the results of our efforts (and your teaching!) on our class blog .
Thanks again for sharing so generously, Jan
Jan, your students did a great job! Thanks for sharing!!
Saw this on Mr. E's blog after finding it on Pinterest (LOVE!). I teach Middle School Art and the students love/hate this project. They love the way it looks and how complicated it SEEMS, but I have them do it on a large scale, as an extra credit assignment to work on whenever they finish their current project. IT's very time consuming, which is great because it keeps them busy for a long time. They refer to it as the “Tornado” drawing, or “worms” or even “tornado worms”. Love your blog btw!

I really like this for my 5th graders who work on 3d looks all year. I call it “Giant Snails and Dragon Tails.”

I love that name, Stephanie! Great idea!!

i think they should be call stalagmites (for the ones that go up) and stalactites (for the ones that go down) after the rock formations that form one “drip” at a time. these are formed similarly – one line at a time :)
Good idea, Kim!

This is so cool I did it with my fith grade class this week.
That’s awesome, Colin! I’m glad it was a hit with your students!
[…] Line Design Drawing shapes, Coloring, Shading […]
[…] http://www.handmadecharlotte.com https://www.teachkidsart.net […]
[…] “Line Design with Shading” -draw lines today. Use colored pencils to color design with shading. […]
Leave a Reply Cancel reply
Your email address will not be published. Required fields are marked *
Notify me of follow-up comments by email.
Notify me of new posts by email.
This site uses Akismet to reduce spam. Learn how your comment data is processed .
Privacy Overview
7 Easy Art Lessons For When You’re in a Pinch

Sometimes lesson planning comes down to the wire. Maybe your students went through a project much faster than expected, or you simply did not have the time to get ahead of things. We’ve all been there. It’s not unheard of to scour the internet and social media for ideas, but sometimes we still come up short. No art teacher is perfect, and we all need a lesson idea in a pinch from time to time! We don’t want these activities to be fluff or busywork. Instead, we want them to help our students build skills and scaffold learning.
The next time you find yourself in need of a last-minute activity or lesson, look no further. The following seven activities are easily adaptable for various grade levels. They also require minimal material prep and use supplies you likely have in your art room.
1. Personal Soda Can Label

We live in a consumer world where new beverages, food, candy, and snacks are constantly introduced to the market. Teachers and students experience product and brand design —often without even realizing it. Looking at the typography and imagery of different products can spark interesting conversations with both elementary and secondary students.
One way for students to explore the idea of consumerism through product design and advertising is by creating a personal beverage label. This will require students to brainstorm a brand and identity for their product by picking the flavor, color, and overall look. Use the handout below to get your students started planning their designs.

Once students have designed their labels, you can take this activity a step further by attaching the design to an aluminum can. Have students participate in a reflection or critique activity. Ending the activity here might be appropriate for your elementary students, but you could take it a step further for your middle and high schoolers. Have students use their aluminum can with a custom label for observational drawing. Beginning students often struggle with matching the text and typography on traditional soda cans. Using the label they initially created will help them build confidence in their drawing skills. After practicing observational drawing skills, students add shading to create the illusion of form. High school students can also explore more package design and advertising elements.
Suggested materials: Paper, drawing materials, aluminum cans (optional) Suggested grade levels: Elementary, middle school, high school
2. Crushed Soda Can Drawing

Another simple yet effective way to recycle aluminum cans in your classroom is to crush them and use them for observational drawing. When students learn to draw, they eagerly want to draw things as realistically as they can. Students often feel frustrated and disappointed when they aren’t able to draw things perfectly. One way to reduce the pressure of realistic drawing is to begin with an imperfect object. Crushing cans and spray painting them white can serve as a beautiful and cost-effective way to teach basic drawing skills.

Students can draw the cans from life or use a reference photo. If they use a reference photo, you could introduce your students to the traditional grid method or provide them with alternative ways of making a grid.
Cover the cans with white paint so students can focus on the simplified shapes without worrying about labels or text. Strong lighting can also help students to identify values easily. If you don’t have aluminum cans on hand but still want to try this activity, use these images as references .
To adapt this lesson and take it even further for your secondary students, explore new and advanced techniques to create a background with contrast and emphasis. Students research and experiment with a technique they have wanted to try. Provide them with a demonstration and sampling of some ideas to get them started.
Here are some exciting advanced techniques:
- Monoprinting
- Painted Paper Weaving FLEX Lesson (can be found in FLEX Curriculum )
- Paper marbling
Suggested materials: Paper, drawing materials, aluminum cans Suggested grade levels: Upper elementary, middle school, high school
3. Ashley Mary-Inspired Organic Shape Painting

Exploring abstract and non-objective art can be an empowering experience for students. However, sometimes the freedom to create can leave them paralyzed or push them to overwork their pieces. One way to introduce students to proper painting techniques while exploring color, pattern, and shape is to learn about the contemporary artist Ashley Mary . Mary’s playful paintings are reminiscent of the free-form collages of Matisse. Comparing Mary, a contemporary artist, with Matisse, a classical artist, can provide a foundation for inspiration and discussion. To learn more about Ashley Mary, download our complimentary FLEX Curriculum Artist Bio . Find this and many more artist bios in FLEX Curriculum .

Before students begin painting, have them choose a color scheme. Encourage students to work with a limited palette to push them to make more intentional color decisions. Students create shapes and patterns one paint layer at a time. If using watercolor, this can be a wonderful exploration of how transparent and translucent colors mix and layer. The free-form nature of this painting style also fosters intuitive thinking.
Suggested materials: Paper, acrylic or tempera paint, watercolor Suggested grade levels: Elementary, middle school
4. Water Droplet Drawing

If you are looking for a skill-building activity to boost your students’ confidence, this is it! Inspired by art teacher Jennifer Sell , this water droplet drawing activity is the perfect way to introduce students to shading and form at any age level. For best results, use a material that blends easily, like graphite, charcoal, chalk, or oil pastel. Use these videos to help guide your students as they navigate through the activity.
To adapt this for your advanced learners, students create the same drawing with two different media. Compare and contrast the process, medium characteristics, and end results.
Suggested materials: Paper, chalk, graphite, charcoal, or oil pastel Suggested grade levels: Upper elementary, middle school, high school
5. Textured Slump Mold Slab Bowl

Are you in need of a one-day clay activity that requires minimal materials? Creating slump molds is a great way to introduce or review making slabs with students. All you need is clay and a mold, like a bowl, to press the clay inside. This idea also can introduce surface texture on clay. Students roll a slab, add texture, then press into the slump mold. If you plan on doing more clay lessons with your students, this is a quick project for students to practice the glazing process.
Suggested materials: Clay, bowls for molds Suggested grade levels: Elementary, middle school
6. Op Art Drawing

Optical illusions are always exciting for students, and learning how to make them is even better! Some op art designs require more math and complexity, while others are on the simpler side. These op art sphere and cube designs are perfect as an introduction to your younger artists. Check out this video for a step-by-step guide to create them.
If you plan on doing more complex op art activities with your advanced or high school students, these simple drawings will make great bellringer prompts. Connect several spheres and cubes to create more elaborate patterns and compositions. For more op art lesson ideas, check out the Connecting Op Art and Math in FLEX Collection.
For a brief introduction to op art that you can share with your students, check out the FLEX video below:
Suggested materials: Pencil, markers, ruler, paper Suggested grade levels: Elementary, middle school, high school
7. Color Mixing Lines

The process of color mixing never ceases to amaze students, no matter how many times they have experienced it. This activity allows students to observe color mixing and explore creative drawing processes.
To start this project, students use a water-based marker or watercolor paint. If students use markers, create shapes of color right next to or slightly overlapping each other. Prep an eyedropper filled with water or a paintbrush dipped in clean water. Stand the painting up vertically and carefully drop water on the paper. Watch as the water mixes with the color and drips down the page together.
Use the same method with watercolor paint with a wet-on-wet technique by painting the paper with water first. Add color with the paper held vertically.
Once the paint drips are dry, students identify the positive and negative shapes created by the drips. Students can trace the shapes and fill in designated areas with line patterns.
Suggested materials: Water, watercolor, markers, paper Suggested grade levels: Elementary, middle school
Alexander Graham Bell said, “Before anything else, preparation is the key to success.” With all that art teachers have to do daily, we understand the importance of preparation. However, there are only so many hours in the day, and sometimes we don’t have enough time to get it all done! If you find yourself behind, overwhelmed, or stuck, try one of these activities. They are sure to engage students from start to finish, adaptable for all grade levels, and you can easily tie them into your existing curriculum when you’re in a pinch.
What’s your go-to lesson when you are in a pinch?
How do you prep in advance for a last-minute activity?
Magazine articles and podcasts are opinions of professional education contributors and do not necessarily represent the position of the Art of Education University (AOEU) or its academic offerings. Contributors use terms in the way they are most often talked about in the scope of their educational experiences.

Abby Schukei
Abby Schukei, a middle school art educator and AOEU’s Social Media Manager, is a former AOEU Writer. She focuses on creating meaningful experiences for her students through technology integration, innovation, and creativity.

Art and Appetite: 7 Ways to Explore the Significance of Food in the Art Room

7 Engaging Ways to Teach the Elements and Principles of Art and 3 Fun Ways to Review Them

10 Easy Strategies to Apply Brain-Based Learning in the Art Room

7 Common Misconceptions When Approaching Your Art Curriculum This Year

- all classes
- art teacher resource
- art vocabulary
- reflection paper
- shopping list

WI State Standards:
- AA Cr10h Investigate: Engage in critical thinking, problem solving, and research through elements and principles of art and design studio practices and processes. (aesthetics / problem solving)
- AA Cr11h Plan: Formulate original concepts by practice, experimentation, and revision. (planning/experimentation)
- AA Cr12h Make: Create works of art that introduce students to media, care of tools, and basic craftsmanship skills. (skills)

what will you learn?
The elements and principles of design are the building blocks used to create a work of art.
Elements of Art are the visual "tools" that artists use to create an art work - they are what makes up an image or an art object: line, shape/form, value, color, space, and texture.
Principles of Design are the ways artists use the Elements of Art in an artwork - this is "what we do with the Elements" - how we arrange them, how we balance them, what is being emphasized, etc. The principles are: balance, contrast, repetition, emphasis, and unity.
elements of art
Elements of Art are the visual "tools" that artists use to create an art work
Artists manipulate these elements, mix them in with principles of design and compose a piece of art. Not every work has every last one of these elements contained within it, but there are always at least two present.
For example, a sculptor, by default, has to have both form and space in a sculpture, because these elements are three-dimensional. They can also be made to appear in two-dimensional works through the use of perspective and shading.
There are six Elements of Art:
- Shape / Form

principles of design
Principles of Design are the ways artists use and arrange the Elements of Art in a composition.
The Principles of design is what we do to the elements of art. How we apply the Principles of design determines how successful we are in creating a work of art.

ASSIGNMENTS

Strange noise...

Imagination drawings

Limited drawing

Popcorn factory

About me Mind Map
formative assignments (practice)

Line Repetition Design

Drawing with lines

Lines & Emotions

summative assignment

Focal point line drawing

Tangram basics

Tangram images

Name design

Hand study 1

Hand study 2

Flower study

Colored pencils
summative assignments

Tessellations

Value scale

Form construction & shading

Observational drawing

Grid drawing

White on Black

Half picture

Cutout shading

Pointillism

Layers and holes

Scratch art

Photorealism

Ribbon design
semester 1 evaluation

focus on value

focus on coloring skills

portfolio assessment

Landscape coloring

Color wheel practice

Color wheel

Color schemes

Practice color scheme

Color scheme designs

Color scheme triptych

color cubes

obscure color wheel

Monochromatic painting

Complementary painting

color scheme painting

color scheme portrait
1 point perspective

1 pt. perspective

additional w/s

Checkerboard

Post in perspective

1 pt grid plan

Name in perspective

Room in perspective

Buildings in 1 pt. perspective
2 point perspective

2 pt perspective

2 pt grid plan

3 point perspective

3 pt perspective

city block with a story

Texture Study

Textured apples

Texture patterns

Textured cylinder

Creative patterns

Optical design

Textured circles
semester 2 evaluation

skills assessment

focus on 3 elements

Balances design

Printmaking

pattern problem

patterns experiment

Pattern design

Subway train

Double drawing

Linoleum printing

Oil pastels
Wisconsin essential standards rubric

1. All assignments must be completed on or before the due date. 2. Unfinished artwork is graded as such. 3. If you are absent, it is your responsibility to make up all work. You can sign out art supplies if needed. 4. If your project requires extra time to be completed, you have to make arrangements with me prior the due date. This is your responsibility. 5. Each project has a rubric with specific requirements and guidelines. Follow them. 6. Unless an assignment specifically requires copying, it will be interpreted in the same manner as plagiarism. 7. You are also graded for your in-class studio work.
CLASSROOM RULES
1. Food, drinks, candy, gum are not allowed in the Art rooms. A bottle of WATER is permitted in room 206 (only). 2. Cell phones are not allowed at any time. Phones should be turned off and put away. 3. Be in the room before the bell rings. Dropping your stuff and leaving does not qualify you as being on time. 4. Sit at your assigned seat unless I give you OK to move. That means you do not walk around the room during the class. 5. Talk quietly with students at your table. Do not talk during the instructional time. 6. Draw, paint, etc. on your artwork only! 7. Use materials from your tote-tray only... don't go into other people's trays. 8. You can bring your work home anytime. You are responsible for having it back next day. 9. If you must swear, please do it elsewhere... Thanks. 10. You are responsible for cleaning your work area and the tools that you used. 11. If you are in the Graphics lab, use the printers for the current ART assignments only!!! 12. Encourage your fellow classmates in a positive way... treat them fairly and nicely. This room should be a fun and comfortable place for everyone.


- For My Student Teachers
- Artist Birthdays
- Art by Mr.E
May 19, 2011
Line design w/shading - 4th grade.

33 comments:
I borrowed your idea earlier in the year to use w/my 5th graders. Had some very nice work so I'm doubly impressed at the quality of your 4th grade artists!

I really like that with the shading. jan

Love the NEW look of our blog! GREAT!

I MUST remember to give this a try with my older kids next year!! Wonder what happens when you use different kinds of lines (straight, zig-zag, etc.). I'm intrigued -- time to get out the sketchbook and do a little doodling to experiment! thanks

I "stole" this idea last year, and again this year, and I love the results. Everyone is successful!
Any words of advice for colored pencils...they are ALWAYS breaking!!! I try to avoid them because the kids and I get frustrated. Love the project!
As an artist, I use really expensive colored pencils and this happens a lot. If you ever notice that after the kids sharpen them and the new sharpened color tip just falls right out, its a result of the inside of the pencil being broken. This means the pencil has been dropped a lot or something to break up the inside. What you want to do is toss the pencils in the microwave for a small amount of time (2-5 second intervals) so that it will fuse/melt the inside back into one piece. Don't microwave them too much for it will also ruin them or they will melt completely. Very messy.

Colored pencils are one of my fav! They do break a lot though...I just have my kids sharpen them a little. I have small lidded bowls on each table with two sharpeners in them. This allows both kids to sharpen at the same time. Crayola and Rose Art are a bit harder lead..and don't seem to break as much.
Question. . . where did you come up with this idea? What was the inspiration? It's a unique design. . . is it inspired by any op art?
I just love this project! It's easily executed and the results are spectacular. Thanks for sharing it.

This looks so cool! I'm definitely going to try it out. BTW shouldn't that be "INcluding", teacher? ;)
Can you do a video..... im not an artist and my students are confused!! Please and thank you

Thanks so so much for these awesome instructions. I'm doing these now with my Grade 5s and they're turning out fabulous! :) Danielle @ http://artroomwithaview.blogspot.ca/
I teach Ceramics and I am seeing this as a really interesting design to carve onto a pot. Thanks!
I've taught this project for 6-7 years now, first with high school, now with the middle school. If the correct technique is used, it comes out awesome. This includes overlapping lines to create value, starting each arc where you left off to avoid "paperclips and mushrooms", changing direction to create movement, and varying size from small to large (and back again) to create the appearance of depth and moving back in space or coming forward. I like the work in just b/w as the color can distort the value of the overlapping lines-arcs.

This is an awesome, eye-popping project! I do a similar optical illusion art with circles, straight lines, and wavy lines (or "ribbons" of line), but I think I may swap that out for this one this year! Thanks for the wonderful blog, Mr. E!
Could u use the letter of the kids name. Then use the lines or would it just blend in? I'm not art person . This looks like fun.
Anonymous, that is an interesting idea!! I might have to give it a try!
I used to do this when i was a kid but start with bubble letters and layer them to fill the whole page. It was addicting!
Boy, did your comment bring back memories! My friends and I all did this, too, back when we were in school--write our names in fat, puffy letters, then draw lines around and around and around them until we filled up the page. Then haul out those crayons, map colors, or markers, and amuse ourselves for HOURS!!! Why do something plain when you can do something awesome?!? WesTXGrl13
If you need more ideas. Try Zentangle they use this design a lot plus a lot more ideas. It is easy calms the mind lets you relax and put in touch with your inner self.
Hey, what a interesting idea! I liked it very much.. - Paper crafts in Dubai
This is an interesting idea, I love the colors. As soon as I send this message, I'm going to try it. Thank you so much!
Forget my last entry; once I followes the first set of steps it started to make sense. I was thinking too much rather than attempting it. Don't think. Just start with the center line with the dots spaced out about every two inches, then do "lips" or "leaves" in a sort of figure 8 pattern. Then do the same shape in a concentric pattern around each shape. Once you get to the 3rd or 4th concentric shape it starts to make sense.
James, also if you look through my blog...you will find a Deluxe Edition of this...and I have more photos & more information.
I've been doing some Zentangles this past year , seen this Pattern of yours and love it. If your teaching it to forth graders surely I can do it. I love the three demential look it gives. Thank you for sharing.
im not a teacher but this is cool... how do you do that?
so nice art using lines.....wow
can u make a video
can some one make a video
Thanks Mr. E!
Thanks for sharing! I'm enjoying creating these designs and colouring them in for relaxation. Stay inspired! Michelle
Watch: 'Kelly Clarkson Show' hosts Portsmouth art teachers, students (and their monsters)

PORTSMOUTH — A project bringing monsters to life earned art students and teachers from the Portsmouth school district a guest spot on " The Kelly Clarkson Show" in New York City.
Sarah Mundy , a visual arts teacher at Portsmouth High School, and Dondero School art teacher Adam Bastille were joined by high school junior Tyrnyn Moyer, 17, and 8-year-old second grade student Vivienne Walker on Tuesday’s episode of Clarkson’s NBC show. Clarkson, a Grammy Award-winning singer and winner of the inaugural season of “American Idol” in 2002, hosted the group to commemorate National Teacher Appreciation Week .
The Portsmouth art students and teachers discussed a collaborative project: Bastille’s second-grade Dondero students drew depictions of monsters, which were delivered to high schoolers in Mundy’s ceramics class. The PHS students turned the drawings of monsters into ceramic sculptures.
Mundy, an avid TikTok user promoting art education and students’ work, received a message from a producer of the show during April vacation regarding a video she posted about the project. Mundy, Bastille and the students were invited to tape the episode in New York City last week.
“Just by getting that visibility out there, it empowers the kids and keeps them going,” Mundy said Thursday.
The students and teachers filmed the episode with Clarkson in New York on April 30, exactly one week before it aired.
How Portsmouth students bring monsters to life
“We talked about creating texture and coloring and shading and outlining it to make it a refined drawing,” Bastille explained on the show. “The biggest success for me is when I saw all my second-graders (and) their artwork that they made, each monster and creature was different. They had their own personality, for sure.”
Bastille had his students sketch three different monsters, then choose one to send over to the high school ceramics students. Walker chose her blue-colored, crown-wearing, hook-handed monster she named “Hooky,” which Moyer was responsible for creating.
“I think my favorite part about the whole project was definitely making the hook,” said Moyer, the high school student. “It's like the heart and soul of the whole piece. And another great thing about it is with all the hair, I got to try a new glazing technique called mishima, which is basically where you take a needle tool and you make all these thin little designs.”
Moyer’s ceramic creature was then brought out to Walker to applause from the studio audience.
“Oh my gosh, that is so cool,” Clarkson said. “That’s heavier than I anticipated!”
Art teachers and Kelly Clarkson show appreciation for their teachers, too
Mundy, a Portsmouth High School graduate, has taught high school art for 10 years. Bastille has worked at Dondero for seven years after dreaming of becoming an art teacher as a child.
“I think I became a teacher because I really struggled to get through school,” Mundy told Clarkson. “Academics and the rigor of it was just really challenging and the art room was a safe space where I could express myself and work in clay. Now I'm actually really proud to be working at the high school where I went to school and I get to offer that space to the kids.”
“My high school art teacher really set me up for success,” Bastille said. “She was always there for me. I always wanted to be an art teacher at a young age. I had that dream. Even my elementary art teacher, she really inspired creativity in me because she did this choice-based art program, where I got to choose my own projects and develop and make my own projects. It was just amazing to me to be an artist at such a young age. It inspired me to be an art teacher.”
The show’s host gave her own nod to the importance of school art programs at the start of her successful life.
“(The) arts (are) what kept me in school,” Clarkson said. “You had to make a certain average to be able to participate in the arts programs and that's what kept me a better student than I would have been. It's a lesson to not get rid of the arts programs in schools.”
After Walker’s three-dimensional monster was presented to her, the second grader and Moyer took turns giving praise to their instructors.
“Thank you so much, Mr. Bastille. You make art class so fun,” Walker told her teacher. “You're funny and kind and I love when we have dance parties.”
“I just wanted to say thank you so much. You're an incredible teacher, a fantastic potter and just overall such an amazing person,” Moyer said to Mundy. “I've loved getting to know you and working with you. You always know how to guide us without just fully giving us the answers. We get to go through the path of finding out for ourselves. You're so great at getting everyone, especially me, to branch out creatively and try new things. On behalf of the entire Portsmouth (High) School, I just want to say thank you so much for all your hard work.”
Scholastic Corporation is donating 1,500 books to Dondero School and $5,000 to Portsmouth High School for art supplies, Clarkson revealed at the end of the interview.
Mundy plans to give Bastille $2,500 for his classroom needs and will spend her half on new shelves within the kilns in her classroom. She and the Dondero instructor hope to continue the monsters-themed project with students next year and later display all the finished artwork in an exhibit for all their pupils and their families to view.
The episode came the same week as the Portsmouth High School art department’s second annual “Fine Arts Night.” The free event will feature student art, performances and food made by the school’s culinary students.
The event will be held at 3S Artspace on Friday, May 10 from 5 p.m. to 8 p.m.
Perspectives Identity
The free black women’s library.
“Part of what inspired the project was wanting to create something that really centered the brilliance and creativity of Black women writers and the transformative possibilities that come with reading.” The Free Black Women’s Library is a third-space social art project founded and maintained by artist OlaRonke Akinmowo that features a collection of over 5,000 books written by Black women and Black nonbinary writers in the Bedford-Stuyvesant neighborhood in Brooklyn. Like any library, it is a space to read, write, and study. Visitors are also invited to attend workshops, film screenings, book signings, teach-ins, story time sessions, critical conversations and to use the space to gather in community. During her CPP Residency, OlaRonke has created Obsidian, a collective featuring 20 Black women writers and artists who meet several times a month. In December 2024, Obsidian will publish a book, Pretty Little Brick . The Met’s Civic Practice Partnership (CPP), launched in 2017, catalyzes and implements creative projects that advance healthy communities by bringing the skills and interests of neighborhood stakeholders together with those of The Met and artists who are socially minded in their practice. Invited CPP artists work in their own neighborhoods across New York City and at The Met to develop and implement ambitious projects and forge meaningful collaborations. Learn more about OlaRonke’s CPP Residency .

The Civic Practice Partnership

OlaRonke Akinmowo and The Free Black Women's Library

Meet Alethea Pace, Artist-in-Residence

Behind the Scenes

For Families

From the Archives

In Circulation

Notes from Museum Leadership

Religion and Spirituality

Social Change

- 2022 Update
- 2021 Update
- 2020 Update
- Reputation and History
- Departments and Programs
- Faculty Recruiting
- Zoom Backgrounds
- Board of Visitors
- SCI Learning Academy
- Administration
- Faculty Directory
- Staff Directory
- PhD Students
- Diversity, Equity and Inclusion at SCI
- Diversity, Equity and Inclusion Committee
- School Initiatives and Resources
- University Initiatives and Resources
- Carving the path to safer and smarter buildings
- A holistic approach to intelligent social learning
- How to anticipate hiccups in health care
- Preserving a shared digital memory
- Holding information technologies accountable and addressing misinformation on the web
- More than an afterthought: Dr. Ibrahim shows students the necessity of cybersecurity
- Current Grants
- Faculty Accepting Undergraduate Students for Research
- Submit Research for Undergraduate Students
- Labs, Centers, and Institutes
- Visiting Scholars
- Undergraduate Research Scholars
- Degrees and Programs
- Find the Right Major for You
- Computational Biology
- Computational Social Science
- Computer Science
- Data Science
- Digital Narrative and Interactive Design
- Information Science
- BS + MS in Computer Science
- Physics and Quantum Computing
- Library and Information Science
- Intelligent Systems
- Telecommunications
- Computational Modeling and Simulation
- Information Science with a focus in Telecommunications
- Applied Data Driven Methods
- Big Data Analytics
- Cybersecurity, Policy, and Law
- Information and Network Security
- Professional Institute
- Types of Opportunities
- Experiential Learning Courses
- Meet Alexa Spaventa
- Meet J. Stephanie Rose
- Meet Lydon Pelletier
- Meet Pedro Bustamante
- Meet Nico Campuzano
- Meet Andrea Michael
- Meet Kinori Rosnow
- Take the Next Step
- Undergraduate Admissions FAQ
- Master's Admissions
- Doctoral Admissions
- Certificate Admissions
- GRE Requirements
- Financial Aid
- Scholarships
- Campus Life
- Information Sessions
- A-Z Student Resources
- Responsibilities
- Placement Assessments
- General Education Requirements
- Major and Minor Declaration
- Faculty Mentors
- Contact the SCI Advising Center
- Building Hours
- Career Resources
- Post-Graduate Outcomes
- Course Schedule
- Enrollment Resources
- Graduation Process and Expectations
- Apply for Graduation
- School Recognition Ceremony
- Information Technology
- Graduate Student Orientation
- New Graduate Student FAQ
- Undergraduate Student Orientation
- Ombudsperson
- Academic Integrity Policy
- Experiential Learning Policies
- School Forms
- Student Appeals
- Student Organizations
- Academic Support and Tutoring
- Student Success Workshops
- Who to Contact
- Submit a News Item
- Event Assistance & Promotion
Tim Huang’s “The Time Traveling Project” Presented at Governor’s Residence
Technology has the capability to transform the way people produce and consume art, and at SCI, Assistant Professor Tim Huang is making that happen with a Pittsburgh connection.
On March 19, Huang and fellow researcher Pat Healy, a PhD student studying information science, presented their work on The Time Traveling Project in Harrisburg at Pennsylvania Governor Josh Shapiro’s residence.
“Being invited to present at the Governor's Residence was an incredible honor and a significant milestone in my career,” said Huang. “This opportunity showed that my work is starting to bring attention to the needs and stories of marginalized communities. The experience validated the importance of bridging the gap between technology and historical preservation while emphasizing community engagement. It reinforced the significance of inclusivity in technology research and the transformative impact immersive technologies can have on underserved communities.”
Healy also remarked on the opportunity to present at the Governor’s Residence.
“More people need to see these photos, they need to see what the Hill District was like in its golden era, see the stunning portrait of the Black working class in the bulk of his photos that we don't really see represented in any other media,” said Healy.
Huang, a faculty member in SCI’s Department of Information Culture and Data Stewardship (ICDS), developed an immersive artistic experience using virtual reality (VR), resulting in The Time Traveling Project. Using the photography of famed Black photographer and Pittsburgh native Teenie Harris and a VR headset, people can engage with Harris’ photos and historic Pittsburgh in an exciting new way.
The attendees at this reception, including Governor Shapiro, responded positively to Huang’s presentation.
“Several attendees, including leadership from the Carnegie Museum of Art, were enthusiastic about the potential of using VR for education and community engagement,” said Huang. “The positive reception underscored the importance of ICDS’s mission to positively impact local communities through information and technology, with a focus on meeting community needs through collaboration with residents.”
In addition to showcasing how The Time Traveling Project bridges the gap between historical preservation and modern technology, Huang noted how sharing this research aligned with his greater research goals.
“[This event] provid[ed] an opportunity to highlight the broader impact of immersive technology in historical preservation and community engagement,” said Huang. “The presentation provided an excellent platform to connect with a wider audience and to encourage more people to get involved. It opened new doors for collaboration, as several attendees expressed interest in supporting or partnering with the project.”
Though The Time Traveling Project looks to the past, Huang is excited about the future of this research and the potential for its impact.
“This experience has motivated me to continue exploring innovative ways to bring these technologies to a wider audience and further enrich the storytelling of marginalized communities,” said Huang. “It has also highlighted the visibility of the work ICDS and SCI have been focusing on, inspiring me to continue contributing to its mission to positively impact local communities using information and technology, while ensuring that projects like this address community needs together with local residents.”
Other next steps for Huang include working to expand community partnerships and refine the VR experiences to not only explore the past but envision future spaces.
“In April, I had discussions with Dr. Mindy Fullilove that helped shape my approach to community healing, further refining the concept of using VR storytelling as a tool to help communities impacted by displacement heal and envision a path toward restoration,” noted Huang. “The momentum from this event will be instrumental in reaching broader audiences and securing further funding for the project's expansion.”
Learn more about the Time Traveling Project here .
- Share full article
Advertisement
Supported by
In the Arts, Is It Breaking Big, or Selling Out?
The boundaries between art, fashion and luxury seem to be melting away. That’s great for brands, but what about artists — and the art?

By Farah Nayeri
The 11-foot sculpture looks like something out of a comic strip: a luxury handbag perched on skinny legs and matched with high-end sneakers. The work is by the Austrian-born artist Erwin Wurm, and it represents accessories from the collections of Lanvin, the French fashion house.
“Desire” (the title of the sculpture) was commissioned by Lanvin and unveiled in Beijing in early April. It will travel to six other Chinese cities, including Shanghai — where, in June, a Wurm solo exhibition opens at the Fosun Foundation: the nonprofit arm of the Fosun Group, Lanvin’s majority owners.
“I made this piece because it fit into my series,” Wurm, 69, said in a phone interview, referring to his “walking bag” sculptures, which parody women’s contemporary passion for handbags. “I reduce females to long legs and shoes and handbags. That’s a statement, but it’s a critical statement.”
The artist acknowledged that the Lanvin sculpture commission might appear to some as if “I created something for a brand,” but he said that he agreed to it, realizing that “it can be dangerous, or it can be good.”
When artists first started doing large-scale collaborations with brands a couple decades ago, Wurm noted, “everybody was shocked.” Today, he said, brands have become the modern-day versions of “the nobility or the kings or the pope: the people who gave commissions to the artists.”
“That’s our world,” he added.
Worlds Colliding
“Desire” is among the latest examples of the escalating overlap between art and the world of fashion and luxury. Artists are designing handbags and accessories for luxury brands. Luxury brands are building museums and putting on art exhibitions. Auction houses, which since the 18th century have been prestige marketplaces for fine art, are now selling bags, sneakers and streetwear.
For fashion brands, it’s a win-win: Associating with art elevates them from being seen as purely commercial ventures. The hope is that their high-end products will be likened to works of art.
The artists benefit financially and raise their profiles, becoming known to wider and more global audiences. Yet depending on the frequency and the extent of the collaborations, there are credibility hazards: the risk of being perceived as selling out for money.
Lanvin’s deputy general manager, Siddhartha Shukla, said brands nowadays were much more than the fashion and accessories collections that they brought out every season.
He noted that Lanvin, for example, was “a brand with an incredible heritage” which had moved into “urban culture, the world of rap artists and musical artists, the world of teenage TikTok creators, the world of K-pop stars.” The brand, he said, had “pervaded many of these subcultures,” and “must recognize that and must respond to it.”
Lanvin Lab — a division of Lanvin the company that started last year, after Shukla’s arrival — was designed to promote creative collaborations such as the sculpture commission from Wurm.
“Artification”
The marriage of art and fashion is hardly new. In the 1930s, the designer Elsa Schiaparelli teamed up with the artist Salvador Dalí to produce such items as a compact powder case shaped like a telephone dial , and a long dress with a giant lobster down the front . In the 1960s, Yves Saint Laurent designed cocktail dresses replicating Piet Mondrian’s signature grids.
Yet on the whole, “for most of the 20th century, art and fashion were separate,” Don Thompson wrote in his 2021 book, “The Curious Economics of Luxury Fashion.” “Art was important, and fashion was frivolous.”
“Today, collaborations between brands and artists are common,” he added, describing a process academics and researchers have labeled “artification,” whereby “luxury fashion providers want to position their products closer to art, because art represents taste and culture.”
In a phone interview, Thompson gave an example. “If you were to spend $25,000 on a handbag, your friends would consider it shocking and frivolous,” he said. “If you spent $25,000 on a work of art, you are a collector, you’re a patron of the arts.”
“Fashion would like to absorb that view of what they do as something independent of commerce,” he added.
At the same time, Thompson said, “artists see paid collaborations the way that actors see paid commercials.” And given that the luxury goods industry is much bigger than the art industry, he noted, an artist’s work “gets displayed to a hugely bigger audience.”
Art itself has been produced in many multiples for a long time. It has “gone through a century of mass production,” said Daniel Birnbaum, a curator who is the artistic director of the digital art production platform Acute Art. He previously ran the Moderna Museet in Stockholm, and was the artistic director of the 2009 Venice Art Biennale.
“The introduction of photography and technologies of reproduction transformed not only how an art piece can reach an audience,” he said, but also just what an art piece is. “If it used to be that unique object, it could suddenly be in an edition of 40,” he added.
Mass production became all-pervasive with Andy Warhol, the Pop Art pioneer, who incorporated images from advertising, billboards, celebrity magazines and other mass media into his art. In the course of his lifetime, Warhol produced more than 9,000 paintings and sculptures and nearly 12,000 drawings, according to his foundation. Though they came in multiples, Warhol’s works are among the most costly and coveted in the world: His “Shot Sage Blue Marilyn” (1964) sold for $195 million in 2022 .
Dawn of a New Age
Art and mass production have fused even more brazenly since the turn of the millennium, as more and more artists have started designing products for brands. Among the first brands to pioneer this practice was Louis Vuitton, especially under its then artistic director Marc Jacobs. In the Spring 2003 collection, the company released handbags and a range of other leather accessories with patterns designed by the Japanese Pop artist Takashi Murakami.
Murakami would go on to do three more collaborations with Vuitton. In his 2007-8 solo exhibition at the Museum of Contemporary Art in Los Angeles, he installed an actual Louis Vuitton shop with handbags on sale. The shop was “hard to categorize,” Jacobs said in 2008 in conversation with Interview magazine. “Isn’t that what the state of art is right now? It’s not so easy to define.”
Many other artists have since been enlisted by Louis Vuitton as designers for hire, including Richard Prince, Jeff Koons, and Yayoi Kusama.
Louis Vuitton’s parent company LVMH is also a longstanding sponsor of art exhibitions. In 2014, it opened the Fondation Louis Vuitton: a vast art space in western Paris designed by the architect Frank Gehry, which has programmed a series of blockbuster shows, such as the recent Mark Rothko retrospective, which drew 852,000 visitors.
The auction houses are catching the fashion bug, too, and since the turn of the millennium, they have started adding high-growth luxury categories to their sales. In 2023, Sotheby’s posted sales of $7.9 billion, almost a third of that total generated by luxury products (meaning jewelry, watches, handbags but also classic cars, real estate, sports memorabilia, streetwear and spirits).
Josh Pullan, head of the global luxury division at Sotheby’s, said luxury auctions were “an unbelievable entry point for new clients,” as half of the buyers and bidders at those auctions were new to Sotheby’s.
Sotheby’s has started mixing all of its sales categories in some of its auctions. A February sale called “The One” offered everything from Queen Marie Antoinette’s carved console table to Michael Jordan’s own Air Jordan sneakers.
Will the luxury side cannibalize the fine art side?
“No, I don’t think it’s a zero-sum game: I think it’s 100 percent complementary,” Pullan said.
What is certain is that the two worlds of art and fashion are absolutely not comparable in size. “The fashion world is much bigger, and much more powerful,” said Birnbaum, the London-based curator, noting that the world’s richest person (worth more than $200 billion, according to the Forbes annual ranking ) was Bernard Arnault, the chairman and chief executive of LVMH.
Nonetheless, Birnbaum added, the artist is seen as important, and persistently being courted by brands. “There’s something in the signature itself: it still has that magnetism.”
The trick, he said, was to retain it. If artists who are “huge brand names” do too many fashion collaborations, “there’s a risk that they lose that magnetism, that magic.”
“It’s a risk for them,” he said. “It’s not a risk for art.”
Art School Santa Fe camps | 4 Your Kids: Project Summer

- Yekaterinburg
- Novosibirsk
- Vladivostok

- Tours to Russia
- Practicalities
- Russia in Lists
Rusmania • Deep into Russia
Out of the Centre
Savvino-storozhevsky monastery and museum.

Zvenigorod's most famous sight is the Savvino-Storozhevsky Monastery, which was founded in 1398 by the monk Savva from the Troitse-Sergieva Lavra, at the invitation and with the support of Prince Yury Dmitrievich of Zvenigorod. Savva was later canonised as St Sabbas (Savva) of Storozhev. The monastery late flourished under the reign of Tsar Alexis, who chose the monastery as his family church and often went on pilgrimage there and made lots of donations to it. Most of the monastery’s buildings date from this time. The monastery is heavily fortified with thick walls and six towers, the most impressive of which is the Krasny Tower which also serves as the eastern entrance. The monastery was closed in 1918 and only reopened in 1995. In 1998 Patriarch Alexius II took part in a service to return the relics of St Sabbas to the monastery. Today the monastery has the status of a stauropegic monastery, which is second in status to a lavra. In addition to being a working monastery, it also holds the Zvenigorod Historical, Architectural and Art Museum.
Belfry and Neighbouring Churches

Located near the main entrance is the monastery's belfry which is perhaps the calling card of the monastery due to its uniqueness. It was built in the 1650s and the St Sergius of Radonezh’s Church was opened on the middle tier in the mid-17th century, although it was originally dedicated to the Trinity. The belfry's 35-tonne Great Bladgovestny Bell fell in 1941 and was only restored and returned in 2003. Attached to the belfry is a large refectory and the Transfiguration Church, both of which were built on the orders of Tsar Alexis in the 1650s.

To the left of the belfry is another, smaller, refectory which is attached to the Trinity Gate-Church, which was also constructed in the 1650s on the orders of Tsar Alexis who made it his own family church. The church is elaborately decorated with colourful trims and underneath the archway is a beautiful 19th century fresco.
Nativity of Virgin Mary Cathedral

The Nativity of Virgin Mary Cathedral is the oldest building in the monastery and among the oldest buildings in the Moscow Region. It was built between 1404 and 1405 during the lifetime of St Sabbas and using the funds of Prince Yury of Zvenigorod. The white-stone cathedral is a standard four-pillar design with a single golden dome. After the death of St Sabbas he was interred in the cathedral and a new altar dedicated to him was added.
Under the reign of Tsar Alexis the cathedral was decorated with frescoes by Stepan Ryazanets, some of which remain today. Tsar Alexis also presented the cathedral with a five-tier iconostasis, the top row of icons have been preserved.
Tsaritsa's Chambers

The Nativity of Virgin Mary Cathedral is located between the Tsaritsa's Chambers of the left and the Palace of Tsar Alexis on the right. The Tsaritsa's Chambers were built in the mid-17th century for the wife of Tsar Alexey - Tsaritsa Maria Ilinichna Miloskavskaya. The design of the building is influenced by the ancient Russian architectural style. Is prettier than the Tsar's chambers opposite, being red in colour with elaborately decorated window frames and entrance.

At present the Tsaritsa's Chambers houses the Zvenigorod Historical, Architectural and Art Museum. Among its displays is an accurate recreation of the interior of a noble lady's chambers including furniture, decorations and a decorated tiled oven, and an exhibition on the history of Zvenigorod and the monastery.
Palace of Tsar Alexis

The Palace of Tsar Alexis was built in the 1650s and is now one of the best surviving examples of non-religious architecture of that era. It was built especially for Tsar Alexis who often visited the monastery on religious pilgrimages. Its most striking feature is its pretty row of nine chimney spouts which resemble towers.
Plan your next trip to Russia
Ready-to-book tours.
Your holiday in Russia starts here. Choose and book your tour to Russia.
REQUEST A CUSTOMISED TRIP
Looking for something unique? Create the trip of your dreams with the help of our experts.
- SMP WEDDINGS
- SMP’S VENUE BLOG
- LITTLE BLACK BOOK BLOG
- LBB INDUSTRY BLOG
- DESTINATION
- NEW ENGLAND
- THE NORTHWEST
- THE MIDWEST
- THE SOUTHWEST
- THE SOUTHEAST
- THE MID-ATLANTIC
- THE TRI-STATE AREA
Russia Weddings
- Real Weddings
- Bridal Week
- Engagements & Proposals
- Seasonal Wedding Trends
- Bridal Beauty
- Wedding Fashion Trends
- Vendor Guide
- DIY Projects
- Registry Guide
- Engagements & Proposals
- by Melissa Hammam
- comments ( )
Hands up if you’re ready to be dazzled! From a ceremony structure designed to float on water to a jaw-dropping reception room with flowers blooming from every service, we’re swooning over every bit of this wedding. If you can believe it, that’s just the beginning. Julia Kaptelova artfully shot every detail, like the ballet performance guests were treated to and snow falling from the ceiling for the first dance! Prepare to be amazed and take a visit to the full gallery .

From About You Decor … Our design is a symbol of dawn and a distant endless horizon. Ahead is a long, happy life without any borders. An international couple, Pavel and Cherry, met in London and have been walking together for many years.

From the Bride, Cherry… My husband and I we decided to have our summer wedding in Moscow because the city is where his roots are. As we knew we were going to have the other wedding ceremony in China, we wanted our Moscow one to be very personal and intimate. We’ve known each other since we were fourteen, together with many of our friends whom we’ve also known for a decade.

I didn’t want to walk down the aisle twice so the plausibility of my request quickly came into discussion. The open pontoon stage was constructed in order to facilitate the bridal entrance on water, although there were concerns about safety as the last thing we wanted was probably a drowned bride before she could get on stage, picture that! I have to say on that day it wasn’t easy to get on the pontoon stage from the boat, in my long gown and high heels. Luckily my bridesmaids still noticed even though they stood the furthest from me on the stage, and helped me out without prior rehearsal. My girls could just tell whenever I needed a hand or maybe they were just so used to my clumsiness. Who knows 😂
We all love our photographer Julia! She’s so talented and her style is so unique. Our beloved host Alex is exceptional who made everyone laugh and cry. It was truly a blessing to have so many kind and beautiful souls on our big day. Thank you all!

[iframe https://player.vimeo.com/video/384992271 600 338]

Photography: Julia Kaptelova Photography | Wedding Planner: Caramel | Cake: Any Cake | Invitations: Inviteria | Rings: Harry Winston | Band: Menhouzen | Grooms attire: Ermenegildo Zegna | Wedding Venue: Elizaveta Panichkina | Bridesmaids’ dresses: Marchesa | Bridesmaids’ dresses: Alice McCall | Bride’s gown : Jaton Couture | Bride’s shoes: Manolo Blahnik | Decor : About you decor | Earrings: Damiani | Muah: Khvanaco Studio | Video: Artem Korchagin
More Princess-Worthy Ballgowns

I’m still not convinced this Moscow wedding, captured to perfection by Sonya Khegay , isn’t actually an inspiration session—it’s just that breathtaking. From the beautiful Bride’s gorgeous lace wedding dress and flawless hair and makeup to the pretty pastel color palette and stunning ceremony and reception spaces, this wedding is almost too good to be true. Do yourself a favor and see it all in The Vault now!

From Sonya Khegay … It was the last day of April and still very cold in the morning. The weather forecast wasn’t pleasing and no one expected that the sun would come out, but miracles happen and light rain gave way to the warm rays.
I love how all the details went together, you could feel the harmony in everything throughout the entire wedding day from the morning until the fireworks.
A gentle look of the bride, elegant but so airy and unique decor, the fresh and light atmosphere of early spring and, of course, true happiness in the eyes. My heart becomes so warm from these memories, it is always a pleasure to see the birth of a new family of two loving hearts.
Photography: Sonya Khegay | Event Design: Latte Decor | Event Planning: Ajur Wedding | Floral Design: Blush Petals | Wedding Dress: La Sposa | Stationery: Special Invite | Bride's Shoes: Gianvito Rossi | Hair + Makeup: Natalie Yastrebova | Venue: Rodniki Hotel
- by Elizabeth Greene
You really can’t go wrong with simple: a beautiful Bride , perfectly pretty petals , loved ones all around. But add in an amazing firework show to cap off the night and simple just became downright extraordinary. Captured by Lena Elisseva , with assistance by Katya Butenko , this rustic Russian celebration is simply fantastic. See it all in the Vault right here !

From Lena Eliseeva Photo … This cozy and warm summer wedding of gorgeous Natalia and Anton was in the middle of June. The young couple decided to organize their wedding themselves, and the day was very personal and touching. I am absolutely in love with rustic outdoor weddings, and this one is my favourite because of the free and easy atmosphere.
All the decor excluding the bride’s bouquet was made by a team of ten friends of the bride and groom. And it was charming – a light and beautiful arch, eco-style polygraphy and succulents, candy-bar with caramel apples and berries – sweet joys of summer.
At the end of ceremony the guests tossed up white handkerchiefs embroidered by Natalia’s own hands.
The most touching moment was the happy eyes of the groom’s grandmother, the most estimable person on the wedding. And the fireworks were a bright end to that beautiful day.

Photography: LENA ELISEEVA PHOTO | Floral Design: Katerina Kazakova | Hair And Makeup: Svetlana Fischeva | Photography - Assistance: Katya Butenko
These photos from Lena Kozhina are so stunningly beautiful – as in you can’t help but stop and stare – it’s hard to believe it’s real life. But these pics are proof of this gorgeous Bride and her handsome Groom’s celebration at Moscow’s Fox Lodge , surrounded by vibrant colors and breathtaking blooms . Oh, and the idea of prepping for your Big Day outside in the sun ? Brilliant. See more bright ideas right here !

From Lena Kozhina … When we met with the couple for the first time, we immediately paid attention to Dima’s behavior towards Julia. There was a feeling of tenderness and awe, and we immediately wanted to recreate this atmosphere of love, care and warmth on their Big Day.
Later, when we had chosen a green meadow and an uncovered pavilion overlooking a lake as the project site, it only highlighted a light summer mood with colorful florals and a great number of natural woods. The name of the site is Fox Lodge and peach-orange color, as one of the Bride’s favorites, set the tone for the whole design – from the invitations, in which we used images of fox cubs to elements of serving guest tables and other decorative elements with the corresponding bright accents.
Photography: Lena Kozhina | Event Planning: Ajur Wedding | Wedding Dress: Rosa Clara | Shoes: Marc Jacobs | Catering: Fox Lodge | Makeup Artist: Elena Otrembskaya | Wedding Venue: Fox Lodge | Cake and Desserts: Yumbaker | Decor: Latte Decor
From Our Partners

Bangor Daily News
Maine news, sports, politics, election results, and obituaries
Downtown Bangor’s umbrella art display returns

Share this:
- Click to share on Twitter (Opens in new window)
- Click to share on Facebook (Opens in new window)
- Click to share on Reddit (Opens in new window)
- Click to print (Opens in new window)
- Click to email a link to a friend (Opens in new window)

Cross Street in downtown Bangor is closed to vehicle traffic and parking Tuesday and Wednesday while crews install an art display featuring dozens of multicolored umbrellas suspended over the street.

The seasonal art fixture, known as the Umbrella Sky Project, was introduced last year by the Downtown Bangor Partnership and sponsor Northern Light Eastern Maine Medical Center.
Since debuting in Portugal in 2012, similar Umbrella Sky displays have popped up all over the world. The Umbrella Sky Project was inspired by Mary Poppins and is intended to bring color to otherwise mundane city streets, directing pedestrians and traffic toward the area.
Last year, crews hung Bangor’s umbrellas in July after the Bangor City Council approved the project in June, but the display was removed for the winter in October.
More articles from the BDN
Kathleen o'brien.
Kathleen O'Brien is a reporter covering the Bangor area. Born and raised in Portland, she joined the Bangor Daily News in 2022 after working as a Bath-area reporter at The Times Record. She graduated from... More by Kathleen O'Brien
IMAGES
VIDEO
COMMENTS
This art lesson is one of my favorite high school art projects because it is so simple and builds the foundation for everything we do for the rest of the year. People are often most impressed by drawings with good shading because adding value to an object makes them appear three-dimensional and can produce the effect of realism. Learning to see ...
After students complete the value scale and sphere shading assignment, we will move on to drawing eyes. Once these exercises have been complete we will move on to the background and self-portrait symbols. I plan to break each task into bi-weekly 20-30 minute chunks that students can manage doing at home while/if we are in distance learning. In ...
To control and tilt the pencil, use your middle finger. This grip will enable you to use the side of the pencil core, to create wider shaded lines. Move your shoulder instead of your wrist, when moving the pencil back and forth, to control the strokes better. To create fine details, use a regular writing grip.
The combination of these shading techniques helped me achieve various textures commonly seen in wrinkled skin. Tip: When drawing rough or wrinkly skin, try to avoid blending your graphite. Homework Assignment + Challenge. Shade 4 different subjects using each of the 4 shading techniques above.
Shading techniques enable artists to create a range of values and a contrast between highlights and shadows. Different shading techniques will produce different kinds of textures, patterns and results. A drawing is a combination of line and tone. Shading is what takes a drawing from looking two dimensional, to appearing as if it has volume and ...
The more the surface of the apple turns away from direct light, the darker it becomes. Step 11. When you're done, use an eraser to indicate the highlight. Step 12: Bonus. If you want your drawing to pop out, exaggerate your values to create depth (make dark areas darker, light areas even lighter).
2. Make at least 5 contour studies of several objects in different sizes on Newsprint 5" to 10 " (12.7 to 25.4 cm) long. 3. Cut around the sketches closely with a pair of scissors. 4. On a larger piece of newsprint, arrange the sketches to create an area of emphasis and directional movement.
Shade the form's darkest areas. 4. reflected light. If you are placing your element next to other elements that share the same light source - they will bounce some of that light back to your form. To show that reflected light you need to leave some areas slightly lighter than your main shaded areas. 5. indirect light.
stippling (pointillism) pointillism (stippling) - creating value in a drawing by placing dots. This is time consuming technique. It looks good when all dots are the same size. To change value - alter space between the dots. Works great with a felt pen, fine point markers, etc.
Day 5 - Figure Shading Studies. Putting it all together. Plan your shadow pattern. Shading with graphite pencil. Shading with charcoal pencils on colored paper. Shading with dye inks (marker) Shading with color pencils. Day 5 Assignment (create your own figure shading) If you'd like to take your drawing skills to the next level, enroll in this ...
Print out worksheet 1. hatching - a shading technique that uses lines drawn closely together. Vertical strokes. Vary pressure and spacing of the lines to create values. Angled strokes. Horizontal strokes. Short curved strokes. crosshatching - a shading technique that uses sets of lines (strokes) that overlap.
Teaching value and shading basics is an important middle or high school art technique to include in any drawing course. This project takes shading to the next level by focusing on line quality and shading to create a unique work of art.Designed for middle, high school, and intro level students, this pack includes 2 warm-up activities, a ...
A project my students are using to learn value and shading in art as one of the Elements of ArtOther Places you can find me:Zazzle shop: https://www.zazzle.c...
Draw a curvy line across your paper. 2. Make about 8 dots, unevenly spaced, on your line. 3. Next, connect the dots with curved lines. (The lines from the dots at each end should go off the paper, rather than curve back down to the line.) 4. Then, from each of these curved lines, build up a "column" of more curved lines (or "rings ...
step 2. Shade inside each shape. Start at the edge (incorporate the outline into the shading). Value should be placed from dark (at the edge) to mid-value - to light - and to fade. The transition from dark to light (fading or "drop-shadow effect) - should be between 1/2" and 1". If you shade too dark - use an eraser to lighten the area>.
Drawing&Painting: Sketchbook Assignment 6, Due Friday 10/28. Page 1: Make 15-20 gesture drawings on one page, but only take one minute per drawing. Sketch 2: Set up a still life of 3 or more objects and draw them using shading and value. Try to draw them to scale and with the proportions correct.
The following seven activities are easily adaptable for various grade levels. They also require minimal material prep and use supplies you likely have in your art room. 1. Personal Soda Can Label. We live in a consumer world where new beverages, food, candy, and snacks are constantly introduced to the market.
5. Each project has a rubric with specific requirements and guidelines. Follow them. 6. Unless an assignment specifically requires copying, it will be interpreted in the same manner as plagiarism. 7. You are also graded for your in-class studio work. CLASSROOM RULES. 1. Food, drinks, candy, gum are not allowed in the Art rooms.
Line Design w/Shading - 4th Grade ... This is an awesome, eye-popping project! I do a similar optical illusion art with circles, straight lines, and wavy lines (or "ribbons" of line), but I think I may swap that out for this one this year! Thanks for the wonderful blog, Mr. E!
1:18. PORTSMOUTH — A project bringing monsters to life earned art students and teachers from the Portsmouth school district a guest spot on " The Kelly Clarkson Show" in New York City. Sarah ...
The Free Black Women's Library is a third-space social art project founded and maintained by artist OlaRonke Akinmowo that features a collection of over 5,000 books written by Black women and Black nonbinary writers in the Bedford-Stuyvesant neighborhood in Brooklyn. Like any library, it is a space to read, write, and study. Visitors are also ...
Technology has the capability to transform the way people produce and consume art, and at SCI, Assistant Professor Tim Huang is making that happen with a Pittsburgh connection. On March 19, Huang and fellow researcher Pat Healy, a PhD student studying information science, presented their work on The Time Traveling Project in Harrisburg at Pennsylvania Governor Josh Shapiro's residence ...
In 1938, it was granted town status. [citation needed]Administrative and municipal status. Within the framework of administrative divisions, it is incorporated as Elektrostal City Under Oblast Jurisdiction—an administrative unit with the status equal to that of the districts. As a municipal division, Elektrostal City Under Oblast Jurisdiction is incorporated as Elektrostal Urban Okrug.
May 2, 2024. The 11-foot sculpture looks like something out of a comic strip: a luxury handbag perched on skinny legs and matched with high-end sneakers. The work is by the Austrian-born artist ...
Moscow Oblast (Russian: Московская область, romanized: Moskovskaya oblast, IPA: [mɐˈskofskəjə ˈobləsʲtʲ], informally known as Подмосковье, Podmoskovye, IPA: [pədmɐˈskovʲjə]) is a federal subject of Russia (an oblast).With a population of 8,524,665 (2021 Census) living in an area of 44,300 square kilometers (17,100 sq mi), it is one of the most densely ...
SANTA FE, N.M. — Summer is right around the corner and, parents, we know your kids can get bored at home during that much-needed break. As a part of our "4 Your Kids: Project Summer" series ...
Zvenigorod's most famous sight is the Savvino-Storozhevsky Monastery, which was founded in 1398 by the monk Savva from the Troitse-Sergieva Lavra, at the invitation and with the support of Prince Yury Dmitrievich of Zvenigorod. Savva was later canonised as St Sabbas (Savva) of Storozhev. The monastery late flourished under the reign of Tsar ...
This real wedding is pure inspiration. With each stroke of the brush, the details add to the already ideal picture: one of the most picturesque Moscow areas, the warm day in June, the tenderest and the most beautiful bridal portraits, the ceremony in the greenhouse, wallowing in flowers and sun rays….
The seasonal art fixture, known as the Umbrella Sky Project, was introduced last year by the Downtown Bangor Partnership and sponsor Northern Light Eastern Maine Medical Center.. Since debuting in ...
By Eliot Brown and Rory Jones. May 7, 2024 12:01 am ET. The engineers saw a mountain-sized problem. For weeks, thousands of trucks and diggers had worked 24 hours every day, scooping millions of ...