
How to See Your Notes When Presenting in PowerPoint

As a presenter, delivering a seamless and confident presentation is key to making a lasting impression. However, it can be challenging to remember every detail of your presentation, especially if you have a lot of content to cover. Fortunately, with PowerPoint’s Presenter View, you can easily access your notes and confidently deliver your presentation. In this article, we will cover all aspects of using PowerPoint’s Presenter View to enhance your presentation.
Table of Contents
Why You Need to See Your Notes When Presenting in PowerPoint
Presenting without having your notes at hand can be daunting and can affect the quality of your presentation. Whether you are presenting in front of a small group or a large audience, you will need to have access to your notes. This will help you deliver your presentation confidently, as you will have a clear idea of what to say or do next. In addition, having your notes visible can help you stay focused on the topics you want to cover and avoid straying off-topic.
Another reason why it is important to see your notes when presenting in PowerPoint is that it can help you manage your time effectively. By having your notes visible, you can keep track of the time and ensure that you are covering all the important points within the allocated time frame. This can help you avoid rushing through the presentation or running out of time before you have covered all the key points.
Furthermore, having your notes visible can also help you engage with your audience better. When you are confident and well-prepared, you are more likely to make eye contact with your audience and use body language effectively. This can help you build a connection with your audience and keep them engaged throughout the presentation.
How to Access Presenter View in PowerPoint
Before you can access Presenter View, you need to have a PowerPoint presentation open in Slide Show mode. Once your presentation is open, simply click on the ‘Slide Show’ tab and check the box beside ‘Use Presenter View.’ Your screen will then automatically switch to Presenter View, allowing you to see your notes and other helpful controls.
Presenter View is a great tool for giving presentations, as it allows you to see your notes and upcoming slides while your audience only sees the current slide. You can also use Presenter View to zoom in on specific parts of your slide, draw on your slides, and even use a virtual laser pointer to highlight important information. To exit Presenter View, simply press the ‘Esc’ key on your keyboard.
Understanding the Presenter View in PowerPoint
Presenter View is a powerful tool that enables you to manage your presentation effectively. It comprises several elements, including:
- The slide display area, which shows the slide that your audience sees.
- The notes section, which displays any text that you have added as notes or comments.
- The timer, which can help you stay within your allotted time.
- The navigation controls, which let you move forward and backward in your presentation easily.
- The zoom slider, which enables you to zoom in and out of your slides for added detail.
- The laser pointer and highlighter tools, which allow you to emphasize important points on your slides.
Presenter View also allows you to preview upcoming slides, giving you a chance to prepare for the next section of your presentation. This feature can be especially helpful if you need to refer to specific information on a later slide.
In addition, Presenter View provides a way to keep your audience engaged by allowing you to add annotations to your slides. You can draw attention to specific areas of your slide, highlight key points, or even add additional information that may not be included in the slide itself.
Setting Up Presenter View: Step-by-Step Guide
If you want to customize your Presenter View experience, follow these steps:
- On the ‘Slide Show’ tab, click ‘Set Up Slide Show.’
- Under ‘Multiple Monitors,’ select the ‘Use Presenter View’ checkbox.
- If you’re using a single monitor, select the ‘Display slide show on’ option and choose your primary monitor.
- If you’re using dual monitors, select the ‘Display slide show on’ option and choose the monitor that you want to display Presenter View on.
- Customize the Presenter View by selecting the options that you want to use, such as speaker notes, the timer, and the navigation controls.
- Click ‘OK.’ Your Presenter View should now be set up.
It’s important to note that not all versions of PowerPoint have the Presenter View feature. If you don’t see the ‘Use Presenter View’ checkbox under ‘Multiple Monitors,’ it’s likely that your version of PowerPoint doesn’t support this feature. In this case, you may need to upgrade to a newer version or use a different presentation software that offers Presenter View.
How to Customize Presenter View Settings in PowerPoint
If you have specific preferences for Presenter View, you can customize it by following these steps:
- Click the ‘Settings’ button in the Presenter View toolbar.
- Select the options that you want to use, such as the color scheme, font size, and slide size.
- Click ‘Save Changes’ to apply your changes.
Customizing your Presenter View settings can greatly enhance your presentation experience. For example, you can choose to display your notes on one screen while your audience sees only the slides on the other screen. Additionally, you can select the option to display a timer or a clock to help you keep track of time during your presentation. Experiment with different settings to find what works best for you and your audience.
Using Presenter View on Dual Monitor Setup
If you have a dual-monitor setup, you can use Presenter View to present your slides on one screen while managing your notes and tools on the other screen. To do this, simply select the ‘Use Presenter View’ checkbox under ‘Multiple Monitors’ in the ‘Set Up Slide Show’ dialog box. Once you start presenting, the Presenter View screen will appear on the secondary monitor, while the slides will appear on the primary screen.
Presenter View is a great tool for presenters who want to keep their notes and tools hidden from the audience. With Presenter View, you can see your notes, upcoming slides, and a timer, while your audience only sees the current slide. This feature is especially useful for longer presentations, where you may need to refer to your notes or keep track of time.
Another benefit of using Presenter View is that it allows you to easily navigate through your presentation. You can use the arrow keys on your keyboard to move forward or backward through your slides, or you can use the thumbnails on the Presenter View screen to jump to a specific slide. This makes it easy to adjust your presentation on the fly, without having to interrupt the flow of your presentation.
Troubleshooting Common Issues with Presenter View in PowerPoint
If you experience common issues with Presenter View, such as notes not displaying correctly, audio not working, or distorted visuals, try these troubleshooting tips:
- Make sure that your computer meets the minimum system requirements for using Presenter View.
- Check that the correct audio output is selected in the control panel.
- Review your slides and notes to ensure that there are no formatting errors.
- Try closing other open applications to free up system resources.
- Ensure that your computer is updated with all available updates.
- Try reinstalling or repairing PowerPoint to eliminate any software conflicts.
However, if these troubleshooting tips do not resolve your issues, there may be other factors at play. One possible cause of issues with Presenter View is outdated or incompatible drivers for your computer’s graphics card. Check with your computer manufacturer or graphics card manufacturer to see if there are any updates available.
Another potential issue could be related to your computer’s display settings. Make sure that your display settings are optimized for the resolution and aspect ratio of your presentation. You may also want to try adjusting the scaling settings to see if that improves the display of your slides and notes.
Tips and Tricks for Effective Note-taking During Presentation
To get the most out of Presenter View, try these effective note-taking tips:
- Organize your notes by slide or topic to stay on track during the presentation.
- Use bullet points and keywords to keep your notes concise and easy to read.
- Include cues or action words to remind you of any demonstrations, animations, or other interactive elements in your presentation.
- Use the highlighter tool to draw attention to the most critical points.
Enhancing Your Presentation with Presenter View
Presenter View can enhance your presentation in several ways, such as by allowing you to add visual aids and multimedia elements, manage your time effectively, and engage your audience. By using Presenter View, you can keep your presentation on track, highlight key information, and maintain your audience’s attention throughout.
The Importance of Rehearsing Your Presentation with Presenter View
Practicing your presentation with Presenter View can help you become familiar with the interface, identify any errors or issues, and ensure that your presentation will run seamlessly. Use Presenter View during your presentation rehearsal to simulate the actual presentation environment and get a feel for how it works.
Taking Advantage of the Laser Pointer and Highlighter Tools in Presenter View
The laser pointer and highlighter tools are handy for emphasizing key points on your slides and improving audience engagement. To use them, simply press and hold the ‘Ctrl’ key and click the mouse to activate the laser pointer or highlighter. Release the key to deactivate them.
How to Switch Between Slides and Notes during a Presentation
If you need to switch between slides and notes during your presentation, simply click the ‘Notes’ button in the Presenter View toolbar. This will display your notes and allow you to scroll through them as needed.
Utilizing the Timer and Countdown Features of Presenter View
The timer and countdown features are useful for keeping your presentation on track and ensuring that you do not exceed your allotted time. To use them, simply enable the ‘Timer’ feature in the ‘Settings’ section of Presenter View. You can then set the countdown time and choose whether to display it during the presentation or keep it hidden.
Sharing Your Screen Using Presenter View in Microsoft Teams or Zoom Meetings
If you are using Microsoft Teams or Zoom Meetings to deliver your presentation remotely, you can still use Presenter View by sharing your screen. To do this, simply select the ‘Share Screen’ option and choose the ‘Presenter View’ screen. This will allow you to present your slides while keeping your notes and controls visible to you for an uninterrupted presentation experience.
By following the steps and tips outlined in this article, you can use PowerPoint’s Presenter View to deliver a polished and professional presentation that wows your audience. Always remember to rehearse your presentation before the actual day so that you’re comfortable with the tools and settings for Presenter View, and ready to tackle any issue that might arise.
By humans, for humans - Best rated articles:
Excel report templates: build better reports faster, top 9 power bi dashboard examples, excel waterfall charts: how to create one that doesn't suck, beyond ai - discover our handpicked bi resources.
Explore Zebra BI's expert-selected resources combining technology and insight for practical, in-depth BI strategies.

We’ve been experimenting with AI-generated content, and sometimes it gets carried away. Give us a feedback and help us learn and improve! 🤍
Note: This is an experimental AI-generated article. Your help is welcome. Share your feedback with us and help us improve.

How-To Geek
How to use speaker notes in powerpoint.
If you're worried about forgetting important points during your presentation, jot down some speaker notes. Here's how to prepare and use them.
Quick Links
Add speaker notes in powerpoint, use speaker notes during a powerpoint presentation.
Adding speaker notes to a PowerPoint presentation provides reference material for the speaker when they're presenting a slideshow, allowing them to stay on track without forgetting key message points. Here’s how to add and use speaker notes.
To add speaker notes in PowerPoint, you’ll first need to be in the Normal view. If you’re not already there, you can switch to Normal view by going to the “View” tab and then selecting “Normal” in the “Presentation Views” group.
Next, in the pane on left, select the slide where you'd like to add speaker notes.
Next, click the “Notes” button at the bottom of the window.
A small box reading “Tap to Add Notes” will appear beneath the slide. For Mac users, this will say “Click to Add Notes.”
Now, simply type the speaker notes for that slide. Repeat this process for each slide you'd like to add notes to.
There are two ways to use speaker notes during a presentation: by presenting on a secondary monitor or by printing out the speaker notes .
Using a Secondary Monitor
It’s safe to assume that most presentations will be presented on a secondary monitor. If this is the case for you, there’s not a whole lot you really need to do.
Related: How to Add an Extra Monitor to Your Laptop
The first thing you need to do is change the view to Slide Show. You can do this by selecting the Slide Show icon at the bottom-right corner of the window.
In this view, the audience will see only the slides as you’re going through the presentation. However, on your primary monitor, you’ll see the current slide, a preview of the upcoming slide, and your speaker notes for the current slide.
This is a convenient way to have a virtual copy of the speaker notes while you’re giving a presentation, but it never hurts to have a hard copy.
Printing the Speaker Notes
To print the speaker notes of your presentation, first select the “File” tab in the Ribbon.
Related: How to Print Multiple PowerPoint Slides to Each Piece of Paper
In the pane on left, select the “Print" button.
In the “Settings” group, select the option that says “Full Page Slides.”
A drop-down menu will appear. Here, select “Notes Pages” in the “Print Layout” group.
Finally, click “Print.”
You’ll now have a physical copy of your speaker notes.

May 9, 2022
Edit your notes in Presenter view in PowerPoint
Victoria Tran
- Add our blog to your RSS feed reader" href="/rss/blog.xml" data-bi-name="RSS Subscription" data-bi-id="rss_feed" data-bi-bhvr="120" data-bi-socchn="RSSSubscription" title="Microsoft 365 Insider Blog RSS" target="blank" class="d-inline-block">
Hey, Officer Insiders! My name is Victoria Tran, and I’m a Program Manager on the PowerPoint team. I’m thrilled to share that you can now edit notes in Presenter view in PowerPoint for Windows. No more switching to Editor view to type or change your notes, even during a presentation!
Edit notes in Presenter view
Accessing and editing your slide content whenever the need arises is a key part of the PowerPoint workflow. Whether you’re making an important edit to your speaker notes during a presentation rehearsal or jotting down feedback during your presentation, the ability to edit notes in Presenter view increases your productivity and eliminates the need to toggle between views.
We are excited to add this highly requested feature and expand the use of PowerPoint notes. In the future, we’ll continue to add support for editing notes in other views, such as Teleprompter view.
How it works
Ready to edit notes in Presenter view?

NOTE: You can also press the F6 key to select the Notes pane in Presenter view. When a white outline appears around the pane, press Enter and start typing to make any updates you want.
Known issues
Presenter view currently only allows basic formatting of notes, such as bold, italics, and underlining (via keyboard shortcuts). Formatting such as text color, highlighting, and other options aren’t yet available.
Tips and tricks
- If you are using keyboard commands to navigate through your slides during a presentation, make sure the text insertion point is not showing in the Notes pane. If it is, the arrow keys will move the insertion point around in the pane instead of navigating the slides.
- If you have two monitors, a full-screen slide will show on one monitor and Presenter view on the other monitor, featuring a view of the next slide, your speaker notes, a timer, and more. If you have just one monitor, you can press Alt + F5 to try out Presenter view.
Availability
We will be rolling the edit notes in Presenter view feature out to Office Insiders running Beta Channel Version 2204 (Build 15225.20000) or later.
Don’t have it yet? It’s probably us, not you.
Features are released over some time to ensure things are working smoothly. We highlight features that you may not have because they’re slowly releasing to larger numbers of Insiders. Sometimes we remove elements to further improve them based on your feedback. Though this is rare, we also reserve the option to pull a feature entirely out of the product, even if you, as an Insider, have had the opportunity to try it.
We want to hear from you! Please click Help > Feedback to submit your feedback about this feature.
Learn what other information you should include in your feedback to ensure it’s actionable and reaches the right people. We’re excited to hear from you!
Sign up for the Office Insider newsletter and get the latest information about Insider features in your inbox once a month!
Sorry, JavaScript must be enabled to use this app.
- GTA 5 Cheats
- Print on a Chromebook
- Nothing Phone 2 Review
- Best YouTube TV Alternatives
- Asus ROG Ally vs. Steam Deck
- Gameshare on Nintendo Switch
How to add notes to your Microsoft PowerPoint slides
When you present a slideshow, it’s likely that you have more to say than what displays on the slides. You may want to expand on the text you’ve included, or if the slide only contains visuals, explain them further.
Add speaker notes to a slide in PowerPoint
Hide notes while editing a slideshow, view speaker notes during a slideshow.
Luckily, Microsoft PowerPoint provides a built-in feature for speaker notes. This allows you to add notes to each slide and then see them in Presenter View when you start the show.
What You Need
Microsoft PowerPoint
Open your PowerPoint presentation and select the first slide where you want to add notes.
Step 1: Go to the View tab and choose either Normal or Outline View . This allows you to see your slide along with the note you plan to add.
If you’re wondering how to add a note in PowerPoint without changing the view, the short answer is: You can’t. But if you prefer not to use Normal or Outline View, you can check out the Notes Page view in the same section of the ribbon.
While still technically a “view,” this displays your slide and a text box for your note as a printed page, as shown below.
Step 2: Display the Notes panel below the slide if it’s not visible using one of the following:
- Click the Notes button in the Status Bar at the bottom.
- Move your cursor to the bottom of the window. When you see the two-sided arrow, drag up until the panel displays.
- Best Microsoft Office deals: Get Word, PowerPoint, and Excel for free
- How to convert Google Slides to PDF
- How to buy Microsoft Office: all methods, explained
Step 3: When the panel is empty, you’ll see “Click to Add Notes” within it. Place your cursor in the box and type your note.
Step 4: You can apply simple formatting to your note using the tools on the Home tab or in the floating toolbar. This is handy if you want to add bullet points or emphasize the font with bold, italics, or an underline.
Step 5: If you have a lengthy note within the panel, you’ll see a scrollbar appear on the right so that you can move down and see the entire note. You can also drag up on the panel to enlarge it.
If you want your slide in full view as you're assembling or editing your slideshow, you can hide the presenter notes. This does not delete them; it merely moves the notes panel out of view.
Do one of the following to hide your notes:
- Drag the notes panel downward until it no longer displays.
When it’s time to present your slideshow, you can use Presenter View to see your speaker notes. This allows you to view the notes for each slide on your monitor while presenting the slideshow on another. Your audience will not see your notes.
Step 1: Go to the Slide Show tab. On Windows, check the box for Use Presenter View in the Monitors section of the ribbon. On Mac, click the Presenter View button in the Start Slide Show section.
If you’ve already started the slideshow, you can still turn on Presenter View. Click the Three Dots in the Presenter Toolbar and choose Show Presenter View (Windows) or Use Presenter View (Mac).
Step 2: You’ll then see your notes display on the right side of the screen, with your slide on the left. As you advance each slide, the notes will display accordingly.
Step 3: The text for your note wraps automatically to the next line, and you have a scrollbar to move through those lengthy notes.
To adjust the font size for the notes, use the buttons below the notes panel.
Whether you want to add notes to PowerPoint to talk through your slideshow or simply as references while you assemble your slides, be sure to take advantage of this built-in feature.
For additional ways to work in Microsoft PowerPoint, check out how A.I. can help you create your slideshows .
Editors' Recommendations
- How to keep your Microsoft Teams status active
- How to add audio or video to Google Slides
- How to change your background in Microsoft Teams
- How to embed a YouTube video in PowerPoint
- How to convert a PowerPoint to Google Slides
- How-To Guides

Few communication applications are as versatile as Microsoft Teams. Along with allowing you to send quick messages to teammates or launch a video chat, the software is fully integrated with Office 365 so you can optimize its performance. One of its most useful features, however, is the ability to create a new team. This lets you group people together so they can chat about certain projects or goals without spamming everyone in your organization.
Knowing how to make a new team and how to properly organize teams makes it easy for a company to enhance productivity and streamline communication. When used effectively, Microsoft Teams is useful for both in-office and remote workers, ensuring everyone stays on the same page regardless of location.
PowerPoint makes it easy to give a great presentation thanks to intuitive software that lets anyone craft an eye-catching deck. What's even better, however, is the option to use Presenter View. This lets you leave notes for yourself that can be viewed on your computer screen while everyone else is only seeing your presentation.
Do you have any clue how much power your PC consumes when you’re playing video games? Or how about when it’s just sitting idly? Whether you’re trying to figure out how to cut down on energy costs, or simply want to know how much toil your PC endures when running Abode Creative Suite, you’ll want to learn how to measure your PC’s power draw.
Fortunately, there are several different tools you can use to monitor this important statistic. Some are built right into your operating system, while others will require a separate download. You can also purchase certain external devices to keep tabs on your desktop’s energy output.
Understanding Presenter View in PowerPoint: A Deep Dive Guide

Origin and Evolution of Presenter View
Why presenter view is a game-changer for professionals, activating and customizing presenter view in powerpoint, in-depth features of the presenter view, common mistakes and how to avoid them, advanced tips for a power presentation, final tips for enhancing your presentation game, introduction to presenter view.
Have you ever found yourself awkwardly toggling between slides and speaker notes during a presentation? Or wished you could preview the next slide without your audience seeing? Enter Presenter View in PowerPoint, a feature designed to make presenting smoother and more professional.
In essence, Presenter View is a special mode in PowerPoint that allows the presenter to see their speaker notes on one screen, while the audience views the note-free presentation on another screen. This dual-screen setup means you can have your notes, upcoming slides, and timer conveniently on one screen while your audience remains blissfully unaware.
“Presenter View is the unseen ally behind many successful PowerPoint presentations.”
Microsoft’s PowerPoint, with its roots tracing back to the late 1980s, has undergone several metamorphoses. Over the years, as technology improved and presentation dynamics changed, Microsoft introduced new features to make the software more user-friendly and versatile. One such innovation is the Presenter View.
Back in the early days of PowerPoint, presenters had to rely on printouts or separate documents for their speaker notes. The advent of Presenter View in the early 2000s was a game-changer. It allowed presenters to merge their slides and speaker notes into one cohesive presentation experience.
The beauty of Presenter View lies not just in its conception but in its evolution. Over different versions of PowerPoint:
- 2003 : Introduction of a basic Presenter View with slides and notes.
- 2007 : Enhanced screen setup with better dual-monitor support.
- 2010 : Introduction of slide zoom and laser pointer features.
- 2013 & Beyond : Integration with touch features, improved UI, and annotations.
Each version brought refinements, making it more intuitive and packed with features, tailoring to the evolving needs of presenters globally.
Fun Fact : Presenter View wasn’t initially as popular as it is today. It took a few iterations and user feedback loops for Microsoft to perfect the balance between utility and user experience.
The Core Components of Presenter View
Presenter View in PowerPoint is like the cockpit for pilots: it’s where all the essential controls and information are at the presenter’s fingertips. Whether you’re a newbie to PowerPoint or a seasoned professional, understanding these components can transform your presentation experience.
- This provides a glance at your current, previous, and upcoming slides. It ensures you’re always prepared for what’s coming next and can seamlessly transition between points.
- The soul of your presentation, speaker notes, are discreetly placed at the bottom or side, only visible to you. These notes can be elaborate explanations, quick pointers, or even personal reminders. They’re like your secret cheat sheet!
- Ever worried about running over time? This feature shows the elapsed time since you began the presentation and, in some versions, allows you to set a countdown. Stay on track and manage your pace efficiently.
- Interactive features that allow you to draw on slides or use a virtual laser pointer. These are especially helpful when you want to emphasize or explain specific points visually.
- Navigate between slides effortlessly and zoom into specific parts of a slide to draw attention or elaborate on details.
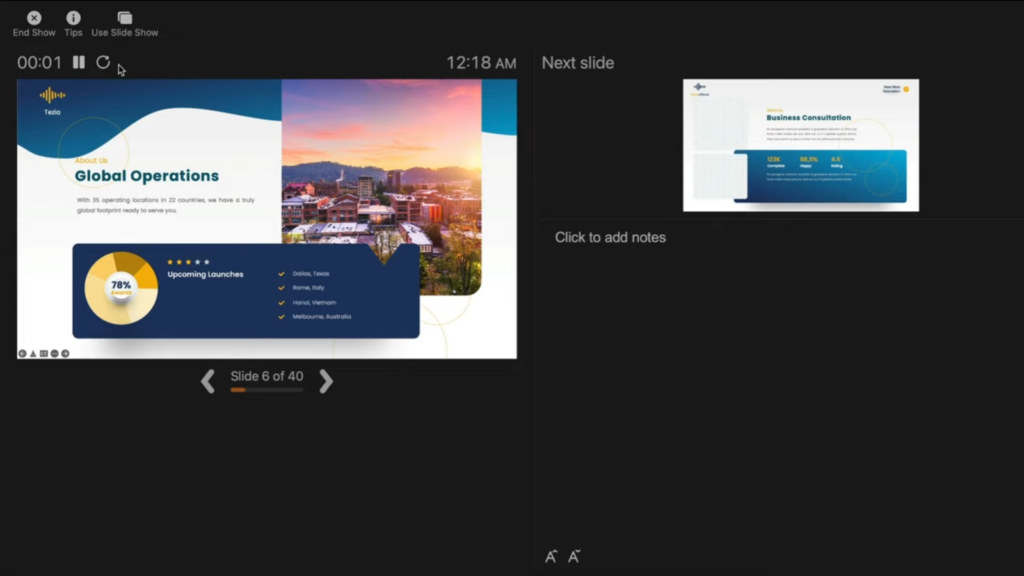
Table: Core Components Overview
Quote : “Presenter View is to a presenter what a dashboard is to a driver. It empowers, directs, and enhances the journey of your narrative.” – Jane Harris, Lead PowerPoint Expert – Powerbacks team
Understanding these components is one thing, but leveraging them effectively during a presentation can make a significant difference. Let’s delve into the ‘why’ behind the significance of Presenter View.
Stepping onto the stage or presenting in a boardroom can often be an overwhelming experience. The constant juggle between capturing the audience’s attention and keeping track of your slides can lead to nervousness. But what if there was a way to have everything you need right in front of you, ensuring smooth sailing through your presentation? Enter Presenter View.
- Having a preview of the upcoming slides and personal notes right in front of you can be a massive boost to confidence. You’re always one step ahead, knowing exactly what’s coming next.
- Instead of turning back to view the screen repeatedly, Presenter View lets you face your audience directly. This creates a more engaging and personal interaction.
- Gone are the days when you’d hold a bunch of cue cards or sheets of paper. With digital speaker notes, you have a cleaner, more organized setup.
- Using the annotation tools and laser pointer, you can make your presentation more interactive, leading to better retention and engagement from your audience.
- There’s no denying that seamlessly transitioning between slides, using interactive tools, and having no physical notes gives a more polished and professional look.
Table: Benefits of Using Presenter View
Quote : “Embracing the Presenter View is not just about leveraging a tool; it’s about amplifying your message and connecting more profoundly with your audience.”
It’s evident that the Presenter View has undeniable advantages for professionals. But how do you activate it and customize it to suit your needs? Let’s walk through the steps.
Starting with PowerPoint 2013, Microsoft enhanced the Presenter View to ensure that it’s both intuitive and user-friendly. Activating it and making it work for you is simple, as outlined in the following steps:
Step-by-Step Guide to Activate Presenter View :
- Start by opening your PowerPoint presentation. This will be the one you intend to deliver.
- At the top, you’ll notice several tabs. Click on the one labeled ‘Slide Show’.
- Within the Slide Show tab, you’ll spot a checkbox labeled ‘Use Presenter View’. Ensure that it’s ticked. If it’s not, simply click on it.
- If you’re using an external projector or display, make sure it’s connected. PowerPoint will automatically detect it and use the Presenter View on your primary display, showing the main presentation on the external one.
- Start your presentation by either pressing F5 on your keyboard or clicking on ‘From Beginning’ in the Slide Show tab.
- Next Slide Preview : Gives a preview of what’s coming next.
- Speaker Notes : Displays your notes for the current slide.
- Slide Navigation : Use this to jump to a specific slide.
- Annotation Tools : Highlight or draw on your slides in real-time.
- Timer : Keeps track of how long you’ve been presenting.
- You can move around the different elements, increase font size of your notes for better readability, or even hide specific components if they’re not required.
Table: Quick Access Tools in Presenter View
Quote : “The beauty of PowerPoint’s Presenter View is the control and flexibility it offers. It’s like having a personal assistant during your presentations.” – Linda Green, Presentation Expert
Now that we know how to activate and customize the Presenter View let’s delve deeper into its features and tools for maximum efficiency during presentations. Shall we proceed?
PowerPoint’s Presenter View is not just a simple “next slide” preview; it’s a hub of tools and functionalities designed to make the presenter’s job easier and the presentation more engaging.
H3: Slide Preview This is arguably the most straightforward feature but also the most helpful. At a glance, you can see what’s coming up, ensuring that you’re always prepared for the next topic or section.
- Smooth Transitions : Eliminates awkward pauses between slides.
- Improved Pacing : Know when to speed up or slow down based on upcoming content.
- Reduced Anxiety : No unpleasant surprises during your presentation.
H3: Speaker Notes For those who don’t rely on pure memory, speaker notes are a lifesaver. They’re your secret weapon, visible only to you, that provides additional context or reminders about what to say.
- Bold the crucial points to ensure they stand out.
- Use concise bullet points for easier and quicker reading.
- Add time cues if you’re aiming to cover specific points within certain timeframes.
H3: Slide Navigation While it’s always best to move sequentially through your slides, there might be instances when you need to skip ahead or return to a previous point. With the slide navigation tool, you can effortlessly hop around your presentation.
- Case Study : During a corporate presentation, John, a sales manager, was posed with a sudden question about Q2 performance. Thanks to slide navigation, he quickly reverted to the relevant slide, addressed the query, and resumed without any hiccups.
H3: Annotation Tools Engage your audience by turning your presentation into an interactive canvas. Whether you’re highlighting an essential statistic or drawing a quick graph, these tools can make a significant impact.
- Use contrasting colors to ensure visibility.
- Don’t overdo it; the aim is to emphasize, not to overwhelm.
- Practice beforehand to ensure you’re comfortable with these tools during the presentation.
H3: Timer It’s easy to lose track of time during a presentation. With Presenter View’s timer, you can keep tabs on the elapsed time, helping you manage the pace and duration of your talk.
- Tip : Always allocate a buffer period. If you’re presenting for 30 minutes, aim to finish in 25. This allows for Q&A or any unexpected delays.
Quote : “PowerPoint’s Presenter View is like a dashboard for presenters. It provides every tool one might need, all within arm’s reach, ensuring a seamless and interactive presentation experience.” – Michael Roberts, Tech Analyst
Understanding the features of the Presenter View is the key to unlocking its potential. With practice and familiarity, it becomes an extension of the presenter, leading to more confident and impactful presentations.
Making the Most of Presenter View
If you’ve ever wanted to feel like a presentation Jedi, mastering the Presenter View is your path to the force. But having the tool isn’t enough – it’s about leveraging its features optimally. Here’s a detailed guide on maximizing the benefits of the Presenter View:
H3: Setup and Access Before harnessing its power, you need to ensure you can access Presenter View without hitches.
- Connect your computer to the projector or external display.
- Launch PowerPoint and open your presentation.
- Go to the Slide Show tab and select Set Up Slide Show .
- In the pop-up, ensure Browsed by an individual (window) is selected.
- Start the slide show. Presenter View should appear on your computer, while the audience sees only the slides.
H3: Customize the Display Remember, it’s your dashboard; make it as comfortable and efficient for you as possible.
- Within Presenter View, hover over the bottom to reveal the toolbar.
- Click on the gear icon to adjust settings.
- Reorder tools based on your preference or hide those you don’t need.
H3: Practice, Practice, Practice The tool’s efficiency relies heavily on your familiarity with it. Do dry runs to ensure you know where everything is and how each feature works.
- Pro Tip : Mimic the presentation environment during practice. If you’re presenting in a large hall, practice with the same setup.
H3: Seamlessly Integrate Other Media If your presentation includes videos, animations, or other media, ensure they play seamlessly in Presenter View.
- Deep Dive : Always embed media within the presentation. Relying on external links or files can disrupt the Presenter View experience.
H3: Engage the Audience Use the tools not just to aid your presentation but to engage your audience. Pose questions, use the pen tool to sketch quick diagrams based on audience inputs, and make it interactive.
- Table of Engagement Techniques :
H3: Master the Art of Transitions Smooth transitions are key to maintaining audience attention. With a preview of the next slide, prepare your narrative to flow seamlessly.
Even with the most powerful tools, human error can play a spoilsport. The Presenter View, as intuitive as it may be, has its quirks. Here’s a list of common pitfalls users face and ways to steer clear of them:
H3: Not Checking Hardware Setup Before you even start the presentation, ensure your hardware is correctly set up. This includes checking the display connection, ensuring the projector or external monitor is detected, and setting up the correct display settings.
- Pro Tip : Always keep a spare HDMI or VGA cable. Technical glitches often come from the most unexpected sources.
H3: Overlooking Speaker Notes Having made the effort of adding speaker notes to your slides, it would be a shame not to use them. They serve as a discreet prompt, ensuring you don’t miss any critical points.
- Fact : According to a study, presenters who actively used speaker notes were 25% more consistent in delivering their core messages.
H3: Ignoring the Timer Time management is crucial. If you have a fixed time slot, exceeding it can inconvenience others and may appear unprofessional. Conversely, finishing too early can leave your audience unsatisfied.
- Actionable Advice : Always have a buffer. If your slot is 30 minutes, aim for a 25-minute presentation, leaving room for Q&A or unexpected delays.
H3: Relying Exclusively on Presenter View Despite its usefulness, never be wholly dependent on Presenter View. Technical glitches happen, and the ability to continue smoothly without it showcases professionalism.
- Case Study : At a major tech conference in 2018, a renowned speaker’s Presenter View malfunctioned. Instead of panicking, he smoothly transitioned to the standard view, using his printed notes as a backup. The audience lauded his adaptability, and his message wasn’t overshadowed by the hiccup.
H3: Not Adapting to Audience Feedback The tools in Presenter View, like slide navigation, are meant to enhance adaptability. If you sense your audience resonating more with a particular topic, don’t be afraid to dwell on it a bit longer or even revisit slides.
By sidestepping these common mistakes, you not only harness the full potential of Presenter View but also project confidence and control. Next, we’ll explore some advanced features to elevate your presentation game even further.
Mastering Presenter View basics can tremendously improve your presentation skills. But if you’re looking to elevate your game and leave a lasting impression, dive into these advanced features:
H3: Seamless Transition Between Slides The art of a great presentation lies not just in the content but also in the delivery. A choppy slide transition can disrupt the flow. PowerPoint offers a plethora of transition effects — from subtle fades to dynamic 3D effects.
- Go to the Transitions tab.
- Browse and select your preferred effect.
- Adjust the transition duration if needed.
- Click Apply To All to maintain uniformity.
H3: Use Zoom to Focus on Details Occasionally, you might want to draw attention to specific details on a slide. Instead of making your audience squint, use the in-built Zoom feature.
- Tip : Combine zoom with a laser pointer or pen tool for emphasis.
H3: Ink Annotations Annotating directly on your slides can be beneficial for interactive sessions or workshops. PowerPoint’s “Ink” feature allows you to do just that.
- Did You Know? : Ink annotations made during a presentation can be saved for future reference!
H3: Embed Multimedia for a Rich Experience Modern presentations often go beyond static slides. Consider embedding videos, audio clips, or even live web content to keep your audience engaged.
- Navigate to the Insert tab.
- Choose Video or Audio and select your file.
- Adjust playback settings under the Playback tab.
H3: Custom Slide Show Sometimes, different segments of your audience require varied content. Instead of having multiple PPT files, create a custom slideshow within the same presentation.
PowerPoint’s Presenter View is akin to a secret weapon, waiting in the wings, ready to empower speakers, educators, and presenters globally. Whether you’re a novice taking your first steps into the world of presentations or a seasoned speaker aiming to refine your skills, the Presenter View, along with the myriad features PowerPoint offers, ensures your content shines in the best light.
Remember, a successful presentation doesn’t merely rely on flashy slides or multimedia elements. It’s the seamless blend of content, delivery, and engagement. And with tools like Presenter View, you’re equipped to handle the technical aspects, allowing you to focus on what truly matters – connecting with your audience.
As Bill Gates once said:
“If you think the PowerPoint presentation is there for you as the presenter, you’re wrong. It’s there for the audience.”
So, the next time you’re gearing up for that crucial pitch, workshop, or lecture, take a moment to familiarize yourself with Presenter View. Your audience — and your confidence — will thank you for it.
Happy presenting!
Save my name, email, and website in this browser for the next time I comment.
Home Blog PowerPoint Tutorials How to Work with Presenter View in PowerPoint
How to Work with Presenter View in PowerPoint

Not all presenters have excellent memory recall or the ability to speak flawlessly to the audience without any cues. However, many of them are good at hiding it by using Presenter View in PowerPoint. It is a presentation mode that enables the presenter to hide speaker notes and presentation controls from the audience while leveraging the various handy features offered by PowerPoint.
How to Use Presenter View in PowerPoint
To start using Presenter View, ensure it’s enabled before you begin your slideshow. If you are new to this feature, we recommend using this option to familiarize yourself with the various navigation options for this presentation mode. This might also be helpful if the PowerPoint templates you are accustomed to using might have animations that you might want to preview in this mode to understand when to give the next visual cue.
How to Enable Presenter View in PowerPoint
To enable PowerPoint presenter view, go to the SlideShow tab and make sure the Use Presenter View option is enabled. This will ensure that you can access Presenter View when you switch your slides to SlideShow mode.

Adjust Display Settings
You can swap between the presenter view and slideshow mode or duplicate the slideshow to exit the Presenter View from the Display Settings menu from the top toolbar.

Navigate Slides in Presenter View
Like any standard PowerPoint presentation in SlideShow mode, you can navigate between slides by using the arrow keys or with a presentation remote. Presenter View also provides slide navigation buttons to move the slides back and forth.

View Taskbar in Presenter View
The Show Taskbar option at the top enables viewing the taskbar. This can be helpful if you require using the taskbar, such as to view your battery charge, see the time, enable or disable another app from the taskbar menu, etc.

Reset or Pause the Timer
Once you start your presentation in Presenter View, a timer starts showing how much time you have spent in slideshow mode. This is an excellent way to understand how much time you have consumed for your session and to keep an eye out for good timekeeping. You can also hit Pause or reset the timer anytime.

Change the Size of the Speaker Notes
How to view notes in PowerPoint while presenting? If you have any speaker notes added to your slides, they will appear in Presenter View on your screen. You can increase or reduce the size of the text via the two options at the bottom of the speaker notes pane.

Using Annotation Tools in Presenter View
PowerPoint annotation tools can be accessed from the bottom toolbar in Presenter View. The Pen and Laser Pointer Tools button gives you access to the pen, ink colors, laser pointer, and eraser and also allows you to show or hide the mouse pointer via Arrow Options .

View All Slides in Presenter View
If you need to go back and forth to find a relevant slide for an ongoing discussion or query during your presentation, you can view all slides in Presenter View via the See all slides option.

Zoom Slides using Presenter View
PowerPoint’s Zoom feature lets presenters quickly pick a portion of the slide to zoom into. Presenter View allows you to leverage this feature by instantly selecting a portion of the slide to enlarge it after selecting Zoom into the slide option. To exit the Zoom mode or hit the Esc key.

Black or Unblack SlideShow
Sometimes, you might want to turn the screen blank for a while, such as during a mid-presentation break. The Black or Unblack SlideShow option blanks the slides for your audience while continuing to show you all navigation options via Presenter View.

Toggle Subtitles in Presenter View
One of the most revolutionary features introduced by Microsoft for PowerPoint over the past decade has been Live captions. This feature enables subtitles by converting speech to text as you present. You can toggle Live subtitles on or off while in presenter view to help your audience read what you speak.

Toggle Camera in Presenter View
Like subtitles, you can also toggle the camera on or off in Presenter View.

End Slideshow in Presenter View
There are different ways to end or exit a SlideShow from Presenter View. You can hit the Esc key or click End Slide Show . Similarly, you can click the three dots at the bottom and select End Show .

More Slideshow Options
Other than the various visibility prominent menus available to navigate, annotate, and present your slides, you can also find a few additional options via More slideshow options , which are accessible via the three dots at the bottom toolbar. These include adjusting the position of the subtitles, turning your screen white or black, ending the slideshow, etc.

How to Use Presenter View on a Single Screen
While Presenter View can be enabled to work with dual monitors, you can also use Presenter View on a single monitor with remote meeting apps like Zoom. A simple method for switching to Presenter View on a single monitor is to click the three dots ( More slideshow options ) at the bottom in SlideShow mode and select Show Presenter View .

You can also switch to Presenter View on a single monitor anytime using the ALT+F5 hotkey.

The presenter can easily manage a PPT in presentation mode, with the utility to view speaker notes, annotate or zoom slides, toggle subtitles or camera on or off, and keep your audience engaged via better slideshow management. However, if you’re new to this presentation mode, a bit of practice might help you avoid confusion when presenting before an audience in Presenter View for the first few times.

Like this article? Please share
PowerPoint Tools, Presentation Skills Filed under PowerPoint Tutorials
Related Articles

Filed under PowerPoint Tutorials • May 31st, 2024
How to See Notes in PowerPoint
Optimize your presentation slides by knowing how to see notes in PowerPoint. Instructions for slide design and Presenter View modes.

Filed under PowerPoint Tutorials • May 28th, 2024
How to Circle Something in PowerPoint
Mark important areas in your presentation slides by learning how to circle something in PowerPoint. Instructions with shapes, handmade, and slideshow.

Filed under Google Slides Tutorials • May 22nd, 2024
How to Translate Google Slides
Whereas Google Slides doesn’t allow to natively translate slides, such process is possible thanks to third-party add-ons. Learn how to translate Google Slides with this guide!
Leave a Reply
How to Add Notes to PowerPoint Presentations: A Comprehensive Guide

Sara Wanasek

Presenting a slideshow can be a daunting task, especially when you’re speaking to a large audience. Thankfully, most presentation software comes equipped with the ability to add notes to your slides, making it easier for you to stay on track and deliver a seamless presentation – no full memorization needed.
In this blog, we will explore two different ways that you can to add notes to PowerPoint:
- Presentation notes that you prepare in advance and only you can see or
- Adding live notes to your presentation for your audience to see
By leveraging these techniques, you’ll be able to engage your audience effectively and deliver memorable presentations. Let’s dive in.
How to Add Presenter Notes in PowerPoint
Presenter Notes in PowerPoint are notes that you can view on your screen while you are presenting. Your audience will not see these notes, just you, so you can stay on track, remember important points, and deliver your information clearly and easily. Presenters, here’s everything you need to know to add notes to PowerPoint.
Add Notes in Edit Mode
Notes can be added to any slide in PowerPoint. Follow these steps:
- Start by clicking on the Notes button located beneath each slide. If you don’t see it, click on the View tab at the top of the screen and then click on Notes Page.
- Begin typing your notes for that slide, providing additional details, reminders, or cues to guide your presentation.
- Repeat the process for each slide you want to add notes to.
Once you’ve added your notes, you’re ready to deliver your presentation with confidence!

Present with Notes
Now that your notes are added to your presentation, let’s learn how to use them during the presentation. Do note that to present with the Presenter Notes, you will need to be connected to another screen or projector.
- First, select the Slide Show tab in the PowerPoint ribbon
- In the Set Up section, click the check box for Presenter View
- Enter Presentation Mode! You should see your presentation on one screen (such as your projector) and your notes displayed on the other screen (such as your laptop).
⚠️ If the Presenter view appears on the wrong screen, you can swap this by clicking on the Display Setting on top of the Presenter view screen.

As you move through your slides, your notes will automatically advance with the slides, keeping you right on track.
Print Notes
If you prefer a physical copy of your notes to present with or want to share it with your audience, you can print them from PowerPoint.
To do this go into File → Print → and under Settings , choose Notes Pages . Now, you can Print .
Presenting with notes in your PowerPoint presentation helps you stay on track, maintain confidence, engage your audience, adapt to unexpected situations, and appear professional and organized, ultimately leading to a smoother, more impactful delivery. But what if you want to further explain a concept with notes and annotations during your presentation? You can with annotation tools! →
Add Notes During a Presentation
Need to add notes to aid your presentation and help your audience understand, follow along, and stay engaged? Presenter tools such as annotations are great tools to help your presentation delivery and pace. By interacting with your slide information throughout your presentation, you can encourage active learning and audience participation in the presentation. There are a few ways you can add notes to PowerPoint:
Add Notes to Any Slide
During your presentation, you can add notes in two main ways:
1.You can use PowerPoint’s built-in simple pen and highlighter to add notes to your slide. This is found in the bottom left corner of the screen click on the pen and choose your color to begin drawing.
2. For sightly more advanced pen tools, text boxes, and shapes, you can use the free PowerPoint add-in ClassPoint, to add notes to PowerPoint sides . Once downloaded, ClassPoint , an audience engagement tool, will add a toolbar at the bottom of your presentation screen with these additional annotation & presentation tools .
This gives you different thickness options and color options for the pens , highlighters , shapes , and text boxes on your slide.
Insert Whiteboard Slides
Did you know you can even add a blank whiteboard slide into your PowerPoint presentation while you are presenting? With ClassPoint, it’s true!
Perfect for when you run out of space, want to brainstorm, or have fresh details to convey to the audience.
To add a whiteboard slide to your presentation, click on the Whiteboard icon on the ClassPoint toolbar. From there, choose a template provided, or add your own whiteboard background design . This slide will be opened & inserted right into your presentation and you can begin adding your notes. All annotations added will be saved once you exit out of the presentation mode.
Add disappearing laser ink
With ClassPoint’s presentation toolbar, you can also use the laser pointer to write with disappearing ink!
Although this will not save to your slide, it is a great way to help your audience follow along and make connections to your slide information.
Share Notes
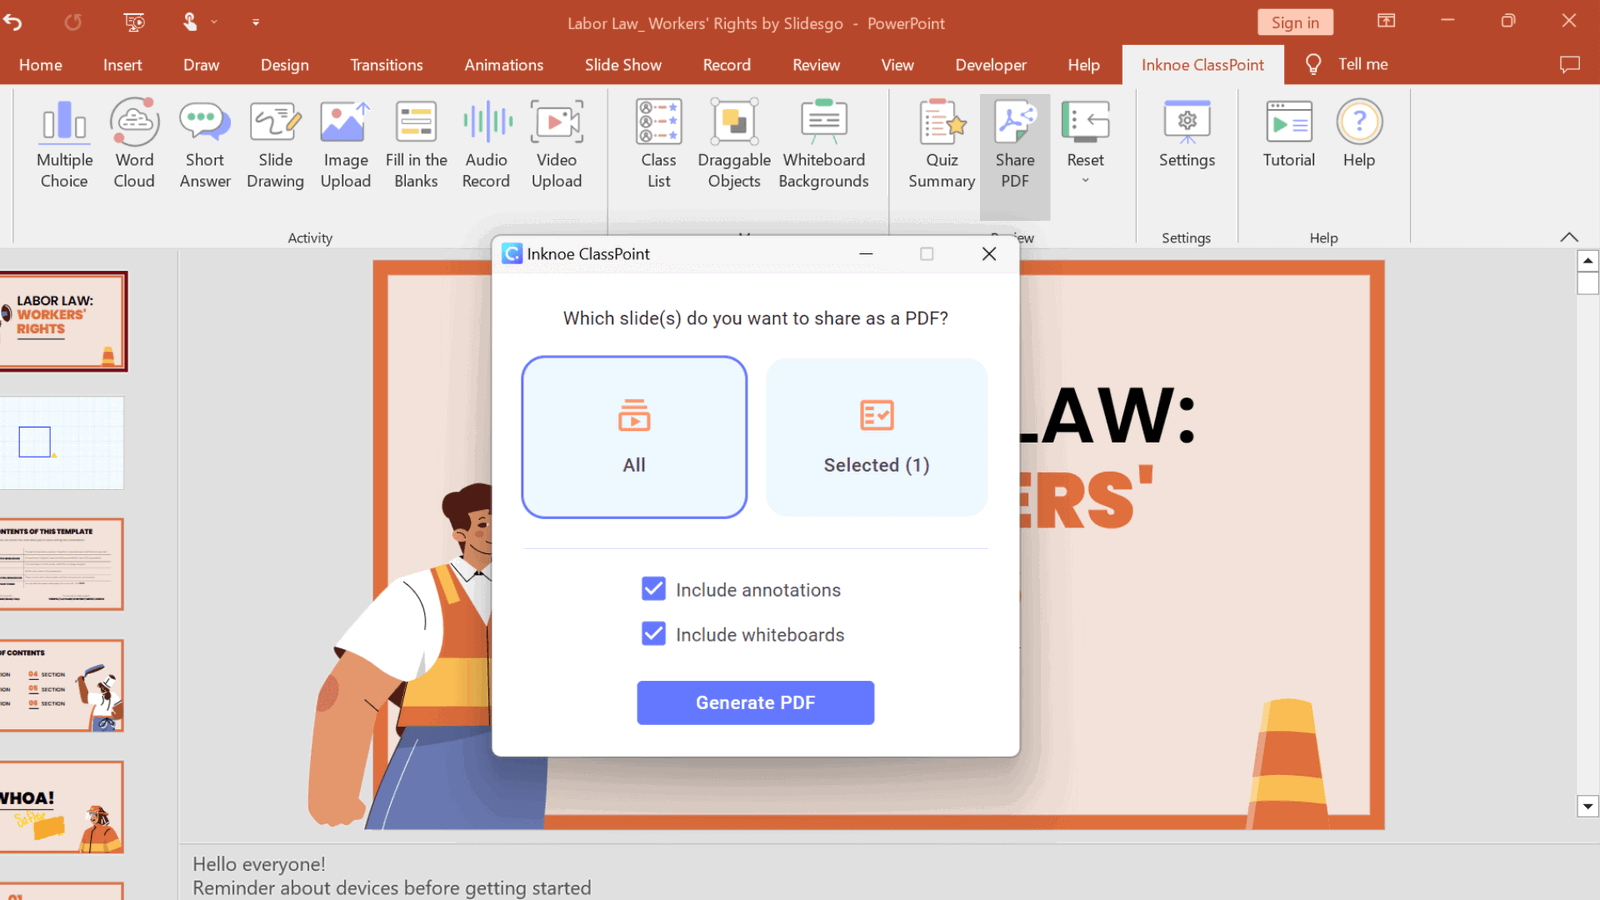
Just like when you printed your Speaker Notes above, you can also share all the notes you added to your PowerPoint slides. Print your presentation, or share it with your audience via a QR code.
Click on the Share PDF icon on the ClassPoint tab in the PowerPoint ribbon. Select to include the whiteboard and annotations that you made and click Generate . A QR code will appear that your audience can scan to access your PowerPoint slides and see all the notes you have added!
Overall, adding annotations to your PowerPoint presentation is a great way to enhance your message, engage your audience, and make your presentation more effective. So if you haven’t tried it before, why not give it a go and see the difference it can make to your next presentation?
Adding notes to your presentation is a simple but effective way to elevate your overall performance. Whether you’re adding notes in edit mode or during your presentation, PowerPoint offers a variety of tools to help make your presentation a success. Start implementing these strategies with ClassPoint, and watch as your presentations become more engaging and impactful than ever before!
About Sara Wanasek
Try classpoint for free.
All-in-one teaching and student engagement in PowerPoint.
Supercharge your PowerPoint. Start today.
500,000+ people like you use ClassPoint to boost student engagement in PowerPoint presentations.
How to view your notes in the presentation mode
Usually, there are two different screens for the presentation. For example, one screen is your laptop and the second is the provided monitor, TV, projector, web application screen, etc.
Today is popular to give a presentation via the Internet. E.g., you can use a Web meeting application such as WebEx or GoToMeeting or present your PowerPoint presentation online using the Office Presentation Service , to show your presentation to the audience on the additional screen.
For this purpose, PowerPoint provides the Presenter view , a special view of the presentation that is available on systems with more than one monitor (presentation screen):

To start your presentation with the Presenter view , see some features of the Presenter view .
In the Presenter View screen, there are the following elements:
On the left side:
The timer can help you keep track of how long your presentation has dragged on. You can click on the pause button for some cases or even restart the timer.

On the right side:
- On the top, the next slide is shown (see how to create your own slide show ),
- On the bottom, the notes of the current slide.
You can reorganize the Presenter view by moving the divider lines to see more notes, or make the slide bigger:

The text should wrap automatically, and a vertical scroll bar appears if necessary. You can also change the size of the text on the Notes pane by using the two buttons at the lower left corner of the Notes pane:
See more about different features of Presenter view in how to make slide show easier and more informative using Presenter view .
See also this tip in French: Comment afficher vos notes dans le mode de présentation .
Please, disable AdBlock and reload the page to continue
Today, 30% of our visitors use Ad-Block to block ads.We understand your pain with ads, but without ads, we won't be able to provide you with free content soon. If you need our content for work or study, please support our efforts and disable AdBlock for our site. As you will see, we have a lot of helpful information to share.

Some features of the Presenter view

Everything You Need to know About Notes in PowerPoint
- Post author: Jacob Stauttener
- Post published: October 11, 2021
- Post category: Presentations
- Post last modified: August 15, 2022
- Reading time: 23 mins read
Please Share This Share this content
- Opens in a new window
Do you have a presentation to make and find yourself wondering how to add notes to PowerPoint?
Adding notes to your PowerPoint Presentation is a simple and effective way to make presenting easier. In this article, we will go over how you can add notes to PowerPoint, tips on using those notes, and how to print some fancy PowerPoint notes.
Now, let’s get right into it!
Why Would I Want Notes in my PowerPoint?
PowerPoint Slides are not meant to be your script. They are meant to enhance your message and help guide the attention of your audience. Generally, you want the audience’s focus to be on you and your spoken word – not your slides.
The temptation for many first starting with PowerPoint is to place all of the information they need to discuss on the slides. The problem with this is that the audience begins to read your slides and lose concentration on the words from your mouth. When the audience reads your slides ahead of you, they often lose their interest fast and their attention is split between your words and what is on the slide.

PowerPoint gives you a simple way to add notes to your slides that your audience never sees. These notes are there to help you so you never have to use your presentation deck as your script. Instead, you the notes section.
So, how do we add notes to PowerPoint?
How to Add Notes to PowerPoint
Microsoft made adding notes to PowerPoint extremely easy. All you have to do is go down to the bottom of the screen where it says “Click to add notes”. Once you click there, you can add in your notes for the presentation.

I recommend that you use this for a point form. For my videos made from converted PowerPoint files, I like to write my full script there. I have also seen marketing, communications and presentation professionals use this space for stage and technical directions too.
What to do if you Don’t See the Notes Section
If you don’t see the notes section, there is a little tab at the bottom of the screen that you can click to make the notes appear.

I want to point out that the you can adjust the separating bars between sections. You can change the size of the notes area by hovering over the line and then clicking, holding and dragging that line to resize the area.

Different Views and Adding Notes
Speaking of different views, you don’t need to write out all your notes on the default slide design page (also known as the “Normal” View). You can also access these notes in the “Outline View” and the “Notes Page” too.

Personally, I like editing my notes in the “Normal View”. Remember that you can resize your notes window by hovering over the bar above it. When you see the two sided arrow, click and drag to resize the window. That will give you ample room to edit your notes while viewing your slides. The “Notes Page” is also a good view for editing your notes.
How Should I Write Up my Notes in PowerPoint?
How you write up your notes for your presentation is completely up to you. My opinion is that the best method is to write out a series of point form notes that remind you of your salient points and to act as a guide to keep you on track. This way, you don’t get off track, cover everything you want and maximize your potential interaction with the audience.
To me, so long as you know the content, this is the best way to present to your audience as it allows flexibility in your delivery to cater to the room. It his harder to adjust to your delivery if your presentation is fully scripted out.
- My opinion – point form notes are the best
- State only your salient points
- Use as a guide to stay on topic and to remember important points
- There are also plenty of reasons to fully type out your presentation script
While I prefer bullet point scripts when I present, your support crews would likely prefer that you stick to a fully written script with stage directions. This helps the show go smoothly for larger events where you have people helping the presenter in the delivery of their message. When the presenter follows a full script completely it helps everyone involved in that delivery stay on track and not miss queues such as when to change the slide, join in the conversation, or adjust an AV setting (like lighting).
As mentioned earlier, you could add stage directions in the PowerPoint notes section for the presenter or tech crew. Let’s talk a little bit about that now.
Use Your Notes for Stage Directions Too
Using the Notes section of PowerPoint, you can add in reminders for yourself (and anyone helping) about stage and technical directions. Perhaps you have an external video that you want queued up or a secondary source shown for a live demo. You can add this there to keep everyone on track. If you have multiple presenters delivering different parts of the presentation to your audience, you can also use the Notes section to direct who will be presenting each part.
[Square Brackets] are a common way to differentiate the spoken script words from the presentation directions. Italics also work well .
Highlights will show up in your handouts “Notes Page”, but they don’t generally show in other modes of PowerPoint. I advise sticking to Square Brackets, Italics or whatever you find already works with you and your support staff.
Again, how you choose to write your script in PowerPoint notes is up to you. As a presenter, I prefer bullet points. When I use PowerPoint to create hobby videos, I like to use a full written script. While supporting presenters as a media technician, I prefer a fully scripted notes section with stage directions.
You will have to find what works best for you. Now, let’s chat about how to actually use the notes section of PowerPoint when it comes to Presenting, Recording and printing Handouts.
How to use PowerPoint Notes – Presenting, Recording and Handouts
Now that we have the notes in our presentation, how do we use them? Microsoft gave us three effective ways to use these notes. You can use them as your speaker notes while you present to an audience, notes while you record a presentation, and as part of a handout for your audience. Let’s go through how to do all three of these uses for PowerPoint notes.
How to Present with Speaker Notes
Just like adding notes, presenting with speaker notes is extremely easy. All you have to do is present in Presenter view with two screens. This second screen could be your home monitor, a TV at the office or a projector at a convention center.
To make sure that your presentation is set up to take advantage of presenter view, go to “Slide Show”. From there, make sure that “Use Presenter View” is selected. When you go to show the presentation, the computer will automatically set up one screen with the presenter’s view and the other with the full screen slides.

You can change which screen the slides show on by changing the “Monitor”. The other will become your Presenter View screen.
A Quick Look at the Presenter View
This is a fantastic tool for both anyone who has to control a PowerPoint presentation in front of a live audience or anyone presenting to a virtual audience too. As a media technician I use this view all the time. It is great for following the scripts of the presenters and also works out great while running webcasts too. The only problem about this view is that you need two monitors to get the option to function.

The screen shot above shows a PowerPoint deck that I turned into a video for a YouTube channel. This is the presentation showing in “Presenter View”. The slide is on the left, the next slide is on the right and under it is my script (or the notes section).
When you go to record your slide deck, you can also still access your notes. Let me demonstrate below.
How to Record with Speaker Notes
To record a presentation, you go to “Slide Show” followed by “Record Slide Show”.

There you will find the notes on a toggle button near the top middle of your screen.

I find this one annoying to use because it is so small, but its location forces you to look almost directly into your laptop’s webcam (as most laptops have it located at the top of the computer screen). If you are recording video with you content in PowerPoint, this is a huge bonus! I can’t think of a better place to put the script other than right under the camera for giving the audience the impression that you are talking to them when you are reading your script.

How to Print Speaker Notes with Slides in PowerPoint
Even though we live in a paperless society, we still need to make printouts and hand outs. You can make them electronically (as PDFs) or physically on paper. One great way to access your notes is through the Notes Page. You can find this by clicking on “View” and then “Notes Page.”
If you have any presenters that want a printed copy of the notes for the podium (or technical or communications staff that also need the notes), I recommend that you print off the slide deck’s “Notes Page”.

To print your notes, select “File” and then “Print”. Here you will find a drop down for the slide layout. It likely says “Full Page Slides” to start. Change this to “Notes Pages”. You will see an image of the printer page further down in the article when I show you how to make fancy handouts with this same view.
Below is how the printout will look by default. Personally I find this layout very straight forward to work with.

“But wait, you mentioned I can turn this view into good looking handouts. How do I do that?”
Creating Impressive Handouts with Notes – Altering the Layout of Handout Notes in PowerPoint
Now let’s look at how to take the notes (or script) of your presentation and turn that into a nice handout to give to your audience.
As a tip, I like to back up my files before I mess around with the layouts, but that is up to you on whether you do that or not.

To print, I went to “File” and then “Print”. On the print screen, I make sure that I choose the “Notes Pages” under the settings.

You can then print these handouts as PDF files or as physical copies.
Creating PowerPoint Handouts with Word
As with all things computers, there are usually multiple ways to doing things. Sometimes, those ways lead to different results but cover the same end goal. Here is another way to do handouts. This time, we utilize Microsoft Word.
You may want to back up your work before you go through with this just to be on the safe side.

As a note, the function to export PowerPoint to Word takes a lot of memory. If you run into problems or see the message “PowerPoint couldn’t write to Microsoft Word,” restart your computer. Then run the Export with all other programs closed. If that still does not work, split the PowerPoint into two separate presentations. One with the first half of the slides and the other with the second half. Export both of those presentations and then combine them in Word.
Relevant Links…
In this post, I made reference a few times to my hobby videos On top of Tech Presenters, I run another website focused on tabletop gaming. That website also has a YouTube channel connected to it. I made all of my early videos on that channel using PowerPoint. Now I use video editors instead, but it is surprising how much you can do with PowerPoint.
If you are interested in video editors, check out my article “ The Best Free Video Editors Out There For the PC” . You can also find more PowerPoint Tips right here on Tech Presenters. One article that I would like to direct your attention to is “ The Hottest PowerPoint HotKeys for Presenters “. Be sure to check that article out for some HotKeys that could help you present better in front of an audience.
Turning back to this article, the PowerPoint files that I screen captured are from the videos listed below. I made them using PowerPoint and even wrote my scripts into the notes section of the program.
- LED Lamp Review for Painting, Building and Photographing Miniatures – Lamp by GameCraft Miniatures
- 28mm WW2 Soviet Train Station Review – MDF Terrain by Things from the Basement soon on Kickstarter
- Monster Scenery Terrain Review – Broken Ground – Pre-painted terrain for miniature gaming and RPGs
On top of these videos, I also have a related Website called Must Contain Minis .
For those wondering, I am using Office 365 on Windows 10.
Now, let’s finish up this article.
Bringing it Together…
In this article, we went over how to add notes to PowerPoint. Not only that, but we went further and also discussed how to use the notes during presentations, for recording and for printing off handouts.
As a presentation support professional, I find coupling my slides with notes extremely handy. As a presenter, these notes help me stay on track and to make sure that I cover all of the important points that I wanted to make. Knowing how to use these notes, and how to get the most out of them, really helps in delivering the best presentations that you can.
Personally I like to keep back up files and older versions of my files in case I run into any problems. In general, I am pretty cautious in my approach and there is not harm in keeping multiple files. Just make sure that you name them well and work on the newest version. I figured I would leave that reminder here. If you are playing around with the layout of your notes page or messing around with what appears on them, it might be a good idea to keep a back up to go to in case things don’t work as intended.
Until next time, Happy Presenting Everyone!!!
You Might Also Like

Let Me Introduce Myself – Jacob of Tech Presenters

Final Tips for Online Meetings and Presentations

Virtual Best Practices for Webcasts & Presentations
This post has one comment.
Pingback: How to Make Bullet Points Show 1 by 1 in PowerPoint - Tech Presenters
Comments are closed.
By continuing to use this website, you consent to the use of cookies in accordance with our Cookie Policy.
How to View Notes in PowerPoint While Presenting

Giving presentations can be nerve-wracking. Even if you know your content inside and out, it’s easy to get flustered when all eyes are on you. Having speaker notes in PowerPoint can be a lifesaver to jog your memory or keep you on track.
The good news is PowerPoint makes it easy to add notes to your slides. The even better news is that you can view those notes privately while presenting so the audience only sees your slides.
Here is a step-by-step guide to adding speaker notes in PowerPoint and viewing them during your presentation.
Step 1: Add Notes to Your Slides
The first thing you need to do is add notes to the slides you want to reference during your presentation.
Here’s how:
- Open your PowerPoint presentation and select Normal View .
- Click on the slide thumbnail where you want to add notes. The notes pane will open underneath.
- Click where it says “Click to add notes” and type your notes.
You can add quite a bit of text in the notes pane. It will automatically wrap and include scroll bars if needed.
Pro Tip: Don’t write full sentences in your notes. Use short phrases or bullet points as memory joggers instead.
Step 2: Start Your Presentation in Presenter View
Once your notes are added, it’s go time! Starting your presentation in Presenter View allows you to view your speaker notes privately on your computer screen. The audience will only see the slides on the projected screen.
Here’s how to enable Presenter View:
- Select the Slide Show tab.
- Check the box for Use Presenter View .
- Click From Beginning or press F5 to start the slideshow.
A Presenter View panel will open on your computer screen. You’ll see your current slide, a preview of the next slide, a timer, and your speaker notes.
Step 3: View Notes While Presenting
Now that you’re in Presenter View presenting your slides, your notes will be readily available to you.
Here’s how to view them:
- Click the Notes button on the bottom left of the Presenter View panel. Your notes will pop up in a separate panel.
- Scroll through your notes using the up and down arrows or by dragging the scrollbar.
- Click the Notes button again to minimize the notes pane.
Your notes will stay hidden from the audience’s view on the presentation screen.
Pro Tip: Make sure your notes text size is large enough to read quickly. Use the plus and minus buttons in the bottom left corner of the notes pane to adjust text size.
Step 4: Use Other Presenter View Tools
In addition to speaker notes, Presenter View gives you other useful presentation tools:
- Laser pointer – Click the pen icon then choose the laser pointer. Click and drag it on your slide to point things out to your audience.
- Highlighter – Select the pen icon then choose the highlighter. Click and drag it on your slide to highlight important points.
- Slide thumbnails – Click the thumbnail icon to see all your slides in one view. Click a slide to jump directly to it.
- Screen blackout – Select the screen icon to temporarily black out the presentation screen. This shifts focus back to you as the presenter when needed.
- Zoom – Magnify parts of your slide using the magnifying glass icon. Click and drag to move around the zoomed area.
- Slideshow controls – Use the onscreen controls to jump between slides, pause the timer, end show, etc.
Step 5: Swap Displays (Optional)
If you connect a second monitor, you can choose which screen shows your speaker notes in Presenter View and which one projects only the slides to your audience.
Here’s how to swap the displays:
- Open Display Settings on your computer.
- Select the monitor icon representing the display you want Presenter View to appear on.
- Check the box for Make this my main display .
- Return to PowerPoint. Presenter View will now appear on your selected monitor.
And that’s it! With these simple steps, you can privately view your speaker notes during a PowerPoint presentation. No more fumbling around with printed notes or trying to memorize every word.
Spend less time worrying about what to say, and more time engaging your audience with these public speaking tips. Before you know it, presentations will be a breeze even without those trusty notes as a backup!
About The Author
Vegaslide staff, related posts.

How to Compress Photos in PowerPoint

PowerPoint 2003: Formatting Bulleted and Numbered Lists

5 Sites with Microsoft PowerPoint Templates, & Other Tools

3 Ways to Reduce PowerPoint File Size


Powerpoint Assist
Tips for Powerpoint by Regina Griffin
How To View Notes In PowerPoint While Presenting On Teams
Looking to enhance your PowerPoint presentations on Microsoft Teams?
Explore the various features of PowerPoint on Teams, including accessing and View Notes In PowerPoint While Presenting On Teams.
From opening PowerPoint to resizing the Notes Panel, follow each step. Discover other useful features like using the Laser Pointer Tool, annotating slides in real-time, and sharing your screen.
Get expert tips from teacher Regina Griffin in Oregon, US.
Key Takeaways:
- Easily access and view notes during a PowerPoint presentation on Teams by opening the Notes Panel, available in the presentation mode.
- Maximize the presentation experience by utilizing the laser pointer tool and annotating slides in real-time, enhancing audience engagement and collaboration.
- Effortlessly share your screen on Teams to allow for a seamless presentation experience, making it easier to present and collaborate with others remotely.
What is Microsoft Teams?
Microsoft Teams is a collaboration platform developed by Microsoft, designed to facilitate communication and teamwork within organizations.
It offers a plethora of features such as chat functionality, video conferencing, file sharing, and integration with other Microsoft Office applications like Word and Excel .
Through Microsoft Teams, team members can collaborate in real-time on projects, share updates, assign tasks, and schedule meetings effortlessly. The platform allows for the creation of different channels for specific teams or topics, making it easy to organize discussions and documents. The ability to customize notifications ensures that users stay informed without feeling overwhelmed by constant updates.
How Does Microsoft Teams Work?
Microsoft Teams operates as a centralized hub for team collaboration, offering chat, meetings, file sharing, and integration with other Microsoft 365 applications.
Within this digital workspace, team members can communicate in real-time through chat, fostering quick decision-making processes and improving teamwork. The platform facilitates virtual meetings, allowing users to conduct video conferences, share screens, and engage in discussions seamlessly. File sharing becomes effortless as documents, presentations, and other files can be uploaded and accessed directly within the platform. The integration of Microsoft 365 applications provides a cohesive experience, enabling users to transition between tools effortlessly, leading to increased efficiency and effective workflow management.
How to Access Notes in PowerPoint on Teams
Accessing notes in PowerPoint on Teams allows presenters to have speaking notes, additional content, and reminders during their presentations.
To utilize notes effectively in PowerPoint on Teams, start by opening the desired PowerPoint presentation where the notes are saved. Next, locate the ‘Slide Show’ tab at the top of the screen. Click on this tab and then select the ‘Notes’ option. This will allow you to view and access the notes associated with each slide.
Remember that notes in PowerPoint on Teams can be used for more than just text. You can embed images, links, and even simple diagrams to enhance your presentations and keep your speaking points organized.
Step 1: Open PowerPoint on Teams
To access notes in PowerPoint on Teams, start by opening the PowerPoint application within the Microsoft Teams environment.
Once you’re in a Teams meeting, look for the ‘Share’ option at the bottom of the screen, usually represented by an arrow pointing up. Click on ‘Share’, and a menu will pop up. From this menu, select ‘PowerPoint’ to open a new tab with various PowerPoint options.
Within this new tab, you can choose to upload a presentation from your device, access recently used files, or create a new PowerPoint file directly in Teams. This seamless integration between PowerPoint and Teams enhances collaboration and makes presenting content smoother for users.
Step 2: Select the Presentation You Want to Present
After opening PowerPoint in Teams, choose the specific presentation you intend to present to your audience.
When selecting your presentation within PowerPoint on Teams, it’s crucial to ensure that you pick the correct file for a smooth and professional delivery. To do this, consider the content, format, and audience of your presentation. Opt for a file that is well-organized, visually engaging, and relevant to your topic. This will not only help you deliver your message effectively but also keep your audience engaged throughout. Remember, the right presentation can significantly enhance the impact of your message during the meeting or webinar.
Step 3: Open the Notes Panel
Once the presentation is selected, access the Notes panel within PowerPoint to view and manage your presentation notes.
To open the Notes panel in PowerPoint on Teams, start by opening your presentation. Then, locate the View tab in the top menu bar. Click on the View tab to reveal a range of options. From the dropdown menu, select the Notes Panel . This action prompts the Notes Panel to appear on the right side of your screen, providing you with a designated space for your presentation notes. You can then add, edit, and format your notes directly in this panel, allowing you to effectively manage your talking points and reminders during the presentation.
How to View Notes in PowerPoint While Presenting on Teams
Viewing notes in PowerPoint during a presentation on Teams allows speakers to maintain key points, reference details, and enhance their delivery.
To access notes within PowerPoint on Teams, locate the Slide Show tab and click on it. From the dropdown menu, select ‘Use Presenter View.’ This action will bring up the presenter view in PowerPoint, where you can see the slide being displayed alongside your notes.
Once in Presenter View, navigate to the bottom of the screen to find the speaker notes section. This is where you can view and even edit your notes while the audience sees the main slide on their screens.
Step 1: Start the Presentation
Initiate the presentation from PowerPoint within Teams to begin your session and engage with your audience.
When starting your presentation, it’s crucial to set the tone for what’s to come. Begin by selecting the ‘Share Content’ option at the bottom of the meeting screen in Teams. This action opens a menu where you can opt to share a window, a PowerPoint presentation, or even an entire screen. Choosing to start directly from PowerPoint ensures a seamless transition and allows for a polished delivery.
Remember, first impressions matter, so ensuring that your presentation opens smoothly is essential to capture your audience’s attention right from the start. By hitting the ‘Share’ button and navigating to your desired presentation, you signal the beginning of your talk. This action instantly brings your slides to the foreground, signaling to your viewers that the presentation is about to commence.
Step 2: Navigate to the Notes Panel
During the presentation, navigate to the Notes panel in PowerPoint on Teams to access and view your prepared notes.
Accessing the Notes panel in PowerPoint on Teams provides presenters with a convenient way to refer to their speaking points without the audience’s awareness. To find the panel within the software interface, look for the ‘Notes’ tab typically situated beside the slide being displayed. Clicking on this tab will reveal a dedicated space where you can read your detailed notes, key reminders, or key phrases to enhance your presentation delivery.
The accessibility of these notes adds a layer of security, ensuring that even if the presenter loses track, they can easily glance at their notes for guidance, maintaining a smooth flow of information. By utilizing the Notes panel, presenters can avoid disruptions and maintain a professional demeanor, fostering engaging interactions with the audience.
Step 3: View Notes on the Side of the Presentation
Display your notes on the side of the presentation screen in PowerPoint on Teams to maintain a seamless flow and reference your content effortlessly.
By opening PowerPoint in Teams , presenters can utilize the ‘Presenter View’ option to have their notes displayed on their screen while the audience views the slideshow.
This feature allows you to glance at your notes discreetly without interrupting the flow of the presentation, ensuring that you stay on track and deliver your message effectively.
You can use this setup to neatly organize your thoughts, highlight key points, and maintain eye contact with your audience.
Step 4: Resize the Notes Panel
Adjust the size of the Notes panel in PowerPoint on Teams to suit your preferences and optimize your viewing experience.
Resizing the Notes panel in your PowerPoint presentation on Teams is a simple yet essential customization that can enhance your overall presentation delivery. By resizing this panel, you have the flexibility to focus more on your content or have your notes displayed prominently for easy reference during the presentation.
One of the key advantages of resizing the Notes panel is the ability to customize the layout according to the amount of text you have in your notes. This ensures that you have a clear and unobstructed view of both your slides and your accompanying notes, allowing for smoother transitions and improved communication with your audience.
Other Useful Features in PowerPoint on Teams
Apart from viewing notes, PowerPoint on Teams offers additional features like the Laser Pointer Tool , real-time annotations, and screen-sharing capabilities.
Utilizing the Laser Pointer Tool in PowerPoint on Teams allows the presenter to highlight key points during the presentation, adding emphasis and aiding audience focus.
The real-time annotations feature enables collaborative editing and feedback, fostering interactive discussions and boosting engagement levels.
The screen sharing function facilitates sharing content seamlessly, enhancing communication and ensuring all team members keep updated and knowledgeable.
Using the Laser Pointer Tool
The Laser Pointer Tool in PowerPoint on Teams allows presenters to point out specific content on slides, emphasizing key points and enhancing audience engagement.
By activating the Laser Pointer Tool, presenters can easily draw attention to crucial details, making complex information more digestible for the viewers. This feature is particularly useful during virtual presentations, helping remote audiences stay focused on the main ideas being discussed. The tool enables presenters to navigate through content seamlessly, leading to a smoother flow of information delivery. With just a simple click, the laser pointer can highlight important statistics, graphics, or quotes , ensuring that the audience grasps the core message of the presentation. The interactive nature of this tool adds dynamism to the presentation, making it more engaging and memorable.
Annotating Slides in Real-Time
Real-time annotations on slides in PowerPoint on Teams enable presenters to interact dynamically with their content, fostering collaboration and engagement.
By incorporating real-time annotations during a presentation, speakers can respond to queries or suggestions on the spot, enhancing audience participation and fostering a more interactive environment. This feature allows for instant visual enhancements, making it easier for viewers to grasp complex ideas. The collaborative nature of annotating slides in real-time promotes teamwork and idea sharing among team members, leading to more innovative and engaging presentations. With the ability to annotate directly on the slides during a Microsoft Teams meeting, presenters can keep the audience attentive and involved throughout the session.
Sharing Your Screen on Teams
Screen sharing functionality in Teams allows presenters to showcase their content, demos, or applications directly from PowerPoint for interactive and informative sessions.
When utilizing screen sharing in Teams with PowerPoint, enables a smooth transition between different slides and interactive elements during presentations. Participants can view the shared content in real time, offering a dynamic and engaging experience. The seamless integration between Teams and PowerPoint ensures that presenters can easily switch between sharing their screen and other collaborative features, fostering a more interactive and visually appealing session.
Frequently Asked Questions
1. how do i view my presenter notes while giving a presentation on microsoft teams.
To view your presenter notes while presenting on Teams, go to the “Slide Show” tab on the PowerPoint ribbon and check the box next to “Use Presenter View.” This will allow you to see your notes while your audience only sees the slides.
2. Can I customize the size and placement of my presenter notes on Teams?
Yes, you can customize the size and placement of your presenter notes on Teams by going to the “Presenter View” tab on the top right corner of your screen. From there, you can adjust the size and placement of your notes to your preference.
3. How can I switch between slides and my presenter notes on Teams?
To switch between slides and your presenter notes while presenting on Teams, use the arrow keys on your keyboard or the navigation buttons on the bottom left corner of your screen. This will allow you to seamlessly switch between your slides and notes.
4. Is it possible to add additional notes or annotations to my presenter notes on Teams?
Yes, you can add additional notes or annotations to your presenter notes on Teams by using the “Ink” feature on the “Presenter View” tab. This will allow you to write or draw on your notes during your presentation.
5. Can I view my presenter notes on a second screen while presenting on Teams?
Yes, you can view your presenter notes on a second screen while presenting on Teams by selecting the “Extend” option on the “Presenter View” tab. This will display your slides on one screen and your notes on the other.
6. How do I exit the presenter notes view on Teams and resume my presentation?
To exit the presenter notes view on Teams and resume your presentation, simply press the “Esc” key on your keyboard. This will take you back to the regular PowerPoint view where you can continue presenting your slides.
Similar Posts
How to edit a slide in powerpoint.
Are you looking to enhance your PowerPoint presentations but not sure where to start? In this comprehensive guide by Oregon-based teacher Regina Griffin, we will explore the importance of knowing how to edit a slide in PowerPoint. From basic functions like adding, deleting, and rearranging slides to advanced techniques such as using the Slide Master…
How To Add Audio To All Slides In PowerPoint
Do you want to take your PowerPoint presentations to the next level? Adding audio can enhance audience engagement, add variety to your presentation, and make complex concepts easier to understand. In this step-by-step guide by teacher Regina Griffin from Oregon, US, you will learn how to seamlessly Add Audio To All Slides of your PowerPoint…
How To Embed Video In PowerPoint Without File
Looking to enhance your PowerPoint presentations with engaging video content? We explore the benefits and requirements of embed video in PowerPoint in this tutorial. From compatible video formats to troubleshooting common issues, we cover everything you need to know to seamlessly integrate video into your slides. Whether you are a teacher like Regina Griffin in…
How To Align Text Under Bullets In PowerPoint
Do you want to create professional and visually appealing presentations in PowerPoint? One important aspect to consider is aligning text under bullets. Aligning text under bullets enhances readability, organizes information, and creates a visual hierarchy. This tutorial by Regina Griffin, a teacher from Oregon, US, provides step-by-step instructions on how to align text under bullets…
How To Use Designer In PowerPoint
Are you tired of spending hours creating visually appealing PowerPoint presentations? Look no further, as PowerPoint Designer is here to save the day! In this article, we will explore How To Use Designer In PowerPoint, how it works, how to access it, and the benefits of using it. Join teacher Regina Griffin from Oregon, US,…
How To Format In PowerPoint
Are you looking to take your PowerPoint presentations to the next level? Understanding the importance of formatting is key to creating engaging and visually appealing slides. In this article, we will explore basic and advanced Format techniques, as well as tips for effective formatting. From choosing the right theme to incorporating interactive elements, teacher Regina…
How to Make PowerPoint Notes Invisible While Presenting
Making PowerPoint notes invisible during a presentation is a straightforward process. Simply use the Presenter View option, which shows your notes on your screen but not on the audience’s view. With a few clicks, you can deliver a seamless presentation without your notes being visible to everyone.
After completing this action, you will be able to present your PowerPoint slides without the audience seeing your personal notes, creating a more professional and clean presentation.
Introduction
Imagine you’re giving a big presentation. Your slides are perfect, but you’re a bit nervous and could use some notes to keep you on track. The last thing you want is for your audience to see these notes, distracting from the impact of your slides. That’s where the ability to make PowerPoint notes invisible during a presentation comes in handy.
PowerPoint is an incredibly powerful tool for creating compelling presentations. Whether you’re a student, a business professional, or a lecturer, mastering PowerPoint is a valuable skill. One of the lesser-known features of PowerPoint is the ability to keep your speaker notes private while presenting. This feature is particularly important for anyone who relies on cues or additional information to deliver their presentation smoothly. It’s a simple trick that can make a big difference in how confidently you present your information.
Step by Step Tutorial on Making PowerPoint Notes Invisible
Before getting into the steps, it’s important to understand what we’re aiming for. By following these steps, you will be able to view your notes on your computer while only the slides are displayed to your audience. This allows you to reference your notes discreetly during your presentation.
Step 1: Set Up Multiple Monitors
Ensure that you have a second monitor or projector connected to your computer.
Having a second monitor or projector connected is essential for using Presenter View. This allows you to view your notes on one screen while the audience sees only the presentation on the other.
Step 2: Enable Presenter View
In PowerPoint, click on the ‘Slide Show’ tab and check the ‘Use Presenter View’ box.
Enabling Presenter View is the key action that hides your notes from the audience. This option is usually found in the ‘Monitors’ group on the ‘Slide Show’ tab.
Step 3: Start Your Slide Show
Start your slide show as you normally would, and your notes will be visible only to you.
Once Presenter View is enabled and you start your slide show, you’ll see your notes on your screen, while the audience will see only the slides.
Having your notes hidden from the audience helps maintain the focus on the content of your slides, rather than on your personal cues. This contributes to a more professional appearance and can help you make a better impression.
Knowing that you can reference your notes without the audience seeing them can be a significant confidence booster. This safety net allows you to focus on delivering your message rather than memorizing it.
With Presenter View, not only can you see your current slide’s notes, but you also get a preview of upcoming slides. This flexibility can be a game-changer, allowing you to better plan your transitions and manage your presentation’s pace.
One significant limitation is the need for additional equipment. Without a second monitor or projector, you won’t be able to use Presenter View.
Technical issues can also pose a problem, such as when the second screen isn’t immediately recognized by your computer, which could cause delays or disruptions to your presentation.
For those who are not tech-savvy, using Presenter View may require a bit of a learning curve. Becoming comfortable with this feature can take some practice.
Additional Information
When preparing for a presentation, there are a few extra tips you might find useful. First, rehearse with Presenter View ahead of time to become comfortable with toggling between your notes and the slides. Familiarize yourself with the controls, so you don’t fumble during the actual presentation.
Another tip is to keep your notes concise. Since you’ll be the only one seeing them, it might be tempting to write down everything, but this can be counterproductive. Short, keyword-based notes are generally more helpful than lengthy paragraphs.
Also, always have a backup plan. Technology can be unpredictable, so be prepared to give your presentation without your notes being visible on your screen. This could mean having a printout of your notes or being familiar enough with your material that you can present without them.
Finally, remember to engage with your audience. While it’s great to have notes, don’t become so reliant on them that you fail to make eye contact and connect with your audience. Presenter View is just a tool to aid you, not a crutch to lean on.
- Connect a second monitor or projector.
- Check the ‘Use Presenter View’ box in PowerPoint.
- Start your slide show to view notes on your screen and slides on the audience’s screen.
Frequently Asked Questions
What is presenter view.
Presenter View is a PowerPoint feature that allows you to view your notes on your screen while the audience sees only the presentation slides.
Can I use Presenter View without a second monitor?
No, Presenter View requires a second monitor or projector to function correctly.
How can I ensure my notes are completely invisible to the audience?
By using Presenter View and making sure your laptop is not mirrored on the projector or second screen.
What should I do if my computer doesn’t recognize the second monitor?
Check your connection and make sure that you have the correct display settings on your computer.
Can I still see the next slide in Presenter View?
Yes, Presenter View allows you to see not only your notes but also a preview of the upcoming slide.
In conclusion, making PowerPoint notes invisible during a presentation is a nifty trick that can make a significant difference in your delivery. It allows for a more professional appearance and can help boost your confidence as a speaker. By following the steps outlined, you’ll be able to leverage the power of Presenter View to keep your notes private while still engaging your audience with a polished presentation.
Always remember to practice ahead of time, keep your notes concise, and, most importantly, ensure that you’re prepared for any technical hiccups that might arise. Good luck with your presentations, and may your PowerPoint notes always remain invisible to your audience!

Matthew Burleigh has been writing tech tutorials since 2008. His writing has appeared on dozens of different websites and been read over 50 million times.
After receiving his Bachelor’s and Master’s degrees in Computer Science he spent several years working in IT management for small businesses. However, he now works full time writing content online and creating websites.
His main writing topics include iPhones, Microsoft Office, Google Apps, Android, and Photoshop, but he has also written about many other tech topics as well.
Read his full bio here.
Share this:
Join our free newsletter.
Featured guides and deals
You may opt out at any time. Read our Privacy Policy
Related posts:
- How to Save Powerpoint as PDF with Notes
- How to Set Time for Slides in Powerpoint
- How to Show Speaker Notes in Google Slides
- Can I Convert My Powerpoint to Google Slides?
- How to Unhide a Slide in Powerpoint 2013
- How to Add Page Numbers in Powerpoint 2010
- How to Drag Slides From One PowerPoint to Another: A Step-by-Step Guide
- How to See Notes on PowerPoint on the Laptop: A Step-by-Step Guide
- How to Make a Powerpoint Slide Vertical in Powerpoint 2013
- How to Delete a Slide in Powerpoint 2010
- How Do I Print Just the Notes in Powerpoint 2010?
- How to Loop a Slideshow on Powerpoint 2013
- How to Hide a Slide in Powerpoint 2010
- How to Rotate a Slide in PowerPoint: A Step-by-Step Guide
- How to Delete Multiple Slides in Google Slides
- How to Change the Font on All Slides in Google Slides
- How to Check Word Count on Powerpoint 2010
- How to End Powerpoint on Last Slide in Powerpoint 2010
- How to Insert Slides from Another Presentation in Powerpoint 2010
- How to Make Table Borders Invisible in Google Docs: A Step-by-Step Guide

Present on multiple monitors (and view speaker notes privately)
You can present with 2 monitors: Using Presenter View is a great way to view your presentation with speaker notes on one monitor (your laptop, for example), while your audience views the notes-free presentation on a different monitor (like a larger screen you're projecting to).
Note: Make sure the device you're using for your presentation supports the use of multiple monitors. Check with your manufacturer for up-to-date information about multiple monitor support.
To do this procedure and split the view between projectors in this way, you must be connected to the second screen.
Set up PowerPoint to use Presenter view with two monitors
On the Slide Show tab, in the Monitors group, select Use Presenter View .

Windows Display Settings should open.
In the Display Settings dialog box, on the Monitor tab, select the monitor icon that you want to use to view your speaker notes, and then select the This is my main monitor check box.
If the This is my main monitor check box is selected and unavailable, the monitor is already designated as the primary monitor.
Select the monitor icon for the second monitor—the one the audience will watch, and then select the Extend my Windows Desktop onto this monitor check box.
Notes: If the Windows Display Settings don't open, do the following:
Windows 10: Click Start > Settings > System > Display . At the top, under Customize your display , is a diagram of the screens connected to your computer, with each screen numbered. If you are connected to a project, typically it will be represented in the diagram as screen 2. Select screen 1 in the diagram, then scroll downward. Ensure that the check box named Make this my main display is selected. Above that check box, in the Multiple displays list, select Extend these displays .
Windows 8: Right-click the Windows Start button, click Control Panel > Display > Adjust resolution . In the Multiple displays list, click Extend these displays . Select the monitor on which you want to view your speaker notes, and click Make this my main display .
You can use PowerPoint on your smartphone as a remote control to run your presentation and view your speaker notes. See Using a laser pointer on your smartphone when presenting in PowerPoint for more information, including a brief video.
Deliver your presentation on two monitors
On the Slide Show tab, in the Set Up group, click Set Up Slide Show .

In the Set Up Show dialog box, choose the options that you want, and then click OK . If you choose Automatic , PowerPoint will display speaker notes on the laptop monitor, if available. Otherwise, PowerPoint will display speaker notes on the main display identified in your Display settings ( Settings > Display ).

Extend vs. Duplicate: What happens after the slide show ends
PowerPoint does something behind the scenes to make the process of starting a slide show on a second monitor as smooth and quick as possible. When you enter Slide Show, PowerPoint automatically changes your display settings (also known as your display topology) to Extend .
What can be confusing is what happens after your slide show concludes:
In PowerPoint 2013 , when your slide show ends, PowerPoint leaves the display topology as Extend . (The benefit of this approach is that the next time you present on a second monitor, the first slide will appear with minimal delay. The drawback is that PowerPoint may be overriding your preferred display setting of "duplicate". Some people don't like this override.)
In newer versions , in the same end-of-slide-show scenario, PowerPoint reverts to your default setting, returning to Duplicate , if that's what you have chosen.
If you are using PowerPoint 2013 and you want PowerPoint to revert to the default setting, rather than keeping the Extend setting, you can tell it to do that by making a small change to the Windows registry as described below.
In this procedure, you are creating a command that adds a new setting to the Windows Registry for PowerPoint, and then you are running that command:
Create a new file in Notepad.
Copy and paste the following three lines of text into Notepad:
On the File menu in Notepad, click Save As .
Name the file Update.reg . (It's important that the file name extension be .reg ).
In the Save as type box, choose All Files (*.*) .
Take note of the folder in which you are saving the file. Then click Save , and close Notepad.
Open File Explorer from the Start menu and navigate to the folder where you saved Update.reg.
Double-click Update.reg .
Answer "Yes" to the two prompts that ensue.
With that completed, PowerPoint will now revert to your default display topology at the conclusion of a slide show.
(Read more technical details in this community forum post that was answered by a PowerPoint program manager .)
Video: Use Presenter view
View your speaker notes as you deliver your slide show
Video: Rehearse timings for a slide show
Zoom in to part of a slide in Slide Show view
Print your PowerPoint slides, handouts, and notes
Create a self-running presentation
Start the presentation and see your notes in Presenter view
PowerPoint videos not playing on secondary monitor

Need more help?
Want more options.
Explore subscription benefits, browse training courses, learn how to secure your device, and more.

Microsoft 365 subscription benefits

Microsoft 365 training

Microsoft security

Accessibility center
Communities help you ask and answer questions, give feedback, and hear from experts with rich knowledge.

Ask the Microsoft Community

Microsoft Tech Community

Windows Insiders
Microsoft 365 Insiders
Was this information helpful?
Thank you for your feedback.
Contribute to the Microsoft 365 and Office forum! Click here to learn more 💡
April 9, 2024
Contribute to the Microsoft 365 and Office forum!
Click here to learn more 💡
PowerPoint Forum Top Contributors: Steve Rindsberg - John Korchok - Bob Jones AKA: CyberTaz ✅
May 10, 2024
PowerPoint Forum Top Contributors:
Steve Rindsberg - John Korchok - Bob Jones AKA: CyberTaz ✅
- Search the community and support articles
- Microsoft 365 and Office
- Search Community member
Ask a new question
How to see my notes while recording narrations in PowerPoint
Report abuse.
Reported content has been submitted
Replies (13)
* Please try a lower page number.
* Please enter only numbers.
Let me help you to see the Narration while recording.
Refer to the sections Record a narration before or during a slide show and Preview a narration in the following link and check if it helps:
http://office.microsoft.com/en-us/powerpoint-help/record-and-add-narration-and-timings-to-a-slide-show-HA102749693.aspx
Let us know if the steps mentioned in the link were helpful to you.
Thank you.
2 people found this reply helpful
Was this reply helpful? Yes No
Sorry this didn't help.
Great! Thanks for your feedback.
How satisfied are you with this reply?
Thanks for your feedback, it helps us improve the site.
Thanks for your feedback.
Thanks for your reply.
I can see narrations recording on the screen but I still can't see my notes that are my narrations. Do I have to memorize them all?
The step 3 in the "Record comments on a slide" article said that I can see "record" but there is no "record" in the dialog. And can't record comments either on a slide.
By the way, I have Surface Pro with windows8.1 installed Office 365 home premium.
Thanks for your help.
4 people found this reply helpful
Hi, everybody out there, who are wondering why we can't see the notes while recording. No we can't. Because it does not have the function for it. That's why Microsoft Support Team wasn't reply to my question here, I guess or because I haven't paid enough for the software.
I think that PowerPoint doesn't have this functions yet. I maybe wrong but I couldn't get any reply from Microsoft Support Team but I figured out how to see the notes for my narrations during recording. There is a way to see them I found. I had to use the dual monitor configuration and run the slideshow. That case I can see the presenter screen on my PC and the slideshow on the another monitor. Again, this is not for building the presentation. It's only for the record of the voice for the slideshow we are running.
I think that it's for our boss to see if we did right while we were doing the presentation correct on the end of the day. If we have done OK for our work, we can use it again with the recorded one on the next show.
So, we have to look for an alternate and a better one if we like to have this function, I guess. Or add on, such as an articulate.com. I probably haven't paid enough for Microsoft but I've paid whatever they required, but yes, they said it's without any support. And they said to me if you wanted any support, you should pay more. I just couldn't afford to pay more than $300.00 to find out "Sorry, you can't!"
I was looking for the solution including "Sorry, you can't" or "There is a way but you have to pay for it."
I just wanted to find out if I could do it or not.
THAT'S THE ANSWER FOR THIS QUESTION. THANKS. PLEASE REPLY IF I'M WRONG.
67 people found this reply helpful
I'm still having very hard time to record voices on the slides and playback. I figured out this MS Powerpoint doesn't have a function to record voices while building a presentation although we can record our voice while presenting but it's not easy and controllable.
When I go on the menu on top,
SLIDE SHOW
Record Slide Show (Both Checked)
MY Slide Show is launched and the presenter slide show with note displays on my Surface Pro and the presentation displays on the another monitor since I have dual monitor configuration. I also see recording diagram with elapsed time on the presenting monitor.
Then, I pressed Enter key to move the next slide, the recording diagram will disappear. It works on the another monitor and on my Surface Pro screen but either slide sample on the left nor notes on the presenter screen. When I hit enter key again, the new slide will insert on the presenter PC.
In this same operation it works sometimes as I expected. That is moving the next slide and notes as well by pressing enter key.
Rehearse Timing in the menu does the same.
And no selection available if I have custom slide shows. The recording slide show will be only the first one in the custom slide show list.No chance to pick up other ones.
Am I missing something to do?
Thanks for your help.
36 people found this reply helpful
- Article Author |
- Volunteer Moderator
If you don't need the sound to be continuous from one slide to the next, you could record your narration in a sound editor like Audacity (free), which'll give you FAR better control over the sound quality and allow you to edit out any oopsies. Save each slide's sound to a file as you finish recording it, then insert it on the slide (Insert | Audio).
Or you can Insert | Audio | Record Audio to record and insert the audio using PPT's default settings.
You can then either have the audio start when clicked (the default) or you can select it, then Animations | add a PLAY animation, change timing to Start: With Previous to have the sound play automatically.
You can do all of this in normal view, where you can see your slide notes.
Or you could print your notes. To dead trees, or save them as PDF and open the PDF and PPT (in windowed view) and record your narration.
10 people found this reply helpful
That link is similar to the answer found in the PowerPoint ? icon. However, it does not show you how to set a mode in which you can see your notes and record your voice at the same time. This is frustrating.
My solution: Copy & paste my notes into Note Pad and start my narration for each slide. I think that the notes in PowerPoint were developed to be viewed only for live presentations--not voice recordings.
It would be a wonderful upgrade if we could record narration and see our notes at the same time. ;-)
15 people found this reply helpful
- Volunteer Moderator |
- Article Author
1 person found this reply helpful
I agree with you, that this would be a great feature.
And I agree with John; his suggestion is the best way of getting your request in front of the developers who add features to PPT.
Meanwhile, here's a bit of VBA that'll automatically export your notes text to a file and open the file. Saves all that wrist-wearying select/copy/paste stuff.
Export the notes text of a presentation
I could not find the VBA for exporting notes to another file. That would have been helpful.
I fail to see why MS has not corrected the problem of why one feature (recording) turns off another related feature (presenter mode). It would seem that Steve as an authorized moderator could count how many people over what period of time want this corrected rather than direct us to have to log it into a list of requested enhancements.
And, BTW, this thread was about the 10th item list from the Google search on "cannot see speaker notes when recording in powerpoint" --so some would have gotten fed up by the 5th on the list.
12 people found this reply helpful
Question Info
- Norsk Bokmål
- Ελληνικά
- Русский
- עברית
- العربية
- ไทย
- 한국어
- 中文(简体)
- 中文(繁體)
- 日本語
How to make a slide show
Learn how to make a slide show with photos, videos, music, and custom settings using a slide show maker.
Learn how to make a slide show with PowerPoint
Discover how to make a slide show with photos, videos, music, and custom settings using a slide show app like PowerPoint.
What is a slide show maker?
To create a slide show, you’ll want to use a slide show maker—or slide show app—which is a software program or online service that enables you create digital slide shows with text, photos, videos, music, and other special effects. The full range of slide show features and functionality varies from program to program.
Once you’ve created a slide show, it can be published on the internet or shared with others as a video file. Additionally, you can use slide shows to create dynamic, interactive content on websites.
Slide show software can be used for a variety of purposes, such as creating presentations for work, school, and even your personal life. For instance, slide shows are often used to:

Display photos during an event
Slide shows are a great way to share photos and videos with guests at a wedding, birthday, or other special event.
Create a digital photo album
Some slide shows are created for personal reasons, such as sharing important memories with family or friends.

Highlight products or services
Businesses can use slide shows to showcase their products, promote special offers and sales, or pitch their services to potential clients.
Enhance teaching, training, and public speaking
Slide shows can also provide helpful visuals in educational settings, classroom presentations, and public speaking forums.
What you need to make a slide show
When it comes to creating a slide show, there are a few things you'll need to get started. First and foremost, you'll need a device equipped with presentation software or access to an online slide show app. Secondly, you’ll need a way to display your slide show, which usually means connecting your device to a projector or big screen TV. Beyond that, you’ll need some visual aids and other media to bring your slide show to life.
Explore each of these slide show requirements in more detail:
Devices and equipment —To create a slide show, you’ll use a computer or other device—such as a tablet or mobile phone—with PowerPoint or a similar program installed. You will also need a way to project the slides onto a screen or wall. This can be done with a projector, but if you don't have one available, you can use your TV or computer monitor. Simply connect your device to the TV or monitor using an HDMI cable and select the correct input. Your slides will now be projected onto the screen.
Media —Of course, creating a slide show requires media that adds visual and even audio elements to your presentation. This can be anything from photos and videos to music and text. You can use search engines to find copyright-free media to use in your slide show.
Another option is to purchase royalty-free stock footage, images, and audio files from online media libraries. This could be a bit more expensive, but it guarantees that you have the legal right to use the media in your presentation.
Finally, you can also use your own videos, images, and even music. While this can be a time-consuming process, it does allow you to create custom content specifically for your slide show.
Slide show creator —To bring your slide show together, you’ll need a slide show creator. The slide show software you choose will depend on your presentation requirements and preferences. There are many slide show makers on the market, with Microsoft PowerPoint being one of the most popular and widely used programs globally.
How to choose a slide show maker
When choosing slide show software, it's important to consider the features and specifications that are most important to you. Some of the questions you might ask when choosing a slide show maker include:
- How easy is the software to use?
- Is the software Mac or PC compatible?
- Can I access and edit my slide show on the cloud?
- What kind of slide shows can be created with the software?
- How many photos and/or videos can be included in a slide show?
- Can text and other elements be added to slide shows?
- Are transitions and effects available for slide shows?
- Is music accompaniment an option?
- What are the options for saving and sharing your slide show?
Building a slide show doesn't have to be difficult. With the right software, you can create an engaging presentation in no time.
Six steps for creating a slide show

1. Plan your slide show
Before getting too deep into your slide show project, it’s a good idea to select and save the photos and videos you want to use. This helps you create a slide show more efficiently and purposefully, ensuring a better outcome.
4. Import media
Start adding photos, videos, and other desired media to your slides. You can upload these from your device or online media libraries. If you planned your slide show in advance, you should have all your media saved in one place.

2. Launch your slide show app
Once you’ve decided on a slide show maker, you’ll want to launch the app from whatever device you’ll be using to create your presentation.
5. Add text, music, and transitions
After you’ve arranged the visuals in your slide show, you can provide additional information and communicate sentiment using custom text, music, and timed slide transitions.

3. Choose your theme
Most slide show software offers a variety of pre-set themes, colors, and designs. You can choose one that best suits your slide show or create a custom theme using the program’s various tools and features.
6. Record, save, and share your slide show
Now you’re ready to record your slide show, which can include a voiceover or Cameo . Once your slide show is complete, you can save it as a video to your device or to the cloud, such as OneDrive . You can access your saved slide show at any time to display at events, use in meetings, share online, or send directly to other people.
How to make a slide show with photos
Adding photos to your slide show is a great way to enliven your presentation and make it more visually interesting. Here are a few different ways you can add photos to your slide show in PowerPoint.

Add photos from your device
Whether you’re using a computer, tablet, phone, or other device, you can use photos that are saved to your device to create your slide show. In PowerPoint, simply select “Insert” then “Pictures” from the program menu, then choose “This Device.” This will open your photo library and allow you to find the photos you want to use. Once you’ve selected the photos that you want to import, just click on the "Insert" button and they will be added to your slide show. If you’re using a pre-made theme, you can also right-click the image in the slide show and select “Change Picture.” Again, you will choose “This Device” to access your photo library. After inserting your photo, you can reposition it on your slide or resize it however you like.

Use stock photos
Another way to add photos in PowerPoint is to follow the same process you would when adding photos from your device, but when prompted to choose your photo source, select “From Stock Images” instead of “This Device.” This will display a library of photos that you can use in your slide show without worrying about copyright infringement. There are thousands of stock images available in most slide show maker programs. Once the library is open, you can explore existing photo categories or use keywords to search for photos that fit your needs.

Explore online photo sources
Online photos are images you can insert into a PowerPoint slide show directly from the internet, as opposed to using those you have saved on your device. This is a convenient option if you don't have photos already prepared for your slide show, or if you can’t find the right kind of photo in the stock image library. However, there are some potential risks associated with using online photos, namely that you must be careful to use royalty-free images so not to infringe on any copyrights. In PowerPoint, there is a filtering option to ensure your search results only show royalty-free photos. Inserting photos from online sources follows the same process as the previous two methods, but this time, you’ll select “From Online Sources.”
How to add videos, music, and text

How to add videos to PowerPoint slide shows
Adding videos to your slide show involves accessing videos from your device, a stock video library, or online video sources—just as you would when adding photos. In this case, however, you’ll navigate to the menu in PowerPoint and select “Insert,” followed by “Media,” then “Video.” Once your video appears on your slide, you can resize or reposition it to fit your presentation needs. You can also set your video to play automatically in the slide show by selecting “Playback” on the menu and choosing “Start Automatically.”

How to add music to PowerPoint slide shows
Much like adding videos, you can add music to individual slides in PowerPoint by navigating to “Insert” on the menu, then “Media,” and finally “Audio.” You can then import music from your device, or you can record your own audio directly in PowerPoint. However, if you want your audio to play across multiple slides in your presentation—for example, as background music for a slide show—you’ll have to take a couple of extra steps. Once you’ve imported your audio file, select “Playback” from the menu and choose the “Play in Background” option. Your music will now play across all slides. You can set one song to loop for the duration of the slide show, or you can add more songs to play continuously throughout the slide show.

How to add text to PowerPoint slide shows
Premade themes in PowerPoint make adding text slide shows easy. On slides that already have templated content, you can simply click on the text and begin editing. In addition to changing what the text says, you can resize, recolor, reposition, and add special effects to the text. Of course, you can also change the font—or style—of the text. Most of this can be done from the “Home” tab on the menu while certain effects, such as shadows, can be found on the “Shape Format” tab. If you’re designing your presentation slides from scratch, or want to create additional text, find “Insert” on the menu, then choose “Text Box” or “Word Art,” depending on your desired text effect.
Discover custom slide show settings
Add even more effects to your PowerPoint slide show with custom settings like timing, transitions, and looping.

Set slide show timing
Adding timing to your slide show is a great way to control the pacing and flow of your presentation. To add timing in PowerPoint, go to the "Transitions" tab on the menu and find the "Advance Slide" area. Make sure the box next to “After:” is checked, then input the amount of time you’d like each slide to appear on-screen. The slides will automatically advance, creating a movie-like effect that’s great for events and special occasions.

Create slide show transitions
Now that you’ve added automatic timing to your slide show, you can make it more visually appealing by creating slide transitions. Transitions are special effects that allow you to animate the way your slides change from one to the next, and there are a variety of different transitions in PowerPoint that you can choose from. You can add these transitions to your slide show from the "Transitions” tab. From there, you’ll select the transition you want to add. To preview the transition, simply click on it. You can click “Apply To All” to automatically add the same transition to every slide in your slide show, or you can manually add different transitions to different slides.

Loop your slide show
If you want your slide show to play continuously until you choose to turn it off, you can set your PowerPoint presentation to loop. This will ensure your slide show automatically starts over from the beginning once it reaches the end. To get started, navigate to the “Slide Show” tab on the menu and select “Set Up Slide Show.” When the settings window opens, check the box next to “Loop continuously until ‘ESC’” and then click “OK.” When you’re ready to turn your slide show off, simply press the Esc key on your keyboard.
Slide show template and theme tips
Search themes and templates online.
With numerous slide show themes and templates available, it’s easy to find one that fits your needs.
Customize your design
If you can’t find the perfect theme or template, you can change things like colors and fonts.
Build a custom template
If you want a blueprint to use with future slide shows, you can create your own template.
Add new slides
If you need more slides, you can choose a specific layout and your theme will be carried over.
Edit your slide layouts
Even when using a theme or template, you can rearrange slide content to highlight key information.
Add photos, videos, and text
Themes and templates make adding media easy since most slides have designated content areas.
Change or resize your fonts
If your theme’s font is too small, you can resize it or choose a new font to make it easy to read.
Reorder your slide show
Some themes and templates have a predefined sequence, but you can reorder slides to meet your needs.
Create your own slide show
Slide shows are a great way to engage your audience and present important information. Whether you're creating a slide show for personal or professional reasons, slide shows are an essential tool for anyone who wants to share information in a visually appealing manner.
Discover more ways to improve your slide show
What options are available to create a slide show?
Slide show makers come in many forms. Some slide show software can only be used on specific devices, while other slide show creators can be accessed via the cloud from any device at any time.
It’s a good idea to evaluate a variety of slide show makers to ensure that you find one with all the features you need. For instance, some slide show software skews toward business use cases and others toward personal.
Microsoft PowerPoint is a popular slide show app that allows you to save presentations to your device or the cloud, and is widely used for personal, professional, and educational purposes.
Frequently asked questions
What are slide show apps and software.
Slide show apps and software are used to create and share slide shows. Slide show programs are typically used to communicate information, diagrams, plans, or processes. They can also be used to display photos and videos at events or retail stores. Usually, slide show makers have a range of built-in features and layouts, making them easy to use, regardless of technical skill levels.
What should a slide show include?
An effective slide show should be engaging, visually appealing, and informative. To achieve this, you'll want to make sure to include the following elements:
- A catchy headline or title. This will help grab your audience's attention and set the tone for the rest of your presentation.
- A variety of images. Don't just rely on text—incorporate photos, illustrations, or even video to maximize viewership.
- Bullet points or short blocks of text. Keep your slide content concise and easy to digest; too much information will only overwhelm your viewers.
How do I make a picture slide show?
There are a few different ways to make picture slide shows. You can use online programs, or you can create a slide show directly on your computer, phone, tablet, or other device using slide show software. Some programs, such as Microsoft PowerPoint, can be accessed on your personal device and on the cloud.
How long should a slide show be?
The length of your slide show will depend on several factors, such as the topic of your presentation, the audience you're presenting to, and the amount of time you have. That said, slide shows are generally between five and ten minutes long.
How can I make a slide show better?
Here are a few tips to make your slide show more engaging:
- Add images, videos, and music to bring your slide show to life.
- Use a font that is easy to read from a distance.
- Try not to use too many words on each slide.
- Use custom transitions and timing to make your slide show flow.
- Ensure a cohesive slide show by using a theme or template.
- For live presentations, practice with the Speaker Coach feature .
Follow Microsoft 365

5 Free Alternatives To Microsoft PowerPoint
M icrosoft PowerPoint has always been the default choice for creating professional meeting briefs or fun little project demonstrations in schools. Its inclusion as a free service for students or working professionals makes it a no-brainer to use. However, for the general public, it can get quite expensive to pay for a subscription just to be able to create simple presentation slides. Although you can subscribe to Microsoft's Office Suite and get more bang for your buck, the pricing still doesn't hit the affordable range for most.
Fortunately, completion has been growing, and a sea of strong contenders offer similar services to PowerPoint. After considering feature sets, here are five of the best free alternatives to Microsoft PowerPoint. At the end of the article, you can find a detailed explanation of why we've chosen the services, alongside useful comparisons that may help you make your decision easier.
Read more: The 20 Best Mac Apps That Will Improve Your Apple Experience
When it comes to productivity apps, Zoho makes some of the better ones in the market. Zoho Sheet, for example, is one of the best Microsoft Excel alternatives out there — owing to its extensive product catalog, there is a great way to view and edit presentations. The aptly named Zoho Show lets you design and demonstrate professional-looking slides, all without having to download the program.
Zoho takes a minimal approach to most of its services, and its PowerPoint application is no different. You'll find that most menus are contextually aware of what tasks you're currently performing, which helps keep unnecessary tools out of the way and bring the important ones in focus. There is also a huge library of customizable templates you can choose from, making it easier to kickstart your presentation work.
Zoho Show is completely free to use for individuals and offers unlimited cloud storage. No features are locked behind a paywall, and rest assured, you can fully rely on this online presentation-making tool for all your needs, be it for school or work.
Canva is a service that can easily climb up to becoming everyone's favorite once they start using it. While most applaud it for its graphic designing prowess, there are many other things Canva can do that you probably aren't aware of . Among them is the ability to craft beautiful slides for your presentations and projects.
By creating a free account, you can access thousands of templates on Canva. You can filter these by use case—maybe you need one for a professional business briefing or a casual one explaining why your pet dog is the best canine. There is a whole section of ready-to-use templates dedicated to mobile-friendly viewing as well, which is something you don't usually find to be as accessible with other tools.
Like most presentation apps, Canva lets you collaborate with your team members and work across devices seamlessly. The Canva app for mobile also lets you control your slides remotely during your presentation. Some menus also feature AI-featured tools to add one-click enhancements to your slides -- unfortunately, these are locked behind premium subscription tiers. However, for the cent percent of the population, Canva can be used without spending a dime to meet a plethora of creative needs.
Apple takes great pride in developing in-house solutions to meet every user requirement. While most of its products dominate the competition in popularity, the same cannot be said for Keynote , the company's version of Microsoft PowerPoint. The program was first released in 2003 with macOS Big Sur and has largely remained one of those icons you glance over and forget about.
However, recent versions of Keynote have made it a compelling alternative to PowerPoint. Not only is it pre-installed on every Apple device, including your iPhone, but it also works best with the iPad touchscreen. Keynote has a largely clean and professional approach to the built-in templates, but nothing is stopping you from going creative. Animations are one of Keynote's strongest suits, allowing you to create near cinematic-looking presentations with just a few clicks.
While you can still use Apple Keynote through iCloud on Windows devices, this alternative is clearly meant for people surrounded by the walled garden of Apple technology. It makes use of features like AirDrop, Live Photos, and VoiceOver — all of which are technologies available across Apple devices. Using Apple Keynote is completely free, and the app has easy exporting tools that make working with Microsoft PowerPoint less of a hassle.
WPS Presentation
WPS Office makes some of the best solutions for creating and editing documents on smartphones , but their service offerings extend to Windows, macOS, and even Linux. WPS Presentation is perhaps the closest you'll get to Microsoft PowerPoint in terms of the user interface and how most tools are bundled in familiar locations.
This PowerPoint app offers real-time collaboration where you can invite your team members and work on the same document remotely. Like most collaboration tools, users can leave comments to suggest changes or add information for other people on the team.
WPS Presentation is not the only free product; you can utilize every app in the WPS Office suite. Unlike most competitors, you don't need to download or use a separate mini-app to make presentations. WPS Office has a document editor, PowerPoint creator, spreadsheet manager, and other tools all within its umbrella. Premium plans for this service exist, but they mostly cater to unlocking features for editing PDFs.
Google Slides
As a netizen, you most likely already have a Google account. Not only is it required to make any meaningful use of your Android phone, but popular services that we take for granted, like Gmail and Drive, all fall under Google's umbrella. One such free service that the tech giant has at its disposal is Google Slides . While the barebones UI might seem lackluster at first, Slides has nearly the same level of functionality as Microsoft PowerPoint and can even be supercharged by add-ons.
All of Google's workspace apps, such as Docs, Sheets, and Slides, provide an intuitive way to work in a team. You can add comments, use annotations, and share the presentation with limited access to others. You can use one of the many predesigned Google Slides templates for simple presentations , or browse for templates that cater to specific needs. Being part of a bigger service catalog has its obvious advantages, such as seamless integration with Google Meet, Gmail, and other products from Google that you already use.
We recommend Google Slides to anyone who needs to create and edit PowerPoint presentations on the go and can't be bothered with working in a complicated environment. The service is also available as an app for Android and iOS, and you can export your presentations in a wide range of formats, including PPT, PDF, or PNG for individual slides.
To Pay Or Not To Pay?
You'll notice that all the services we've mentioned on this list are free to use. In fact, you can use Office 365 apps online for free — including PowerPoint, which makes purchasing a standalone subscription to the Microsoft PowerPoint app quite redundant. However, nearly every free alternative here short of Keynote also offers premium plans, but should you consider buying one?
For the vast majority of people who are looking for a robust software to create, edit, and share presentations with — these free options deliver exceptionally well in every aspect. Some apps like Google Slides and Apple Keynote let you work in smaller teams with the free tier as well. Apps like WPS Office and Canva tend to lock new and exciting features like AI tools behind a paywall, and while these are nice to have, you definitely can do without them.
If you're looking for a presentation tool for a company with multiple people, you can scale up using any of the alternatives mentioned on this list. Both Google Workspace and Zoho offer reliable and enterprise-level plans you can upgrade to. For everyone else — enjoy creating and demonstrating your PowerPoint presentations for free.
Read the original article on SlashGear .

IMAGES
VIDEO
COMMENTS
Start presenting. On the Slide Show tab, in the Start Slide Show group, select From Beginning. Now, if you are working with PowerPoint on a single monitor and you want to display Presenter view, in Slide Show view, on the control bar at the bottom left, select , and then Show Presenter View.
Launch PowerPoint. Look for Slide Show tab. When found, click it and select From Beginning visible under Start Slide Show group. If you are working with PowerPoint on a single monitor and still ...
Select the Slide Show tab. Select the Use Presenter View checkbox. Select which monitor to display Presenter View on. Select From Beginning or press F5. In Presenter View, you can: See your current slide, next slide, and speaker notes. Select the arrows next to the slide number to go between slides. Select the pause button or reset button to ...
By default, PowerPoint is set to use Presenter view when you run a slide show. You can change this setting on the Slide Show tab of the PowerPoint ribbon: Read Start the presentation and see your notes in Presenter view for more details about how to see and use Presenter view. Print speaker notes. See Print slides with or without speaker notes ...
If you want to customize your Presenter View experience, follow these steps: On the 'Slide Show' tab, click 'Set Up Slide Show.'. Under 'Multiple Monitors,' select the 'Use Presenter View' checkbox. If you're using a single monitor, select the 'Display slide show on' option and choose your primary monitor.
Here's how to add notes in PowerPoint: Select a slide you want to add notes to. View the Notes pane located beneath each slide. If it's not visible, you can make it appear by clicking Notes on the bottom taskbar. You will see a blank space with the prompt "Click to add notes."
Next, in the pane on left, select the slide where you'd like to add speaker notes. Next, click the "Notes" button at the bottom of the window. A small box reading "Tap to Add Notes" will appear beneath the slide. For Mac users, this will say "Click to Add Notes.". Now, simply type the speaker notes for that slide.
To open Presenter view in PowerPoint, click the Slide Show tab and select the Use Presenter View check box. 2. Start your slide show. 3. Click the Notes pane in the lower right corner of the PowerPoint window, then start typing. NOTE: You can also press the F6 key to select the Notes pane in Presenter view. When a white outline appears around ...
Take advantage of the PowerPoint Presenter View to practice and present your PowerPoint speaker notes. This view also helps you as a presenter by showing you...
Click the Notes button in the Status Bar at the bottom. Move your cursor to the bottom of the window. When you see the two-sided arrow, drag up until the panel displays. Step 3: When the panel is ...
Step-by-Step Guide to Activate Presenter View: Open Your Presentation: Start by opening your PowerPoint presentation. This will be the one you intend to deliver. Navigate to the Slide Show Tab: At the top, you'll notice several tabs. Click on the one labeled 'Slide Show'. Check the 'Use Presenter View' Option:
Check the box beside the "Use Presenter View." Select from the "Start Slide Show" section to start your presentation "From the Beginning." Click the three dots menu on your full-screen slideshow view and select "Show Presenter View." When your presentation displays "Presenter View," you can scroll and use it for your speech.
A simple method for switching to Presenter View on a single monitor is to click the three dots ( More slideshow options) at the bottom in SlideShow mode and select Show Presenter View. You can also switch to Presenter View on a single monitor anytime using the ALT+F5 hotkey. The presenter can easily manage a PPT in presentation mode, with the ...
Start by clicking on the Notes button located beneath each slide. If you don't see it, click on the View tab at the top of the screen and then click on Notes Page. Begin typing your notes for that slide, providing additional details, reminders, or cues to guide your presentation. Repeat the process for each slide you want to add notes to.
On the right side: On the bottom, the notes of the current slide. You can reorganize the Presenter view by moving the divider lines to see more notes, or make the slide bigger: The text should wrap automatically, and a vertical scroll bar appears if necessary. You can also change the size of the text on the Notes pane by using the two buttons ...
Speaker notes in PowerPoint help presenters recall important points, such as key messages or stats, as they give a presentation. The speaker note panel lives at the bottom of your screen in Normal view, although some users may have this section hidden. Use the speaker notes to add more nuanced information about a slide's graphics, or ...
Adding notes to your PowerPoint Presentation is a simple and effective way to make presenting easier. In this article, we will go over how you can add notes to PowerPoint, tips on using those notes, and how to print some fancy PowerPoint notes. ... Select "View" and then "Notes Page" to get the slides with notes pages. To print your ...
Here's how: Open your PowerPoint presentation and select Normal View. Click on the slide thumbnail where you want to add notes. The notes pane will open underneath. Click where it says "Click to add notes" and type your notes. You can add quite a bit of text in the notes pane. It will automatically wrap and include scroll bars if needed.
Step 1: Open PowerPoint on Teams. To access notes in PowerPoint on Teams, start by opening the PowerPoint application within the Microsoft Teams environment. Once you're in a Teams meeting, look for the 'Share' option at the bottom of the screen, usually represented by an arrow pointing up. Click on 'Share', and a menu will pop up.
Step 2: Enable Presenter View. In PowerPoint, click on the 'Slide Show' tab and check the 'Use Presenter View' box. Enabling Presenter View is the key action that hides your notes from the audience. This option is usually found in the 'Monitors' group on the 'Slide Show' tab.
Deliver your presentation on two monitors. On the Slide Show tab, in the Set Up group, click Set Up Slide Show. In the Set Up Show dialog box, choose the options that you want, and then click OK. If you choose Automatic, PowerPoint will display speaker notes on the laptop monitor, if available. Otherwise, PowerPoint will display speaker notes ...
I am unable to see my Presenter Notes in my 'Presenter view". I see the main slide with a ribbon of slides underneath...There are no notes. How do I get the traditional view for the Presenter View back where I see my notes? Move the pointer to the extreme right edge of the window. When the pointer appears as a ⇼ drag to the left.
My solution: Copy & paste my notes into Note Pad and start my narration for each slide. I think that the notes in PowerPoint were developed to be viewed only for live presentations--not voice recordings. It would be a wonderful upgrade if we could record narration and see our notes at the same time. ;-) John Korchok.
Six steps for creating a slide show. 1. Plan your slide show. Before getting too deep into your slide show project, it's a good idea to select and save the photos and videos you want to use. This helps you create a slide show more efficiently and purposefully, ensuring a better outcome. 4.
Using Apple Keynote. is completely free, and the app has easy exporting tools that make working with Microsoft PowerPoint less of a hassle. WPS Presentation. WPS Presentation app on different ...