Big Home Projects
Electrical problems in the home: 12 common issues and their solutions, table of contents.
Electrical problems in the home are common,, yet they they can become serious issues if left unresolved. From flickering lights to faulty wiring, these problems can impact daily life and potentially pose a safety risk.

12 of the most common electrical issues in your home
1. flickering lights.
Various things, such as faulty wiring or loose light bulbs, can cause flickering lights. To address this issue, try the following steps:
2. Tripping circuit breakers
3. electrical surges.
Electrical surges can damage sensitive electronics and appliances. Consider these steps to protect your devices:
4. Dead outlets
Dead outlets can be frustrating, but there are a few things you can try before calling an electrician:
5. Overloaded circuits
Overloaded circuits occur when you have too many devices connected to a single circuit. Here’s what you can do:
6. High energy bills
7. malfunctioning switches.
If you have switches that don’t work correctly, follow these steps:
8. Faulty wiring
Faulty wiring can pose serious risks, so it’s important to address this issue promptly.
9. Buzzing sounds
10. malfunctioning gfci outlets.
GFCI outlets are essential for protecting against electric shock hazards. Try these steps if they malfunction:
11. Warm outlets or switches
Warm outlets or switches may indicate an electrical issue that requires attention.
12. Constantly blown fuses
What causes electrical problems in the home.
Electrical problems in the home can be caused by various factors, including faulty wiring, overloaded circuits, inadequate grounding, outdated electrical systems, improper installation or maintenance, damaged electrical components, power surges, and environmental factors such as moisture or pests.
How can I detect electrical problems early?
Are flickering lights a sign of electrical problems.
Yes, flickering lights can be a sign of underlying electrical problems. While occasional flickering may be due to a loose bulb or a minor issue, persistent or recurrent flickering can indicate more significant issues with the electrical system. These problems could include loose wiring connections, overloaded circuits, faulty light fixtures, or even issues with the electrical supply from the utility company.
What are some common electrical wiring issues?
Why does my circuit breaker keep tripping.
Another reason could be a short circuit, which happens when a hot wire comes into contact with a neutral wire or a ground wire, resulting in a sudden surge of electrical current. Faulty or damaged electrical appliances, damaged wiring, or loose connections can also cause circuit breakers to trip.
How dangerous is a faulty electrical outlet?
Can appliances be affected by electrical problems.
Yes, appliances can be affected by electrical problems. Electrical issues such as power surges, voltage fluctuations, faulty wiring, or inadequate grounding can have a direct impact on appliances. Power surges, for example, can cause sudden spikes in voltage that can damage sensitive electronic components within appliances.
How do I handle an electrical surge at home?
Are unusual odors indicative of electrical problems.
If you detect any unusual odors related to your electrical system, it is recommended to turn off the power supply to the affected area, unplug any devices, and seek professional assistance from a qualified electrician to assess and resolve the underlying electrical problem.
What is the risk of DIY electrical repairs?
How often should i have a home electrical inspection.
To find reputable contractors and electricians for your home projects, you can visit our directory website, Big Home Projects , which provides a list of qualified professionals in your area.
Author: Logan
Find contractors, vendors, & rentals, don’t miss another important update from us, join our community, change location, find awesome listings near you.
- Join Insider
10 Electrical Wiring Problems Solved
This guide explains 10 of the most common electrical problems in older homes and the best solutions for each issue.

If you have an older home, there’s a good chance its wiring is out of date. This can cause problems in a modern household, with our ever-growing collections of electricity-hungry appliances, lighting, and electronics.
“The circuits in these older homes weren’t designed to power the many gadgets of modern life,” says electrician Allen Gallant, who has wired six This Old House TV project houses.
The signs of strain may be obvious — a tangle of extension cords and power strips sprouting from a single outlet — or lurking unseen behind walls, ceilings, and cover plates. In this guide, we’ll give you tips for dealing with the most common problems caused by older, outdated wiring.
Hire an Electrical Pro and Avoid Fire Hazards
Some wiring problems are just inconveniences. But others can pose serious fire or electrocution hazards. If you’re buying a house (especially one that’s more than 50 years old), or if you’ve never had your wiring inspected, it’s a good idea to hire a licensed electrician to give your home a thorough going-over.
“He’ll look at the insulation on the wires to see if it’s dried out and fraying, he’ll look for corrosion in the service panel, and he’ll look to see if a previous owner did anything unsafe,” Gallant says. After that, he recommends getting a quick follow-up inspection every five years.
Don’t be alarmed if the inspection turns up code violations. Each time the electrical code is revised, old wiring is “grandfathered,” assuming it was installed correctly. The code only requires you to update wiring in rooms being gut-renovated.
To help you assess the state of your own electrical system, we’ve asked Gallant to identify the 10 most common wiring problems he sees, the dangers they pose, and his recommended solutions.
Remember: Anytime you work with wiring, be sure to turn off the circuit at the main breaker panel.
Common Electrical Problems
1. overlamping.

What it means: A fixture has a light bulb with a higher wattage than the fixture is designed for.
Code violation? Yes.
Danger level: High. The bulb’s intense heat can scorch or melt the socket and insulation on the fixture’s wires, which increases the risk of arcing — sparks that jump through the air from one wire to another. Arcing is a chief cause of electrical fires. The damage to socket and wires remains even after the bulb has been removed.
Solution: Stay within the wattage limit listed on all light fixtures made since 1985. For older, unmarked fixtures, use only 60-watt bulbs or smaller. When in doubt, opt for LED bulbs, which use less energy and produce less heat.
2. Uncovered Junction Boxes

What it means: Because a junction box houses the splices where wires are connected to one another, a person could inadvertently damage the wires or get a shock.
Danger level: Minimal, as long as wires aren’t within reach.
Solution: Spend a few cents to buy a new cover and install it with the screws provided.
3. Flickering Lights When It’s Windy

What it means: Frayed wiring in the weatherhead (the outdoor fitting where overhead cables from the power line come into the house) is causing a short whenever the cables move.
Code violation? No.
Danger level: High. Aside from the annoyance, the frayed wiring can arc and start a fire.
Solution: Contact the electric utility, which may replace the weatherhead at no charge.
4. Too Few Outlets

What it means: Heavy reliance on extension cords and power strips.
Code violation? No; grandfathered in. Today’s codes require receptacles within 4 feet of a doorway and every 12 feet after that.
Danger level: Minimal, as long as you use heavy-duty extension cords, 14-gauge or thicker. (The thicker the wire, the lower the gauge number.) Undersized extension cords (16-gauge or smaller) can overheat and ignite a fire if loads are too heavy.
Solution: Add more outlets. You’ll pay more for second-floor installations than first-floor outlets This work requires cutting holes in walls and ceilings to snake the wires. Some electricians will patch the holes; others leave the patching to you.
5. No GFCIs

What it means: There is an increased risk of electrocution in wet areas, such as baths and kitchens. GFCIs (ground-fault circuit interrupters) shut down circuits in 4 milliseconds before a current can cause a deadly shock.
Code violation? No; grandfathered in. (Codes today require GFCIs in the kitchen, garage, basement, and outdoor outlets.)
Danger level: High.
Solution: Replace old receptacles with GFCIs. This is a simple job that many homeowners do themselves or hire an electrician to handle the work. As an alternative, GFCI breakers can be installed on the main electrical panel. But then every time one trips, you have to go down to the basement to reset it.
6. Overwired Panel
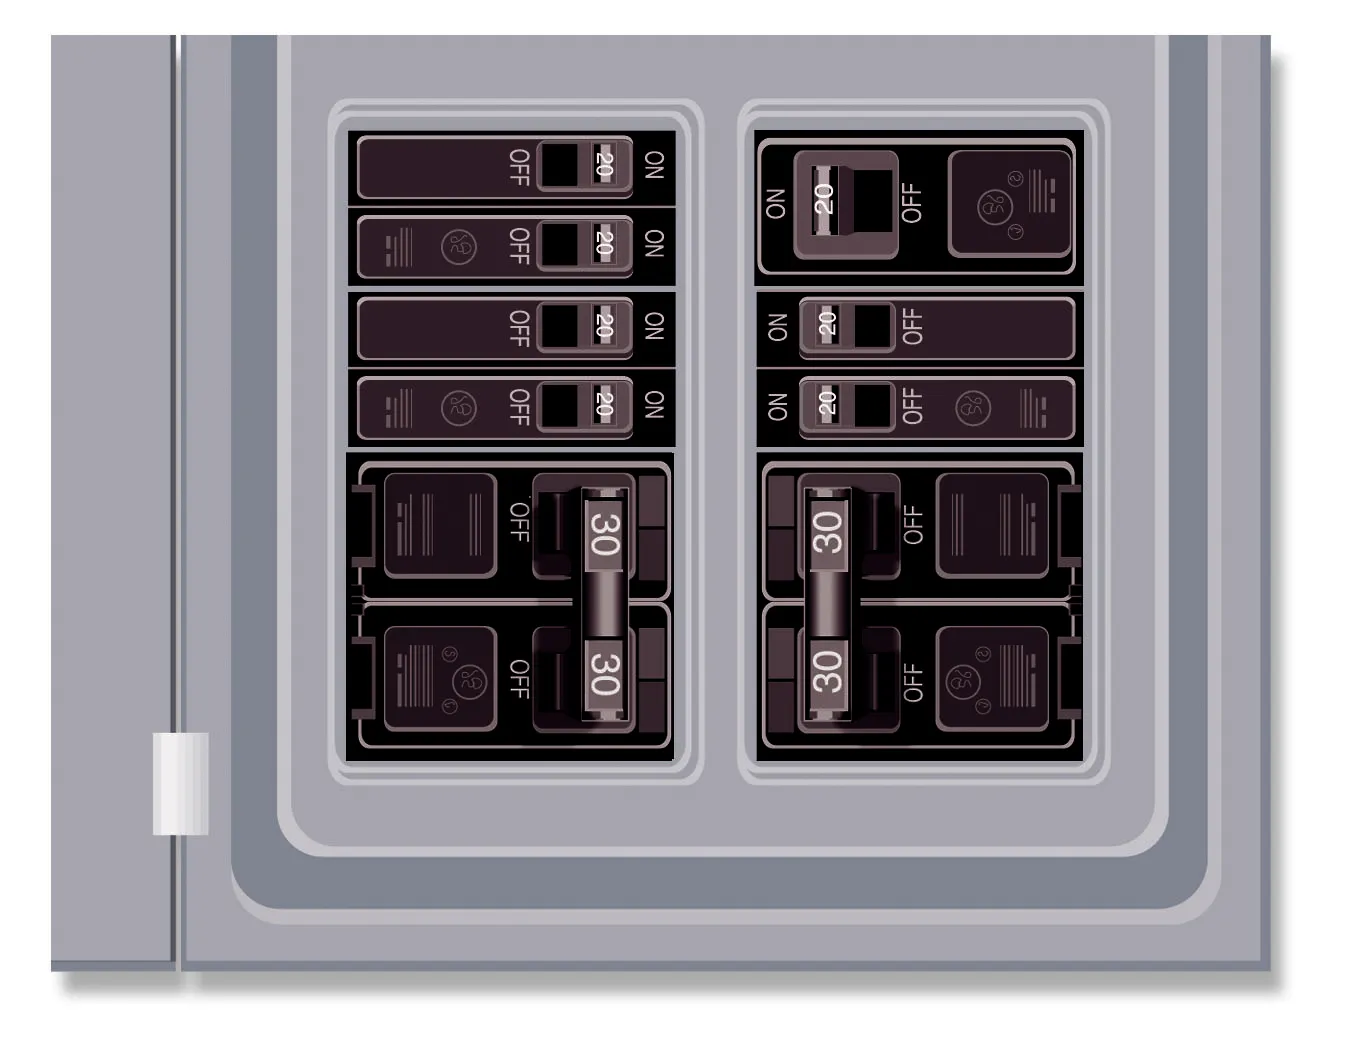
What it means: The panel contains more circuits than it’s rated to handle because too many single-pole breakers (one circuit) have been replaced with tandem breakers (two circuits) in one slot. (Tandem breakers aren’t the same as high-amp double-pole breakers, which take up two slots with one circuit.) A label on each panel specifies how many circuits the panel can accommodate.
Danger level: Minimal. It may become an issue when the house is being sold and an inspector looks inside the panel.
Solution: Add a subpanel with a few extra slots, or, if you’re planning major home improvements, replace the existing panel with a larger model.
7. Aluminum Wiring
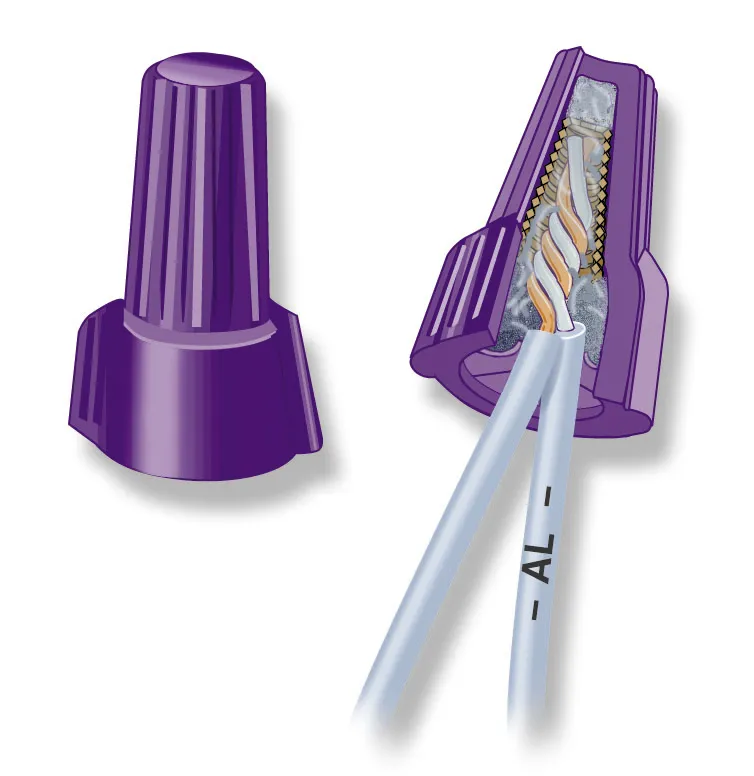
What it means: You have a type of wiring, used in the 1960s and ’70s as a cheap substitute for copper, that is no longer considered safe.
Code violation? No; grandfathered in.
Danger level: High. Aluminum corrodes when in contact with copper, so connections loosen, which can lead to arcing and fires.
Solution: Retrofit a dielectric wire nut approved for aluminum wire onto each copper/aluminum connection in light fixtures. These nuts have a special grease that stops corrosion while maintaining conductivity. Make sure any replacement switches and receptacles are labeled AL-compatible.
8. Backstabbed Wires

What it means: On newer switches and receptacles, wires pushed in the back are more likely to come loose than those anchored around screw terminals.
Code violation? No. The practice is allowed, even for new construction.
Danger level: It depends. At a minimum, loose wires can cause a receptacle or switch to stop working. In the worst case, they can start a fire.
Solution: Check for backstabbed connections by removing a switch or receptacle from its outlet box. If one is backstabbed, there are likely to be more. Release the wires and attach them to the appropriate screw terminals on the receptacle.
9. Ungrounded (2-prong) Receptacles

What it means: Your house’s wiring has no way to safely conduct any stray current that escapes the confines of the wires.
Code violation? No; grandfathered in. Today’s code requires grounded circuits and receptacles.
Danger level: Minimal, as long as you don’t use an adapter to fit a three-prong plug into a two-prong receptacle. Doing so could destroy the device you’re plugging in and increase the chance of electrocution.
Solution: If wiring allows, replace two-prong receptacles with properly grounded three-prong ones. Test all existing three-prong receptacles with a GFCI circuit tester to make sure they’re grounded. Rewire any that aren’t.
10. Plug Falls Out of Receptacle

What it means: Worn contacts in the receptacle no longer grip the prongs firmly.
Danger level: High. Loose contacts can cause arcing, which can ignite dry wood and dust.
Solution: Replace the old receptacles as soon as possible. Many homeowners feel comfortable doing this themselves. You can hire an electrician for this job, although there’s likely to be a minimum charge for small jobs like this.
Old Electrical Wiring: Is It Safe?
Today’s standard household wiring is a plastic-sheathed, insulated three-wire cable, universally known by the trade name Romex. But the vintage copper wiring in many older houses works just as well as the new stuff, as long as it’s in good condition and hasn’t been altered in a way that violates code. Here are some wiring systems you’ll find in older homes.
Knob and Tube
The earliest residential wiring system has a cloth-covered hot wire and a neutral wire, which run parallel about a foot apart. Ceramic knobs anchor the wires to the house framing; ceramic tubes are used where wires cross or penetrate framing.
Caveats: Knob and tube wiring cannot be grounded or spliced into a grounded circuit. Its soldered connections may melt if too much current flows through them. Rewire or disconnect any circuits covered with building insulation; it causes this wiring to overheat.
Armored Cable (Bx)
This is the successor to knob and tube. A flexible steel sheath covers hot and neutral wires, which are insulated with cloth-covered rubber. The sheath provides a ground, so grounded receptacles are easy to retrofit.
Caveats: Sheath must be anchored securely to a metal outlet box. Check condition of insulation every five years or so; it degrades over time, as shown above, or if too much current is allowed to flow through the circuit.
Two-Wire Plastic-Sheathed Cable
An early PVC-insulated (Romex) wire.
Caveats: Plastic is easily damaged. Grounded receptacles cannot be retrofitted to this wire.
Signs of Faulty Electrical Wiring
The signs of faulty electrical wiring can manifest in various ways, alerting homeowners to potential issues before they escalate into more serious problems.
Visual Indicators
Visual cues are often the most obvious signs of electrical wiring problems. If you notice any of these signs, it’s important to address them promptly to prevent further damage or potential hazards. Keep an eye out for:
- Discolored or scorched outlets and switches
- Frequently tripping circuit breakers or blown fuses
- Loose outlet plates or plugs that don’t stay in place
- Visible frayed or exposed wires
Auditory Warnings
Your ears can also alert you to electrical issues. These sounds often indicate loose connections or arcing, which can lead to electrical fires if left unchecked. Listen for:
- Buzzing or humming sounds coming from outlets or switches
- Crackling noises within walls
- Popping sounds when plugging in or unplugging devices
Unusual Smells
Any unusual odors associated with your electrical system warrant immediate attention from a qualified electrician, as they could indicate overheating wires or other serious issues. Be alert for burning odors, especially near outlets or appliances. In addition, a persistent ozone or fishy smell can also indicate a serious issue.
DIY Electrical Troubleshooting
While many electrical issues require professional attention, homeowners can safely perform some basic troubleshooting. However, safety should always be the top priority when dealing with electricity.
Safety Precautions
Before attempting any electrical work:
- Never work on wet surfaces or with wet hands
- Turn off power to the circuit at the main breaker panel
- Use a non-contact voltage tester to confirm the power is off
- Wear insulated gloves and use tools with insulated handles
Basic Diagnostic Tools
Several tools can help homeowners diagnose common electrical issues:
- Circuit tester: Checks if an outlet is properly wired
- GFCI tester: Verifies that GFCI outlets are functioning correctly
- Multimeter: Measures voltage, current, and resistance
When To Call a Professional
While DIY troubleshooting can be helpful, many electrical issues require professional expertise. Electrical work can be dangerous if not done correctly. When in doubt, it’s always safer to consult a licensed electrician.
Call an electrician when faced with the following scenarios:
- You’re uncomfortable working with electricity
- The problem persists after basic troubleshooting
- You encounter any signs of major wiring issues or fire hazards
- Your home has aluminum wiring or knob-and-tube wiring
- You need to add new circuits or upgrade your electrical panel
Regular professional inspections can catch potential issues before they become serious problems and ensure your home’s wiring meets current safety standards.
What To Expect
During a professional electrical inspection, an electrician will typically:
- Check for proper grounding throughout the system
- Examine your main service panel and circuit breakers
- Inspect visible wiring for signs of wear or damage
- Look for any code violations or outdated wiring methods
- Test outlets and switches for proper function
Frequency of Inspections
For most homes, electrical inspections should be conducted every 3-5 years for homes less than 40 years old. If your home is older, an electrical inspection every 1-2 years is warranted.
The electrical system should also be inspected before purchasing a home and after any major renovation or addition.
More frequent inspections may be necessary for homes with a history of electrical issues.
Energy Efficiency and Wiring
Upgrading your wiring can lead to more efficient energy use and potentially lower electricity bills. For example, replacing old aluminum wiring with copper can improve conductivity and reduce energy loss.
Impact of Old Wiring on Energy Bills
Outdated or deteriorating wiring can lead to increased energy consumption in several ways:
- Loose connections can create heat, wasting energy
- Outdated wiring may not support energy-efficient appliances effectively
- Resistance in old wires can cause voltage drops, making appliances work harder
Smart Home Integration Challenges
As smart home technology becomes more prevalent, older electrical systems may struggle to support these devices. Issues can include:
- Interference from old wiring affecting Wi-Fi and other wireless signals
- Insufficient power for smart home hubs and devices
- Lack of neutral wires in switch boxes, necessary for many smart switches
Smart home integration could include adding dedicated circuits for smart home equipment or ensuring all switch boxes have neutral wires.
Next Up In Electrical
- How Effective Are Surge Protectors?
- All About Multimeters
- How to Label a Circuit Breaker
- Simple Guide for Selecting a Home Generator
- All About Portable Power Stations
- Simple Guide to Installing a Generator Hook-Up
Get the latest This Old House news, trusted tips, tricks, and DIY Smarts projects from our experts–straight to your inbox.
WhatsApp Our Local Electrician To Get a Fast Response & Quote For Your Electrical Needs.
How to Troubleshoot Simple Electrical Issues
- September 7, 2024
Should you encounter any dilemmas concerning the electrical systems in your home, fret not! This guide is packed with insightful tips on pinpointing and resolving such issues. From flickering lights to non-functional outlets, this article provides comprehensive solutions for all your needs. Offering precise and thorough guidance, you will soon be equipped to tackle any electrical challenges that arise.
Start by understanding electrical systems. Knowing how electricity flows and the components involved will make troubleshooting easier. Safety is always your top priority .
We’ll explore common electrical problems and possible causes/solutions. This knowledge will give you confidence when tackling them.
We’ll also talk about maintenance to prevent future electrical problems. Inspecting wiring, outlets, and appliances is key. Simple tasks like tightening connections or replacing cords help too.
Specific problems, like flickering lights or non-functioning outlets, have step-by-step guides . Follow these instructions to find the root cause and take action.
This article is to empower you with knowledge. Complex issues should be handled by a professional electrician . Electrical work can be dangerous if you don’t know what you’re doing, so don’t hesitate to ask for help.
Table of Contents
Common Electrical Issues
Circuits that trip often, lights flickering, outlets not working, circuits overloaded, and switches not functioning – these are all common electrical issues.
- Tripping circuits: This happens when the circuit breaker trips due to too much current.
- Flickering lights: It is a sign of loose wiring or faulty wiring.
- Faulty outlets: Maybe wires not tight or components not working.
- Overloaded circuits: Too many appliances in one circuit can cause it to trip.
- Malfunctioning switches: Indicates either switch failure or wiring problem.
Plus, power surges can harm electrical devices and frequent bulb burnouts can mean electricity issue. Notice these to help troubleshoot electrical issues better and with accuracy.
Tools Needed for Troubleshooting
When tackling electrical issues, the correct tools are essential. These tools help professionals spot and solve problems quickly. Let’s take a look at the primary tools required for troubleshooting:
- Multimeter: Measures voltage, current, and resistance. It can detect faulty connections, short circuits, and incorrect readings.
- Wire Strippers: Take off insulation from electrical wires without damaging the conductors. They let technicians make suitable connections and ensure safety.
- Circuit Tester: Tests if a circuit is live or dead. It helps find out if there is an electrical current running correctly through the system.
- Screwdrivers: Different sizes of screwdrivers open electrical panels, control boxes, and devices for inspection or repairs.
- Wire Cutters: Precisely cutting wires prevents damage and provides accurate connections. They come in various sizes to fit different wire gauges.
- Insulation Tape: Insulates exposed wires or covers damaged cables until permanent repairs are made.
In addition to these tools, a well-stocked toolbox with pliers, gloves, flashlight, alligator clips, and soldering iron is crucial. These extra tools help address special issues that may arise during troubleshooting.
To sum up, the right tools are essential for professionals dealing with electrical issues. From multimeters to wire strippers and circuit testers, each tool serves a specific purpose in identifying and solving problems efficiently.
Safety Precautions
Electric work can be dangerous! So, it’s important to take the right safety measures. Here are three key ones to keep in mind when fixing electrical faults:
- Turn off the power. Before doing any electrical work, make sure the power is off at the breaker box. This will avoid any shocks or short circuits.
- Wear protective gear. When working with electricity, use insulated gloves, safety goggles, and non-conductive footwear to stop injury.
- No water contact. Never touch electrical devices with wet hands. Dry them first!
Remember – these safety measures are vital to keep you safe. Plus, check that you have the right tools and are following procedures. Stay safe when handling electrical issues!
Step 1: Checking the Power Source
Verifying the power supply is essential when troubleshooting electrical issues. Here are a few simple steps to quickly detect if there’s a problem:
- Make sure all switches and outlets are switched on. Sometimes, a minor mistake can create the feeling of a bigger issue.
- Have a look at the circuit breaker panel or fuse box. Check for any tripped breakers or blown fuses. Reset tripped breakers or exchange blown fuses with ones of the same amperage.
- Contact your utility company to confirm if your home has power. They can tell you about any outages or maintenance in your area that could be impacting your power supply.
It’s important to deal with power source difficulties before dealing with more complicated troubleshooting procedures. This’ll save you time and effort in solving electrical issues.
Although these steps go over the basics of examining the power source, remember that every case could have distinct details that need extra attention. It’s always smart to get help from a professional electrician if you are uncertain or unable to fix the issue yourself.
By understanding and applying these steps correctly, you can ensure a steady flow of electricity and reduce interruptions caused by simple power source problems.
Step 2: Inspecting the Wiring

Inspecting wiring is key for troubleshooting electrical issues. Here’s a 5-step guide for help:
- Turn off power first: To avoid electric shock or circuit damage, always turn off the power first.
- Check for loose connections: All wiring connections need to be tight and secure. Loose connections can cause malfunctions and even fires.
- Look for worn-out insulation: Inspect the wiring for signs of worn-out or damaged insulation, such as cracks or exposed wires.
- Watch out for burnt marks or discoloration: Burnt marks or discoloration on wires indicate overheating which may be due to excessive current flow or faulty components. Identify and address the underlying issue quickly.
- Test the continuity of each wire: Using a multimeter, check for any breaks in the circuit. Breaks in continuity can disrupt electrical flow and cause issues.
Different wiring needs specific inspection techniques and precautions. Consult a professional electrician if you’re uncertain.
These steps help inspect wiring and identify issues causing electrical problems. Always prioritize safety when dealing with electricity.
Step 3: Evaluating the Switches and Fixtures
To inspect switches and fixtures properly, take these 3 steps:
- Visually scan for cracks, exposed wiring, and loose switch plates.
- Test the switches and fixtures to make sure they’re working.
- Check connections and wiring behind the switch plates. If you spot frayed or damaged wires, repair or replace them.
Regular inspections and maintenance can help ensure your electrical system’s safety and reliability. But be careful – if you’re uncertain or facing a complex issue, call a qualified electrician.
Step 4: Analyzing Appliance Issues
Analyzing appliance issues is essential for troubleshooting simple electrical problems. To do this, go through four steps:
- Inspect the appliance. Look for damaged wires or components. Check the connections are secure and clean.
- Test the power supply. Make sure it’s plugged in and the outlet works. Check with a different device to rule out any power issue.
- Review the appliance’s controls and settings. A small change in temperature or mode may solve the problem.
- Check the user manual or online resources. Read the manual for troubleshooting instructions. Search online for common problems and solutions related to your appliance.
By following these steps, you can gain insight into the cause of the malfunction. For complex issues, consult forums or customer support.
We have been discovering ways to fix electrical issues. You should feel able to tackle small problems now. The most important thing is safety.
At first, we noted the importance of properly understanding the problem. Then, we discussed how to look at circuits and wires. Plus, we looked into outlets and switches.
We also spoke about lighting problems. From checking bulbs to investigating fixtures and wiring, we looked into everything.
One more thing! It’s important to check the breaker panel for blown fuses or breakers. Plus, understanding GFCIs can be useful for shock-related issues.
Practice is the key to succeeding in troubleshooting. The more familiar you become with electrical systems, the better you’ll be at identifying and dealing with issues.
Now, go ahead with this knowledge. May it help you in your journey through the world of electricity! Happy problem-solving!
Frequently Asked Questions
1. How do I troubleshoot a dead electrical outlet?
To troubleshoot a dead electrical outlet, start by checking if the circuit breaker is tripped or a fuse is blown. If the breaker or fuse is fine, use a voltage tester to check for power at the outlet. If there is no power, try resetting the GFCI outlet nearby. If these steps don’t solve the issue, it’s best to call a licensed electrician.
2. Why is my light bulb constantly flickering?
A flickering light bulb is usually caused by a poor connection between the bulb and the socket. First, turn off the light and make sure the bulb is screwed in tightly. If that doesn’t work, try replacing the bulb. If the problem persists, there may be an issue with the socket or the wiring, and it’s recommended to consult a professional electrician.
3. What should I do if I experience a mild electrical shock when touching an appliance?
If you feel a mild electrical shock when touching an appliance, immediately unplug it. Avoid touching the appliance with wet hands or while standing on a wet surface. Check for any loose or exposed wires in the appliance’s cord. If the problem continues, it’s important to consult an electrician to avoid potential risks of electric shock.
4. How can I fix a constantly tripping circuit breaker?
A constantly tripping circuit breaker can indicate an overloaded circuit. Start by unplugging any unused devices and distribute the load among different outlets. If the breaker still trips, try plugging the device into a different circuit. If the problem persists, it may be due to a faulty breaker or a wiring issue, requiring the assistance of a professional electrician.
5. What should I do if my circuit breaker won’t reset?
If your circuit breaker won’t reset, it may be due to a short circuit or a ground fault. Start by turning off all the devices connected to that circuit. Then, try resetting the breaker. If it continues to trip immediately or after turning on the connected devices, there could be a wiring problem. It’s advisable to seek professional help to diagnose and fix the issue.
6. Why are my outlets not providing power?
If your outlets are not providing power, check for tripped circuit breakers or blown fuses in the electrical panel. Resetting the tripped breaker or replacing the blown fuse might solve the problem. If not, the issue could be loose or damaged wiring, requiring the expertise of a licensed electrician to inspect and repair.
Related posts:
- What Do You Need to do to Become an Electrician?
- Most Common Electrical Problems At Kuala Lumpur Home
- How to Prevent Electrical Fires in Your Kuala Lumpur Office
- Essential Guidelines for Planning Your Home Electrical Installation


25 Common Electrical Problems and Solutions
Electrical problems can be frustrating and potentially dangerous for homeowners. From outdated wiring and faulty outlets, to circuit breaker tripping and electrical shocks, it is important to identify and address these problems promptly. In this blog, we will explore 25 common electrical problems that homeowners may face and provide possible solutions for each issue. Whether you are a DIY enthusiast or prefer to hire a professional, this guide will provide valuable information and resources to help you address any electrical issues in your home.
1- Outlets not working
One of the most frustrating electrical problems that homeowners face is when outlets stop working. This can be especially frustrating if it is an outlet that is frequently used or if it is the only outlet available in a certain area.
The impact of this problem can range from simply being inconvenient to potentially dangerous if it involves appliances that need to be plugged in for safety purposes. In some cases, non-working outlets can also be a sign of a larger electrical issue within the home.
There are several possible causes for outlets not working, including loose connections, outdated wiring, and circuit overloads.
Possible solution:
If the outlet is not working, the first step is to check the circuit breaker to see if it has tripped. If the circuit breaker is tripped, simply reset it and see if the outlet starts working. In some cases, it may be necessary to upgrade the outlet or rewire the circuit to ensure the safety and functionality of the home. If the outlet is found to be faulty, it may also be necessary to replace the outlet.
2- Tripped circuit breaker
A tripped circuit breaker is a common electrical problem that can be caused by a variety of factors. It is essentially a safety mechanism that is designed to protect the home and its electrical system from damage due to an overload or short circuit.
When a circuit breaker trips, it cuts off the flow of electricity to the circuit, which can disrupt the power supply to various appliances and electronics. This can be a nuisance and can lead to the loss of work or entertainment if it affects devices that are in use.
The main causes of circuit breaker tripping include overloading the circuit, faulty wiring, and malfunctioning appliances or electronics. It is important to identify the root cause of the tripping and take steps to fix it to avoid future disruptions.
To fix a tripped circuit breaker, locate the electrical panel and locate the circuit breaker that is tripped. Flip the switch to the off position, and then back to the on position. After the circuit breaker has been reset, check to see if the issue has been resolved.
If the issue persists, it is important to identify the appliances or electronics that may be causing the issue and unplug them. If the circuit breaker trips again, it is recommended to have a professional electrician inspect the circuit and determine the cause of the problem.
3- Flickering lights
Flickering lights can be a nuisance and can also be a sign of a larger electrical issue within the home. While it is normal for lights to flicker occasionally, if it is happening frequently or if it is accompanied by other electrical problems, it is important to address the issue.
The main causes of flickering lights include loose connections, outdated wiring, and faulty light bulbs. In some cases, flickering lights can also be a sign of an overloaded circuit or a problem with the electrical panel.
The impact of flickering lights can range from simply being annoying to potentially dangerous if it is a sign of a larger electrical issue.
If the flickering lights are caused by a faulty light bulb, the easiest solution is to simply replace the bulb with some energy efficient bulbs . If the flickering persists after replacing the bulb, it is recommended to have a professional electrician inspect the circuit and determine the cause of the problem.
4- GFCI outlet not resetting
Ground Fault Circuit Interrupter (GFCI) outlets are designed to protect against electrical shocks and are commonly found in areas of the home that are prone to water, such as the bathroom and kitchen. These outlets are equipped with a reset button that will trip if it detects an electrical current leak.
If a GFCI outlet is not resetting, it can be a sign of a larger electrical issue within the home. The main causes of a GFCI outlet not resetting include loose connections, outdated wiring, and a malfunctioning outlet.
- Check the circuit breaker: If the circuit breaker has tripped, simply reset it and see if the GFCI outlet resets. If the outlet still does not reset, it is likely a separate issue.
- Test the GFCI outlet: Use a voltage tester to determine if there is power to the outlet. If there is no power, it may indicate a problem with the wiring or a faulty outlet.
- Inspect the wiring: Check for any loose or damaged wiring around the outlet. If the wiring is damaged, it will need to be repaired or replaced by a professional electrician.
- Replace the outlet: If the outlet is faulty, it will need to be replaced by a professional electrician.
5- Overloaded circuits
Overloaded circuits are a common electrical problem that can be caused by a variety of factors. It occurs when too many appliances or electronics are plugged into one circuit, causing the circuit to become overloaded and potentially leading to a fire hazard.
The main causes of overloaded circuits include too many appliances or electronics being plugged into one circuit, outdated wiring, and faulty appliances or electronics.
To fix an overloaded circuit, it is important to identify the appliances or electronics that are causing the overload and unplug them. In some cases, it may be necessary to upgrade the electrical panel or rewire the circuit to accommodate the electrical load.
6- Frayed or damaged electrical cords
Frayed or damaged electrical cords can be a serious electrical hazard and should be addressed immediately. These types of cords can easily short-circuit and potentially start a fire.
The impact of frayed or damaged electrical cords can be dangerous if they are not addressed. The main causes of frayed or damaged electrical cords include wear and tear over time, animals chewing on the cords, and improper usage or storage.
If an electrical cord is frayed or damaged, it is important to unplug the cord and dispose of it immediately. It is recommended to replace the cord with a new one that is in good condition to avoid any potential dangers.
7- Dimming lights
While it is normal for lights to dim slightly when appliances or electronics are turned on, if it is happening frequently or if the lights are dimming significantly, it could be a sign of a problem.
The main causes of dimming lights include outdated wiring, faulty light bulbs, and overloaded circuits.
If the dimming lights are caused by a faulty light bulb, the easiest solution is to simply replace the bulb. In some cases, upgrading the electrical panel or rewiring the circuit may be necessary to accommodate the electrical load.
8- Lack of power in certain outlets or rooms
A lack of power in certain outlets or rooms can be a frustrating and inconvenient electrical problem. It can disrupt the use of appliances and electronics and can also be a sign of a larger electrical issue within the home.
The main causes of a lack of power in certain outlets or rooms include circuit overloads, outdated wiring, and faulty outlets or switches.
If there is a lack of power in certain outlets or rooms, the first step is to check the circuit breaker to see if it has tripped. If the circuit breaker is tripped, simply reset it and see if the power returns.
9- Electrical shocks
Electrical shocks can be a serious electrical hazard and should be addressed immediately. These types of shocks can be caused by a variety of factors, including faulty wiring, outdated outlets or switches, and water damage.
The impact of electrical shocks can range from simply being uncomfortable to potentially dangerous if it leads to a fire or serious injury. It is important to identify the root cause of the issue and take steps to fix it to ensure the safety of the home.
If an electrical shock is experienced, the first step is to unplug any appliances or electronics that may be causing the issue. It is recommended to have a professional electrician inspect the outlet or switch and determine the cause of the problem. In some cases, it may be necessary to upgrade the outlets or switches to ensure the safety of the home.
10- The burning smell from outlets or appliances
A burning smell can be caused by a variety of factors, including faulty wiring, outdated outlets or switches, and malfunctioning appliances or electronics. The impact of a burning smell from outlets or appliances can be dangerous if it leads to a fire.
If a burning smell is noticed coming from an outlet or appliance, it is important to take immediate action to prevent any potential dangers. The first step is to turn off the main power switch and unplug any appliances or electronics that may be causing the issue. If the burning smell persists, it is recommended to evacuate the home and call 911 for emergency assistance.
11- Circuit overloads
Circuit overloads are a common electrical problem that can be caused by a variety of factors. It occurs when too many appliances or electronics are plugged into one circuit, causing the circuit to become overloaded and potentially leading to a fire hazard.
The impact of circuit overloads can range from simply being inconvenient to potentially dangerous if it leads to a fire.
The main causes of circuit overloads include too many appliances or electronics being plugged into one circuit, outdated wiring, and faulty appliances or electronics.
To fix a circuit overload, it is important to identify the appliances or electronics that are causing the overload and unplug them. It may also be necessary to upgrade the electrical panel or rewire the circuit to accommodate the electrical load.
12- Sparks or smoking from outlets or appliances
Sparks or smoking from outlets or appliances can be a serious electrical hazard and should be addressed immediately. These types of issues can be caused by a variety of factors, including faulty wiring, outdated outlets or switches, and malfunctioning appliances or electronics.
The impact of sparks or smoking from outlets or appliances can be dangerous if it leads to a fire.
If sparks or smoking are experienced from outlets or appliances, the first step is to unplug any appliances or electronics that may be causing the issue. Rectify the issue and then use the outlet.
13- Electrical outlets not grounded
Electrical outlets that are not grounded can be a serious electrical hazard and should be addressed immediately. These types of outlets may not provide proper protection against electrical shocks and can potentially lead to serious injury or death.
The impact of electrical outlets not being grounded can be dangerous if it leads to electrical shocks.
The main causes of electrical outlets not being grounded include outdated wiring, faulty outlets or switches, and improper installation.
If an outlet is not grounded, it is important to have a professional electrician inspect the outlet and determine the cause of the problem. In some cases, it may be necessary to upgrade the outlets or switches or rewire the circuit to ensure proper grounding. It is also important to ensure that all outlets are properly grounded to ensure the safety of the home.
14- Electrical panel issues
Electrical panel issues can be caused by a variety of factors, including outdated panels, faulty wiring, and circuit overloads.
The impact of electrical panel issues can range from simply being inconvenient to potentially dangerous if it affects appliances that are necessary for safety purposes.
If there are issues with the electrical panel, it may be necessary to upgrade the panel or rewire the circuit to ensure the safety and functionality of the home.
15- Electrical fires
Electrical fires can be a serious electrical hazard and should be addressed immediately. These types of fires can be caused by a variety of factors, including faulty wiring, outdated outlets or switches, and malfunctioning appliances or electronics.

The impact of electrical fires can be dangerous if it leads to serious injury or damage to the home. It is important to identify the root cause of the issue and take steps to fix it to ensure the safety of the home.
If an electrical fire occurs, the first step is to unplug any appliances or electronics that may be causing the issue and to turn off the main power switch. It is also important to evacuate the home and call 911 for emergency assistance. It is recommended to have a professional electrician inspect the outlet or switch and determine the cause of the problem.
16- Outdated wiring
Outdated wiring can be dangerous and leads to many other electrical problems, if it is not up to code or if it is not able to handle the electrical load of the home.
The main cause of outdated wiring is simply that it has not been updated in a long time and is no longer able to handle the electrical needs of the home.
If outdated wiring is identified as the cause of an electrical issue, it may be necessary to completely rewire the home to ensure the safety and functionality of the electrical system.
17- No power to appliances or electronics
A lack of power to appliances or electronics can be a frustrating and inconvenient electrical problem that can be caused by a variety of factors. It can disrupt the use of these items and can also be a sign of a larger electrical issue within the home.
The main causes of a lack of power to appliances or electronics include faulty outlets or switches, outdated wiring, and circuit overloads.
If there is a lack of power to appliances or electronics, the first step is to check the circuit breaker to see if it has tripped. If the circuit breaker is tripped, simply reset it and see if the power returns. If the power still does not return, it is recommended to have a professional electrician inspect the circuit and determine the cause of the problem. In some cases, upgrading the electrical panel or rewiring the circuit may be necessary.
18- Faulty outlets or switches
Faulty outlets or switches can be dangerous if they are not functioning properly or if they are not up to code. The main causes of faulty outlets or switches include outdated or damaged components, improper installation, and incorrect wiring.
If faulty outlets or switches are present in the electrical system, it may be necessary to upgrade the outlets or switches or to rewire the circuit to ensure the safety and functionality of the electrical system.
19- Malfunctioning appliances or electronics
Malfunctioning appliances or electronics can be caused by a variety of factors, including outdated or damaged components, incorrect usage, and incorrect installation.
If malfunctioning appliances or electronics are identified as the cause of an electrical issue, it may be necessary to repair or replace the malfunctioning item to ensure the safety and functionality of the home.
20- Frequent circuit breaker tripping
Frequent circuit breaker tripping can be caused by a variety of factors, including circuit overloads, faulty wiring, and outdated electrical panels.
If frequent circuit breaker tripping is occurring, it is important to identify the appliances or electronics that are causing the issue and unplug them. In some cases, upgrading the electrical panel or rewiring the circuit may be necessary to accommodate the electrical load.
21- Sparks or smoking from circuit breaker
Sparks or smoking from a circuit breaker can be a serious electrical hazard and should be addressed immediately. These types of issues can be caused by a variety of factors, including faulty wiring, outdated circuit breakers, and circuit overloads.
The impact of sparks or smoking from a circuit breaker can be dangerous if it leads to a fire. It is important to identify the root cause of the issue and take steps to fix it to ensure the safety of the home.
If sparks or smoking are experienced from a circuit breaker, the first step is to turn off the main power switch and unplug any appliances or electronics that may be causing the issue. It is recommended to have a professional electrician inspect the circuit breaker and determine the cause of the problem. In some cases, it may be necessary to upgrade the circuit breaker or rewire the circuit to ensure the safety and functionality of the home.
22- Faulty smoke detectors
Faulty smoke detectors are detectors that may not function properly or may not provide proper warning in case of a fire. The impact of faulty smoke detectors can be dangerous if it leads to a fire.
The main causes of faulty smoke detectors include outdated or damaged components, incorrect installation, and incorrect usage.
If faulty smoke detectors are identified as the cause of an electrical issue, it is recommended to have a professional electrician or smoke detector technician inspect the detectors and determine the best solution. In some cases, it may be necessary to repair or replace the detectors to ensure the safety and functionality of the home.
23- Lack of proper electrical outlets for modern devices
A lack of proper electrical outlets for modern devices can be caused by a variety of factors, including outdated wiring and outlets that are not equipped to handle modern devices.
The impact of a lack of proper electrical outlets for modern devices can range from simply being inconvenient to potentially dangerous if it leads to electrical fires or shocks.
If there is a lack of proper electrical outlets for modern devices, it is recommended to upgrade the outlets or rewire the circuit to ensure the safety and functionality of the home.
24- Unsafe outdoor electrical connections
Unsafe outdoor electrical connections can be a serious electrical hazard and should be addressed promptly. These types of connections can be dangerous if they are not up to code or if they are not protected against weather and other outdoor elements.
The impact of unsafe outdoor electrical connections can be dangerous if it leads to electrical fires or shocks. The main causes of unsafe outdoor electrical connections include outdated or damaged components, improper installation, and incorrect usage.
Possible solution:
If unsafe outdoor electrical connections are identified as the cause of an electrical issue, it is important to ensure that all outdoor electrical connections are protected against the weather and other outdoor elements to avoid any potential dangers.
25- Faulty electrical panel labeling
Faulty electrical panel labeling can be a frustrating and inconvenient electrical problem that can disrupt the use of appliances and electronics. These types of issues can be caused by a variety of factors, including incorrect labeling or outdated labels.
The impact of faulty electrical panel labeling can range from simply being inconvenient to potentially dangerous if it leads to incorrect circuit usage or electrical fires.
If faulty electrical panel labeling is identified as the cause of an electrical issue, it is recommended to have a professional electrician inspect the panel and determine the best solution. In some cases, it may be necessary to update the labels or have the panel professionally labeled to ensure the safety and functionality of the home.
What is the Most Common Cause of Electrical Problems?
The most common cause of electrical problems is outdated or damaged wiring. As homes age, the wiring can become outdated and may not be able to handle the electrical load of modern appliances and electronics. Additionally, wiring can become damaged over time due to wear and tear, pests, or natural disasters.
Other common causes of electrical problems include faulty outlets or switches, circuit overloads, and malfunctioning appliances or electronics. It is important to regularly inspect and maintain the electrical system in your home to prevent any potential issues.
What are Three Warning Signs of an Overloaded Electrical Circuit?
There are several warning signs that can indicate an overloaded electrical circuit, including:
- Frequent circuit breaker tripping: If the circuit breaker is frequently tripping, it may be a sign that the circuit is overloaded. This can be caused by too many appliances or electronics being used on the same circuit, or by outdated wiring that cannot handle the electrical load.
- Sparks or smoking from a circuit breaker: If sparks or smoking are observed coming from a circuit breaker, it is a clear indication of an overloaded circuit and should be addressed immediately.
- Flickering or dimming lights: If the lights in your home are flickering or dimming, it may be a sign that the circuit is overloaded. This can be caused by too many appliances or electronics being used on the same circuit, or by outdated wiring that cannot handle the electrical load.
Electrical problems can range from inconvenient to potentially dangerous and it is important to address them promptly to ensure the safety and functionality of your home. From outdated wiring and faulty outlets, to circuit breaker tripping and electrical shocks, there are many common electrical issues that homeowners may face. By understanding the root causes of these issues and taking the necessary steps to fix them, you can avoid any potential dangers and ensure that your home’s electrical system is functioning properly. If you are unsure about how to address an electrical issue, it is always best to consult with a professional electrician for expert guidance and assistance.
About The Author

Engr. Liaqat H.
Related posts, how to calculate an electrical load estimate for a building 2023, the role, challenges, selection and future of electrical systems in buildings, 10 simple methods to save electrical energy at home, types of energy efficient light bulbs for maximum savings and minimum carbon footprint, leave a comment cancel reply.
Your email address will not be published. Required fields are marked *
Save my name, email, and website in this browser for the next time I comment.
- Start a Project
- Join as a PRO
Common Home Electrical Problems and What to Do About Them
13th Sep, 2021 |
Electricity has become an inevitable part of modern life. Almost all of us depend on it — whether it’s for lighting, operating appliances and devices, or heating and cooling.
The last thing we want is for our home’s electrical system to have issues. Unfortunately, that’s not always the case. Power can go out in a storm, breakers could trip, and light switches can malfunction. That’s why it’s important to get familiarized with the common electrical problems around the house, as well as know the appropriate solution to each issue.
Note that when it comes to electricity, safety is paramount. Never attempt to do any electrical work on your own. The tips here are for troubleshooting only, and you should call a licensed electrician near you to solve the root of the issue.
10 Common Electrical Problems Around the House
1. frequent power surges.
A power surge happens when an occurrence forces too much current through an electrical system causing a quick, about a millisecond, service interruption. This can be caused either by internal surges (e.g. when an AC is turned on, or when tripped circuit breakers create an increase in the electrical current) and external surges (e.g. lightning strikes or damaged powerlines).
Although power surges only last for a thousand of a second, experiencing it frequently can damage the electrical components in your home, cause a plugged-in appliance to overheat and dramatically reduce its lifespan, or wost, start an electrical fire.
If you do experience recurring power surges, the first thing you can do is to unplug any cheap devices or electrical cords from your outlets and see if this puts a stop to the surges. If the problem continues, make sure to schedule a visit from your local electrician to prevent dangerous power surges from damaging your home.
As a prevention, you can also use surge protection devices (SPD), which you can plug into outlets around your house, or ask a qualified electrician to install an SPD into your electrical panel so your whole home is protected.
2. Dips in Power
Also called voltage sags, this occurrence is opposite to power surges. Dips happen when there is a sudden drop in voltage (around less than 10% or more) below the normal electric supply. In a home, voltage sags occur when appliances like refrigerators or heating and cooling systems are switched on.
Like the power surge, what you can do about this is to add a voltage protector to your sockets or have a professional install the device into your breaker panel. This will help protect your appliances and other electronic devices from being damaged by sudden changes in power.
3. Tripping Circuit Breakers
When a circuit breakers trips, it means that it is doing its job to cut off the current flow when it detects an electrical fault that could damage the electrical circuit. Using multiple high-wattage appliances, like washing machines, dishwashers, hairdryers, at the same time can cause the breaker to trip.
If this does happen to you, go to your circuit breaker box and identify the tripped breaker. You will know which one when you see that the switch is positioned to OFF or somewhere between ON and OFF. Turn off the lights and unplug the electronics that are connected to the circuit. Push the switch back to ON and try to turn on the lights and appliances connected to the circuit one at a time.
If the circuit trips again, it’s a clear red flag that you have a more serious issue. Leave the circuit breaker to OFF and consult a trusted electrician immediately to identify and solve the problem.
4. Overloaded Circuit
One reason why a circuit breaker frequently trips is overloading a circuit. Unfortunately, homes do not have enough electrical outlets to meet our growing dependency on electricity.
To prevent overloading, make sure that you don’t use too many electronics and appliances at a time. Remove any devices that you are not using, like phone chargers (yes, they continue to draw electricity even if they’re not connected to your device), and never plugin too many items in a single circuit. Also, it’s a bad idea to chain extension cords together and connect multiple devices to them.
You can use a heavy-duty extension cord properly as a temporary solution to having few electrical outlets. The safest solution to this is to contact a qualified electrician to install new outlets for you.
5. Loose Outlets
Another common electrical problem around the house is loose outlets. This is an issue that should be addressed immediately before the wires inside the electrical box become loose and cause a huge disaster, such as electric shocks or fires.
To fix the problem, make sure that you turn off the breaker that supplies electricity to the outlet, or a better option is to switch off the main breaker instead so that there’s no electricity flowing around the house (make sure to prepare a flashlight). Double-check to make sure there’s no power. You can plug an appliance to check or use a voltmeter. Never proceed unless you’re a hundred percent sure. Unscrew the outlet and place outlet shims onto the outlet screws to make up for any space between the box and the screws. You can add more shims until the outlet is secure.
Again, if you’re unsure how to do this or you don’t have the tools to take on this fix, it would be safer to have a professional electrician do the troubleshooting for you.
6. Warm Outlets or Light Switches
If you feel that your outlets or switches are warm, it means that you should start paying attention to your home’s electrical system. A warm outlet or light switch could be caused by a couple of things: 1. there are too many plugs in an outlet, 2. a part of a switch or outlet is broken, 3. there is damage in the wiring, or 4. a high amount of current is flowing to an outlet.
Solving this issue is tricky because often, the problem that needs to be addressed is behind your walls, which only trained electricians could identify and solve.
7. Electrical Shocks
While electrical shocks are often mild, it’s not something that you do not want to experience. However, if it does happen when you turn on or off a device, it only means two things: it’s either the appliance is faulty or there could be a problem with the wiring.
To do an inspection, try plugging the appliance in a different outlet to check whether the issue is in the outlet or device, but you will be risking yourself of another electrical shock. To be on the safer side, it’s smart to call an electrician to resolve the problem.
8. Lights Are Too Dim or Bright
If you notice that some lights around your home are either too bright or too dim, it could mean that you are using an incorrect wattage.
Electricians call using a higher wattage light bulb “overlamping”, which means the light bulb has a wattage higher than the light fixture can handle. Using the wrong light bulb can cause overheating or damage to your light fixture.
To solve or prevent this issue, make sure that you check what the light fixture manufacturer recommends for the wattage and use the appropriate bulbs.
Flickering lights are also annoying and are a different issue altogether. If you experience this in your home, try to check first if the bulb is only loose. Otherwise, it could be a warning sign that you have issues with wiring that needs the attention of an expert.
9. Light Bulb Burn Often
Does your light bulb burn only after a few weeks? It could mean different things. It’s either you’re simply using a bad batch of lights, you tightened the blub to the fixture too much, the bulb is exposed to vibration, there’s an issue with the wiring on the circuit, or you’re using the wrong kind of bulb (again, overlamping).
You can try to investigate and see what’s causing your light bulbs to burn often, or a more convenient approach is to reach out to an electrician to get to the bottom of the problem.
10. Increased Electrical Bill
There are a couple of reasons why there is an inexplicable rise in your electric bill. Make sure to watch out for these things below:
- Faulty appliances – malfunctioning appliances will consume more energy than normal
- Leaking ductwork on heating and cooling system – this makes the unit run more often than usual
- Poor insulation/ Home is too drafty – causing the heater to work double to keep the temperature in your home cozy
- Appliances on stand by – devices that are plugged in and on standby mode still draw power and will reflect only our electric bill
- Damaged wiring – this is a serious issue that should be inspected by an electrician ASAP
- Old wiring – if you live in a home that’s over a decade old, chances are your wiring could not handle the demands of modern appliances. This calls for a visit from an electrician for an electrical inspection and upgrade.
We hope that our tips could help you troubleshoot or prevent these common home electrical issues. Again, remember that if you are unsure or you’re not confident to do these things, the smartest thing to do is to contact a licensed electrician to check and fix the problem for you. As the saying goes, it’s better to be safe than sorry.
Related Posts
- Types Of Electricians (Complete Guide)
- Winter is Coming: 10 Ways to Save Energy
- 6 Expert Tips To Find A Professional Electrician
- 12 Signs You Need to Hire an Electrician
Leave a Reply Cancel reply
Your email address will not be published. Required fields are marked *
Save my name, and email in this browser for the next time I comment.
Get FREE project cost information delivered right into your inbox
Same day pros.
- Terms & Conditions
- Privacy Policy
- Do not sell my info
- Same Day Service Providers
- Business Tools
- Contractor Marketing Services
Social Media
Cookie consent.
Electrician Apprentice HQ #1 Online Resource For Becoming An Electrician

Ohms Law Power Wheel: Understanding the Electrical Formula Wheel
How to use the ohm’s law formula wheel, e or v = voltage (volts), i= current (amps), r= resistance (ohms), ohm’s law example problems, principle’s of ohm’s law – proportional and inversely proportional.
that the electrical current (I ) flowing in an circuit is proportional to the voltage (V ) and inversely proportional to the resistance (R) .
Increasing Resistance
Increasing voltage, ohm’s law pie formula chart.
the rate at which work is done when one ampere (A) of current flows through an electrical potential difference of one volt (V)
Formula Wheel with Ohm’s Law and PIE
Useful links:, about thomas hawkins, best pipe & conduit bending apps for electricians (conduit bending calculator).
- Skip to main content
- Skip to primary sidebar
- Case Studies
- Electrical Engineering
12 Typical Electrical Engineering Problems And Solutions

The complex world of electrical engineering presents constant challenges, from complex circuit malfunctions to perplexing power distribution issues. This comprehensive guide explores these common electrical engineering problems, equipping you with the knowledge and strategies to resolve them effectively. Whether you’re a seasoned professional or just starting your journey, this resource provides a valuable foundation for conquering even the most intricate electrical engineering obstacles.
StudyForFE’s FE Electrical Exam Prep Review Course provides a comprehensive solution for those seeking to excel on the FE Electrical Exam Exam. This course equips you with the necessary expertise to tackle typical electrical engineering problems confidently. By enrolling, you can gain valuable knowledge and enhance your preparedness for the examination.
What Is Electrical Engineering?

Electrical engineering thrives on innovation, with engineers constantly working to develop new technologies and push the boundaries of what is possible. This rapid pace of change presents both opportunities and challenges for industry professionals. Engineers must remain updated with the latest advancements to keep pace with the competition and deliver cutting-edge solutions to clients and customers. One of the significant challenges facing electrical engineers is the constant need to update their:
- Skills
- Knowledge base
Staying Updated
With new technologies emerging regularly, engineers must invest time and effort in staying abreast of the latest developments. This involves attending
- Training sessions
- Conferences to learn about emerging trends and technologies
Engineers must continuously engage in self-study to enhance their expertise and remain competitive in the job market.
Innovation and Sustainability in Electrical Engineering
Another challenge for electrical engineers is the pressure to innovate and develop solutions that are not only efficient but also sustainable and environmentally friendly. With the growing focus on sustainability and green technologies, engineers must find ways to minimize the environmental impact of their projects while still meeting performance requirements.
This necessitates a shift towards:
- Renewable energies
- Energy-efficient designs
- Sustainable practices in the field of electrical engineering
Balancing Complexity and Simplicity in Electrical Systems
The increasing complexity of electrical systems presents a challenge for engineers, requiring them to develop solutions that are not only robust and reliable but also easy to maintain and troubleshoot. Engineers must strike a balance between complexity and simplicity, designing systems that are sophisticated yet user-friendly. This involves leveraging the latest tools and technologies to streamline the design process and ensure the optimal performance of electrical systems.
Thriving in the Dynamic Field of Electrical Engineering
Electrical engineering is a dynamic and fast-changing field that offers numerous opportunities for professionals. Engineers must navigate the challenges of staying abreast of new technologies, developing sustainable solutions, and managing the increasing complexity of electrical systems. By investing in continuous learning, innovation, and sustainability, engineers can overcome these challenges and thrive in the ever-evolving realm of electrical engineering.
Related Reading
- Is Electrical Engineering Hard
- Electrical Engineering Internship
- What Do Electrical Engineers Do
- Electrical Engineering vs Mechanical Engineering
- Electrical Engineering Projects
- How Hard Is Electrical Engineering
- Electrical Engineer Education Requirements
- Electrical Engineering Interview Questions
12 Typical Electrical Engineering Problems

1. Circuit Design Challenges
Designing efficient and effective circuits can be a real headache. It often involves ensuring that all components work well together without any hiccups. Simulation tools can be a lifesaver for optimizing circuit design. These tools allow you to test and tweak your designs virtually before physically building them.
Following best practices for PCB layout can significantly improve your circuit’s performance. These include:
- Keeping trace lengths short
- Avoiding sharp angles
2. Power Quality Issues
Power quality issues , like voltage sags, swells, and harmonic distortion, can disrupt the smooth operation of electrical systems. Improving power quality involves techniques like using power conditioning equipment, which helps:
- Stabilize the voltage
- Filter out disturbances
Proper grounding practices are also essential to ensure a clean and stable power supply and minimize these issues.
3. Thermal Management
Overheating is a common problem in electrical systems and can lead to component failure. Effective thermal management is crucial to keeping things cool. Heat sinks and fans can help dissipate heat, while thermal analysis tools can help identify hotspots in your design. Ensuring good airflow and using materials with high thermal conductivity can also make a big difference.
4. Signal Interference
Electromagnetic interfere n ce (EMI) and radio frequency interference (RFI) can wreak havoc on your signals, causing data loss or corruption. Shielding techniques, such as metal enclosures and grounding, effectively minimize interference. Proper cable routing can also reduce the chances of interference, and filtering methods can help clean up the signal.
5. Reliability and Maintenance
Ensuring the reliability of electrical systems is a continuous challenge, as regular maintenance is vital in preventing unexpected failures. Predictive maintenance strategies, such as monitoring the condition of components and systems, can help foresee issues before they become critical. Reliability testing and using robust, high-quality components can also enhance the overall dependability of your systems.
6. Safety Concerns
Safety is paramount in electrical engineering, as the risks of electrical hazards and accidents are always present. Implementing stringent safety protocols, providing proper training, and using safety equipment can mitigate these risks. Ensuring that your designs comply with safety standards and regulations is essential for protecting people and equipment.
7. Energy Efficiency
Achieving energy-efficient designs is increasingly essential in today’s eco-conscious world. Energy-saving techniques, such as using energy-efficient components and optimizing system design, can reduce power consumption. Implementing smart grid technologies also allows for better management of energy resources, enhancing efficiency.
8. Component Failures
Dealing with unexpected component failures can be:
- Frustrating
Troubleshooting techniques, such as systematic testing and fault isolation, can help identify the root cause of failures. Selecting high-quality components and incorporating redundancy into your designs can improve reliability and minimize the impact of component failures.
9. Integration with Modern Technologies
Integrating traditional systems with modern technologies like IoT and AI presents its own set of challenges. Strategies for seamless integration include:
- Upgrading legacy systems to support new technologies
- Ensuring compatibility
Staying updated with technological advancements and continuously learning about new tools and methods can help ease the integration process.
10. Environmental Impact
Addressing the environmental impact of electrical engineering projects is crucial for sustainable development. Adopting sustainable design practices, such as using eco-friendly materials and designing for energy efficiency, can reduce environmental harm.
Proper recycling and disposal of electronic waste are also essential to minimize the ecological footprint of your projects.
11. Voltage Drop
Voltage drop is a common problem in electrical and electronic engineering, where the voltage at one point in the circuit is lower than expected. If left unchecked, this can lead to equipment malfunctioning, decreased performance, and even fires. To prevent such issues from arising, several methods exist for overcoming this issue:
EMF Shielding
Using materials that block electromagnetic fields can help reduce the amount of voltage drop over long distances.
Surge Prevention
Salling surge protectors on the circuit can prevent sudden voltage drops.
Circuit Optimization
Optimizing the circuit’s design can ensure it draws the least energy possible and minimizes voltage drops.
Voltage Regulation
Installing a voltage regulator on the circuit will maintain a constant output voltage irrespective of fluctuations in input voltage.
Engineers may also consider using additional components, such as capacitors or transformers, to reduce voltage drops and ensure optimal performance.
12. Protection Against Overvoltage
Power surge protection is an essential aspect of protecting against overvoltage. It involves using devices such as surge protectors to divert an unacceptably high voltage away from sensitive electronics.
Lightning and ESD Protection Strategies
Lightning protection is another important strategy against overvoltage. It involves installing devices such as lightning arresters and surge diverters to protect against the high voltages created by lightning strikes.
ESD (electrostatic discharge) protection is a strategy against overvoltage caused by static electricity. It involves using ESD mats, wristbands, and other grounding devices to dissipate the electrostatic charge and prevent damage to sensitive electronics.
Strategies For Identifying And Analyzing Electrical Engineering Problems

A systematic problem-solving approach in electrical engineering is critical for efficiently identifying and analyzing issues. Engineers can address each aspect methodically by breaking down complex problems into manageable components.
- Ensuring thoroughness
- Reducing oversights
- Facilitating more accurate and efficient solutions
Utilizing Theoretical Knowledge and Practical Experience
Combining theoretical knowledge with practical experience is essential in electrical engineering problem-solving efforts. Theoretical knowledge provides a foundational understanding of electrical principles and systems, while practical experience offers insights into real-world applications and limitations. This blend enables engineers to devise technically sound and practically feasible solutions.
Applying Analytical Tools and Simulation Techniques
Analytical tools and simulation techniques play a significant role in identifying and analyzing electrical engineering problems. Tools that help engineers model and analyze electrical systems under various conditions include:
- Circuit simulators
- Finite element analysis (FEA) software
- MATLAB Simulations
These tools facilitate testing hypotheses and exploring different scenarios without the need for physical prototypes, saving time and resources.
Collecting and Interpreting Relevant Data
Accurate data collection and interpretation are fundamental to understanding electrical engineering problems. Engineers must gather data to form a comprehensive picture of the issue from various sources, such as:
- Historical records
Analyzing this data helps identify patterns, anomalies, and potential causes, leading to more informed decision-making.
Identifying Root Causes and Potential Failure Modes
Root cause analysis (RCA) techniques like the 5 Whys or fishbone diagrams help engineers trace problems back to their origins. Failure modes and effects analysis (FMEA) can be used to systematically identify potential points of failure and assess their impact on the system.
This proactive approach allows for developing robust solutions and preventive measures, enhancing electrical systems’ overall reliability and performance.
Unlocking Success with StudyForFE’s FE Electrical Exam Prep Review Course
Imagine you are skillful in electrical engineering and want to help students pass their Fundamentals of Engineering (FE) and Professional Engineering (PE) exams. You can turn to StudyForFE , an online exam preparation platform founded by an experienced professional engineer.
Industry Expertise: Led by Licensed PE Wasim Asghar
StudyForFE offers exceptional courses like the FE electrical exam prep review course, guided by Wasim Asghar, a licensed professional engineer with over 15 years of industry experience. Wasim has authored highly acclaimed textbooks and study guides, such as:
- FE Electrical and Computer Review Manual
- PE Power Reference Manual
Interactive Learning and Personalized Support
The StudyForFE courses feature:
- Interactive lectures
- Practice problems
- Personalized mentorship from Wasim
From recent graduates to experienced professionals, students have attributed their exam success to Wasim’s courses and mentorship. It’s time to boost your career as an electrical engineer by reaching out to StudyForFE and learning more about the FE electrical exam prep review course !
- Electrical Engineering vs Computer Science
- How Long Does It Take To Become An Electrical Engineer
- PE Electrical
- Electrical Engineering Certifications
- Power Electrical Engineering
- Best Online Electrical Engineering Degree
- Electrical Engineering Online Courses
- Electrical Engineering Job Outlook
- Diploma In Electrical Engineering
- Free Electrical Engineering Courses
- Electrical Engineering Online Degrees
- Electrical Engineering Education Requirements
- Best Universities For Electrical Engineering
- Electrical Engineering Terms
- Electronics Engineering vs Electrical Engineering
Solutions And Best Practices

Power system optimization techniques
Power system optimization is crucial for maintaining efficient and reliable electrical systems. Techniques like voltage regulation ensure that voltage levels remain within the desired range, preventing damage to components and equipment.
Power factor correction improves the efficiency of the power system by minimizing reactive power, while harmonic mitigation reduces distortions in the power supply, enhancing overall performance.
Circuit Design Techniques
Circuit design techniques are tools and the foundation of creating effective electrical systems. Impedance matching helps maximize power transfer and minimize signal reflection, ensuring better performance.
Filtering removes unwanted frequencies from signals, while proper grounding practices enhance safety and reduce noise and interference.
Control System Design and Tuning Methods
Control system design and tuning methods are additional steps essential for achieving desired system behavior and stability. By carefully designing control systems and tuning parameters, engineers can ensure systems respond correctly to inputs and maintain stability under various operating conditions.
EMI/EMC Mitigation Strategies
EMI/EMC mitigation strategies are vital for preventing electromagnetic interference and ensuring electromagnetic compatibility. Shielding techniques, such as using metal enclosures, help block external interference. Filtering removes unwanted signals, and layout optimization minimizes interference by strategically placing components and routing traces.
Thermal management solutions
Thermal management solutions are critical for preventing overheating and maintaining the reliability of electrical systems. Heat sinks and cooling systems help dissipate heat, while thermal analysis tools identify potential hotspots and guide design improvements. Effective thermal management ensures components operate within safe temperatures, prolonging their lifespan.
Signal processing and communication techniques
Signal processing and communication techniques play a vital role in modern electrical engineering. Modulation techniques, such as amplitude and frequency modulation, enable the transmission of signals over long distances.
Coding improves data integrity and error correction, while channel equalization compensates for signal distortion, ensuring clear and reliable communication.
Emerging Trends And Future Challenges

The role and impact of new technologies in electrical engineering are immense. Electrical engineers are continuously exploring new frontiers to harness the power of emerging technologies and drive innovations that can shape a more sustainable and efficient future.
These new technologies are revolutionizing various aspects of electrical engineering and playing a critical role in addressing future challenges in the field.
Renewable Energy
One of the key emerging trends in electrical engineering is the increasing adoption of renewable energy sources, such as
- Hydroelectric power
Renewable Integration
This transformation in the energy landscape is driving the need for electrical engineers to:
- Integrate these intermittent sources into the grid
- Develop efficient energy storage solutions
- Optimize power distribution.
Ensuring a stable power supply from renewable energy sources requires the expertise and ingenuity of electrical engineers.
Smart Grids
Smart grid technologies have been at the forefront of the ongoing revolution in the energy sector. Electrical engineers are developing advanced sensors, communication systems, and control algorithms to enable:
- Real-time monitoring
- Optimization of power generation, transmission, and distribution
These technologies are helping create resilient, efficient, and responsive power grids that adapt to changing demands and challenges.
Internet of Things (IoT)
The proliferation of connected devices in the IoT era is driving the need for electrical engineers to design:
- Energy-efficient systems
Beyond Connectivity
Electrical engineers face challenges in:
- Managing data flow
- Ensuring interoperability
- Developing advanced analytics to optimize IoT applications.
As the number of interconnected devices continues to grow, electrical engineers will play a critical role in shaping the future of the IoT landscape .
Future Challenges and Solutions in Electrical Engineering

As the field of electrical engineering continues to evolve, new challenges and opportunities are emerging that require innovative solutions. Some vital future challenges in electrical engineering include:
Energy Efficiency
Improving the energy efficiency of electrical systems and devices will remain a top priority for electrical engineers. Potential solutions include:
- Developing advanced power electronics
- Implementing innovative energy management systems
- Designing energy-efficient buildings and transportation
Electrical engineers can help reduce energy consumption and minimize environmental impact by focusing on energy efficiency.
Cybersecurity
As electrical systems become increasingly interconnected, ensuring their security against cyber threats is paramount. Electrical engineers must work with cybersecurity experts to develop:
- Robust authentication protocols
- Secure communication channels
- Resilient system architectures
By prioritizing cybersecurity, electrical engineers can ensure the reliability and safety of critical energy infrastructure.
Autonomous Systems
The rise of autonomous vehicles, robotics, and smart cities presents new challenges for electrical engineers. They must develop reliable sensor systems, real-time control algorithms, and fail-safe mechanisms to enable autonomous systems’ safe and efficient operation.
By addressing these challenges, electrical engineers can help shape a future where autonomous systems are central in transforming various industries and sectors.
Continuous Learning and Adaptation in Electrical Engineering

Continuous learning and adaptation are essential for staying relevant and contributing to emerging fields. Electrical engineers must update their skills and knowledge to keep pace with developments in fields like artificial intelligence, quantum computing, and nanotechnology.
Collaborating with professionals from other disciplines will also be crucial for solving complex problems and developing innovative solutions in electrical engineering. By embracing new technologies and fostering a culture of continuous learning, electrical engineers can play a vital role in shaping a more sustainable, secure, and technologically advanced future.
- Coursera Electrical Engineering
- Best Electrical Engineering Books
- Electrical Engineering Training Courses
- Electrical Engineering Degree Cost
- Job Responsibilities Of Electrical Engineer
- Future Of Electrical Engineering
- Electrical Engineering Recruitment Agencies
- Best Electrical Engineering Graduate Schools
- How To Make More Money As An Engineer
- Electronics Engineering Certifications
- Where do Electrical Engineers Work
- Facts About Electrical Engineering
- Electrical Engineer Work Environment
Land Your Dream Electrical Engineering Job With Ease With the Help of Our FE Electrical Exam Prep Review Course
StudyForFE offers exceptional courses like the FE electrical exam prep review course, guided by Wasim Asghar, a licensed Professional Engineer with over 15 years of industry experience. Wasim has authored highly acclaimed textbooks and study guides, such as the
The StudyForFE courses feature interactive lectures, practice problems, and personalized mentorship from Wasim. From recent graduates to experienced professionals, students have attributed their exam success to Wasim’s courses and mentorship.
It’s time to boost your career as an electrical engineer by reaching out to StudyForFE and learning more about the FE electrical exam prep review course !
Licensed Professional Engineer in Texas (PE), Florida (PE) and Ontario (P. Eng) with consulting experience in design, commissioning and plant engineering for clients in Energy, Mining and Infrastructure.

You are using an outdated browser. Please upgrade your browser or activate Google Chrome Frame to improve your experience.
Home | Blog | How to Solve Common Household Electrical Problems
How to Solve Common Household Electrical Problems

Nobody likes to deal with electrical problems in their home. They’re a nuisance and can be dangerous. According to the Electrical Safety Foundation International, home electrical problems account for about 51,000 fires and more than 500 deaths annually in the U.S.
But why all these fires? Why so much damage?
It could be because many of us simply don’t take the time to understand our houses and our electrical systems, and common electrical issues go unnoticed. You might be walking past serious electrical concerns without a second thought — just because you don’t even recognize they’re there.
Table of Contents
- Flickering Lights
- Bulbs Burning Out Too Fast
- Recessed Ceiling Light Losing Power
- Outlets Sparking
- Outlet Doesn’t Work
- Breaker Keeps Tripping
- Frayed Wires
You’re probably perfectly capable of replacing a light bulb, or flipping a switch on your breaker. But most experts agree that when it comes to handling serious electrical problems in your house, it’s best to step back and let the professionals handle things. Attempting to repair some common household electrical problems without contacting a professional could result in serious injury and/or damage.
Not sure if the electrical problem is something you can fix or something that requires an expert’s attention? A good rule of thumb is that if you’re the least bit unsure, it’s best to call your electrician. It’s better to be safe than sorry — and avoid potentially causing more damage.
Choosing The Right Lightbulb
Still, that doesn’t mean you should sit on the sidelines while you wait for the electrician to arrive. By arming yourself with knowledge, you might be able to help by diagnosing or isolating the electrical problem before the professionals arrive.
If you’re experiencing electrical problems at home, do some detective work and try to figure out what’s causing them. Here are a few of the most common household electrical problems and what you can do to diagnose them.
1. Flickering Lights
Does your light bulb flicker, growing suddenly dimmer and then suddenly brighter? Does a light flicker even when turned off? If so, you’re not alone. Flickering lights are one of the most common household electrical problems.
First, check the basics. Make sure the bulb is screwed in tightly. Try switching your bulb out for a different one if the problem is with the bulb itself. Confirm you’re using the recommended wattage. Your problem could be that simple.
If none of these seem to be the culprit, the most likely cause is a poor connection. Your best action is to call a professional to fix this problem immediately before it becomes a broken connection.
You can help diagnose the problem by seeing if the circuit breaker keeps tripping in one room or throughout the house. This can help determine if the flickering lights are on one circuit or if more circuits are affected.

2. Light Bulbs Burning Out Too Fast
This is another common electrical problem that could have several causes. The good news is that all of them are relatively simple and have quick, easy fixes.
- You might be running a bulb with too high wattage.
- You might be leaving the bulb on too long.
- You might be using a cheap, poor bulb.
Always ensure you are using the correct bulb for the socket and not leaving them on for extremely long periods.
Another possible explanation is the quality of power your bulb is receiving. Most power companies deliver more than 120 volts of power intended for the average bulb, which tends to have shorter lives because it receives too much power.
A solution to this problem is to buy the same bulb as before, but look for the one stamped “130v” instead of “120v.” The downside of this solution is that the light will not be quite as bright from this new bulb, but it should last longer.
3. Recessed Ceiling Light Losing Power but Then Working Later On
This is a safety feature rather than an electrical problem. Most likely, you’re using a bulb with a too-high wattage. The bulb is getting too hot, so it powers itself off. When it’s had time to cool down, it turns itself back on.
This one is an easy fix. Replace the bulb with one of a lower wattage.
4. Electrical Outlets Sparking
Electrical outlets sparking doesn’t always mean there’s a problem. They are known to spark sometimes, especially if you’ve just plugged in a large appliance. This is similar to static electricity and is entirely normal.
Sparking isn’t always innocent, of course. It could also be a sign of a much larger problem. It could mean that the outlet gets too hot, and the heat has stripped away the protective coating of the wires. This means that the sparking is being caused by electricity jumping through these bare wires, which could lead to a dangerous electrical fire.
If the sparking only happens when you turn on a large appliance, you’re probably safe. But if it seems to be happening for no reason, you might want to contact an electrician and have them look at the outlet.

5. Electrical Outlet Doesn’t Work
First, determine if multiple electrical outlets don’t work or if it’s just one. If none of your outlets work, consider checking with your neighbors to see if they have the same problem. If they are, the problem is with your power company. Give them a call as soon as possible. If just one outlet has no power, then you have a case of a dead outlet. You’ll want to locate your main circuit breaker. In most houses, they’re in the basement, garage, laundry room, or maybe a utility closet.
Once you’ve located your circuit breaker, you’ll need to determine if the electrical problem was caused by the breaker being tripped. One way to do this is to see if any of the switches are in the “off” position. Another way is to switch them all off and then switch them on one by one to figure out what controls what. Of course, this is great to know, even if there is no emergency.
One way to do this is to use the buddy system. One of you can flip the breaker switches while the other watches or tests to see which breaker controls which outlets and switches. This will save you from having to run back and forth.
New Homeowner’s Guide To Electrical Needs
Okay, so you’ve checked your breaker, and it wasn’t tripped. But your outlet still has no power. What else could be the problem? Check the outlet itself. Is it stained black or brown? If so, this could mean that your outlet has burned out. If this is the case, do not touch it. Even if half the outlet seems to be working, do not use it. Call an electrical professional immediately to get the outlet replaced.
Did your electrical outlets suddenly stop working? This could have been to protect you. Some outlets are built with a failsafe feature. This means that if they sense a problem that could be harmful to either you or to themselves, the outlet shuts itself off automatically.
These outlets are called ground-fault circuit interrupter (GFCI). They’re usually located in your kitchen, bathroom, laundry room, garage, or outdoors. They might shut themselves off if they experience a harmful surge of electricity or encounter moisture.
You can determine if you have a GFCI outlet by looking to see if it has two little buttons in the middle of the outlet. One should say “test,” and another say “reset.” If the “reset” button has been pushed out, press it back in to reset the outlet. They can also be reset on your main circuit breaker.
None of these solutions seem to be working. It might be time to call an electrician. If you decide to call in an electrician, note which outlets aren’t working. Do the electrical outlets in one entire room seem to be the problem? Or are it just the outlets on one wall? This might indicate that the problem is part of one single circuit. This is helpful information that you can share with your electrician.
6. Breaker Keeps Tripping
Is your breaker constantly tripping and you can’t figure out why? There could be a couple of different reasons. Here are a few ways to find out what is tripping your circuit breaker.
First, it’s important to realize that your circuit breaker is a safety device. Its job is to prevent fires and keep you and your house safe. When your circuit breaker gets tripped, that’s usually a clue that something isn’t working right. Of course, the breaker could be faulty, but it’s best to assume there’s a real problem and to check for it.
- GFCI Outlets: One cause for a tripped circuit breaker might be those GFCI outlets again. If you reset your circuit breaker and it keeps tripping immediately afterward, it could be trying to warn you that something bigger is going on under the surface. They are shutting themselves off to protect you from whatever the problem is. Contact your electrician immediately.
- Circuit is Overloaded: Another issue might be overloading the circuit breaker. If you’re running multiple high-wattage appliances on the same circuit, it could be overloading and tripping. To fix this, you can switch certain items to a different outlet or room. Another solution is to ask your electrical professional to set up a separate circuit for the appliances causing the problem. It also helps to turn off appliances when you’re not using them.
- Short Circuit: Another problem could be something called a short circuit. This means the electrical current travels down a different path than it should. For example, in most regular appliances, the electrical current flows through one wire and out through another. But if one wire is broken, the path is interrupted, and the electricity travels down a different path. This could cause the wires to get hot and possibly start a fire. This is another problem to contact your electrician about.
- Weather: Another possible explanation might be the weather. Does your breaker keep tripping after every storm? If so, water might be coming into contact with your electrical system. Anytime water and electricity are mixed, this is a highly dangerous situation. It’s very important not to attempt to fix this problem yourself. Call in a professional and explain the problem.
- Power Surge: Your breaker could also be tripping because of a power surge. Even though you might think of power surges as something that happens because of a lightning strike, they’re a lot more common than that. It might be caused by the power company changing their grid or just by powering off a large appliance.

Power surges can be extremely damaging to your electronics. Your breaker is tripping to protect them. You can take steps to keep your electrical equipment safe by purchasing and installing surge protectors and similar items.
Does your circuit breaker keep tripping even with nothing plugged in or without load? Or none of these issues seem to be causing the problem? There are probably some internal issues with the wiring. Call an expert and ask them if they can diagnose the problem.
As tempting as it can be to flip the switch to reset the breaker simply, it’s important to remember that the breaker is usually tripping for a reason. It’s trying to keep you safe. It’s worth taking the time to figure out the problem’s source. You never know what problems you might be ignoring if you don’t. It’s always best to be on the safe side.
7. Frayed Wires
This is a problem that is often overlooked. Using electronics with frayed wires is practically an invitation to electrical fires and other disasters. Faulty wires should always be replaced.
Signals that a wire needs to be replaced include exposed wiring, fraying, black or brown stains or a nasty, burning smell. If you notice any of these problems with any of your wires, don’t ignore them. Just buy a new wire and hire an electrician to install it for you .

You’ve Diagnosed the Problem. Now What?
After you’ve diagnosed the probable cause of your electrical problem, it’s important to take the next step. Avoid attempting to do complicated electrical repairs on your own. This is dangerous both for you and your electrical system.
It can be tempting to think that your problem isn’t a big deal. But why take that risk? Your home and safety are too important. Instead, call the team of knowledgeable and reliable professionals at Lippolis Electric. Your home is too valuable to risk by underestimating the issues that could be going on in your house.
Schedule An Appointment
Schedule service
Please note that your appointment is not set until confirmed by Lippolis Electric shortly after you've submitted the form.
| ‹ | › | |||||
| Sun | Mon | Tue | Wed | Thu | Fri | Sat |
Popular Posts
- How to Upgrade or Remove Your Outdated Home Intercom System by Bobby
- What to Do in an Electrical Emergency by Bobby
- Reasons Your Older Home May Need an Electrical Renovation by Bobby
- Your Home Office’s Electrical Needs by Ron Troyer
- How to Solve Common Household Electrical Problems by Bobby
Recent Posts
- The Evolution of Lippolis Electric, a Family Business with Paul Lippolis & Michelle Parinello Podcast
- Electrical Infrastructure On Naval Ships Podcast
- Leading a Successful Service Sales Team Podcast
- The Benefits of Joining a Franchise Network Podcast
- How to Scale and Expand Into International Markets Podcast
- Beyond The Blueprint
- EV Charging Station
- Uncategorized
To schedule a FREE estimate or service, call 914-738-3550
The Beyond The Blueprint Podcast Has Launched. Check It Out Today!
Request Service
Please note that your appointment is not set until confirmed by Lippolis Electric shortly after you've submitted the form. Weekend dates are typically reserved for emergency services
| ‹ | › | |||||
| Sun | Mon | Tue | Wed | Thu | Fri | Sat |
Learn from trade experts & gain certifications essential for your career success.
- Jun 28, 2021
- 18 min read
Electrical Troubleshooting: A Complete Guide
Intro to electrical troubleshooting: chapter 1.
Finding the problem
Diagnosing the Problem
Testing capacitors & motors, troubleshooting a system, finding the problem.
In this module, we will introduce you to electrical troubleshooting. We will cover:
- What electrical troubleshooting is,
- Wiring diagrams, and
- The hopscotch method Skip to quiz!
All modern systems from HVAC systems to dishwashers eventually break down.
Troubleshooting is the process of:
Finding the problem within a broken system, and
Fixing the problem
You can troubleshoot any type of electrical equipment. Most jobs in the skilled trades involve troubleshooting. For example, an appliance technician may troubleshoot a broken dishwasher.
Troubleshooting allows us to fix equipment that is no longer working. For example, imagine that your new dishwasher stops working. Instead of replacing the dishwasher, you can troubleshoot the problem.
In general, equipment breaks down because one part is malfunctioning. All of the other parts in the system work as expected. Troubleshooting allows us to replace the bad component instead of the entire system.

Wiring Diagrams

Recall that a wiring diagram is a blueprint of the electrical components in a system. Wiring diagrams can tell you:
What components are in a system,
How components are wired, and
The flow of current in a system.
To troubleshoot a system, we often need to refer to a wiring diagram. The information on a wiring diagram helps us understand the components, wiring, and the flow of current. Without a wiring diagram, it is very difficult to start troubleshooting.
Recall that a wiring diagram has a line and a control side. The line side of the circuit is usually powered by 240V. The control side of the circuit is usually powered by 24V.
When troubleshooting, it can be helpful to break the line side of the circuit into the:
Line side, and
On the line side of the circuit, you will find switches like contactor switches. On the load side of the circuit, you will find electrical loads like motors.
The control side of a circuit has relays, safeties, and coils. For example, the thermostat on an HVAC system is usually found on the control side of the circuit. The control side of the circuit receives a lower voltage, for example 24V.
When we troubleshoot a system, a problem on the line or control side presents different problems. For example, a problem on the control side could be causing the thermostat to not call for heating or cooling. On the line side, a fan may not be running due to a bad winding.
The Hopscotch Method
Once we have read the wiring diagram, we can begin to troubleshoot the system. The hopscotch method is the most common method used to diagnose electrical problems. The first step in troubleshooting is to find the source of the problem. The hopscotch method is a great way to find the component that is malfunctioning.
With the hopscotch method, you follow the flow of electricity in a circuit. At each component, you will take a voltage measurement with your multimeter. Recall that as voltage passes through a component, you will see a voltage drop.
You will measure the voltage across each component until you find a component that receives 0V. If a component has 0V, the specific component may be faulty.
Once we find a faulty component, we can use other tools to determine the specific problem. The hopscotch method helps us find the specific component that is faulty. Without the hopscotch method, we would have to test many more components to find the fault.
Troubleshooting Mindset
When troubleshooting, there is not a set order that you should follow when diagnosing a problem. The order of steps will change depending on the problem in the system. Solving unique and challenging problems is what makes troubleshooting interesting.
Even though there is no set process, it is important is to have a step by step method to find the problem.
Not using a step-by-step process to troubleshoot can:
Take a very long time,
Cause you to miss a problem, and
Lead to diagnosing the wrong problem
The hopscotch method is an example of a step-by-step process to find the problem in a system.
When you begin troubleshooting, always refer to the wiring diagram. Break the system down into the line, load, and control sides of the circuit. Once you have broken the system into components, you can systematically check each system.
In general, we recommend that you start on the control side of the circuit. For example, if you are troubleshooting an HVAC system, start by changing the thermostat value. If the unit turns on, then you know the thermostat is calling to the line side.
Once you know the problem is not in the control side, you can begin to check the line side of the circuit. In general, it is best to follow the flow of current through the system. A ladder diagram can help you visualize the flow of current in a system.
Following the current ensures that you do not miss a problem or identify a problem in the wrong component. For example, you are troubleshooting an HVAC system. A switch is malfunctioning. Any components after the switch will display a 0V measurement.
If you follow the flow of current, you will find that the switch is the main problem. If you do not follow the flow of current, any component you measure after the switch will display 0V. Replacing the component will not solve the problem since the switch is what needs to be fixed.
Replacing the wrong component is the main cause of callbacks in the skilled trades. Following the flow of current and using the hopscotch method will significantly reduce the chance of replacing the wrong component.
Once you find a problem, never assume that you are done troubleshooting. When you are troubleshooting, the main goal is to find the root cause of the problem. One major problem can make several smaller problems in the system.
If you stop troubleshooting without finding the root cause, the system will break again. For example, you find a blown fuse on a unit. Instead of just replacing a fuse, you need to ask why the fuse was blown. If you do not find what caused the fuse to blow, the system may break again.
In this module, you learned about the basics of troubleshooting.The hopscotch method is the most common method of diagnosing problems in an electrical system. It is important to follow the flow of current in a methodical and step by step process when troubleshooting.
In this module, we cover types of electrical faults including:
- Open circuits,
- Overamping, and
- Short circuits
We will also review grounding. Skip to quiz!
Electrical Faults
If a component is not working, we say that the component has a fault. An electrical fault is the specific reason that a component is not working.

Recall that the hopscotch method is used to find components with a 0V reading. With the hopscotch method, we can identify the damaged components within an electrical system. Knowing that a component has 0V flowing through it is not accurate enough for troubleshooting.
We need to identify the specific reason that the component is not working. If we do not determine the specific fault, the repairs we make may be unnecessary, or they may not work.
For example, a motor you are inspecting is not working properly. This alone is not enough to replace the motor. The motor could have a bad capacitor or a shorted winding. Depending on the problem, we would use a different repair.
Types of Electrical Faults
There are several types of electrical faults including:
Open circuits,
Overamping, and
Short circuits
We will explain each type in the coming slides.
Open Circuits
One common type of fault is an open circuit. An open circuit refers to a system that does not have complete path for current to flow. An open circuit is usually caused by a broken wire.

Note that the switch is in an open position. This is an open circuit since there is no path for current to flow.
Several items can cause an open circuit including:
A broken wire,
Lack of power, and
An open switch
To check for an open circuit, we will use the continuity setting on your multimeter. Start by setting your multimeter to continuity.
Insert the black connector into the COM port. The red port should be inserted into the mVΩ port. Touch the tip of your leads together.You should hear a beep sound and the display should say 0.
To find the open circuit, you want to check each part of the component. For example, the indoor fan motor on an HVAC unit is not running.You would need to check the wiring, windings, fan relay, and other components for continuity.
To measure continuity, press your leads on opposite terminals of the part. Place one lead on the terminal entering the component. Place the other lead on the terminal exiting the component.
If the meter beeps and displays a value close to 0, there is continuity.If it is an open circuit, your meter will display “OL”. Continue checking parts until you find the open circuit.
For example, you are checking the continuity of a light switch. Your meter displays a value close to 0. In this case, 0.01. Since the meter displayed a value close to 0, there is continuity across the switch. This means the switch is in the closed position.
Another common electrical fault is overamping. All electrical equipment is designed to work safely under a certain amount of current. A component is overamping if it receives current above the safe limit.

If a component receives too much current, the component can be damaged. The current limit for a component can be found in the data sheet. Recall that the data sheet contains information on the part. It is created by the manufacturer.
To determine if a component is overamping, start by checking the data sheet. The data sheet will tell you the maximum current that the component is rated to handle.
To determine if a component is overamping, we will use a clamp multimeter. Recall that a clamp multimeter has a claw on top. The claw can measure the current of a wire inside the claw.
Start by grabbing your clamp multimeter. Open the jaws of the clamp meter. Close the jaws of the multimeter so that the wire is in the middle of the clamp.
If your meter displays a higher current than the data sheet, then the component is overamping. If a component is receiving too much current, it will heat up and be destroyed.
If a component is overamping, it will usually be damaged when you see it. For example, a blown fuse indicates that the system had too much current. You should look for the reason the system has too much current. Do not just replace the fuse.
Short Circuits
A short circuit is another type of electrical fault. A short circuit refers to a system that has an unintended and low resistance path for current to flow. The low resistance draws large amounts of current which can damage the system.

In the field, there is a common misunderstanding that a short circuit describes all broken components. A short circuit is a specific type of electrical fault.
Just like an open circuit, we will measure continuity to find a short circuit. We will measure the continuity from the hot wire to ground. Recall that to check an open circuit, we measured from the entrance to the exit of the component.
Start by setting your multimeter to continuity. Insert the black connector into the COM port. The red connector should be inserted into the mVΩ port.Touch the tip of your leads together. You should hear a beep sound and the display should say 0.
Place one lead on the hot terminal of the component. The other lead should be placed on the ground terminal.
If the meter displays OL then there is not a short circuit in that specific section. You can then check the next part for a short circuit. If the meter display a value close to 0, there is a short circuit in the part.
Ground Faults
Recall that grounding refers to connecting electrical systems to the earth.
There are two types of grounding:
Equipment grounding, and
System grounding
Equipment grounding connects components to non current carrying conductors. For example, an equipment ground may connect a component to a conduit or junction box.

System grounding connects the neutral points of a conductor to the earth. For example, a system ground may connect a transformer to the earth. In general, system grounds are poles driven deep into the earth. You can see them highlighted in the image.
In general, grounding is designed to keep you safe when touching electrical equipment. If a component is not grounded, you can be shocked when touching it.
When you are troubleshooting, always make sure that the system is grounded.If you work on an ungrounded system, you can be shocked.
In this module, you learned about common types of electrical faults. Finding the specific type of electrical fault allows us to effectively repair the component.
We covered several types of electrical faults including:
Open circuits
We also gave an overview of grounding. Be extremely careful if a components ground is damaged.

In this module, we will cover how to inspect:
- A single run capacitor,
- A dual run capacitor, and
- A seized motor Skip to quiz!
Capacitor Overview
Recall that an electrical fault is a system failure that prevents a component from running. A bad capacitor is one of the most common electrical faults.

Recall that a capacitor is a device used to store electrical energy in a circuit. The next few slides will teach you how to check if a capacitor is running correctly.
A faulty capacitor will not store electrical energy. To test if a capacitor is faulty, we will use the farads setting on our multimeter. Recall that farads is the unit of measurement for capacitance.
Before handling a capacitor, we need to disconnect the capacitor from the system. Remove the wires from the terminals of the capacitor. Pull the capacitor out of the system.
To test a capacitor, we need to discharge it. Recall that capacitors can store electrical energy even after the power to the circuit has been turned off.To discharge a capacitor, place a test resistor across the two terminals of the capacitor.
Next, we need to set up our multimeter. Turn the multimeter dial to the farads setting. The black connector plugs into the COM port. The red connector plugs into the port with the capacitance symbol.
Recall that there are two types of capacitors:
Single run capacitors, and
Dual run capacitors
A single run capacitor will have two terminals. A dual run capacitor will have three terminals.
Recall that both types of capacitors come with a capacitor rating. For example, it is common to see a capacitor rated for 7.5 microfarads. Recall the symbol for microfarads is µF. You can see an example of a capacitor rating in the image.
Single Run Capacitors

To measure the capacitance of a single run capacitor, we need to place one multimeter probe on each terminal.
If the measurement on your multimeter is within 10% of the capacitor’s rating, then the capacitor is functioning well. If the value is above or below the 10% range, then the capacitor needs to be replaced.
For example, you are measuring a 7.5µF single run capacitor. If your multimeter displays a value of 7.3µF, the capacitor is working correctly. If your multimeter displays a value of 3.4µF, the capacitor needs to be replaced.
Dual Run Capacitors
Recall that a dual run capacitor has three terminals. The terminals are labeled HERM, COM, and FAN. You can see a typical dual run capacitor in the image to the right.

Dual run capacitors have a different rating system than single run capacitors. A dual run capacitor may be labeled 45/5 microfarads. The first number (45) is the capacitance between HERM and COM. The second number (5) is the capacitance between FAN and COM.
For example, we are working on a 45/5µF capacitor. You would expect to see a 45µF rating when you connect your leads to the HERM and COM terminals. You would expect to see a 5µF rating when you connect your leads to the FAN and COM terminals.
Just like a single run capacitor, the capacitor needs to be replaced if the reading is above or below 10% of the rating. For example, if the reading is 30µF between HERM and COM then you need to replace the capacitor.
Before checking on a dual run capacitor, you need to short all three terminals. To short the capacitor, we will use a resistor. First place the resistor over COM and HERM. Then place the resistor over FAN and COM.
Once the capacitor is discharged, you need to measure the capacitance between the terminals. Start by placing your leads on HERM and COM. Then place your leads on COM and FAN. The black lead should always be on the COM terminal.
Be careful when replacing capacitors. A bad capacitor can be caused by another problem in the system. If you find a bad capacitor, check the rest of the system for potential errors. It is important to identify the root cause of any problems in a system.
Seized Motors
A common reason systems stop working is a problem with the motor. A seized motor is a common problem. A seized motor is a motor that is not working when it is receiving power.

Motors can fail for several reasons including:
A bad capacitor,
Shorted windings, and
Open windings
A seized motor will usually make a humming noise when the power is turned on. A humming noise from a motor generally means that the motor is seized.
Once you identify a motor is seized, there are a few things you can check. Most motors use a run capacitor to help start the motor. If a run capacitor has gone bad, the motor may not start.
You can also manually rotate the motor wheel. If the wheel feels sluggish, the motor is seized up.
In this module, you learned about electrical faults within capacitors. A bad capacitor is one of the most common causes of electrical failure. You also learned how to identify a seized motor.
This module will go through an example of troubleshooting an HVAC system. We will use the hopscotch method and our knowledge of common electrical faults to find the problem. Skip to quiz!

For this example, you are an HVAC technician. You have been called out to a customer’s home. The customer explains that the unit is not heating or cooling the house.
Recall that it is important to troubleshoot a system in a step by step process. A thorough process reduces the chance that you misdiagnose the problem.
In the wiring diagram to the right, you can see a ladder diagram of the indoor unit. We will refer to the ladder diagram to determine the flow of current through the system. You may also refer to a schematic diagram to view the wiring of components.
In this example, we want to start by confirming that the thermostat is working correctly. In other words, we are checking the control side of the system. We want to make sure that the thermostat is calling for heating or cooling.
To do this, go to the thermostat in the home. Set the thermostat to a value above or below the room temperature. This should cause the unit to turn on. Check the air vents to see if warm, cool, or no air is moving into the house.
In this example, there is no air coming out of the vents. This indicates a fault. We need to check what components are working in the indoor and outdoor units.
You may check if the following equipment is running:
Indoor fan motor,
Compressor, and
Condenser fan motor
If no equipment is running, the thermostat may not be calling for heating or cooling. If some equipment is running, the problem is most likely not in the thermostat.
In this example, you first check the outdoor unit. The compressor and compressor fan motor are both running. There does not seem to be a problem at the outdoor unit.
Next, we will check the indoor unit. You notice that the indoor fan motor is not running. This indicates that the problem may be associated with the indoor fan motor.
Reading the Diagram
We need to check what the possible causes are for the indoor fan motor not functioning. To check this, we will refer to the ladder diagram of the indoor unit.

After you read the indoor ladder diagram, you notice that several problems could have caused the indoor fan motor to not start.
Some causes could be:
A faulty fan switch in the thermostat,
The indoor fan relay is faulty,
A faulty run capacitor, and
A fault with the fan motor
Notice that each of these faults would stop current from flowing through the motor.
We need to troubleshoot each of these faults one by one. To test each component, we will use the hopscotch method. It is important that we check the components in the correct order. We must follow the flow of current or we may miss the problem.
Set your multimeter to measure AC voltage. Your black lead should be plugged in the COM port. Your red lead should be plugged into the mVΩ port.
Checking the Switch
Recall that there are several possible electrical faults including:
First, we need to check the fan switch in the thermostat.

To check the fan switch in the thermostat, we will confirm that the contactor coil of the relay is receiving 24V. When the fan switch is in the closed position, it allows 24V to pass to the contactor relay.
If the contactor coil receives 24V, then the fan switch in the thermostat is working correctly. If there is a 0V reading across the contactor coil, we know the problem is in the thermostat.
Place your leads on opposite ends of the relay contactor coil. Your meter reads 24V. This means that the fan switch in the thermostat is working. Next, we need to check if the relay is faulty.
Checking the Relay

To test the indoor fan relay, we start by checking the incoming voltage to the relay. Connect your multimeter leads to the terminals at the top of the relay. Your multimeter reads 240V. The indoor fan relay is receiving the correct amount of power.
Next, we will check if we have 240V on the load side of the relay. Place your leads on the outgoing terminals of the relay. The multimeter reads 240V. The problem is not with the indoor fan relay.
Checking the Capacitor
So far we have discovered the problem is not in the thermostat switch or the indoor fan relay. Next, we need to test the run capacitor.For this example, the dual run capacitor is rated 45/5µF.

Start by turning the power off and disconnecting the capacitor. Next, we need to discharge the capacitor. Place a 20KΩ, 5 W bleed resistor across the capacitor terminals.
Set your multimeter to measure capacitance. Place your black lead on the COM terminal of the capacitor. Your red lead should go on the FAN terminal. Your multimeter reads 4.9µF. The capacitor is working.
Next, you need to measure from HERM to COM. Place your black lead on the COM terminal of the capacitor. Your red lead should go on the HERM terminal. Your multimeter reads 44.2µF. The capacitor is working.
Checking the Motor
We have now checked ¾ of the possible problems. The last option is a fault with the fan motor. Remember that we have been following the flow of current through the system.
To check the motor, we need to try spinning the blower wheel. Recall that the blower wheel is supposed to smoothly spin. There also should not be a sound.
As you spin the blower wheel, you notice a sound and the wheel does not turn well. The sound and sluggish wheel tell us that the blower wheel may be obstructed. The cause of the no heat/no cool was a seized or faulty indoor fan motor.
In this module, we troubleshot a residential HVAC system. It is important to use the hopscotch method to narrow down the potential problems. Once we know where the problem is, we can test each possible cause. Understanding these plays a significant role in electric water heating troubleshooting, electric clutch troubleshooting, electric trailer brakes troubleshooting, electric pressure washer troubleshooting.
Question #1 : The line side of a wiring diagram can include:
Evaporators
Contactor switches
All of the above
Scroll down for the answer...

Answer: All of the above
The line side of the circuit includes all components that are powered by 240V. This can include motors, evaporators, and contactor switches.
Question #2 : The control side of the circuit will usually have:
The control side of the circuit will usually have the components powered by 24V. These components include coils, relays, and safeties.
Question #3 : Following the flow of current means to:
Check each component in the order it receives current
Follow the water in the system
Check each component in the reverse order it receives current

Answer: Check each component in the order it receives current
Following the flow of current means to check each component in the order it receives current. This is critical to effectively using the hopscotch method.
Question #4 : Once you fix the problem, you do not need to check the rest of the system.
Answer: False
You must check the rest of the system after fixing the problem. Repairing the first problem could expose a second problem farther down the current flow.
Question #5 : An open circuit is
A very large circuit
A circuit that does not have a complete path for current
A circuit that does have a complete path for current
A circuit with an unintended path

Answer: A circuit that does not have a complete path for current
An open circuit does not have a complete path for current to flow. This can be caused by a broken wire, lack of power, or an open switch.
Question #6 : To check for an open circuit, you
Measure capacitance
Measure continuity
Touch the wire
Replace the system
Answer: Measure continuity
To check for an open circuit, you will measure the continuity of the part. It is important to place your leads at the entrance and exit of the part. For example, on a wire you will place one lead on each end of the wire.
Question #7 : Overamping is:
A component receiving too much current
A component receiving too much voltage
A component that does not have continuity
A component that has too much capacitance

Answer: A component receiving too much current
An overamping component is drawing too much current. This can damage the component if it is above the safe range.
Question #8 : A short circuit is a common name for any type of problem in a component.
A short circuit is a specific type of electrical fault in a unit. It is not a general term.
Question #9 : There are two types of capacitors: single and dual run.

Answer: True
There are two types of capacitors. Single run capacitors have two terminals. Dual run capacitors have three terminals.
Question #10 : A capacitor is working as expected if it is within __% of the rating.
A capacitor is functioning well if it is within 10% of the rating. For example, a 10 microfarad capacitor is working with it is within 9-11 microfarads.
Question #11 : A dual run capacitor with a rating of 45/5 microfarads would have:
45 microfarads between HERM and COM
5 microfarads between FAN and COM
A dual run capacitor would have a 45µF reading between HERM and COM. It would alsos have a 5µF reading between FAN and COM.
Question #12 : A humming sound from a motor that is not running indicates that the motor may be seized.
A humming sound from a motor that is not running indicates that the motor may be seized. You will need to check the capacitor and wheel to determine the cause.
Question #13 : When troubleshooting it is important to:
Follow the flow of current
Use a step by step method
Find the root cause of the problem

When you are troubleshooting you need to follow the flow of current and use a step by step method to avoid errors. It is also important to dive deeper into the problems you find and fix the root problem.
Question #14 : The wiring diagram helps us determine the reasons a component may not be working properly
A wiring diagram is critical to determining all the possible causes a component may not work.
Recent Posts
A complete guide to electrical drawings, blueprints & electrical wiring.
Inspection Encyclopedia: Here's Everything You Need To Know As A Technician (Part 1)
Inspection Encyclopedia: Here's Everything You Need To Know As A Technician (Part 2)
Blog Categories
Ohm’s Law Practice Problems | Review and Examples
- The Albert Team
- Last Updated On: December 5, 2023

Welcome to the fascinating world of electrical principles, where understanding Ohm’s Law is not just a skill but a necessity. Often considered the backbone of electrical engineering and physics, Ohm’s Law is a fundamental concept that illuminates the relationship between voltage, current, and resistance in an electrical circuit. In this comprehensive guide, we will cover the core of Ohm’s Law, explore its fundamental formula, and work through a series of Ohm’s Law practice problems. Mastering Ohm’s Law is a step towards unraveling the complexities of electronics.
What Does Ohm’s Law State?
Ohm’s Law is a fundamental principle in electronics and physics, providing a simple yet powerful way to understand the relationship between voltage, current, and resistance in electrical circuits. At its core, Ohm’s Law states that the current through a conductor between two points is directly proportional to the voltage across these points and inversely proportional to the resistance between them. This relationship is elegantly captured in the formula V = IR , where V stands for voltage, I for current, and R for resistance.
Understanding Voltage, Current, and Resistance
In order to fully appreciate Ohm’s law, let’s review the three components.
- Voltage (V) : Often described as the electrical force or pressure that drives the flow of electrons through a conductor. It’s the potential difference between two points in a circuit.
- Current (I) : This is the flow of electrical charge, measured in amperes (A). It represents how many electrons are flowing through the circuit.
- Resistance (R) : Resistance is the opposition to the current flow in a circuit. It’s measured in ohms (Ω) and depends on the material, size, and temperature of the conductor.
By manipulating the Ohm’s Law formula, you can solve for any one of these three variables if the other two are known. This makes it an invaluable tool for understanding and designing electrical circuits.
Practical Applications
Ohm’s Law isn’t just a theoretical concept; it has numerous practical applications in everyday life and various industries. Here are a few examples:
- Electronics Design: Engineers use Ohm’s Law to design circuits, select appropriate components, and ensure electrical devices function safely and efficiently.
- Troubleshooting Electrical Problems: Technicians often use Ohm’s Law to diagnose issues in electrical systems, such as finding short circuits or identifying components that are not functioning correctly.
- Educational Purposes: Ohm’s Law is a fundamental concept taught in physics and electronics courses, helping students understand the basics of electrical circuits.
- Power Management: In larger-scale applications like power distribution, Ohm’s Law helps calculate the load that can be safely put on electrical systems without causing damage or inefficiency.
Understanding Ohm’s Law opens up possibilities for creating, managing, and troubleshooting electrical systems, from the smallest electronic devices to large-scale power grids.
What is the Formula for Ohm’s Law?
Ohm’s Law is elegant in its formulation, providing a precise mathematical relationship between voltage, current, and resistance in an electrical circuit.
| V = IR |
In the formula for Ohm’s Law, V represents voltage measured in volts (V), I is the current measured in amperes (A), and R is the resistance measured in ohms (Ω). This formula is the cornerstone for analyzing and understanding electrical circuits, requiring two variables to solve.
Ohm’s Law Triangle
The Ohm’s Law triangle is a helpful tool for remembering how to calculate voltage, current, and resistance. It visually represents the formula V=IR in a graphic format, with V at the top, I on the left, and R on the right. By covering the variable you want to calculate, the other two variables show how they relate. For example, covering V shows I\times R , covering I shows /frac{V}{R} , and covering R shows \frac{V}{I} . This tool is handy for beginners and a reference for quick calculations.

Strategies for Solving Ohm’s Law Practice Problems
When solving problems using Ohm’s Law, it’s important to follow a systematic approach:
- Identify Known Quantities: Start by determining which of the three variables (voltage, current, resistance) are known.
- Determine the Unknown: Figure out which variable you need to calculate.
- Use the Ohm’s Law Circle: Utilize the Ohm’s Law circle to understand the relationship between the variables and to choose the correct formula.
- Solve Step-by-Step: Apply the formula and solve for the unknown variable step-by-step, ensuring accuracy in your calculations.
- Check Units: Always check that your units are consistent (volts for voltage, amperes for current, ohms for resistance) and convert if necessary.
By applying these strategies, you can effectively use Ohm’s Law to solve a wide range of electrical problems, enhancing your understanding and skills in electrical theory and practice.
Examples of Ohm’s Law
Calculating Current: If a light bulb has a resistance of 240\text{ ohms} and is connected to a 120\text{-volt} power source, the current flowing through it can be calculated as:
Determining Voltage: For a toaster that draws a current of 5\text{ amperes} and has a resistance of 10\text{ ohms} , the voltage across it is:
Finding Resistance: If a hairdryer operates at 220\text{ volts} and draws a current of 11\text{ amperes} , its resistance is:
These examples demonstrate how Ohm’s Law is applied in practical situations, providing a clear understanding of how electrical components function in various devices.
Ohm’s Law Practice Problems
Here are eight practice problems involving Ohm’s Law, arranged in order of increasing complexity. These problems will help you apply the concepts of voltage, current, and resistance in various scenarios. Work through these on your own, then scroll down for solutions.
1. Basic Current Calculation
A circuit with a 9\text{-volt} battery and a resistor of 3\text{ ohms} . What is the current flowing through the circuit?
2. Resistance Determination
Find the resistance of a bulb that draws 0.5\text{ amperes} from a 120\text{-volt} supply.
3. Voltage Calculation
What is the voltage across a resistor of 15\text{ ohms} through which a current of 2\text{ amperes} is flowing?
4. Multiple Resistors (Series)
In a series circuit with a 12\text{-volt} battery, if there are two resistors of 4\text{ ohms} and 6\text{ ohms} , what is the current flowing through the circuit?
5. Multiple Resistors (Parallel)
Calculate the total resistance in a parallel circuit with two resistors of 5\text{ ohms} and 10\text{ ohms} . If a voltage of 12\text{-volts} is applied across the circuit, what is the total current flowing through the circuit?
6. Combined Ohm’s Law and Power
A device using 18\text{ watts} of power is connected to a 9\text{-volt} battery. Calculate the current drawn by the device and determine the resistance of the device.
7. Variable Resistance
If the current in a circuit is 0.25\text{ amperes} and the voltage is 10\text{ volts} , what must be the resistance?
8. Complex Circuit Analysis
In a circuit, a 6\text{-ohm} resistor and a 12\text{-ohm} resistor are connected in series to a 9\text{-volt} battery. Calculate the current through each resistor.

Solutions to Ohm’s Law Practice Problems
Are you ready to see how you did? Review below to see the solutions for the Ohm’s Law practice problems.
We have a simple circuit with a 9\text{ V} battery and a 3\ \Omega resistor. In order to solve this, use Ohm’s Law, V=IR to find the current:
Therefore, the current flowing through this circuit is 3\text{ amperes} , typical for small electronic devices.
A bulb is connected to a 120\text{ V} supply and draws 0.5\text{ A} .To find the resistance, rearrange Ohm’s Law to R = V/I :
The bulb has a resistance of 240\ \Omega , indicating it’s suitable for moderate power applications.
A resistor of 15\ \Omega carries a current of 2\text{ A} . Apply V=IR to find the voltage across the resistor:
The voltage across this resistor is 30\text{ V} , typical for small household circuits.
We have a series circuit with a 12\text{ V} battery and two resistors ( 4\ \Omega and 6\ \Omega ). First, sum the resistances in series. Then, apply Ohm’s Law.
Summing the resistance:
Now, apply Ohm’s Law with the total resistance, rearranged for the current:
The current of 1.2\text{ A} flows uniformly through each component in this series circuit.
In this scenario, there is a parallel circuit with two resistors of 5\ \Omega and 10\ \Omega . First, calculate the total resistance in parallel using the reciprocal formula:
Then, apply Ohm’s Law with the total resistance, rearranged for the current:
The total current flowing through the circuit is approximately 3.6\text{ A} .
An 18\text{ W} device is connected to a 9\text{ V} battery. First, find the current using by rearranging the power formula P=VI :
The device draws a current of 2\text{ A} . Next, use Ohm’s Law rearranged for resistance:
The device’s resistance is 4.5\ \Omega .
For a circuit with a current of 0.25\text{ A} and a voltage of 10\text{ V} , apply Ohm’s Law to find the resistance:
The circuit has a resistance of 40\ \Omega , indicating a relatively high resistance for the given current and voltage.
First, calculate the total resistance:
For a series circuit, all elements receive the same current. Each resistor in this series circuit experiences a current of 0.5\text{ A} .
As we reach the end of our exploration into Ohm’s Law, it’s clear that this fundamental principle is more than just a formula; it’s a key to unlocking the mysteries of electrical circuits. Through this guide, we’ve journeyed from the basic understanding of voltage, current, and resistance to applying these concepts in various practical scenarios. The practice problems provided various challenges, from straightforward calculations to more complex circuit analyses, each designed to strengthen your grasp of Ohm’s Law.
Remember, the journey of mastering Ohm’s Law is as much about practice as it is about understanding the theory. Each problem you solve, and each circuit you analyze adds to your skill set, making you more adept at navigating the world of electronics.
Interested in a school license?
Popular posts.

AP® Score Calculators
Simulate how different MCQ and FRQ scores translate into AP® scores

AP® Review Guides
The ultimate review guides for AP® subjects to help you plan and structure your prep.

Core Subject Review Guides
Review the most important topics in Physics and Algebra 1 .

SAT® Score Calculator
See how scores on each section impacts your overall SAT® score
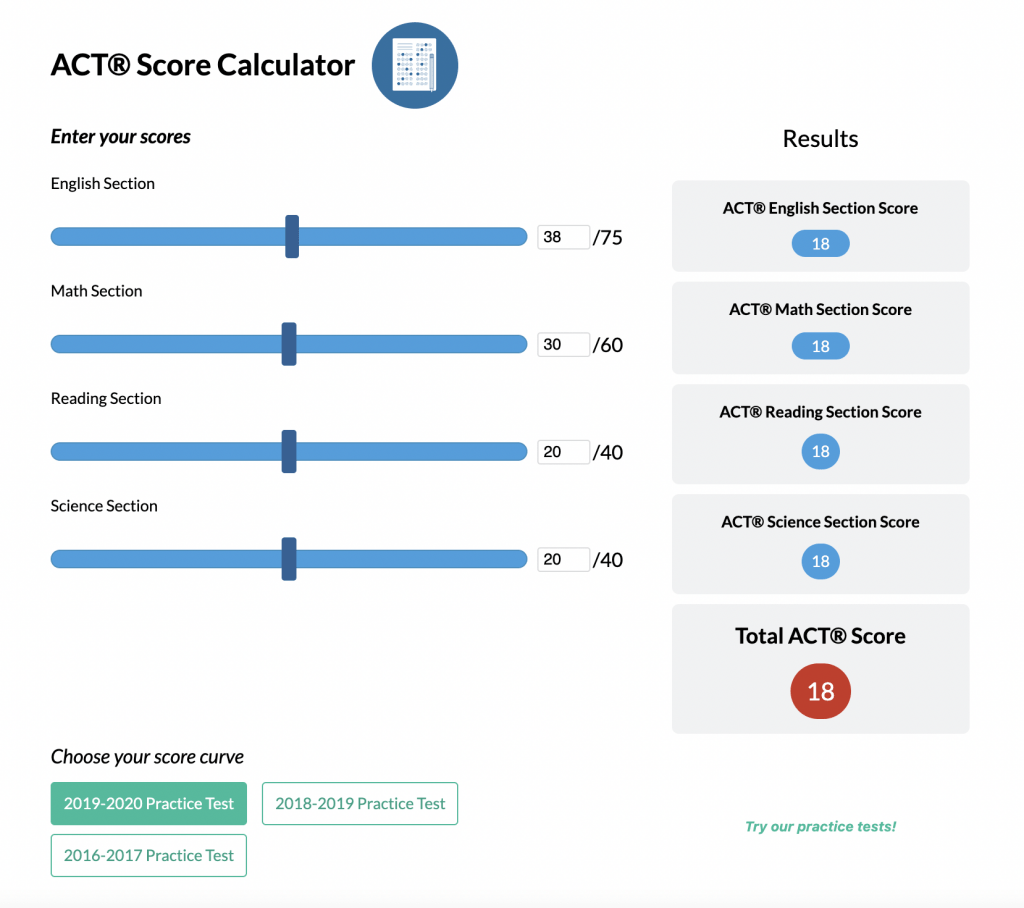
ACT® Score Calculator
See how scores on each section impacts your overall ACT® score

Grammar Review Hub
Comprehensive review of grammar skills

AP® Posters
Download updated posters summarizing the main topics and structure for each AP® exam.

Professional Tool Reviews for Pros
How to Troubleshoot and Fix Electrical Problems with Home Appliances

Not every seemingly broken appliance requires a service call. The most common problems with household appliances are mechanical in nature. You may have a broken or worn-out component (such as a switch or motor). A loose wire or a bad connection can also cause easily-fixable problems. If they want to, any homeowner can learn how to troubleshoot and fix electrical problems with home appliances. Read on for some easy troubleshooting tips!
Editor’s Note: As with any advice you follow online, we do not claim ultimate authority. Please turn off breakers and verify power is off with either a non-contact voltage tester and/or multimeter before working on any electrical wires. Please take all safety precautions against electrical shock, and/or consult a professional if you don’t understand something you’re doing. Electricity is not to be trifled with! You also want to make sure you stay in compliance with all local and national building and electrical codes .
What are the Basic Tools You Need to Troubleshoot Home Appliances?
Most home appliances take AC voltage, supplied to your house from the utility company and use it to make heat, light, turn a motor, or all three at the same time. But when the appliance stops functioning, a logical approach to troubleshooting comes in handy. Fixing electrical problems and even tracing circuit breakers involves the use of basic tools.
You can, for example, check for proper voltage at each circuit component and even the condition of components and connections using functions found on tools like an Amprobe multimeter . It helps to be equipped to troubleshoot electrical problems. To make this less painful, you should have the following tools:
- NCV – non-contact voltage detector (determines if power is flowing to a circuit to keep you safe)
- Digital multimeter (measures AC and DC voltage as well as continuity—whether you have a break in a wire)
- Screwdrivers (Phillips and flat head)
- Basic wire strippers
- Clamp meter (checks current draw—this is for more advanced troubleshooting and repairs)
How to Fix Electrical Problems Step by Step
Here is a recommended step-by-step troubleshooting method you can use to isolate and fix electrical problems near any home appliance problems using just a digital multimeter (DMM) and some basic tools:
1. Check the AC Supply Voltage
Believe it or not, some problems start at the source. Always ensure you have the proper AC voltage coming to an outlet or power supply.
To measure the AC supply voltage at a receptacle, first set the DMM (digital multimeter) function switch to Volts AC (VAC). If required, select a range greater than the voltage you expect to measure (greater than 120 volts). An auto-ranging meter automatically selects the most appropriate range for you. Next, connect the test leads (red and black) to the Voltage (V) and Common (C) ports on the meter.
The red multimeter probe tests the “hot” line and the black tests neutral or ground. Carefully, insert the red probe of the meter into the “hot” slot of the receptacle. This is typically the “short” or smaller slot. The black probe goes into the other vertical slot of the receptacle or the Ground slot.
The meter should read between 116 and 124 volts. The power cord from the appliance usually terminates with three wires: black, white, and green. Black (or less commonly, red) is usually the “hot” wire, white is “neutral”, and the green wire should be ground.
You should also read almost no voltage between Neutral (long slot) and the Ground hole.

Troubleshooting Low or No Voltage
If you measure no voltage at the outlet, check to make sure the circuit breaker or switch controlling the receptacle is ON. Also, make sure the probes are sufficiently inserted into the receptacle. You may need to angle them or move them around to be sure. If you DO detect voltage at the receptacle, you could have a problem in the power cord. That will be your next test.
If, however, you measure a voltage that’s much lower than the expected ~120V, you may have a problem with a disconnected neutral (white) wire. Since, most of the time, wires don’t “break in the middle” you might want to check to see if a neutral (white) wire corroded or came disconnected at an outlet or switch on the same circuit. Be sure to shut off the power before searching for broken neutral wires.
2. Check the Power Cord
Over time, and sometimes through accidents or flexing, the internal conductor in the power cord can break while appearing perfectly normal on the outside. To check a power cord, first, disconnect it from the outlet. For this next part, you will need to gain access to the internal connections on your appliance. Never test any wires on an appliance still connected to an outlet!
Set your multimeter to the resistance or “Ohms” function and measure the resistance between each prong of the plug and the point where the power cord connects to the appliance. The flat, narrow blade on the plug should be connected to the black wire. The flat, wide blade goes to the white wire. The round pin connects to the green wire.
A good power cord will have less than one ohm of resistance from the plug to the end of each wire. Anything higher than one ohm may indicate a cord that is starting to break down and could become overheated when in use. Replace the entire power cord if any wire shows high resistance or “OL” is displayed on the meter.
3. Check the Current Draw – Advanced Users
Sometimes a low or high current draw indicates a motor problem. It can alert you to how to fix electrical problems when systems don’t operate as they should. Current draw is measured by using a clamp accessory attached to your multimeter, or by using a clamp meter. If you don’t know what this looks like, check out our Amprobe clamp meter review .

To make a current measurement, either connect the clamp accessory or grab the clamp meter. Accessories connect to the current jack and common jack of the multimeter. Clamp the jaw around one conductor (wire) of the circuit to be measured. Typically you can find the power cable split out at the appliance side, but please be careful or hire an electrician if you don’t fully understand the risks here. Be careful not to clamp the jaw around both conductors, this will cancel the signal, showing zero current.
Tech Note: The current clamp acts as a step-down transformer, taking the higher current consumed by the appliance and transferring it to a much smaller current (usually 1000 to 1) which the digital multimeter can handle.
To make a current measurement with a clamp meter, select the AC current function and clamp the jaws around one conductor. The display will show the current being measured. What you are doing here is making sure the appliance is actually drawing current in the first place. An appliance that isn’t working may simply not draw any electricity because it has a problem somewhere else and is failing internally.
Check out the Klein Tools CL800 AC/DC clamp meter – Buy Now ($129.97)
4. Checking Switches
You can quickly troubleshoot electrical problems by checking onboard switches on small appliances. Make sure power is flowing through them and getting to its proper destination. You can verify this in a couple of ways. With the appliance plugged in, you can check both the input side and output side of the switch for voltage.
With the probe leads plugged into the Volts and Common inputs set the meter to the Voltage AC (VAC) mode. Touch the black probe to ground (the metal frame of the appliance) or to the neutral connector on the power cord (the white wire). Carefully touch the red probe to the connectors on the switch, first one side, then the other. With the switch in the “ON” position, the voltage should be present on both input and output lugs.
Bonus Step: Checking Continuity
Another way is to check the continuity through the switch. For this test, remove power from the switch first by unplugging the appliance.
Next, isolate the switch by removing the wire or wires from one side of the switch.
Then, set the multimeter to the Continuity function and place one lead on the input lug of the switch and the other lead on the output lug of the switch. When the switch is on, the multimeter should sound the audible continuity signal and read about zero ohms. With the switch in the off position, the audible tone should stop and the meter will display “OL.” If it doesn’t, you have found your problem: a defective switch.
What’s Next?
Fixing electrical problems in home appliances may seem daunting. If, however, the problem is just a loose cable or a bad switch, why pay hundreds of dollars for a simple solution? Many electrical problems have been solved easily and quickly by homeowners willing to take a few minutes to do some basic troubleshooting.
Hopefully, this guide was helpful—we love passing on tips from our electrician Pros which may be helpful to other Pros who don’t work in that field. If this helped you, or you have additional troubleshooting steps you’d suggest we add here, please leave a comment below!
- Tags: circuit breaker finder , electrical , How To

Clint DeBoer
Editor-in-Chief
When he's not playing with the latest power tool, Clint DeBoer enjoys life as a husband, father, and is an avid reader—especially the Bible. He loves Jesus, has a degree in recording engineering, and has been involved in multimedia and/or online publishing in one form or another since 1992.
Related articles

Craftsman Now Available at Acme Tools!
This week, Acme Tools announced that they would start carrying Craftsman tools, storage items, outdoor power equipment, and more! This […]
Fall Lawn Care: How to Keep Your Yard Healthy This Autumn
The latter months of the year bring cooler weather and less sunlight, signaling lawns to start slowing their growth. This […]
Ryobi 18V Edge Battery Technology – It’s a Big Deal
Earlier this year, Ryobi announced a huge update to its battery lineup: the 18V One+ High Performance Edge battery. It’s […]
Best New Tools for 2024 – September Update
Whether it’s the latest announcements from your favorite tool brands or the year’s Pro Tool Innovation Award winners and finalists, […]
- 512.371.0100
- Certification
- Financial Aid
- Solar Power
- HVAC en Espanol
- Career Seekers
- Student Area
- Book a tour
Electricians play a pivotal role in ensuring the smooth operation of various industries, from construction to technology. With the increasing demand for electricity-driven systems, the need for skilled electricians has never been more pronounced...

Electricians play a pivotal role in ensuring the smooth operation of various industries, from construction to technology. With the increasing demand for electricity-driven systems, the need for skilled electricians has never been more pronounced. In today's job market, the opportunities for those with electrical expertise are vast and varied. This blog highlights six crucial skills every electrician should possess. As we explore these skills, it becomes evident that being an electrician is not just about fixing wires and circuits but mastering a set of competencies that significantly impact the professional landscape. In an era dominated by technological advancements, electricians ensure that the lights stay on, machinery operates seamlessly, and communities have access to power. This blog aims to celebrate the role of electricians, offering insights into the essential skills that empower them to excel in their dynamic profession. So, let's embark on this journey to discover the fundamental skills that make electricians the backbone of our electrified world.
#1. Technical Proficiency
In the intricate electrical work world, technical proficiency is the cornerstone of an electrician's skill set. A profound understanding of electrical systems and components is vital for ensuring the safe and effective functioning of various electrical installations.
In-Depth Knowledge
Electricians must possess a thorough grasp of electrical circuits and wiring. According to the U.S. Bureau of Labor Statistics, this knowledge is crucial for designing, installing, and repairing electrical systems. Furthermore, familiarity with different types of electrical equipment, such as transformers and circuit breakers, enhances an electrician's ability to troubleshoot issues efficiently.
Read and Interpret Blueprints
Reading technical drawings and blueprints is a fundamental skill for electricians involved in construction projects. The National Electrical Contractors Association (NECA) emphasizes the importance of interpreting these documents accurately to ensure precise electrical installations. This skill facilitates effective collaboration with other professionals and ensures electrical work aligns seamlessly with project requirements. As electricians hone their technical proficiency, they become adept at navigating the complexities of electrical systems, contributing to the reliability and safety of the infrastructures they support.
#2. Safety Awareness
In the electrifying world of electricians, safety awareness takes center stage. The dynamic nature of electrical work underscores the importance of prioritizing safety to prevent accidents and ensure the well-being of professionals and those they serve.
Prioritizing Safety
Electricians are exposed to inherent risks associated with working on electrical installations and repairs. The Occupational Safety and Health Administration (OSHA) emphasizes the significance of adhering to safety protocols and regulations to mitigate these risks. Prioritizing safety not only safeguards the electrician but also contributes to the overall reliability of electrical systems.
Wearing personal protective equipment (PPE) is a fundamental aspect of an electrician's safety toolkit. OSHA provides guidelines on the types of PPE electricians should use, including insulated gloves, safety glasses, and flame-resistant clothing. The proper use of PPE not only minimizes the risk of electrical injuries but also ensures that electricians can carry out their tasks with confidence and precision. Electricians create a secure working environment by placing safety at the forefront, fostering trust among clients and colleagues. As we navigate the electrifying landscape of electricians' skills, our next destination is the realm of Problem-Solving Skills, where adaptability and quick thinking take the spotlight.
#3. Problem-Solving Skills
In the dynamic realm of electrical work, problem-solving skills stand out as a beacon guiding electricians through the intricacies of their profession. The ability to navigate unexpected challenges and employ quick thinking is instrumental in ensuring the smooth operation of electrical systems.
Dynamic Electrical Work
Electrical systems are susceptible to various challenges, from unforeseen malfunctions to complex installation requirements. According to the International Association of Electrical Inspectors (IAEI), electricians must embrace the dynamic nature of their work and be prepared to adapt to evolving scenarios. This adaptability is essential for maintaining the integrity of electrical systems across diverse applications.
Troubleshooting
Troubleshooting is a core competency for electricians. Identifying and addressing the root causes of electrical malfunctions ensures that systems operate at peak efficiency. The Electrical Training Alliance underscores the importance of developing systematic approaches to troubleshooting, emphasizing diagnostic skills and logical problem-solving. As electricians refine their problem-solving skills, they become adept at turning challenges into opportunities for growth. The journey continues as we explore the significance of Communication Skills in the collaborative world of electricians.
#4. Communication Skills
Effective communication skills weave the threads that ensure seamless interactions with clients, team members, and other professionals in the collaborative tapestry of electrical work. Beyond technical prowess, the ability to communicate clearly and concisely is fundamental to the success of an electrician.
Effective Communication
An electrician's work often involves interactions with clients, understanding their needs, and translating technical jargon into basic terms. The National Electrical Contractors Association (NECA) underscores the significance of effective communication in establishing trust and delivering satisfactory results. Clear communication ensures client satisfaction and paves the way for successful collaboration on projects.
Clear Communication
Translating complex technical information is a skill that sets exceptional electricians apart. Clarity is paramount when explaining issues to non-technical stakeholders or providing instructions to team members. The International Brotherhood of Electrical Workers (IBEW) emphasizes the importance of concise communication in ensuring everyone is on the same page. This collaborative approach enhances efficiency and minimizes the risk of errors. As electricians refine their communication skills, they contribute to individual projects' success and their profession's overall positive perception. Join us as we illuminate the next vital skill – Time Management – in the electrifying journey of electricians.
#5. Time Management
In the fast-paced world of electrical work, time management emerges as a key player, allowing electricians to meet project deadlines, maximize productivity, and ensure the timely completion of tasks without compromising quality.
Time Efficiency
Time efficiency is not merely a desirable trait but a crucial aspect of an electrician's toolkit. According to the International Association of Electrical Inspectors (IAEI), meeting project deadlines is essential in the construction industry, where electrical work is often one part of a larger project. Efficient time management enhances the overall project timeline and contributes to client satisfaction.
Balancing Multiple Tasks
Electricians often find themselves juggling multiple tasks within a project. Prioritizing these tasks based on urgency and importance is a skill emphasized by the Electrical Training Alliance. Strategic time management ensures that each aspect of a project receives the attention required, leading to a harmonious workflow and successful project completion. As electricians master the art of time management, they boost their productivity and contribute to the overall efficiency of the projects they undertake. Join us on the final leg of our exploration, where we delve into the world of Continuous Learning and Adaptability – crucial elements for staying at the forefront of the ever-evolving field of electrical work.
#6. Continuous Learning and Adaptability
In the ever-evolving landscape of electrical work, the journey doesn't end with mastering current skills. Continuous learning and adaptability are the compasses guiding electricians toward staying at the forefront of technology and maintaining a thriving career.
Electrical Advancements
The electrical technology field is dynamic, with constant advancements reshaping how electricians approach their work. According to the U.S. Bureau of Labor Statistics (BLS), staying updated on industry trends and innovations is crucial for electricians to remain competitive in the job market. Embracing new technologies ensures that electricians can efficiently navigate modern electrical systems.
Adaptability
Adaptability is the linchpin that allows electricians to embrace technological changes with confidence. The Electrical Training Alliance emphasizes the need for electricians to continually update their skills and knowledge to align with industry shifts. This adaptability not only future-proofs careers but also positions electricians as leaders in integrating cutting-edge technologies. As electricians commit to continuous learning and adaptability, they not only enhance their expertise but also contribute to the innovation and progress of the electrical industry. In concluding our exploration, we celebrate the holistic skill set of electricians and encourage aspiring and seasoned professionals to embrace the dynamic nature of their profession.

- Employability Skills
The Skills Successful Electricians Need
Search SkillsYouNeed:
Personal Skills:
- A - Z List of Personal Skills
- Personal Development
- Career Management Skills
- Career Options for School Leavers
- Careers for Graduates
- Developing Your Super-Strengths
- Discovering Your Career Values
- Creating and Exploring Career Possibilities
- Improving Your Career Confidence
- Building A Personal Brand
- Job Crafting and Job Enrichment
- Choosing and Changing Jobs
- Negotiating Within Your Job
- Networking Skills
- Top Tips for Effective Networking
- Personal SWOT Analysis
- Continuing Professional Development
- Setting Up a ‘Side Hustle’
- Career Sectors
- Careers in Business
- Careers in Administration and Management
- Careers in Retail
- Careers in Hospitality and Personal Care
- Careers in Information Technology and Computing
- Careers in Construction
- Careers in Manufacturing
- Careers in Engineering
- Creative Careers: Arts, Crafts and Design
- Creative Careers: Media and Advertising
- Careers in Healthcare
- Careers in Social Work and Youth Work
- Careers in Life Sciences
- Careers in the Third Sector
- Careers Involving Animals, Farming and the Natural World
- Careers in Education
- Careers in Physical Sciences
- Careers in Financial Services, Insurance and Banking
- Careers in Law and Law Enforcement
- Careers in the Armed Forces, Security and Emergency Services
- Careers in Politics and Government
- Careers in Sports
Check out our eBook:

The Skills You Need Guide to Personal Development
- Creative Thinking Skills
- Personal Skills for the Mind
- Emotional Intelligence
- Stress and Stress Management
- Anger and Aggression
- Assertiveness
- Living Well, Living Ethically
- Understanding Sustainability
- Caring for Your Body
Subscribe to our FREE newsletter and start improving your life in just 5 minutes a day.
You'll get our 5 free 'One Minute Life Skills' and our weekly newsletter.
We'll never share your email address and you can unsubscribe at any time.
Electricians are responsible for many tasks, from routine maintenance and installations to fixing older systems. There are also some specialised duties they are responsible for, such as testing electrical systems, troubleshooting devices, calibrating electrical equipment, and reading blueprints. Because they do so much, electricians need some special skills to remain in-demand in a sector that is becoming increasingly competitive and technical.
If you are thinking about becoming an electrician, here are some essential skills you need.
Problem-solving Skills
One of the most common duties of an electrician is diagnosing and fixing electrical issues. Electricians are responsible for getting to the root of these issues and finding working solutions. Because of this, they need high-level problem-solving skills .
Even though electricians are taught how to identify common issues and how they can solve them, how they apply this knowledge is what differentiates successful electricians from those who are not. Successful electricians are able to come up with working solutions regardless of the issues they encounter, including edge cases that were never covered in college or university.
Technical Abilities
Electricians must be able to think technically. This requires critical thinking and strong maths and algebra skills. Electricians must be able to take systems apart and then put them back together, something that calls for solid technical skills. Trusting your technical skills and having confidence around electrical systems is essential if you want to become a successful electrician.
Successful electricians must also know how to safely use power tools, how to install different electrical parts such as cables, switching devices, tubing, and conduits, as well as plan a whole electrical system.
Electricians rarely work by themselves. They work with other people such as plumbers, carpenters, and other tradespeople. If you work for business electricity suppliers, you will need to also learn how to work with other electricians and people who outrank you such as supervisors and project managers.
After you gain some experience, you might also have a team working under you. If you already know how to work with a team, it will be very easy to keep things going smoothly.
The most important skills and qualities you need in this regard include patience, good communication skills, friendliness, patience, and being a team player .
Business Knowledge
Many electricians prefer to start their own businesses after they gain some experience. If you want to start a business, you need essential business skills. These include skills such as accounting skills, ability to hire the right people, customer service , and time management .
Time management is a particularly important skill to have because electricians must be able to respond to customers fast and complete their jobs on time. Electricians who run electricity supply businesses must also be able to estimate how much labor and time it will take to complete a job. Successful electricians also have a reputation for completing tasks in a reasonable amount of time and this is what makes them so valuable.
The ability to listen to customers, understand what they need, provide a solution and complete jobs to the best of your ability are all ways to provide good customer service. Many people appreciate good customer service and they are likely to become repeat customers if they are treated well.
Flexibility
Electricians often work in shifts but in some specific cases, they may need to put in more hours or be able to work on their days off to deal with some unplanned electrical issues. Successful electricians understand they need to be flexible enough to deal with these issues as they come up rather than working a precise 9-5 shift.
Communication Skills
Electricians must be good communicators. They have to be able to listen, ask the right questions, and then communicate with their teammates to chart out a course of action. Good communication skills are also essential because electricians are often dealing with people who do not have a working knowledge of electrical systems. They must be able to understand what their customers are saying even if they do not say it in precise technical jargon.
If you run your own business or are responsible for a team, you will be required to train new apprentices regularly. To ensure this is a successful endeavour, you must be able to instruct them in precise and clear terms, so they understand what needs to be done.
Motor Skills, Good Vision and Physical Fitness
All three of these are qualities rather than skills but they are still applicable if you want to be a successful electrician. Electricians need to be precise; a simple mistake might lead to loss of life or property. Because of this, they must have proper motor skills to ensure that no matter how much they move around, they are still able to complete their job precisely.
Good vision can be viewed in several ways. The first one is hand-eye coordination. As with manual dexterity, this is an important skill to have as it can help electricians work with all objects and tools.
The second is how good your eyesight is. While it is perfectly fine if you wear glasses, you should not be color blind. Electrical wires and systems are color-coded and the ability to distinguish between all these different colors could save your life!
Being an electrician requires a certain level of physical fitness. Even if you do not have to have an athlete's body, you must be able to climb up and down stairs, ladders, and other structures multiple times a day, stand for long periods, lift heavy objects and crouch or bend multiple times a day.
Commitment to Safety
Electricians should be aware they work in high-risk situations. Therefore, they should be committed to keeping the spaces they work in as safe as possible for both themselves and their teammates. To do this, they should know about specific electrical safety regulations. They should also know how to analyze a situation to see if it is safe or not and if not, they should find ways to make it safe so they can get to work.
Going Above and Beyond
Businesses looking to save money can find business electricity suppliers who offer competitive tariffs. As an electrician, you can help them save money in other ways, such as by advising on suitable upgrades like switching to LED lighting.
If you want to become an electrician, you will need some specific skills and qualities. Even though personal qualities cannot be taught, everything else you need to become a successful electrician will be taught at college or university.

Further Reading from Skills You Need
The Skills You Need Guide to Getting a Job
Develop the skills you need to get that job.
This eBook is essential reading for potential job-seekers. Not only does it cover identifying your skills but also the mechanics of applying for a job, writing a CV or resume and attending interviews.
About the Author
James Daniels is a freelance writer, business enthusiast, a bit of a tech buff, and an overall geek. He is also an avid reader, who can while away hours reading and knowing about the latest gadgets and tech, whilst offering views and opinions on these topics.
Continue to: Transferable Skills Maintaining a Healthy Work / Life Balance
See also: Career Management Skills How to Become a PAT Tester UK: Essential Steps and Requirements Marketing for Freelancers and the Self-Employed
- PRO Courses Guides New Tech Help Pro Expert Videos About wikiHow Pro Upgrade Sign In
- EDIT Edit this Article
- EXPLORE Tech Help Pro About Us Random Article Quizzes Request a New Article Community Dashboard This Or That Game Happiness Hub Popular Categories Arts and Entertainment Artwork Books Movies Computers and Electronics Computers Phone Skills Technology Hacks Health Men's Health Mental Health Women's Health Relationships Dating Love Relationship Issues Hobbies and Crafts Crafts Drawing Games Education & Communication Communication Skills Personal Development Studying Personal Care and Style Fashion Hair Care Personal Hygiene Youth Personal Care School Stuff Dating All Categories Arts and Entertainment Finance and Business Home and Garden Relationship Quizzes Cars & Other Vehicles Food and Entertaining Personal Care and Style Sports and Fitness Computers and Electronics Health Pets and Animals Travel Education & Communication Hobbies and Crafts Philosophy and Religion Work World Family Life Holidays and Traditions Relationships Youth
- Browse Articles
- Learn Something New
- Quizzes Hot
- Happiness Hub
- This Or That Game
- Train Your Brain
- Explore More
- Support wikiHow
- About wikiHow
- Log in / Sign up
- Education and Communications
- Engineering
How to Solve Circuit Problems
Last Updated: December 24, 2022
wikiHow is a “wiki,” similar to Wikipedia, which means that many of our articles are co-written by multiple authors. To create this article, 14 people, some anonymous, worked to edit and improve it over time. This article has been viewed 38,890 times. Learn more...
Solving circuits is one of the most challenging tasks for the undergraduate student as it involves numerous theorems, concepts, and processes for solving the circuits. But following a planned problem solving strategy simplifies the problem, making it easier to solve.

Community Q&A
- Use all the tools available: transforms, linear algebra, dimensional analysis, nonlinear modelling, chief among them. Thanks Helpful 0 Not Helpful 2

You Might Also Like

- ↑ https://en.wikipedia.org/wiki/Mesh_analysis
- ↑ https://en.wikipedia.org/wiki/Nodal_analysis
About This Article
- Send fan mail to authors
Did this article help you?

Featured Articles

Trending Articles

Watch Articles

- Terms of Use
- Privacy Policy
- Do Not Sell or Share My Info
- Not Selling Info
wikiHow Tech Help Pro:
Level up your tech skills and stay ahead of the curve
30 Electrical Engineering Problems – Root Cause Analysis
Table of Contents
A 1970s built fertilizer plant electrical switchgears, transformer to substation switchgear bus ducts, associated systems flashed often and shutdown the system. Thanks to redundancy, the crew isolated the affected section and transferred the loads to the healthy section.
NH3 plants are difficult to start after a crash shutdown. Fortunately provided steam turbines for the various NH3 plant’s major compressors and their auxiliaries e.g. lube and seal oil pumps, boiler feed water pump feeding 3‑waste heat, and 2 fired boilers the poor electrical reliability did not affect the NH3 plant excessively. However, the urea and 3 NPK streams often shutdown affected the NH3 plant their main raw material provider.
The first maintenance manager (MM – an US cititzen ), assigned the electrical reliability-increasing task to Indian Origin US citizen electrical consultant and the US shareholding Co switchgear expert.
His successor an Indian citizen of long experience and reputation assigned reputable high-tech engineering colleges to the task. All attributed plant emitted pollutants reducing the electrical insulation unacceptably low as the Root Cause – well-known fact to the plant personnel!
Hence, they recommended shifting the Electrical Load Centers (LCs) far away from the plants and substitute imported switchgears in place of the poor-quality indigenous switchgears. Unable to implement the longtime taking, nearly impossible and prohibitively expensive tasks, the plant lived with the near life-threatening safety hazards posing system, 10-15% production loss, and high maintenance costs for 3 years
The author pointed out the ‘stalwarts’ failed attempts and his mechanical engineering qualification. However, the MM pointed out, “many including the US instrument engineer gave up many instrument problems ; but you, using Root Cause Analysis (RCA) approach and perseverance solved all.
Root Cause Analysis (RCA)
The author attributes his problems solving success to the following:
Electrical Engineering Problems and Solutions
This root cause analysis (RCA) is from real-time scenarios that happened in industries during the tenure of two or three decades ago. These articles will help you to improve your troubleshooting skills and knowledge.
| S.No. | Electrical Problems and Solutions | Article |
|---|---|---|
| 1. | Recurring Short Circuit Flash Overs Safety Hazards & Damages | |
| 2. | Frequent Feeder-A Lightning Arrestor (LA) Bursts | |
| 3. | Alternate 110 KV connection to Feeder F-A | |
| 4. | Poorly built Switchgears – Damage of Breakers | |
| 5. | Burst Transformer | |
| 6. | Premature AFB failures – Arc Fault Breaker | |
| 7. | Short AFB lives generally – Arc Fault Breaker | |
| 8. | Replace Failed Motors quickly and easily | |
| 9. | Pulverizers’ Poor Availabilities | |
| 10. | Aluminum Cable Terminations Repeat Failures | |
| 11. | Plant Air Compressor Low availability | |
| 12. | Critical High KW motor winding burnout threats | |
| 13. | Considered not possible HT motors’ DOR Changed | |
| 14. | Repaired HT Motors, shop run tested though no shop HT supply | |
| 15. | Poor Power Factor boosted | |
| 16. | Fasteners & General corrosion of Motors | |
| 17. | Frequent Totally Enclosed Fan Cooled (TEFC) motors burnouts eliminated | |
| 18. | Corrosion posed HT motors burnout threats | |
| 19. | Plant illumination external corrosion | |
| 20. | Weigh Feeders Variable Speed Drives | |
| 21. | Cement kilns, Rotary Drum Driers Simplest Drive | |
| 22. | Welding Machines Poor Availabilities | |
| 23. | Screen Vibrators | |
| 24. | 11 kV Bus A to B Phase Check | |
| 25. | Miscellaneous Electrical Tasks | |
| 26. | Misbehaving HT Motor disciplined | |
| 27. | 110 KV Minimum Oil Circuit Breakers (MOCB); No Vendor Spares & Service threaten their sudden failure and indefinite outage | |
| 28. | Poor Electrical Heating Element Lives | |
| 29. | 11 kV, 3.3 kV, and 400 V systems IR values made infinity forever | |
| 30. | Burst Transformers and 11 kV Input Breakers | |
| 31. | Transformers Coolers Problem |
You can also follow us on Facebook and Twitter to receive daily updates.
Share With Your Friends
Recommended articles, 8 thoughts on “30 electrical engineering problems – root cause analysis”.
Really amazing solved problems of electrical. Thanks Mr. Raghava Chari.
Thank you sir for sharing your experiences.
Very interesting articles. good share.
Great, Looks like author is expert in all departments.
Raghava Chari
may I get your phone number? i am Siva Reddy 9489050748 from TUTICORIN
hello sir i am interested in instrumentation root cause analysis
Sure, I will publish the author’s instrumentation RCA articles by the end of this month.
Leave a Comment Cancel reply
More articles.
This week: the arXiv Accessibility Forum
Help | Advanced Search
Electrical Engineering and Systems Science > Audio and Speech Processing
Title: audio decoding by inverse problem solving.
Abstract: We consider audio decoding as an inverse problem and solve it through diffusion posterior sampling. Explicit conditioning functions are developed for input signal measurements provided by an example of a transform domain perceptual audio codec. Viability is demonstrated by evaluating arbitrary pairings of a set of bitrates and task-agnostic prior models. For instance, we observe significant improvements on piano while maintaining speech performance when a speech model is replaced by a joint model trained on both speech and piano. With a more general music model, improved decoding compared to legacy methods is obtained for a broad range of content types and bitrates. The noisy mean model, underlying the proposed derivation of conditioning, enables a significant reduction of gradient evaluations for diffusion posterior sampling, compared to methods based on Tweedie's mean. Combining Tweedie's mean with our conditioning functions improves the objective performance. An audio demo is available at this https URL .
| Comments: | 5 pages, 4 figures, audio demo available at , pre-review version submitted to ICASSP 2025 |
| Subjects: | Audio and Speech Processing (eess.AS); Machine Learning (cs.LG); Sound (cs.SD) |
| Cite as: | [eess.AS] |
| (or [eess.AS] for this version) | |
| Focus to learn more arXiv-issued DOI via DataCite (pending registration) |
Submission history
Access paper:.
- HTML (experimental)
- Other Formats
References & Citations
- Google Scholar
- Semantic Scholar
BibTeX formatted citation
Bibliographic and Citation Tools
Code, data and media associated with this article, recommenders and search tools.
- Institution
arXivLabs: experimental projects with community collaborators
arXivLabs is a framework that allows collaborators to develop and share new arXiv features directly on our website.
Both individuals and organizations that work with arXivLabs have embraced and accepted our values of openness, community, excellence, and user data privacy. arXiv is committed to these values and only works with partners that adhere to them.
Have an idea for a project that will add value for arXiv's community? Learn more about arXivLabs .
IMAGES
VIDEO
COMMENTS
Replace any flickering bulbs with new ones. If the problem persists, consider contacting an electrician to inspect and repair any faulty wiring connections. 2. Tripping circuit breakers. Tripping circuit breakers occur when there is an overload or short circuit in your electrical system.
Solution: Replace old receptacles with GFCIs. This is a simple job that many homeowners do themselves or hire an electrician to handle the work. As an alternative, GFCI breakers can be installed on the main electrical panel. But then every time one trips, you have to go down to the basement to reset it. 6.
Step 1: Checking the Power Source. Verifying the power supply is essential when troubleshooting electrical issues. Here are a few simple steps to quickly detect if there's a problem: Make sure all switches and outlets are switched on. Sometimes, a minor mistake can create the feeling of a bigger issue.
21- Sparks or smoking from circuit breaker. Sparks or smoking from a circuit breaker can be a serious electrical hazard and should be addressed immediately. These types of issues can be caused by a variety of factors, including faulty wiring, outdated circuit breakers, and circuit overloads. The impact of sparks or smoking from a circuit ...
Push the switch back to ON and try to turn on the lights and appliances connected to the circuit one at a time. If the circuit trips again, it's a clear red flag that you have a more serious issue. Leave the circuit breaker to OFF and consult a trusted electrician immediately to identify and solve the problem. 4.
12 volts ÷ 3 ohms = 4 amps. It's as simple as that. Let's tackle another example to find a circuit's resistance using the given values: Voltage = 120v. Current = 17 amps. Now plug the known values into our formula wheel and work the equation. 120 volts ÷ 17 amps = 7.05 ohms. I told you it was simple.
11. Voltage Drop. Voltage drop is a common problem in electrical and electronic engineering, where the voltage at one point in the circuit is lower than expected. If left unchecked, this can lead to equipment malfunctioning, decreased performance, and even fires.
Always unplug appliances. If working with home wiring, always turn off the relevant circuit breakers and test the lines to ensure they are not live. 1. Power Surges. A surge of electricity can be caused by electricity, damaged power lines, or devices within your home.
Flickering lights are one of the most common household electrical problems. First, check the basics. Make sure the bulb is screwed in tightly. Try switching your bulb out for a different one if the problem is with the bulb itself. Confirm you're using the recommended wattage. Your problem could be that simple.
Loose wires within the circuit which would make the connection intermittent would also have the same effect in the end. If that doesn't solve the problem, try using a better brand light bulb before blaming faulty wiring in the fixture or the circuit. Troubleshooting home electrical problems can be a serious headache.
Homeserve's Blog is your source for home maintenance and repair tips, information and news for educational and entertainment purposes only. The Blog should not be used as a substitute for a competent advice from a licensed professional in your state, reviewing your issue. Systems, equipment, issues and circumstances vary.
Intro to Electrical Troubleshooting: Chapter 1Content1. Finding the problem2. Diagnosing the Problem 3. Testing Capacitors & Motors4. Troubleshooting a System Finding the ProblemIn this module, we will introduce you to electrical troubleshooting. We will cover:- What electrical troubleshooting is,- Wiring diagrams, and- The hopscotch method Skip to quiz! OverviewAll modern systems from HVAC ...
Ohm's Law Formula. V = IR V = I R. In the formula for Ohm's Law, V V represents voltage measured in volts (V), I I is the current measured in amperes (A), and R R is the resistance measured in ohms (Ω). This formula is the cornerstone for analyzing and understanding electrical circuits, requiring two variables to solve.
Important soft skills for electricians include communication, problem-solving, and customer service. These professionals should be able to work individually and as part of a team. Electricians need strong math skills to make measurements and calculate electrical current values. Electricians install and repair electrical power components ...
Here is a recommended step-by-step troubleshooting method you can use to isolate and fix electrical problems near any home appliance problems using just a digital multimeter (DMM) and some basic tools: 1. Check the AC Supply Voltage. Believe it or not, some problems start at the source.
Electricians create a secure working environment by placing safety at the forefront, fostering trust among clients and colleagues. As we navigate the electrifying landscape of electricians' skills, our next destination is the realm of Problem-Solving Skills, where adaptability and quick thinking take the spotlight.
Problem-solving Skills. One of the most common duties of an electrician is diagnosing and fixing electrical issues. Electricians are responsible for getting to the root of these issues and finding working solutions. Because of this, they need high-level problem-solving skills.
4. Write down all the givens, organize the information and think about the best way to attack the problem. 5. Work out the possible solutions on paper. Normally, there are many ways to solve a circuit but there are only one or two easy ways to the solution. 6. Keep the overview of the problem in sight. Remember, while solving circuits, to ...
Electrician skills refer to the various abilities that an electrician utilizes to perform their job. These skills represent soft skills, such as communication or problem-solving, and technical skills related to electrical work. Technical skills and knowledge ensure that you conduct the tasks associated with your job effectively and safely.
Electrical Engineering Problems and Solutions. This root cause analysis (RCA) is from real-time scenarios that happened in industries during the tenure of two or three decades ago. These articles will help you to improve your troubleshooting skills and knowledge. The below is the list of electrical solved problems. 1.
We consider audio decoding as an inverse problem and solve it through diffusion posterior sampling. Explicit conditioning functions are developed for input signal measurements provided by an example of a transform domain perceptual audio codec. Viability is demonstrated by evaluating arbitrary pairings of a set of bitrates and task-agnostic prior models. For instance, we observe significant ...