How To Create a Link to a Specific Slide in Google Slides
Lee Stanton Lee Stanton is a versatile writer with a concentration on the software landscape, covering both mobile and desktop applications as well as online technologies. Read more April 12, 2022
If you have ever made a PowerPoint presentation, you already know that you can add a hyperlink to your slides. Google Slides takes linking to a whole new level, allowing you to add links to specific slides in your presentation. With this handy feature, you’ll be able to jump from one slide to another without the hassle of pausing your slideshow just to find something.

Continue reading to find out how to add a link to a specific slide in Google Slides. This guide will also explain how to add a link to a different presentation in Google Slides.

How to Add a Link to a Specific Slide in Google Slides
Knowing how to add a link to a specific slide in Google Slides can be quite handy. For example, with this feature, you can create a link at the end of the presentation that says “Return to the first slide” or something along those lines. If you’re making a huge presentation with over 50 slides, having links that take you back and forth to specific points in the presentation will save you a lot of time. While the author of the presentation can use this linking tool in many ways, it’s also useful for the audience, as it will help them get around the presentation with less effort.
Not only can you add a link to a specific slide in Google Slides, but you can also insert a link that will take you to another Google Slides presentation. There’s no limit to how many links you can add, and you can even edit them.
This feature allows you to create a connection between different slides within the same Google Slides presentation. Here’s what you need to do to add a link to a specific slide in Google Slides:
- Open Google Slides in your preferred browser.

- Click on the “Apply” button.
The linked word or text will immediately turn blue. You can click on it right away to make sure you added the link successfully. When you click on the link, you’ll see a box with a preview of where the link will take you. Simply select the link in the box, and you will be taken to the slide you chose.
Since this online presentation platform is a part of the Google Docs Editors suite, you won’t be required to save the presentation. Any type of changes made on Google Slides will be automatically saved.
A much faster way to add a link to a specific slide is to highlight the text and right-click on it. You will see the “Link” option somewhere on the drop-down menu. Follow the same steps from the instructions above to complete the linking process. An even faster way to insert a link is to use the shortcut “Ctrl + K.”
Depending on the slide you’re on at the moment, Google Slides will give you a few suggestions. For example, if you’re on the first slide, you will have the option to add a link for the second slide. Similarly, if you want to add a link to the third or fourth slide, you will also have a few recommendations. If you can’t find the slide you want to add the link for, go directly to “Slides in this presentation” under the options.
Once the link is added, it’s relatively easy to customize it. Let’s say you linked the wrong slide, and you want to remove the link altogether. Simply click on the link you’ve just made and select the “Remove link” icon on the pop-up menu. Another option you have is to copy a link without having to use the standard “Ctrl + C” and “Ctrl + V” key combination. Instead, just click on the link and select the “Copy link” icon. These shortcuts save you a lot of time, allowing you to focus on your presentation.
If you have made a mistake, or if you want to change which slide the link will take you to, you can edit it in no time. This is done by selecting the pen icon on the pop-up menu. From this point, you can edit the text the link is attached to and which slide it’s linked to. If you want to insert a new link, don’t forget to click on the “Apply” button.
Google Slides allows you to be creative with your links. For example, you can also attach a link to pictures, diagrams, shapes, or stickers in your presentation, which can be extremely useful for educational presentations made for young learners.
How to Add a Link to a Different Presentation in Google Slides
As mentioned before, you also have the option to insert a link to a totally different presentation on Google Slides. This is a great tool for two presentations that cover similar topics or that are connected in some other way. This is how you can add a link to a different presentation in Google Slides:

If you have viewed or edited the other presentation, it should appear in the “suggestions” menu. If it isn’t there, you will have to add the link to that presentation manually. If you’re interested in how you can do this, go through these instructions:

That’s all there is to it. This method takes a bit longer, but if you view or edit the presentation where the link should go, it will appear in the “suggestions” menu. You can do this with all your presentations on Google Slides, even those shared with you by other Google users.
Improve Your Google Slide Presentations with the Link Tool
The ability to add a link that will take you to a specific slide in Google Slides is very useful, and it saves you a lot of time when you’re presenting it. With this tool, you can add a link to a word or text and even use it for pictures, diagrams, animations, and various other visual content. You can be as creative and practical as you like with your Google Slide presentations.
Did you try to add a link for a specific slide in Google Slides? How did you manage to do it? Tell us about your experience with Google Slides in the comments.
Related Posts
Disclaimer: Some pages on this site may include an affiliate link. This does not effect our editorial in any way.

Afam Onyimadu May 22, 2024

Lee Stanton April 24, 2024

Lee Stanton March 18, 2024
Send To Someone
Missing device.
Please enable JavaScript to submit this form.

- Get started with computers
- Learn Microsoft Office
- Apply for a job
- Improve my work skills
- Design nice-looking docs
- Getting Started
- Smartphones & Tablets
- Typing Tutorial
- Online Learning
- Basic Internet Skills
- Online Safety
- Social Media
- Zoom Basics
- Google Docs
- Google Sheets
- Career Planning
- Resume Writing
- Cover Letters
- Job Search and Networking
- Business Communication
- Entrepreneurship 101
- Careers without College
- Job Hunt for Today
- 3D Printing
- Freelancing 101
- Personal Finance
- Sharing Economy
- Decision-Making
- Graphic Design
- Photography
- Image Editing
- Learning WordPress
- Language Learning
- Critical Thinking
- For Educators
- Translations
- Staff Picks
- English expand_more expand_less
Google Slides - Linking Between Slides
Google slides -, linking between slides, google slides linking between slides.

Google Slides: Linking Between Slides
Lesson 17: linking between slides.
/en/googleslides/audience-qa/content/
Linking between slides
In Google Slides , you can easily turn any text or object into a link, and linking between slides is a powerful feature with lots of possibilities.
Watch the video below to learn how to use this feature to create an interactive presentation.
Creating an interactive presentation
In this lesson, you are going to learn how to create an interactive presentation about the solar system. Along the way, you will learn how to turn text into links , how to turn part of your slide into a link , how to edit links , and more.
Open our example file if you'd like to work along with the lesson. Make sure you're signed in to Google, then click File > Make a copy .
You can view the finished product to see what the presentation will look like when we're done.
Turning text into a link to another slide
To build our interactive presentation, we will begin by creating a link from the Jupiter slide back to the home slide.

Selecting a linked object
Whenever you select an object that has a link, a dialog box will appear. From this dialog, you can click the remove link icon , click the pencil icon to edit the link, click the copy icon , or click the name to go to the link.

Turning part of your slide into a link
Now, we are going to turn Jupiter into a link that takes users to the Jupiter slide. This is going to be a little tricky because this entire slide is a single image, which means that you can't actually select the planet.
Fortunately, there is a workaround. We are going to create a transparent shape and place it over Jupiter. Then, we will add a link to that shape. This technique allows you to turn any part of your slide into a link.

Copying, pasting, and editing links
Creating a new transparent shape for every planet would take a long time. It's much quicker to copy and paste your existing shapes.

Testing your links
It's important to test your links before sharing your presentation. Click Present to start the presentation.

The cursor changes when you hover over part of the slide that has a link.

Click a link to go to a slide.

It's a good idea to test every link in your Google Slides presentation to make sure that it leads to the correct slide.

Once you learn how to link between slides, there are nearly endless possibilities.
/en/googleslides/inserting-and-editing-videos/content/
How to Link to a Specific Slide in Google Slides: A Step-by-Step Guide
Linking to a specific slide in Google Slides allows you to direct viewers to a particular part of your presentation. This can be useful when you want to highlight a specific slide or make navigation easier for your audience. Here’s a quick overview of how to do it: You’ll need to obtain the unique link of the slide you want to link to and then insert that link into your text or another slide.
How to Link to a Specific Slide in Google Slides
In this section, we’ll go through the steps to link to a specific slide in Google Slides. By the end, you’ll know exactly how to direct your audience to any slide you choose.
Step 1: Open Google Slides
Open your Google Slides presentation where you want to create the link.
Once your presentation is open, you’ll be able to see all your slides on the left side of the screen. This is where you’ll choose the slide you want to link to.
Step 2: Select the Slide
Scroll through your slides and select the one you want to link to.
Click on the slide thumbnail on the left side. The slide will appear in the main window. Make sure this is the slide you want to direct your viewers to.
Step 3: Click on "Copy link to this slide"
Right-click on the selected slide thumbnail and choose "Copy link to this slide."
When you do this, Google Slides generates a unique URL for that specific slide. This is the link you’ll be using.
Step 4: Insert the Link
Go to the text or object where you want the link to appear, highlight it, and press Ctrl+K (or Command+K on a Mac). Paste the link you copied.
This step ensures that when someone clicks on the highlighted text or object, they’ll be taken directly to the specific slide.
Step 5: Test the Link
Click on the link you just created to make sure it directs to the correct slide.
Testing the link ensures that everything is working properly and that your viewers will end up at the intended slide.
After you complete these steps, when someone clicks the link, they’ll be taken directly to the specific slide you chose. This can make your presentations more interactive and easier to navigate.
Tips for Linking to a Specific Slide in Google Slides
- Use Descriptive Text: Instead of saying "click here," use text that describes what the link is for, like "View Slide on Marketing Strategy."
- Check Permissions: Make sure your presentation is shared with the right permissions so others can view it.
- Use in Different Formats: You can paste these links in emails, documents, or other web pages.
- Organize Your Slides: Keeping your slides well-organized makes it easier to find and link to specific ones.
- Update Links: If you make changes to the presentation, double-check that your links still work.
Frequently Asked Questions
How do i share my google slides presentation with others.
You can share your presentation by clicking the "Share" button on the top-right corner, then entering the email addresses of the people you want to share it with.
Can I link to a slide from another Google Slides presentation?
Yes, you can copy the link to a slide from one presentation and insert it into another.
What happens to the link if I delete the slide?
If you delete the slide, the link will become invalid and will no longer work.
Can I use this feature in the mobile app?
Currently, this feature is best used on the desktop version of Google Slides.
How do I edit a link?
Click on the linked text or object, then click the pencil icon to edit the link.
- Open Google Slides.
- Select the slide.
- Click on "Copy link to this slide."
- Insert the link.
- Test the link.
Linking to a specific slide in Google Slides is a handy feature that can greatly enhance your presentations. Whether you’re sharing a slide deck for a team project or creating an interactive training module, being able to direct your audience to the exact slide you want them to see simplifies navigation and keeps everyone on the same page.
Next time you’re working on a presentation, give this feature a try. It’s easy to use and can make a big difference in how your audience interacts with your slides. For further reading, check out Google’s support documentation on sharing and collaboration features. Now, go ahead and make your presentations more dynamic and user-friendly by linking to specific slides!

Kermit Matthews is a freelance writer based in Philadelphia, Pennsylvania with more than a decade of experience writing technology guides. He has a Bachelor’s and Master’s degree in Computer Science and has spent much of his professional career in IT management.
He specializes in writing content about iPhones, Android devices, Microsoft Office, and many other popular applications and devices.
Read his full bio here .
Share this:
- Click to share on Twitter (Opens in new window)
- Click to share on Facebook (Opens in new window)
- Click to email a link to a friend (Opens in new window)
- Click to share on LinkedIn (Opens in new window)
- Click to share on Reddit (Opens in new window)
- Click to share on Pinterest (Opens in new window)
- Click to share on Tumblr (Opens in new window)
Related posts:
- How to Hide a Slide in Google Slides
- How to Duplicate a Slide on Google Slides
- How to Change Slide Dimensions in Google Slides
- How to Delete a Slide on Google Slides
- How to Delete Multiple Slides in Google Slides
- How to Put Canva Slides into Google Slides: A Step-by-Step Guide
- How to Number Slides in Google Slides
- How to Make Columns in Google Slides
- How to Import Slides in Google Slides: A Step-by-Step Guide
- How to Put YouTube Videos in Google Slides
- How to Share Google Slides in Presentation Mode Like a Pro
- How to Insert Videos in Google Docs
- How to Make Google Slides Play Automatically: A Step-by-Step Guide
- How to Change Font on Google Slides Text Box
- How to Copy and Paste Multiple Slides in Google Slides: A Simple Guide
- How to Share Google Slides in Presentation Mode: A Step-by-Step Guide
- How to Get Google Slides to Play Automatically: A Step-by-Step Guide
- How to Embed a Vimeo Video in Google Slides: A Step-by-Step Guide
- Importing Keynote Presentations to Google Slides: A Step-by-Step Guide
- I Tried Both: Apple Watch 9 vs Fitbit Charge 6
- Best Places to Print Photos Online
How to Link Slides in Google Slides
CTRL+K (Command+K for Macs) is the shortcut, but the INSERT menu works, too
:max_bytes(150000):strip_icc():format(webp)/tim-fisher-5820c8345f9b581c0b5a63cf.jpg "google presentation link to slide")
- Emporia State University
:max_bytes(150000):strip_icc():format(webp)/ryanperiansquare-de5f69cde760457facb17deac949263e-180a645bf10845498a859fbbcda36d46.jpg "google presentation link to slide")
- Western Governors University
In This Article
Jump to a Section
- Linking to a Slide
- Editing the Hyperlinks
- Use the Hyperlink During a Presentation
Why Internal Hyperlinks Are Useful
- Frequently Asked Questions
What to Know
- On the website, go to Insert > Link to choose a destination slide.
- In the app, tap Insert link to pick where the link should go.
This article explains how to link to another slide from within a Google Slides presentation. Instructions for both the desktop website and the mobile app are included.
How to Link to a Slide in Google Slides
It's as easy as choosing the source object and the destination slide, but the directions are a little different between the website and app.
Link Slides From the Website
Use the Insert menu to find the hyperlink option.
Highlight the text or select the object/image for which you want to create a hyperlink.
Be careful what you're choosing here. If you have text on top of a large object, you might accidentally choose the object when you really want to add a link to the text.
Go to Insert > Link , or press Ctrl+K (Windows) or Command+K (Mac).
Select the slide you want to link to. If you have trouble finding it, choose Slides in this presentation to view only those slides.
Link Slides From the App
Tap-and-hold the item to see the hyperlink option.
Select the object or press-and-hold the text to highlight it (double-tap the text to enter edit mode).
Tap Insert link . If you don't see this option, you either can't add a hyperlink to that specific object, or it's in the overflow menu (the three dots).
Search for and then select the slide you want to link to. All the slides in your presentation are listed in the Slides menu.
Tap the checkmark at the top right to save the link, and then be sure to also select the checkmark at the top left of the next screen to save the changes you made to the slide.
Editing Hyperlinks in Google Slides
At any time, you can change or remove the hyperlinks you've made.
Select the hyperlink once for a small menu to pop up. Use the second link (called Edit link in the app) to change which slide should appear when it's clicked, or use the third link ( Remove link in the app) to completely delete that hyperlink.
You can also change the formatting of the link to adjust the color or remove the hyperlink's underline. You might do this to make the text flow better with the slide's overall theme, so it blends in and looks like other items in the slideshow, instead of an obvious link.
To do that, highlight the text, and then use the formatting menu to make any changes you want. In the example below with the letter C , we've removed the underline and restored the black text color so it looks more like the text from the other slides. The link still works despite the formatting changes.
How to Use the Hyperlink During a Presentation
When you want to proceed to the next slide in a presentation, it's typical to click somewhere on the slide. However, if you have a specific slide you want to advance to—one you've already made a hyperlink for—you have to make sure to select that link when it comes time to access the slide you want to present.
A presentation naturally flows from the first slide to the second one, and then the third, and so on. If there are things you want to address earlier than they'd be presented during the natural flow of the slideshow, you can jump to them ahead of time through hyperlinks. It's essentially a shortcut to wherever you want to go next.
For example, maybe you have a citations slide at the very end of the presentation that provides sources for the data you're discussing. Creating a hyperlink provides an easy way to link to that slide from all your slides so you don't have to click through potentially dozens of slides just to reach the one you want to present right now, nor do you need to squeeze all the citations in each slide that needs them. If you care to show those sources during the presentation, they're now just a click away.
Another handy use for a hyperlink is to link back to the first slide from every other slide, maybe because you're using a table of contents to outline the slideshow. Linked slides are also convenient if you're building a walkthrough, such as a software tutorial, because specific objects you've hyperlinked can then go directly to whatever slide provides details about that item.
You must select an object before you can insert a link. Make sure there's a blue box around the object you want to link.
To embed a video in Google Slides , go to Insert > Video and select Google Drive, by URL, or use the YouTube search bar. Choose a video and click Select to insert it.
You can convert the PDF to an image and insert it that way. Alternatively, upload the PDF to your Google Drive, right-click the file, and select Get link . Then, insert the link in Google Slides.
Get the Latest Tech News Delivered Every Day
- The 8 Best Google Drive Add-ons for 2024
- How to Add Audio to Google Slides
- How to Add a Hyperlink in a Google Doc
- How to Insert PDF Files Into PowerPoint Presentations
- How to Use Google Duet in Slides
- How to Group Objects in Google Slides
- The 13 Best Free PDF Editors (May 2024)
- How to Put a Spreadsheet in Google Slides
- How to Use Portrait and Landscape Slides in the Same Presentation
- How to Embed Video in Google Slides
- How to Link to Other Slides or Websites in PowerPoint
- Use This PowerPoint Template for a Multiple Choice Quiz
- How to Do a Hanging Indent in Google Slides
- How to Make Google Slides Portrait
- Add Hyperlinks to PowerPoint Presentations
- How to Add Music to Google Slides
How to Create a Link to a Specific Slide in Google Slides
Unlocking the power of google slides: direct links to specific slides.
Google Slides is a versatile tool that allows users to create dynamic presentations for a variety of purposes, from educational lectures to business proposals. One of its lesser-known features is the ability to create hyperlinks that direct users to specific slides within a presentation. This can be incredibly useful for referencing particular sections, sharing focused content, or creating a non-linear navigation structure within your slide deck. In this article, we’ll explore the steps and strategies for creating these targeted links, ensuring your audience can jump straight to the information they need.
Understanding the Basics of Google Slides Hyperlinking
Before diving into the specifics of linking to a particular slide, it’s important to grasp the fundamentals of hyperlinking in Google Slides. Hyperlinks in Google Slides can be used to connect to external websites, email addresses, different slides within the same presentation, or even to a specific slide in another presentation. This flexibility opens up a world of possibilities for interactive and interconnected presentations.
Why Link to a Specific Slide?
Linking directly to a specific slide can serve multiple purposes:
- Efficiency: Quickly direct viewers to the most relevant information without scrolling through the entire presentation.
- Organization: Create a table of contents or an interactive agenda that allows users to navigate the presentation with ease.
- Focus: Highlight a particular slide or section during discussions or Q&A sessions.
- Customization: Tailor the viewing experience by guiding the audience through a personalized path based on their interests or responses.
Step-by-Step Guide to Creating a Link to a Specific Slide
Now, let’s walk through the process of creating a link that will take users directly to a specific slide in your Google Slides presentation.
Step 1: Open Your Google Slides Presentation
Begin by opening the Google Slides presentation you wish to link to. Ensure that you have editing access to the presentation, as you’ll need to make changes to the slide properties.
Step 2: Identify the Slide You Want to Link To
Navigate through your presentation and decide which slide you want to create a direct link for. Take note of the slide number, as this will be crucial in the next steps.
Step 3: Obtain the Presentation’s Shareable Link
Click on the “Share” button located at the top right corner of the Google Slides interface. In the sharing settings, ensure that the presentation is set to be viewable by anyone with the link, or by the specific people you intend to share it with. Copy the shareable link provided.
Step 4: Modify the Shareable Link
The shareable link you’ve copied will look something like this:
To link directly to a specific slide, you’ll need to append the slide ID to the URL. The slide ID is a combination of the presentation ID and the slide number. Here’s how you can construct it:
Replace g35f391192_04 with the slide ID that corresponds to the slide you want to link to. The slide ID typically follows the format g[presentationID]p[slide_number] , where the slide number is the position of the slide in the deck.
Step 5: Test Your Link
After modifying the link, it’s important to test it to ensure it directs to the correct slide. Paste the new URL into your browser’s address bar and see if it opens the desired slide. If it doesn’t work, double-check the slide number and the format of the URL.
Advanced Linking Techniques
Beyond the basic linking to a specific slide, there are advanced techniques that can enhance your presentation’s interactivity and user experience.
Creating an Interactive Table of Contents
An interactive table of contents can serve as a navigation hub for your presentation. Here’s how to set one up:
- Create a new slide at the beginning of your presentation.
- List the main sections or topics covered in your presentation.
- Turn each section title into a hyperlink using the modified URLs that point to the corresponding slides.
- Ensure that each link is tested and functional.
Embedding Links Within Images or Shapes
For a more visual approach, you can embed hyperlinks within images or shapes:
- Insert an image or draw a shape on your slide.
- Select the image or shape and click on the “Insert link” icon or right-click and select “Link.”
- Paste your modified URL into the link field.
- Test the link to ensure it directs to the correct slide.
Linking to Slides in Different Presentations
You can also link to slides in different presentations by following similar steps and using the appropriate presentation ID and slide number for the external presentation.
Best Practices for Linking to Specific Slides
To ensure a seamless experience for your audience, consider these best practices when creating links to specific slides:
- Keep URLs Short: Use URL shorteners to make the links more manageable, especially if you’re displaying them in print or expecting users to type them.
- Consistent Formatting: Maintain a consistent style for all hyperlinks to help users recognize clickable elements.
- Clear Navigation: Provide clear instructions or cues for users to navigate back to the table of contents or main sections.
- Accessibility: Ensure that your links are accessible, with descriptive anchor text for screen readers.
Frequently Asked Questions
Can i link to a specific slide from an external website.
Yes, you can link to a specific slide from an external website by using the modified URL that includes the slide ID. Make sure the presentation is set to be viewable by anyone with the link.
Will my links still work if I add or delete slides?
If you add or delete slides, it may change the slide numbers and thus affect your links. You’ll need to update your links to reflect the new slide order.
Can I prevent others from editing the linked slide?
You can set the sharing settings of your presentation to “View” or “Comment” to prevent others from editing the slides. However, if you’re linking to a slide within a presentation that others have edit access to, they can still make changes.
Is it possible to track how many times a link to a specific slide is clicked?
Google Slides does not provide built-in click tracking for links. However, you can use URL shortening services that offer analytics, or embed the presentation on a webpage and use web analytics tools to track interactions.
Creating a link to a specific slide in Google Slides is a powerful feature that can greatly enhance the interactivity and user experience of your presentations. By following the steps outlined in this article, you can create efficient, organized, and focused presentations that cater to the specific needs of your audience. Remember to test your links, use best practices for hyperlinking, and consider advanced techniques to take your presentations to the next level.
Whether you’re an educator, a business professional, or just someone looking to share information in a more dynamic way, mastering the art of linking to specific slides in Google Slides will undoubtedly be a valuable skill in your toolkit.

- Previous How To Put Text On Top Of An Image In Google Docs
- Next How To Write Greater Than Or Equal To On Keyboard

Why Does My Ps5 Keep Copying Game Content
How To Calculate Midrange In Excel
Troubleshooting Cisco ASDM Issues on Windows 10: How to Resolve the “Unable to Launch Device Manager” Error
Your email address will not be published. Required fields are marked *
- About JOE TECH
- Privacy Policy
How to Link to a Specific Slide on Google Slides Presentation

You have uploaded a large PowerPoint presentation file on Google Drive that contains a few dozen slides but the executive summary, or the slide that has all the key points, lies somewhere in the middle of the presentation.
Here’s a simple tip on how to create a hyperlink such that people, who may be in a hurry, can skip all the previous slides presentation and jump directly to the executive summary slide without having to click the forward button ‘n’ number of times.
Link to Slide in Google Slides
Open your presentation in Google Slides and copy the slide URL:
https://docs.google.com/presentation/d/FILE_ID/edit
Now replace /edit in the URL with present?slide=id.p# where # is the number of slide that you wish to link to. So if you wish to directly link to the 21st slide, your direct link would be:
https://docs.google.com/presentation/d/FILE_ID/present?slide=id.p21
This trick may however not work if you are link to the last slide as in this example .
Also see: Convert Google Slides to Video
Linking in Slideshare
You can append the slide number to any SlideShare URL and it will directly start the presentation from that particular slide. For example, this Slideshare presentation has 24 slides but I can jump to slide 18 directly using the following URL:
https://www.slideshare.net/labnol/adsense-amit-agarwal/18
Also see: Google Drive URL Tricks
Amit Agarwal
Google Developer Expert, Google Cloud Champion
Amit Agarwal is a Google Developer Expert in Google Workspace and Google Apps Script. He holds an engineering degree in Computer Science (I.I.T.) and is the first professional blogger in India.
Amit has developed several popular Google add-ons including Mail Merge for Gmail and Document Studio . Read more on Lifehacker and YourStory
Awards & Titles
Digital Inspiration has won several awards since it's launch in 2004.
Google Developer Expert
Google awarded us the Google Developer Expert award recogizing our work in Google Workspace.
ProductHunt Golden Kitty
Our Gmail tool won the Lifehack of the Year award at ProductHunt Golden Kitty Awards in 2017.
Microsoft MVP Alumni
Microsoft awarded us the Most Valuable Professional (MVP) title for 5 years in a row.
Google Cloud Champion
Google awarded us the Champion Innovator title recognizing our technical skill and expertise.
Video Tutorials
Subscribe to our YouTube channel and get notified whenever we upload a new video tutorial.

Google Add-ons
We build bespoke solutions that use the capabilities and the features of Google Workspace for automating business processes and driving work productivity.
Mail Merge with Attachments
Send personalized email to your contacts with Google Sheets & Gmail

Document Studio
Create pixel perfect documents from Google Sheets and Google Forms

Save Emails and Attachments
Download emails and attachments from Gmail to your Google Drive

Google Forms Email Notifications
Send email to respondents when they submit your Google Forms

Email Google Spreadsheets
Email entire spreadsheets, selected cell ranges or send dynamic charts on schedule.
Creator Studio for Google Slides
Turn your Google Slides presentations into animated GIF images and videos

Email Newsletter
Sign up for our email newsletter to stay up to date.
We will never send any spam emails. Promise.
How to Hyperlink in a Google Presentation: A Step-by-Step Guide
Hyperlinking in a Google Presentation is a straightforward process. First, select the text or object you want to link. Then, click the “Insert” menu and choose “Link,” or use the Ctrl+K shortcut. Type or paste the URL, and press “Apply.” Now, the text or object will act as a clickable hyperlink, directing viewers to the designated website or page.
After you’ve inserted a hyperlink, clicking on the linked text or object during the presentation will open the web page in a new browser tab. This enables you to provide your audience with additional resources, supporting information, or direct them to related content.
Introduction
In the digital world we live in today, presentations have gone beyond static slides. They are now interactive experiences that can engage and inform audiences in dynamic ways. One way to amplify the impact of your presentation is by adding hyperlinks. Hyperlinks in Google Presentations can transform a simple slide into a gateway to a universe of information related to your topic.
But why is this important? Well, think of the last time you sat through a presentation. Wasn’t it more engaging when the presenter provided links to further reading, or videos that complemented their points? That’s the power of hyperlinking—it adds depth to your presentation and keeps your audience hooked. This guide is perfect for teachers who want to make their classes more interactive, professionals aiming to make their pitches more persuasive, or anyone looking to make their presentations pop. Let’s dive in and learn how to hyperlink in a Google Presentation!
Step by Step Tutorial on How to Hyperlink in a Google Presentation
Before we start, remember that adding hyperlinks can make your presentation more interactive and resourceful. Let’s go through the steps.
Step 1: Select the Text or Object
Select the text or object in your slide that you want to turn into a hyperlink.
When you have decided on the text or object, simply click on it to highlight it. This indicates that it’s ready for the next step.
Step 2: Open the Link Dialog Box
Click the “Insert” menu at the top of the screen and choose “Link,” or simply press Ctrl+K on your keyboard.
A dialog box will appear where you can insert the link. This is where you’ll specify the destination for your hyperlink.
Step 3: Type or Paste the URL
In the dialog box that appears, type or paste the URL you want to link to.
Make sure the URL is correct to avoid linking to the wrong page. A simple copy and paste from the browser’s address bar will work perfectly.
Step 4: Press ‘Apply’
After entering the URL, press the “Apply” button to finalize the hyperlink.
Once applied, the text or object you selected will become clickable and will take you to the URL once clicked during the presentation mode.
Additional Information
When you’re hyperlinking in a Google Presentation, remember that context is key. Think about why you’re adding a link and how it enhances your presentation. It could be additional data to back up your arguments, a related video that reinforces your points, or an article for further reading. Also, ensure that the hyperlinks open in a new tab so that viewers can easily return to the presentation.
Another tip is to test your hyperlinks before the actual presentation. There’s nothing more embarrassing than a link leading to a “404 error” page. Also, consider the use of URL shorteners if the link is too long and unwieldy, as this can make the text look cleaner and more professional.
Lastly, be mindful of the design aspect. If you’re hyperlinking text, make sure it stands out with different coloring or underlining. This way, your audience clearly knows it’s clickable. Now go ahead and make your Google Presentations come alive with hyperlinks!
- Select the text or object you want to hyperlink.
- Click “Insert” then “Link,” or use the Ctrl+K shortcut.
- Type or paste the URL in the dialog box.
- Press “Apply” to link the text or object to the URL.
Frequently Asked Questions
Can i hyperlink to a specific slide within my presentation.
Yes, you can! Instead of pasting a URL, choose a slide from the list in the link dialog box.
Can I remove a hyperlink?
Absolutely! Just click on the linked text or object and then click the “Unlink” button or press Ctrl+K and clear the URL.
Will my hyperlinks work when I export the presentation to a different format?
When you export your presentation to a PDF, the hyperlinks will still work. However, exporting to other formats like PPTX may not preserve the links.
Can I track if people are clicking on my hyperlinks?
While Google Presentations doesn’t offer this feature natively, you could use URL shorteners that provide click statistics.
What should I do if a link isn’t working during my presentation?
Always have a backup plan. If the internet fails, be prepared to summarize what the link would have shown or have the actual content downloaded and ready to display.
There you have it, a comprehensive guide on how to hyperlink in a Google Presentation. By now, you should feel like a hyperlinking hero, ready to take your presentations to the next level. Remember, the key to a great presentation is not just the content but how you deliver and connect it to the wider world.
Hyperlinks are your secret weapon, bridging the gap between your slides and the vast resources of the internet. Happy presenting, and may your links always lead to the right place!

Matthew Burleigh has been writing tech tutorials since 2008. His writing has appeared on dozens of different websites and been read over 50 million times.
After receiving his Bachelor’s and Master’s degrees in Computer Science he spent several years working in IT management for small businesses. However, he now works full time writing content online and creating websites.
His main writing topics include iPhones, Microsoft Office, Google Apps, Android, and Photoshop, but he has also written about many other tech topics as well.
Read his full bio here.
Share this:
Join our free newsletter.
Featured guides and deals
You may opt out at any time. Read our Privacy Policy
Related posts:
- How to Change Hyperlink Color in Powerpoint 2010 (An Easy 5 Step Guide)
- How to Insert Text Box in Google Docs
- How to Edit a Hyperlink in Google Docs
- How to Create a Hyperlink in Powerpoint 2010
- How to Remove the Underline from a Hyperlink in Word 2013
- How to Turn Off Auto Hyperlink in Excel 2010
- How to Remove a Hyperlink in Word 2010
- How to Edit a Hyperlink in Word 2010
- How to Create a Hyperlink in Word 2010
- How to Remove Hyperlinks in Google Docs
- How to Create a Clickable List in PowerPoint: A Step-by-Step Guide
- How to Wrap Text in Google Sheets
- How to Insert Hyperlinks on Tumblr: A Step-by-Step Guide
- How to Subscript in Google Docs (An Easy 4 Step Guide)
- Can I Convert My Powerpoint to Google Slides?
- How to Do a Hanging Indent on Google Docs
- How to Disable ScreenTips in Powerpoint 2013
- How to Add a Hyperlink in Google Docs
- How to Make All Columns the Same Width in Excel 2013
- How Do I Add a Google Calendar to My iPhone?

Cloud Storage

Custom Business Email

Video and voice conferencing

Shared Calendars

Word Processing

Spreadsheets
Presentation Builder

Survey builder

Google Workspace
An integrated suit of secure, cloud-native collaboration and productivity apps powered by Google AI.
Tell impactful stories, with Google Slides
Create, present, and collaborate on online presentations in real-time and from any device.
- For my personal use
- For work or my business

Jeffery Clark
T h i s c h a r t h e l p s b r i d g i n g t h e s t o r y !

E s t i m a t e d b u d g e t

Make beautiful presentations, together
Stay in sync in your slides, with easy sharing and real-time editing. Use comments and assign action items to build your ideas together.

Present slideshows with confidence
With easy-to-use presenter view, speaker notes, and live captions, Slides makes presenting your ideas a breeze. You can even present to Google Meet video calls directly from Slides.

Seamlessly connect to your other Google apps
Slides is thoughtfully connected to other Google apps you love, saving you time. Embed charts from Google Sheets or reply to comments directly from Gmail. You can even search the web and Google Drive for relevant content and images directly from Slides.

Extend collaboration and intelligence to PowerPoint files
Easily edit Microsoft PowerPoint presentations online without converting them, and layer on Slides’ enhanced collaborative and assistive features like comments, action items, and Smart Compose.

Work on fresh content
With Slides, everyone’s working on the latest version of a presentation. And with edits automatically saved in version history, it’s easy to track or undo changes.

Make slides faster, with built-in intelligence
Assistive features like Smart Compose and autocorrect help you build slides faster with fewer errors.

Stay productive, even offline
You can access, create, and edit Slides even without an internet connection, helping you stay productive from anywhere.
Security, compliance, and privacy

Secure by default
We use industry-leading security measures to keep your data safe, including advanced malware protections. Slides is also cloud-native, eliminating the need for local files and minimizing risk to your devices.
Encryption in transit and at rest
All files uploaded to Google Drive or created in Slides are encrypted in transit and at rest.
Compliance to support regulatory requirements
Our products, including Slides, regularly undergo independent verification of their security, privacy, and compliance controls .
Private by design
Slides adheres to the same robust privacy commitments and data protections as the rest of Google Cloud’s enterprise services .

You control your data.
We never use your slides content for ad purposes., we never sell your personal information to third parties., find the plan that’s right for you, google slides is a part of google workspace.
Every plan includes

Collaborate from anywhere, on any device
Access, create, and edit your presentations wherever you are — from any mobile device, tablet, or computer — even when offline.

Get a head start with templates
Choose from a variety of presentations, reports, and other professionally-designed templates to kick things off quickly..

Photo Album

Book Report

Visit the Slides Template Gallery for more.
Ready to get started?
- Help Center
- Get started
- Learn by product
- Learn by role & industry
- Hybrid workplace tips
- Gen AI tips
- Productivity tips
- Business tutorials
- Switch from Microsoft & others
- Support & accessibility
- Google Workspace
- Privacy Policy
- Terms of Service
- Submit feedback
- What's new?
- Get started Welcome Get ready to switch What to do on your first day Your first week & beyond Cheat sheets & reference guides Open Google Workspace apps
- Learn by product Calendar Chat Chrome browser Docs Drive Gemini Gmail Meet Sheets Slides Managed teams Mobile & device setup All products
- Learn by role & industry Administrative assistants Digital marketing Finance Healthcare Human resources Law practices Manufacturing Media & entertainment Nonprofits Professional services Project management Research & development Retail Sales & marketing Technical support UX design Visual design Web development
- Hybrid workplace tips Hybrid work training & help Use Meet Companion mode Stay connected when working remotely Work from home Work with remote teams Plan & hold meetings from anywhere Hold large remote events Work with non-Google Workspace users
- Gen AI tips Generative AI training & help Get started with Gemini Gemini cheat sheet Role-specific prompts & use cases Tips for writing prompts for Gemini Gemini usage limits Learn about generative AI
- Productivity tips Set up business meetings Discuss topics with your team Brainstorm with colleagues Improve communication Make video conference calls Create great presentations Create strong proposals Onboard team members Optimize your inbox Analyze data Clean up data Go paperless
- Business tutorials Use generative AI at work Plan & manage a project Plan & hold meetings from anywhere Hold large remote events Stay connected when working remotely Collaborate with decision makers Share a final document Free up storage space Plan a project with external clients Delegate work when you're OOO Get up to speed after time off Additional training resources
- Switch from Microsoft & others Switch from Microsoft Switch from Slack Switch from Zoom, Skype, or Webex Switch from Box, Dropbox, or C:\ drive Switch from HCL Notes
- Support & accessibility Support for users Support for administrators Accessibility Save or customize Learning Center guides
Bring your best ideas to life with Gemini for Google Workspace. Get tips & real-life use cases for using gen AI at work .
Get started with Slides in Google Workspace
Share a presentation.
On this page
Present your slides, unshare a presentation, comment on a presentation, chat with collaborators in a presentation.
Want advanced Google Workspace features for your business?
Try Google Workspace today!
To present a full-screen presentation in Google Slides:
- Open a presentation in Google Slides .
- From the current slide, the presentation will become full screen. To change slides, use the arrow keys on your keyboard or click the arrows at the bottom of the presentation.
- To exit full-screen, press the Esc key.
View a presentation with speaker notes
- Click Presenter view .
- Click Speaker notes .
Do other actions while you're presenting
When you present, you can choose more options from the toolbar at the bottom of the presentation window:
- Select slides to present from a list
- Open "Presenter" view
- Turn on laser pointer
- Print the presentation
- Download the presentation in PDF or PPTX format
Share a presentation with specific people
- Up to 100: You can let up to 100 people with view, edit, or comment permissions work on a Google Docs, Sheets, or Slides file at the same time.
- 100 or more: When 100 people or more are accessing a file, only the owner and some users with editing permissions can edit the file. To let more than 100 people view your file at the same time, publish it as a web page instead .
- On your computer, go to Google Drive .
- If you use an eligible work or school account , click Add expiration to add an expiration date .
- Optional: Add a message to your notification email.
- If you don't want to notify people, uncheck the box.
- Click Send or Share .
Share a link to a presentation
You can choose if your file should be available to anyone or restricted to only the people with access. If you allow access to anyone with the link, your folder won't restrict who can access it.
- Select the file you want to share.
- Choose who can access the file.
- Learn more about how others view, comment, or edit files.
- Click Done .
Stop sharing a presentation you own
- Find the file or folder in Google Drive , Google Docs , Google Sheets , or Google Slides .
- Open or select the file or folder.
- Find the person you want to stop sharing with.
- Click Save .
Remove a link to a presentation you own
- Find the file or folder in Google Drive , Google Docs , Google Sheets , or Google Slides .
- Select Restricted .
- Click Done .
- On your computer, open a document, spreadsheet, or presentation.
- Highlight the text, images, cells, or slides you want to comment on.
- Type your comment.
- Click Comment .
- Enter your message in the chat box.
Note: All chats in Google Docs, Sheets, and Slides include anyone viewing the file. The chats aren't saved.
Google, Google Workspace, and related marks and logos are trademarks of Google LLC. All other company and product names are trademarks of the companies with which they are associated.
Was this helpful?
Learn how to print Learning Center guides, save them as PDFs, or customize them for your organization.
Home Blog PowerPoint Tutorials How to Create an Hyperlink in PowerPoint and Google Slides
How to Create an Hyperlink in PowerPoint and Google Slides

Hyperlinks are an interactive feature in PowerPoint and Google Slides.
Some information in your slides will come in hyperlinks or links. This guide will show you how to create a hyperlink in PowerPoint to reference web pages, images, e-mails, a current slide in your document, and other files you wish to include in your presentation.
How to Insert Hyperlink in PowerPoint
You can use hyperlinks with PowerPoint to access information conveniently. In PowerPoint, you can link web pages, images, e-mails, existing files , or even another slide in your presentation.
Creating Hyperlinks for Web Pages in PowerPoint
With this feature, you can embed URLs that lead your audience directly to relevant online resources. Whether you’re citing a source, linking to further reading, or showcasing your organization’s website, this functionality adds an interactive dimension to your presentation. Not only does this increase engagement, but it also provides your audience with a tool to delve deeper into the subject matter at their own convenience.
Here is the step-by-step guide on how to insert hyperlinks to web pages in PowerPoint:
1. On your slide, highlight the portion of text you want your hyperlink to be added (the anchor). For shapes like text boxes, click the border of the text box.
2. Next, go to the Insert tab. On the links group, click Link. Alternatively, right-click , and you can also find the Link option there.
3. A dialog box will pop up. By default, you’ll see the Current Folder tab. On the Address portion, insert the link to the web page you want to add.

Important: Your highlighted text will appear in the Text to Display bar. For shapes however, << Selection in Document >> will appear.
4. Select OK .
5. Check by clicking the word or shape and see if it leads to the web page.
Link Images in PowerPoint and Other Files
The ability to link images and other files in PowerPoint adds a layer of interactivity to your presentations. Imagine presenting a new product design , and with one click on an image, you open up a detailed specification document. Or perhaps you’re conducting a seminar presentation , and a click on an infographic leads to an in-depth report. By linking images to other files in PowerPoint, you can create presentations that aren’t just linear journeys, but immersive experiences that invite exploration. This can transform your PowerPoint decks from static PowerPoint slideshows into dynamic presentations, where every image and file link can become a gateway to deeper understanding and engagement.
Here is how to link images in PowerPoint:
1. Highlight the word or object in the slide that you want to link images or files into.
2. Right-click and select Link.

Important: If you hover on the right arrow, you can also see the Recent Items that you’ve linked.
3. Use the Look in search bar to quickly locate your image or file on your computer. You can also link videos , word documents , excel files, and even your recent presentations .

4. Once found, the file path of your image or file will appear on the Address bar .
5. Finally, click OK.
6. Check by hovering your cursor over the hyperlink . You should see the file path of your image/file. Also, click to see if it works properly.
Link to a Slide within your Presentation
The ability to link to a specific slide within your PowerPoint presentation can enhance your presentations, turning a linear slide sequence into an interactive presentation.
This feature can be particularly useful in scenarios where you’d like to refer back to earlier information or skip to specific topics based on audience responses. For instance, during a Q&A session , you could instantaneously jump back to a relevant slide to clarify a point, or in a business proposal, you could navigate directly to sections that interest your stakeholders the most.
The functionality encourages engagement and facilitates a more conversational style of presentation, adapting to your audience’s needs and interests in real-time.
You can link slides in your PowerPoint presentation using two ways :
- via the Action buttons (Shapes)
- through Links .
Both can be found in the Insert Ribbon.
Link a Slide via Action Buttons (Shapes)
1. From the Insert tab, click Shapes . Scroll at the bottom to find the Action buttons . Pick a design that will fit the action you want to perform.

2. After selecting, left-click and drag your mouse to draw out the Action button. When done, a dialog box will appear.
3. Enable the Hyperlink option by clicking the button next to it, then choose the appropriate action that you’ll run.

Important: You can also run programs with your action button by enabling the Run program option. Click Browse to search for the program you want to run.
4. Click OK when done.
Link a Slide via Object Anchor
1. Click the object you want to insert the hyperlink into.
2. Go to the Insert tab and click Link .
3. From the main tabs, click Place in This Document . An outline of your presentation will show up. Select the slide you want to be linked to the object.

4. Click OK.
Creating Hyperlinks for an Email Address
Incorporating hyperlinks for email addresses in your PowerPoint presentations can foster more immediate engagement from your audience.
By clicking on the hyperlinked email address present in your presentation slides, your audience members can easily draft an email to the specified address, eliminating the need for them to manually enter it or using copy & paste. This can be especially useful in scenarios where you want to encourage questions, feedback, or follow-up correspondence. For example, during a webinar or virtual presentation , you might link your email address to invite questions after the session. Or perhaps, in a business proposal or report, you could link the email addresses of key team members to facilitate direct communication.
Here is how to insert an hyperlink for an email address in PowerPoint:
1. Highlight the word or phrase you want to link an E-mail address into.
2. Right-click and select Link . From the main tabs, select E-mail Address .
3. Fill out the empty E-mail address and Subject fields. You can also see your recently used E-mail addresses in the box below.

How to Insert Hyperlinks in Google Slides
In Google Slides, hyperlinks are also called Links . You can use them to link a webpage, a file in your Google Drive, or a slide in your presentation .
Link a Web Page using Link
1. Open your presentation in Google Slides.
2. Select the object you want to link the web page into. For a word or phrase, highlight the necessary parts.
3. Go to Insert then click Link . Alternatively, right-click and select Link from the options.

Important: You can easily access this feature by pressing Ctrl+K on Windows and Cmd+K on Mac.
4. On the search bar, paste your web page link. Then select Apply.
Link a Slide in your Google Slides Presentation
Whether you’re an educator providing additional resources for further learning, a marketer directing audiences to a specific webpage, or a business professional linking to data files for more in-depth analysis, the hyperlink feature in Google Slides can help to improve your presentations, making them more interactive. You could even link to different slides within the presentation, creating a non-linear, interactive experience that lets the viewer explore the content in a way that best suits their needs. This functionality can also facilitate seamless collaboration by linking to other documents or slideshows within the Google Workspace. You can also use buttons in your Google Slides presentations and configure hyperlinks to navigate to different slides or to open external resources.
By effectively using hyperlinks in Google Slides, you can create a rich, interconnected presentation that fully utilizes the benefits of the digital medium.
How to insert an hyperlink with Google Slides? Here is how to:
1. Select the object/phrase you want your slide or file to be linked to.
2. Right-click and click Link. On the bottom of the dialog box, click Slides in this presentation.
3. Choose where your slide is located from the options. You can also pick the next, previous, first, and last slides.

4. Enter the file name in the search bar for files in your Drive.
5. Check by clicking on the object/phrase if it navigates to the correct slide/file.
Final Thoughts
Those are all the methods to follow when using hyperlinks or links in your presentations. It’s a great feature to make your slides look complete and connected. Note that the formatting of the word or phrase may look different when inserting a link to it, but don’t worry as it can be easily adjusted.

Like this article? Please share
Google Slides, Presentation Skills, Presentation Tips Filed under PowerPoint Tutorials
Related Articles

Filed under PowerPoint Tutorials • May 22nd, 2024
How to Remove Animations from PowerPoint and Google Slides
This tutorial explains how to remove animations/transitions in PowerPoint and Google Slides

Filed under Google Slides Tutorials • May 22nd, 2024
How to Translate Google Slides
Whereas Google Slides doesn’t allow to natively translate slides, such process is possible thanks to third-party add-ons. Learn how to translate Google Slides with this guide!

How to Insert a Word Document into PowerPoint
If you asked yourself how to link research data in .doc format into your presentations, then don’t miss our guide on how to insert a Word document into a PowerPoint file.
Leave a Reply
How to share your Google Slides presentation
- Written by: Emma Trantham
- Categories: Google Slides
- Comments: 4

Wondering how to share a Google Slides presentation? Good news! It’s a pretty simple process. There are multiple ways of sharing a Google Slides deck. The right method for you will depend on how you’re going to deliver the slides, the required file type, and your audience. Do you want to share so that a colleague can proof-read and edit, or so that an online audience has the virtual equivalent of a handout?
As Google Slides exists completely online, sharing your presentation with others isn’t limited to an email attachment. This post will show you how to share Google Slides presentations in five ways, there’s definitely something here to meet your needs!
Share with people and groups
Publish to the web
Download as different file type
Email as attachment
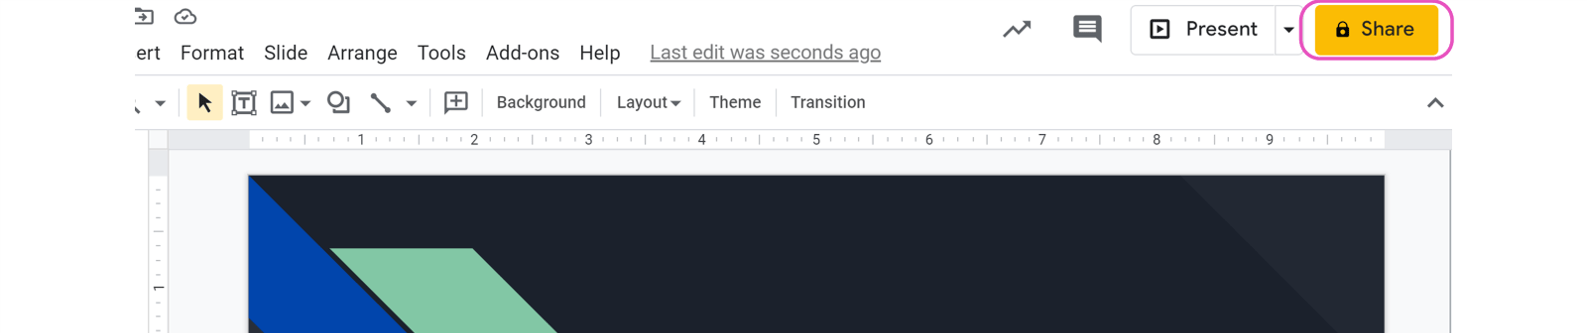
Before we get to that, you need to know where to find the Share function in Google Slides.
- Open Google Slides and click File , in the top bar
- Click Share at the top of the drop-down menu
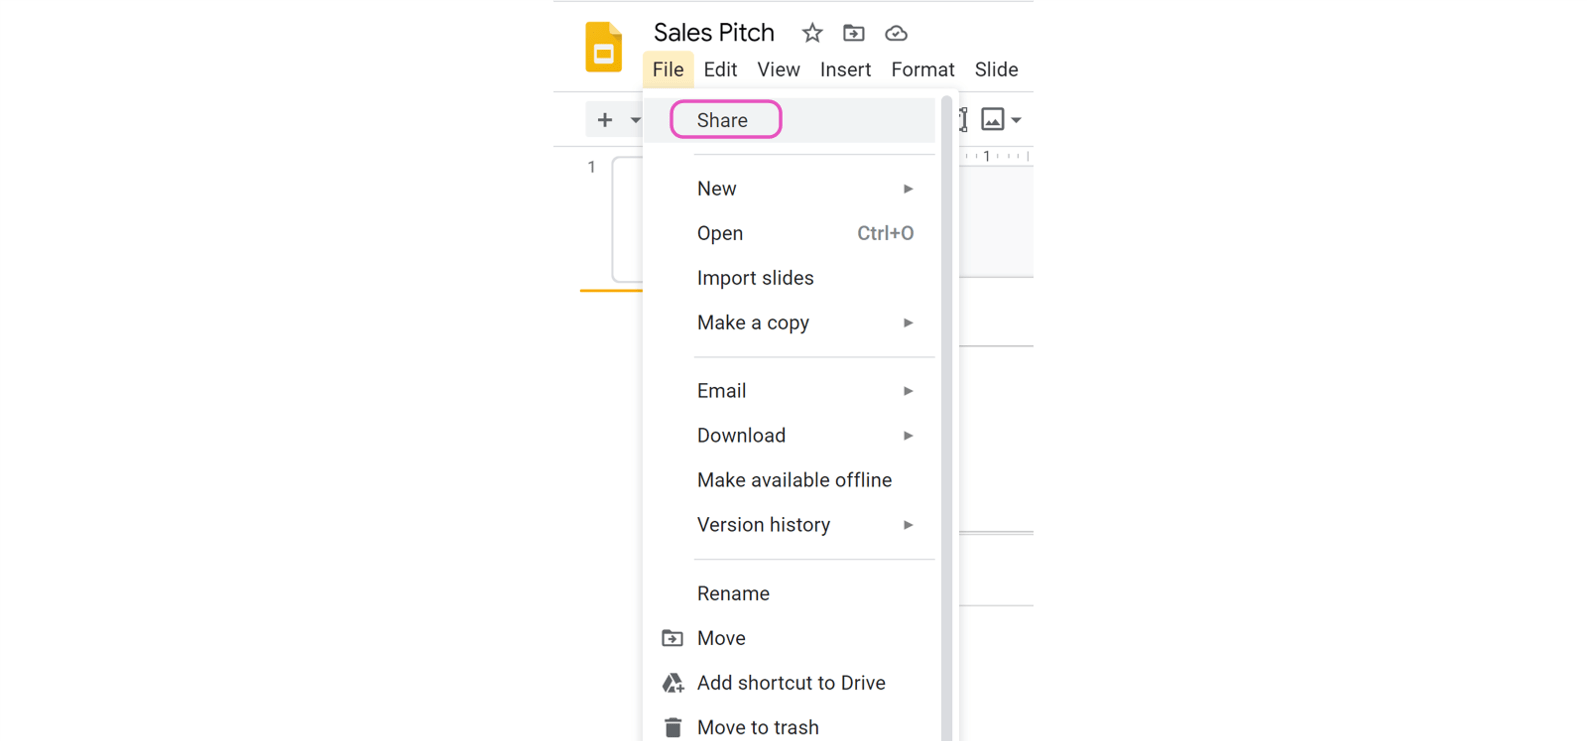
- Or, click Share at the top right-hand side of your window.
1. How to share Google Slides presentations with people and groups
Using Share with people and groups , you can share your Google Slides presentation with multiple people at once. This is helpful if your teammates need to collaborate in the same deck or if you require feedback from a colleague or client. Share with people and groups allows you to change the editing permissions per contact. You can allow each contact to simply view the document, or add comments, or edit it themselves. The level of permission you choose can be different for each contact you share with, giving you a lot of flexibility.
- Click Share to bring up the Share with people and groups pane.
- Next to Add people and groups , start typing the name or email address of the contact you want to share the deck with. A list of recommendations will appear as you type. Once you’ve selected the right contact, their name will appear at the top of the pane. If the person you want to share with is not already in your contact list, you need to type in their full email address.
- Click the small cross next to a contact name to deselect the contact.
When you share using Share with people and groups , Google will ask the user to log in to their Google account to access your shared file. If the user does not have a Google account, they will be unable to access your deck. Just head to the next section to find out how to grant access to non-Google users.
Now you’ve chosen your contact, you can alter their permissions to change how they are able to interact with the deck. There are three options – Viewer , Commenter , and Editor . Simply click on the option currently visible and a drop-down menu will appear allowing you to choose whether your contact can… well… view, comment on or edit the deck. Pretty self-explanatory, right?
But which permission should you give to who and when?
- Viewer: This will prevent contacts from editing slides. If your deck is completely finished and approved, set the permissions to Viewer to stop contacts accidentally editing – or even deleting – slides from your finished presentation!
- Commenter: The best option for gathering feedback. If your contact has limited knowledge of Google Slides, direct them towards our handy Ultimate Guide to Google Slides post so that they can brush up! In the meantime, share your deck using the Commenter function. This way, contacts can comment without being able to rearrange slides, or change text or animations.
- Editor: Perfect for collaborative projects. Editor allows you to share an editable version of your deck. Everyone with this permission can work on the same slides at the same time. This means you don’t end up with multiple versions of the same deck.
For more tips on how to improve collaboration in Google Slides, check out these 6 ways to get the most out of online collaboration with Google Slides .
Once you’ve selected one of these permission options, you’re free to hit Send . If you tick Notify people , your contact will receive an email letting them know that they have permission to access or interact with your deck.

In the Share with people and groups pane, the owner of the Google Slides presentation appears at the top. Beneath that, you can see who has access to the deck and the status of their permissions. If you want to change someone’s permissions, press the yellow Share button at any time and edit permissions using the same drop-down menu.
To stop sharing with a specific person:
- Click Share and scroll to the contact you want to remove
- Click the drop-down arrow next to their name
- Select Remove
- Click Save .
Notice the Give temporary access and Make owner options. If you choose to Give temporary access , you can edit the number of days that your contact has access to your deck. All you have to do is click the number of days next to Access expires to change the expiration date. This can be a great option if you’re working with people outside of your organization, such as clients or agencies. For example, you can schedule the expiration date for the end of a project, once the feedback has been received and the work completed.
Make owner allows you to pass ownership of the deck to another user. After you’ve created a presentation you might need to hand it over, to the presenter for example. You can use this option to give someone else complete control. Use it with caution, however. Once you’ve handed over ownership, you cannot retrieve it – unless the new owner hands it back or chooses to grant you access permissions.
Top tip: If you’re the owner of the deck (if you have created it yourself or have been given ownership by the original creator), there are further sharing options. When you click Share , you’ll notice a cog appears in the top right-hand corner pop up. This allows you to choose whether your Editors can change permissions and share or if Viewers and commenters can see the option to download, print, and copy. All you have to do is tick or untick the box. Easy!
2. How to share a Google Slides presentation via a link
In this window you can also get a link.
- Click the blue Copy link button.
- Paste the link anywhere, from an email draft to a Microsoft Teams chat
This link will only work for people who have been given permission to view, edit or comment on the deck. To change this:
- Click Share
- In the Get link section, press Change .
- Choose whether your deck is Restricted or if Anyone with the link can view. Note: when you change a link’s setting to Restricted , the only people who can still see the deck are those you have directly shared with in the Share with people and groups section.
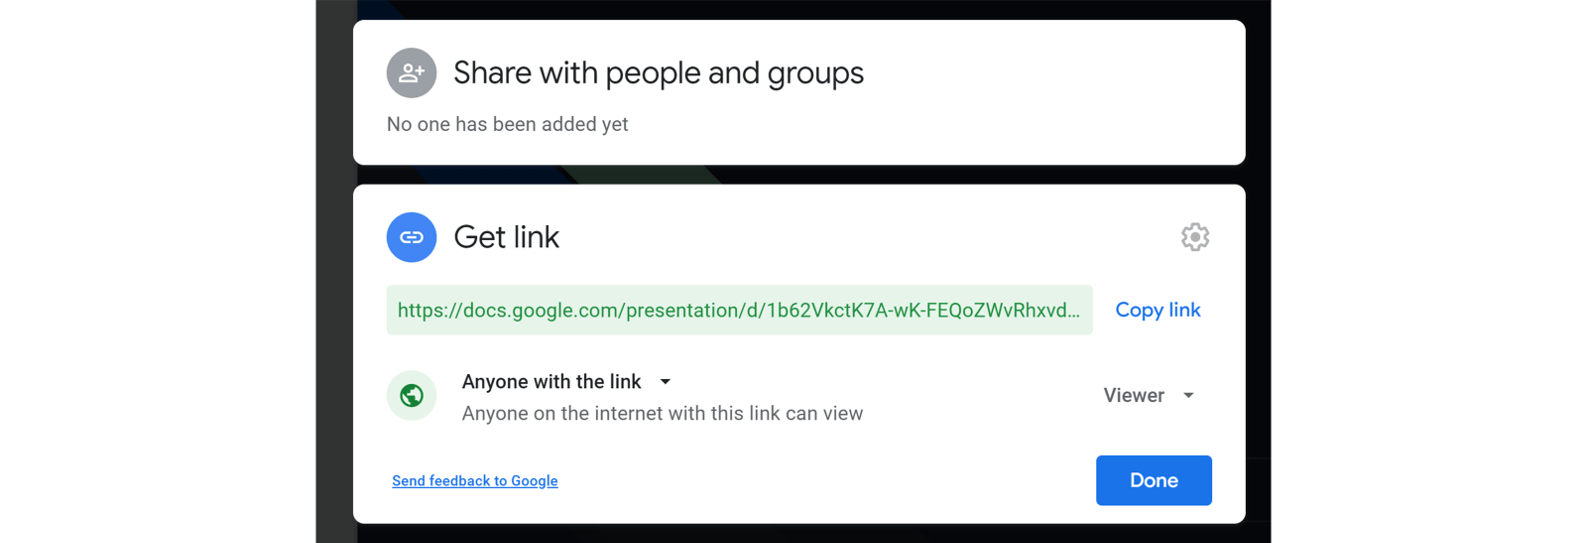
Though the Anyone with link function can be useful, it’s not the most secure option. Remember: the users that you originally shared the link with can continue to share the link with their friends, colleagues, and contacts too, meaning your presentation can be shared endlessly and with anyone! If your deck contains confidential content, you should not use this method.
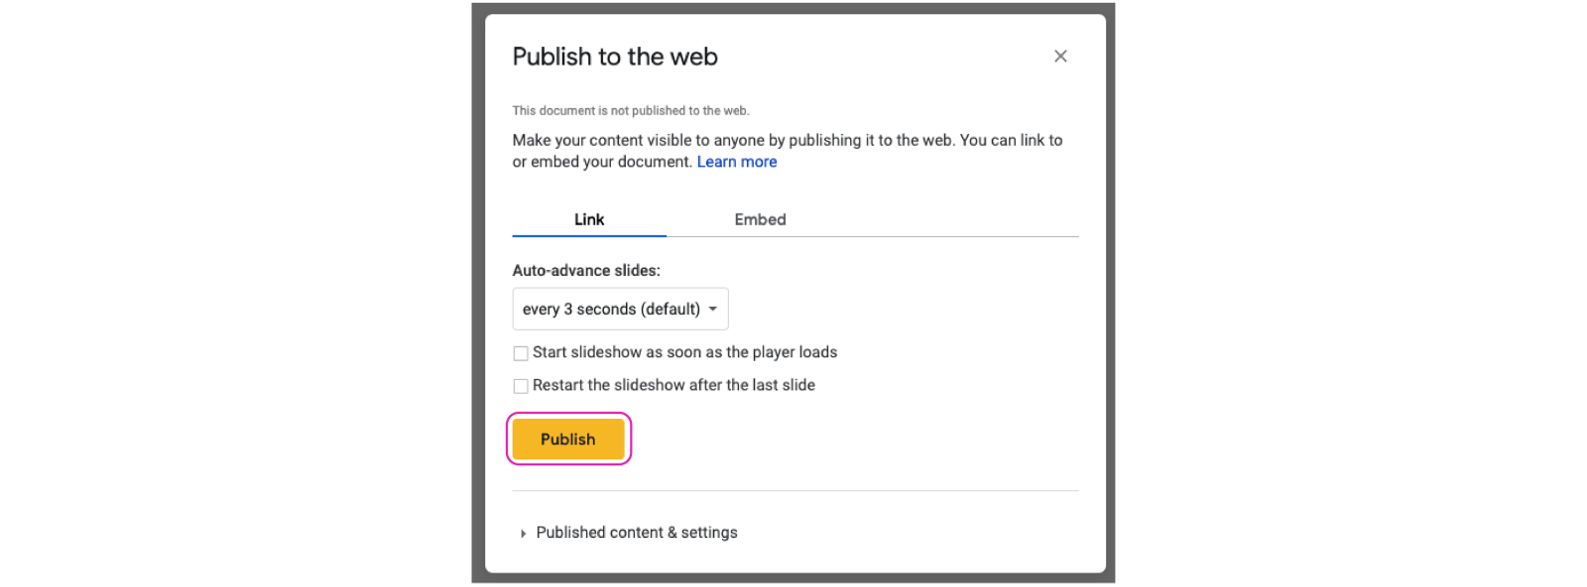
3. How to publish a Google Slides presentation to the web
If you don’t want your viewers to edit your deck, then Share with groups and people may not be the option for you. Instead, choose to Publish to the web . With this option, your deck becomes non-editable, it will simply play as if your deck was a video; auto-advancing through the slides. This means that the viewer won’t have control over which slides they view or the order they view them in. The content of your slides will be visible to anyone and everyone when publishing to the web, so be careful about choosing this option if your slides contain confidential information.
- Click File
- Select Publish to the web
- Choose Link or Embed. You can share the URL with your contacts, or you can embed the link on a website or blog
- Choose how your slides playback using the drop-down menu beneath Auto-advance slides
- Click Publish
- Copy the URL or HTML and share your deck
4. How to download a Google Slides deck as different file type
Another method of sharing (or saving) your slides involves downloading the deck as a different type of file.
- Under File select Download .
- Select the format you need (Microsoft PowerPoint (.pptx), PDF Document (.pdf), or JPEG Image (.jpeg)), and the download will begin.
- Open your file
While there are many formats available, we don’t recommend all of them. For example, when downloading as an Image, whether PNG or JPEG, the quality of your slides can be lost, the presentation will be static, and you can only download one slide at a time. If you’re printing or emailing your deck, downloading as a PDF is the best option to get a static version of your slides.
Since PowerPoint is the closest option to Slides, this format retains the presentability of the deck. However, there’s a chance that your content will corrupt or break as not all features are transferable between file formats. Check for any changes and make tweaks – like removing animations – before sending your presentation to your contacts. To find out more about the differences between PowerPoint and Slides, check out 9 Google Slides features we wish PowerPoint had or if you want to try different platforms to PowerPoint, we recommend The ULTIMATE Guide to PowerPoint Alternatives .
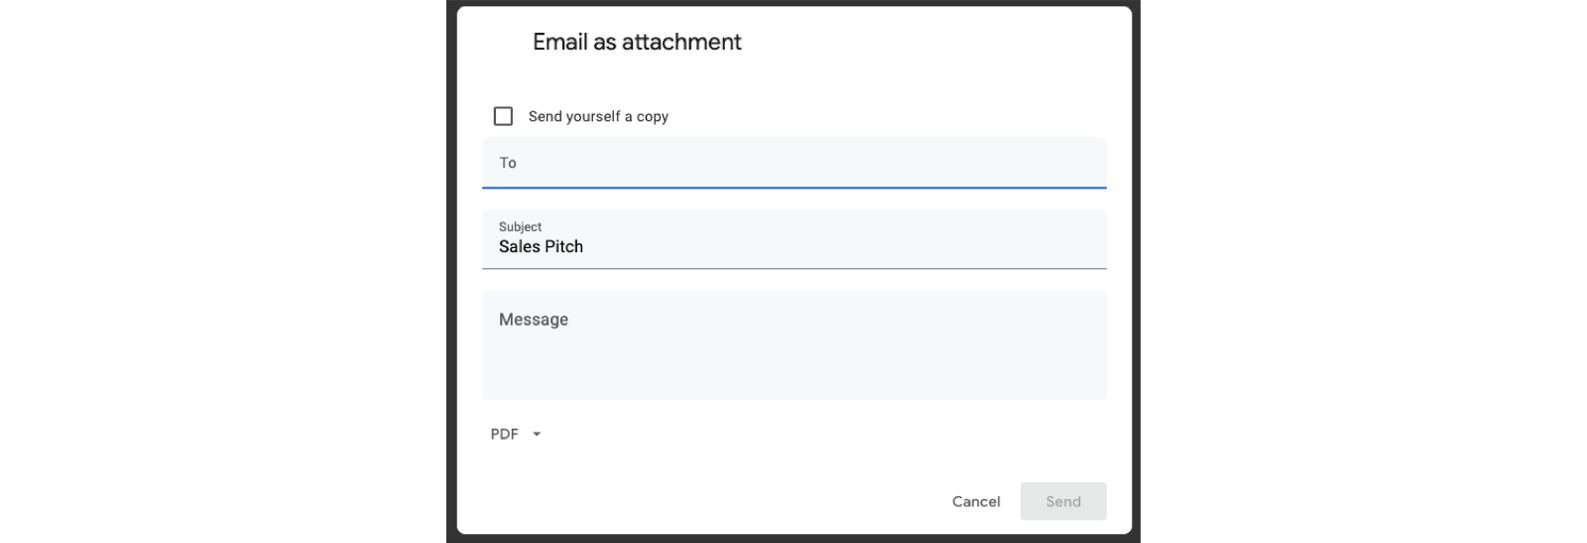
5. How to email your Google Slides presentations as an attachment
If all these sharing options still aren’t quite cutting it, there’s one more! To share your slides via email:
- Select Email as attachment
- Type the name or email address of your contact
- Pick the file type your deck
- Add a message, then hit Send
That’s the last of our five tips on how to share a Google Slides presentation. Now you know pretty much everything there is to know about sharing your slides and, if you want to make those slides even more awesome and effective, you have got to check out these 5 Google Slides video tutorials to level up your skills .

Emma Trantham
Principal consultant, related articles, how to present in google slides with present mode toolbar.
- Google Slides / Presentation skills
It takes time to create engaging, visual slides, so why undermine all your effort at the crunch point? Delivering a presentation properly really isn’t that tricky! With Google Slides’ Present mode toolbar, it’s super easy to present in Google Slides navigating your presentation effortlessly.

How to use Presenter view in Google Slides
- Comments: 5
For seasoned presenters and newbies alike, the move to online presenting comes with the joint complications of an online audience and unfamiliar tech. Talk about spinning plates! This blog post covers how to use Presenter view in Google Slides, so that you can be more professional and feel more confident.
The best free Google Slides templates
- Google Slides
- Comments: 1
Google Slides templates are a great starting point to improve the look and feel of your presentation. They’re fab as they’re accessible and low cost, but it’s important to remember that even well-designed presentations can be ineffective if the content is text heavy.

What is the name of piece that I attach to my chromebook that allows me to present Google slides
Hi Milton. I’m not sure what you mean – could you please clarify?
Hello, My PowerPoint contains an audio file. I uploaded it to Google Sites (new) and there’s no audio. So I uploaded my PowerPoint to Google Slides and inserted that into my Google portfolio Site hoping that would fix the problem. It didn’t. Can you tell me how to get the audio file to upload to my portfolio site, along with my slides? Thank you! Pam
Hi, I am looking for a way to have Google slides running on a laptop or tablet and instead of the presentation going to a screen, to go live i.e. as it would on a projecter in a URL that I can tell people about, so they can use it with their mobile phones, tablets etc. The sort of application would be for Carol singing, each slide would have no more than two lines to allow for large type and as it goes through the verses it shows on singers devices, one slide at a time. This of course would be outside, i.e. people would at best use mobile data, or if it would work for a larger number by wifi tethering (wifi provided by 1phone/tablet. Thank you, Sam
Join the BrightCarbon mailing list for monthly invites and resources
We were notified on Friday that we’ve been successful in our renewal bid. They were particularly complementary about our presentation and claimed it was one of the best they’ve had. Greg Tufnall Siemens

How to use Google Slides, Google's free slideshow presentation maker
- Google Slides is Google's slideshow presentation program that allows real time collaboration.
- Google Slides is part of the Google Workspace suite, which also includes Google Docs and Gmail.
- Google Slides differs from Microsoft PowerPoint in its simplicity and collaboration options.
Google Slides is a presentation program that's part of Google Workspace, a group of productivity apps that also includes Gmail, Google Sheets, Goole Docs, Google Meet , and more. Workspace has more than 3 billion users worldwide.
With Google Slides, users can create, present, and collaborate via online presentations from various devices. You can present during Google Meet calls directly from Slides and embed charts from Google Sheets. You can also add YouTube videos to Slides presentations.
Google recently announced plans to add artificial intelligence features like its Gemini AI tool to its Workspace programs, which include Slides. Users will be able to use Gemini to create images or written content for slides, or even reference other files in their Drives or emails in their Gmail accounts.
What is Google Slides?
Google Slides is a cloud-based presentation program that's part of the Google Workspace. Google Slides can be used to create and deliver presentations online.
Several different themes are available in Slides for designing presentations. Users can customize Slides presentations in a variety of colors and styles. You can add photos, videos from YouTube, charts from Google Sheets , and information from many other sources. Different members of a team can contribute and collaborate on the presentation in real time.
There's no specific limit on how many slides you can add to your Google Slides presentation, but there is a 100 MB file size limit.
How to download Google Slides
To access Google Slides, visit slides.google.com .
Related stories
You can also open Slides while Gmail or Google Chrome is open by clicking on the Google Apps icon in the upper-right corner (shown as three rows of dots) and selecting Slides.
Another option is to download the Google Slides app for your Apple or Android device. Search for Google Slides in the Apple App Store or Google Play Store.
What templates are available?
Dozens of Google Slides templates are available, depending on your needs. For instance, there are general presentation templates, photography portfolios, pitch decks, case studies, science fair projects, and more.
To browse the templates available, open Google Slides. Then, click Template Gallery in the upper-right corner. Scroll through the options, choose the one that meets your needs, and start creating a presentation.
What's the difference between Google Slides and PowerPoint?
Both Google Slides and PowerPoint are presentation programs. Google Slides is a program within Google Workspace, and PowerPoint is a Microsoft program. PowerPoint is an offline program, while Slides is online which allows for real time collaboration.
The programs share many features that allow for presentation creation and delivery, but PowerPoint may offer more advanced design features.
You can convert Google Slides into PowerPoint presentations, and vice versa. From the top menu in Slides, click File, Download, and choose Microsoft PowerPoint.
How to learn to use Google Slides
Through Google Workspace, you can access several quick-start guides, cheat sheets, and troubleshooting resources to help you learn to use Google Slides. There are also many YouTube videos with tutorials for using Slides.
On February 28, Axel Springer, Business Insider's parent company, joined 31 other media groups and filed a $2.3 billion suit against Google in Dutch court, alleging losses suffered due to the company's advertising practices.
- Main content
- Starting a Business
- Growing a Business
- Small Business Guide
- Business News
- Science & Technology
- Money & Finance
- For Subscribers
- Write for Entrepreneur
- Entrepreneur Store
- United States
- Asia Pacific
- Middle East
- South Africa
Copyright © 2024 Entrepreneur Media, LLC All rights reserved. Entrepreneur® and its related marks are registered trademarks of Entrepreneur Media LLC
5 Steps to Preparing an Engaging Industry Presentation You can make a great impression and generate interest with an exciting, informative presentation. Find out my five secrets to creating an industry presentation guaranteed to wow.
By Cyrus Claffey Edited by Chelsea Brown May 28, 2024
Key Takeaways
- This article offers practical advice for delivering impactful presentations at industry events, emphasizing the importance of a comfortable stage presence, understanding your audience, designing effective slides and more.
Opinions expressed by Entrepreneur contributors are their own.
Industry events are a chance to network with your colleagues and impress distributors — but to really make the most of your time at a conference, you need to learn how to prepare a presentation that engages, informs and leaves an impact.
I've presented at some of the most important real estate and property technology events in the country as the founder of ButterflyMX . Here are a few tricks I've picked up along the way to wow any audience.
Related: 6 Tips for Making a Winning Business Presentation
1. Getting comfortable with the stage
I recommend taking a walk around the stage before your presentation. By familiarizing yourself with your environment, you can prepare yourself better.
And while you're on stage, a relaxed, comfortable presence goes a long way in keeping your audience engaged . Whether you want to play your presentation casually or more formally, audiences can sense discomfort, which prevents them from fully connecting with your message.
To project your sense of comfortability, focus on your body language . You can project confidence by speaking slowly and clearly and by walking across the stage to keep the audience's attention — even if there's already a podium or lectern set up on stage.
Unfortunately, if a speaker spends too long standing behind the podium, an audience might interpret that as a sign of indecision and inaction from the speaker. Instead, you can remove any barriers between yourself and the audience by using the whole length of the stage.
2. Familiarity with industry statistics
An audience that doesn't know me might be wondering why they should be taking my advice. I certainly don't blame them. When I'm watching a new presenter, I ask the same question.
If you can back up your claims with hard data, your presentation will ring true with listeners. You can cite industry-wide statistics or establish your own bona fides by citing stats that buttress your own credibility by establishing your company's success.
In my case, I'm happy to use a couple of statistics that prove how successful my company, ButterflyMX, is in the proptech industry. For instance, we serve more than one million apartment units, and if you're interested in how consumers feel about us, look no further than the internet — we have over 20,000 five-star reviews !
Related: 7 Ways to Captivate Any Audience
3. Knowing your audience
Depending on who your audience is , you'll have to adjust your game plan and prepare for different things.
I've spoken at conferences where the audiences couldn't be more different — a presentation that wows one crowd might have no information that's applicable to another. As the founder of a property technology company, I have the pleasure of speaking at a variety of different conferences that serve different markets.
For example, integrators and installers might value a talk on product features and hardware more than others. And if I'm presenting to an audience of property managers, I'll know to dial down the technical talk and focus on the benefits a robust video intercom offers, such as simplifying their day-to-day workloads.
Depending on your audience, you need to strike the right balance between talking about hardware specs and features.
4. Designing your slides carefully
Slides are a good opportunity to share the aesthetics, tone and values of your company — but you've got to make sure you use them effectively.
A slide with too much text looks busy, and it'll distract your audience and draw focus away from you. Instead, consider putting that information into your notes and speaking it aloud. Slides should focus on one or two visual elements, like bullet points, charts and graphs.
As for the actual design of your slides, you should ensure that you adhere to your company's brand guidelines. If you're unfamiliar with the concept, brand guidelines are a single, governing document that goes over important design concepts like the colors and logos that your company has.
Related: 6 Ways to Take Your Next Presentation to the Next Level
5. Asking for audience participation
Asking for audience participation is the ultimate way to ensure everybody is locked in and paying attention — but it's also a double-edged sword. You also need to be prepared in case asking the audience to participate doesn't necessarily go your way.
For example, you might generally ask if an audience has any questions at the end of your presentation. But you run the risk of running into a hostile, bad-faith question — or you might even be met with silence.
That's why I'd recommend you give the audience questions and tasks that have a little more structure. You could do things like asking for a show of hands, asking for specific anecdotes or taking a poll.
Polls have gotten an especially high-tech upgrade recently — see if you can set up an electronic voting system that allows audience members to vote with their smartphones. Then, you'd be able to throw the results on screen and watch them update in real time!
You should pepper these interactive sections throughout your presentation to ensure that audiences are engaged throughout your entire talk.
Entrepreneur Leadership Network® Contributor
Founder of ButterflyMX
Want to be an Entrepreneur Leadership Network contributor? Apply now to join.
Editor's Pick Red Arrow
- Lock 3 Things Your Business Idea Must Have to Succeed — as Proven By Famous Harvard Business School Startups
- This Couple Cashed in Their 401ks to Launch a Virtual Business — Here's How It Led to a 9-Figure Exit and Co-Owning 2 Professional Soccer Teams
- Lock The No. 1 State to Retire in Might Not Even Be on Your Radar, According to a New Report
- Lock 12 Books That Self-Made Millionaires Swear By
- Lock These Are the Highest-Paying Side Hustles for a Single Day of Work
- Use These 3 Steps to Find the Perfect Franchise Opportunity for You
Most Popular Red Arrow
How to become an ai-centric business (and why it's crucial for long-term success).
Learn the essential steps to integrate AI at the core of your operations and stay competitive in an ever-evolving landscape.
Kickstarter's CEO Explains Why the Platform Is Changing After 15 Years
In an interview with Entrepreneur, Kickstarter CEO Everette Taylor explains the decision-making behind the changes, how he approaches leading Kickstarter, and his advice for future CEOs.
Melinda French Gates Reveals Her Next Move After Leaving Gates Foundation: 'Set Your Own Agenda or Someone Else Will Set It For You'
French Gates announced that she is donating $1 billion over the next two years.
5 Steps to Preparing an Engaging Industry Presentation
You can make a great impression and generate interest with an exciting, informative presentation. Find out my five secrets to creating an industry presentation guaranteed to wow.
Amazon Fresh Is Lowering Prices on Thousands of Items to Keep Up With Competition
The grocer will offer weekly savings.
Save on a Lifetime of PDF Management for Memorial Day
Easily convert, edit, and annotate PDFs for work and business with this deal.
Successfully copied link

Why I Prefer Google Slides to Microsoft PowerPoint
Quick links.
- Ease of Collaboration
- Offline Access
- Integration With Other Google Tools
- More Storage Space
- Compatibility With PowerPoint
- AI Features
- Provide Detailed Version History
- Customization Features and Template Options
PowerPoint and Google Slides are two popular options for presentations, but which one is best? As someone who has used both programs for a long time, I've found that Google Slides offers many advantages that make it my go-to choice.
Let's be clear: I'm comparing the web-based PowerPoint and Google Slides versions. It's unfair to compare Google Slides to the desktop version of PowerPoint, isn't it? Here are some reasons why Google Slides is my favorite presentation tool.
1. Ease of Collaboration
Ease of collaboration was the central reason I switched to Google Slides for my presentation needs. As a content creator, I always aim for a seamless collaboration experience while dealing with my clients and team members. Google Slides offered exactly that, and I was in love with it.
So, is Google Slides better than PowerPoint for collaboration? It certainly has advantages that make it an ideal choice for a lot of users.
With Google Slides, you can efficiently work with others and share your work , no matter what kind of computer or phone you use. If you have a Google account and the link to the presentation, you can join in and make changes simultaneously with other members.
In contrast, to collaborate in PowerPoint, you have to consider various external factors, such as the user's working device and storage locations. For example, you might not be able to easily collaborate with someone who has an older version of PowerPoint, or with someone using a PowerPoint mobile due to feature limitations. Some things that are restricted in the free web and mobile version compared to PowerPoint on desktop include limited commenting tags, editing options, and more.
Additionally, Google Slides also has built-in chat and commenting features. This feature allows all your team members to stay on the same page and communicate with each other to streamline editing. In PowerPoint, you're limited to comments only.
2. Offline Access
Another important reason for my switch to Google Slides is the offline access feature. With this feature, you can create, edit, and present presentations to others even without an internet connection. Any changes you apply offline are synced automatically once you're back online, so you can keep working even without an internet connection.
You can activate offline access by checking the offline mode option in your Google Drive settings.
Also, with Google Slides, you don't need software installed on your computer to access your presentations offline. However, Microsoft PowerPoint requires an internet connection to save changes to OneDrive storage. No internet, no autosave!
3. Integration With Other Google Tools
Switching to Google Slides is easy if you already use Google apps like Docs, Sheet, Meet, and Gmail. They all work well together. You can import charts and tables from Google Sheets into your presentations with just a few clicks. Any modifications to the original data in Google Sheets will automatically be reflected in your Google Slides presentation.
For example, on Google Slides, open the "Insert" tab and navigate to the "Chart" option. From there, click on the "From Sheets" option and import a chart from Google Sheets.
Furthermore, you can add Google Keep notes to your Slides and share your content in Google Meet with Smart Canvas without switching between tabs.
On the other hand, Microsoft PowerPoint integrates with other Microsoft tools, but it's not as seamless as Google Slides and has limited integration capabilities. For example, unlike Google Sheets, which updates data automatically in Slides, PowerPoint requires you to manual refresh to update Excel charts. This means you need to copy and paste the updated chart from Excel to PowerPoint.
4. More Storage Space
Google Slides offers more storage space through Google Drive. With a Google account, you get 15GB of storage shared across Google Photos, Drive, and Gmail. This is significantly more than what Microsoft offers with its free PowerPoint Web version, which only provides 5GB of OneDrive storage. If you create large presentations with many images or videos, Google's extra storage space can be a significant advantage.
Additionally, Google offers affordable plans to upgrade your storage if needed. For example, you can get 100GB of storage for a $20 annual fee, which is perfect for those who create and store a lot of presentations. However, it's important to note that pricing for additional storage might be different depending on your region.
For detailed information, it's best to check your plans manually by clicking the "Get More Storage" option in Drive.
5. Compatibility With PowerPoint
I know what you're thinking—what if I need to work with someone who only uses Microsoft PowerPoint? Fear not; Google Slides has got you covered. You can import and export PowerPoint presentations into Google Slides, making switching between the two platforms easy.
This feature has been a lifesaver for me when I work with my clients or colleagues who use PowerPoint. I can easily collaborate with them and edit their files without any hassle. After making changes, I can save the Google Slides file again as a PowerPoint file.
You can add your PowerPoint file to Google Slides by either uploading it on Drive or directly opening it from the File > Open option.
6. AI Features
You can also use Google AI tools like Gemini to improve your presentations. For example, the Gemini AI feature in Google Slides allows users to generate images and slides based on their prompts. You can access Gemini from the Slides side panel and input your prompts, such as "Create a slide about," and it will generate slides accordingly.
This feature lets you quickly add relevant and visually appealing presentation content without leaving the Google Slides platform. Using Gemini AI, you can also generate background images in various styles, such as Vector art, Photography, Watercolor, and others.
In contrast, Microsoft AI feature tools like Copilot are not available on the PowerPoint web version. To use Copilot and other AI features in PowerPoint requires a paid subscription to either Microsoft 365 or Copilot Pro.
7. Provide Detailed Version History
Both Google Slides and Microsoft PowerPoint allow you to view and restore previously edited versions of your presentation. However, Google Slides stands out with its detailed version history feature. This feature groups certain versions of your presentation together if you make multiple changes over a short period. This makes it easy to find and select the version you need. These group versions are displayed under the Version History panel.
Another notable feature of Google Slides is the ability to name the modified versions. This is quite useful when working on large documents with multiple collaborators, as it can take time to find the version you want, among many others. To rename a version, open the "Version History" panel, click the three-dot icon, and then select "Name This Version" from the dropdown menu.
Once you've named important versions of your presentation, you can filter them by selecting the "Named Versions" option from the drop menu. This will highlight only the renamed versions, along with the current version of the document, making it easy to locate the version you need.
8. Customization Features and Template Options
The web version of Microsoft PowerPoint has limited features compared to the PowerPoint desktop app, which can sometimes be helpful while designing presentations. For example, you can't insert charts or equations in the web version. Additionally, you can't add hyperlinks to pictures or shapes. On the other hand, you can add equations, charts, and hyperlinks to images in Google Slides.
While both platforms offer a good selection of templates, I prefer Google Slides because its templates are user-friendly and easy to customize. It also provides more flexibility when working with themes compared to the web version of PowerPoint.
Google Slides isn't a flawless tool, but for me and many other presentation creators, it not only gets the job done but also has some advantages over PowerPoint. Whether you're a student, team, or regular user, you can use it to make clear and effective presentations.

- Slidesgo School
Lesson plan generator: AI-mazing classes that empower minds

Teaching is an art, but even the most creative educators need a little help streamlining their planning . With just 24 hours in a day, it often feels like we need days with 37 hours to get everything done. That’s where we at Slidesgo come in, tackling this issue head-on and developing a practical, simple, and—most importantly—fast solution for educators .
Our brand-new AI lesson plan generator is not just another digital tool; it’s your new teaching assistant that will transform your lesson planning process . With just a few details—your lesson topic, classroom level, and setting—you’ll get within seconds a fully formed lesson plan tailored to engage your students. Plan faster, teach smarter!
Effortless planning at your fingertips
Features that make the difference, real results, real impact.
Imagine having an assistant who understands precisely what you need, from structure to content, all at lightning speed with just the click of a button. That’s exactly what our AI-powered tool offers to educators.
If you’re a teacher aiming to enhance your educational delivery without the added stress, the AI lesson plan generator will become your best classroom companion. With its ability to generate precise, engaging, and pedagogically sound lesson plans quickly , you can wade goodbye to the tedious parts of lesson creation and hello to more dynamic, impactful teaching.

- Efficiency at its best : Forget long hours spent planning. With this tool, you can create comprehensive, effective lesson plans in a fraction of the time, freeing you up to add the personal touches that make your teaching unique.
- Intuitive interface for all : There’s no need to be tech-savvy. Our AI lesson plan’s user-friendly design makes generating your next great lesson as easy as typing a question into a search bar.
- Top-notch content options : From captivating summaries to hands-on activities that reinforce learning, the generator offers a variety of educational content to enrich any lesson.
- Instant customization : Adapt your lessons to meet the specific needs of your classroom. Whether you need to adjust complexity for different student levels or tweak the language, this tool is ready to suit your exact requirements.
Teachers are like orchestra conductors, skillfully managing multiple instruments to create beautiful harmony. Thanks to this handy technology, educators everywhere can concentrate on what truly matters: their students.
With less time spent on lesson planning, you can pour more energy into engaging with your students and boosting their learning experiences. The biggest perk? More time to inspire and connect with your students , making your classroom more interactive and enjoyable.

It’s time to plan efficiently and inspire effectively. Empower your teaching with Slidesgo’s AI lesson plan generator —your AI-mazing classroom awaits!
Do you find this article useful?
Related tutorials.

Entrepreneurship and Personal Development Hackathon: The magic of learning by doing
The new generations show us that the way of learning has completely changed. Now more than ever, it is key to encourage and support the development of social and entrepreneurial skills in children so that they can become more actively involved in their learning. Participating in creative projects and collaborative activities allows them to explore and learn on their own about topics that interest them, solve their problems with more autonomy, and work better in teams.This idea was the motivation behind the Junior Entrepreneurship and Personal Development Hackathon organized by Slidesgo in collaboration with Genyus School. At this event, more than 150 children had...

Work faster, teach better: boost your skills with Slidesgo Academy
We truly believe that every educator has what it takes to be a fantastic presenter, but we’re also aware of the time it takes to hone these skills. Enter Slidesgo with a great, fast solution: Slidesgo Academy.At this empowering and encouraging platform, we’ve partnered with veteran classroom educators to compile the best tips that will enable you to create engaging, eye-catching, and top-quality presentations for your students and fellow educators. You’ll surprise yourself with how quickly you can craft lessons that engage and excite. Join us as a student, and become the best teacher you can be!

7 tips to create a positive classroom culture
No matter if it's been ages since you last stepped into a classroom or just a long time ago―there’s probably a particular learning experience you often find yourself thinking about. Maybe it was a passionate teacher who kept the whole class engaged, or perhaps a classmate who lent you a hand with a tricky topic. Positive classroom experiences do leave a lasting mark on us, so it makes perfect sense that people leading a classroom aim to create the finest possible learning setting. In this article, we’ll share some tips to help you turn a regular classroom into a positive space.

How to create a word cloud in Google Slides
There are many ways to improve your Google Slides presentation. From choosing the right font to finding the right template, good presentations keep an audience engaged and convey a message in a clear way.Knowing how to visualize data in a slideshow is one of those actions that have a huge impact on the success of a presentation. At the end of the day, plain data fails to motivate decisions as effectively as clear insights do. This is when powerful visual tools like word clouds step in. Let us tell you all about them.
Premier says sex education group will be banned from giving school presentations
Organization disputes suggestion that material delivered was outside curriculum.

Social Sharing
Premier Blaine Higgs says he will ban a Quebec-based sex education group from presenting at schools in New Brunswick after a presentation he believes was "clearly inappropriate."
The premier took to X, formerly Twitter, to express his displeasure with a presentation given at several New Brunswick high schools.
"To say I am furious would be a gross understatement," he said. "This presentation was not part of the New Brunswick curriculum and the content was not flagged for parents in advance.
"The fact that this was shared shows either improper vetting was done, the group misrepresented the content they would share ... or both."
Higgs said the Department of Education told his office the presentation was supposed to be about the sexually transmitted infection human papillomavirus – but it went beyond that.

He shared and criticized a presentation slide that includes questions like "do girls masturbate" and "is it good or bad to do anal?"
Teresa Norris, who delivered the presentation to several New Brunswick schools last week, denied that schools were misled about what the presentation would cover.
The president and founder of the charity HPV Global Action, which also operates a youth sexual education resource called Thirsty for the Talk, said she was surprised and disappointed at Higgs's reaction.
She said the slide Higgs shared was the presentation's cover slide. She said it reflects actual questions her group receives from students.
"That excerpt that was taken is an extraction of something that's very grossly misrepresenting what this presentation is about," Norris said.

"All of the topics that we cover are supporting the learning areas. This is something that your province has decided ... We're not creating something that the province hasn't already put in place."
Norris said she has been giving presentations at New Brunswick schools for several years. All schools receive an outline of the topics to be covered and the school must give its consent prior to the presentation, she said.
The presentation is called Healthy Relationships 101. Norris said it is an "A to Z" about relationships and sexuality.
"We are not promoting any of these sexual behaviours ... we talk about abstinence in the presentation, we empower students to help them make decisions about their relationships," she said.

"We teach them to understand when they are not comfortable, or that they don't feel ready, and to pay attention so that they have those boundaries. Our goal is always to destigmatize conversations about sexual health."
Objectives in the province's high school sex education curriculum include having students define sexuality, discuss safe sex practices that include abstinence, masturbation, condom use and birth control options, and how to handle sexual feelings and sexual pressure.
Andrea Anderson-Mason, MLA for Fundy-the Isles-Saint John West, said she has heard about the presentation from teachers and constituents with family members who attend Fundy Middle-High School.
The Anglophone South School District has not responded to a request for comment.
Anderson-Mason said she has a daughter in Grade 12 at the school, but the presentation was only delivered to Grade 9 to Grade 11 students.
The MLA said reaction has been mixed and she is hoping to see a balanced conversation on the issue.

"When I was in high school, I had a male teacher teach me about breast self-examination, and at 47 years old I am still grateful for that information and use it," she said. "There is a time and a place and an appropriateness to talk about our bodies."
For Norris, the ultimate goal is to help students stay informed and avoid getting into relationship situations they are not ready for.
Despite Higgs's statement, she has not been given any formal message from the province banning the presentation.
Requests to the premier's office for comment have not been answered.
ABOUT THE AUTHOR

Savannah Awde is a reporter with CBC New Brunswick. You can contact her with story ideas at [email protected].
Related Stories
- Premier defends banning sex ed group despite not seeing presentation
- Sask. developing framework that could let 3rd-party organizations teach sex ed. in schools
- Education minister says francophone schools are following Policy 713
- High school students in Moncton say cellphone restrictions help concentration in class
How-To Geek
How to link to another slide in the same powerpoint presentation.
If you know you'll be referring to the content of a previously-viewed slide at some point during your presentation, it might be useful to insert a link pointing back to that slide for quick access.
Quick Links
Linking to another slide in the same presentation, using the zoom feature.
If you know you'll be referring to the content of a previously-viewed slide at some point during your presentation, it might be useful to insert a link pointing back to that slide for quick access. Here's how to set it up.
Open your presentation and navigate to the slide that will contain the hyperlink. Once there, highlight the text, object, shape, or image to which you want to attach the link.
Next, head over to the “Insert” tab and click the “Link” button.
In the Insert Hyperlink window that opens, select “Place in This Document” on the “Link To” list on the left.
On the right, under the “Select a place in this document” list, select the destination slide.
The four options at the top of the list let you select the first or last slide in the presentation or the slide that comes right before or after the slide containing the link.
If you need to link to a different slide, expand the “Slide Titles” category. This shows you a list of all the slides in your document. If a slide has a title, the list shows the title. If a slide does not have a title, the list shows it as something like "Slide 7."
Click the slide to which you want to link.
A preview of the selected slide will appear in the window to the right. If you’re unsure which slide it was that you needed to link back to, this will come in handy.
Once you’re finished, click “OK” and PowerPoint will insert your link.
As a matter of good practice, double-check to make sure the link is working properly. To test the link in the regular slide editing view, Ctrl-click the linked object. To test the link when playing your presentation, you don't have to hold the Ctrl key; just click the linked object.
If for some reason you need to remove the hyperlink, right-click the object and then select “Remove Link.”
If you’re using PowerPoint for Office 365 or PowerPoint 2019, then you can take advantage of the new “Zoom” feature, which lets you seamlessly transition to any slide in the presentation by placing it inside another slide.
First, go to the slide that you'll be linking from. Using “Normal View,” click and drag the slide you want to insert from the left-hand pane to the current slide.
Once the slide is inserted, a new “Format” tab will appear. Click it.
In the “Zoom Options” group, check the box next to “Zoom Transition.” You’re also able to specify the duration of the transition, with 01.00 being the default.
Now let’s take a look at what happens when we click that slide during our presentation.
As you can see in the above GIF, clicking the “Introduction” slide that we placed inside our “Information” transitions back to the "Introduction" slide. Clicking again brings us back to the original "Information" slide.
IMAGES
VIDEO
COMMENTS
Go to "Insert.". Choose "Link" from the list of options. Select which slide the link will take you to. If you don't see the slide number, select "Slides in this presentation ...
Click Insert > Link from the menu. Use the Insert Link button in the toolbar. Right-click the item and choose "Link" (this may not be available for images). When the add link box displays below the item, you can select one of the suggested slides in your slideshow. If you don't see the one you want, click "Slides in This Presentation" at the ...
Select the transparent shape. Right-click and choose copy. Right-click again and choose paste. To edit the link, click the pencil icon. Alternatively, you can right-click and choose link just like we did before. Click the Slides in this presentation drop-down menu and choose the correct slide. Click Apply.
To link to another slide in Google Slides: Open Google Slides and go to the slide where you want to insert your link. If you haven't already, insert the text or object that you want to click to ...
By adding links, you can jump to any slide during your presentation. You can use links to create a table of contents, navigation buttons, or other kinds of i...
Click on the linked text or object, then click the pencil icon to edit the link. Summary. Open Google Slides. Select the slide. Click on "Copy link to this slide." Insert the link. Test the link. Conclusion. Linking to a specific slide in Google Slides is a handy feature that can greatly enhance your presentations.
Link Slides From the App. Tap-and-hold the item to see the hyperlink option. Select the object or press-and-hold the text to highlight it (double-tap the text to enter edit mode). Tap Insert link. If you don't see this option, you either can't add a hyperlink to that specific object, or it's in the overflow menu (the three dots).
Step 3: Obtain the Presentation's Shareable Link. Click on the "Share" button located at the top right corner of the Google Slides interface. In the sharing settings, ensure that the presentation is set to be viewable by anyone with the link, or by the specific people you intend to share it with. Copy the shareable link provided.
Select the object you want to add the hyperlink to and go to "Insert" in the main menu. 2.-. Click on "Link ," and a blank bar will open next to the object selected. 3.-. Enter the URL of the website or document you want to link to. 4.-. Click on " Apply ". Your hyperlink will now appear on the slide.
Linking a picture in Google Slides is as same as linking to text or other objects. Select the image you want to link, go to Insert > Link, or use CTRL+K and enter the URL or select a slide or Google Drive file to link to the image. Once the image is linked, you can click on it during your slideshow to open the link.
Select the resource. Click Insert → Link or press Ctrl + K (Cmd + K in Mac). You can also click the Insert link button on the toolbar. Adding links in Google Slides. Click the Slides in this presentation drop-down arrow and select the slide you want to link to. You also have options to go to the next, previous, first and last slide too.
How to Create a Blank Presentation. Now that you have a Google account, it's time to create your first presentation. Head over to Google Slides and place the cursor on the multicolored "+" icon in the bottom-right corner. The + turns into a black pencil icon; click it. Pro Tip: Type.
Amit Agarwal is a Google Developer Expert in Google Workspace and Google Apps Script. He holds an engineering degree in Computer Science (I.I.T.) and is the first professional blogger in India. Amit has developed several popular Google add-ons including Mail Merge for Gmail and Document Studio.Read more on Lifehacker and YourStory
First, select the text or object you want to link. Then, click the "Insert" menu and choose "Link," or use the Ctrl+K shortcut. Type or paste the URL, and press "Apply.". Now, the text or object will act as a clickable hyperlink, directing viewers to the designated website or page. After you've inserted a hyperlink, clicking on ...
Use Google Slides to create online slideshows. Make beautiful presentations together with secure sharing in real-time and from any device.
Step 2. Access the Link Option. After you've opened your presentation, selecting File > Publish to the web menu option: Select the Publish to the web menu option in Google Slides. The Publish to the web dialog box appears. The Link tab opens by default: Use the Link tab to publish your presentation online.
Use the pen tool during a slideshow. On your browser, open a presentation in Google Slides. At the top right corner, click Slideshow . At the bottom left, click Options Enable pen tool. To draw or annotate, click and drag on your slide. Optional: To change the pen color, at the bottom, click Pen tool Select a color.
Rename your presentation—Click Untitled presentation and enter a new name.. Add images—Click Insert Image to add images from your computer, the web, Google Drive, and more. You can also move, delete, or resize images. Add text—Click Insert Text box to add new text boxes. Then, click a text box to enter text. You can move, delete, or re-size text boxes.
Remove a link to a presentation you own. Find the file or folder in Google Drive, Google Docs, Google Sheets, or Google Slides. Open or select the file or folder. Click Share or Share Copy link . Under "General access", click the Down arrow . Select Restricted.
Link a Web Page using Link. 1. Open your presentation in Google Slides. 2. Select the object you want to link the web page into. For a word or phrase, highlight the necessary parts. 3. Go to Insert then click Link. Alternatively, right-click and select Link from the options. Insert Hyperlink in Google Slides. Important: You can easily access ...
Email as attachment. Before we get to that, you need to know where to find the Share function in Google Slides. Open Google Slides and click File, in the top bar. Click Share at the top of the drop-down menu. Or, click Share at the top right-hand side of your window. 1.
Go to File > Publish to the Web in the menu. Choose either "Link" or "Embed" per your intent. Then use the Auto-Advance Slides drop-down box to choose the timing for the slides. Here again, you can pick from every second up to every minute. To loop the slideshow, check the box for Restart the Slideshow After the Last Slide.
How to download Google Slides. To access Google Slides, visit slides.google.com . You can also open Slides while Gmail or Google Chrome is open by clicking on the Google Apps icon in the upper ...
Select them by navigating to Insert > Shapes. In Jeopardy, the clue or answer comes first, followed by the question. To add a new slide, click Slide and choose New slide. Alternatively, use the ...
Step 2: Make a Copy of the Template. Select the slide you'd like to copy. If you want to copy multiple slides, click on the first slide, press Ctrl on your keyboard, and then select any ...
Here are a few tricks I've picked up along the way to wow any audience. 1. Getting comfortable with the stage. I recommend taking a walk around the stage before your presentation. By familiarizing ...
4. More Storage Space. Google Slides offers more storage space through Google Drive. With a Google account, you get 15GB of storage shared across Google Photos, Drive, and Gmail. This is ...
There are many ways to improve your Google Slides presentation. From choosing the right font to finding the right template, good presentations keep an audience engaged and convey a message in a clear way.Knowing how to visualize data in a slideshow is one of those actions that have a huge impact on the success of a presentation.
Premier Blaine Higgs says he will ban a Quebec-based sex education group from presenting at schools in New Brunswick after a presentation he believes was "clearly inappropriate."
Linking to Another Slide in the Same Presentation. Open your presentation and navigate to the slide that will contain the hyperlink. Once there, highlight the text, object, shape, or image to which you want to attach the link. Next, head over to the "Insert" tab and click the "Link" button. In the Insert Hyperlink window that opens ...