
How To Draw Bubble Letters – Step By Step Tutorial

This post and the photos within it may contain affiliate links. If you purchase something through the link, I may receive a commission at no extra charge to you.
In this tutorial, I will teach you how to draw bubble letters step by step.
You will learn what bubble letters are and how to draw them with my four-step formula.
You will also learn how to apply this technique and draw the entire bubble letter alphabet.
Finally, I’ll show you a few easy effects you can apply to make your bubble letters pop even more.
Here is a quick overview of this tutorial –
Tools needed to draw bubble letters
What are bubble letters, how to draw bubble letters step by step, bubble letters alphabet (process video), free printable bubble letters worksheets, 3 cool effects you can add to your bubble letters.
- Final words
Bubble letters are fun and easy to create, and you’ll be able to draw them even if you have zero prior experience.
Without any further delays let’s get started.
Bubble letters are a form of hand lettering so we will need pretty much the same tools.
Also, we will need a few basic tools to learn the basics of bubble letters. Let’s have a look (links to Amazon) –
- And fine liner (or marker)
- Colored markers/pencils (optional)

The true power of bubble letters is achieved once we add colors and various effects.
I’ll talk more about those later on in the tutorial.
To learn the basic construction and shading of bubble letters you just need the few basic tools I mentioned.
Bubble letters are best described as puffy and rounded letters .
It’s a lettering style that resembles the shape of a bubble – hence the name.

Bubble letters are often used in graffiti, but in this tutorial, we will focus on creating them on paper.
Due to their particular shape bubble letters have this fun and playful look.
Makes them perfect for any sort of occasion where you want to portray that feeling or emotion with your lettering work.
Technically speaking you can create bubble letters in a multitude of ways.
However, I want to show you what I consider to be the easiest way to do it.
With time and practice you can develop a different method, and add more style and complexity to your letterforms.
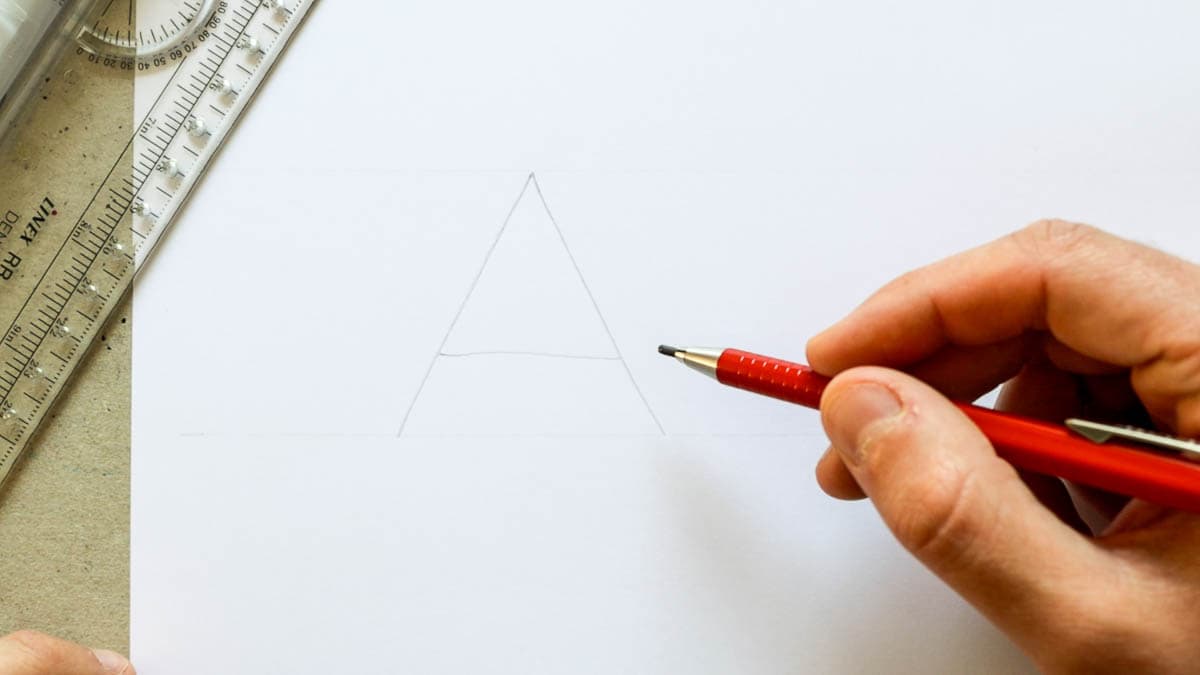
So let’s begin with an example using the letter A.
Step 1 –
Using my pencil, I’m going to write out a capital letter A in the most basic form possible.

Step 2 –
Again, using my pencil, I will draw out an outline around each separate part of the letter A.
It’s super important that we divide each letter into its most basic parts as much as possible.
In this example, we have the two diagonals and the middle horizontal stroke.
As I’m outlining these parts I make sure to round the edges.
You decide how thick you want these outlines to be.
If you want a heavier-looking letter than make it thicker and vice versa.

Step 3 –
Using a fine liner, I’m going to outline the outline I made in the previous step.

Step 4 –
I’ll take my eraser and delete the pencil lines.
And there you have a bubble letter A!

I just want you to take a quick moment and notice that in some places the strokes overlap and create sharp edges.

That’s perfectly fine.
In fact, having a few sharp edges inside the letter is essential to achieve that distinctive inflated, bubbly look.
You can see how it would look if we kept the edges rounded on the inside as well.

Not that it would be incorrect or wrong if you made your bubble letters like that, I just think that the example on the left looks much better.
What about rounded bubble letters?
Like always, rounded letters can be a bit more tricky.
By rounded I mean letters such as O, C, S, Q, etc.
Even letters with partly rounded parts such as R, P, B, J, etc.
But don’t worry, I’ll show you now that it’s easier than you might think.
You can choose between two main techniques.
The first one follows the same idea as the one I demonstrated earlier.
So, you write the letter out and you just create a thicker outline around it.
Here is an example with the letters S and O.

This technique is pretty simple and straightforward but I feel that with rounded letters it gives a bit of a boring result.
Here is the second technique, which is the one I prefer more.
Instead of writing out the letter in the basic shape, I will make it more square and angular.
Here is an example –

Writing the letters like this allows me to break the letter down into smaller parts.
Now I can outline those parts and keep the outer edges more rounded while the ones inside are sharper.

By using this technique not only able to achieve a more interesting look, but I can also create a bunch of different variations.
Since the initial skeleton letter is more angular I can shape the final look in many variations.
Check out the example below.

Alright, now that we’ve seen the technique needed to draw bubble letters, let’s apply it to the other letters as well and create the whole alphabet.
Here you can see the video process of me creating the whole alphabet using the same method I demonstrated previously.
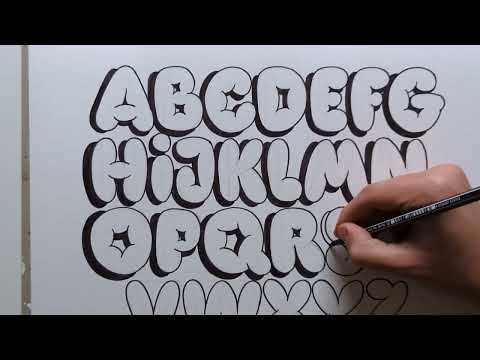
Here you can see an image of the whole bubble letter alphabet.
You can also notice that I’ve added a bit of a drop shadow to make the letters pop even more.

The same principle can be applied to lowercase (minuscule) letters as well.

To help you practice your bubble letters, I created two free printable worksheets.
One comes with a drop shadow already in place, the other one is without so you can practice adding the drop shadow in any direction you want.

Like with all my worksheets, you can get these for free from the Lettering Crate.
If you’re still not part of the Lettering Crate, all you need to do is drop your email below, and you’ll get instant access to it.

Stay updated with my tutorials and get instant access to the Lettering Crate –
A growing library of free lettering & calligraphy resources that includes –.
- Calligraphy practice sheets
- Procreate brushes
- The 30-day lettering planner
- Printables, and more!
Bubble letters are cool on their own but they are even cooler once you add a few effects to them.
The best part is that these effects are super easy to add and they can really lift the whole look of your bubble letters.

For this section, I wanted to show you three simple and cool-looking effects for your bubble letters.
Cool effect #1 – Make a drop shadow on your bubble letters
How to add shadows to your lettering is something we have already covered in a separate tutorial, but I’ll give you a quick demonstration here as well.
If you never did drop shadows before it might seem a bit daunting at first, but don’t worry it’s easier than you might think.
The first thing is to imagine a light source.
Most commonly it’s either on the top left or the top right side.
For this example, let’s imagine the light source is on the top right side.

The drop shadow will be cast on the opposite side, which in this case is the bottom right.
This means that each bottom and right side of my letter will have a cast shadow. Here is an example –

Notice that I leave a bit of space before I start (or finish) the shadow.

This gives the illusion of the letter popping off the page.
The absolute same thing can be done if we switch the light source to the other side.
It does take a bit of practice before you get it, but trust me, if you do the whole alphabet a couple of times you’ll already learn how to do the drop shadow.
You can use the bubble letter alphabet image example as a reference for the other letters.
Technically speaking you can put your light source wherever you want on the page, but it’s most commonly placed (and it looks the best) on either the top right or top left side.
Cool effect #2 – Adding highlights to your bubble letters
The easiest way to explain what highlights are is to say that they are the exact opposite of shadows.

Highlights appear on the areas closest to the source of light – they are the points where the light reflects from the shape.
So if our light source is on the top left side our highlights will appear on all top and all left side of our letters.
It’s also important to mention that highlights are always best presented with white or other bright colors.
Cool effect #3 – Adding an extra outline (second line) to your bubble letters
Another cool effect to add is a second line that goes around the other edges of the whole piece.
That means both the letter and the shadow as well.
The second line really adds a special extra pop to the whole look of your bubble letters.

What matters is that you pick the right colors.
There needs to be a good amount of contrast between these lines, otherwise, it doesn’t look that good.
I wrote a whole separate article about colors and how to use them in your lettering.
Bonus effect #4 – Over inflating your bubble letters
This is a super simple and easy tip that will make your letters look more ”bubbly”.
Remember that at the beginning of the tutorial, I mentioned that the overlapping strokes will create sharp edges?
Just by adding a bit more detail to these inner edges, you can make your letter look more bloated.
Check out this example –

Easy right?
By adding various effects to your bubble letters you can achieve some really creative designs.
I love these two examples by Renee from her tutorial on 5 lettering effects anyone can do –

I also made a little piece using watercolors.
Haven’t worked with watercolors in a while so I’m a bit rusty.
The cool thing about watercolors is that you can layer different values and create more advanced shading.

Sum up and final words about bubble letters
Let’s do a quick sum-up of everything we covered in this tutorial –
- Bubble letters are a fun and playful lettering style
- They get their name due to the inflated and rounded shape
- You only need a few basic tools such as paper, a pencil, a fine liner, and an eraser.
- The easiest way to draw bubble letters is by separating the letters into individual parts and creating a “thick outline” around each part.
- You can add various effects and colors to make your bubble letters pop even more.
- Consistent practice is the absolute key to improving your work
And there you have it friends!
That’s how you can draw bubble letters.
If you decide to create some bubble lettering and share it on Instagram, make sure to add #ldtutorials so I can check them out and share them on my stories.
Until the next time, Cheers!

How To Draw Bubble Letters
This is a step by step tutorial that will teach you how to create bubble letters. We are going to start with the basic letter construction and proceed by adding shades and other effects. Once you will feel comfortable enough with the basics, you will be able to start tweaking and bending shapes in different ways to create your very own unique style. Bubble Letters are fun and easy to make, and best of all it can be created with a variety of different tools (pens, markers, etc.)
- Paper (HP premium) - Practice paper
- Staedtler Mechanical Pencil
- Sakura Pigma Micron Fineliners
- Colored marker pens (refillable)
Instructions
Check out the full step by step tutorial for more details on how to apply shadows, and different effects to your bubble letters.
Recommended Products
As an Amazon Associate and member of other affiliate programs, I earn from qualifying purchases.

Did you make this project?
Please leave a comment on the blog or share a photo on Instagram
About the author

Hey, I’m Max Juric, and I’m deeply passionate about calligraphy and hand lettering.
I’ve spent years honing my skills in the art of lettering, working with hundreds of clients from all over the world on design projects such as logotypes, branding, custom lettering, murals, and more.
But my journey doesn’t end there. I’ve also dedicated myself to sharing my knowledge and expertise with others, creating a wealth of resources including tutorials, articles, and podcasts.
It’s been incredibly rewarding to see thousands of people engaging with my content each month. Knowing that I’m helping fellow enthusiasts grow and develop their skills makes me really happy.
Welcome to Lettering Daily, your hub for all things lettering and calligraphy. Whether you’re a seasoned pro or just starting out, I’m here to inspire and guide you on your lettering journey. Stick around, and let’s explore the world of letters together!
43 thoughts on “How To Draw Bubble Letters – Step By Step Tutorial”

i love youre buble riting i was doing the a and it terned out perfect .
Awesome! Glad to hear that 🙂 Im planning a bit update of this article, and I’ll make it even better.

This really helped me with a gift for my friend
Awesome! Glad to hear that 🙂

This is a great website! love it! I’m gonna recommend it to my friends in the art class!
Thank you, Cece! 🙂
This is a really good website to teach people how to do bubble letters! In my honest opinion, this is starting to be my favorite website!
Thank you so much! 🙂

Wassup bro?

You have brought up a very great points , thanks for the post.
You are welcome! 🙂

you are so cool and helpful!!

I agree with you

can you do the letter y
Will do, yes! I’ll do a whole update of this article very soon! 🙂

it is really help full and you need to use it for everything cuz i do
Thank you, Esperanza! 🙂

This was very helpful. Thank you
Thank you so much, Antonella! 🙂 It really means a lot!

yes tank you people to be the god hahahahaha

Thank you,,, You forgot Q LOL
Yup, I did 😀 I will fix that in the next update, don’t worry 🙂

I pinned you because you are good
Thank you! 🙂

could make a worksheet or freebie for bubble letters that would really help! btw keep up the great work!
You are right! I will update the article as soon as I can. Better and more detailed instructions, a better video and most definitely a worksheet! Thank you for the feedback! Hearing what my readers want to see is really helpful! Cheers 🙂

Hey, do you still have your whole alphabet video up?
Yup, it’s always here. You can’t see it or?

YOU are an amazing website i draw my name and i was awesome best site ever https://www.lettering-daily.com/ thanks-
faridaalwazeer

This is very helpful. thanks for always being an inspiration to us. Especially to me as a newbie.
You are welcome, Melissa! 🙂

I made the tutorial and I enjoyed every moment. Thanks a lot!! Greetings from Mexico, keep the good work!
Thank you so much for the kind words!

Wow, you’re amazing, thanks for your great tutorial, and God bless you.
Thank you so much for the kind words, means a lot! 🙂

How do you do the letter “Q”?
Hey Patricia! At the beginning of the article, there is a video where i demonstrate how to draw the whole alphabet (along with the letter Q). Basically, it’s just like the letter O with a bar extending in the bottom right corner. Feel free to join our official Facebook group – over there I can give you some direct feedback to your work 🙂

Really learned a lot from this tutorial, than you for taking the time to teach a new technique. Thank you!
Thank you so much for your kind words! Really means a lot 🙂
Leave a Comment Cancel Reply
Your email address will not be published. Required fields are marked *
Save my name, email, and website in this browser for the next time I comment.
This site uses Akismet to reduce spam. Learn how your comment data is processed .
Bubble Letters | Bubble Letter Generator

Free Bubble Letter Generator Copy And Paste
Fancy Bubble Letters | Printable Bubble Letters & Bubble Words:
Open Bubble Letter Generator

Create Bubble Words in Minutes!
Use our free bubble letter generator to create bubble text from the font designs available. Move the letters around to overlap or not. Print or download it to your PC. Write anything you want – letters, words, or sentences. There are many kinds of bubble letter fonts available with letters and numbers. The bubble font generator is useful when you want to create bubble words. If you are looking for individual letters, then see the alphabet of bubble letters below. You can print large full-page printable letters for each letter in the ABC.

Select either letters or numbers and symbols. Then select the letter and the style. Click on any initial to add it to your canvas. Drag each letter to the desired location. When satisfied, download with a transparent background. You can only download these letters as an image or a PDF. If you want bubble letters to copy and paste then see the bubble writing generator above.
You can also use the bubble letter maker to add balloon letters and numbers. They are available in four different colors.

With our free bubble letter generator, you don’t need to know how to draw bubble letters. You simply select the letter or number that you want from any of the bubble letter designs and click on it and the free bubble letter font will appear on your page. Drag the letters in the correct order to write your title, name, or word. You can decide if the letters overlap or not and how close they will be. Play around with the letters until you are satisfied with the layout and then download the page. It will download with a transparent background unless you added a background image. To add a background, upload any image.
You can either use the smaller letters to write words, names, titles, or sentences or use the huge letters to print one initial per page. The larger letters are perfect for creating posters.
We offer various fonts and styles for each of the letters in the bubble letter alphabet.
How to Use the free Bubble Font Generator

Select any bubble font and type any text.
Free Bubble Fonts
The video above shows you how to create bubble text. You can use the bubble text generator to write as many words as you want. Open the bubble alphabet and select the letter you need. Click on it to insert it. Drag it to wherever you want to place it.
Alphabetical Bubble Letters
Bubble letters alphabet from A to Z. Click on each letter to see the bubble lettering options for each letter. We offer different fonts and styles for each letter to give you as many options as possible. Select the style that best suits your needs. There are more bubbly letters, box letters, block letters, balloon letters, cloud letters, graffiti-style, comics style, etc.
There is also a step-by-step tutorial to draw bubble letters for each letter below.
Bubble Letter A

Bubble Font B

Bubble Letter C

Bubble Letter D

Bubble Letter E

Bubble Letter F

Bubble Letter G

Bubble Letter H

Bubble Letter I

Bubble Letter J

Bubble Letter K

Bubble Letter L

Bubble Letter M

Bubble Letter N

Bubble Letter O

Bubble Letter P

Bubble Letter Q

Bubble Letter R

Bubble Letter S

Bubble Letter T

Bubble Letter U

Bubble Letter V

Bubble Letter W

Bubble Letter X

Bubble Letter Y

Bubble Letter Z

How to use our bubble letters maker
- Click on any set of letters from the selection above to open the online font generator.
- Click on “click here to select design” to choose the design that you want to use. For example, we have a graffiti style, balloon style, and other cool and cute letters.
- There is also a huge version that will print one letter per page instead of words or sentences.
- Click on all of the letters that you want from each design. You can go back and add letters at a later stage, but it is quicker to choose as many as you need at this point. The letters are in the order of the alphabet (ABC).
- Drag the letters around until they are in the correct order and overlapping as much as you want them to.
- When you make bubble letter words you should overlap the letters.
- Download and print.
How to create printable bubble letters
- Once you have followed the steps above, click on the print icon to print the letters. You can also download it to your computer and print it from there.
- If you want to create a page with one letter only, then follow the steps above but select the “huge” category. These big printable bubble letters will each cover one full page.
- Select the letter and then download or print the page.
- You can use this method to write anything such as printable names in bubble letters.
How to create a bubble letter template
- If you want to create a template with one letter per page, then open the bubble letter creator and follow the instructions above. You can use these templates for many different purposes, such as to create coloring pages for children learning to read and write. To make a stencil, print on cardstock and then cut out the letter by hand or with a cutting machine such as a Cricut or a Silhouette.
- If you want to write a word such as “love,” “happy birthday,” “thank you,” or “mom,” then click on each letter in the word that you want to write.
- You can then either cut out or trace the letters.
- If you want to create colorful letters, then color each letter once you have printed the template. You can also use the colored letters.
How to Make Bubble Letters in Word
- You can import the words into Microsoft Word once you have completed the stages above.
- Create the word as per the instructions above and then download it as an image file.
- Open a Word document and click on “insert” -> “picture” and select the file that you downloaded previously.
How to Add a Background
- Open the bubble letter font generator and click on the image icon to add a background.
- Then follow the steps above.

Do you need any letters or symbols that do not appear here?
At this stage, we only have uppercase (capital) letters available. If you need lowercase letters, numbers, or symbols such as a question mark, “&” or others, then please leave a comment below. We will try to add those options for you and free of charge.
Colored Letters
Most of the fonts are black and white, but we also have colored letters. You can also download the printable colorable letters and color them yourself.
You can also print the stencil and then color it yourself. If you need a graffiti font generator, then follow the instructions above and select this font.

How to Draw Bubble Letters: A Step-by-Step Guide
To draw bubble letters, start by sketching the basic letter shape in pencil, then add thickness and rounded edges to create the bubble effect. Bubble letters add a fun and playful touch to any design or artwork.
They are bold, curved, and filled with color, making them popular for graffiti art, posters, and even personalized cards and invitations. Learning how to draw bubble letters is a straightforward process that requires just a few simple steps. In this guide, we will walk you through the process of creating your own bubble letters, from sketching the basic letter shape to adding the rounded edges and thickness that give them their distinctive bubble appearance.
So, grab your pencil and paper, and let’s get started on creating eye-catching bubble letters!
Understanding Bubble Letters
Bubble letters are a playful and expressive form of lettering that can add a flair to any art project. Understanding how to draw bubble letters opens up a world of creative possibilities. In this post, we will explore the history and significance of bubble letters in art, as well as the characteristics and features that make them unique.
History And Significance Of Bubble Letters In Art
Bubble letters have a rich history in the world of art, dating back to the mid-20th century. They emerged as a popular style of lettering during the graffiti movement in New York City in the 1970s. Graffiti artists would use bubble letters to create bold and eye-catching tags on walls and subway cars. This urban art form eventually spread worldwide, gaining recognition as a form of contemporary art.
The significance of bubble letters lies in their ability to communicate a sense of fun and playfulness. They break away from the traditional rigid form of lettering and allow for a more expressive and personalized approach. Bubble letters provide artists with a versatile tool to convey their thoughts, emotions, and messages in a visually captivating way.
Characteristics And Features Of Bubble Letters
Bubble letters are known for their distinct round shapes and exaggerated proportions. They consist of letters that appear inflated, as if they were shaped like bubbles. Here are some characteristics and features that make bubble letters stand out:
- Round and Curvy: Bubble letters have smooth, rounded edges and curves, giving them a soft and playful appearance.
- Thick and Bold: The letters are typically drawn with thick lines to enhance their impact and make them more visually striking.
- Inner and Outer Contours: Bubble letters often have both inner and outer contours, creating a dimensional effect that adds depth to the design.
- Shadows and Highlights: Shadows and highlights can be added to bubble letters to further enhance their three-dimensional look and make them pop off the page.
- Embellishments: Artists can add various embellishments to bubble letters, such as stars, hearts, or swirls, to make them more unique and personalized.
These characteristics and features give bubble letters their distinct visual appeal and make them a popular choice for creating eye-catching designs, logos, and signage.
Now that we have explored the history and significance of bubble letters in art, as well as their characteristics and features, you are ready to start trying your hand at drawing your own bubble letters.
Getting Started: Materials And Preparation
Are you ready to bring your artwork to life with vibrant and playful bubble letters? Getting started with this fun and creative journey requires proper materials and an optimal workspace. In this section, we will explore the essential supplies needed for drawing bubble letters and how to prepare your workspace for optimal creativity.
Essential Supplies Needed For Drawing Bubble Letters
To create beautiful bubble letters, it’s essential to have the right tools at your disposal. Here is a list of supplies you’ll need:
- Sketchbook: A quality sketchbook with smooth and thick paper will be your canvas for experimenting with different bubble letter designs.
- Pencils: Invest in a range of high-quality pencils with different lead hardness (e.g., HB, 2B, 4B) to achieve varying line thickness and shading.
- Erasers: Keep both a kneaded eraser and a standard eraser handy to correct mistakes and fine-tune your artwork.
- Markers: Bold and vibrant markers are perfect for filling in your bubble letters and adding a pop of color to your design.
- Rulers: Straight lines are essential in bubble lettering. Use a ruler to create precise outlines and ensure your letters are uniform.
- Coloring materials: Aside from markers, you may want to use colored pencils, crayons, or paints to add depth and dimension to your bubble letters.
Preparing The Workspace For Optimal Creativity
Before diving into the world of bubble letter art, it’s important to prepare your workspace for optimal creativity. Here are some tips to set the stage for your artistic process:
- Clean and clutter-free: Clear your workspace of any unnecessary clutter or distractions. A clean environment allows your mind to focus solely on your artwork.
- Ample lighting: Make sure your workspace is well-lit to avoid any strain on your eyes and to see every detail of your bubble letters.
- Comfortable seating: Opt for a comfortable chair that supports good posture, as you may spend hours engrossed in your bubble letter creations.
- Organized supplies: Keep your pencils, markers, erasers, and rulers within reach and neatly organized. This saves time and keeps your creative flow uninterrupted.
- Inspiration board: Surround yourself with inspiration. Pin up images, quotes, and artwork that motivate and ignite your creativity.
With these essential supplies and a well-prepared workspace, you’re ready to embark on your bubble letter journey. Now, let’s start creating some captivating and lively designs!
Creating Basic Bubble Letters
Are you interested in learning how to draw bubble letters? Bubble letters are fun and can be a great way to add style and personality to your artwork. In this guide, we will walk you through the process of creating basic bubble letters step by step. So grab your pencil, and let’s get started!
Step 1: Sketching the letter outlines
The first step in drawing bubble letters is to sketch the outlines of the letters. Start by lightly penciling the basic shape of the letter you want to draw. Keep in mind that bubble letters have rounded edges, so try to create smooth curves as you sketch.
Step 2: Adding thickness and roundness to the letters
Once you have the letter outlines, it’s time to make the letters appear more three-dimensional. To do this, add thickness and roundness to the letters. Begin by doubling the thickness of each line, creating a bold and chunky look. Then, carefully round out the corners of the letters to give them a more bubbly appearance.
Step 3: Connecting the letter parts
Now that you have the basic shape and thickness of the letters, it’s time to connect the different parts of each letter. Bubble letters often have overlapping sections, so you’ll need to make sure each part of the letter flows smoothly into the next. Pay close attention to the curves and connections, ensuring a seamless transition from one section to another.
Step 4: Refining and cleaning up the sketch
Finally, it’s time to refine and clean up your sketch. Take a closer look at each letter and make any necessary adjustments. Smooth out any rough lines, refine the roundness, and ensure each letter looks clean and polished. Use an eraser to remove any unnecessary pencil marks, leaving behind only the final bubble letter sketch.
With these four steps, you can now create your own basic bubble letters. Remember, practice makes perfect, so don’t be discouraged if your first few attempts don’t turn out exactly as you imagined. Keep experimenting with different styles, sizes, and letter combinations to develop your own unique bubble letter designs!

Credit: artbyro.com
Adding Style And Personality To Bubble Letters
When it comes to drawing bubble letters, adding style and personality is an essential step in making your artwork truly stand out. By experimenting with different letter shapes and sizes, enhancing the letters with decorative elements, and adding shading and highlights for depth and dimension, you can transform plain bubble letters into unique and captivating designs. Additionally, exploring color options can make your bubble letters vibrant and eye-catching. In this blog post, we will guide you through the process of adding style and personality to your bubble letters, ensuring that each step is easy to follow and yields impressive results.
Step 1: Experimenting With Different Letter Shapes And Sizes
One of the key ways to add style and personality to your bubble letters is by experimenting with various letter shapes and sizes. This allows you to create more distinct and interesting designs. To do this:
- Start by sketching the basic outline of your letter in a bubbly shape.
- Vary the width of the letter strokes to create a more dynamic look.
- Try different bubble sizes within your letter design to add visual interest.
By playing around with different shapes and sizes, you can achieve bubble letters that reflect your own unique style and personality.
Step 2: Enhancing The Letters With Decorative Elements
To further elevate the style and personality of your bubble letters, consider adding decorative elements. Here are some ideas:
- Incorporate swirls or flourishes alongside the letter strokes for an elegant touch.
- Add shadows behind the letters to create a three-dimensional effect.
- Integrate stars, hearts, or other small symbols within the letter design for added visual interest.
These decorative elements can bring your bubble letters to life and make them even more visually appealing.
Step 3: Adding Shading And Highlights For Depth And Dimension
To achieve a more realistic and dynamic look, shading and highlights are crucial. Here’s how you can add depth and dimension to your bubble letters:
- Identify the light source in your artwork, and imagine where the shadows would naturally fall on the letters.
- Gently shade the areas that would be in shadow, using a darker tone or cross-hatching technique.
- Add highlights to the opposite side of the shadows to create the illusion of light reflecting on the letters.
By adding shading and highlights, you can make your bubble letters appear more three-dimensional and lifelike.
Step 4: Exploring Color Options For Vibrant Bubble Letters
Color is a powerful tool to enhance the style and personality of your bubble letters. Consider these tips when choosing colors:
- Opt for bright and bold colors to make your bubble letters stand out.
- Experiment with gradients or ombré effects for a more visually striking appearance.
- Consider using complementary colors to create contrast and visual interest.
Remember to choose colors that align with the overall theme or message of your artwork. With the right color choices, your bubble letters will become vibrant and captivating designs.
Advanced Techniques And Tips For Perfecting Bubble Letters
When it comes to drawing bubble letters, mastering the basic technique is just the beginning. To take your bubble letter creations to the next level, it’s time to explore some advanced techniques and tips. In this guide, we’ll walk you through step-by-step instructions for adding shadows and gradients, incorporating 3D effects, using different tools and techniques for unique textures, and troubleshooting common challenges in bubble letter drawing. Get ready to level up your artistic skills and create bubble letters that truly pop!
Step 1: Adding Shadows And Gradients For A Realistic Look
One of the best ways to make your bubble letters come to life is by adding shadows and gradients. This simple technique can instantly add depth and dimension to your letters, creating a realistic and eye-catching effect. To achieve this effect, follow these steps:
- Start by outlining your bubble letters with a bold line.
- Choose a light source direction to determine where the shadows will fall.
- Using a slightly darker color, create a shadow on one side of each letter. Blend the shadow by softly smudging the edges.
- Add a gradient effect by gradually transitioning from a lighter shade to a darker shade within each letter.
- Finally, add highlights with a white or light-colored pencil or marker to create a shining effect.
By mastering the art of adding shadows and gradients, your bubble letters will look more realistic and visually appealing.
Step 2: Incorporating 3D Effects To Make The Letters Pop
Take your bubble letters to the next level by incorporating 3D effects that make them jump off the page. To achieve this effect, follow these steps:
- Start by drawing your bubble letters as usual, but leave some space between each letter.
- Using a ruler and a pencil, create a series of lines that connect the corners and curves of the letters.
- Erase the extra lines and adjust the thickness of the bubble letters to make them look three-dimensional.
- Add shading and highlights to create a realistic 3D effect.
By incorporating 3D effects, your bubble letters will have an added sense of depth and dimension, grabbing the viewer’s attention.
Step 3: Using Different Tools And Techniques For Unique Textures
One of the greatest advantages of drawing bubble letters is the opportunity to experiment with different tools and techniques to create unique textures. Here are some ideas to get you started:
- Try using a fine-tipped pen or marker for intricate details and precise lines.
- Experiment with various drawing techniques, such as cross-hatching, stippling, or blending colors.
- Consider incorporating mixed media elements, such as collage or watercolor, for added interest.
- Explore different textures by using different types of paper or textured surfaces.
By embracing these different tools and techniques, you can add depth, variety, and creativity to your bubble letters, making each piece truly unique.
Step 4: Troubleshooting Common Challenges In Bubble Letter Drawing
Like any art form, drawing bubble letters can sometimes come with its own set of challenges. Here are some common issues you might encounter and how to troubleshoot them:
| Common Challenge | Troubleshooting Tips |
|---|---|
| The letters look uneven or disproportionate. | Use a pencil to sketch the letters lightly before going over them with a pen or marker. This way, you can make adjustments and ensure they are proportionate. |
| The lines are smudging or bleeding. | Allow enough drying time for each layer of ink or paint before adding additional details or color. You can also try using a fixative or applying a thin layer of clear tape to protect your work. |
| The colors are not vibrant or bright enough. | Choose high-quality, vibrant art supplies and layer the colors to intensify their richness. You can also experiment with different techniques to create more vibrant effects, such as blending or using complementary colors. |
By being aware of these common challenges and having troubleshooting strategies in your arsenal, you’ll be better equipped to overcome them and create bubble letters that exceed your expectations.
Frequently Asked Questions For How To Draw Bubble Letters
How do you draw the best bubble letters.
To draw the best bubble letters, start by sketching the outline of the letter with rounded edges. Then, fill in the letter with a thicker line to create a 3D effect. Add shadows and highlights to give depth. Practice and experiment with different styles to find what works best for you.
How Do You Draw Bubble Letters?
To draw bubble letters, start by sketching the basic shape of each letter using rounded edges. Then, thicken the outlines to make them appear more three-dimensional. Finally, add curves and highlights to give the letters a bubbly look. Practice and experimentation are key to mastering this unique style of lettering.
What Tools Do I Need To Draw Bubble Letters?
The tools needed for drawing bubble letters are simple and readily available. All you need is a pencil, eraser, paper, and markers or pens of your choice. You can also use digital drawing apps or software if you prefer a digital approach.
It’s important to choose good quality materials to achieve the desired results.
Are There Any Tips For Creating Eye-catching Bubble Letters?
Absolutely! Here are some tips to make your bubble letters more captivating. Experiment with different sizes and shapes for each letter. Consider adding decorative elements like shadows, gradients, or patterns. Using vibrant colors and playing with different styles can also make your bubble letters stand out.
Practice regularly and find your own unique style to make your creations truly eye-catching.
Drawing bubble letters can be a fun and creative way to add a touch of style to your artwork. By following the simple steps outlined in this blog post, you can easily master the art of drawing bubble letters. Remember to start with a solid outline, add depth and dimension, and experiment with different styles and embellishments.
So what are you waiting for? Grab your pen and paper, and start creating your own unique and eye-catching bubble letter designs today! Happy drawing!
Similar Posts

When Does a Kid Learn to Ride a Bike : Unlocking the Secret
Children typically learn to ride a bike between the ages of two and eight, with the average age being just over five. Learning to ride a bike is a significant milestone in a child’s development, signaling their growing independence and physical skills. While most kids are ready to start learning at this age, individual readiness…

Why Do We Use Bubble Letters?
Bubble letters are used to create a bold, playful, and eye-catching appearance for text. By adding rounded shapes and exaggerated curves to each letter, they create a unique and fun visual appeal. Bubble letters are commonly used in graffiti, children’s art, and graphic design projects to add a sense of whimsy and creativity to the…

What Age Do Kids Learn to Read: Tips for Early Reading Success
Kids typically learn to read between the ages of 4 and 7. This is when they start recognizing and understanding letters and words. In the journey of a child’s development, learning to read stands as a significant milestone. The foundation of reading skills is usually laid down between the ages of 4 to 7, as…

How Do You Make Bubble Letters Fun?
To make bubble letters fun, you can add bright colors and playful designs. Then, incorporate them into engaging activities. Bubble letters are a great way to add a fun and creative touch to any project or design. Whether you’re an artist, a teacher, or just someone who enjoys expressing themselves through art, there are numerous…

What Do Kids Learn in 6th Grade: Essential Education Insights
In sixth grade, kids learn more advanced math skills like place value and decimal work up to the hundredths place. They develop organization and independence while tackling increased homework and critical-thinking projects. Subjects such as math, science, and social studies become more in-depth, fostering problem-solving abilities. Academic requirements intensify, preparing students for more challenging concepts…

How to Help Kids Learn Multiplication: Expert Tips & Fun Methods
To help kids learn multiplication, use times table sheets, teach tricks, and make learning fun with songs and games. Encourage regular practice and reward their efforts to improve their skills. Kids typically start learning multiplication in second grade and continue to refine their abilities in subsequent grades. Supporting them with engaging methods and consistent practice…
Calligraphy
Supplies & Resources
Handwriting
How to Draw Bubble Letters: The Complete Guide [2023]

Table of Contents
In this tutorial, you’ll learn how to draw bubble letters and how to have fun doing it. We’ll start from the basics and will take it a step further to show you how to boost your creativity. Some concepts we’ll dive into can be used in other styles too. Let’s get started.
What are bubble letters?
For the unfamiliar, bubble letters are letters that have a rounded or inflated effect. Just like bubbles. You can also think about them as letter balloons. There are many uses for this style, and you’ll learn mostly examples on paper and a bit in digital form. The same techniques apply. Nonetheless, it is a style used a lot in other ways, like graffiti.
So, let’s dive into it!
What do you need to get started?
Since we’ll start with the basics, all you need is a pencil and paper. In my case, I’ll be using a mechanical pencil . You can also add a rubber if you want to clean everything up nicely.
To create something a bit more permanent, you can use any pen or marker. I’ll be using a Rotring Art Pen , but you can choose something else you have at home.
For the final touches, I’ll be using Photoshop and a Wacom Bamboo Pen . But you can mimic everything I’ll do with markers, Posca pens, Copic Markers , etc. We’ll go into it a bit more in-depth later.
1 – How to start drawing bubble letters (Skeleton)
Draw a normal letter.
The way to start drawing Bubble Letters is to draw a normal letter. I’ll start with a capital A, but you can choose any other letter. You just have to apply the same principles.
As you can see in the image, it’s not good to start with a cramped letter. The width must leave enough room to work around. And don’t open the letter too much either. If you have a hard time knowing, start with something and see how it goes. If you see it’s too tight or too spread out, you can always restart.
This A is your skeleton. You’ll erase it later, but it is the most important part of this tutorial since it’s the base for what will come next. Remember, everything we’ll learn for this A can be used for any other letter, number, or symbol.
Draw outside the shape
What we’ll do now is essentially draw outside of your A shape, with a fair distance. The idea is that you round all hard shapes, like the edges and vertices where edges meet. Draw around them and avoid hard shapes. Be as soft as you can with your lines.
As you can see by the image, we have a rounder shape for our A. It isn’t exactly perfect, but it is a start. Now, let’s improve on it. What we want to achieve is a form with more personality. Like this next example.
Exaggerate the bubble shape
Let’s start with our A skeleton again. But this time, let’s exaggerate our exterior and interior shapes. Think of them as balloons. The way it is now it’s like a clown balloon, the one used to make animals and swords. But it’s not fun, or comic-like yet. Take a look at the next image.
On this one, you see more character. It’s like the A got inflated. It’s more bubbly looking, right? How do we reach this?
First, accentuate the forms. Round up the larger sides, with different widths. On each edge go from a lower width size to a bigger one, and back to the first. If you do it all around you’ll end up with something like the image.
Don’t forget to do the same on the inside, even if you don’t have enough room. Round up your lines so you give the sense that it has no more space to blow up.
Add details to the bubble letter: extend the edges
As a final touch, you can extend the edges that connect, to give the illusion that one part of the letter is on top of the other. In this case, you can see it clearly on the bottom line of the middle edge of the A.
If you’re interested in something a bit less round and the first one looks dull to you, mix them up. Here’s when your imagination can fly.
As you can see above, you can maintain the straightest shape on the outside of the A and give it a rounder feel inside. That way you have a bit more room while still being legible and interesting-looking.
2 – How to create depth in bubble letters
Define a light source.
Typically, the way to create depth in any style of drawing is by using linear perspectives with vanishing points and/or by the use of shading. For this tutorial let’s learn how to add shades and glow to our letters.
If you want to know more about light and shadows used in art, check out the beginners guide to shadow light drawing.
First, we need to define the light source in our drawing. You have to imagine light coming from somewhere. Usually, we use diagonal directed lights coming from the top right or the top left corner. But you can use it regardless of the direction, as long as you adjust the shadow and glow to match the intended direction.
After you have the light source defined, let’s start shading. You can shade on top of the letters or behind them. Let’s learn both processes.
Outside Shadow (Cast Shadow)
I’m going to use photoshop from now on, but you can use your pencils, Copic markers , etc. The important part is to follow the instructions. Regardless of the format.
The way to achieve this result is to add the visible part of the shadow behind your A. You can redraw the entire letter with a pencil if it helps you.
Remember, you have to follow your light source. The way to do that is to distance the shadow further from the light source but in the same direction. See the image below.
Draw as many guides as you need until you get the hang of it.
Now, after the light source, we need to accent the brightness. Just like you see in a bubble or a balloon. The glow is of course a part of the letter, so you must shadow on top of it. Here are some examples.
As you can see, regardless of the style you choose, the same rules apply to every situation.
Since we’re talking about shadows and depth, you can just as easily create a 3D letter with it.
The same technique you use for the outline shadow, you can use to turn your shape from 2D into 3D. The only difference is you’re going to connect the shapes from the shadow and the letter every time the direction changes. Then, you cover it. See the image below.
The reason why these don’t work so well with bubble letters is because you can see the biggest differences when using sharp edges, like we see in the middle of the A here. When the letters are straight you have a better perception. Nonetheless, here it is in case you want to try it!
Learn a bit more about cast shadows using perspective.
Inside Shadow (Form Shadow)
For the inside shadow techniques, you’ll apply the same rules as before, with a few twists.
The main difference is, your shadow will work inside the letter. You’ll need to imagine it has the same curves as a balloon or a bubble. You have a lighter side that catches the light from the light source and a darker side that catches no light.
The trick with this one is using a gradient shadow, so you can feel the roundness of it. Opposed to the bold shadow we’ve seen before.
Realistic form and cast shadows can be learnt more in depth to develop this skill further.
3 – Have fun with different styles of bubble letters
Before we end the tutorial, it’s important to remember you can and should use your creativity to boost your work. Try drawing different letters with different shapes and come up with different versions. This will help you be versatile with your work.
You can also make fonts now! Here are some bubble letter fonts you can check out to get some inspiration:
www.hipfonts.com/bubble-fonts/
I hope you have learned something new about creating Bubble Letters with this tutorial. Now that you have the basic rules, you can bend them to fit your needs and creativity.
Go bubble the world!
Leave a Reply Cancel reply
Your email address will not be published. Required fields are marked *
Save my name, email, and website in this browser for the next time I comment.
Post Comment
How to Make Bubble Letters
Introduce your kid to a whole world of alphabet fun with bubble letters! Just have her follow the illustrated step-by-step instructions -- before she knows it, she'll be a bubbling master.
View aligned standards
Trending Post : How to: calligraphy and hand lettering for beginners
How To Make Bubble Letters + Free Lettering Worksheet
Sharing is caring.
Learn my easy, step-by-step process for creating beautiful bubble letters every time. Plus, get access to the FREE Bubble Lettering Worksheet.
In this bubble lettering tutorial, I share tips and tricks for making your designs pop with vibrant colors and techniques for adding personality and style to your lettering.
See the full step-by-step Bubble Lettering video tutorial
This post contains some affiliate links for your convenience. Click here to read my full disclosure policy.
MY FAVORITE PENS FOR BUBBLE LETTERING
- Linc Glitter Gel Pens . Using gel pens for bubble lettering is addicting! These are some of my favorite glitter gel pens and are super affordable.
- PaperMate Ink Joy Pens
- Pentel Arts Sparkle Pop Metallic Gel Pens
- Sakura Gelly Roll Metallic Gel Pens
- Monoline Pens

Free Download
Get my bubble lettering worksheet and start making awesome bubble letters today.

Learn how to create playful and eye-catching bubble lettering with this workbook for beginners!
This workbook is the best way to learn a new lettering style. This bubble lettering style is perfect for – bullet journals, planners, prints, cards, and everything in between!
This workbook is perfect for anyone who wants to learn how to create bubble lettering.
WHAT YOU’LL RECEIVE…
A 25-page instant download workbook, which includes everything mentioned below.
WHAT YOU’LL LEARN…
- – How to create 2 different bubble lettering styles including a lowercase case alphabet.
- – Tips and Tricks to add the perfect shadowing to your bubble letters as well as other fun embellishments to make your letters pop.
- – Easy layout designs with common words and phrases.
- – BONUS: Blank practice page.
Final Thoughts
Making bubble letters used to be my favorite lettering style in high school. At the time, I didn’t even know they were called this.
It took me a long time to get used to making these bubble letters, so keep practicing them before giving them up completely.
Once you’re comfortable with making the basic bubble lettering style, add your personal touches and create your own.
Share your bubble letters with me and tag me on Instagram
Similar Posts

Easy Diy Father’s Day Card + Free Calligraphy Practice Worksheet

5 Things You Need To Know Before Starting Calligraphy

7 Calligraphy Practice Tips You Need To Start Doing Today

The Best Modern Calligraphy Supplies For Beginners

How To Do Bounce Lettering For Beginners

Easy Floral Doodle Ideas To Decorate Your Lettering
Leave a reply cancel reply.
Your email address will not be published. Required fields are marked *
This site uses Akismet to reduce spam. Learn how your comment data is processed .
GET MY FREE FAUX CALLIGRAPHY WORKSHEET!
Subscribe (free!) to get instant access to this Faux Calligraphy Worksheet. Subscribing gets you into my newsletter with updates about my new free files, workbooks, classes, and blog posts.

FREE WORKSHEET
Get my basic calligraphy drills worksheet and start learning calligraphy right away.
Cursive Bubble Letters Worksheets
Cursive bubble letters worksheets are educational resources designed to help students learn and practice writing in a stylized and fun way. They combine the flowing, connected strokes of cursive handwriting with the playful, rounded shapes of bubble letters. These worksheets can offer various activities and exercises aimed to enhance a child’s handwriting skills and can be explained to teachers or parents in the following way:
Introduction to Cursive Bubble Letters
- Cursive Writing: This refers to a style of penmanship where letters are joined together in a flowing manner. It is often taught with the aim of increasing writing speed and efficiency.
- Bubble Letters: These are letters written in a way where they appear inflated or “bubbly.” They are rounded, bold, and often used to create a playful and visually appealing effect.
Educational Aspects:
- Fine Motor Skills: Learning to write involves developing fine motor skills, which are vital for performing various tasks, including regular writing.
- Handwriting Skills: It provides practice in forming letters and connecting them smoothly in a playful, non-stressful way.
- Creativity: The combination of cursive and bubble letters allows children to explore their creative side while learning how to write.
Engaging and Fun:
- Engagement: The playful nature of bubble letters can make the learning process more engaging and enjoyable for children.
- Variety: Offering different styles of lettering can keep children interested and motivated to practice writing.
Worksheet Features
- Letter Tracing: The worksheets might contain dotted lines of cursive bubble letters that guide students in forming and connecting letters.
- Practice Areas: They typically have areas where children can practice writing on their own after tracing.
- Alphabet Guide: Often, they include an alphabet guide that shows how each letter is formed in the cursive bubble style.
- Words and Sentences: Sometimes, they might provide words or sentences for students to practice writing in a cursive bubble style.
- Visual Appeal: Bubble letters can be visually appealing to children, which might spark their interest in handwriting activities.
- Learning Styles: Different children have different learning styles, and some may find that the visual and tactile nature of tracing and writing cursive bubble letters enhances their learning.
- Encouraging Creativity: Children can be encouraged to color in the bubble letters, further developing their fine motor skills and sparking creativity.
- Homework: Can be used for additional handwriting practice at home.
- Classroom Activity: Employed as a fun and educational activity during school.
- Special Events: Used for creating fun, hand-written posters or cards.
Additional Tips for Parents/Teachers
- Encouragement: Praise efforts and progress in handwriting to boost motivation and confidence.
- Consistency: Regular practice is crucial for developing handwriting skills, so ensure consistent usage of the worksheets.
- Adaptation: Make sure to adapt the use of worksheets according to the child’s pace and interest.
- Additional Activities: Incorporate activities where they can use their cursive bubble letter skills, such as writing a letter to a friend or creating their own stories.
Understanding the aspects and benefits of cursive bubble letters worksheets will allow parents and teachers to effectively implement them as a resource in developing a child’s handwriting and motor skills while making the learning process enjoyable.

Related Posts

Cursive N Worksheets

Fancy Cursive Letters Worksheets

Cursive Capital Letters Worksheets

Missing Letters Worksheets

Silent Letters Worksheets

Polka Dot Letters Worksheets
Leave a reply cancel reply.
Save my name, email, and website in this browser for the next time I comment.
Type above and press Enter to search. Press Esc to cancel.
Teach Starter, part of Tes Teach Starter, part of Tes
Search everything in all resources
Results for ‛Bubble Writing’
1,553 teaching resources
- Foundation Year 274
- Preschool / Kindergarten 60
- Year 1 708
- Year 2 732
- Year 3 814
- Year 4 711
- Year 5 631
- Year 6 532
- Year 7 107
- Worksheet 660
- Classroom Decor 206
- Lesson Plan 158
- Teaching Slides 75
- Teacher Planning 60
- Crafts 41
- Classroom Management 22
- Unit Plan 17
- Assessment Tools 11
- Classroom Video 8
- Report Card Writing 2
- English 1280
- Maths 170
- Science 42
- Social Emotional Learning 19
- Technology 8
- Health and Physical Education 6
- English Language Arts 2
- The Arts 2
- Curriculum-Aligned 1127
- Editable 261
- Differentiated 52
- Plus Plan 1330
- Printable PDF 1209
- Google Slides 594
- Microsoft PowerPoint 138
- Microsoft Word 111
- Zip File 103
- Podcast 8
- Microsoft Excel 5
- Resource Pack 3
- Google Sheets 1
- Preschool / Kindergarten 60
- Foundation Year 274
- Writing Templates 187
- Task Cards 60
- Cut and Paste 22
- Inquiry Based Learning 16
- Flipbooks 15
- Colour By Code 14
- Mini Books 14
- Sorting Activities 13
- Flashcards 5
- Book Review 4
- Fact Sheets 2
- Brochures 1
- Word Searches 1
- Posters 137
- Classroom Displays 27
- Word Walls 23
- Page Borders 4
- Book Covers 3
- Desk Name Plates 2
- Printable Letters 2
- Lesson Plan 158
- Interactive Games 59
- Matching 16
- Board Games 13
- Active games 6
- Teaching Slides 75
- Teacher Planning 60
- Classroom Procedures 12
- Behaviour Management 10
- Unit Plan 17
- Assessment Tools 11
- Classroom Video 8
- Report Card Writing 2
- Writing 1234
- Reading 186
- Speaking and Listening 23
- Place Value 126
- Number Sense 26
- Measurement 8
- Number Patterns 6
- Whole Number Operations 6
- Number Lines 4
- Fractions 1
- Geometry & Space 1
- Earth and Space Sciences 19
- Biological Sciences 16
- Science Inquiry 6
- Chemical Sciences 4
- Physical Sciences 3
- Multiculturalism 7
- Geography 6
- Self Awareness 6
- Self Management 6
- Relationship Skills 5
- Social Awareness 3
- Decision Making Skills 2
- Physical Education 3
- Personal, Social & Community Health 2
- Visual Arts 1
- Curriculum-Aligned 1127
- Editable 261
- Differentiated 52
- Plus Plan 1330
- Printable PDF 1209
- Google Slides 594
- Microsoft PowerPoint 138
- Microsoft Word 111
- Zip File 103
- Microsoft Excel 5
- Resource Pack 3
- Google Sheets 1

Bubble Writing - Letter, Number and Punctuation Sets

Contraction Bubbles Worksheet

Informative Writing Fact Files - Differentiated Writing Worksheets

Developing Narrative Writing Skills PowerPoint - Year 3 and Year 4

Using Quotation Marks in Narrative Writing PowerPoint

Visual Writing Rubric - Foundation Year

Creative Writing Prompt Choice Boards - Lower Primary

Writing Out Loud: Dialogue Punctuation Worksheet

R.A.C.E.S Writing Strategy Checklists & More

5 Information Report Writing Prompts

R.A.C.E.S. Constructed Response Writing Classroom Display

Alphabet Writing Rhymes - Teaching Slides

Coordinating Conjunctions Craft and Writing Activity

How to Grow A Sunflower – Procedural Writing Craftivity

Contractions Writing Activity Pack

How to Make a Salad – Procedural Writing Craftivity

How to Make A Jam Sandwich – Procedural Writing Craftivity

How to Build a Sandcastle – Procedural Writing Craftivity

How To Build a Snow Globe – Procedural Writing Craftivity

Procedural Writing Sequencing Worksheet – How to Wash Your Dog

How To Make A Sandwich – Procedural Writing Activity

How To Make Pancakes – Procedural Writing Activity

Writing Paper with Picture Box - Differentiated Templates

Procedure Texts Writing Scaffolds

Holidays and Seasons - Lined Writing Paper Templates

Themed Letter Writing Template Pack

Daily Writing Prompts Calendars - Upper Primary

How to Make a Milkshake – Procedural Writing Worksheet

How to Make a Paper Plane – Procedural Writing Worksheet

How to Stay Healthy – Procedural Writing Project

How to Plant a Garden – Procedural Writing Project

Writing with Compound Words Worksheet Pack

Gratitude Journal Writing Prompts for Kids - Daily Slides

Procedural Writing Prompt Task Cards

Writing Procedural Texts Teaching Slides

How to Make Waffles – Procedural Writing Project

Procedural Writing Checklists

Procedural Writing Posters

Procedural Writing Flipbook

Procedural Writing Templates – "How to" Prompts

Procedural Writing Graphic Organisers

Exploring Procedural Writing Teaching Slides

5 Procedural Writing Prompts

Procedure Writing – Printable Recipe Book Template

Procedure Writing Word Wall

Animal Adaptations - Informative Writing Prompt Worksheets

Writing Persuasive Texts PowerPoint - Year 5 and Year 6

Characteristics of Animals - Year 1 Writing Activities

Animal Research Project - Informative Writing Booklet

'If I Were a Bowerbird...' Writing Stimulus

Dotted Numbers 0-20 Handwriting Sheet

Dotted Numbers 0-10 Handwriting Worksheet

Tracing Numbers 0-10 Handwriting Worksheet

Tracing Numbers 0-20 Handwriting Worksheet

Penguin Craft & Writing Template

Rainforest Bird Craft & Writing Template

Cursive Writing Worksheets PDF - Alphabet

Cursive Handwriting Worksheets - Days, Months, Colours, and Numbers

Persuasive Writing Planning Flipbook

Reading and Writing 4-Digit Numbers Flipbook
Bubble Handwriting Fonts
41 free fonts
Related Styles
Bubble letters, motley forces by niskala huruf.

Twice by Dirtylinestudio

Janda Manatee by Kimberly Geswein

Sunshine Tropical by Holydie Studio

Graphy Filled by Dharmas Studio

CIROYA Trial by twinletter

Gembila by ntorialstudio

Rainbow 2000 by GGBotNet

Bubble Letters by ByTheButterfly

KBCuriousSoul by KhrysKreations

King Rabbit by ahweproject

Blendstripe by alexatype

Shiny Kids by StringLabs

c Cassel by wepfont

Comic Panels by HAWTPIXEL - Darrell Flood

Even More Styles
- International
- Education Jobs
- Schools directory
- Resources Education Jobs Schools directory News Search

Bubble Writing - Coronation Word Bank
Subject: English
Age range: 7-11
Resource type: Visual aid/Display
Last updated
28 January 2024
- Share through email
- Share through twitter
- Share through linkedin
- Share through facebook
- Share through pinterest
Bubble writing - cursive word bank
Like many primary school teachers I have tried a variety of handwriting schemes with varying degrees of success. Having thought through many common problems with handwriting I have developed a simple scaffold that places a bubble either side of the line to support letter formation. This simple scaffold provides a guide to consistently form cursive letters and ensure each letter is uniform in both height and width. Children are able to leave equal spaces between words and see clearly whether or not there is enough space at the end of each line for the next word they intend to write. There has been a huge impact within my class in a very short space of time and I hope you will see similar benefits within your own setting.
Included is a PowerPoint presentation including a variety of words linked to the King’s coronation.
It is suggested that this resource is used alongside the full pack for the relevant Key Stage available from my TES store.
Tes paid licence How can I reuse this?
Your rating is required to reflect your happiness.
It's good to leave some feedback.
Something went wrong, please try again later.
This resource hasn't been reviewed yet
To ensure quality for our reviews, only customers who have purchased this resource can review it
Report this resource to let us know if it violates our terms and conditions. Our customer service team will review your report and will be in touch.
Not quite what you were looking for? Search by keyword to find the right resource:
How to Blow a Bubble Writing Creative Writing Craftivity

What educators are saying
Description, questions & answers, teach two reach.
- We're hiring
- Help & FAQ
- Privacy policy
- Student privacy
- Terms of service
- Tell us what you think
IMAGES
VIDEO
COMMENTS
Cool effect #3 - Adding an extra outline (second line) to your bubble letters. Another cool effect to add is a second line that goes around the other edges of the whole piece. That means both the letter and the shadow as well. The second line really adds a special extra pop to the whole look of your bubble letters.
Learn to draw the alphabet in Bubble Writing, with award winning illustrator, Shoo Rayner.Learn how to draw bubble writing by watching this video first https...
Create the word as per the instructions above and then download it as an image file. Open a Word document and click on "insert" -> "picture" and select the file that you downloaded previously. How to Add a Background. Open the bubble letter font generator and click on the image icon to add a background.
How about some handwriting practice with a little bit of fun? Let's learn how to write BUBBLE LETTERS with this tutorial on capital and lowercase letters for...
Hey Gang!This video is part of the -How To Draw Bubble Letters Tutorial And you can read the full tutorial here - https://www.lettering-daily.com/bubble-lett...
Essential Supplies Needed For Drawing Bubble Letters. Preparing The Workspace For Optimal Creativity. Creating Basic Bubble Letters. Step 1: Sketching the letter outlines. Step 2: Adding thickness and roundness to the letters. Step 3: Connecting the letter parts. Step 4: Refining and cleaning up the sketch.
Draw a normal letter. Draw outside the shape. Exaggerate the bubble shape. Add details to the bubble letter: extend the edges. 2 - How to create depth in bubble letters. Define a light source. Outside Shadow (Cast Shadow) Inside Shadow (Form Shadow) 3 - Have fun with different styles of bubble letters.
How to Make Bubble Letters. Introduce your kid to a whole world of alphabet fun with bubble letters! Just have her follow the illustrated step-by-step instructions -- before she knows it, she'll be a bubbling master. Download Free Worksheet. Add to collection. Add to assignment.
Sharing is Caring! Learn my easy step-by-step process to create beautiful bubble letters every time. Plus get access to the FREE Bubble Lettering Worksheet. In this bubble lettering tutorial, I show you tips and tricks to make your designs pop with vibrant colors and techniques for adding personality and style to your lettering.
wikiHow Quick Video on How to Draw Bubble Letters. To draw bubble letters, start by writing the basic shapes of the letters you want. You can use either capital or lowercase letters. Next, draw an outline around each letter with rounded edges. To make this easier, try surrounding every line in the letter with an oval. If you're drawing a curved letter, like "C," use a series of curved ...
Grade: Cursive bubble letters worksheets are educational resources designed to help students learn and practice writing in a stylized and fun way. They combine the flowing, connected strokes of cursive handwriting with the playful, rounded shapes of bubble letters. These worksheets can offer various activities and exercises aimed to enhance a ...
Explore more than 3,635 "Bubble Letter Formation" resources for teachers, parents and pupils as well as related resources on "Bubble Writing". Instant access to inspirational lesson plans, schemes of work, assessment, interactive activities, resource packs, PowerPoints, teaching ideas at Twinkl!
ppt, 16.41 MB. Bubble writing - non-cursive handwriting scaffold. Like many primary school teachers I have tried a variety of handwriting schemes with varying degrees of success. Having thought through many common problems with handwriting I have developed a simple scaffold that places a bubble either side of the line to support letter formation.
Phoneme Set on Speech Bubbles (Multicolour) Explore more than 94 "Bubble Letters" resources for teachers, parents and pupils as well as related resources on "Bubble Writing". Instant access to inspirational lesson plans, schemes of work, assessment, interactive activities, resource packs, PowerPoints, teaching ideas at Twinkl!
PDF. I use Bubble Letters to teach students their colors by letting them color inside of each color word, fill the words with pictures that are the same color, fill the color words in with thumbprints, play dough or dot paint, or Other ideas include: 1) Letting students cut out and glue pictures from magazines in the same color.
This handy pack of Printable Bubble Writing Alphabet Letters is perfect for display use in the classroom. It downloads to your device at the click of a button in four handy PDF documents - upper case letters, lower case letters, numbers, and punctuation. The letters are organised alphabetically within their packs, so it's easy to find the characters you're after! Simply print and cut out ...
Black Thought Bubble with Chalk Outline Cut-Out 1 review. Boho Dreamscape Themed Editable Speech Bubble Display 1 review. Kindergarten Bubble Day Write and Draw Activity. Summer Vibes Themed Editable Speech Bubble Display 1 review. Mind Map Writing Template 23 reviews. Celestial Themed Editable Speech Bubble Display.
Homework Basket Activities Little Learners Month Halloween 2024 First Day of School 2024 Activities Sequencing Homework Labels, Signs & Decorations Classroom Displays Book Covers Name Tags Letter Sets ... Bubble Writing - Letter, Number and Punctuation Sets PDF
1 to 15 of 41 Results. 1. 2. 3. Next. Looking for Bubble Handwriting fonts? Click to find the best 31 free fonts in the Bubble Handwriting style. Every font is free to download!
Alphabet Doodle Pages 9 reviews. Bubble Writing Blank Display Lettering 8 reviews. Decorate My Initial Name Writing Activity 18 reviews. Editable Name Simple Colouring Activity Sheets 27 reviews. Top 10 Display Lettering Resource Pack 62 reviews. Graffiti Alphabet Poster 5 reviews.
Maybe, with a bit of bubble lettering on your walls, you've been inspired to make your own little bubble mixture! Here's what you'll need: Makes 500ml of bubble mix. Ingredients. 475ml water. 15ml washing-up liquid (good quality works best) 10ml glycerine. Equipment.
Bubble Writing - Coronation Word Bank. Subject: English. Age range: 7-11. Resource type: Visual aid/Display. File previews. pptx, 3.9 MB. Bubble writing - cursive word bank. Like many primary school teachers I have tried a variety of handwriting schemes with varying degrees of success. Having thought through many common problems with ...
They put it together, and then cut a hole in the mouth area. The teacher can blow up the balloon, tie it, and then stick it through the hole and put tape on the back. Staple the head to the writing and you will have a wonderful bulletin board display. Blow the bubble less than half way. Enjoy! Total Pages. 12 pages.