
Assigning groups to Azure AD roles and Privileged access groups, a first look!
On August 13th 2020, Alex Simons (Microsoft Identity PM) announced that assigning groups to Azure AD roles in now in public preview . This feature is one of the most requested features to be found in the Azure AD feedback forum .
I have been following this feature request for a while now, and up until recently Microsoft stated that implementing Azure AD role assignment for Azure AD groups wasn’t the issue, the issue was more related to who is able to manage those groups. For example, if enabled how can we circumvent that someone with the “User Administrator” role (capable of adding users to groups) is capable of adding someone to the group used to assign Global Administrator rights. When implemented incorrectly, this new “feature” could then introduce a new security risk in your environment.
Assigning groups to Azure AD roles requires an Azure AD Premium P1 license at minimum, for the Privileged Identity Functionality an Azure AD Premium P2 license is needed.
Disclaimer: This post reflects the status of assigning groups to Azure AD roles as of August 20, 2020. Functionality may change, even right after this post has been published.
So, let’s walk through on what was announced and see..
So, up until now when you wanted to assign a user an Azure AD role, you had to include the user account directly in the role. Verifying which account has what privileges is therefore hard, especially if you don’t have Azure AD Privileged Identity Management (PIM) licensed.
For a more in depth overview of what Azure AD Privileged Identity Management (PIM) is, please see another blogpost I wrote on this subject here: Lessons learned while implementing Azure AD Privileged Identity Management (PIM)
Changed behaviour while adding members to Azure AD Roles
On the topic of PIM, I also noticed some changed functionality when adding users when you have PIM enabled in your environment. If you don’t have PIM enabled you can assign a user to a role, but if you have PIM enabled there is another experience where when you want to assign an Azure AD role you are actually redirected to the Privileged Identity Management blade, where you can directly create an Eligible (must be activated) or Active (always active) assignment.
Adding users to Azure AD roles via Group membership
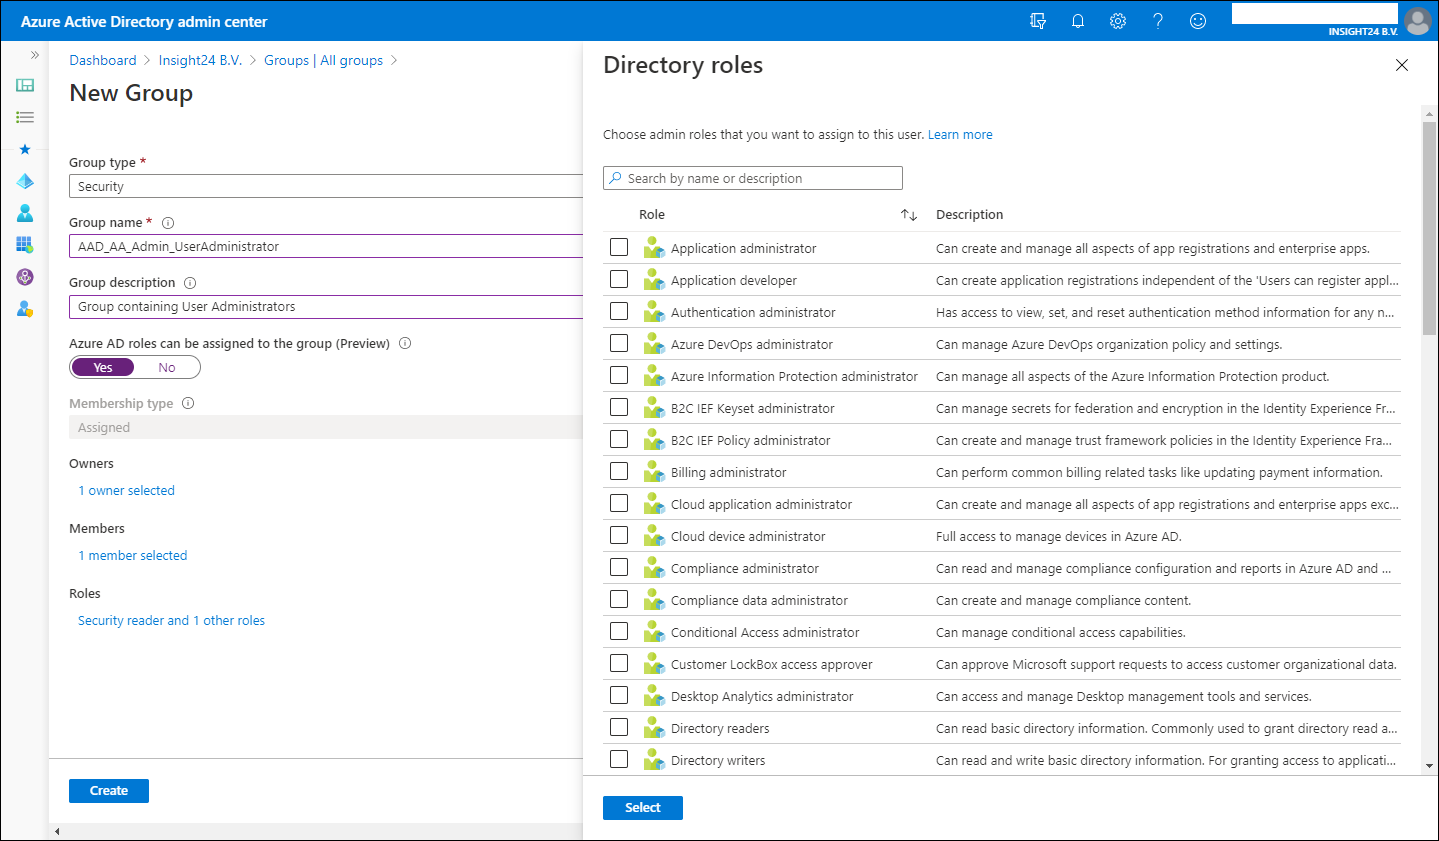
In order to add users to Azure AD roles via Group membership you first have to create a new group, so it’s not possible to repurpose an existing group for this.
New groups have the option to set the “Azure AD roles can be assigned to the group (Preview)” option which can be set to either “No” or “Yes”. When you switch this setting to ‘Yes’ the group’s eligibility for role assignment is permanent. Besides that you can only have a membership type of Assigned, so using Dynamic Groups is not supported, and within the wizard you can only add users as member and not groups (group nesting). Interestingly, you can assign multiple Azure AD roles to the group.

If you want to create the Group with the “Azure AD roles can be assigned to the group (Preview)” option enabled you will get an extra confirmation screen:

The option “Azure AD roles can be assigned to the group (Preview)” is only visible if you are member of either the Global Administrator or Privileged Role Administrator role.
Privileged access groups
Once a group with the option to enable Azure AD role assignments is created and you have PIM enabled, a new option becomes available called “Privileged access (Preview)”.
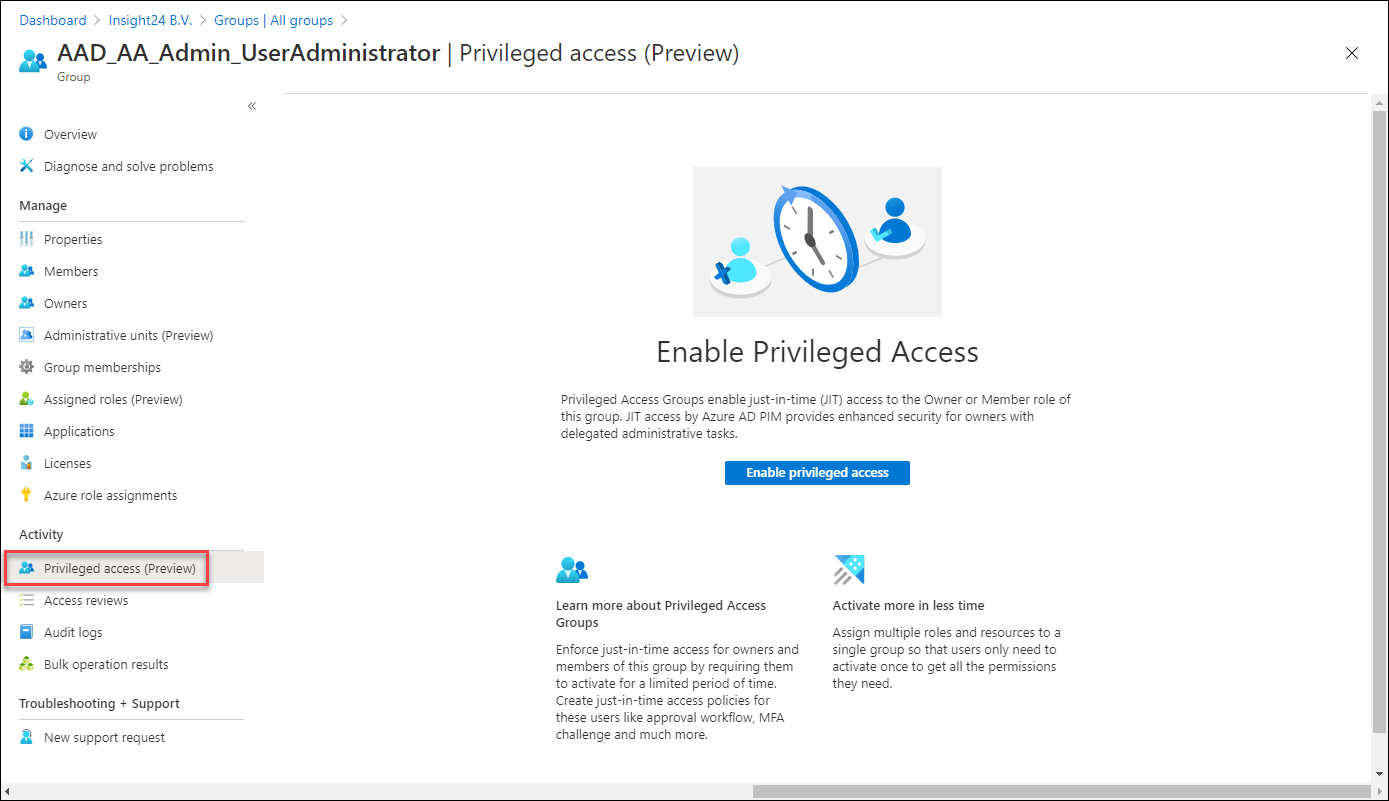
Enabling this option gives us the following options:
Define Eligible or Active assignments to the group
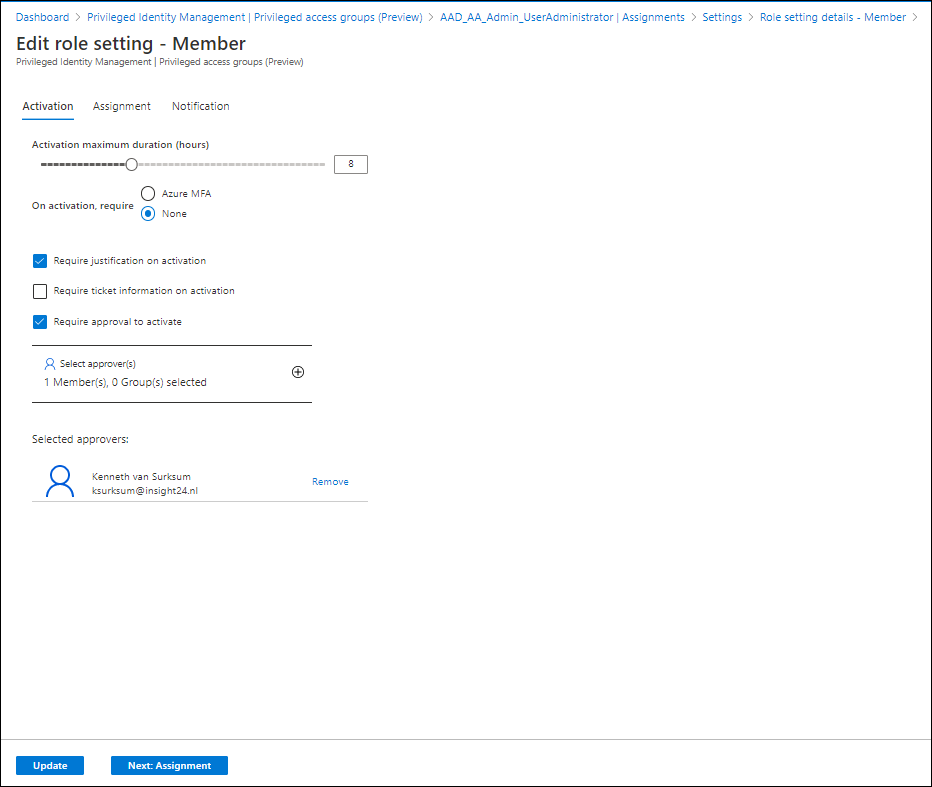
On the group you can assign members or owners using the capabilities provided by PIM. So for example, while adding our user as a member of the group permanently earlier in this article, I now have the option to make the membership Eligible. Also notice that this assignment type is time bound, with a maximum of 1 year.
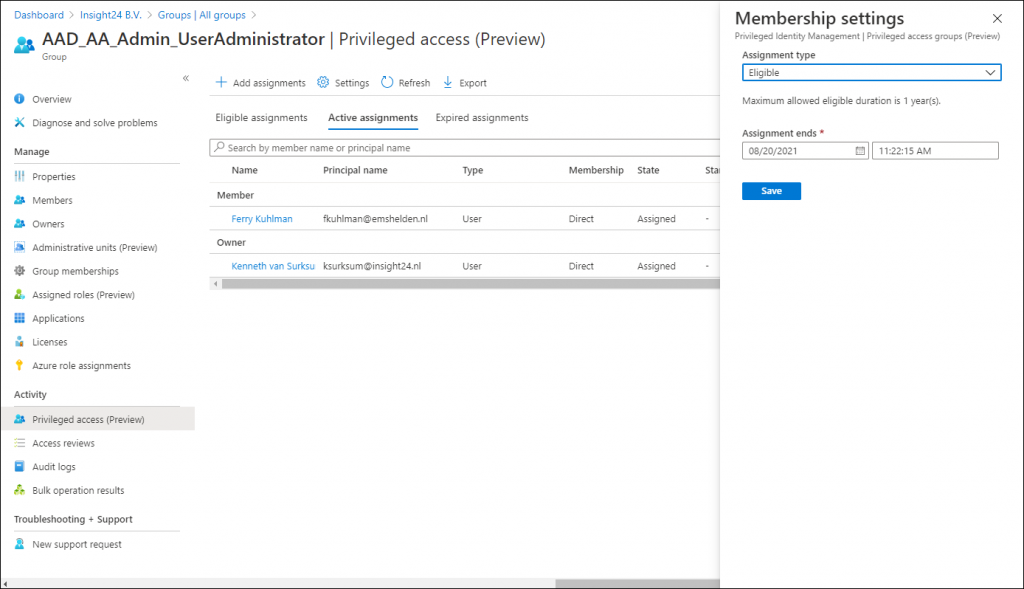
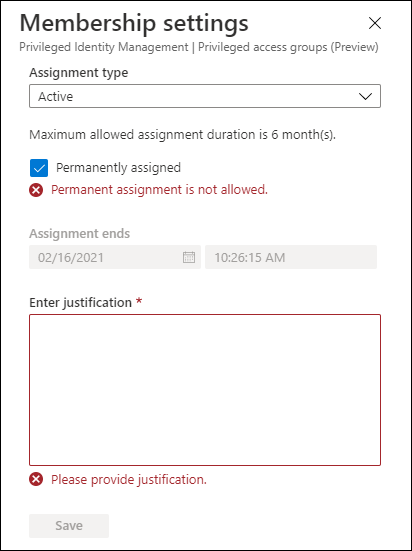
It’s also interesting to notice that if you want to update an Active Assignment you will not be allowed to Permanently assign an Active role by default. And that assigning an Active role has a maximum allowed assignment duration of 6 months. Once the group is enabled for Privileged Access and you want to add a member, then you don’t have the option “Permanently assigned” available. Also notice that providing a justification is mandatory.
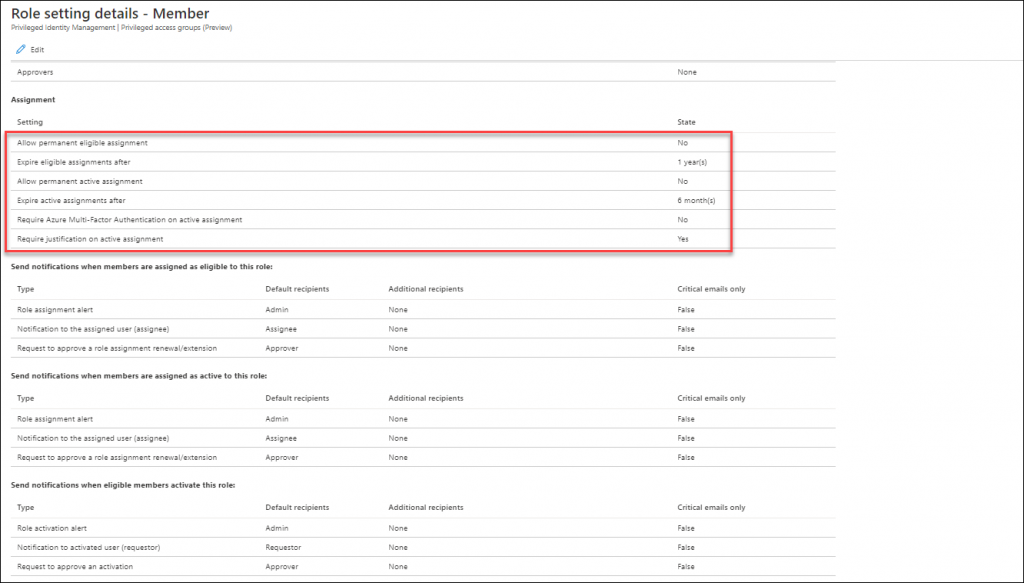
The default options described above are configurable though, trough the settings, so you are able to configure these depending on your requirements.
Activating your Azure AD role while using Privileged access groups
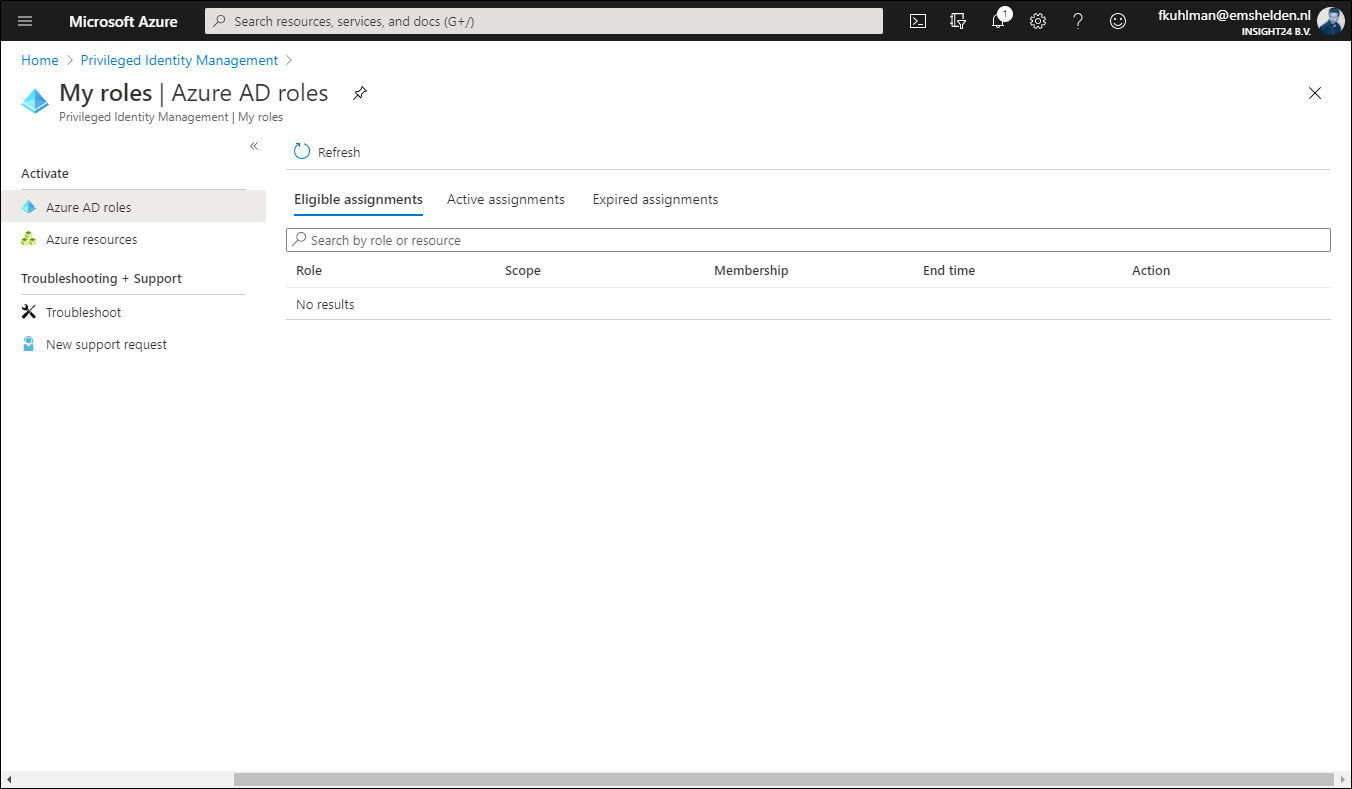
It’s interesting to see that once a user is set to Eligible for the privileged access group, that the Azure AD role doesn’t show up under Eligible Assignments when the user browses to My Roles in PIM. In order to active the Azure AD role in this scenario, the user must go to Privileged access groups (Preview) and active the role from there.
Once the role is activated via the group, it will show up under Active assignments, and what’s interesting to see is that at this time it’s still displayed as being permanent. But I expect that to be fixed while the functionality is still in preview.
Within the PIM settings of the group you can also specify that any Activation request for the group must be approved. This works similar to approval in PIM as we already know it. You define that approval is mandatory and specify who can approve. This can either be a user or a group.
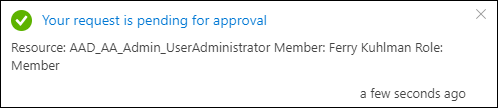
If the user now requests to activate the privileged access group, he will receive the message that the request is pending for approval
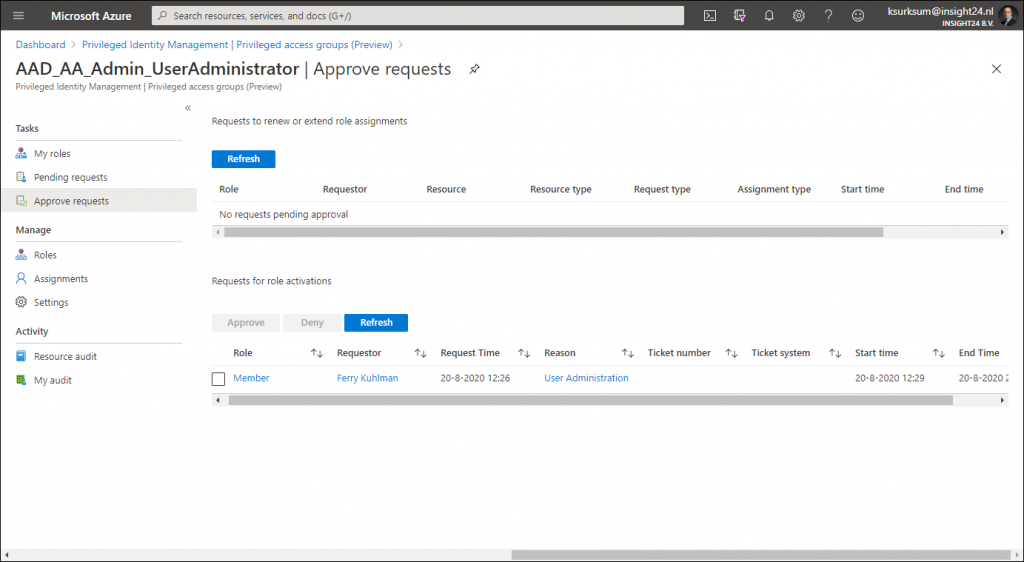
The approver doesn’t see the request under Privileged Identity Management | Approve requests but has to go to Privileged Identity Management | Privileged access groups (Preview) and select the group, from there the Approve Requests functionality is providing the ability to approve the request.
I hope this walkthrough gave you an idea on the new possibilities as announced in the public preview. And there is much more to cover actually when it comes to PIM, like more in depth information about auditing and access reviews.
Microsoft has addressed its own concerns by only allowing Global Administrators and Privileged Role Administrators to create the groups enabled for Azure AD role assignment. And having this functionality combined with Privileged Identity Management (PIM) makes the solution even better. Another reason to buy an Azure AD Premium P2 license for your administrative accounts at least.
A winning feature is that by using Privileged access with Azure AD Groups is that you can enable multiple Azure AD roles at once, this could save you creation of a custom role in some cases when using PIM.
While there are still some little fixes which must be applied, for now this looks like a welcome addition for any Azure AD tenant using Premium functionality.
Assigning groups to Azure AD roles is now in public preview!
Use cloud groups to manage role assignments in Azure Active Directory (preview)
Management capabilities for privileged access Azure AD groups (preview)
2 thoughts on “ Assigning groups to Azure AD roles and Privileged access groups, a first look! ”
- Pingback: Active Directory Identity Governance – Privileged Identity Management - JanBakker.tech
make the Security Admin Role a member Privilege Role Admin in Privilege Identity Management in Azure AD is this possible??
Leave a Reply Cancel reply
Your email address will not be published. Required fields are marked *
This site uses Akismet to reduce spam. Learn how your comment data is processed .
Privacy Overview
10 ready-to-implement PowerShell scripts to make AD management easy!
- AD Fundamentals
- AD Policies
- Azure AD Fundamentals
- Azure AD Management
- Free AD Tools
How to use Azure AD groups to manage role assignments
Azure Active Directory (Azure AD) is a cloud-based identity and access management service that helps organizations manage user access to on-premises and cloud resources. One of the key features of Azure AD is the ability to create and manage groups, which can be used to assign roles and permissions to users within your organization.
In this article, we’ll take a look at how to use Azure AD groups to manage role assignments in Windows Active Directory.
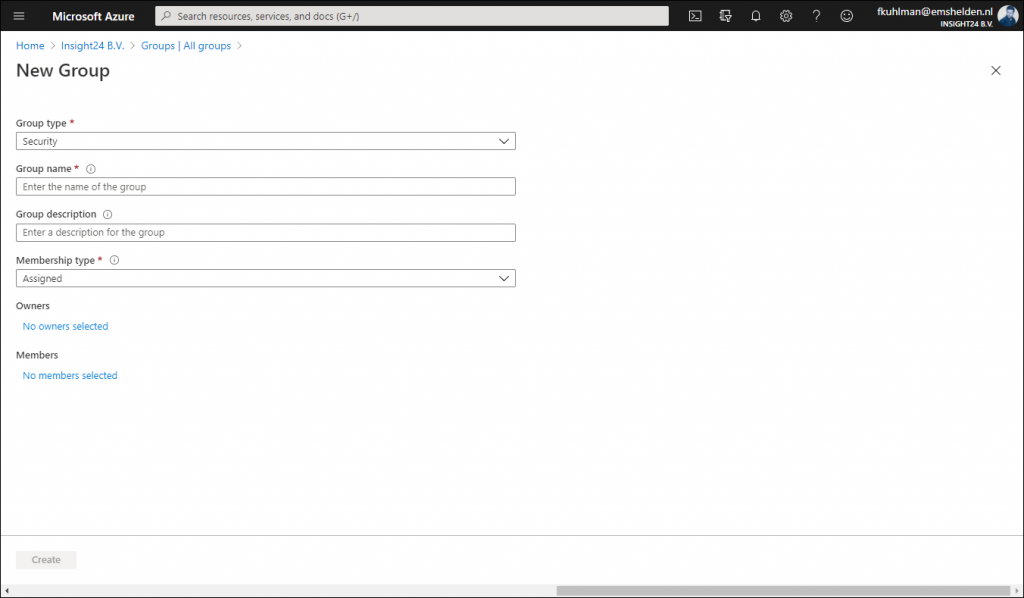
Step 1: Create an Azure AD group
To begin, you’ll need to create an Azure AD group in the Azure portal. To do this, follow these steps:
- Sign in to the Azure portal.
- Navigate to the Azure AD blade.
- In the left menu, click “Groups.”
- Click the “New group” button.
- Select “Security” as the group type.
- Enter a name and description for the group.
- Click “Create.”
Step 2: Assign users to the Azure AD group
Once you’ve created the group, you’ll need to assign users to it. To do this, follow these steps:
- In the Azure portal, navigate to the Azure AD blade.
- Click on the group you just created.
- Click the “Members” tab.
- Click the “Add member” button.
- Select the users you want to add to the group and click “Select.”
- Click “Assign.”
Step 3: Assign roles to the Azure AD group
Now that you’ve created the group and added users to it, you’ll need to assign roles to the group. To do this, follow these steps:
- Click the “Directory roles” tab.
- Click the “Add Directory Role” button.
- Select the role you want to assign to the group and click “Select.”
Step 4: Synchronize the Azure AD group with Windows Active Directory (optional)
If you want to use the Azure AD group to manage role assignments in Windows Active Directory, you’ll need to synchronize the group with your on-premises Active Directory. To do this, you’ll need to use the Azure AD Connect tool.
- Download and install Azure AD Connect on a server in your on-premises environment.
- Run the Azure AD Connect Configuration Wizard.
- Select “Customize synchronization options” and click “Next.”
- Select the Active Directory domain you want to synchronize with Azure AD and click “Next.”
- Under “Optional Features,” select “Group writeback.”
- Follow the prompts to complete the synchronization process.
Step 5: Assign permissions in Windows Active Directory (optional)
Once you’ve synchronized the Azure AD group with your on-premises Active Directory, you can use the group to assign permissions in Windows. To do this, follow these steps:
- Open the Active Directory Users and Computers console.
- Navigate to the object you want to grant permissions to (e.g., a folder or file).
- Right-click the object and select “Properties.”
- Click the “Security” tab.
- Click the “Edit” button.
- Click the “Add” button.
- Select the Azure AD group and click “OK.”
- Select the appropriate permissions for the group and click “OK.”
Related posts
Before migrating to active directory domain services (ad ds) 2022, azure ad pass-through - on-premises authentication in the cloud, how to unlock azure ad account, what is azure kubernetes service (aks) - an overview.
Free Active Directory Tools
Active Directory Management & Reporting
Self-Service Password Management
Real-time Active Directory Auditing
Exchange Server Auditing & Reporting
Active Directory Backup & Recovery Tool
People also read
Active directory account lockout policy, managing gpos in active directory, how to locate active directory objects, active directory object permissions: step-by-step guide to managing permissions using gpos, aduc, and powershell, active directory object classes and attributes: an overview.
A one-stop place for all things Windows Active Directory. Follow us for more content
Quick Links
Curated resources.
There are over 8,500 people who are getting towards perfection in Active Directory, IT Management & Cyber security through our insights from Identitude.
Wanna be a part of our bimonthly curation of IAM knowledge?
- Please enter a valid e-mail address Please enter a valid e-mail address Please enter a valid e-mail address
- By clicking 'Become an insider' , you agree to processing of personal data according to the Privacy Policy .
A Cloud Guy
Azure, M365, AWS and IT in general
Azure AD – Assign Groups and Users to an application
Azure AD allows granting access to resources by providing access rights to a single user or to an entire Azure AD group. Using groups let the application or the resource owner to assign a set of permissions to all the members of a group. Management rights can be granted to other roles, like example., Helpdesk administrators to add or remove members from the group.
When a group is assigned to an application, only users in the group will have access. Also, if the application exposes role, roles can also be assigned to groups or users.
When I was working on integrating Salesforce with Azure AD for SSO, I needed to assign groups to the roles that Salesforce exposed and I figured I’d document the process I went though here.
Table of Contents
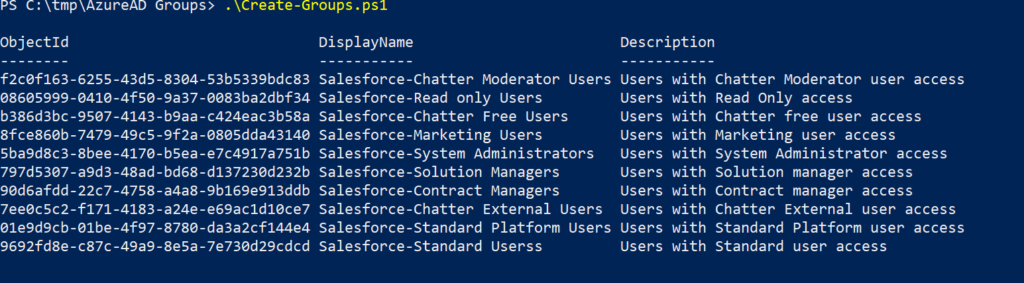
Bulk create Azure AD groups
This section describes how to create multiple groups in Azure AD. This is not needed if your organization already has groups created.
Use below script to create multiple Azure AD groups that are listed in a csv file,
csv file input,

PowerShell output,
Assign Groups and Users to an app using PowerShell
Assigning groups or users can be done from the Azure AD admin portal by clicking on the Users and groups tab in the application which you are granting access to.
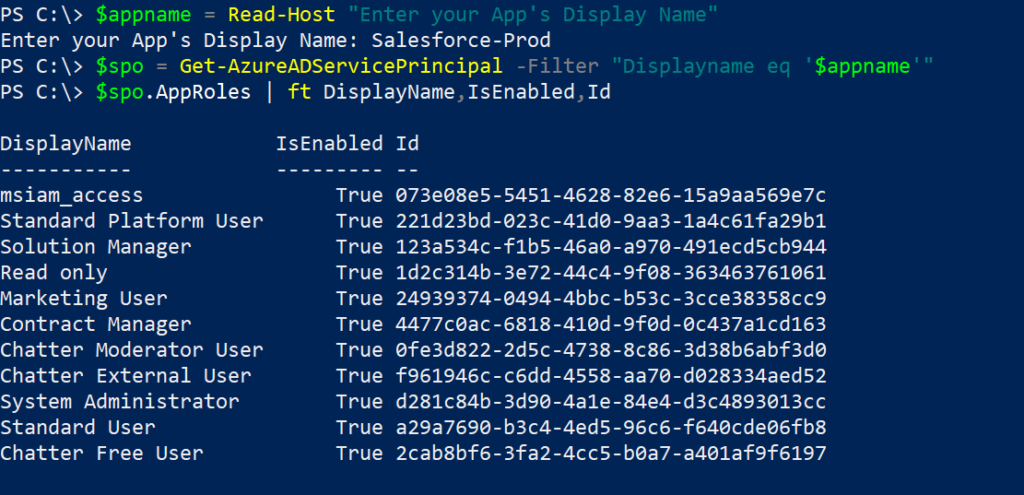
My plan here is to create Azure AD groups that corresponds to the name of the role that Salesforce exposes and then add users to those groups which provides them with appropriate access to the application.
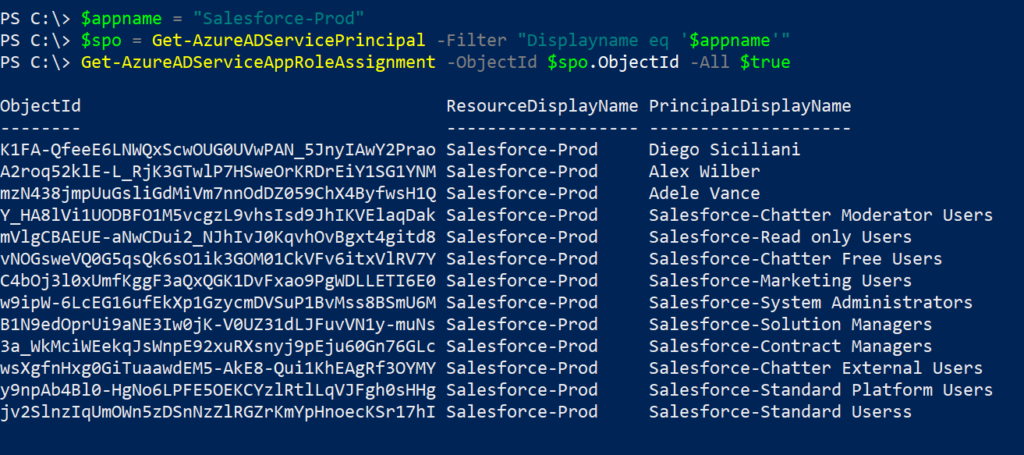
Determine the roles available for the application
To determine the roles that the application exposes, use the cmdlet below.
Assign Groups to Roles in Application
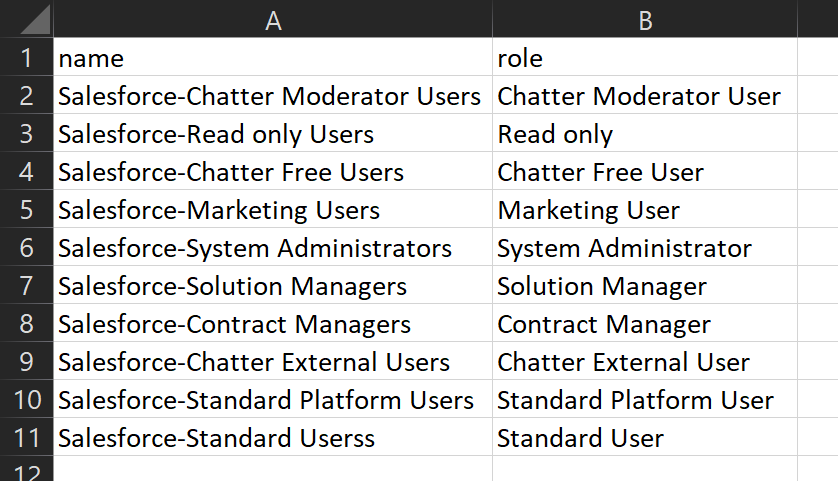
Use below script to assign the application’s roles to groups. If you notice the csv file, I’m using the groups created in the previous step to the roles. This way, it is easier to manage. The New-AzureADGroupAppRoleAssignment cmdlet can be used to achieve this.
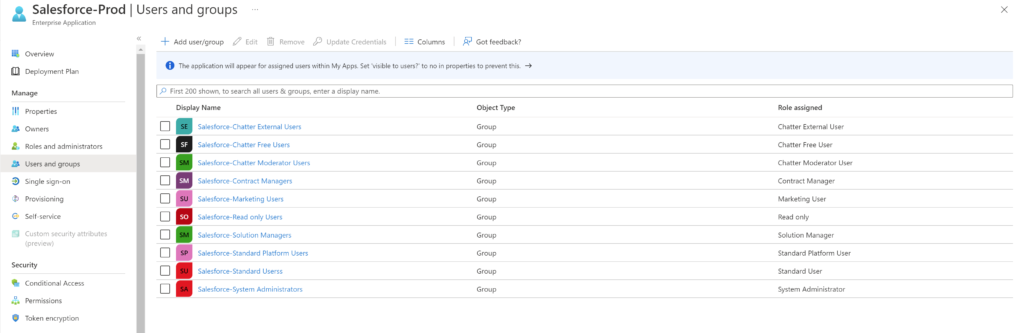
This below is how the application looks like in the Azure AD admin portal after running the above script,
Assign Users to Roles in Application
Use below script to assign the application’s roles to users. This can be achieved using the New-AzureADUserAppRoleAssignment cmdlet. Use the below script,
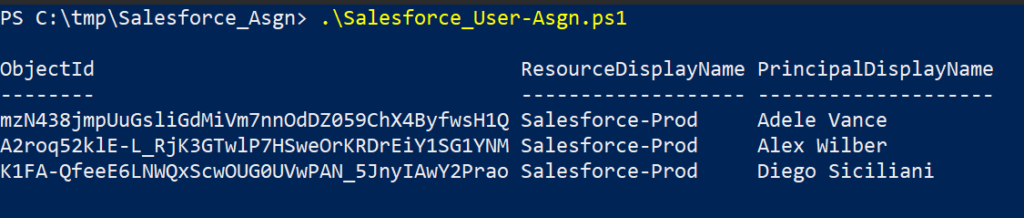
Get all role assignments to an application using PowerShell
Get-AzureADServiceAppRoleAssignment cmdlet can be used to determine all role assignments to an application,
Remove All Groups and Users assigned to an application
To remove all assigned groups and users from an application, Remove-AzureADServiceAppRoleAssignment cmdlet can be used,
It should go without saying that removing all permissions will disable user’s access to the application. Don’t try this as a first step in a production environment, unless you are absolutely sure of it.
Thank you for stopping by.✌
1 thought on “Azure AD – Assign Groups and Users to an application”
- Pingback: Implement Azure AD SSO integration with Salesforce – A Cloud Guy
Leave a Comment Cancel reply
Save my name, email, and website in this browser for the next time I comment.
Our thoughts on the future of digital innovation and the cloud.
Using azure ad groups to manage ad role assignments.
- #Governance and Security
- #The Best of Microsoft Azure
Azure Active Directory (AD) Groups have proven to be a silver bullet to control Role-Based Access Control (RBAC) access. It is true whether we talk about controlled access to resources or other Microsoft services using Office 365 groups and Security Groups. The Azure AD Group’s idea is to minimize the manual permission assignment for any particular benefit or use case and rather have AD Groups as members and manage the permission at the group level.
Suppose you have a dozen employees requesting access to any particular Azure service ( Analytics Resource Group) . In that case, you’d want to create a Security Group ( Analytics_Administrator) with Azure service permission. Then, add all the employees to that Analytics_Administrator Group for permissions. This moves the permissions management to the group level, and anybody who’s part of Analytics_Administrator will have the necessary permission automatically.
What’s New?
Microsoft has taken the Azure AD Groups to the next level and introduced the RBAC control capability for Azure AD Roles. With this feature, you can use AD groups to manage Azure AD Roles’ permissions with minimum effort. You no longer need to assign explicit AD Roles to any employee anymore and then keep a tab on ongoing changes.
Feature In-Depth
Create group using azure portal.
As you create a new security group in Azure, you’ll see an option ‘ Azure AD roles can be assigned to the group ‘ in GUI interface. As you turn this feature to ‘ Yes ‘, the created group can be used to control Role assignment to group level.

Create Group using Azure PowerShell
This feature can also be enabled using PowerShell or CLI deployment by setting isAssignableToRole to true , if doing programmatic deployments. You however can’t set this property on existing groups.
Install the Azure AD Preview module to get the up to date modules with new feature using the following command:
As you install the preview module, use the following command to create a new group with role-assignable feature.
While assigning the role permission to this newly created group, use the command New-AzureADMSRoleAssignment along with role definition and group ID.
Use the following command to get the desired role that you’d like to manage with this newly created group followed by another command to assign the role permission.
There’s limit of 200 role-assignable groups per tenant as of now.
Limitations
With any new feature comes it’s own limitations. Since the feature is still in preview, there are some things to consider before you plan on adaptation.
- You cannot use the role-assignable groups with your custom AD roles .
- You cannot use on-premises groups to assign AD role permissions in Hybrid-AD scenario.
There are some ongoing known issue and changes being rolled out as the feature gets adopted more extensively. You can check the known issues at this link .
There’s a minimum requirement of Azure AD P1 license to leverage this feature. If you are using Azure PIM, you must have Azure AD P2 to fulfill the license requirements.
- Use Cloud Groups to Manage Role Assignment
- Create group for assigning role
More Insights
What is cloud governance & it’s relation to scottish highlands, getting the right support for your azure cloud migration, let's talk about powering your digital growth, head office, invero headquarters.
Regional Offices
Neil Hoffman - 28.08.2020
Azure ad roles – group assignment preview.

A long-awaited Azure Active Directory feature has finally made it into public preview, giving you the ability assign Azure AD Roles to Azure AD Groups . Quite a few organizations I have worked with over the past few years have been asking when this will finally happen… well the time is upon us!
Generally, IT organizations prefer to assign rights and permissions via groups and not to individual user accounts. This practice is supported across most Microsoft 365 and Azure services with one major exception, Azure AD roles , which are how various limited administrative rights are delegated to select users.
In order to assign Azure AD roles before this preview, a manual entry must be made to add the role, such as Exchange Administrator, to an individual user account. Even if you are using Microsoft Privileged Identity Management (PIM), which is Microsoft’s premium Just-in-Time (JIT) identity platform, you were still limited to assigning the eligible roles to users and not groups.
There are some limitations in the preview, such as the group must be a newly created cloud-based group and you must select the option to allow for this type of assignment as shown here:

Notice that the Membership type gets grayed out if you choose ‘yes’ to this preview option, so these cannot be dynamic groups. When you click ‘Create’ you are met with this warning confirmation:

Once you create the group with this option enabled, you will be able to add it to an Azure AD role either from the ‘Group properties’ or from the ‘Azure AD Roles and administrators’ blade:

Or, from the PIM console to assign an eligible role to the group:

It should be known that one of the reasons why Microsoft has waited this long to enable this feature (I’ve been told by members of the Azure AD Product Group) is the risk which it poses. Microsoft has been cautious to allow this functionality due to the potential for organizations to inadvertently grant elevated permissions to inappropriate individuals. So, please do be careful with this feature. I would recommend using a special naming convention so these groups are easy to identify, such as adm-ExchangeAdmins or adm-GlobalAdmins.
Another limitation is these groups cannot be synced from on-premises Active Directory when Azure AD Connect is in use. This will be disappointing to some organizations who have been waiting specifically for the ability to delegate permissions in Azure AD based on AD group memberships. To those in which boat, hang tight, the announcement does state that this addition is on the roadmap. In the meantime, if you are really interested in bridging the gap in the short term, you may be able to get creative with some scripting to replicate group memberships, but I would only recommend this in an extreme case. Otherwise, I would just wait until the functionality has been added to the service.
As always, feel free to reach out if you have any questions or would like assistance planning out your Azure AD implementation.
THANK YOU FOR YOUR SUBMISSION!

The form was submitted successfully.
Join the insentra community with the insentragram newsletter, hungry for more.
 algorithms to automate attacks, increasing speed, scalability, and sophistication. Ethical Hacking.")
AI Phishing Attacks: How Cybercriminals Leverage AI for Spam Emails
Cybercriminals use AI to create realistic, targeted emails, making phishing attacks more dangerous. Read this blog on how to stay safe from AI phishing attacks.

The Insentra Advantage: Transforming IT Services through Partnership
Discover what makes Insentra different from other IT services providers. Learn the Insentra Advantage and how partnering with us can catapult your business.

IT Admin Nightmares: Wrestling Security Threats with Microsoft Defender
Dive into the world of security threats and how they can turn your hair grey faster. Learn how to use Microsoft Defender to fend off these digital miscreants.
Work with us, and see what Insentra can do for you
Insentra can augment end user service capabilities and accelerate business growth. Whether it’s an opportunity you can’t address, some pre-sales assistance, clients asking for a Professional or Managed service you can’t deliver, you’re struggling to break into new markets and accelerate your channel, or you’re frustrated trying to juggle multiple providers for all your IT needs – Insentra can help.
Empower yourself to seize every opportunity. Partner with Insentra.
Get In Touch
- Insentragram
Information For
Connect with us, meet the crew.
- About Insentra
- Privacy Policy
- ISO Certification
- Terms of Use
- COVID-19 Response
If you’re waiting for a sign, this is it.
We’re a certified amazing place to work, with an incredible team and fascinating projects – and we’re ready for you to join us! Go through our simple application process. Once you’re done, we will be in touch shortly!
- Train Story
- Open Opportunities
- Join our Talent Network

- Cloud And Modern Data Center
- Information Management
- Managed Services For Partners
- Modern Workplace
- Professional Services
- Secure Workplace
- Thought Leadership
- Brew With The Crew
- Insentra Insights
- Late Night Brew
- The Download
- Case Studies
- eBooks & Guides
- Health Checks
- Webinar and Chill

- Digital Workplace
- Business Intelligence Consulting Services
- Microsoft Copilot Readiness Assessment
- Managed Citrix
- Cloud Backup
- Digital Employee Experience (DEX)
- Managed M365
- Managed AVD
- Netscaler Support
- Secure Azure
- Secure Collaboration
- Managed Intune
- Managed Defender
- Server Management
- Azure Finops
- Cloud and Modern Data Centre
- Microsoft FastTrack
- Technology Partners
- Remote Working Readiness Services
- Independent Software Vendors

Unleashing the power of Microsoft Copilot
This comprehensive guide provides everything you need to get your organization ready for and successfully deploy Copilot.
Who is Insentra?
Imagine a business which exists to help IT Partners & Vendors grow and thrive.
Insentra is a 100% channel business. This means we provide a range of Advisory, Professional and Managed IT services exclusively for and through our Partners.
Our #PartnerObsessed business model achieves powerful results for our Partners and their Clients with our crew’s deep expertise and specialised knowledge.
We love what we do and are driven by a relentless determination to deliver exceptional service excellence.
Information for Partners
Information for clients, information for vendors, our credentials.

Insentra ISO 27001:2013 Certification
SYDNEY, WEDNESDAY 20TH APRIL 2022 – We are proud to announce that Insentra has achieved the ISO 27001 Certification.
- Clients Case Studies
- Client FAQs
- Partner FAQs
- Vendors FAQs
- Vendors Case Studies
- Meet The Crew
- Managed Services Catalogue
- FastTrack Updates
- Tune in to Find Out About Intune
- Hackers. Attacks. Security.
- Zero Trust - Trust No One
- Teams Governance - Start Your Journey Today
- Acceleration - Your Journey To M365 Adoption
- Advanced Threat Protection
- Azure Information Protection
- Identity & Access Management
- Centera Migrations
- Email Archive Migrations
- File Archive Migrations
- PST Consolidations
- Tenant to Tenant Migrations
- Application Delivery
- Azure Virtual Desktop
- Citrix Digital Workspace
- Citrix Networking
- Citrix on Azure - Fast Start
- Citrix User Experience
- Modern Management
- Teams & Collaboration
- Professional Services Catalogue
- EBooks & Guides
- Webinar And Chill
Documentation
Welcome to the Okta Community!
The Okta Community is not part of the Okta Service (as defined in your organization’s agreement with Okta). By continuing and accessing or using any part of the Okta Community, you agree to the terms and conditions , privacy policy , and community guidelines
How to Use the Optional JIT Setting Group Assignments with Azure IdP
Oct 24, 2023 • knowledge article, information.
- Okta Identity Engine
- Okta Classic Engine
- Azure Active Directory IdP is already configured ( Make Azure Active Directory an Identity Provider )
Configuring the full group sync requires some setup from within the Okta Admin Dashboard and Microsoft Azure Active Directory.
Note : The Full Sync of Groups removes users from groups in Okta that are not in the inbound SAML. Another technique to achieve a similar result is to use the "Add User to Missing Groups" option (not covered in this article).
Configuring Full Group Sync for Azure AD IdP in Okta
Login to the Okta Admin Dashboard and navigate to Security > Identity Providers .
Click on the Configure dropdown menu for the Azure IdP entry and select Configure Identity Provider
Scroll down to the JIT Settings heading and find the Group Assignments dropdown menu.
Select Full sync of groups, and two new fields will appear below the Group Assignments field, SAML Attribute Name, and Group Filter .
Enter the group claim for the SAML Attribute Name. To get the group claim, follow the instructions below for How to find the SAML Attribute Name .
Create Okta groups that are named the Azure AD Group ID of the groups that need to be synchronized to Okta. To find the Azure AD Group ID, follow the instructions below, labeled How to find the Group ID of the Groups in Azure AD.
Enter the Group Filter values based on the Group ID of the groups that are being synced from Azure AD.
Click the Update Identity Provider button to start the full synch.
Testing the Full Group Sync
To test the full sync of the group configuration that was just completed, sign in to Office 365 with a user that belongs to one of the groups that were included in the Group Filter field; this should be a user that does not already exist in Okta.
Once on the Office 365 Dashboard, navigate to Apps>All Apps and click on the Okta app. This will cause the user to be JIT-created in Okta and assigned to the group that the user was assigned to in Azure AD (named the Group ID name).
Check in Okta for the new user. Their profile will show that it is sourced from the IdP, and the user will already be assigned to the groups that were synchronized
NOTE : The group names must be named with the Group ID, which can create some confusion because Group IDs are not meant to be human-readable. There are many ways to mitigate this issue: one method would be to create a Group Rule that populates more human-readable Group names based on membership to the Group ID groups. To find out more about Group Rules, read the Okta documentation here: Create a group rule
How to Find the SAML Attribute Name
Configuring the full sync of groups requires that the SAML Attribute Name be defined; these steps will demonstrate how to find that value within the Microsoft Azure Active Directory .
Log in to the Azure Active Directory Admin console and click on Applications > Enterprise Applications
Click on the Single sign-on link
Click on the Edit button by the Attributes and Claims setting.
In the Attributes & Claims screen, click the + Add a group claim button
Select the Security groups radio button and the "Group ID" Source attribute (this is the default selection) .
Click the Save button to save the changes.
Copy the Claim name value of the new group claim that was just created.
How to find the group ID of the Groups in Azure Ad
Configuring the full sync of groups requires that the Azure AD Group ID be identified and entered in the Group Filter field. These steps will outline how to find the Group ID.
To find the Azure AD Group ID, go to the Azure Active Directory admin console and navigate to Azure Active Directory > Groups > All groups
The Azure AD Group ID is the value listed in the Object ID column of the All groups page.
Related References
- Create a Group Rule
- Make Azure Active Directory an Identity Provider
- Create the Okta enterprise app in Azure Active Directory
This browser is no longer supported.
Upgrade to Microsoft Edge to take advantage of the latest features, security updates, and technical support.
What are Azure management groups?
- 17 contributors
If your organization has many Azure subscriptions, you may need a way to efficiently manage access, policies, and compliance for those subscriptions. Management groups provide a governance scope above subscriptions. You organize subscriptions into management groups; the governance conditions you apply cascade by inheritance to all associated subscriptions.
Management groups give you enterprise-grade management at scale, no matter what type of subscriptions you might have. However, all subscriptions within a single management group must trust the same Azure Active Directory (Azure AD) tenant.
For example, you can apply policies to a management group that limits the regions available for virtual machine (VM) creation. This policy would be applied to all nested management groups, subscriptions, and resources and allow VM creation only in authorized regions.
Hierarchy of management groups and subscriptions
You can build a flexible structure of management groups and subscriptions to organize your resources into a hierarchy for unified policy and access management. The following diagram shows an example of creating a hierarchy for governance using management groups.

Diagram of a root management group holding both management groups and subscriptions. Some child management groups hold management groups, some hold subscriptions, and some hold both. One of the examples in the sample hierarchy is four levels of management groups, with the child level being all subscriptions.
You can create a hierarchy that applies a policy, for example, which limits VM locations to the West US region in the management group called "Corp". This policy will inherit all the Enterprise Agreement (EA) subscriptions that are descendants of that management group and will apply to all VMs under those subscriptions. This security policy cannot be altered by the resource or subscription owner, allowing for improved governance.
Management groups aren't currently supported in Cost Management features for Microsoft Customer Agreement (MCA) subscriptions.
Another scenario where you would use management groups is to provide user access to multiple subscriptions. By moving multiple subscriptions under that management group, you can create one Azure role assignment on the management group, which will inherit that access to all the subscriptions. One assignment on the management group can enable users to have access to everything they need instead of scripting Azure RBAC over different subscriptions.
Important facts about management groups
- 10,000 management groups can be supported in a single directory.
- This limit doesn't include the Root level or the subscription level.
- Each management group and subscription can only support one parent.
- Each management group can have many children.
- All subscriptions and management groups are within a single hierarchy in each directory. See Important facts about the Root management group .
Root management group for each directory
Each directory is given a single top-level management group called the root management group. The root management group is built into the hierarchy to have all management groups and subscriptions fold up to it. This root management group allows for global policies and Azure role assignments to be applied at the directory level. The Azure AD Global Administrator needs to elevate themselves to the User Access Administrator role of this root group initially. After elevating access, the administrator can assign any Azure role to other directory users or groups to manage the hierarchy. As an administrator, you can assign your account as the owner of the root management group.
Important facts about the root management group
- By default, the root management group's display name is Tenant root group and operates itself as a management group. The ID is the same value as the Azure Active Directory (Azure AD) tenant ID.
- To change the display name, your account must be assigned the Owner or Contributor role on the root management group. See Change the name of a management group to update the name of a management group.
- The root management group can't be moved or deleted, unlike other management groups.
- All resources in the directory fold up to the root management group for global management.
- New subscriptions are automatically defaulted to the root management group when created.
- Everyone who has access to a subscription can see the context of where that subscription is in the hierarchy.
- No one is given default access to the root management group. Azure AD Global Administrators are the only users that can elevate themselves to gain access. Once they have access to the root management group, the global administrators can assign any Azure role to other users to manage it.
Any assignment of user access or policy on the root management group applies to all resources within the directory . Because of this, all customers should evaluate the need to have items defined on this scope. User access and policy assignments should be "Must Have" only at this scope.
Initial setup of management groups
When any user starts using management groups, there's an initial setup process that happens. The first step is the root management group is created in the directory. Once this group is created, all existing subscriptions that exist in the directory are made children of the root management group. The reason for this process is to make sure there's only one management group hierarchy within a directory. The single hierarchy within the directory allows administrative customers to apply global access and policies that other customers within the directory can't bypass. Anything assigned on the root will apply to the entire hierarchy, which includes all management groups, subscriptions, resource groups, and resources within that Azure AD tenant.
Management group access
Azure management groups support Azure role-based access control (Azure RBAC) for all resource accesses and role definitions. These permissions are inherited to child resources that exist in the hierarchy. Any Azure role can be assigned to a management group that will inherit down the hierarchy to the resources. For example, the Azure role VM contributor can be assigned to a management group. This role has no action on the management group but will inherit to all VMs under that management group.
The following chart shows the list of roles and the supported actions on management groups.
*: The Management Group Contributor and Management Group Reader roles allow users to perform those actions only on the management group scope.
**: Role assignments on the root management group aren't required to move a subscription or management group to and from it.
See Manage your resources with management groups for details on moving items within the hierarchy.
Azure custom role definition and assignment
You can define a management group as an assignable scope in an Azure custom role definition. The Azure custom role will then be available for assignment on that management group and any management group, subscription, resource group, or resource under it. The custom role will inherit down the hierarchy like any built-in role. For information about the limitations with custom roles and management groups, see Limitations .
Example definition
Defining and creating a custom role doesn't change with the inclusion of management groups. Use the full path to define the management group /providers/Microsoft.Management/managementgroups/{ groupId } .
Use the management group's ID and not the management group's display name. This common error happens since both are custom-defined fields when creating a management group.
Issues with breaking the role definition and assignment hierarchy path
Role definitions are assignable scope anywhere within the management group hierarchy. A role definition can be defined on a parent management group while the actual role assignment exists on the child subscription. Since there's a relationship between the two items, you'll receive an error when trying to separate the assignment from its definition.
For example, let's look at a small section of a hierarchy for a visual.

The diagram focuses on the root management group with child Landing zones and Sandbox management groups. The Landing zones management group has two child management groups named Corp and Online while the Sandbox management group has two child subscriptions.
Let's say there's a custom role defined on the Sandbox management group. That custom role is then assigned on the two Sandbox subscriptions.
If we try to move one of those subscriptions to be a child of the Corp management group, this move would break the path from subscription role assignment to the Sandbox management group role definition. In this scenario, you'll receive an error saying the move isn't allowed since it will break this relationship.
There are a couple different options to fix this scenario:
- Remove the role assignment from the subscription before moving the subscription to a new parent MG.
- Add the subscription to the role definition's assignable scope.
- Change the assignable scope within the role definition. In the above example, you can update the assignable scopes from Sandbox to the root management group so that the definition can be reached by both branches of the hierarchy.
- Create another custom role that is defined in the other branch. This new role requires the role assignment to be changed on the subscription also.
Limitations
There are limitations that exist when using custom roles on management groups.
- You can only define one management group in the assignable scopes of a new role. This limitation is in place to reduce the number of situations where role definitions and role assignments are disconnected. This situation happens when a subscription or management group with a role assignment moves to a different parent that doesn't have the role definition.
- Resource provider data plane actions can't be defined in management group custom roles. This restriction is in place as there's a latency issue with updating the data plane resource providers. This latency issue is being worked on and these actions will be disabled from the role definition to reduce any risks.
- Azure Resource Manager doesn't validate the management group's existence in the role definition's assignable scope. If there's a typo or an incorrect management group ID listed, the role definition is still created.
Moving management groups and subscriptions
To move a management group or subscription to be a child of another management group, three rules need to be evaluated as true.
If you're doing the move action, you need:
- Built-in role example: Owner
- Built-in role example: Owner , Contributor , Management Group Contributor
Exception : If the target or the existing parent management group is the root management group, the permissions requirements don't apply. Since the root management group is the default landing spot for all new management groups and subscriptions, you don't need permissions on it to move an item.
If the Owner role on the subscription is inherited from the current management group, your move targets are limited. You can only move the subscription to another management group where you have the Owner role. You can't move it to a management group where you're a Contributor because you would lose ownership of the subscription. If you're directly assigned to the Owner role for the subscription (not inherited from the management group), you can move it to any management group where you're assigned the Contributor role.
Azure Resource Manager caches management group hierarchy details for up to 30 minutes. As a result, moving a management group may not immediately be reflected in the Azure portal.
Audit management groups using activity logs
Management groups are supported within Azure Activity log . You can search all events that happen to a management group in the same central location as other Azure resources. For example, you can see all role assignments or policy assignment changes made to a particular management group.

When looking to query on management groups outside the Azure portal, the target scope for management groups looks like "/providers/Microsoft.Management/managementGroups/{ management-group-id }" .
Using the Azure Resource Manager REST API, you can enable diagnostic settings on a management group to send related Azure Activity log entries to a Log Analytics workspace, Azure Storage, or Azure Event Hub. For more information, see Management Group Diagnostic Settings - Create Or Update .
To learn more about management groups, see:
- Create management groups to organize Azure resources
- How to change, delete, or manage your management groups
- See options for How to protect your resource hierarchy
Coming soon: Throughout 2024 we will be phasing out GitHub Issues as the feedback mechanism for content and replacing it with a new feedback system. For more information see: https://aka.ms/ContentUserFeedback .
Submit and view feedback for
Additional resources
IMAGES
VIDEO
COMMENTS
Assign users and groups to an application using Azure AD PowerShell. Open an elevated Windows PowerShell command prompt. Run Connect-AzureAD and sign in as at least a Cloud Application Administrator.. Use the following script to assign a user and role to an application:
On August 13th 2020, Alex Simons (Microsoft Identity PM) announced that assigning groups to Azure AD roles in now in public preview.This feature is one of the most requested features to be found in the Azure AD feedback forum.. I have been following this feature request for a while now, and up until recently Microsoft stated that implementing Azure AD role assignment for Azure AD groups wasn ...
This feature will help you better manage group memberships by allowing you to build dynamic Azure AD Security Groups and M365 groups based on other groups - create hierarchical groups with ease! For example, you can now create Dynamic-Group-A with members of Group-X and Group-Y. The groups that define the membership of the dynamic group can ...
Step 1: Create an Azure AD group. To begin, you'll need to create an Azure AD group in the Azure portal. To do this, follow these steps: Sign in to the Azure portal. Navigate to the Azure AD blade. In the left menu, click "Groups.". Click the "New group" button. Select "Security" as the group type. Enter a name and description for ...
Assign Groups and Users to an app using PowerShell. Assigning groups or users can be done from the Azure AD admin portal by clicking on the Users and groups tab in the application which you are granting access to.. My plan here is to create Azure AD groups that corresponds to the name of the role that Salesforce exposes and then add users to those groups which provides them with appropriate ...
The Azure AD Group's idea is to minimize the manual permission assignment for any particular benefit or use case and rather have AD Groups as members and manage the permission at the group level. Suppose you have a dozen employees requesting access to any particular Azure service ( Analytics Resource Group) .
Simplified licensing requirements for group-based licensing. Users who are targeted for group-based licensing need Azure Active Directory (Azure AD) Basic (and above), or Office 365 E3/A3 (and above). To start using group-based licensing, look at our Assign licenses to users by group membership in Azure AD documentation.
In Azure AD Group, Select your group for roles assignment and click on Assigned roles. You can also select Azure Active Directory > Roles and administrators and select the role you want to assign to the Azure AD group. Assign Azure AD Roles Using Privileged Identity Management Fig.6. Under the Assigned roles, click on the Add assignment.
#6. Use groups for Azure AD role assignments. The sixth best practice is to use groups for Azure AD role assignments and delegate the role assignment. If you have an external governance system that takes advantage of groups, then you should consider assigning roles to Azure AD groups instead of individual users. You can also manage role ...
5. I have an enterprise application in Azure with some roles defined, let's say: professor role. student role. staff role. Then I have some Active Directory groups which are nested, like: root professor group PROF. nested professor group PROF1. nested professor group PROF2.
Azure Ad Roles - Group Assignment Preview. A long-awaited Azure Active Directory feature has finally made it into public preview, giving you the ability assign Azure AD Roles to Azure AD Groups. Quite a few organizations I have worked with over the past few years have been asking when this will finally happen… well the time is upon us!
To find the Azure AD Group ID, go to the Azure Active Directory admin console and navigate to Azure Active Directory > Groups > All groups. The Azure AD Group ID is the value listed in the Object ID column of the All groups page. Related References. Create a Group Rule; Make Azure Active Directory an Identity Provider
Get-Azure ADGroup App Role Assignment -ObjectId <String> [-All <Boolean>] [-Top <Int32>] [<CommonParameters>] Description. The Get-AzureADGroupAppRoleAssignment cmdlet gets a group application role assignment in Azure Active Directory (AD). Examples Example 1: Retrieve application role assignments of a group
While you can't easily configure the token as you would with regular Azure AD P2 and include the groups and roles, it was trivial to write an Azure Function that using the user object ID and client_ID derived the assigned roles and groups by overlapping the /memberOf groups of the user and the /appRoleAssignments of the servicePrincipal.
Another scenario where you would use management groups is to provide user access to multiple subscriptions. By moving multiple subscriptions under that management group, you can create one Azure role assignment on the management group, which will inherit that access to all the subscriptions. One assignment on the management group can enable users to have access to everything they need instead ...
Importing the dashboard into Azure Managed Grafana. To import the dashboard into Azure Managed Grafana, follow these steps: Go to the Azure Portal and navigate to your Azure Managed Grafana resource. Click Identity under Settings. Ensure that the system-assigned managed identity is enabled. Click on the Azure role assignments button.