This browser is no longer supported.
Upgrade to Microsoft Edge to take advantage of the latest features, security updates, and technical support.

Assign licenses to users by group membership using the Microsoft 365 admin center
- 4 contributors
This article shows you how to use the Microsoft 365 license center to assign licenses to a group.
Some Microsoft services are not available in all locations. Before a license can be assigned to a user, the administrator has to specify the Usage location property on the user.
For group license assignment, any users without a usage location specified inherit the location of the directory. If you have users in multiple locations, we recommend that you always set usage location as part of your user creation flow in Microsoft Entra ID. For example, configure Microsoft Entra Connect configuration to set usage location. This recommendation makes sure the result of license assignment is always correct and users do not receive services in locations that are not allowed.
Assign a license
Sign in to the Microsoft 365 admin center with a license administrator account. To manage licenses, the account must be a License Administrator, User Administrator, or Global Administrator.

Browse to Billing > Licenses to open a page where you can see all licenses available in your organization.

Under Licenses , select the license that you would like to assign.
In the License details section, choose Groups at the top of the page.
Choose + Assign licenses
From the + Assign licenses page search for the group that you would like to use for license assignment.

When assigning licenses to a group with service plans that have dependencies on other service plans, they must both be assigned together in the same group, otherwise the service plan with the dependency will be disabled.
To complete the assignment, on the Assign license page, click Assign at the bottom of the page.

When assign licenses to a group, Microsoft Entra ID processes all existing members of that group. This process might take some time depending on the size of the group.

Verify that the initial assignment has finished
From the Admin Center, go to Billing > Licenses . Select the license that you assigned.
On the License details page, you can view the status of the license assignment operation. For example, in the image show below, you can see that Contoso marketing shows a status of All licenses assigned while Contoso human resources shows a status of In progress .

Read this section to learn more about how audit logs can be used to analyze changes made by group-based licensing.
To learn more about the feature set for license assignment using groups, see the following articles:
- What is group-based licensing in Microsoft Entra ID?
- Identifying and resolving license problems for a group in Microsoft Entra ID
Coming soon: Throughout 2024 we will be phasing out GitHub Issues as the feedback mechanism for content and replacing it with a new feedback system. For more information see: https://aka.ms/ContentUserFeedback .
Submit and view feedback for
Additional resources
Subscribe for Practical 365 updates
Please turn off your ad blocker and refresh the page to subscribe.
You may withdraw your consent at any time. Please visit our Privacy Statement for additional information
Managing Office 365 Licenses with the Azure AD V2 PowerShell Module

Table of Contents
Update: Because of the deprecation of the Azure AD and Microsoft Online Services PowerShell modules, Practical365 recommends that you use the Microsoft Graph PowerShell SDK to manage licenses for Microsoft 365 accounts. See this article for details about how to create a licensing report with SDK cmdlets.
In Office 365 we have three methods of managing license assignments for individual or multiple user accounts.
- Using the Office 365 admin portal
- Using Azure AD group-based license management
- Using PowerShell
The Office 365 admin portal provides a simple web interface for managing license assignments. It’s easy to add a license for a user, or for multiple users, enable or disable sub-SKU features (the individual services that are included in a license), or remove a license. Licenses for multiple users can be managed at the same time. This method is useful for ad-hoc license management, or for bulk assigning licenses when you first provision an Office 365 tenant. The web interface is friendly for even a non-technical user, so license management tasks can be delegated to people outside of IT support if necessary.
Azure Active Directory group-based licensing, which I wrote about here , simplifies license management by mapping license assignments to groups. License management for end users is then a simple task of adding or removing users in groups, and doesn’t require the ongoing use of Office 365 management tools.
In this article I’m going to demonstrate how to manage Office 365 licenses using PowerShell. This is more complex than either of the previous methods, but is useful for automating license assignments as part of a user provisioning process. PowerShell is also a good method for querying license usage and generating your own custom reports for license consumption, which can help you to manage your costs over time.
We’ll look at:
The Azure AD V2 PowerShell Module
Listing available licenses, querying license assignments for user accounts, assigning a single license using powershell, assigning multiple licenses using powershell, assigning licenses with sub-sku features disabled, removing licenses using powershell.
License management in Office 365 is performed using the Azure Active Directory PowerShell module . The first version of this PowerShell module is also known as the MS Online module, and uses cmdlets with “Msol” in the name, for example Connect-MsolService and Get-MsolUser.
While the MS Online module is still available today, it will be deprecated in the near future. A new Azure Active Directory PowerShell V2 module has been developed to replace it. This module is also known as the Azure AD module. The Azure AD module uses the Office 365 Graph API to interact with Office 365. Microsoft aims to migrate the functionality of the MS Online module to the Azure AD module, and recommends that you use Azure AD for any script development. In this blog post I will demonstrate license management using the Azure AD module.
The Azure AD module is installed using PowerShellGet, which is included with Windows Management Framework (WPF) 5.0 (PowerShell 5.0). Windows 10 and Windows Server 2012 R2 or later ship with PowerShell 5.0 installed by default, which means that PowerShellGet is already available. For earlier operating systems, you’ll either need to upgrade to WMF 5.0, or install PowerShellGet for PowerShell 3.0 or 4.0. Some applications such as Exchange Server are sensitive to changes in the version of WMF that is installed on the system, so you should not upgrade WMF until you’ve verified that all your installed software will continue to work
After the Azure AD module is installed you can connect to your Office 365 tenant by running the Connect-AzureAD cmdlet, and then entering your admin credentials when prompted. The Azure AD module supports the use of multi-factor authentication (MFA).
To explore the available cmdlets in the Azure AD module, run the following command.
As a side note, Connect-AzureAD will work with stored credentials function as long as your account does not require MFA or you’re connecting from a network that allows MFA to be bypassed.

The Get-AzureADSubscribedSku cmdlet is used to query the licenses that your organization has subscribed to in Office 365.
A more detailed view of the licenses that are enabled and consumed is available by expanding the PrepaidUnits property.
In the output above we can see that my tenant has 25 “ENTERPRISEPACK” licenses, and 5 “EMS” licenses. The SkuPartNumber for each does not precisely match the name of the license that you’ll see in Office 365 documentation or in the license management sections of the Office 365 admin portal. For example, ENTERPRISEPACK is the SkuPartNumber for the Enterprise E3 license, while EMS is the SkuPartNumber for the Enterprise Mobility and Security E3 license. A complete list of part numbers and friendly names isn’t available on Microsoft online documentation sites, although with a little searching and common sense you can usually work out what they mean. If there’s any confusion, opening a support ticket with Microsoft will get you the answers you need.
The individual license features and services, also referred to as sub-SKU features, can also be inspected. As with the SkuPartNumber values, the ServicePlanName values are not a match for the friendly names that you see in the Office 365 or Azure admin portals, but names like SWAY , POWERAPPS_O365_P2 , and EXCHANGE_S_ENTERPRISE are obvious. Others are not so obvious, such as MCOSTANDARD (Skype for Business Online), but again some searching online will usually clear up any confusion.
There are two user properties that reveal the license assignments for a user. The first is the AssignedLicenses property, which can be retrieved using Get-AzureADUser .
In the output above we can see the SkuId of the license that is assigned to the user. The matching license can be found by running Get-AzureADSubscribedSku, which in the ouput below we can see is the ENTERPRISEPACK license (Enterprise E3).
The Get-AzureADUser output shown above also reveals the DisabledPlans property. This property contains the ServicePlanId values of the sub-SKU features that have been disabled for the user. There are two ways to match those ServicePlanId values to the actual names of the sub-SKU features. The first is to use the output of Get-AzureADSubscribedSku to view the ServicePlanId values for the individual services, as demonstrated earlier. For the example of Jane Tulley, the ID of the disabled plan is “7547a3fe-08ee-4ccb-b430-5077c5041653”, which is YAMMER_ENTERPRISE in the list of service plans for the ENTERPRISEPACK license.
The other approach is to look at the AssignedPlans property of the user.
In the output above we can see that the “YammerEnterprise” service is suspended, and has a ServicePlanId matching the ID in the list of DisabledPlans we saw earlier.
You will also notice that the service names returned in the Get-AzureADUser output do always not match the service plan names returned in the Get-AzureADSubscribedSku output. For example, Get-AzureADUser shows a service name of “TeamspaceAPI” whereas Get-AzureADSubscribedSku shows the same service as “TEAMS1”. These differences are mildly irritating but do reinforce the idea that you should match two difference pieces of data by the ServicePlanId, not by the friendly name, whenever you are running PowerShell cmdlets or writing scripts to manage your licenses.
For administrators who are familiar with using the MS Online PowerShell module to manage licenses, there is one minor difference to be aware of. The Get-AzureADUser and Get-MsolUser cmdlets return slightly different information for the same user object. Get-AzureADUser will only return sub-SKU features that are Enabled, Deleted or Suspended, whereas Get-MsolUser will return the status of all sub-SKU features. Here’s an example, using an account where I’ve disabled several sub-SKU features to demonstrate the differences in cmdlet output.
The Set-AzureADUserLicense cmdlet assigns and removes Office 365 licenses to user accounts. A simple example is assigning a license to a new user account. Before assigning the license, the usage location of the account also needs to be configure. The license assignment process involves a series of steps to:
- Create an assigned license (singular) object
- Add the assigned license object to another object representing the assigned licenses (plural)
- Run Set-AzureADUserLicense and provide the value for the assigned licenses (plural)
To perform those steps we need to know the ObjectId of the user account, and the SkuId of the license.
Now we can go ahead and create the license assignment.
The user now has a single license SKU assigned, and the plans for that license are enabled.

Using the same steps as above you can assign an additional license to a user. For example, if we wanted to add the EMS license to the user who is already licensed for Enterprise E3, we could simply re-run the steps above using the SkuId for the EMS license.
If you would like to assign multiple licenses at the same time you can do so with just a small modification to the process. Remember, we’re creating an assigned license (singular) object, and adding it to an assigned licenses (plural) object. We can add multiple assigned license (singular) objects by repeating those commands. Here’s an example of licensing a user for Enterprise E3 and EMS at the same time.
The user now has multiple license SKUs assigned, and the services for both of those SKUs are enabled.
In the output above you might notice that Intune, which is included with the EMS license, is not listed as a service. This is another example of how Get-AzureADUser doesn’t show services that are not in an enabled, suspended, or deleted state. Intune requires activation for the user, and is in a “PendingInput” state when the license is initially assigned to the user as you can see in the Get-MsolUser output below.
Office 365 licenses such as Enterprise E3 and E5 allow access to multiple services and applications. For some organizations it is required to disable some of the features of a license, either because the feature should not be used in that environment, or simply to manage a staged roll out and adoption of Office 365 features.
To assign a license with sub-SKU features disabled we use the same process demonstrated earlier, but this time we need to configure the license object with enable and disabled plans before applying the license to the user. For this example I’ll assign an E3 license but only enabled the Exchange Online mailbox and the Office 365 ProPlus applications.
The user now has the license SKU assigned, but with multiple disabled plans. Only the two enabled features are showing as enabled services for the user as well.
For the final demonstration in this article let’s look at how to remove an assigned license using PowerShell. The Set-AzureADUserLicense cmdlet is used for this task, and the process is similar to adding a license. The difference is that when creating the assigned licenses (plural) object we use RemoveLicenses instead of AddLicenses, and provide only the SkuId instead of the full license object.
The user has now had each of the previously licensed features marked as deleted due to the license being removed.
As you can see, managing Office 365 licenses with the Azure AD V2 PowerShell module is a complex task at first, but once you’ve performed the steps a few times it should become much more comfortable. Azure AD group-based license management is simpler, but won’t fit everyone’s needs. Using PowerShell to manage licenses like this will suit organizations who want to automated license assignments into other processes. The use of the Graph API also means you can ignore the Azure AD module itself and write custom code to interact with the REST API to perform the same tasks. That is out of scope of this blog post, but it’s something you can explore if custom development and integration into third party systems is a requirement for you.
About the Author

Paul Cunningham

Nice post. For Azure consulting services visit TechTriad

For years I have been running a detailed report of User licensing built from 3 commands: Get-MsolSubscription Get-MsolAccountSku Get-MsolUser -ALL The report splices out which part of the business owns which subscription and what users are using what licensing.
Now I need to use AzureAD or mgGraph modules and they each hae a command to view the licenses and sku’s but not to see the individual subscriptions.
Do you know a replacement for the Get-MsolSubscription command?? Thanks

Does https://practical365.com/create-licensing-report-microsoft365-tenant/ help?
Pingback: Microsoft Grants Extension for Azure AD License Management Cmdlets

In the article, you state that the documentation does not provide a human understandable list for the skupartnumbers. I found it, after a looooooong search over here: https://docs.microsoft.com/en-us/azure/active-directory/enterprise-users/licensing-service-plan-reference

This Microsoft “Docs” URL *would* be nice, but in fact, it’s once more just a shame. Microsoft writes:
“These tables are for reference purposes and are accurate only as of the date when this article was last updated. Microsoft does not plan to update them for newly added services periodically.”
Obviously, Microsoft doesn’t value their customers that much to keep “Docs” up to date… or at least provide a service that always offers the latest license information with all this mess: String_IDs, SKUs, GUIDs, etc. etc.
But it’s actually much worse: Microsoft cheats the many millions of customers by charging licenses multiple times.
Of course I can prove this very easily 🙂

Can you pls brief on the warning key in the Prepaid Units.

Great article. How can I get the report for all the o365 licenses assigned to a list of users ?
For eg: My userlist file is C:\UserNamesInput.txt

Hello Paul, thank you very much for th clear exmaples.
Very usefull.
Best regards. Aleksej

It covers all most everything in Azure AD user Licensing, Very helpful article.
Thanks for Sharing.

Thank you for this article and write-up. Removing a license(s) from users individually or in bulk seems straightforward.
Say we have users leave the org. Accounts and licenses are removed from the user, but the licenses remain in O365 as unassigned and costing money. What I am looking for is the powershell method of deprovisioning unassigned licenses in O365 down to the assigned number. Why pay for licenses we’re not using?

How do we distinguish between a CSP License and an EA License?

I’m trying to construct a report that will show me all my Azure users and what licenses they have assigned.
For Example: Each User is assigned “Office 365 Enterprise E3” but then inside of “Office 365 Enterprise E3” you have 18 services that can be enable/disabled.
The Ideal would be to create a report on each Product (Office 365 Enterprise E3) then cycle through all the users showing what each user has enabled.
Has anyone got a PowerShell script that could help with this?

VERY HELPFUL In my ignorance, I opened a ticket to Microsoft support and they are not able to give me such detailed answers… By chance I happend to get to this mistery of licenses assignements dates I was looking for… Thanks to you and Internet Riccardo

I’m trying to remove Yammer from all accounts with a mixture of licenses. I have tried to digest your samples but I’m still unsure how to disable specific Sub Features on an existing license. Is this possible or does the script have to reapply the license with Yammer switched off?

First of all thank you for article.
I would like to get information about users + licensing, I did this code: Get-AzureADUser | Select DisplayName,mail,Department,CompanyName,UsageLocation,AssignedLicenses -ExpandProperty AssignedLicenses | Where {$_.SkuId -eq “6fd2c87f-b296-42f0-b197-1e91e994b900” -or $_.SkuId -eq “4b585984-651b-448a-9e53-3b10f069cf7f”} | ft -a
Could I show the SkuId name in result? Like: DisplayName | Mail | Department | CompanyName | UsageLocation | AssignedLicenses

Hey hello and thanks for your article.
How can I get all the users with specific service like “MicrosoftOffice”? Thanks for your help!
I mean this “Get-AzureADUser -SearchString [email protected] | Select -ExpandProperty AssignedPlans”

Can anybody know how to check the date when license is assigned, who assign license and to whom with Office 365 Powershell. is it possible ?
Thanks in advance.

thanks for the article. i am looking for a way to Enabled individual ServicePlan for existing users. we use E3 license with only have a few service plans enabled, now we want to enable more plans, such as “Team”. How can we do that without removing the whole license and re-add.

I am also wondering about it. How can we do it in a more friendly way?

Very helpful article

Hi Paul, have you noticed, or is it just me, that the Get-AzureADSubscribedSku now no longer returns the ServicePlans objects with each Sku object but instead returns a string that looks like the following:
class ServicePlanInfo { AppliesTo: User ProvisioningStatus: Success ServicePlanId: efb87545-963c-4e0d-99df-69c6916d9eb0 ServicePlanName: EXCHANGE_S_ENTERPRISE }
Just wanting to do a sanity check before I start building some code to parse those strings for the ServicePlanId and ServicePlanName. Looks like this is YAML output, essentially, except for the class declaration.
You can ignore the above – the AzureAD commands were being used in my case imported from another PSSession. The serialization must be causing the effect.

Hello Thank you very much for your article. I was wondering. If i have many users, and want to add a licence for all this users? How can i do it? Do i need a csv file or muss write my code in a for each loop? Please can you help me or give me more informations? Thank you
Yes, some PowerShell code to loop through a list of users would do the trick.
Or switch to using group-based license management.

“AdHoc License Administrator” role has been deprecated and “User administrator” role is required at the minimum for managing the licenses.
“User administrator” role gives more access than what I would like to give to the account running the provisioning scripts. Have you found a method to delegate only “License management” permissions to the account running the provisioning scripts.

Thanks Paul, nice post as usual.
On a similar note, I put together a script (still using the MSOL module) to bulk add/remove licenses.
Details: http://ezoltan.blogspot.com/2017/12/assign-or-remove-o365-licenses.html Download: https://gallery.technet.microsoft.com/Assign-or-Remove-O365-e397e1da
Regards, Zoltan

Using the get-azureaduser and get-azureaduserlicensedetail I can easily see what license are assigned. Is there a way to determine if the license is directly applied, or applied using Azure AD group based licenses? I found a way using the MSOL module, but not the AzureAD module.

I have a similar question about cmdlets and methods for viewing licenses assigned using security groups. I have the methods that exist today in the MSOnline module will have counterparts in AzureAd module. This is hoping that that v2 supports more features — not less.

I want to remove multiple licenses using PowerShell. Actually I able to remove single licence like below. But How do I remove multiple licenses?
$AzureUser = Get-AzureAdUser -ObjectId $ADuser.UserPrincipalName
$License = New-Object -TypeName Microsoft.Open.AzureAD.Model.AssignedLicense
$License.SkuId = “6fd2c87f-b296-42f0-b197-1e91e994b900” #6fd2c87f-b296-42f0-b197-1e91e994b900 Office 365 E3
$LicensesToAssign = New-Object -TypeName Microsoft.Open.AzureAD.Model.AssignedLicenses
$LicensesToAssign.AddLicenses = @() $LicensesToAssign.RemoveLicenses = $License.SkuId
Set-AzureADUserLicense -ObjectId $AzureUser.ObjectId -AssignedLicenses $LicensesToAssign

Had this question too, and I figured it out. The logic for this seems pretty silly, and the logic is beyond me, but you need to: – Create an object for each license SkuId – Add the correct license to the objects made in previous step – Create the object with the licenses (plural) – Add the previously created variables to another object (I think) – Create the array – Create the variable/property to remove the licenses – Create the user variable – Then remove the licenses
So the code would look like this: #Hard code the username or prompt for username $ADName = myuserprincipalname / $ADName = Read-host
$E3License = New-Object -TypeName Microsoft.Open.AzureAD.Model.AssignedLicense $EMSLicense = New-Object -TypeName Microsoft.Open.AzureAD.Model.AssignedLicense $E3License.SkuId = “6fd2c87f-b296-42f0-b197-1e91e994b900” $EMSLicense.SkuId = “efccb6f7-5641-4e0e-bd10-b4976e1bf68e” $LicensesToAssign = New-Object -TypeName Microsoft.Open.AzureAD.Model.AssignedLicenses $LicensesToAssign.AddLicenses = $E3License, $EMSLicense $LicensesToAssign.AddLicenses = @() $LicensesToAssign.RemoveLicenses = $E3License.SkuId, $EMSLicense.SkuId $user = Get-AzureADUser -SearchString “$adname” Set-AzureADUserLicense -ObjectId $user.ObjectId -AssignedLicenses $LicensesToAssign

What if you want to enable previously disabled plans? Would this cause disruption? Will it pick up the add or error as the license is already assigned?
I don’t understand your question. What is the scenario you’re looking at?

I’m in the same boat Paul.
Two Scenarios I’d like to try and work through:
1) All users were globally disabled Teams (when that was a thing, which it isn’t now), and we want to add that SubSKU (Teams) back in for all enabled / licensed Users.
2) When we piloted Teams, a group of 20 users were given the Teams SubSKU to allow them to evaluate Teams. If 1), above, works, what will happen to those 20 users. Would the script need to iterate through and skip them if they were already enabled for Teams, or would it just enable it again and continue.

I also have the same question as everyone else. Can we re-apply a license with additional features enabled or disabled. It seems like that is not the case.
Is the only way to add and remove features to remove the full license then re apply with desired features?

This probably won’t help you, but maybe it will help someone else who reads your blog. Your bit on removing licenses was helpful; however, we have a ton of SKUs. There’s no way my Junior Admins or I will remember the SkuIDs for these…so I needed a way to easily remove licenses from a user account without having that information. I wrote this module:
function global:Remove-CompanyUserLicense ($delicenseUID)
$delicenseEmail = $delicenseUID + ‘@company.com’ $Current = Get-AzureADUser -ObjectId $delicenseEmail | Select -ExpandProperty AssignedLicenses $License = New-Object -TypeName Microsoft.Open.AzureAD.Model.AssignedLicense $License.SkuId = $Current.SkuId $LicensesToAssign = New-Object -TypeName Microsoft.Open.AzureAD.Model.AssignedLicenses $LicensesToAssign.AddLicenses = @() $LicensesToAssign.RemoveLicenses = $License.SkuId
Set-AzureADUserLicense -ObjectId $delicenseEmail -AssignedLicenses $LicensesToAssign
Write-Host -ForegroundColor Cyan “License has been removed on $delicenseEmail.”
Write-Output “Error clearing license.”
I’m sure there is a more efficient way to do this, as my Powershell is a bit green. At any rate, I thought it might help save someone some time. Great blog, by the way!
Hi Paul Great article… Trying to make reporting on a user readable for humans without memorising each SkuId. Has anyone managed a script that gives The License SkuPartNumber assigned The assigned License ServicePlanName Preferably parsable as an object for reporting… This is my output and its terrible…
Status : ObjectID : 0e2afe5b-22d9-442f-9ee6-b66c79b5071f UserPrincipalName : [email protected] UsageLocation : NZ AssignedLicenses : {class AssignedLicense { DisabledPlans: System.Collections.Generic.List`1[System.String] SkuId: efccb6f7-5641-4e0e-bd10-b4976e1bf68e } , class AssignedLicense { DisabledPlans: System.Collections.Generic.List`1[System.String] SkuId: 6fd2c87f-b296-42f0-b197-1e91e994b900 } } AssignedPlans : {@{Service=ProjectWorkManagement}, @{Service=MicrosoftOffice}, @{Service=YammerEnterprise}, @{Service=Sway}…}

very nice article thanks
Leave a Reply Cancel reply
Latest articles.

Practical Protection: Breaches, Exposure, and You
In this edition of Practical Protection, Paul Robichaux dives into 5 steps you can take to protect yourself, and potentially your organization, from future breaches.

Deploy Cloud-Based Windows LAPS to Windows Endpoints
Microsoft recently released a revamped version of LAPS that can store the local admin password in Entra ID to work with cloud-managed endpoints. In this blog, we dive into deploying LAPS and how to use it to further enhance the security of Windows endpoints.

PowerShell Serialization Payload Signing in Exchange Server
In this article, Jaap Wesselius discusses PowerShell serialization, what PowerShell serialization payload signing is, why this is important, and how to manage it.
How to Setup Group Based Licensing in Microsoft 365
- Post author: Daniel Bradley
- Post category: Microsoft 365 / Microsoft 365 User Management / Tutorials
- Post last modified: April 11, 2023
- Reading time: 7 mins read
Group-based licensing in Microsoft 365 or Azure Active Directory is a quick and effective way to manage your user license assignments. It means that when a new user (or existing user) is added to a group with group-based licensing, then that user is automatically assigned a license. This is particularly helpful when managing a large number of users, such as during migrations and take overs, or even during ongoing user management by simplifying onboarding processes.
In this tutorial, I am going to show you how to setup group-based licensing in Microsoft 365.
Page Contents
Requirements for group-based licensing
What are the benefits, assign licenses to a group, migrate users to group-based licensing, view the group licensing status.
To use group-based licensing, you will need to have at the minimum an Azure AD P1 license for every user that will benefit from it. Although this might seem a little backward, there is nothing to worry about. As soon as you add a single Azure AD P1 license, the features become available, so you can then configure your group-based licensing to assign both your Azure AD P1 license and any other licenses you wish.
You should also be conscious that you still need enough available (unassigned licenses) to assign to your users. For example, if you create a new group that will automatically assign M365 Dynamics licenses to staff and you add 10 users to that group. You need to ensure you have 10 available licenses ready to be assigned automatically.
It goes without saying one of the primary benefits is easy and simplified license management, enabling streamlined onboarding and change processes as well as simplified administration, removing the need to assign and remove licenses manually.
However, consistency and security should also be considered when deciding on group-based licensing. By ensuring a well-defined group structure you can clearly overlook which licenses are assigned to which user. By incorrectly or over-licensing users you are risking exposing them to data which they should not be able to see, either directly or indirectly which would be perfect for an attacker.
I won’t be going through how to create a group in Azure Active Directory in this tutorial, however, if you want to know how to create a security group using Microsoft Graph PowerShell, then you can check out my guide: How To Create Groups With Microsoft Graph PowerShell .
1. Start by logging into the Azure Active Directory admin center and select Groups .

2. Select your group from the list, then on the left-hand menu, select Licenses .

3. Select the Assignments button and check the license you wish to assign to this group (it could be a single license or multiple), then click Save .

Migrating licensing assignments to groups is quite simple and if done correctly will have zero impact on your end users.
Assumingly if you are migrating users to group-based licensing, atleast some already have licenses directly assigned. Luckily Microsoft have made the migration quite simple and as such, your users can have the same license directly assigned and also assigned via group membership. For example, you may have long standing users who were manually assigned licenses which you want to migrate, you can add them to the necessary licensing group then manually remove their direct assignment.
During the inbetween period where licenses are assigned both ways, only a single license is consumed so you don’t have to worry about over spending or over using licenses. Also, by removing their direct assignment, the user will remain ‘licensed’ via the group membership and there will be no loss of service for the user.
If you want to learn how to bulk remove licenses using PowerShell (if you have many users for example), take a look at my guide: How To Assign User Licenses With Microsoft Graph PowerShell and read the Remove multiple licenses section.
The critical step while migrating to group-based licensing is to ensure licenses are correctly assigned by the group before removing the direct assignement.
1. Start by logging into Azure Active Directory > Users and select the one of the users you are migrating.
2. From the left-hand menu select Licenses . This will display a list of licenses assigned to the user.

3. You can see from the license list, that your target license is both directly assigned and inherited from the group.

You can also remove the direct assignment here by selecting the license and clicking Remove license.
By refreshing the page, you can now see that only Inherited is listed under the assignment paths.

Validate this has worked correctly first for a couple of users before you bulk remove licenses from all users.

Daniel Bradley
Leave a reply cancel reply.
Save my name, email, and website in this browser for the next time I comment.
Use code: MGP15 for 15% off the Microsoft Graph PowerShell for Administrators book. Available until March 31st
Assign Microsoft 365 licenses with group-based licensing
- Updated on February 12, 2024
- Microsoft 365
There is no need to manually assign or remove licenses for each user in the Microsoft 365 admin center. Instead, an easier way to assign licenses for multiple users is with groups. In this article, you will learn how to assign Microsoft 365 licenses using group-based licensing in Microsoft Entra admin center.
Table of contents
Group-based licensing requirements, create new group with members in microsoft entra id, assign microsoft 365 licenses to group in microsoft entra id, verify group-based licensing in microsoft entra id, group-based licensing in microsoft entra id.
Once you create a group with users in Microsoft Entra ID, you can assign one or more product licenses. All the members of the group will have the same licenses assigned. Microsoft Entra ID applies the same licenses when you add new members to a group. And when a member leaves a group, their licenses are automatically removed.
This licensing method eliminates using PowerShell to manage licenses for individual users based on organizational or department structure changes. It makes the process of assigning and removing licenses for multiple users at once more efficient.
Note: If you want to assign Microsoft 365 licenses to users directly, read the article How to Assign Microsoft 365 licenses with PowerShell .
To use group-based licensing, every user must have one of the following licensing:
- Paid or trial subscription for Microsoft Entra ID P1 and above.
- Paid or trial edition of Microsoft 365 Business Premium, Office 365 Enterprise E3 or Office 365 A3 or Office 365 GCC G3, Office 365 E3 for GCCH, or Office 365 E3 for DOD and above.
We will create a group to assign the default Microsoft 365 licenses to all users. Then, we will create another group to add paid Microsoft 365 licenses (e.g., Power BI or Visio) for certain users.
Follow the steps to create a new group, including members in Microsoft Entra admin center:
- Sign in to Microsoft Entra admin center
- Expand Identity > Groups > All groups
- Click New Group

- Select Security
- Enter the group name > M365_E5_Default

You can add members before and after you create the group. In our example, we will add members before creating the group.
- Click No members selected
- Search for the user
- Click the tab Users
- Select the user to add a member
- Click Select

- Click Create

Note: You need to refresh the page to see the new group you created in the list.
Now, we will create a new group to assign other (paid) licenses to a few members. Follow the same steps as shown above to create a new group.
In our example, we named the group M365_E5_EXO_P2 and selected 5 members.

Go to Identity > Groups > All groups to find the two security groups you created. The next step is to assign licenses to each group in Microsoft Entra admin center.

Time needed: 10 minutes
We will show you how to assign Microsoft 365 licenses to a group in Microsoft Entra ID.
Sign in to Microsoft Entra with your admin credentials.

There is another way to assign licenses to a group. You can follow the same steps we showed above or learn another way.
Follow the steps to assign licenses to the other group we created:
- Go to Microsoft Entra admin center
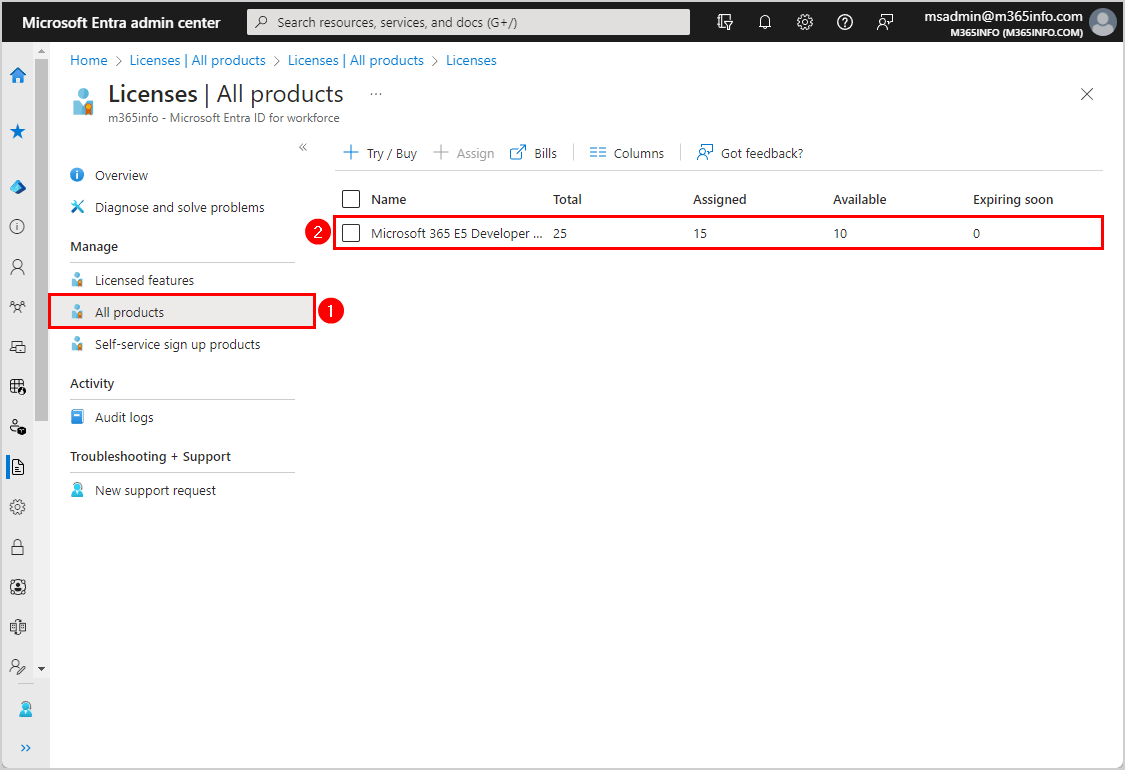
- Expand Identity > (Show more) > Billing > Licenses
- Click All products
- Select the checkbox Microsoft 365 E5 Developer
- Click Assign

- Click Add users and groups
- Search for the group
- Click the tab Groups
- Select the group M365_E5_EXO_P2

- Click on the tab Assignment options or below Next: Assignment options >

- Select the assignment options you want to include
- Click Next: Review + assign >
Note: For the other group, you can only include paid licenses such as Microsoft Power BI or Microsoft Visio .

You will get a notification that the licenses are assigned to the group.
Verify you created a security group type with licensed users in Microsoft Entra ID.
Follow the below steps to find the group-based licensing:
- Expand Identity > Billing > Licenses
- Click on the license Microsoft 365 E5 Developer
You can see that 15 members with the license Microsoft 365 E5 Developer are assigned. In our example, 10 members of the group M365_E5_Default have all the license options, and 5 members from the group M365_E5_EXO_P2 have 1 license option (Exchange Online Plan 2) assigned.
- Click on Licensed users
You will find a list of all the users with the Microsoft 365 E5 Developer license. Some users can have multiple licenses assigned, as you can see in the below picture.
Note: Some users have assigned the Microsoft 365 E5 Developer license manually (Direct), and some through the group-based licensing (Inherited).

Note: You can remove the direct license assignment from each user. To remove the inherited license, you must remove the user from the group.
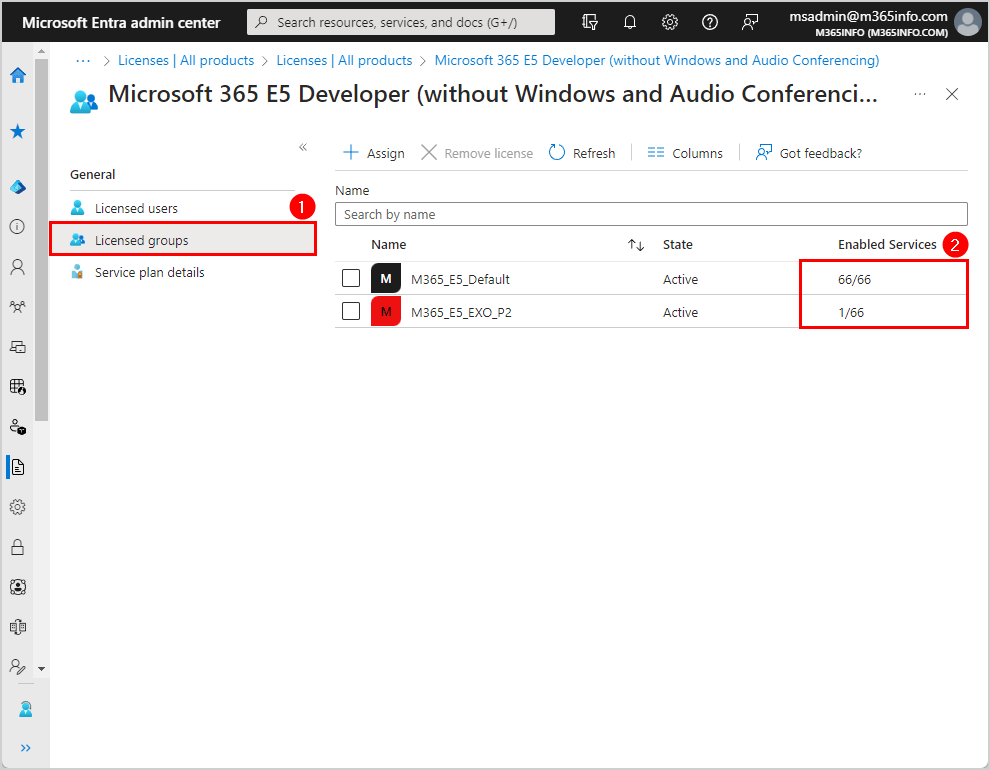
- Click on Licensed groups
It shows that the State is Active for both groups. The Enabled Services show how many services of the license (66/66) you assigned. For the group M365_E5_EXO_P2 , we have only assigned the Exchange Online Plan 2 license (1/66).
You successfully assigned Microsoft 365 licenses with group-based licensing in the Microsoft Entra admin center!
Read more: Configure Certificate-Based Authentication to run automated PowerShell scripts »
You learned how to assign Microsoft 365 licenses with group-based licensing in Microsoft Entra ID. It’s easier to bulk assign Microsoft 365 licenses to all users when creating groups in Microsoft Entra ID. This way, you can find and manage your users’ licenses.
Did you enjoy this article? You may also like Export Microsoft 365 users licenses . Don’t forget to follow us and share this article.
o365info Team
This article was written by our team of experienced IT architects, consultants, and engineers.
What Others Are Reading
To prevent your organization from email spoofing and phishing attacks, it's not enough to only…
DomainKeys Identified Mail (DKIM) is extra security for your outgoing messages. It is essential to…
The user sends an email from a shared mailbox but gets an error message in…
This Post Has 0 Comments
Leave a reply cancel reply.
Your email address will not be published. Required fields are marked *
- previous post: Enable or disable Exchange ActiveSync mailboxes
- next post: How to set Employee ID for Microsoft 365 users
Back to Blog
Office 365 license management: assigning licenses by ad group.

Nathan O'Bryan MCSM

Since the dawn of time (if the dawn of time was in 2011), assigning Office 365 licenses has been a pain. It has never been complicated, but it has also never been a pleasant experience.
You've always had two options to either manually assign licenses to users from the Office 365 Admin portal or use PowerShell to bulk assign the license to large numbers of users. In the first couple of years of Office 365 when most of the customers were small, I primarily just manually assigned licenses in the portal. As larger customers started moving into Office 365, I relied more heavily on PowerShell scripts to assign licenses to Office 365 users en masse.
Microsoft has added a third option to assign the license to users in Office 365 based on group membership. In this blog post, I'm going to walk you through the process of setting up automatic license assignment based on group membership to simplify your Office 365 license management process.
Usage Location
The first hurdle we need to get over is the usage location. Since Office 365 is a worldwide service, and Microsoft does not have legal rights to sell some of those services in some countries, Microsoft needs to ensure that users are in a location where the services are legal before they can allow a license to be assigned to a specific user.
This is not an issue for US based organizations, but in countries, some of the cloud based telephone services in Office 365 are not legal.
When you are assigning licenses manually or via PowerShell you have to assign a usage location to each user before you can assign a license. The good news is that when assigning license via group membership, users who do not have a usage location specifically assigned will inherit the default usage location from the directory.
Assigning Licenses to a Group
The process of assigning a license to a group is done in the Azure AD portal. Go to the Azure AD blade and select "Licenses."

Next, select "All products" under manage and you'll see a listing of the licenses available within your tenant.

Select the license you want to work with (for this example, I selected E3) and then select "Assign" from the top of the menu.
On the next screen, choose "Select users and/or groups" then choose the group to which you want to assign this license.

Under "Assignment options," you can turn off individual parts of the license that you don't want users to get. For example, I tend to turn off Yammer to protect users from being exposed to that mess. Your mileage may vary.
After the license is assigned, you'll get a notification that the assignment was made.

Currently, there is no indication within the portal showing you what previous license assignments have been made. Hopefully, as this feature matures, Microsoft will add that functionality. I do see this feature referenced in the documentation on TechNet, but I don't see previous license assignments in my tenant.
Troubleshooting Issues
There can be a number of different reasons why a Office 365 license assignment might fail. The most straightforward for a license assignment to fail would be not having enough licenses available in your tenant. The problem with assigning licenses via group membership is that license assignment does not happen right away, so there isn't an error to report immediately.
If you add a user to an on-premises AD group, and that group membership change takes 30 minutes to sync to Azure AD, then the license assignment process behind the scenes takes another 15 minutes (about the average based on my testing in my tenant), it can be difficult to figure out why an assignment failed.
In the Azure AD portal, there is a troubleshooting wizard that you can use to assist with figuring out these issues.

The "Troubleshoot" link on the left takes you to a wizard that will step you through a few issues that may occur. I didn't find it to be super helpful with any of the things I broke in my tenant.
What I do think is most helpful is the audit logs. Below you can see where I assigned the E3 license to the "Executives" group, and where I added a test user to that group and he received an E3 license.

I've found that going through the audit logs has given me the information I was looking for on all the problems I created in my license assignments.
Additional Scenarios
Here are a few additional scenarios I found while playing with this feature in my tenant.
You cannot directly remove a license that was assigned by group membership. Trying to do so will result in the following error:

You can manually assign another license to that user. If your new license assignment adds services that user already has (you manually assign an E3 license to a user that already has an E5 license) you won't see an error. This can cause considerable waste, but it does not prevent the user from accessing anything.
As Microsoft adds new services to a license, that new service will automatically be turned on. For example, when Yammer was added to the E3 license that service was just turned on for all users who have E3 licenses assigned. If you want to save users from having to deal with Yammer, you'll need to manually go into Azure AD and change the services that are enabled under that license assignment.
The Wrap-Up
The ability to manage licenses via group membership is a big plus for Office 365 tenants, helping IT Pros with Office 365 license management . There is clearly some additional work that needs to be done before this feature is fully ready. Hopefully, Microsoft will continue to work out the rough spots and give us a great solution for Office 365 license management.
Either way, the ability to manage license assignment via group membership is a feature I have used with several customers now. Overall, it's a great feature for Office 365.
Office 365 License Management
Managing Office 365 licenses is no easy task and forecasting for future needs can be exhausting. At ENow, we believe in ‘buy only what you need, and adopt all that you buy’, and our solutions can help you achieve just that.
Efficiently and effectively optimize your Office 365 licenses to make informed licensing decisions with ENow Office 365 License Management reporting, including: customizable trend analysis, real-time licenses user lists, license addition history, and much more.
Access your free 14-day trial today! Be the IT hero and drive out any hidden costs.

Nathan is a five time former Microsoft MVP and he specializes in Exchange, Microsoft 365, Active Directory, and cloud identity and security.
Related Posts

Office 365 License Management: 5 Tips to Forecast O365 License Needs

AmyKelly Petruzzella
If you’re coming up on your EA, you might be scrambling to accurately forecast your Office 365...

Office 365 License Management: Tips to Reduce Office 365 License Spend
ENow Software
It may come as a surprise to you that 69% of companies reported over-spending on their cloud budget...
Check Microsoft 365 user license is direct assigned or inherited from group
- Updated on April 1, 2024
- Microsoft Entra , Microsoft 365
There are two methods to assign a Microsoft 365 license. One way is to assign the license directly, and the other is to add the user to a group linked to the license, known as group-based licensing . The preferable method is group-based licensing because it’s easier to maintain and for auditing purposes. In this article, you will learn how to check if a Microsoft 365 user license is direct assigned or inherited from a group.
Table of contents
Check user license assignment type in microsoft entra admin center, step 1. install microsoft graph powershell, step 2. prepare get-licenseassignment powershell script, step 3. run get-licenseassignment powershell script, step 4. open license assignment report.
To check if the Microsoft 365 user license is direct assigned or inherited from a group in Microsoft Entra admin center, follow the below steps:
- Sign in to Microsoft Entra admin center
- Expand Identity > Billing > Licenses
- Click All products
- Click the Microsoft product name

- Check the column Assignment Paths if the user is direct assigned or inherited from a group

Note: It’s recommended to Assign Microsoft 365 licenses with group-based licensing and not direct so you can manage it easily.
Check user license assignment type with PowerShell
To check if the Microsoft 365 user license is direct assigned or inherited from a group with Microsoft Graph PowerShell, follow these steps:
Run Windows PowerShell as administrator and Install Microsoft Graph PowerShell .
Important: Always install the Microsoft Graph PowerShell and Microsoft Graph Beta PowerShell modules. That’s because some cmdlets are not yet available in the final version, and they will not work. Update both modules to the latest version before you run a cmdlet or script to prevent errors and incorrect results.
Create two folders on the (C:) drive:
Download the Get-LicenseAssignment.ps1 PowerShell script and place it in C:\scripts folder. The script will export the CSV file to the C:\temp folder.
Ensure the file is unblocked to prevent errors when running the script. Read more in the article Not digitally signed error when running PowerShell script .
Another option is to copy and paste the below code into Notepad. Give it the name Get-LicenseAssignment.ps1 and place it in the C:\scripts folder.
- Line 58: Edit the CSV file path
Run the below command to run the script Get-LicenseAssignment.ps1 .
The PowerShell output shows if the license is inherited by a group or is direct assigned.
Note: The output shows if there are multiple groups assigned to a user or if the user has both a license direct assigned and assigned by group. If both are assigned to a user, read the article Remove direct assigned licenses for users with group licenses .
An Out-GridView will show all the information you need.

The Get-LicenseAssignment.ps1 PowerShell script exports all Microsoft 365 users license assignments to CSV file.
Find the file LicenseAssignments.csv in the path C:\temp .
Open the CSV file with your favorite application. In our example, it’s Microsoft Excel.

The Microsoft 365 user license assignment type report looks great.
Read more: Create Microsoft Entra ID Users from CSV with PowerShell »
You learned how to check if the Microsoft 365 user license is direct assigned or inherited from a group. There are two methods to get the details, which is in Microsoft Entra admin center or with the PowerShell script. Both are excellent to retrieve the information.
Did you enjoy this article? You may also like Export Microsoft 365 inactive users report . Don’t forget to follow us and share this article.
ALI TAJRAN is a passionate IT Architect, IT Consultant, and Microsoft Certified Trainer. He started Information Technology at a very young age, and his goal is to teach and inspire others. Read more »
What Others Are Reading
We have to export an Office 365 mailbox to PST file. An excellent way to…

Microsoft, Google, and other major mail providers are strengthing their mail security. They only allow…
You did remove full access permission from a user or shared mailbox, which is automapped.…
This Post Has 3 Comments
Thanks Ali, I was just looking for something like this. Works perfectly!
Thank you Ali, for the consistency and update you provide. I am always motivated to push more on my Tech career each time I see you post. Great job Man.
Keep pushing, Augustine. You got this!
Leave a Reply Cancel reply
Your email address will not be published. Required fields are marked *
- previous post: How to Setup DNS Aging and Scavenging in Active Directory
- next post: How to Install Microsoft PowerShell PSResourceGet module
Manage Office 365 licenses and roles
When assigning the Office 365 app to a user or a group, you can specify which Office 365 services are enabled for them. For example, you can assign Microsoft E3 licenses with only Exchange and Lync enabled for your Sales team, while your Support team gets an E3 license with only SharePoint Online enabled.
When assigning a user or a group to Office 365, you see the Licenses option. If you have selected Provisioning Type as Licenses/Roles Management Only these licenses and roles are the only attributes available. Office 365 licenses that do not have a status set are not displayed.
To specify which services are made available to your selected user or group, select the services you want the selected user or group to be licensed to use and continue provisioning as before.
Before you begin
Deploy Office 365 app instance in your org. See Typical workflow for deploying Microsoft Office 365 in Okta .
Start this task
You can assign Office 365 licenses to users or groups or edit the assignment from the app instance.
Assign Office 365 licenses and roles to a user or group
Edit office 365 licenses and roles assigned to a user or group.
Go to your Office 365 app instance and open the Assignments tab.
Click the Assign button and select Assign to People or Assign to Groups . The Assign Microsoft Office 365 window opens.

Select a user or a group, then check the appropriate boxes to assign licenses and roles to the selected user or group.
Click Save and Go Back .
From Filters , select a user or a group, then click the Edit button next to it. The Edit Assignment window opens.
Check the appropriate check-boxes to assign or remove licenses and roles for the selected user or group.
Click Save .
© 2024 Okta, Inc . All Rights Reserved. Various trademarks held by their respective owners.
How To Manage Office 365 Licenses Using Groups?
The biggest challenge for any Office 365 Administrators, is managing Office 365 licenses purchased by their Organization effectively. So far the Office 365 admin center doesn’t provide much options to automate Office 365 license assignment effectively. For smaller tenants, manual process provided by Office 365 admin center should suffice. For larger Organizations, automating license assignments is necessary, since the manual process is tiresome and error prone. Hence, the administrators has to spend significant amount of time, to prepare complex PowerShell scripts to achieve the level of automation, they require.
Considering the feedback provided by their customers in automating license assignment, Microsoft has introduced a new group based Office 365 license management system through Azure Portal which is currently in Preview. This group based assignment system, can be used for both groups created in Azure AD and also groups synced from On-Premises Active Directory.
License Assignment to Groups:
Once you open your Azure Portal , navigate to “Licenses” section present in Azure Active Directory. The list of products, currently available for Organization, will be displayed in the Licenses page.
Select the product license, which you want to assign to groups and click on “Assign” button. Once you click on Assign button, User Selection page will appear. In the “Users and Groups” field, you can select the list of groups, you want to assign the selected products.
Once the User selection is complete, “Assignment Options” will display, the list of services available for the selected product. You can disable some of the features, if you don’t want to assign them to a group.
Click “OK”, when you are done with your selection. Then, when you click on “Assign”, the selected product will be assigned to all the users in the selected group. You will receive a notification in Azure Portal, if the license assignment is complete or if any there is any issue in the license assignment.
Once the license assignment is complete, when you look at the “Licenses” page in Azure Portal, the list of licenses which are inherited to groups will be shown.
To complete the Groups based license assignment process, you have to remove all the direct licenses assigned for the user. For example, when you open the licenses page of a user, the list of products assigned for the user will be displayed.
You can remove the licenses which are assigned directly for a user, to enable group based licensing. You should be more cautious, when removing direct licenses for the selected users, since the user’s access to services should not be disrupted when removing these licenses.
Points to be considered:
- Since the groups based license assignment is in preview mode, the procedure mentioned above may change once it is generally available.
- Right now group based license assignment doesn’t support nested groups. Licenses are assigned only for the first-level users.
- Licenses assigned for a user through group can only be managed from Azure Portal. Managing these licenses from Office 365 Admin center will throw error.
- To use group based license assignment Azure Subscription is required, at least for now. It may change once it is generally available.
- When new services are added by Microsoft to a product, it is automatically assigned to the users in group.
Need an Efficient Office 365 License Management Tool to Assign, Remove & Recycle O365 User licenses effectively! Try Vyapin Microsoft 365 Manager!
ABOUT AUTHOR- DEEPAK S
Related posts.
Download Vyapin’s Products
FREE Office 365 E-Book
Recent Posts
- Using SharePoint Migration Tools To Migrate From SharePoint On-Prem To SharePoint Online – Challenges To Expect And Plan For
- Advanced Copy Permissions: Copying Folder Permissions from a Folder Template structure to other folders
- Microsoft 365 reports: Essential reports in a single click
- Microsoft Teams Best Practices and How-to tips?
- SharePoint Migration Planning: A practical approach to build your own checklist
- Active Directory Audit & Reporting
- Do You Know
- Exchange Online
- File Share to SharePoint Migrator
- Hyper-V Reports
- Microsoft 365 Reporting Tool
- Microsoft Azure
- Microsoft Teams
- NTFS Security Audit
- NTFS Security Manager
- Office 365 Migration
- Office 365 Reporting
- Product Release
- SharePoint & Office 365 Archiving
- SharePoint Audit & Reporting
- SharePoint Content Importer
- SharePoint Management & Reporting
- SharePoint Migration
- SharePoint to SharePoint Migration
- Windows Enterprise Reporting

Contribute to the Microsoft 365 and Office forum! Click here to learn more 💡
April 9, 2024
Contribute to the Microsoft 365 and Office forum!
Click here to learn more 💡
Subscription, account, billing Top Forum Contributors: NoOneCan - Dillon Silzer - Stefan Blom 👍✅
April 17, 2024
Subscription, account, billing Top Forum Contributors:
NoOneCan - Dillon Silzer - Stefan Blom 👍✅
- Search the community and support articles
- Microsoft 365 and Office
- Subscription, account, billing
- Search Community member
Ask a new question
Azure Dynamic Groups - Based on O365 License
New to dynamic groups and am curious if this possible one way or another? Can I create a mail-enabled security group or distribution list that contains only O365 users with a specific type of license (IE: only O365 F1)?
I have an hybrid environment so this could be done on-prem then sync'd to Azure AD, or it can be an onmicrosoft.com type of account. It wont be used for email, the 3rd party application only needs the group to contain an email address (or perhaps a UPN).
Open to suggestions if people have more than one way to do it.
Report abuse
I have found this solution which has worked for my scenario. Thanks for trying though.
Create a Dynamic Rule Based on User License Plan – David's thoughts on Microsoft technologies (cloudyhappypeople.com)
My specific scenario was to collect all users with an O365 F3 license. I created a AzureAD group, specified dynamic membership and applied this rule:
USER.ASSIGNEDPLANS -ANY (ASSIGNEDPLAN.SERVICEPLANID -EQ "afc06cb0-b4f4-4473-8286-d644f70d8faf" -AND ASSIGNEDPLAN.CAPABILITYSTATUS -EQ "ENABLED")
After maybe 3-4 minutes, the group membership was collected and displayed.
One side note that I was not expecting is the O365 sent a welcome message to each person... ahhh ****. So I disabled that, and ran an Exchange content search to remove all that **** email from my users.
Disable welcome email for Microsoft 365 groups (spodev.com)
Powershell Command:
Set-UnifiedGroup -Identity "*** Email address is removed for privacy ***" -UnifiedGroupWelcomeMessageEnable:$false
1 person found this reply helpful
Was this reply helpful? Yes No
Sorry this didn't help.
Great! Thanks for your feedback.
How satisfied are you with this reply?
Thanks for your feedback, it helps us improve the site.
Thanks for your feedback.
Replies (3)
Question info.
- Norsk Bokmål
- Ελληνικά
- Русский
- עברית
- العربية
- ไทย
- 한국어
- 中文(简体)
- 中文(繁體)
- 日本語
- WHY WORK HERE
- We solve tough problems for organizations big and small. As a trusted partner to international brands, small firms, and colleges/universities, we need top-notch people to do what we do.

- We offer customized cybersecurity solutions in security, identity & access, compliance, and mobility and DaaS to help you stay ahead of an ever-evolving threat landscape.
- GET STARTED WITH OUR AD HEALTH CHECK

- In Sync: Proper Time Configuration in AD
- Identity & Access
- Mobility & DaaS
- Explore our resources for advice on boosting your organization's security.
- Stay up-to-date — read our experts' unique takes on trends in cybersecurity.

- Improving Entra ID B2B User Management with Cross-Tenant Synchronization
- Our experts are always ready to discuss your needs – whatever stage you’re at – and with no obligation.
- AD HEALTH CHECK
- We enhance your AD and improve its security with our holistic health assessment.

Automated Office 365 License Assignment with Entra ID Premium
- June 13, 2017
- Blog , Security
Brian Desmond
If you’ve recently begun an Office 365 deployment, you’ve undoubtedly run up against the problem of how to assign an Office 365 license to your users. Out of the box, the only option is a manual process of assigning licenses one-by-one. If you have more than a handful of users, that’s not a long-term option.
Without a license, end users will not be able to use Office 365 services like Exchange Online or OneDrive for Business, so it’s critical that users have the right Office 365 license(s) assigned to them. Historically, automating the assignment of licenses has required the development of custom PowerShell scripts or purchasing a third-party solution.
However, Microsoft has finally solved this problem with the introduction of Group Based License Assignment in Entra ID (formerly Azure Active Directory) Premium. With this new feature, you can automatically assign licenses to users based on their membership in security groups. These security groups can be synchronized from your on-premises Active Directory domain, or you can use dynamic security groups in Entra ID Premium that are automatically updated.
Even more helpful, you can not only assign entire licenses (e.g. Office 365 E3), but, you can decide what components (service plans) of an Office 365 license to include or exclude from the assignment. For example, you might decide that all users receive an E3 license, but only hourly employees are licensed for the Microsoft StaffHub component of E3.
Group Based Licensing is a premium feature, so you’ll need to make sure the users you need to license are covered by an Entra ID Premium or Enterprise Mobility Suite license. You’ll need to be a Global admin in Entra ID to configure this feature.
Six Steps to Group Based License Assignment
Getting started is easy. In this example, we’ll assign Office 365 E3 to a group called All Users, but we’ll make sure those users don’t get access to StaffHub. To begin, log in to the Azure management portal and go to your Entra ID and then follow these steps:
1 Click Licenses from the list of tasks:

2 Click All products
3 Select Office 365 Enterprise E3, and then click Assign on the toolbar:

4 Click Select users and/or groups and select the All Users group. Click Select on the bottom of the list.
5 Click Assignment options. Change the Microsoft StaffHub slider to Off and then click OK:

6 Finally, click Assign.
Once you complete this step, users will automatically be assigned the Office 365 E3 license without the Microsoft StaffHub component. Once you assign licenses to a group, the change may not always happen in real time, but, it should still happen quickly. If you assign a license to a very large group, it may take additional time for Entra ID to process your request.
Going forward, if you’re using groups synchronized from your on-premises Active Directory, as users are added to the group, they’ll automatically receive any additional licenses, and likewise as they’re removed from the group, they’ll lose the license they received from the group.
If you were previously assigning licenses directly to users, when they are removed from a group that also assigns the license, they won’t remove the license. The “direct” license assignment will still exist until you manually remove it.
Taking Group Based Licensing to the Next Step
As you can see, group based licensing can greatly simplify how you assign licenses to users. You will no longer need complicated PowerShell scripts that directly assign licenses to users. Even better, group based licensing isn’t just for Office 365. You can also use group based licensing to assign other licenses like Entra ID Premium, the Enterprise Mobility Suite, or Microsoft Dynamics.
How are you licensing your users in Office 365 today? Have you taken advantage of Entra ID Premium features like group based licensing yet? Learn more here.

[RELEVANT BLOG CONTENT]

Three Reasons to Use Azure Automation to Run Your Scripts
Azure Automation is a cloud-based service that can help you run scripts; configure, update, and manage operating systems; and manage your IT asset inventory. This

An Introduction to Protected Actions in Conditional Access
The Microsoft Azure portal includes a subset of permissions called protected actions, which can be used to manage Conditional Access (CA) policies and cross-tenant access

Windows 365 Boot and Switch: Building a Solid Foundation
In the ever-evolving landscape of digital workspace solutions, Windows 365 emerges as a cloud-based PC deployment solution tailored for organizations seeking enhanced security and centralized
6 Tips to Harden Your Windows LAPS Deployment
In a previous blog post, we covered how to migrate to Windows Local Administrator Password Solution (LAPS). With Windows LAPS deployments gaining traction, it’s important

Use Privileged Access Workstations to Increase Security
All organizations use privileged accounts to manage their environments. In many cases, administration is performed from productivity workstations, which are vulnerable to a substantial number

Active Directory: The End of the Road? Not Quite Yet!
Microsoft announced several enhancements to Active Directory Domain Services (AD DS) and Active Directory Lightweight Directory Services (AD LDS) that are included in the preview

Migrating to Windows LAPS
Windows Local Administrator Password Solution (LAPS), now integrated into the OS, is the replacement for Microsoft LAPS, which was a separate installation. Windows LAPS is
Virtual Machine Generation ID with Active Directory Domain Controllers
Active Directory (AD) domain controllers (DCs) have been around since Windows 2000. At that time, virtualization was in its infancy and almost every server was
Leave a Comment Cancel Reply
Your email address will not be published. Required fields are marked *
Save my name, email, and website in this browser for the next time I comment.
This site uses Akismet to reduce spam. Learn how your comment data is processed .
Ravenswood Technology Group is based in Chicago, IL but with customers around the world. We help companies, universities, and other organizations with less than 100 employees to over 500,000 build secure, hybrid infrastructure that enable their users to work from anywhere.

[What we do]
- Identity & Access
[Recent Blog Posts]
How to Sync Time in Active Directory
[Expertise]
- Active Directory Health Check
- Azure Government & Office 365 Government – GCC High
- Microsoft Entra ID
- Microsoft Sentinel
[Get in Touch]
© Ravenswood Technology Group, LLC
Documentation
Welcome to the Okta Community!
The Okta Community is not part of the Okta Service (as defined in your organization’s agreement with Okta). By continuing and accessing or using any part of the Okta Community, you agree to the terms and conditions , privacy policy , and community guidelines
Assign Microsoft Office 365 Licenses in Okta
Nov 20, 2023 • knowledge article, information.
- Okta Integration Network (OIN)
- Office 365 Licenses
- Individual Assignment
- Group Assignment
Check out the video on how to assign Office licenses in Okta.
Individual assignment:
If users are assigned as an individual to the Office integration, the licenses will be managed for each user individually by opening the application user profile from the Assignments tab and changing the licenses.
Group Assignment:
If the Office integration is assigned to an Okta group, all users that are part of that Okta group will use the licenses that the Okta administrator has chosen for that specific group. This flow allows an administrator to easily set a specific license or set of licenses to many users instead of doing this one by one.
If licenses are assigned through groups, some users might be part of multiple groups that are assigning different Office licenses. In order to avoid any possible license conflicts, there are two different options for doing this:
Group prioritization use case
- Office 365 integration combines license assignment values from multiple groups
Recommendation:
- Although it is possible, do not assign the Office integration to application groups. It is best to create an Okta group for this purpose and use a group rule to populate it with the users from the app group.
Related References
- Group rules best practices
- Create group rules
- About group rules
IMAGES
VIDEO
COMMENTS
Assign a license. Sign in to the Microsoft 365 admin center with a license administrator account. To manage licenses, the account must be a License Administrator, User Administrator, or Global Administrator. Browse to Billing > Licenses to open a page where you can see all licenses available in your organization.. Under Licenses, select the license that you would like to assign.
To assign a Microsoft 365 license to a group, follow these steps: Click on the group. Click Licenses > + Assignments. In our example, it's the group M365_Licenses_E3_Base. Select the license. Check which license options you want to assign to the group. Click Save.
While still in the Azure AD portal, navigate to Azure Active Directory —> Licenses —> All products. Check the product to license as Microsoft 365 E3 or another product. Click Assign. To choose the assignment group, click Users and groups. Select E3 Standard or the name of the group created earlier. Click Select.
Using PowerShell. The Office 365 admin portal provides a simple web interface for managing license assignments. It's easy to add a license for a user, or for multiple users, enable or disable sub-SKU features (the individual services that are included in a license), or remove a license. Licenses for multiple users can be managed at the same time.
Select the Groups blade. 2. Select your group from the list, then on the left-hand menu, select Licenses. Select licenses. 3. Select the Assignments button and check the license you wish to assign to this group (it could be a single license or multiple), then click Save. Select Assignments.
Open the newly created security group. Click on Identity > Groups > All groups. Click the newly created group > M365_E5_Default. Assign a new license to the group. Click on Licenses. Select Assignments. Click on Assignments. Select licenses to assign to the group. Select licenses Microsoft 365 E5 Developer.
The process of assigning a license to a group is done in the Azure AD portal. Go to the Azure AD blade and select "Licenses." Next, select "All products" under manage and you'll see a listing of the licenses available within your tenant. Select the license you want to work with (for this example, I selected E3) and then select "Assign" from the ...
Here are the steps in Azure AD to assign the licenses. This is based on the groups you created in Active Directory: Log in to https://portal.azure.com. Click on Azure Active Directory on the left and then Groups on the next tab that appears. Click on the Group name to open it. Click on Licenses on the menu under Manage.
To check if the Microsoft 365 user license is direct assigned or inherited from a group in Microsoft Entra admin center, follow the below steps: Sign in to Microsoft Entra admin center. Expand Identity > Billing > Licenses. Click All products. Click the Microsoft product name.
Edit Office 365 licenses and roles assigned to a user or group. Go to your Office 365 app instance and open the Assignments tab. From Filters, select a user or a group, then click the Edit button next to it. The Edit Assignment window opens. Check the appropriate check-boxes to assign or remove licenses and roles for the selected user or group.
To use group based license assignment Azure Subscription is required, at least for now. It may change once it is generally available. When new services are added by Microsoft to a product, it is automatically assigned to the users in group. Need an Efficient Office 365 License Management Tool to Assign, Remove & Recycle O365 User licenses ...
My specific scenario was to collect all users with an O365 F3 license. I created a AzureAD group, specified dynamic membership and applied this rule: USER.ASSIGNEDPLANS -ANY (ASSIGNEDPLAN.SERVICEPLANID -EQ "afc06cb0-b4f4-4473-8286-d644f70d8faf" -AND ASSIGNEDPLAN.CAPABILITYSTATUS -EQ "ENABLED") After maybe 3-4 minutes, the group membership was ...
1 Click Licenses from the list of tasks: 2 Click All products. 3 Select Office 365 Enterprise E3, and then click Assign on the toolbar: 4 Click Select users and/or groups and select the All Users group. Click Select on the bottom of the list. 5 Click Assignment options.
Group prioritization use case. Office 365 integration combines license assignment values from multiple groups; Recommendation: Although it is possible, do not assign the Office integration to application groups. It is best to create an Okta group for this purpose and use a group rule to populate it with the users from the app group. Related ...
undefined. Roll out Microsoft Copilot for Microsoft 365 at scale in three quick steps. See the methods for each to efficiently enable Copilot services: 1. Optimize Search with data controls in place to limit exposure of information in search. 2. Update Your Apps — both on desktop and mobile — so they are ready for integrated Copilot ...