
Feb 23, 2021

Export Word documents into PowerPoint presentations
Mohit Anand
- Add our blog to your RSS feed reader" href="/rss/blog.xml" data-bi-name="RSS Subscription" data-bi-id="rss_feed" data-bi-bhvr="120" data-bi-socchn="RSSSubscription" title="Microsoft 365 Insider Blog RSS" target="blank" class="d-inline-block">
Hi, Office Insiders, my name is Mohit Anand, and I’m a Program Manager on the PowerPoint team. I’m glad to share that a new scenario is now available in Word for the web . You can now export Word document s in to PowerPoint presentation s .
Word document s to PowerPoint presentation s
Have you ever wished you could easily export an existing Word document into a great PowerPoint presentation? If so, the wait is over!
When you use the Export command, it creates a presentation based on all the summarized sections of the document. It also adds imagery, icons, videos, themes, and fonts using AI.
How it works
To turn your Word document into a PowerPoint presentation:
- Open any document you want to convert into a presentation in Word for the web.
- Click File > Export > Export to PowerPoint presentation .
- When prompted , choose a design theme for your presentation.
- Click Open presentation to re view the results in PowerPoint for the w eb.
- The presentation w ill be created in the OneDrive root folder of the user who used this option.

Scenarios to try
- Open a Word document and explore the available PowerPoint themes.
- Open a Word document that is mostly text and see which AI-backed assets are added by clicking on Export .
Known Issues
- This feature is currently only available in English.
- It is not available in the Internet Explorer and Safari browser.
- We only support text content for the transformation to presentation, other media content support is not currently available. You can add your own media to the presentation after you have exported your Word document.
Availability
Export your document to PowerPoint presentation is rolling out to all Word for the web users shortly .
Features are released over some time to ensure that things are working smoothly. Therefore, we highlight features that you may not have because they’re slowly releasing to larger numbers of Insiders. Additionally, sometimes we remove elements to further improve them based on your feedback. Though this is rare, we also reserve the option to pull a feature entirely out of the product, even if you, as Insiders, have had the opportunity to try them.
Feedback
If you have any feedback or suggestions, you can submit them by clicking Help > Feedback.
Learn more about what other information you should include in your feedback to ensure it’s actionable and reaches the right people.
We’re excited to hear from you! Sign up for the Office Insider newsletter , and you’ll get the latest information about Insider features in your inbox once a month.
Sorry, JavaScript must be enabled to use this app.
- Accessories
- Entertainment
- PCs & Components
- Wi-Fi & Networks
- Newsletters
- Digital Magazine – Subscribe
- Digital Magazine – Info
- Smart Answers
- Best laptops
- Best antivirus
- Best monitors
- Laptop deals
- Desktop PC deals
When you purchase through links in our articles, we may earn a small commission. This doesn't affect our editorial independence .
How to convert a Word document to a PowerPoint presentation

Whether you’re more comfortable working in PowerPoint or you’d like to present the content of your Word document in a different way, we’ve got you covered, There are a few different ways to convert a Word document to a PowerPoint presentation. If you have a Microsoft 365 account, you can use Word for the Web to make the conversion or you can do it directly with PowerPoint. There’s another option, too. Don’t want to convert your document to a presentation, but still need to use it as a reference? You can insert it as an object directly in a slide. If this all sounds super complicated, don’t worry. We’ll guide you each step of the way.
Convert a Word Document to a PowerPoint Presentation Using Word for the Web
First, open your web browser and log in to Office. Once logged in, open the document you want to convert in Word for the Web, and click the “File” tab in the top-left corner of the window.

IDG / Marshall Gunnell
Click “Export” in the left-hand pane and select “Export to PowerPoint Presentation (Preview).”

The Export to Presentation window will appear. Here, select the design theme you’d like to use and click “Export.”

Word for the Web will then begin preparing your new presentation. Once ready, click “Open Presentation.”

Your presentation will open in PowerPoint for the Web. If you need a local copy, you can always download it by going to File > Save as > Download a Copy.
Convert a Word Document to a PowerPoint Presentation Using PowerPoint
You can convert your Word document to a PowerPoint presentation using PowerPoint itself, but you’ll need to make sure your Word document is properly formatted for the conversion first. For content that you want to use as a slide title, make sure you give it the Heading 1 style. For content you want to use as text in the slide, give it the Heading 2 style.
Once you’re ready, open PowerPoint and make sure you’re in the “Home” tab. Next, select “New Slide” in the ribbon and then “Slides from Outline” from the bottom of the menu that appears.

From here, locate the Word document you want to use, select it, and click “Insert.”

PowerPoint will then do its thing. While this way isn’t as good as using Word for the Web, it’ll still get the job done.
Insert Your Word Document as an Object in Your Presentation
If you’re not interested in converting your Word document to a PowerPoint presentation, you can insert it as an object for quick access.
Before we proceed, it’s important you understand the difference between the two types of objects you can insert your document as: Linked or Embedded.
The main difference between the two is where the data is stored. If you embed the object in your presentation, the data from that object is stored in the presentation. This is good if you’re worried about the location of the word document changing (which can break a linked object), but it will increase your file size. A linked object only inserts a link to the source file. In other words, the data from the object isn’t stored in the presentation—it simply links to it. This will keep your file size down, but that link may break if the source file is moved to a different location.
To insert your Word document as an object in your presentation, open your presentation and navigate to the slide you would like to add the object to. From there, click the “Insert” tab and select “Object.”

The Insert Object window will appear. Select “Create from File and click “Browse.”

Locate and select the document you would like to insert. Once inserted, you have two choices. You can either display the entire Word document in the PowerPoint slide or simply display the document icon. If you choose the latter, the document will open in Word when selected.

Click “OK” to insert the object. That’s all there is to it!
Author: Marshall Gunnell
Recent stories by marshall gunnell:.
- How to add the Developer tab to the Microsoft Office Ribbon
- How to block (and unblock) someone in Gmail
- How to enable dark mode in Microsoft Office
- Skip to main content
- Skip to secondary menu
- Skip to primary sidebar
- Skip to footer
Erin Wright Writing
Writing-Related Software Tutorials
How to Convert Microsoft Word Documents to PowerPoint Slides Using Word for the Web
By Erin Wright
This tutorial shows how to convert Microsoft Word documents to PowerPoint slides using Word for the web.
We will also look at how to download the converted file to your computer so you can finish customizing the slides in the desktop version of PowerPoint.
Watch all the steps shown here in real time!
Explore more than 250 writing-related software tutorials on my YouTube channel .
Table of Contents:
How to Convert Word Documents to PowerPoint Slides
- How to Download PowerPoint for Web Files to Your Computer
Your Word document’s first-level heading will become the cover slide. Your second-level headings will become the individual slide titles. For information about creating headings, see “ How to Create and Customize Headings in Microsoft Word (PC & Mac) .
- Log in to your Microsoft 365 account at microsoft365.com using a browser such as Edge or Chrome. (This feature isn’t available in the Safari browser.)
- If your Word file is stored on your computer, select the Upload option.

- Locate and select the Word file in the Open dialog box and then select the Open button.

- After your file opens, select the File tab.

- Select the Export tab.
- Select the Export to PowerPoint presentation option.

- Select a design option from the Export to presentation dialog box. (Select the See more themes button, if necessary.)
Pro Tip: You can change and customize your design later, so don’t worry if you can’t find one that is perfect.
- Select the Export button.

- Select the Open Presentation button.

Your Word document will appear as slides in PowerPoint for the web. The new PowerPoint (.pptx) file should be saved in your OneDrive account. Continue to edit the slides in PowerPoint for the web, as you normally would.
Alternatively, download the file to your computer in order to customize your slides in the PowerPoint desktop app.
How to Download PowerPoint for the Web Files to Your Computer
- Select the File tab.

- Select the Save as option.

- Select the Download a copy option.

- Select the Download button in the dialog box.

- Locate and select the file in your browser’s Download folder or press Windows + E to open File Explorer.
- Select the PowerPoint file in your Downloads folder to open it in your desktop PowerPoint app.
Friendly Reminder: Remember to save your PowerPoint file in another location other than your Downloads folder.
Related Resources
How to Convert a Microsoft Word Outline into PowerPoint Slides
How to Convert a Microsoft Word Outline into PowerPoint Slides on Mac
How to Insert a Linked PowerPoint Slide in Microsoft Word
- Microsoft Word Tutorials
- Adobe Acrobat Tutorials
- PowerPoint Tutorials
- Writing Tips
- Editing Tips
- Writing-Related Resources
How to Convert a Word Document into a PowerPoint Presentation
Easily convert a Word document into a PowerPoint presentation by formatting the document with proper Headings to automatically create separate slides in the presentation.

If you are heavily invested in Microsoft Office and use it for both personal and professional purposes, chances are you might need to convert your document from one format to another. One of the most common conversions users generally go with is Word document to PowerPoint presentation.
Copy/pasting the content of a document in a presentation is not feasible if the document is lengthy. Also, with the conversion feature embedded right into Microsoft Word, the need to use such outdated concepts negates. The feature to convert uses Artificial Intelligence for the job and is highly effective.
Preparing the Document for Converting into a Presentation
It is fairly easy to convert, given, you are aware of the basic formatting. All you have to do is format the text using the various heading options available in Microsoft Word.
The conversion process will use the Headings in your Word document and create separate slides based on the same into a PowerPoint presentation.
Since we are discussing the basics of the subject, we will only be using ‘Heading 1’ for slide’s Title in the converted presentation and ‘Heading 2’ as the slide content. You can similarly use the other available options in the ‘Style’ section of Word to enhance the clarity and quality of the presentation.
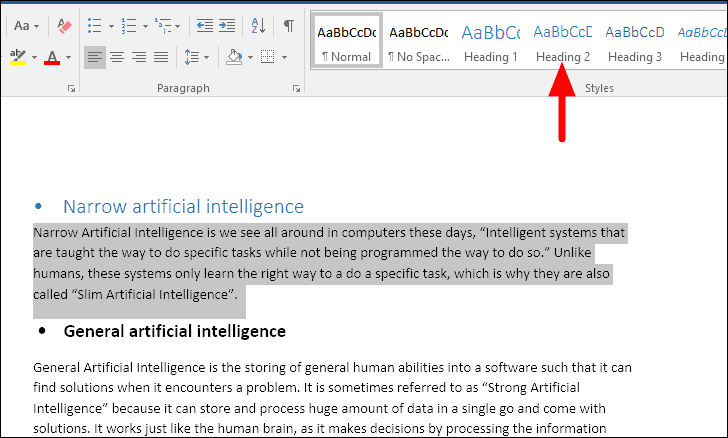
To format the titles, highlight them and then select ‘Heading 1’ from the ‘Styles’ section at the top. Remember, this will be used as the slide title in the PowerPoint presentation after being converted.
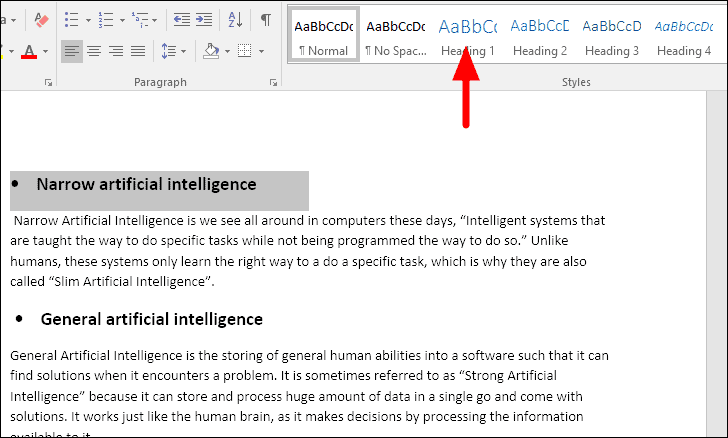
For the text under the heading, you can use other heading options. Again, highlight the content under the topic and select ‘Heading 2’. Since this will be nested under the Heading 1 that we previously used, the conversion process will put it as the slide content for the heading.
You can similarly format the rest of the document and make it readable and ready for conversion.
After you format the text, the text color will change to blue, which can be changed later on, using the themes options in Word.
To change the theme, go to the ‘Design’ tab at the top and then select the suitable document formatting from the listed options.

In this case, we have used ‘Basic (Stylish)’ and the text now looks green which is catchy and enhances the visual appeal of a presentation.

Converting Word Document to Presentation
There are two ways you can convert your document to a presentation, either through Microsoft Word or through Microsoft PowerPoint. However, for both methods, you will have to format the text in headings (for slide titles) and sub-headings (for slide content) structure in the document so that it can be converted.
Converting with Microsoft Word
After you have formatted the document, you will need to add the option to convert a document to presentation in the app’s toolbar, if not enabled currently, which will then be added to the top of Microsoft Word.
Click on the ‘File’ menu at the top-left corner to view the various options.
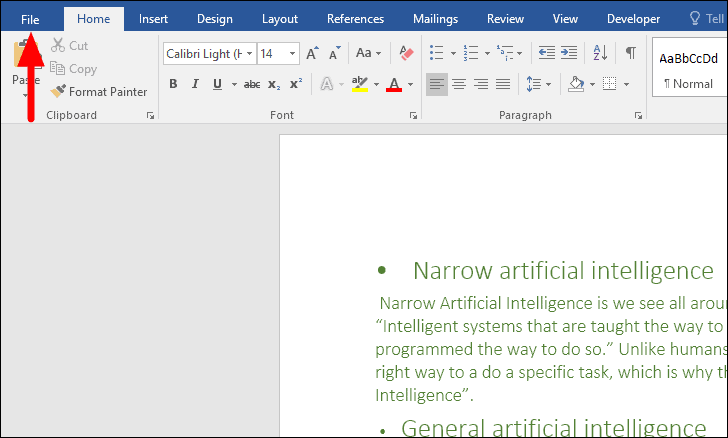
You can now view the information of the current document along with a bunch of features on the left. To enable the conversion icon, select ‘Options’ from the list on the left.
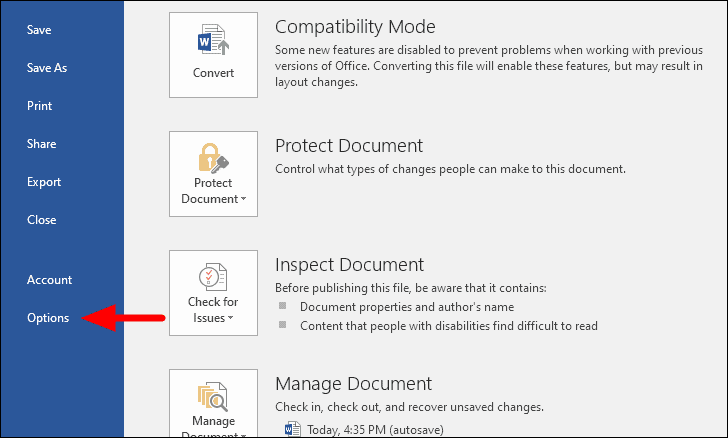
The ‘Word Options’ window will open, select the ‘Quick-Access Toolbar’ tab on the left.
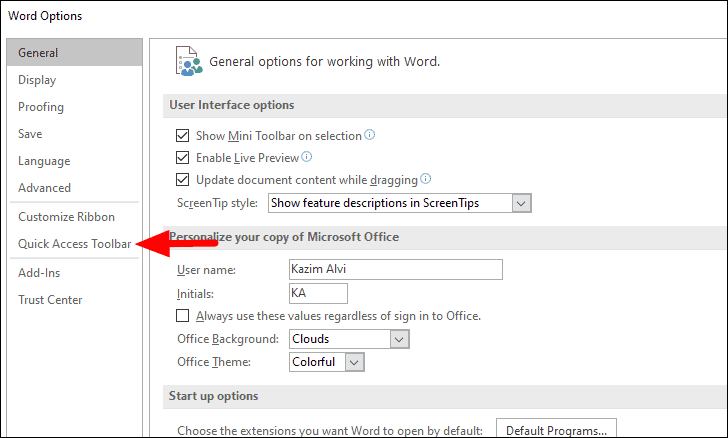
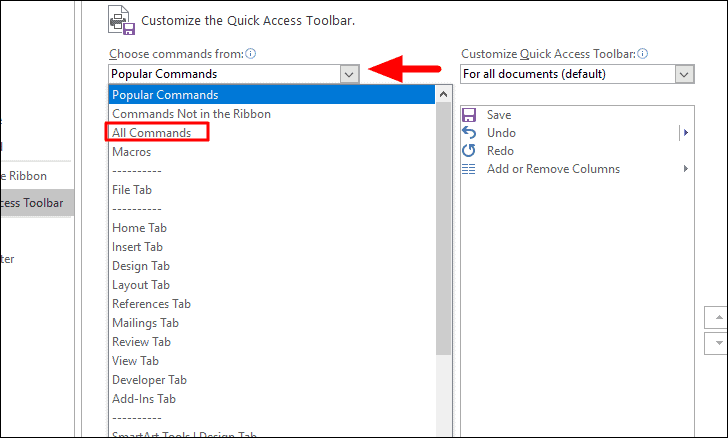
You can now customize the quick access toolbar from this section. Click on the box under ‘Choose commands from’ and select ‘All Commands’ from the drop-down menu.
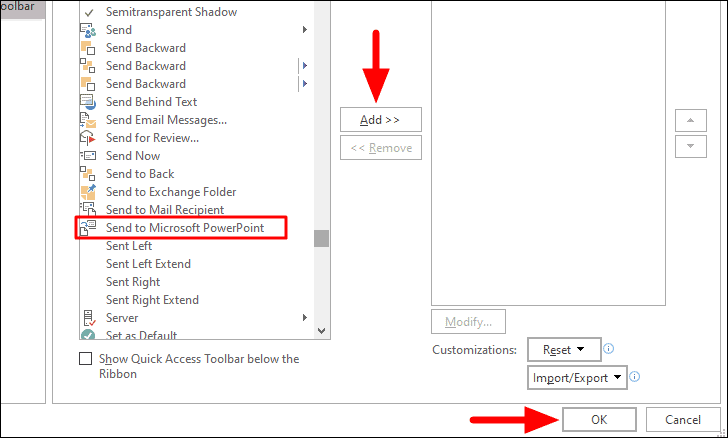
Next, scroll down and look for ‘Send to Microsoft PowerPoint’ from the list and click on ‘Add’ to enable it. The options are listed in alphabetical order; therefore, it wouldn’t be difficult to locate it. After you have added the feature to Microsoft Word, click on ‘OK’ at the bottom to save the changes and close the window.
Now, to convert the document into a PowerPoint presentation, click on ‘Send to Microsoft PowerPoint’ icon that we just added in the instructions above. You can find it above the ribbon bar in Word.
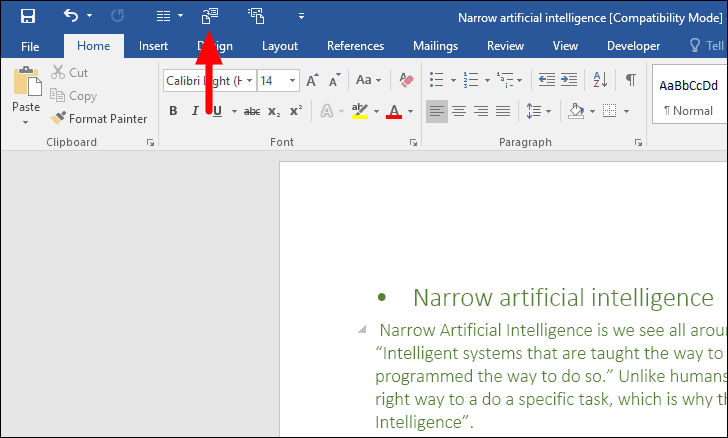
After you click on ‘Send to Microsoft PowerPoint’ icon, the conversion process will begin. It may take some time depending on the document type and length to convert it. Once the conversion is done, the document will now be in form of a presentation, differentiated by the headings we used earlier.
Converting with Microsoft PowerPoint
The process to convert a Word document to a PowerPoint Presentation is intricate in Microsoft Word, however, it is pretty straightforward and simple in Microsoft PowerPoint.
Open a new presentation on Microsoft PowerPoint and then select the ‘Insert’ tab at the top.
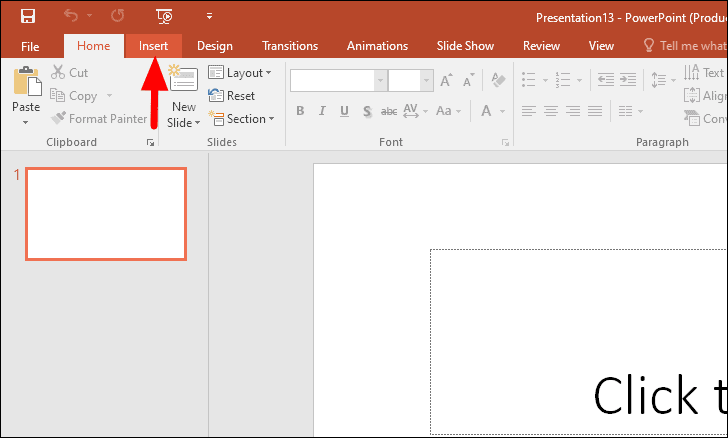
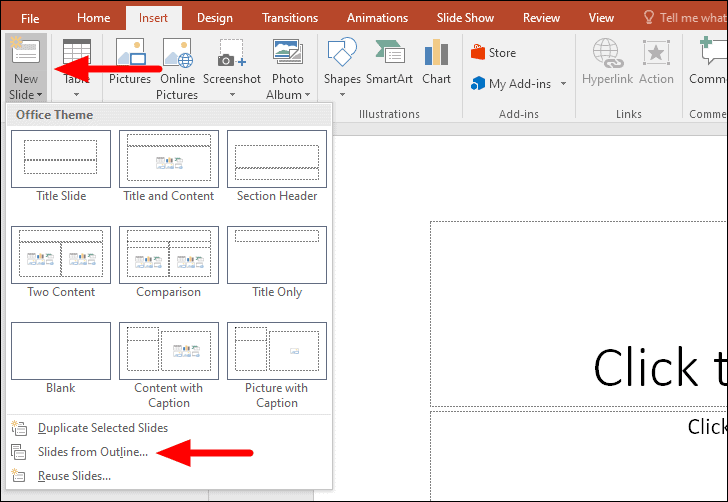
In the ‘Insert’ tab, you will see the option to add various items to the presentation. Since we are here to add a document, click on the ‘New Slide’ icon, the first option from the left. Next, select ‘Slides from Outline’ from the drop-down menu.
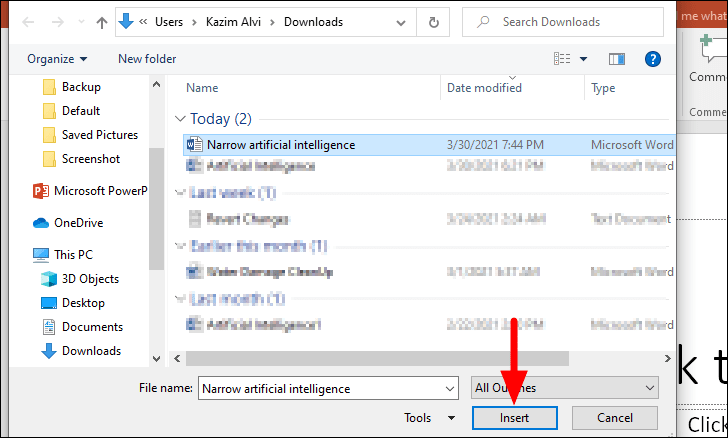
The ‘Insert Outline’ window will open where you can locate and select the document which you want to convert. After you have selected the document, click on ‘Insert’ at the bottom to convert and add to Microsoft PowerPoint.
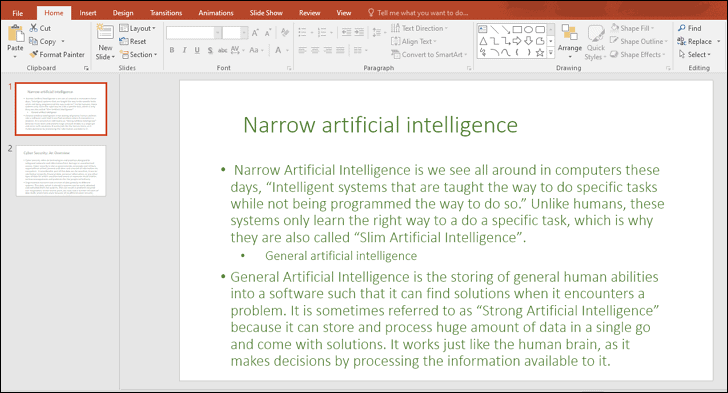
The Word document is now converted to a PowerPoint presentation and the content is distributed between slides by the heading levels that we earlier formatted.
Converting a document to a presentation might have seemed like a herculean task earlier, but it won’t be the case from now on. You can use either of the two methods discussed above for the conversion and save yourself from the hassle of copy/paste. Also, do remember to format the text accurately to attain effective results.

How to Use Gemini Code Assist in VS Code

How to Code Using AI

Microsoft Copilot Pro Review: There is a lot of Unrealized Potential
Get all the latest posts delivered straight to your inbox., member discussion.

How to Enable and Use Arc Sync in Arc Search Browser on iPhone

How to Debloat and Clean Up Microsoft Edge

How to Use AI Silence Remover in Microsoft Clipchamp

What is Super Drag and Drop in Microsoft Edge and How to Enable It

How to Use Microsoft Edge Drop to Share Files Between Your Devices
We explain and teach technology, solve tech problems and help you make gadget buying decisions.
Top 3 Ways to Convert Your Microsoft Word Document Into a PowerPoint Presentation

Maria is a Content Writer with a keen interest in Technology and Productivity Tools. Her articles can be found on sites such as Onlinetivity and Delesign. Outside of work, you can find her mini-blogging about her life on social media.
What if you want to make a Presentation out of a Microsoft Word document? The obvious way is to transfer the contents from the Word document to a PowerPoint slide by copying and pasting text. However, this process might be tedious, especially if the Word document is text-heavy.

An alternative to copying and pasting contents between PowerPoint and Word files would be to convert the Word document into a PowerPoint. There are three ways to go about the conversion of Word documents to PowerPoint. They include:
Using the Export to PowerPoint Option on Office for Web
Using the Word Web App, Microsoft 365 subscribers can easily convert Word documents into PowerPoint Presentations. The Presentation is created based on all summarized sections of the Word file and using AI, images, fonts, and icons may be added.
Here are the steps to follow to use this option.
Step 1: Launch a browser (preferably a Chromium-based browser).

Step 2: Go to Word.Office.com and log in using your Microsoft 365 account details.
Launch Microsoft Word for Web

Step 3: Launch the Word document that you plan to convert.

Step 4: On the opened Word document, click on File.

Step 5: Click on Export.

Step 6: Select the option to Export to PowerPoint presentation.

Step 7: Choose your preferred PowerPoint theme and click on Export.

Step 8: Click on Open Presentation to view your converted document.

While this method is quick and straightforward, it has the following limitations:
- It only supports the English language.
- It cannot be used on Internet Explorer or Safari browsers.
- Media content can only be added after transformation.
Importing the Word Document Into PowerPoint
You can import Word documents directly into PowerPoint. However, before importing, users may need to format the document to ensure it looks appealing on PowerPoint. Here are the steps to import Word into PowerPoint.
Step 1: Launch the Word document.
Step 2: For each section of the Word document that you would like to have an individual slide, add a header by selecting Heading 1, 2, etc. on the Home tab, within the Styles group.

Step 3: To ensure separate slides are created for every new section, press the Enter key on your keyboard to leave an empty line between the end of a section and the title of a new section.
Step 4: After creating the outline, you can change the Font size, color and type.

Step 5: Click on Save to save the new changes to the document.
Step 6: Launch PowerPoint.

Step 7: Click on File and then select Open.

Step 8: Select Browse.

Step 9: On File Explorer, change the file type from All PowerPoint Presentations to All Outlines.

Step 10: Select the formatted document from the saved location and click on Open and PowerPoint will create a new presentation based on your Headers.
Now, that you have the sections for your Presentation, you can add more content and include your preferred design.
Using an Online File Converter
One of the easiest ways to convert your Word documents to PowerPoint presentations is to use an online file converter. There are options available and most of them operate in the same manner. Check the steps below to find how to convert your documents to presentations using an online file converter:
Step 1: Type the address of the online file converter in your browser and press Enter. For this guide we’re using Online2PDF’s tool for converting a Word file to an Presentation.
Visit Online2PDF

Step 2: Click on convert Word to PowerPoint.
Step 3: Upload the Word document by clicking on Upload or Select Files then navigate to the location of the file on your PC.

Step 4: To begin the conversion, select Convert.

Step 5: Click on Download to view the converted file on your desktop.
If data privacy is a concern, using online converters might not be the best option as there is no assurance on if your data is stored and shared with other parties.
Converting PowerPoints to Keynotes
Using any of the three methods stated above, you should be able to convert your Word document into PowerPoint. If you want to use Apple’s software, then you can convert PowerPoint Presentations to Keynotes .
Was this helpful?
Last updated on 07 February, 2022
The above article may contain affiliate links which help support Guiding Tech. However, it does not affect our editorial integrity. The content remains unbiased and authentic.
Leave a Reply Cancel reply
Your email address will not be published. Required fields are marked *
The article above may contain affiliate links which help support Guiding Tech. The content remains unbiased and authentic and will never affect our editorial integrity.
DID YOU KNOW

Maria Victoria
More in windows.

Top 6 Fixes for Cloud Gaming Not Working in Xbox App for Windows

3 Best Ways to Identify Fonts in PDF Files in Windows 10
Join the newsletter.
Get Guiding Tech articles delivered to your inbox.

Link or embed a PowerPoint slide in a Word document
When you want to create a dynamic link between the content of your document and the content in a PowerPoint presentation, insert the content as an object . Unlike when you paste content (such as by pressing Ctrl+V), when you insert it as a linked or embedded object, you can still work with the content in the original program where it was created.
If you insert the slide into the document as a PowerPoint object, Word runs PowerPoint when you double-click the slide, and you can use PowerPoint commands to work with the slide.
When you insert an entire PowerPoint presentation as an object, the document displays only one slide. To display different slides, double-click the PowerPoint object, and then press Enter to run the slide show.
Insert a linked object or embedded object
You can link or embed one or more slides, or you can embed an entire presentation. When you embed a PowerPoint presentation object in your document, Word runs the PowerPoint slide show when you double-click the presentation object in the document. You cannot edit the presentation within the document. The presentation object can be embedded only, not linked.
Open both the Word document and the PowerPoint presentation that contains the slides that you want to create a linked object or embedded object from.
Switch to PowerPoint, and then select the entire presentation or the slides that you want.
Note: To select slides, in Slide Sorter view, click the slide that you want. To select a range of slides, hold down Shift while you click the first and the last slides of the range. To select multiple slides that are not next to each other, hold down Ctrl while you click the slides that you want.
Press Ctrl+C.
Switch to the Word document, and then click where you want the information to appear.
On the Home tab, in the Clipboard group, click the arrow under Paste , and then click Paste Special .
In the As list, select Microsoft PowerPoint Presentation object or Microsoft PowerPoint Slide object .
Select Paste to insert an embedded object, or select Paste link to insert a link to the object, and then click OK .
Alternatively, you can insert a link to the object as follows.
On the Insert tab, in the Text group, click the arrow next to Object , and then select Object .
Click the Create from File tab, and browse to the location of your presentation.
Select Link to file or Display as icon , and then click OK .
Top of page
Update linked objects
By default, linked objects are updated automatically. This means that Word updates the linked information every time you open the Word file or any time the source PowerPoint file changes while the Word file is open. However, you can change the settings for individual linked objects so that the linked object is not updated or so that it is updated only when the reader of your document chooses to manually update it.
You can also prevent Word from automatically updating links in all the documents that you open. You can do this as a security measure, to prevent updating documents with files that are potentially from an untrusted source.
Important: When you open a document that contains linked objects, Word prompts you to update the document with data from the linked files. If you suspect that the linked files may be from an untrusted source, click No in this message.
In addition, you can permanently break the connection between a linked object and its source PowerPoint file. When the connection is broken, you can no longer edit the object in the document; it becomes a picture of the PowerPoint content.
Manually update a linked object
Right-click the linked object, click Linked Slide Object or Linked Presentation Object , and then click Links .
Click the link that you want to update manually, and then under Update method for selected link , click Manual update .
Prevent a linked object from being updated
Click the link that you want to prevent from being updated, and then under Update method for selected link , select the Locked check box.
Note: To unlock the link, clear the Locked check box.
Prevent Word from automatically updating links in all documents
On the File tab, click Options ..
Click Advanced , and then scroll down to General .
Clear the Update automatic links at open check box.
Break the connection between a linked object and its source
Click the link that you want to disconnect, and then click Break Link .
Change linked or embedded objects
Right-click the linked object, and then click Linked Slide Object or Linked Presentation Object .
Click Open or Open Link , depending on whether the object is embedded or linked, and then make the changes that you want.
If the object is embedded, the changes are only in the copy that is in the document. If the object is linked, the changes are made to the source file.
The differences between linked objects and embedded objects
The main differences between linked objects and embedded objects are where the data is stored and how you update the data after you place it in the destination file.
You place either a link to the object or a copy of the object in the document. You can insert content this way from any program that supports the technology of linking and embedding objects (object linking and embedding, or OLE).
For example, a monthly status report may contain information that is separately maintained in a PowerPoint slide. If you link the report to the slide, the data in the report can be updated whenever the source file is updated. If you embed the slide in the report, your report contains a static copy of the data.
1. Embedded object
2. Linked object
3. Source file
When an object is linked, information can be updated if the source file is modified. Linked data is stored in the source file. The Word file, or destination file, stores only the location of the source file, and it displays a representation of the linked data. Use linked objects if file size is a consideration.
Linking is also useful when you want to include information that is maintained independently, such as data collected by a different department, and when you need to keep that information up-to-date in a Word document.
When you embed a PowerPoint object, information in the Word file doesn't change if you modify the source PowerPoint file. Embedded objects become part of the Word file and, after they are inserted, they are no longer part of the source file.
Because the information is totally contained in one Word document, embedding is useful when you don't want the information to reflect changes in the source file, or when you don't want the document recipients to be concerned with updating the linked information.

Need more help?
Want more options.
Explore subscription benefits, browse training courses, learn how to secure your device, and more.

Microsoft 365 subscription benefits

Microsoft 365 training

Microsoft security

Accessibility center
Communities help you ask and answer questions, give feedback, and hear from experts with rich knowledge.

Ask the Microsoft Community

Microsoft Tech Community

Windows Insiders
Microsoft 365 Insiders
Was this information helpful?
Thank you for your feedback.
Free presentation tools
Convert Word to PPT
Use our free Word to PPT tool to read the contents of a .doc or .docx file and convert it into a professionally-designed slide deck in minutes.
Editorial Presentation Template
Minimalist template inspired by print media. For use in Plus AI.
.png)
Forest Floor Presentation Template
Muted, mossy green template. For use in Plus AI.
.png)
Mallorca Colorful Presentation Template
A bright and retro template for personal and professional use. Compatible with Plus AI.

Minimalist Light Professional Presentation Template
A bright and airy professional template for use with Plus AI.
.png)
Modernist Professional Presentation Template
Clean and modern template for business presentations. For use in Plus AI.
.png)
Retro Analog Presentation Template
Brutalism-inspired, unusual slide designs. For use with Plus AI.

Swiss Light Professional Presentation Template
A clean and modern template for use with Plus AI

Swiss Dark Professional Presentation Template
A clean and modern dark-mode template for use with Plus AI
.png)
Sunnyside Education Presentation Template
A bright and cheerful education-friendly template. For use with Plus AI
.png)
Unicorn Gradient Background Template
Unicorn Gradient Background Template. For use with Plus AI.

Cosmic Dust Gradient Background Template
A gradient background template with a moody aesthetic. For use with Plus AI.
Word to PPT converter features
Can i export a word document to powerpoint.
Microsoft's support documentation states you can click File -> Export -> Export to PowerPoint from within Word, but it appears this option typically does exist for most users.
If your Word doc is primarily text content that would require you to make slide designs from scratch, we would recommend using an AI presentation builder like Plus AI to convert it into slides.
Can I convert Word to PowerPoint for free?
Yes, you can use Plus AI's free Word to PPT tool to convert a Word doc into a presentation.
Why can't I convert Word to PowerPoint?
It appears that only certain file types and versions of Word allow users to export their documents to PowerPoint.
If you need to transform text content into a presentation format, try using an AI presentation tool like Plus AI instead.
How to convert Word to PPT using AI?
With an AI tool like Plus AI, you can write an outline, take an existing essay, or use notes in a document to create a presentaton.
Just install Plus AI, upload your Word document in document to presentation mode, select a template, and Plus will generate a presentation in minutes.
Get more with Plus AI for Enterprise

- Billing Plan
- Payment Method
- Notifications
- OCR Converter
- Video Converter
- Audio Converter
- E-book Converter
- Image Converter
- Archive Converter
- Vector Converter
- Document Converter
- Video to MP3
- PDF Converter
- Image to PDF
- Image to Word
- Unit Converter
- Time Converter
- Video Compressor
- Image Compressor
- GIF Compressor
- MP3 Compressor
- WAV Compressor
- Compress PDF
- Compress JPEG
- Compress PNG
- Video to GIF
- WEBM to GIF
- APNG to GIF
- GIF to APNG
- Video Trimmer
- API Job Builder
- API Documentation
- File Conversion API
- Image Conversion API
- Audio Conversion API
- Document Conversion API
- PDF Conversion API
- MP4 Conversion API
- Video Conversion API
- JPG to PDF API
- Video to MP3 API
- HEIC to JPG API
- PDF to JPG API
- Webp to PNG API
- PDF to WORD API
- MP4 to MP3 API
- Webp to JPG API
- WORD to PDF API
- HTML to PDF API
- Website Screenshot API
- Video Compression API
- Compress PDF API
- Image Compression API
PPT to WORD Converter
Convert PPT to WORD online, for free.
- From Device
- From Dropbox
- From Google Drive
- From OneDrive

Drop any files here!
- Reset all options
- Apply from Preset
- Save as Preset
How to Convert PPT to WORD?
- Click the “Choose Files” button to select your PPT files.
- Click the “Convert to WORD” button to start the conversion.
- When the status change to “Done” click the “Download WORD” button
Easy to Use
Simply upload your PPT files and click the convert button. You can also batch convert PPT to WORD format.
Best Quality
We use both open source and custom software to make sure our conversions are of the highest quality. In most cases, you can fine-tune conversion parameters using “Advanced Settings” (optional, look for the icon).
Free & Secure
Our PPT to WORD Converter is free and works on any web browser. We guarantee file security and privacy. Files are protected with 256-bit SSL encryption and automatically delete after a few hours.
Convert other files to WORD format
FreeConvert.com can convert your other files to WORD format:
- WORD Converter
- HTM to WORD
- PUB to WORD
- DOCM to WORD
- Webpage to WORD
- DOTX to WORD
- WPS to WORD
- PAGES to WORD
- DOT to WORD
- ODT to WORD
- TEXT to WORD
- TXT to WORD
- PDF to WORD
- HTML to WORD
- RTF to WORD
- PPTX to WORD
- EPUB to WORD
- SVG to WORD
- PSD to WORD
- WebP to WORD
- ODD to WORD
- BMP to WORD
- GIF to WORD
- JPG to WORD
- TIFF to WORD
- PNG to WORD
Convert Your PPT files to other formats
FreeConvert.com can convert your PPT files to these other formats:
- PPT Converter
- PPT to DOCX
- PPT to PPTX
- PPT to JPEG
Want to convert large files without a queue or Ads?
Upgrade Now
- MP4 Converter
- MP3 Converter
- HEIC to JPG
Document & Ebook
- PDF to Word
- EPUB to PDF
- EPUB to Mobi
Archive & Time
- Pound to KG
- KG to Pound
- Feet to Meter
- Collage Maker
- Image Resizer
- Color Picker
Mobile Apps
- Collage Maker Android
- Collage Maker iOS
- Image Converter Android
- Image Converter iOS
© FreeConvert.com v2.23 All rights reserved (2024)
How-To Geek
6 ways to create more interactive powerpoint presentations.
Engage your audience with cool, actionable features.
Quick Links
- Add a QR code
- Embed Microsoft Forms (Education or Business Only)
- Embed a Live Web Page
- Add Links and Menus
- Add Clickable Images to Give More Info
- Add a Countdown Timer
We've all been to a presentation where the speaker bores you to death with a mundane PowerPoint presentation. Actually, the speaker could have kept you much more engaged by adding some interactive features to their slideshow. Let's look into some of these options.
1. Add a QR code
Adding a QR code can be particularly useful if you want to direct your audience to an online form, website, or video.
Some websites have in-built ways to create a QR code. For example, on Microsoft Forms , when you click "Collect Responses," you'll see the QR code option via the icon highlighted in the screenshot below. You can either right-click the QR code to copy and paste it into your presentation, or click "Download" to add it to your device gallery to insert the QR code as a picture.
In fact, you can easily add a QR code to take your viewer to any website. On Microsoft Edge, right-click anywhere on a web page where there isn't already a link, and left-click "Create QR Code For This Page."
You can also create QR codes in other browsers, such as Chrome.
You can then copy or download the QR code to use wherever you like in your presentation.
2. Embed Microsoft Forms (Education or Business Only)
If you plan to send your PPT presentation to others—for example, if you're a trainer sending step-by-step instruction presentation, a teacher sending an independent learning task to your students, or a campaigner for your local councilor sending a persuasive PPT to constituents—you might want to embed a quiz, questionnaire, pole, or feedback survey in your presentation.
In PowerPoint, open the "Insert" tab on the ribbon, and in the Forms group, click "Forms". If you cannot see this option, you can add new buttons to the ribbon .
As at April 2024, this feature is only available for those using their work or school account. We're using a Microsoft 365 Personal account in the screenshot below, which is why the Forms icon is grayed out.
Then, a sidebar will appear on the right-hand side of your screen, where you can either choose a form you have already created or opt to craft a new form.
Now, you can share your PPT presentation with others , who can click the fields and submit their responses when they view the presentation.
3. Embed a Live Web Page
You could always screenshot a web page and paste that into your PPT, but that's not a very interactive addition to your presentation. Instead, you can embed a live web page into your PPT so that people with access to your presentation can interact actively with its contents.
To do this, we will need to add an add-in to our PPT account .
Add-ins are not always reliable or secure. Before installing an add-in to your Microsoft account, check that the author is a reputable company, and type the add-in's name into a search engine to read reviews and other users' experiences.
To embed a web page, add the Web Viewer add-in ( this is an add-in created by Microsoft ).
Go to the relevant slide and open the Web Viewer add-in. Then, copy and paste the secure URL into the field box, and remove https:// from the start of the address. In our example, we will add a selector wheel to our slide. Click "Preview" to see a sample of the web page's appearance in your presentation.
This is how ours will look.
When you or someone with access to your presentation views the slideshow, this web page will be live and interactive.
4. Add Links and Menus
As well as moving from one slide to the next through a keyboard action or mouse click, you can create links within your presentation to direct the audience to specific locations.
To create a link, right-click the outline of the clickable object, and click "Link."
In the Insert Hyperlink dialog box, click "Place In This Document," choose the landing destination, and click "OK."
What's more, to make it clear that an object is clickable, you can use action buttons. Open the "Insert" tab on the ribbon, click "Shape," and then choose an appropriate action button. Usefully, PPT will automatically prompt you to add a link to these shapes.
You might also want a menu that displays on every slide. Once you have created the menu, add the links using the method outlined above. Then, select all the items, press Ctrl+C (copy), and then use Ctrl+V to paste them in your other slides.
5. Add Clickable Images to Give More Info
Through PowerPoint's animations, you can give your viewer the power to choose what they see and when they see it. This works nicely whether you're planning to send your presentation to others to run through independently or whether you're presenting in front of a group and want your audience to decide which action they want to take.
Start by creating the objects that will be clickable (trigger) and the items that will appear (pop-up).
Then, select all the pop-ups together. When you click "Animations" on the ribbon and choose an appropriate animation for the effect you want to achieve, this will be applied to all objects you have selected.
The next step is to rename the triggers in your presentation. To do this, open the "Home" tab, and in the Editing group, click "Select", and then "Selection Pane."
With the Selection Pane open, select each trigger on your slide individually, and rename them in the Selection Pane, so that they can be easily linked to in the next step.
Finally, go back to the first pop-up. Open the "Animations" tab, and in the Advanced Animation group, click the "Trigger" drop-down arrow. Then, you can set the item to appear when a trigger is clicked in your presentation.
If you want your item to disappear when the trigger is clicked again, select the pop-up, click "Add Animation" in the Advanced Animation group, choose an Exit animation, and follow the same step to link that animation to the trigger button.
6. Add a Countdown Timer
A great way to get your audience to engage with your PPT presentation is to keep them on edge by adding a countdown timer. Whether you're leading a presentation and want to let your audience stop to discuss a topic, or running an online quiz with time-limit questions, having a countdown timer means your audience will keep their eye on your slide throughout.
To do this, you need to animate text boxes or shapes containing your countdown numbers. Choose and format a shape and type the highest number that your countdown clock will need. In our case, we're creating a 10-second timer.
Now, with your shape selected, open the "Animations" tab on the ribbon and click the animation drop-down arrow. Then, in the Exit menu, click "Disappear."
Open the Animation Pane, and click the drop-down arrow next to the animation you've just added. From there, choose "Timing."
Make sure "On Click" is selected in the Start menu, and change the Delay option to "1 second," before clicking "OK."
Then, with this shape still selected, press Ctrl+C (copy), and then Ctrl+V (paste). In the second box, type 9 . With the Animation Pane still open and this second shape selected, click the drop-down arrow and choose "Timing" again. Change the Start option to "After Previous," and make sure the Delay option is 1 second. Then, click "OK."
We can now use this second shape as our template, as when we copy and paste it again, the animations will also duplicate. With this second shape selected, press Ctrl+C and Ctrl+V, type 8 into the box, and continue to do the same until you get to 0 .
Next, remove the animations from the "0" box, as you don't want this to disappear. To do this, click the shape, and in the Animation Pane drop-down, click "Remove."
You now need to layer them in order. Right-click the box containing number 1, and click "Bring To Front." You will now see that box on the top. Do the same with the other numbers in ascending order.
Finally, you need to align the objects together. Click anywhere on your slide and press Ctrl+A. Then, in the Home tab on the ribbon, click "Arrange." First click "Align Center," and then bring the menu up again, so that you can click "Align Middle."
Press Ctrl+A again to select your timer, and you can then move your timer or copy and paste it elsewhere.
Press F5 to see the presentation in action, and when you get to the slide containing the timer, click anywhere on the slide to see your countdown timer in action!
Now that your PPT presentation is more interactive, make sure you've avoided these eight common presentational mistakes before you present your slides.
Reinvent productivity with Copilot for Microsoft 365.
Microsoft Word
Make your words shine with smart writing assistance, helpful document designs, and easy collaboration tools anywhere, anytime.

Get the most out of your documents
Copilot in word.
Transform writing with efficiency and creativity – create, comprehend, refine, and elevate your documents. Get it now when you add Copilot Pro or Copilot for Microsoft 365 to your Microsoft 365 subscription.

Uplevel your writing journey
Copilot in Word will write, edit, summarize, give suggestions, and create right alongside you. Copilot will bring in information from across your organization to create first drafts, add content to existing documents, summarize text, and rewrite sections—or even entire documents—to make them more concise.
Write like a pro
Check spelling, grammar, capitalization, and punctuation in all your Word documents with Microsoft Editor.
Create and edit together
Share your documents with anyone and edit them together, adding comments and suggested changes in real time. 1

Access your documents anywhere
Save your documents to OneDrive and access them from any device knowing your files are protected against digital attacks with built-in ransomware detection.
See what else you can do with Word
Bring your ideas to life quickly and easily.
Design documents that make a statement using customizable templates and content.
Read content with ease
Use audio and visual assistance tools in Immersive Reader that help support your learning style for quicker, more accurate comprehension.
Leave your keyboard behind
Easily edit your documents with the flick of a wrist using action pen in Word.
Word is better with Microsoft 365
Originally starting from Free now starting from Free
Sharing and real-time collaboration
Word for the web
Basic spelling and grammar
Basic templates, fonts, icons, and stickers
Dictation and voice commands
5 GB of cloud storage
Microsoft 365 Personal
Originally starting from $6.99 now starting from $6.99
$6.99 $6.99
(Annual subscription–auto renews) 2
Word for the web and Word desktop app for offline use
Advanced spelling and grammar, in-app learning tips, and more than 20 languages
Premium templates, fonts, icons, and stickers with thousands of options to choose from
Dictation, voice commands, and transcription
1 TB (1000 GB) of cloud storage
Premium desktop, web, and mobile apps
Advanced security
Ad-free experience
Copilot Pro available as an add-on *
Microsoft 365 Family
Originally starting from $9.99 now starting from $9.99
$9.99 $9.99
One to six people
Advanced spelling and grammar, in-app learning tips, use in 20+ languages, and more
Up to 6 TB cloud storage, 1 TB (1000 GB) per person
Sharing and real-time collabora tion
Microsoft 365 Apps for business
Originally starting from $8.25 now starting from $8.25
$8.25 $8.25
(Annual subscription–auto renews) 4
Available for up to 300 employes
Desktop versions of Word, Excel, PowerPoint, and Outlook
1 TB of cloud storage per user
Anytime phone and web support
Microsoft 365 Business Standard
Originally starting from $12.50 now starting from $12.50
$12.50 $12.50
Everything in Microsoft 365 Apps for business, plus:
Web and mobile versions of Word, Excel, PowerPoint, and Outlook
Custom business email ([email protected])
Chat, call, and video conference with Microsoft Teams
10+ additional apps for your business needs (Bookings, Planner, Microsoft Forms, and others)
Automatic spam and malware filtering
Webinars with attendee registration and reporting
New: Collaborative workspaces to co-create using Microsoft Loop
New: Video editing and design tools with Clipchamp
Copilot for Microsoft 365 available as an add-on. **
Add Copilot to your Microsoft plan
Achieve more than ever using AI integrated with Word, Excel, PowerPoint, Outlook, and other Microsoft 365 apps.

Learn more about Microsoft 365 apps and services
Get the word mobile app.
Start using Word today

Get started with Microsoft 365
Frequently asked questions, where can i use microsoft word.
Microsoft Word is available as an app for desktop (Windows and MacOS), mobile devices, and tablets (iOS and Android), and online.
Is there a free version of Microsoft Word?
Yes, Microsoft Word for the web is free for anyone to use online. Sign up or sign in using any email address.
Can I collaborate with other people in Microsoft Word?
Yes, Microsoft Word supports real-time collaboration with multiple people.
In what languages is Microsoft Word available?
Microsoft Word is available in many different languages. Learn more .
- [1] Documents must be saved in and shared from OneDrive.
- [2] Subscription automatically renews. Cancel anytime to stop future charges.
- [3] Microsoft 365 Family subscription unlocks location alerts and driving safety features in mobile app. Location permissions must be active to receive alerts. Drive safety only available in the United States, United Kingdom, Canada, and Australia.
- [4] Once your paid subscription begins, cancelation policies vary based on your status as a new customer, product, and domain selections on Microsoft. Learn more . Cancel your Microsoft 365 subscription any time by going to the Microsoft 365 admin center. When a subscription is canceled, all associated data will be deleted. Learn more about data retention, deletion, and destruction in Microsoft 365 .
- [*] Copilot Pro benefits are currently available on web, Windows, and macOS and iPadOS. A Microsoft 365 Personal or Family subscription is required to access Copilot in select apps, including Word, Excel, PowerPoint, OneNote, and Outlook. Excel features are currently in preview in English only. Microsoft 365 Personal or Family and Copilot Pro are not available in the same transaction and must be purchased in two separate transactions.
- [**] Copilot for Microsoft 365 may not be available for all markets and languages. To purchase, enterprise customers must have a license for Microsoft 365 E3 or E5 or Office 365 E3 or E5, and business customers must have a license for Microsoft 365 Business Standard or Business Premium, or a version of these suites that no longer includes Microsoft Teams.
Follow Microsoft 365
Enter your email address below and we'll send you password reset instructions.
- Audio Converter
- Video Converter
- Image Converter
- Document Converter
- Archive Converter
- Presentation Converter
- Font Converter
- Ebook Converter
PPT to DOC (WORD) Converter
Convert your ppt files to doc online & free.
- Presentation
Microsoft PowerPoint 97/2000/XP
Microsoft word document, how to convert ppt to doc, upload ppt-file(s).
Select files from Computer, Google Drive, Dropbox, URL or by dragging it on the page.
Choose "to doc"
Choose doc or any other format you need as a result (more than 200 formats supported)
Download your doc
Let the file convert and you can download your doc file right afterwards
PPT to DOC Quality Rating

What Is Copilot Pro and How Do You Use It?
Quick links, what is copilot pro, how to use copilot pro to generate ai images, how to use copilot pro in microsoft 365 apps.
- Copilot Pro offers GPT-4 priority access and integration with Microsoft 365 apps for $20/month.
- Copilot Pro also gives you access to DALL-E 3 and 100 boosts a day for image generation.
- You can utilize Copilot in Microsoft 365 to write content in Word, generate formulas in Excel, draft emails in Outlook, and plan presentations in PowerPoint.
Copilot Pro comes with extra features that make you more creative and productive. Let’s dive into what it is and how to use it to create images and do more in Microsoft 365 apps. Here’s what you need to know.
Copilot Pro is the premium version of Copilot with enhanced performance and more features. The subscription costs $20 per month, and you can subscribe from the Microsoft website.
In terms of enhanced performance, you get priority access to GPT-4, an advanced version of GPT-3 , during peak times. Peak times are when people use Copilot the most, leading to reduced performance and access for regular users.
The same goes for GPT-4 Turbo, which is faster and more advanced than GPT-4. To access it, you need to change Copilot's conversation style to "Creative" or "Precise" before typing in your prompts.
A notable added feature of Copilot Pro is integration with Microsoft 365 apps . You can use Copilot directly within apps like Office and Excel to be more productive.
When it comes to creativity, you have advanced image-creation tools like DALL-E 3 and 100 boosts per day. The former improves Copilot’s ability to understand content and context, leading to more impressive results. The latter are credits you spend on increasing the speed at which Copilot generates the images (free users get 15 per day).
You can also train your own GPT in Copilot Pro. That means you can create a GPT tailored to your needs by giving it a name, description, and set of instructions.
Generating an image using Copilot Pro is easy. Just open the Copilot website in your browser, and then describe the image you want it to create. For example, we asked it to create a cool scene where The Avengers and Men in Black fend off an alien invasion.
Since this is AI, the results will have some obvious issues that humans can easily avoid (Tony Stark being an MIB agent), which is why AI can’t replace human creativity.
To use Copilot Pro in Microsoft 365 apps, you’ll also need a Microsoft 365 subscription, which costs $6.99 per month. Also, make sure you’re using the latest version of the 365 apps. Afterward, you’re good to go.
How to Add Copilot to 365 Apps
When you open a Microsoft 365 app like Word or Excel, you should be able to see the “Copilot” button on the ribbon of the “Home” tab (except for Outlook).
If it’s grayed out, ensure the “AutoSave” toggle in the top-left corner is turned on. Copilot Pro requires that this feature be enabled.
If the Copilot button is still grayed out, updating the license can fix the issue. To do that, click “File” on the left side of the top menu.
Then, click “Account” in the bottom left corner.
Afterward, click “Update License” below Product Information in the right panel.
Click “Sign In” and follow the instructions to sign into your Microsoft account. Make sure it’s the one with the Microsoft 365 and Copilot Pro subscriptions.
You should now be able to see the “Copilot” button in the ribbon of the Home tab. Clicking it, will open a panel on the right where you can prompt Copilot.
Keep in mind that any AI-generated content might be incorrect, so always make sure to double-check it. If you want to find out which prompts you can use, click the “View Prompts” button—the book icon—at the bottom of the Copilot panel.
You’ll see that Copilot can help you with a lot of tasks. This includes summarizing the document, checking for specific information (i.e., deadlines and key points), or expanding certain sections.
Writing Documents in Word
In Word, Copilot can help you draft and rewrite content. To draft something with Copilot, select a new line and then click the Copilot icon on the left or press Alt+i.
In the prompt, type what you want Copilot to draft, and click "Generate" or press Enter.
After it generates the output, you can further tweak it from within the prompt by asking Copilot to, for instance, “make it longer” or “make it formal.” Then, click the right arrow button to regenerate Copilot’s response based on the tweaks you want.
Make sure to click “Keep It” —the blue button—if you like the output.
You can also rewrite text by highlighting it, clicking the Copilot icon on the left, and choosing “Rewrite with Copilot” in the menu.
Generate Formulas and Analyze Data in Excel
You can use Copilot to be productive in Excel by generating formulas. In our sample sheet, we have a Budget and Revenue column for each campaign. We can then prompt Copilot for the profit using these columns.
Copilot will create a new column based on your prompt. To see a preview of the output, hover your mouse pointer over the “Insert Column” button. If it’s accurate, click the button to add it to the sheet.
You can also analyze data in your sheet by typing something like: What is the average revenue of each campaign type as a pie chart? You can even insert the resulting chart into the document by clicking the “Insert to a New Sheet” button.
These are just a few examples of how to generate formulas and analyze data. You can even do some basic editing with Copilot, such as highlighting cells and sorting or filtering items within the sheet.
Creating Presentations in PowerPoint
Copilot is one of the tools that can help you plan a presentation. Click the “Copilot” button in the ribbon of the Home tab. Then, describe the presentation you want it to create. In our example, we typed: Create a presentation about procrastination, including what it is, what causes it, and how to overcome it.
Copilot will create the presentation, complete with content, images, and notes.
You can also prompt Copilot to add more slides by typing something like i nclude a slide about [topic] . You can also add an image by typing something such as a dd an image about [topic].
Drafting Emails in Outlook
You need to use the new Outlook or the web version instead of the classic Outlook if you want to be able to use Copilot. The “Copilot” button only shows up when you’re drafting or responding to an email. Once you click the “Copilot” button in the ribbon of the Message tab, select “Draft with Copilot” in the menu.
Tell Copilot what you want to draft and then click “Generate” in the bottom right of the prompt.
Then, you can choose to keep, discard, or regenerate the response. Alternatively, you can prompt Copilot further by clicking the text box that says “Anything You’d Like to Change?”
From there, you can, for instance, ask Copilot to “make it longer” or “make it sound more direct,” based on your needs.
Copilot Pro has even more advanced features that you can dig into, too. This includes things like enhanced code generation, collaboration tools, and the ability to create your own GPTs.
However, you should be able to use it now to be creative when creating images and being productive in Microsoft 365 apps. Keep in mind that Copilot cannot do everything a human does. In some cases, it might be faster and more accurate to do certain things manually.

IMAGES
VIDEO
COMMENTS
Go to File > Export > Export to PowerPoint presentation . In the Export to presentation window, choose a design theme for your presentation, and then select Export . Word exports and transforms the document, applying the design theme you chose. After the transformation is complete, select Open presentation to review the results in PowerPoint ...
Here are a few things to keep in mind in terms of converting Microsoft Word documents to PowerPoint presentations. These points might be updated over time. The feature began rolling out in early 2021: The ability to convert PowerPoint presentations is currently only available in Word for the web. The option is currently only available in English.
To turn your Word document into a PowerPoint presentation: Open any document you want to convert into a presentation in Word for the web. Click File > Export > Export to PowerPoint presentation. When prompted, choose a design theme for your presentation. Click Open presentation to re view the results in PowerPoint for the w eb.
First, open your web browser and log in to Office. Once logged in, open the document you want to convert in Word for the Web, and click the "File" tab in the top-left corner of the window. IDG ...
Choose the theme most appropriate to the content. If you don't like any of the suggested themes, choose the plain one at the bottom right. When done, click the Export button. Your document is ...
Upload option. Locate and select the Word file in the Open dialog box and then select the Open button. Figure 2. Open button. After your file opens, select the File tab. Figure 3. File tab. Select the Export tab. Select the Export to PowerPoint presentation option.
In the Word window, select a header in your document. While the header is selected, in the "Styles" section at the top of the Word window, click the "Heading 1" style. Do this for all the headers in your document. Next, select the paragraph beneath your header. Then, in the "Styles" section at the top, click "More," and then select "Heading 2."
You can find it above the ribbon bar in Word. After you click on 'Send to Microsoft PowerPoint' icon, the conversion process will begin. It may take some time depending on the document type and length to convert it. Once the conversion is done, the document will now be in form of a presentation, differentiated by the headings we used earlier.
Step 2: Go to Word.Office.com and log in using your Microsoft 365 account details. Step 3: Launch the Word document that you plan to convert. Step 4: On the opened Word document, click on File ...
PowerPoint for the web. Turn your ideas into compelling presentations using professional-looking templates. Use animations, transitions, photos, and videos to tell one-of-a-kind stories. Co-author team presentations at the same time, from anywhere. Start using PowerPoint for free Learn more about PowerPoint.
Change linked or embedded objects. Right-click the linked object, and then click Linked Slide Object or Linked Presentation Object. Click Open or Open Link, depending on whether the object is embedded or linked, and then make the changes that you want. If the object is embedded, the changes are only in the copy that is in the document.
A file to store the generated presentations and Microsoft PowerPoint slide shows with the ability to edit them. It was first introduced to store the data in PowerPoint 97 Editor. Stores a set of individual slides with text, graphics, video, and audio information. The file contains information on visual effects inside the slides.
How to convert Word to PPT using AI? With an AI tool like Plus AI, you can write an outline, take an existing essay, or use notes in a document to create a presentaton. Just install Plus AI, upload your Word document in document to presentation mode, select a template, and Plus will generate a presentation in minutes.
Find it, then choose Object . 2. Insert Word Document Into PowerPoint. When you click the Object button, you'll see the menu that lets you insert file into PPT. It's the Insert Object menu, and with it you can see how to insert a file into PPT. On the left, locate the Create from file bubble. Click it.
Here are three methods you can use to insert a Word document into a PowerPoint presentation. The exact steps may vary based on the version of Word or PowerPoint you're using: 1. Export using Word for the web Exporting a Word document can convert the entire document into a PowerPoint. While this method may offer a complete transformation option ...
Click the "Choose Files" button to select your PPT files. Click the "Convert to WORD" button to start the conversion. When the status change to "Done" click the "Download WORD" button.
3. Features of MS Word Creating and saving a file Editing and formatting a document Paragraph formatting Inserting header and footer and Page number Checking spelling and grammar Subscript and superscript Inserting symbols Print preview and printing Inserting clipart, word art, and picture Page setting Bullets and number Border and shading Searching a word and replacing it by another word ...
2. Embed Microsoft Forms (Education or Business Only) If you plan to send your PPT presentation to others—for example, if you're a trainer sending step-by-step instruction presentation, a teacher sending an independent learning task to your students, or a campaigner for your local councilor sending a persuasive PPT to constituents—you might want to embed a quiz, questionnaire, pole, or ...
Select Presentation. In the PowerPoint window that opens, log in using your account. Press Accept on the "Free 5-day pass" section. This lets you use PowerPoint (and Word and Excel) for five days ...
Word for the web and Word desktop app for offline use. Advanced spelling and grammar, in-app learning tips, use in 20+ languages, and more. Premium templates, fonts, icons, and stickers with thousands of options to choose from. Dictation, voice commands, and transcription. Up to 6 TB cloud storage, 1 TB (1000 GB) per person.
A file to store the generated presentations and Microsoft PowerPoint slide shows with the ability to edit them. It was first introduced to store the data in PowerPoint 97 Editor. Stores a set of individual slides with text, graphics, video, and audio information. The file contains information on visual effects inside the slides.
Creating Presentations in PowerPoint . Copilot is one of the tools that can help you plan a presentation. Click the "Copilot" button in the ribbon of the Home tab. Then, describe the ...