How-To Geek
How to autoplay and loop a google slides presentation.

Your changes have been saved
Email is sent
Email has already been sent
Please verify your email address.
You’ve reached your account maximum for followed topics.

I Paid for Google's Drive Storage. Here's Why I Don't Regret It
Google patches another zero-day vulnerability in chrome, why it feels like ads are listening to your conversations (when they aren't), quick links, set up autoplay and loop when presenting, set up autoplay and loop when publishing to the web.
If you don't want to worry about clicking through your slideshow, you can set up Google Slides to play your presentation automatically. Plus, you can have the slideshow loop, so it starts over at the beginning when it ends.
You might be playing your slideshow at a kiosk, during a conference, or publishing it to the web. These are the ideal times to use AutoPlay and Loop in Google Slides . You can automatically present the show and choose the timing between slides. Then, restart the presentation at the beginning each time it ends.
If you plan to start the slideshow and then let it play, you can set up AutoPlay and Loop , or simply one or the other.
Related: How to Loop a PowerPoint Presentation
Start the presentation by clicking "Slideshow" at the top of Google Slides. You can also use the arrow to pick either "Presenter View" or "Start From Beginning" per your preference.

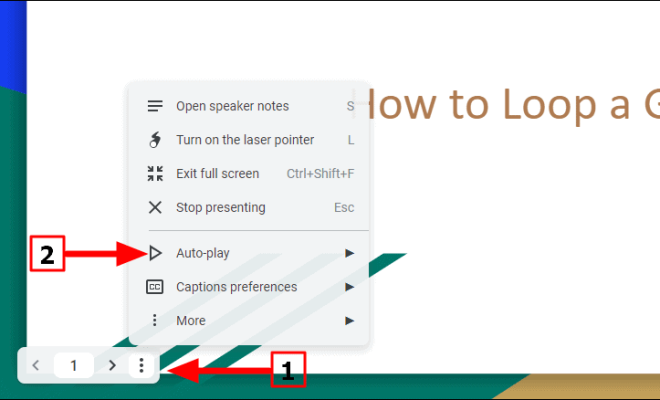
When the slideshow opens, display the Presenter Toolbar by hovering your cursor over the bottom left corner of the presentation.

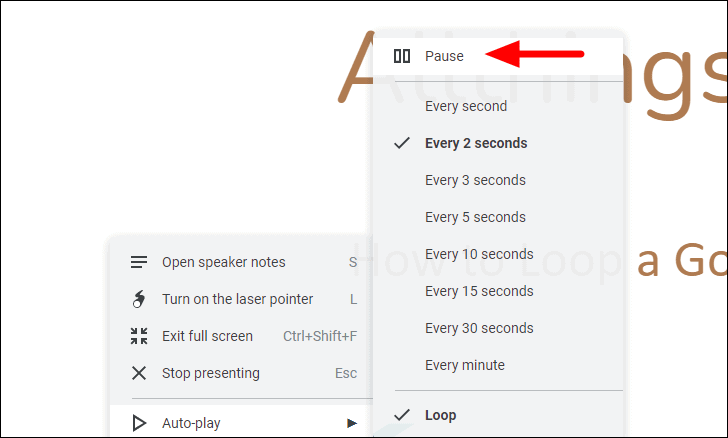
Click the three dots on the right of the Presenter Toolbar, then move to AutoPlay. You'll see a pop-out menu that lets you select the advance timing for the slides. You can pick from every second up to every minute.
If you also want to loop the slideshow, select "Loop" at the bottom of the pop-out menu.

When you finish, click "Play" to automatically play your presentation.

To stop the slideshow, simply click on a slide. You can then resume AutoPlay from the Presenter Toolbar by selecting "Play" again.
Maybe you plan to publish your slideshow to the web or embed it on a website rather than play it locally. You can set up AutoPlay and Loop as part of the publish settings.
Related: How to Share a Google Docs, Sheets, or Slides File as a Web Page
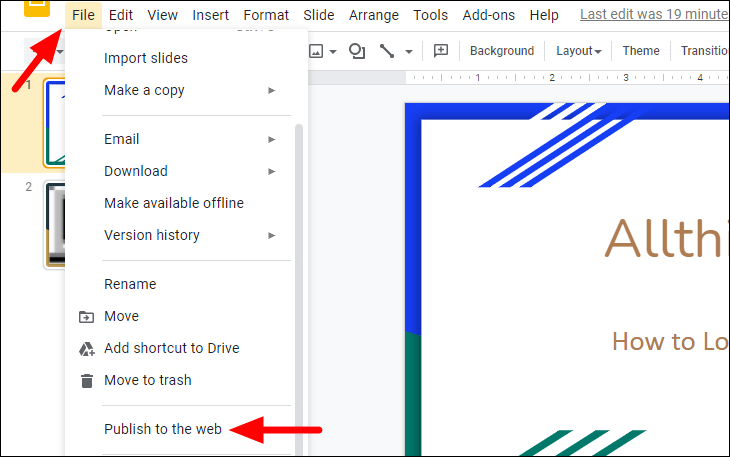
Go to File > Publish to the Web in the menu.

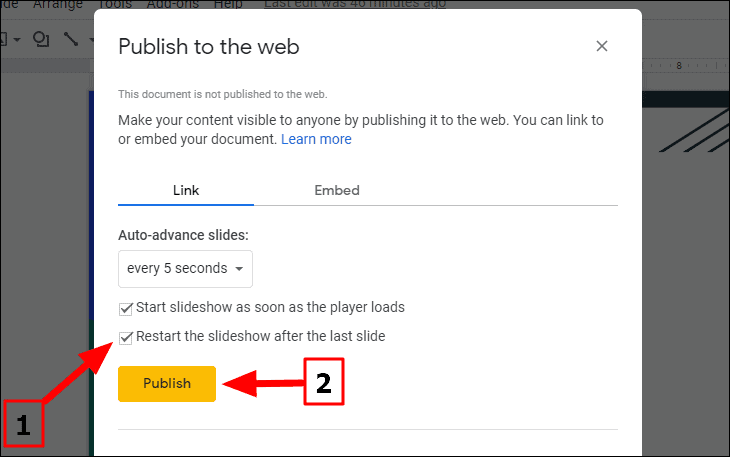
Choose either "Link" or "Embed" per your intent. Then use the Auto-Advance Slides drop-down box to choose the timing for the slides. Here again, you can pick from every second up to every minute.

To loop the slideshow, check the box for Restart the Slideshow After the Last Slide.
You can then mark the checkbox for Start Slideshow as Soon as the Player loads if you like, so that the viewer doesn't have to take any action to begin the presentation.

When you finish, click "Publish" and confirm to obtain the link or embed code for the slideshow.
To share a Google Slides presentation that doesn't require you to walk viewers through it, remember these steps to automatically play and loop the slideshow.
- Google Slides
How to Make Google Slides Loop (Even Without Publishing)

Your changes have been saved
Email is sent
Email has already been sent
Please verify your email address.
You’ve reached your account maximum for followed topics.
Yes, You Can Convert PDF to Excel—Without Third-Party Software!
Make your excel spreadsheets smarter with dropdown lists, the easy way to convert word to excel (and vice-versa).
Since Google Slides is available for free, it doesn't have as many features as you may be used to in more powerful tools, like the desktop version of PowerPoint.
As a result, you might wonder how to loop a Google Slides presentation or make it play automatically. Thankfully, this is possible and not difficult to do. We'll show you how to make Google Slides loop, even without publishing the presentation.
How to Loop Google Slides Presentations Without Publishing
To loop a Google Slides presentation, first set up a new slideshow in Google Slides or open an existing one. Our guide to making a Google Slides presentation for college serves as a good intro if you need help.
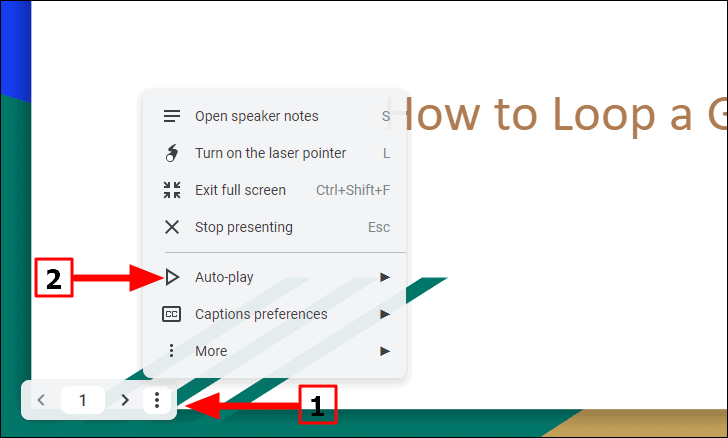
When you're ready to run the slides on a loop, click the Slideshow button at the top-right to start playing your slides. With the slideshow showing, move your mouse to the bottom-left corner of the presentation screen to show the toolbar. On the toolbar, click the three-dot menu and expand the Auto-play item. Then on this menu, click the Loop option at the bottom to enable presentation looping.
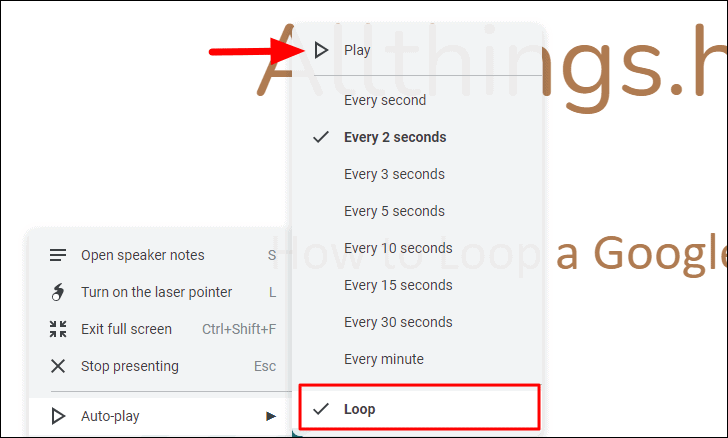
Also on this menu, you'll need to choose the timing for your slides so that they play automatically. These range from short options like Every second or Every 2 seconds to Every 30 seconds or Every minute at the longest. Choose what timing makes sense based on your presentation type.

Once you've selected these options to loop and automatically advance your Google Slides presentation, click the Play button (on the same menu) to begin the slideshow. This will play your slides automatically, at your chosen speed, looping them until you click the Pause button on the same Auto-play menu.
Looping presentations continuously like this is great anytime you want to keep content cycling without your input. Try it for kiosks or to show photos at parties. Make sure to use the Enter/Exit full screen option as appropriate, too.
How to Publish a Looping Google Slides Presentation
If you want to send a Google Slides presentation to someone and have it loop automatically, that's possible too. This was previously the only way to repeat Google Slides slideshows before the above method was added. It still comes in handy if you want someone else's feedback before you give a presentation online, for instance.
To share a presentation that loops automatically, you need to publish your Google Slides presentation to the web . To do so, select File > Share > Publish to web at the top-left corner of the Slides interface.
When you do, you'll have a few options to configure. Select Link (unless you want to Embed it somewhere), then set the Auto-advance slides dropdown box to your preference. The available timings here are the same as with the above method; the default is three seconds, but you can choose from as little as one second or as long as a minute between slides.

Check Restart the slideshow after the last slide and it will continually loop until the recipient closes it. For best results, enable Start slideshow as soon as the player loads as well, so they don't have to start it manually.
Once you click Publish , you'll get a link that you can share with people anywhere you'd like. If you ever change your mind, expand the Published content & settings section and click Stop publishing , and people won't be able to view it with the link anymore.
Don't miss out on Google Slides' Presenter view to make your talk more engaging , either.
Looping Google Slides, Made Simple
Now you know how to loop Google Slides slideshows easily, with whatever timing you prefer. Whether you want to publish your slideshow or not, repeating a slideshow just takes a few clicks.
This isn't the only trick that Google Slides is hiding, either. Check out a lot more tips that help you create eye-catching documents across the Google Docs suite.
- Productivity
- Google Slides
How To Make Google Slides Play on a Loop [Step-by-Step Guide]
- Last updated June 23, 2023
In this article, we’ll discuss two methods of how to make Google Slides play on a loop. These methods can be useful if you want to showcase promotional content at a public event or provide an informational guide at self-service stations.
To make Google Slides auto-loop, click the “ Slideshow ” button at the top-right of your screen. Next, click the vertical three-dot icon in the bottom-left corner of the slide. Select “ Auto-play ” and choose your slide interval. Finally, check the “ Loop ” option and click “ Play .”
While the above method works, other ways exist to make your Google Slides auto-loop. Continue reading as we discuss them in detail below.
Table of Contents
How To Make Google Slides Play on a Loop When Presenting
Using this method, you can directly loop a Google Slide presentation in slideshow mode. However, note that you have to set it up every time you want to run your slides.
Here’s how to do it:
- Go to slides.google.com and open your presentation.
- Click the “ Slideshow ” button in the upper-right corner of your screen.
- Alternatively, you can press Ctrl + F5 for Windows (or Command + Enter for Mac) on your keyboard to begin presenting.

- Click the vertical three-dot icon on the bottom-left corner of your screen.
- Choose “ Auto-play ” from the options that are displayed.
- Configure your preferred slideshow interval (this is set to “ Every 2 seconds ” by default).
- Click the “ Loop ” option and make sure that it has a checkmark on its left side.
- Finally, click “ Play ” to start the looped presentation.

Related : How To Make Google Slides Play Automatically (Easy)
How To Loop Google Slides When Publishing to the Web
To make your Google Slides auto-advance, you can also choose to publish it on the web. There are two ways you can do the publishing:
- Publishing through a link : This creates a unique URL that you can share with others. When someone clicks on the link, they can view your presentation in their web browser.
- Publishing through an embed code : You can add this code to your website. When someone visits your website, they will see your presentation displayed on the page.
Here’s how to make Google Slides play automatically by publishing to the web:
- Open your presentation and go to the “ File ” menu.
- Click on “ Share ,” then “ Publish to web ” from the drop-down menu.

- To publish your slides under the “ Link ” tab:
- Select your preferred interval from the drop-down menu under “ Auto-advance slides .”
- Ensure to check the box for “ Restart the slideshow after the last slide ” to enable looping.
- Optional : Check the box for “ Start slideshow as soon as the player loads ” for auto-play.

- To generate an embed code for your published presentation:
- Switch to the “ Embed ” tab.
- Choose your preferred slide size.
- Select your slide intervals.
- Check the box for “ Restart the slideshow after the last slide .”

- Once you have configured the settings, click the “ Publish ” button.

How To Play Google Slides on a Loop Using the Mobile App
As of this writing, you cannot loop a presentation in the mobile app version of Google Slides. However, if you still want to make your slides play on a loop using your smartphone, you can try the following workaround:
- Open the Google Slides mobile app on your phone.
- Locate your presentation and tap the vertical three-dot icon in the lower-right corner.

- From the displayed options, tap “ Copy link .”

- Open your phone’s web browser and paste the link you just copied into the address bar.
- Tap the vertical three-dot icon on the lower left corner of your screen and choose “ Auto-play .”

- Select your preferred interval and tap the “ Loop ” option to make sure it’s checked.
- Tap “ Play ” to start the looped presentation.

How To Loop Videos in Google Slides
Besides making your Google Slides presentation play continuously, you might also need to loop the videos in your slides. This can be useful when you want to emphasize key points in a video clip and make it play multiple times. Here’s how to loop videos in Google Slides:
- Open your presentation and click the “ Slideshow ” button located in the upper-right corner of your screen.
- Navigate to the specific slide that contains the video that you want to loop.
- Play the video, then right-click on it.
- Choose “ Loop ” from the options being displayed and toggle it on.

Related : How To Add a Video to Google Slides [Complete Guide]
Frequently Asked Questions
Can i loop slides without auto-advance.
No, a loop won’t work without the slides automatically advancing to the next one. Even if you didn’t select a time interval within the auto-play settings but enabled the Loop option, the slides would still auto-advance to perform the loop.
Can I Set My Auto-Advance and Loop Preferences before Presenting?
Yes, you can set your auto-advance and loop options by publishing your presentation to the web. To do this, simply follow the steps below:
- Go to “ File ” > “ Share ” > “ Publish to the web .”
- Set your desired auto-advance interval preferences.
- Check the box for “ Restart the slideshow after the last slide ” to enable looping.
- Click the “ Publish ” button.
Final Thoughts
Making your presentations play on a loop can be handy when you want to display promotional content at public events and trade shows. If you need to access this feature, simply follow this guide on how to make Google Slides play on a loop, and you’re good to go.
Do you want ready-to-use sheets and documents? Check out our premium templates today and get them at 50% off by using the code “SSP.”
Get Premium Templates
- How To Add Audio to Google Slides (Simple Guide)
- How To Add Google Slides Transitions & Animations [Guide]
- How To Add Fonts to Google Slides [Complete Guide]
Most Popular Posts

How To Highlight Duplicates in Google Sheets

How to Make Multiple Selection in Drop-down Lists in Google Sheets

Google Sheets Currency Conversion: The Easy Method
A 2024 guide to google sheets date picker, related posts.
How to Zoom Out in Google Sheets and Zoom Back In [Easy]
- Sumit Bansal
- July 3, 2024
- May 16, 2024
- May 2, 2024
How to Insert a Google Sheets Hyperlink in 5 Seconds
- Chris Daniel
- April 15, 2024
Thanks for visiting! We’re happy to answer your spreadsheet questions. We specialize in formulas for Google Sheets, our own spreadsheet templates, and time-saving Excel tips.
Note that we’re supported by our audience. When you purchase through links on our site, we may earn commission at no extra cost to you.
Like what we do? Share this article!
How to Autoplay and Loop Google Slides? [Complete Guide!]
By: Author Shrot Katewa
![How to Autoplay and Loop Google Slides? [Complete Guide!]](https://artofpresentations.com/wp-content/uploads/2021/03/Featured-Image-Loop-Your-Google-Slides-Presentation.jpg "loop presentation in google slides")
Making your presentation slides autoplay can be really helpful especially when you want to setup the presentation during an event! That way, you can completely focus on delivering a presentation rather than worrying about clicks to change the slide! But, you may wonder whether you can make Google Slides autoplay?
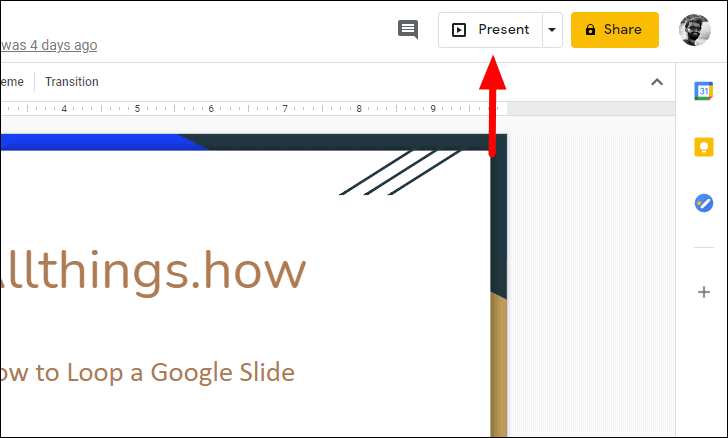
You can auto-advance slides in Google Slides by clicking on “Present” in the top right corner of your screen. Then, move your cursor and you will see a menu bar. Click on the “Gear” icon. Select “Auto-advance” and choose a time delay. You can also use the “publish to web” feature to Autoplay slides.
But, that’s just the crux of it. In this article, I am going to explain to you how you can set up autoplay in Google Slides in a complete step-by-step manner! Plus, I will also share with you tips on how you can loop videos using Google Slides!
So, without any further delay, let’s get started!
A Quick Note Before We Begin – if you want to make jaw-dropping presentations, I would recommend using one of these Presentation Designs . The best part is – it is only $16.5 a month, but you get to download and use as many presentation designs as you like! I personally use it from time-to-time, and it makes my task of making beautiful presentations really quick and easy!
How to Get Google Slides to Autoplay?
Google Slide is full of useful features that give users the ability to create professional-quality presentation slides. One of those features is “Autoplay.”
To know how to use this feature in Google Slides, follow the step-by-step guide given below:
Step 1: Open Publish to the Web Option
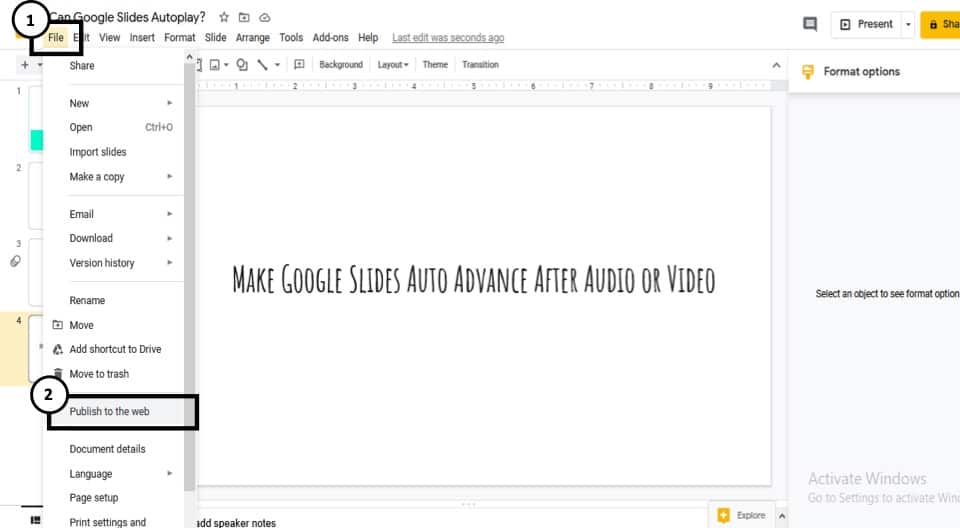
First, open the presentation slides file into Google Slides. Once the file is open, click on “File” located on the top left corner of the screen. From the dropdown menu, select the “Publish to the web” option.
Step 2: Click on Link
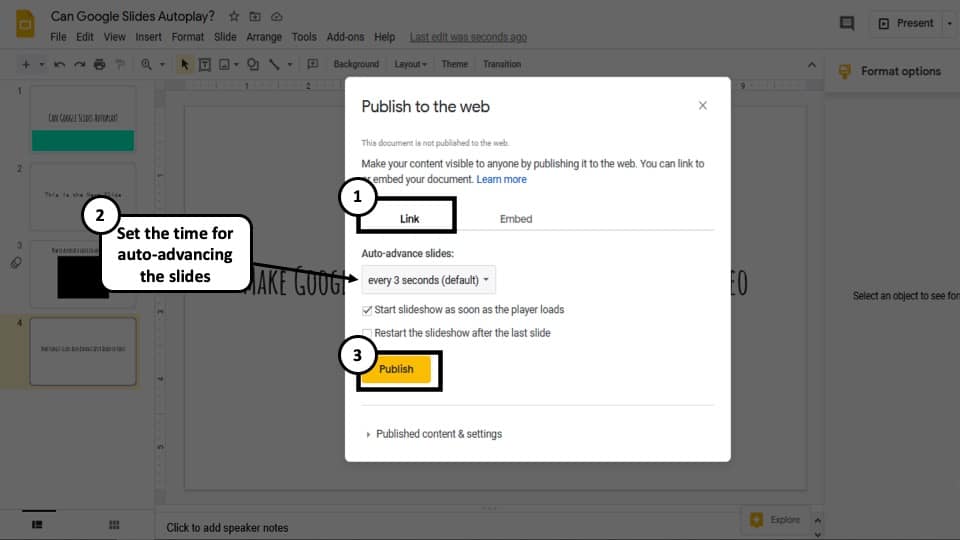
This will open a new dialogue box. From there, select “Link” or “Embed”. If you select the “Link”, it will only give you the option to set the time delay. By selecting “Embed” you will be able to set the slide size as well as the time delay between the slides.
Step 3: Set the Time for Auto Advancing Slides
Now select the time delay between each slide. You can set 1, 2, 3, 5, 10, 15, 30, or 60 seconds as time delay in Google Slides. Check the “Start your slideshow as soon as the presentation loads” option.
Step 4: Publish Your Presentation
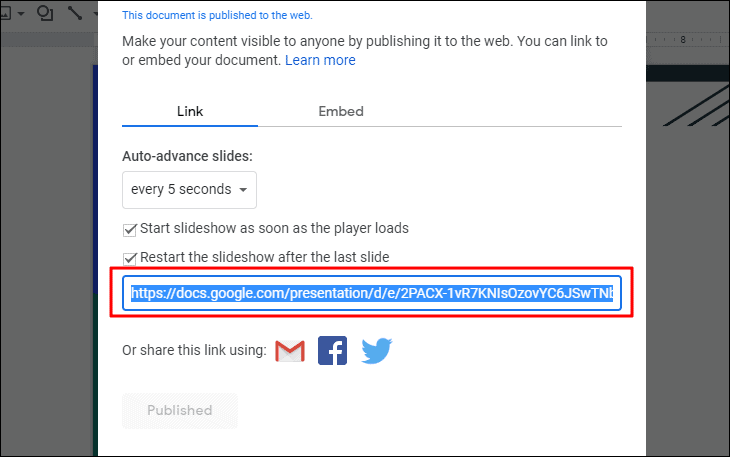
Finally, click on “Publish.” This will give you a link to access your slide if you chose “Link” in step 2.
Step 5: Copy the Link and Share
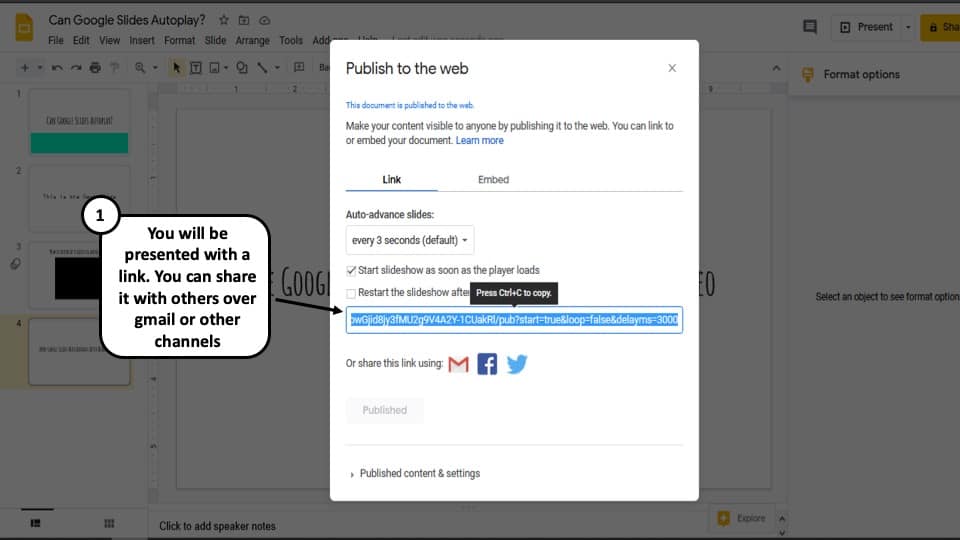
Just make sure to copy and share the link with your audience. Whenever someone uses this link to open your presentation slide, it will start playing as soon as they open it.
If you choose “Embed” in step 2, it will give you an embed code. This is useful if you want to publish your presentation on a website. Whenever someone visits that site, the presentation slides will start playing automatically.
But, what if you don’t want to share the Google Slides presentation with others and instead want to do this to your own presentation? Let’s learn how to do that in the next section.
How to Make Google Slides Auto-Advance without Publishing?
You can also make your google slides auto advance without publishing it to the web! Google added this feature recently to Google Slides.
Here’s how to auto-advance slides in Google Slides without publishing it to the web –
Step 1 – Enter the Presenter Mode in Google Slides

You need to first enter in the presenter mode in Google Slides. To do that, simply click on the “ Present ” option from the top-right corner of your Google Slides screen or press “ Ctrl+F5 “.
Step 2 – Set Your Slides to Auto Advance
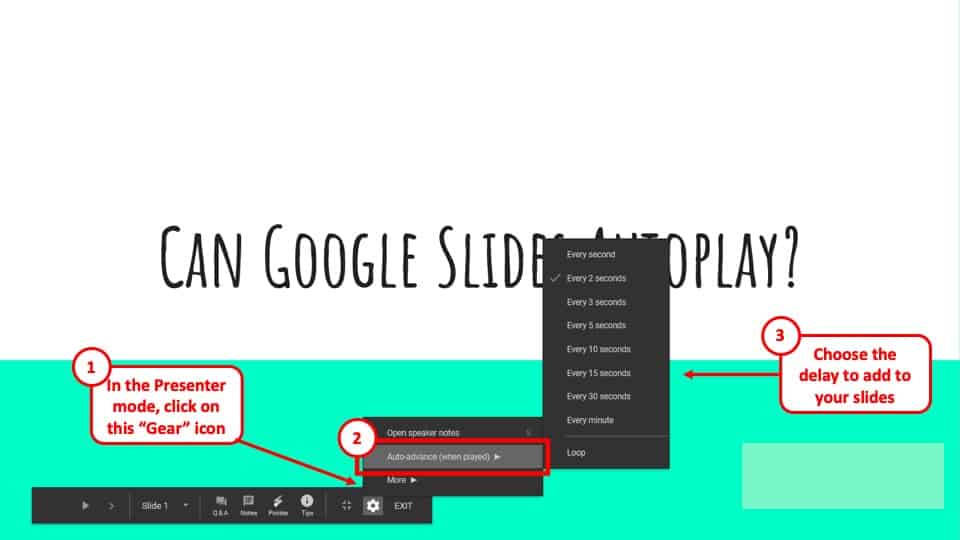
When your presentation enters the full-screen mode, simply click on the gear icon on the options menu at the bottom of the screen. A drop-down menu will pop open. Click on the “ Auto-advance when played ” option. Finally, choose the delay timing for each slide for auto-advance.
How to Loop Google Slides?
You can loop your Google Slides presentation while auto-advancing your slides in both the methods mentioned above.
Let’s look at the 1st method first (when publishing to the web)
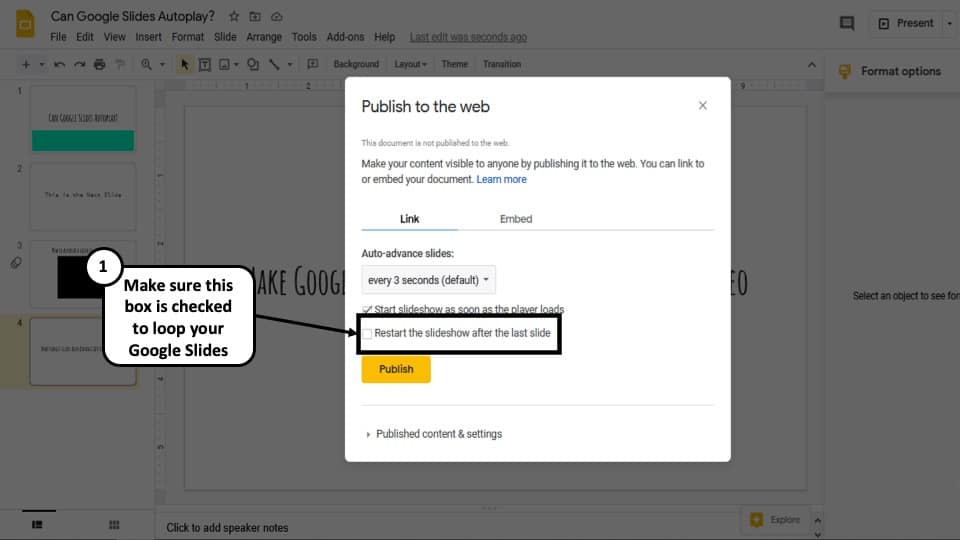
You will just have to check the “ Restart the slideshow after the last slide ” option as well while generating a link to publish to the web. The rest of the steps shall remain the same as before. By doing so, you will be able to loop your Google Slides.
Now, you can also loop your Google Slides presentation without publishing your presentation to the web. Here’s how to do this –

In the presenter mode, simply click on the “ Gear ” icon. Next, click on the “ Auto-advance ” option. In the next menu, click on “ Loop “.
Both the above methods can help you loop your Google Slides presentation.
How to Autoplay a Video in Google Slides?
On top of auto-playing your Google Slides, you can also autoplay the videos that are embedded in the slide. To do that, follow the steps given below:
Step 1: Add a Video to Your Google Slides
Open the presentation slide file in “Normal View” in Google Slides. Add a video to your Google Slides presentation. If you are unsure of how to do that, then check out this guide on how to add a video to Google Slides .
Step 2: Open Format Options for the Video
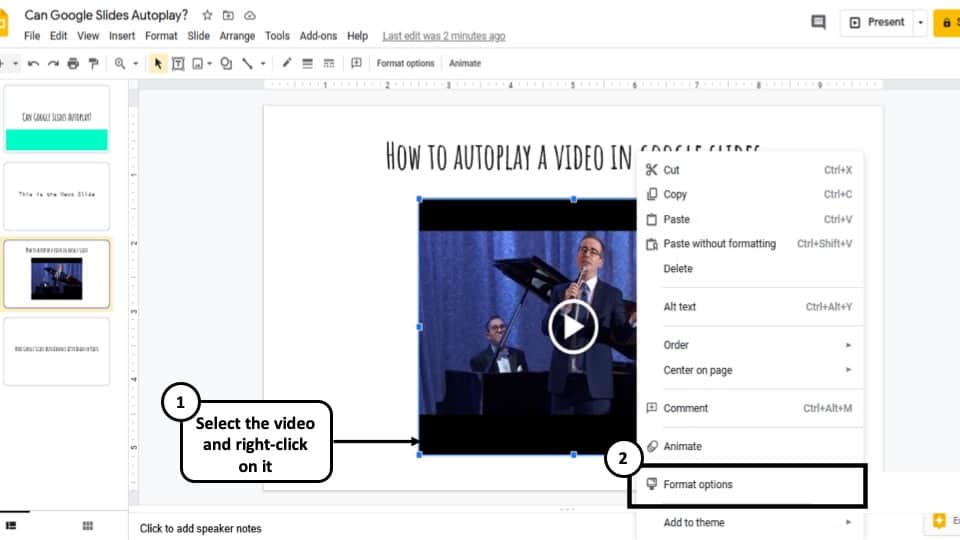
Now select the video, right-click on it and select “Format option”. Or you can also select “Format” from the menu bar located on the top of the screen. From the dropdown menu select “Format option”. This will open a new panel on the right side of the screen.
Step 3: Set Video Playback to Play Automatically
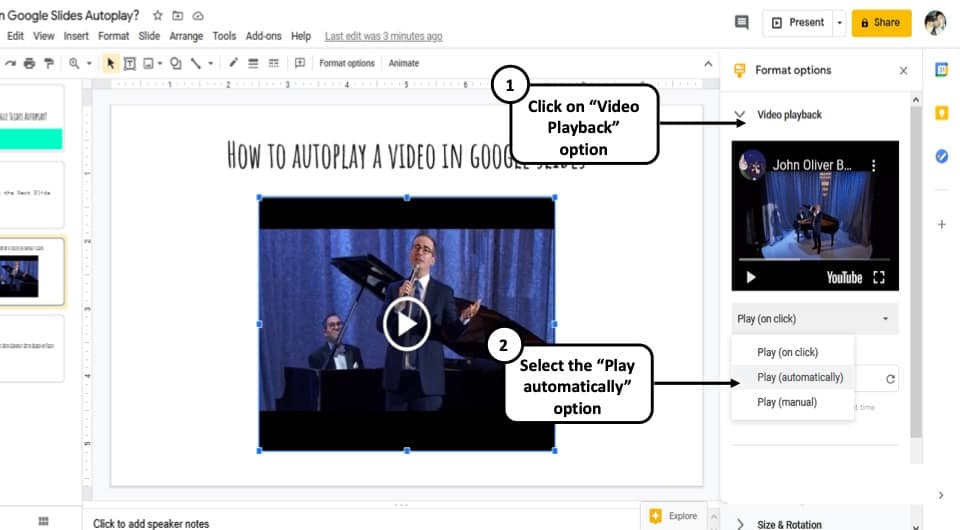
From the format options panel on the right of your screen, click on “Video playback” and select “Play (automatically)”.
That’s all you have to do. Now whenever you open this slide in the “Present” mode, the video will start playing automatically.
Can You Loop a Video in Google Slides?
Google Slides allows you to loop a video as well in addition to setting it to play automatically!
To loop a video on Google Slides, follow the steps given below:
Step 1: Open Presenter Mode in Google Slides
Open the slide into “Present” mode in Google Slides.
Step 2: Loop the Video
Right-click on the embedded video and select “Loop”. And that’s it.
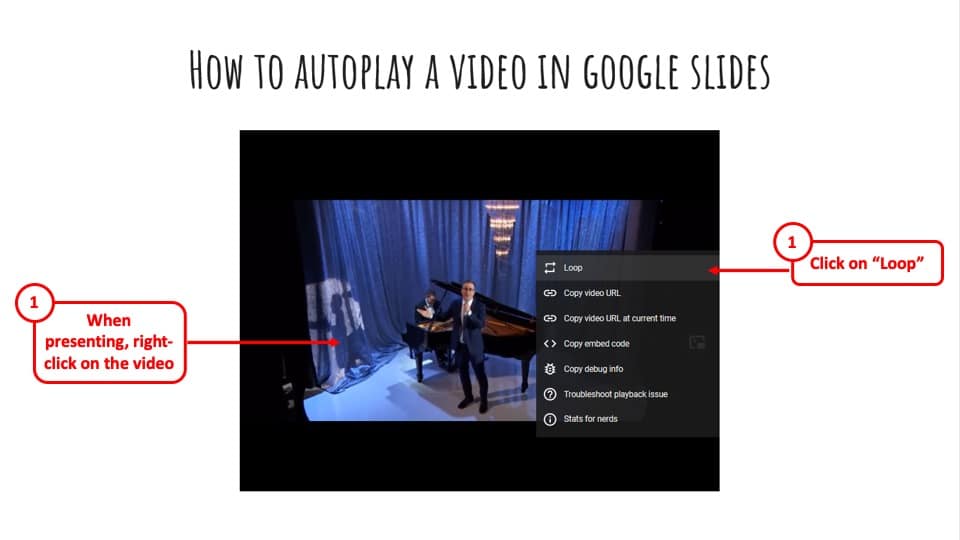
Note: This is more of a video player setting rather than a Google Slides feature. As a result, you will have to do it manually every time you want to play a video on loop. On top of that, it will not work on YouTube videos if you set it to show only a portion of the entire video. So, it’s not really useful for anyone.
Make Google Slides Auto Advance After Audio or Video
To make Google Slides move to the next slide automatically after playing audio or video, you can use the “Auto-advance” feature. To know how to use this feature in Google Slides, follow the step-by-step guide given below:
Step 1: Open the Presenter Mode in Google Slides
First, go to the “Present” mode in Google Slides. After opening the slide, click on the “Present” button located on the top right corner of the screen or press “Ctrl+F5”.This will open the slide in “Present” mode.
Step 2: Click on the Gear Icon
Once you are in the “Present” mode, click on the grey “⚙ (gear)” icon located at the bottom of the screen. This will open the settings menu.
Step 3: Select Auto-advance Option
From the settings menu, select “Auto-advance (when played)” and select a time that you think suitable for you.
Step 4: Add the Autoplay Time Delay
Once you are done setting up the autoplay time, press the play icon located at the bottom left corner of the screen. Now your slides will keep moving automatically after a video or audio is played.
Note – The only drawback to this method is that this process will activate auto-advance settings for all the slides in Google Slides and not just the slide that contains the video or audio. At the time of writing this article, there is no such option that exists yet.
How to Set a Time for Auto Advance in Google Slides?
You can set a specific time delay for auto-advance in Google Slides. You can do that by following the same steps that are used to make Google Slides auto-advance after playing a video or audio. Currently, the time increments in Google Slides include 1, 2, 3, 4, 10, 15, 30, or 60 seconds.
Remember – One thing to keep in mind, the time delay that you’ve set will be applied to all your slides. And this might not be enough for some slides as they will need a longer time to present.
In that case, you can duplicate those slides twice or as many times as you like depending on your needs. This will give you enough time to deliver your message to the audience properly.
How to Stop Google Slides from Auto Advancing?
It is really annoying when the slides automatically advance to the next one when you click by mistake while giving a presentation in the “Present Mode”. When the slides auto-advance (especially when you didn’t do it on purpose), it not only looks unprofessional but also breaks the flow of your presentation!
Although, there is no direct way in Google Slides that you can use to prevent that. But don’t worry, there is a way that you can use to stop your slides from auto-advancing. Take a look at the steps given below:
Step 1: Open the Google Slides Presentation
Open the slides in the “Normal” view.
Step 2: Insert a Rectangle Shape
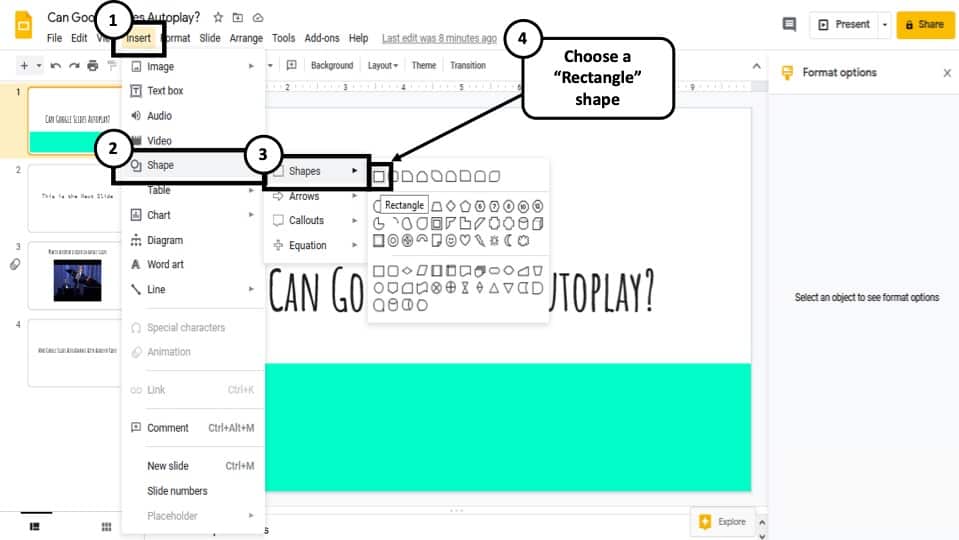
Now inset a box shape in the slide. To do that, click “insert>Shape>Shapes” and then select the box. Make the box as big as the size of the slide.
Step 3: Add a Link to the Rectangle Shape
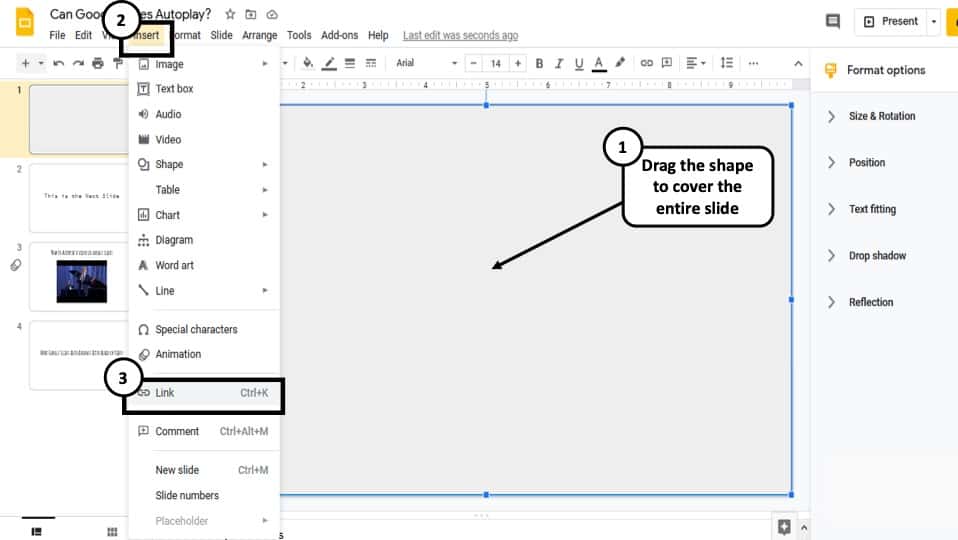
Link the box to the corresponding slide by selecting the box and then clicking “Insert>Link” from the main menu located on the top of the screen.
Step 4: Link the Shape to the Corresponding Slide
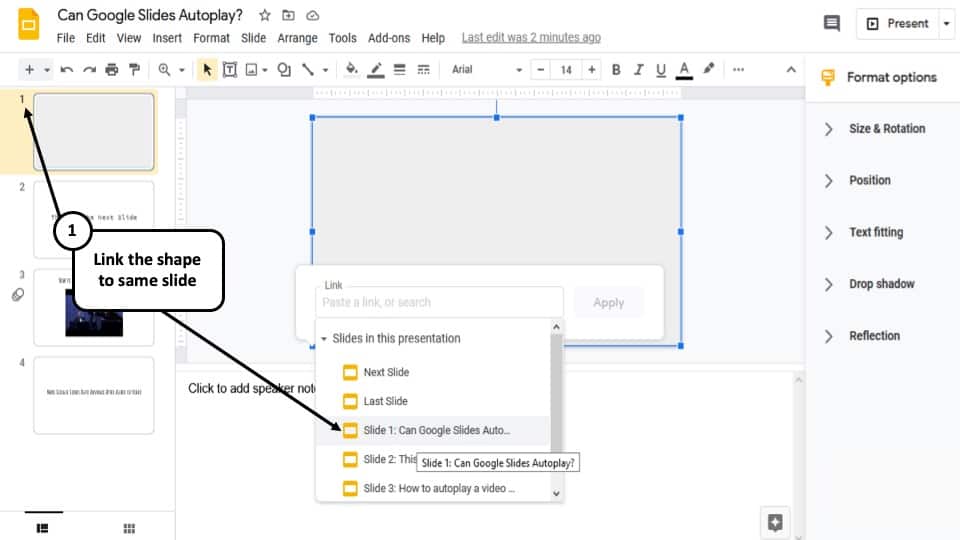
Now choose the slide you want to link it to and hit “Apply”. It will always have to be the slide that is containing the box. So, in the above example, the rectangle shape has been added to slide 1. Thus, the shape needs to be linked to slide 1.
Similarly, if you are adding a shape on the 2nd slide, then link it to slide 2, and so forth.
Interesting Fact: Linking a rectangle to the same slide ensures that even if we click on the slide somewhere in the “Present” mode, Google Slides will reference it back to the same slide; thereby preventing auto-advance to the next slide by mistake.
Step 5: Send the Shape to Back
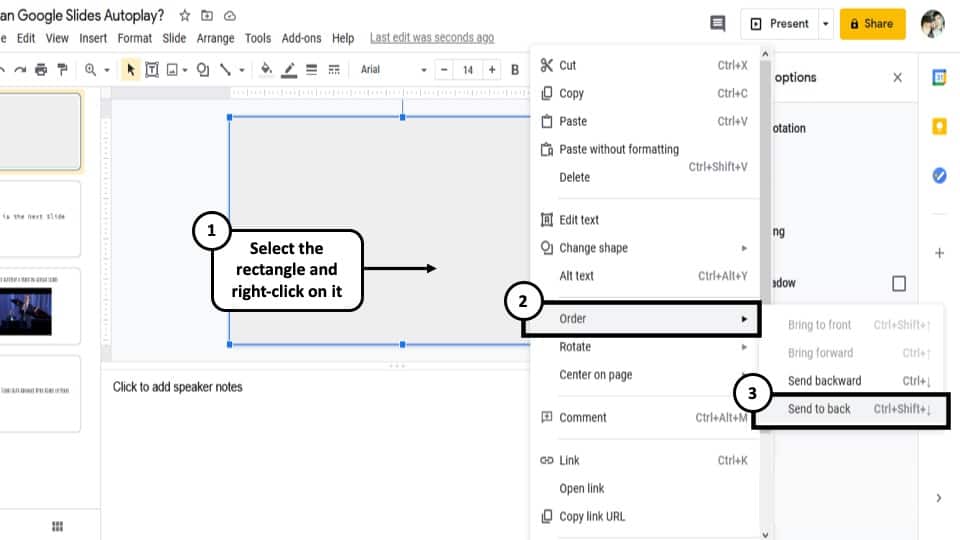
Select the box and right-click on it and select “Order”. Then, click on “Send to back.”
Step 6: Link all Other Elements to the Same Slide
Now select all other text boxes and elements present on that slide that are not working as buttons and link them to that corresponding slide just as we did in step 4.
Step 7: Change the Shape Fill Color to White
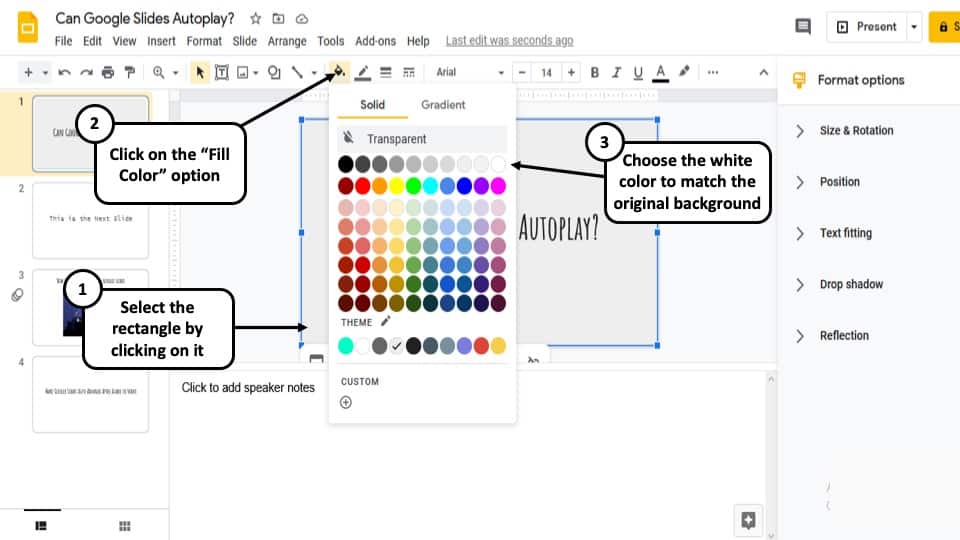
Now select the box again, select the “Fill color” option and click on transparent.
Step 8: Repeat the Procedure for All Your Slides!
Now repeat the procedures from step 2 to step 7 for all the remaining slides. Once, you are done, your slides will not auto-advance even if you click anywhere in the slide by mistake.
More Related Topics
- How to Fix Almost Anything on Google Slides! [A Comprehensive Troubleshooting Guide]
- Do Presentation Clickers Work with Google Slides? [Interesting Read!]
- How to Curve Text in Google Slides? Always Use THIS Trick!
- How to Use the Eyedropper Tool in Google Slides? [Even When This Tool Doesn’t Exist!]
- 17 Pros and Cons of Google Slides! [Should You Even Use it?]
- How to Give a Presentation on Zoom? [Step-by-Step Guide!]
Credit to Cookie_Studio for the Featured Image of this article
- Vote: Reader’s Choice
- Meta Quest 4
- Google Pixel 9
- Google Pixel 8a
- Apple Vision Pro 2
- Nintendo Switch 2
- Samsung Galaxy Ring
- Yellowstone Season 6
- Recall an Email in Outlook
- Stranger Things Season 5
How to autoplay and loop Google Slides

Many presentations are designed to autoplay, advancing from slide to slide without manual intervention and then looping when they are finished. It’s an easy way to set up a marketing slideshow, for example, or show a series of photos designed to play throughout the day.
How to autoplay Google Slides
What does loop audio mean in google slides, what you need.
Desktop PC, laptop, or tablet with Google Slides access
If you’re using Google Slides, the slide creator that's part of Google's free suite , you can set up this autoplay action whenever you are ready. Here’s the most effective way to do it, along with how to get the results that you need.
Don’t worry about autoplay options until the slideshow is complete. When you are finished and everything looks like it's in place, you’re ready to publish the slideshow in a format that can be easily used in a variety of situations.
Step 1: Open your completed slideshow in Google Slides. Select File in the upper left.
Step 2: Select Publish to the web .
Step 3: A new window will open with your publishing options. First, note the top tabs to switch between Link and Embed . Choosing to publish as a link is a very versatile option that allows you to paste the link into an email, message, notes app , or whatever else you want so that it will always be available. The Embed option is designed to provide code for embedding the slideshow on a webpage. That’s not as a common, so we’ll stick with Link for now.
Step 4: Now find the section that says Auto-advance slides . Click on this menu, and you’ll be able to see options for advancing slides from every one second to every minute, with the default set to three seconds. Three seconds is actually quite fast for the average slide, especially if there are words to read or other kinds of content to absorb, but the time spent on slides still depends on the type of slideshow. For this example, we’re bumping up the wait time to five seconds.
Step 5: Find the two options bellow the Auto-advance section: they are Start slideshow as soon as the player loads and Restart the slideshow after the last slide . These are your looping options. Make sure both are enabled so that the slideshow takes care of itself.
Step 6: Now you are finished. Select Publish , and you’ll get a link you can copy or share using social media. All you – or someone else – has to do is open the link, and the slideshow will now do the rest. Keep in mind, the automatic timer is set when the slideshow is published and can no longer be changed. If you decide you want a different timer on the slides, you’ll have to publish a new version.
This is a separate audio option available in Google Slides to loop a particular section of audio over and over so it doesn’t stop – maybe if you want to include a little music in the background, for example. It may take a little tinkering to get looping audio just right. We have a full guide on how to add audio to Google Slides and customize it.
Finally, if you’d like to add a bit more customization to your slides, you can draw on them, too! Here’s how to do it .
Editors’ Recommendations
- How to use Gemini AI to create presentations in Google Slides
- How to use Gemini AI to write anything in Google Docs
- What is Gemini Advanced? Here’s how to use Google’s premium AI
- How to edit a PDF in Google Drive
- How to change your Google background in Chrome
- How-To Guides

Want to add a little charm and personality to your Google Slides presentations? You should try changing the theme colors of your slideshow. This ensures that each new frame contains the same background colors and trim. Once you’ve selected a theme, you’ll then be able to customize it to add even more aesthetic power to your words and pictures.
Google Drive is an excellent cloud storage solution that can be accessed from numerous devices. Whether you do most of your Google Drive uploading or downloading from a PC, Chromebook, or mobile device, there’s going to come a time when you’ll need to delete a file (or two). Fortunately, the deletion process couldn’t be more straightforward. We’ve also put together this helpful guide to show you how to trash your Drive content a couple of different ways.
Word processing software isn’t the kind of tool that most users would consider exciting, which is why we’re glad to see companies like Google adding a little flair to its own products. We’re talking about Google Docs, a free-to-use word processor that’s part of your larger Google Account ecosystem. Basic formatting options and other familiar word processing functions are front and center on Google Docs, but the ability to add doodles, sketches, and other entertaining media to your next Docs file requires a special bit of know-how.
How to Loop a Google Slide
Looping a presentation in Google Slide will keep it running in a spiral until you stop it manually. Here is how to do it effortlessly.

Google Slide is one of the best web-based presentation programs available in the market. You can access it from any system across the globe with your sign-in details. Moreover, the features offered by the platform are at par or even better than most of the others.
When you loop a Google Slide, the slide(s) will continue to spiral. In simple words, once the slideshow ends, it will restart, and this continues until you stop it. If you plan to loop a Google Slide, adding the feature will help save time by avoiding replaying it continuously. Looping a slide can be beneficial on occasions where you want to play the same set of slides again and again.
There are two ways of looping a slide, without publishing it to the web or after publishing it. We will be discussing both methods in this article.
Looping a Google Slide Without Publishing to the Web
Once you are done with the presentation, click on the ‘Present’ icon at the top-right corner to play the slideshow.
Move the cursor to the bottom left corner, click on the ellipsis and then select ‘Auto-play’ from the list of options
Next, click on ‘Loop’ in the context menu. A tick appears before the option after it’s selected. Google Docs also offers the option to change the time period the slides advance at ranging between 1 second to 60 seconds. After you have made the necessary selections, click on ‘Play’ at the top to start the presentation in a loop.
Once the presentation starts, you can pause it anytime by clicking on the ‘Pause’ icon, in place of the ‘Play’ icon which we selected earlier.
Looping after Publishing to the web
This method works great when you have to share the slides with someone. After you publish it to the web, Google Slides provides you a link to it that you can share with others.
Click on the ‘File’ menu at the top and then select ‘Publish to web’ from the drop-down menu.
Next, select the time period for a slide to display and then tick the checkbox for ‘Restart the slideshow after the last slide. This basically means to run the slideshow in a loop. The other checkbox is optional and does not affect the loop feature. Once you are done with the selections, click on ‘Publish’ at the bottom.
Next, click on ‘OK’ in the confirmation box that pops up at the top of the window.

You will now see a link where the ‘Publish’ icon was initially located. Copy the link and paste it in a new tab/window to open the presentation.
The presentation will now play on loop and the first slide will reappear after the last slide. It will not end unless you close the window.

Looping a presentation helps you save time and unnecessary effort to manually replay a presentation at an event or public gathering where a slideshow must continue to run until the event is more.

Claude Sonnet 3.5 vs. ChatGPT-4o: Which is better?

5 best AI Web Browsers in 2024

7 best AI search engines in 2024
Get all the latest posts delivered straight to your inbox., member discussion.

How to generate AI videos from text with Pika Labs

How to use ElevenLabs Reader app to listen to any text

How to fix the 'Insecure Download Blocked' warning on Chrome

How to fix YouTube black screen on Android

How to setup and use Passkey Logins for X on Android
- PC & Mobile
- Google Slides
How To Loop Google Slides
Lee Stanton Lee Stanton is a versatile writer with a concentration on the software landscape, covering both mobile and desktop applications as well as online technologies. Read more August 30, 2023
Device Links
- Device Missing?
Google Slides is an essential tool for business and education both online and offline. Thanks to this program, we get free access to myriad presentation features without needing additional software.
Google Slides are constantly improving; today, you can make your slides advance automatically and loop for the smoothest presentation possible. How do you enable this option? Read on to find out.
When presenting your Google Slides, you can use your keyboard’s arrow buttons to move on to the next screen. You can also press the slide number and hit Enter to go to a specific slide. While this certainly gives you great control, it can be a bit of a hassle when you just want your slides to loop in the background as you give a presentation. Without the loop option enabled, you need to press number 1 on your keyboard and then Enter to go back to the beginning of the presentation.
The ability to loop your slideshow is included within the auto-play functions of Google Slides, which were introduced in 2019. This feature allows you to set the duration of your slides and enable the slideshow to play repeatedly until you pause or stop it manually.
Looping your slides is a fantastic solution in numerous situations. You can use it to display information or promotional material at a trade show or enhance an oral presentation with a few images. Therefore, learning how to use it can come in handy. Read the guide below to learn how to loop Google Slides on several platforms.
How to Loop Google Slides on a PC
You’ll need to open your presentation and enter Slideshow mode to enable looping. Here’s how to do it on a PC.

The slides will loop indefinitely. If you need to pause the presentation to answer some questions or similar, find the pause button in the following way:

You’ll need to enable looping every time you’re presenting from Google Slides, as you can’t save these preferences within the app itself. Nevertheless, you can publish your slideshow with auto-play and loop enabled in the following way:

- Share the presentation in your preferred way or copy its shareable link.
Whenever you open the slideshow through its shareable link, auto-advance, and loop will be enabled by default.
How to Loop Google Slides on an iPhone
Google Slides is undeniably more limited on mobile platforms than on PC. However, having this app in your pocket can still be useful at times. You can make various edits to your presentations, publish or share your slideshow, and present your slides straight from your iPhone. One feature you might have trouble finding is looping your presentation, though.
Slideshow mode gives little flexibility to mobile Google Slides users. If you want to loop your slides while presenting from your iPhone, you’ll need to publish your presentation with this option enabled from a PC and open the shareable link on your phone. Follow these steps to get it done.

You can always edit the auto-play settings of your published presentation in the same three-dot menu.
How to Loop Google Slides on an iPad
Google Slides is more user-friendly on an iPad’s large screen than on iPhone. That said, the features available on this platform are still more limited than the PC version. If you want to present a looping slideshow from your iPad, you’ll need to publish the presentation on your PC with the appropriate settings first.
- Share the link with your iPad and follow the same instructions with the steps listed above, the same with iPhone.
How to Loop Google Slides on an Android
As we mentioned, Google Slides has limited features on mobile platforms. If you’re planning to present looping slides from your Android device by sharing or Chromecasting your screen, you’ll need to take extra steps on your PC beforehand.
The slides will advance at the speed you chose when you exported the presentation, but you can modify this anytime in the same “Auto-play” menu.
Additional FAQs
Can i loop slides without auto-advance.
Google Slides may lead you to believe that you can loop your slides without turning auto-advance on. After all, you can uncheck auto-advance time intervals while still having “Loop” on within the auto-play settings. However, loop doesn’t actually work without auto-advance. This can be a little inconvenient, especially since auto-advance doesn’t offer custom time intervals. Nevertheless, you can still go back to the beginning of your presentation without looping by pressing your number 1 key and hitting Enter.
How can I loop videos in Google Slides?
If rather than a slideshow, you want to put a video on loop, you can similarly do so in Slideshow mode.
1. When you get to your video slide during your presentation, right-click the video.
2. Enable Loop in the dropdown menu. The video will loop until you move to the following slide manually.
Much like slide loop, you’ll need to enable this feature on your video every time you’re presenting.
Can I set my auto-advance and loop preferences before presenting?
At the time of writing this article, pre-setting your slideshow preferences isn’t an option in Google Slides. However, publishing your slideshow to the web with the appropriate settings will ensure that your presentation plays automatically and loops every time it’s opened. Follow the instructions above to publish your presentation this way.
Round and Round
The loop feature makes Google Slides perfect for background slideshows, but this option can come in handy in many different situations. You can loop your presentation in Google Slides on PC or publish the slideshow to present it on other platforms with loop already enabled.
Did you manage to find the loop option in Google Slides? How do you think this feature could be improved? Let us know in the comments section below.
Related Posts
Disclaimer: Some pages on this site may include an affiliate link. This does not effect our editorial in any way.

Lee Stanton September 29, 2023
Lee Stanton September 27, 2023
Lee Stanton September 14, 2023
Send To Someone
Missing device.
Please enable JavaScript to submit this form.
MY BOOK FIRST CLASS TEACHING IS NOW AVAILABLE!

HOW TO CREATE A LOOPING SLIDESHOW IN GOOGLE SLIDES
Have you ever wanted to set a Google Slides slideshow to loop through the slides automatically?
Maybe you want a slideshow looping during Back to School Night or in the background while students are working with directions or examples.
Unlike Microsoft PowerPoint, Google Slides does not allow you to set specific time for each slide to automatically advance. But, you can still create a looping slideshow by publishing the file to the web... I promise it isn't as hard as it sounds! Here's exactly how to do it:

Open a new Google Slides file or open an existing Google Slides file. TIP: Type "slides.new" in your address bar to automatically open a new Google Slides file!
Design the slides as desired. interested in the back to school night slides you see here the editable template is available in my store using the link below, click " file " in the top toolbar, hover over " share " with your cursor (so more options appear), and then click " publish to the web ". a new window titled "publish to the web" will appear., under "auto-advanced slides:", choose the desired length of time each slide will display. check the boxes next to "start slideshow as soon as the player loads" and "restart the slideshow after the last slide"., click " publish " at the bottom and then click " ok " in the window that pops up asking if you're sure you want to publish this selection., copy the link that appeared in the window after step 5. tip: you can triple click the link to select all the text, right click, and choose "copy" or use keyboard shortcuts (ctrl + c or cmd + c) to copy the link. , paste the link in a new tab. tip: put your browser into "full screen" mode to display the slides like a traditional slideshow. note: you can always adjust the settings by repeating steps 3-5., back to school night slide template.
If you want to create a looping slideshow for a Back to School Night or a Meet the Teacher event, I have a Google Slides template that might save you some time!
This product includes both PowerPoint and Google Slides templates so you can choose the format that works best for you. The slides are already designed with the borders, titles, and images so all you have to do is add your own information!
Then, you can use the steps above to loop your slideshow during the event!
The background color of the slides is EDITABLE so you can customize them to fit your classroom theme or school colors. A blank slide is also included that allows you to edit the title and add your own clipart of pictures as needed.
You can grab the Google Slides template using the link below:

MORE GOOGLE SLIDES HACKS
If you found this tutorial helpful, you might also enjoy these other Google Slides hacks!
Here are some of the ideas shared in the video:
■ Adding music to your slides
■ Adding an outline to text using Wordart
■ Cropping an image to a specific shape
■ Creating a force copy link
Check it out below and don't forget to subscribe to my channel ( it's FREE and I post new videos weekly ):
FREQUENTLY ASKED QUESTIONS:
What exactly does "publish to the web" mean.
When you publish a file to the web, you are allowing the file to be visible to others on the web. It is important to keep this in mind if the file includes private or sensitive information. However, if you are using a Google account created by a school, district, or organization, you might have the option to make the published file visible to only those in your organization or a group of people in your organization.
Do I need to republish the file if I've made changes to my slides?
Nope! Any changes you make will automatically update in the published version. However, it may take a few minutes for these changes to display.
How do I stop publishing the file to the web?
Click "File" in the top toolbar, hover over "Share" with your cursor (so more options appear), and then click "Publish to the web". In the new window that appears, click "Published content & settings" and then click "Stop publishing".
How come I don't see the "Publish to the web" option?
If you are using a Google account created by a school, district, or organization, your account administrator might have turned off the ability to publish files to the web. You can contact your account administrator to see if the setting can be turned on.
Can I embed the looping slideshow on a website?
Yes! Instead of using the link, you can click "Embed" in the "Publish to the web" window. After you adjust the settings as desired, you can copy and paste the HTML code in the correct location on the website.
SELECT A GOOGLE APP:
To play, press and hold the enter key. To stop, release the enter key.

- Categories / Trending
How To Autoplay and Loop Google Slides Presentation
May 15, 2022
Before the Covid-19 pandemic, which began in late 2019, many people had already used it. Google Slides are the digital PowerPoints to Microsoft Word. They are easy to use and automatically saved in your Google Drive, as long as you have your Gmail account. You can even set up your Google Slides Presentations on a loop.
Using Google products is easy. With Google, you can do more in one go. As long as you have a Gmail account, you automatically have other Google platforms. Depending on the formality level, you can chat and have a video call via Google Hangout or Google Meet. You can set up your own classroom via Google Classroom.
You can also create your presentations with Google Slides or Google Jamboard. Setting up your calendar is more manageable with Google Calendar. You can also set up an alarm to remind you that the meeting is about to start.
Why Google Slides May Get Boring After A While:

However, after a while, Google Slides may get boring. Yes, they are still effective for presentations. The problem is that you have to expand the slides and hide the rest of the pages. That way, the audience will not get to peek at the following pages after the first one. That will kill off the suspense.
If you have no problems with that, then that is cool. However, some of your audience might lose interest once they find what is on the next slide while you are still explaining the current slide. It is even worse if you give them full, unrestricted access to your Google Slides. They might definitely ruin your presentation.
To avoid such issues, some people may turn to other features, like Google Jamboard. However, there are ways to make Google Slides look and feel more fun during your presentations. You can do this while at home, in an online class during live on Google Meet or Zoom (by sharing your screen with your audience), or during a conference.
One example of turning Google Slides into something more fun is the loop mode feature. With this, your presentation will feel like watching a film. It will engage more audience’s interests instead of still, rigid slides.
Google Slides Presentations On A Loop

Google Slides Presentations can be set up on a loop. Setting them up on a loop is the strategy. In fact, there are two (2) strategies for getting them on a loop.
1. Setting Google Slides On Autoplay and Loop When Presenting.
This is one way to cure your audience’s boredom during your presentation. Before letting it play, set up your Google Slides on Autoplay and Loop to begin the Slideshow. You can even start with the other way around, to set Google Slides on Loop and Autoplay. These are the steps:
- Click “Slideshow” at the top of Google Slides. Alternately, you can also use an arrow to choose “Presenter View” or click on “Start From Beginning”, based on your preference.
- Display the “Presenter Toolbar” once the “Slideshow” is open. By hovering your cursor over the presentation’s bottom left corner, you do that.
- Click three (3) dots on the right of the Presenter Toolbar, then move to “Autoplay”. A pop-up menu turns up, and you can select the advance timing for the slides. The choices are there, from every second to every minute.
- To “Loop” your Google Slides Presentation, choose “Loop” at the bottom of the pop-up menu.
- Once you finish, click “Play” and the presentation is automatically played.
- If you want to stop the “Slideshow”, click on a slide—resume “Autoplay” from the Presenter Toolbar. Then click on “Play” again, and the “Slideshow” stops its Loop.
By looping your Google Slides this way, your presentation may not be as boring as your last ones. It feels like watching a moving screenplay. Well, it basically is, especially since every slide shows different things.
2. Setting Google Slides On Autoplay and Loop When Publishing Them To The Website.
You do not just setting the loop mode when you do your presentation with Google Slides. You can also set it on when you publish your presentations on your company website. How?
The second strategy on getting them on a loop is this. So, you do not just want to play them locally – alias only presenting them to your office staff. You would also like to publish your Google Slides materials on your company website, especially since they work wonders to support the company profile.
Here is how to do it:
- Go to file > Publish To The Web in the menu.
- Opt for “Embed” or “Link” and use the Auto-Advance Slides dropdown box. This will help you to choose your slides’ timing. The options are varied, from every second right up to every minute.
- When you want to loop the Slideshow, click on the box for “Restart The Slideshow After The Slideshow”. The box is checked then.
- Since you want to publish your Google Slides Presentations this way, mark the Checkbox for “Start Slideshow As Soon As The Player Loads” if you prefer that.
- Once you are done, click “Publish”. Confirm to obtain the link or embed code for the Slideshow.
By looping your Google Slides this way, your company website may receive more engagement. Whether it is from potential future customers to anyone seeking job vacancies, let your Google Slides Presentations introduce your company more interestingly.
3. What If You Forget To Set Up The Loop – After You Publish Your Google Slides Presentation To The Web?
So you have already finished working on your presentation. Once you get it published on your company website, you realize that you have forgotten something. You have not set up the Loop on your Google Slides.
No worries, you can still do that, especially when you want to share them with someone. Google Slides gives you a link once you publish them to the web. With that link, you can share your slides with other people.
Here is how:
- Click on the File menu at the top of the screen.
- Select “Publish To The Web” from the dropdown menu.
- Select the time period for the slide. This is to display your slides.
- Tick the “Checkbox” to “Restart” the Slideshow after the last one. This means you are activating the loop mode for your slides.
- If you see the other Checkbox, you may ignore it. You do not have to tick it since it does not affect the Loop.
- Click on the “Publish” button at the bottom of the screen.
- Click “OK” on the confirmation box that shows up at the top of the window after the previous step. You can see the link where the “Publish” icon was. Copy and paste the link into a new tab or window. The presentation is open.
You can see your Google Slides Presentations playing on a loop mode. The first slide will reappear after the last slide closes. It only ends when you close the window.
4. What If There Are Videos On Your Google Slides Presentations? How To Get Them On A Loop Too?
This strategy does not only work wonders for companies. Since the Covid-19 pandemic hit the end of 2019, more school and university classes have shifted to online classes. Three years since then, many of them have already returned to the real classrooms.
However, that does not mean going online has completely stopped. In fact, more long-distant learning programs and remote working policies are still done by many schools and companies. This has changed and shaped the way people adapt to the new normal era. As long as there is a strong internet connection, a workable device, and a willingness to connect, distance is no longer the factor hindering work and school. More people find remote working and learning more modern than conventional ones.
So, we have already discussed “Setting Google Slides On Autoplay and Loop When Presenting” and “Setting Google Slides On Autoplay and Loop When Publishing Them To The Website”. What if there are videos on your Google Slides Presentations – and you want to get them on a loop too?
Thankfully, the strategy is so easy to use here. For example, you have at least two videos on separate slides in the same presentation. This is what you can do:
- Open the Presentation slides with the videos on them on your Google Slides.
- Click on the Present button on the top right corner of your screen.
- Before you play the video, right-click the screen. A small toolbar shows up.
- Choose Loop on the top of the toolbar menu.
- Play the video, and you will see it goes on and on. The Loop is activated.
- You can also do the same for the other video on the next slide.
You can use this strategy like a welcome announcement in your virtual meeting. Whether you are a schoolteacher or a team leader in a company, this strategy works wonders for both occasions. Students who are more attentive in visual learning will find this method more enjoyable than just reading and memorizing words.
5. How To Pause The Loop On Google Slides Presentations:
When turning your Google Slides Presentations on a loop, the correct speed is the key. You do not want it to be so slow that your audience gets bored quickly.
Still, you do not want the Loop to play too fast that your audience cannot grasp the materials on the Google Slides. Even to some, a minute is still way too fast – especially if some of your audience may have an attention-span issue. If that is what happens, is it possible to pause the Loop?
You can pause the Loop anytime you want. For instance, one of your audience complains that the Loop you have set feels a little bit too quick for them. Since your presentation is on an active looping mode, click on the “Play” icon at the time setting menu. The icon then will automatically turn into the “Pause” icon.
The Loop stops. When your audience has finished taking notes and you would like to resume the looping mode, just click on the “Pause” icon, and it reverts to the “Play” icon. Your presentation is back in an active looping mode.
6. How To Time Your Google Slides On A 60-Second-Loop
Once again, it is up to you to decide the timing for each slide when you loop your Google Slides Presentations. This is just one example you may consider if you need to. Here is how:
Choose a timing between the slides.
To choose a timing between your Google Slides here is what you can do:
- Go to the File Menu.
- Check out the Auto-advance Slides dropdown menu of Publish To The Web screen.
- Choose a timing to play for every slide on the dropdown menu.
In this part, you can see various pre-built options to choose from. You get to set up the timing between slides according to your preference.
Test your specific timing first.
To test your specific timing first, here is what you can do:
- Choose a short time to demonstrate.
- Check the options underneath, like “Start The Slideshow As Soon As The Player Loads” or “Restart The Slideshow After The Last Slide”.
The latter option is for you who would like to have your Google Slides Presentations on a loop.
Publish a timed video.
To do this, you have to:
- Publish the video from the selected link.
- Please copy the link and paste it into the new window. You can see the slides are auto-timed and go on a loop according to the setup timing.
- Leave the Google Slides on autoplay loop to keep it going. If you do not want it anymore, just close the window.
There are many ways to get your Google Slides to a better present . As long as you know how to loop them, your audience will be more entertained.
Related Articles

5 Best Sports Logos, Inspiring and Athletic

Looking Tasty: Creating Logos for Food Companies

Designing Logos for Small Businesses with 5 Basic Criteria
©2021 aqr studio, add to cart.
The Tech Edvocate
- Advertisement
- Home Page Five (No Sidebar)
- Home Page Four
- Home Page Three
- Home Page Two
- Icons [No Sidebar]
- Left Sidbear Page
- Lynch Educational Consulting
- My Speaking Page
- Newsletter Sign Up Confirmation
- Newsletter Unsubscription
- Page Example
- Privacy Policy
- Protected Content
- Request a Product Review
- Shortcodes Examples
- Terms and Conditions
- The Edvocate
- The Tech Edvocate Product Guide
- Write For Us
- Dr. Lynch’s Personal Website
- The Edvocate Podcast
- Assistive Technology
- Child Development Tech
- Early Childhood & K-12 EdTech
- EdTech Futures
- EdTech News
- EdTech Policy & Reform
- EdTech Startups & Businesses
- Higher Education EdTech
- Online Learning & eLearning
- Parent & Family Tech
- Personalized Learning
- Product Reviews
- Tech Edvocate Awards
- School Ratings
How to watch Minnesota Lynx vs Phoenix Mercury online
How to watch maria vs. gauff in the 2024 us open online for free, can tech executives be held responsible for what happens on their platforms, concert venues accuse yelp of pushing fake tickets, 2 trump campaign staffers got into a scrap with an arlington cemetery official who didn’t want them filming near the graves of recently buried us troops: report, when a.i.’s output is a threat to a.i. itself, sources: emmanuel macron invited pavel durov to move telegram to paris in 2018; in 2017, a joint operation between french and uae spies hacked durov’s iphone (wall street journal), ask hn: who’s building an ai-free product, apple lays off about 100 services jobs across apple books, news, what is wi-fi calling, and should you use it, how to make google slides loop (even without publishing).
Google Slides is an incredibly powerful presentation tool that has helped countless individuals and businesses create stunning presentations over the years. One great feature of Google Slides is the ability to loop presentations so that they automatically start over once they reach the end, which can be incredibly useful for trade shows, kiosks, or any other situation where you want your presentation to run continuously. In this article, we’ll show you how to make Google Slides loop, even without publishing.
Step 1: Create Your Presentation
Before we get into how to make your Google Slides loop, it’s important to create your presentation. You can do this by going to Google Drive, clicking “New,” and selecting “Google Slides.” Once you’ve created your presentation, add your content and design your slides as desired.
Step 2: Access the Presentation Settings
Now that your presentation is complete, it’s time to make it loop. To do this, open your Google Slides presentation and click on the “Present” button in the top-right corner. This will launch your presentation in full-screen mode.
Step 3: Choose the Looping Option
Once your presentation is in full-screen mode, right-click anywhere on the slide and select “Presentation settings” from the drop-down menu. This will open the presentation settings dialog box.
In the presentation settings dialog box, select the “Loop presentation” checkbox. This will cause your presentation to loop continuously, even if it reaches the end.
Step 4: Save Your Presentation
Now that you’ve set your presentation to loop continuously, it’s time to save your changes. To do this, click the “X” button in the top-right corner of the presentation settings dialog box. This will close the dialog box and save your changes automatically.
Step 5: Test Your Presentation
Finally, it’s time to test your presentation and ensure that it’s looping correctly. To do this, click on the “Present” button again and watch your presentation play all the way through. If it starts over at the beginning, congratulations! You’ve successfully made your Google Slides loop.
Best Sites to Find Which TV Show ...
How to make a slideshow on iphone: ....

Matthew Lynch
Related articles more from author.
8 Hidden Google Photos Search Tools You May Have Missed
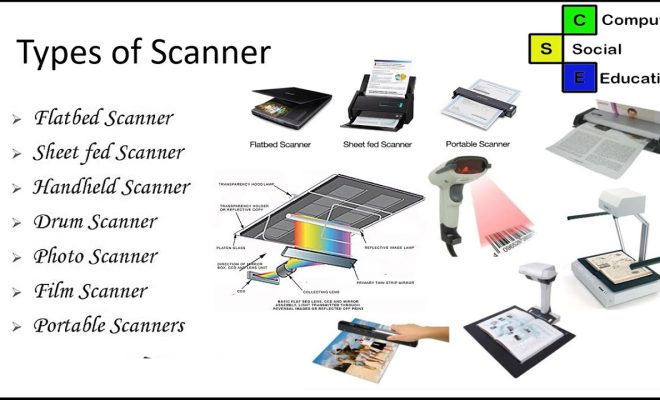
The Differences Between Types of Scanners

What Is OpenWrt And Why Should I Use It For My Router?

YouTube vs. TikTok: Which Is Better for Viewers?

What is an Entity-Relationship Diagram (ERD)?

How to Turn off Sticky Keys on Windows
Make attention-worthy videos faster and better | Join us for a live VEED demo
How to apply code, 🇺🇦 ukrainians can now use all subtitle and translation features for free. use code 'ukraine'.
How To Put, Edit And Loop A Video In Google Slides (Super Quick)

Want to learn how to put a video in your Google Slides presentation?
At VEED , an easy-to-use, yet powerful, video editor, we know the power of embedding a good video in your Google Slides presentation. According to recent research, only a shocking 4% of professionals put videos in their presentations.
This means that 96% are missing out on an effective medium to catch people’s attention and create a powerful presentation.
Want to stand out? Here’s the perfect tutorial for you!
You’ll learn:
- How to put a video in Google Slides in a super quick and easy way.
- How do you let someone access a video on Google Slides?
- How to edit a video embedded In Google Slides
- Google Slides video loop - a quick way to loop your videos for Google Slides
How To Embed A Video In Google Slides In A Super Quick And Easy Way
1. go to your google slides presentation, 2. go to the slide to embed your video in, 3. in the top menu bar, go to insert > video.

4a. Enter the link from YouTube and select the video

4b. Or use a video from Google Drive
Alternatively, you can also embed a video in Google Slides from your Google Drive folders.
Warning : Make sure that all of your editors can access this video from Google Drive. Otherwise, only the original creator will be able to play the video in the presentation (and not the editors).

5. Present your Google Slides with the video!

And voilà, there you have it. You’ve just embedded a video in your Google Slides presentation!
How Do You Let Someone Access A Video On Google Slides?

People who are allowed to edit your Google Slides presentation might not have access to the embedded video from your Google Drive.
Note : If this is the case, they won’t be able to play it during the presentation.
This is because your video has restricted access (ie only you can access it).
To make the embedded Google Drive video accessible to your editors, do the following steps:
- Go to your Google Drive
- Right click on the video added in Google Slides
- Click Share.
You can either share the embedded video:
- To anyone with the link

- With only the editors involved (enter their emails).

Then, your editors will be able to play the video while presenting the whole thing!
How To Edit A Video Embedded In Google Slides
You’ve just learned how to put a video in your Google Slides presentation. But now, it’s time to learn how to edit it for a quick formatting fix or two.
Note : Google Slides has very, very , very basic video editing capabilities (because it’s meant for presentations).
Use VEED’s easy-to-use, yet super powerful, video editor if you want to trim your video, add text, automatically add subtitles and other cool features.
1. In the top menu bar go to Format> Format Options

2. Video playback options

Here are the rudimentary video playback options with Google Slides. They’re quite easy to understand:
- Start at ... End at : These denote at which points the embedded video starts to play and ends.
Here’s an example: Let’s say that you have a four-minute video but you only want it to play between 00:10 to 00:40.
Enter these values, so when you play this video embedded in your Google Slides presentation, it will start at 00:10 and stop playing at 00:40.
- Auto-play when presenting . With this is ticked, your video will automatically start when you get to this slide in your Google Slides presentation.
- Mute audio : Ticking this will mute your audio while the video’s playing.
3. Size and rotation options
You can either drag the ends of your video (upon clicking on it) to change its size and position.
Tick the Lock aspect ratio box, so that you can change the size of your video without changing the overall shape.
4. Position options

First off, you can drag the video you’ve embedded in Google Slides to change its location.
But if you want to change the coordinates numerically, you can alter the X and Y values to place your video anywhere in the Slide.
Don’t know what the From Center/Top left is all about? They’re basically base point references:
- From Center. If you put X:0 and Y:0, this puts your video in the center of the slide.

- From Top left. If you put X:0 and Y:0, this puts your embedded video in the top-left corner of the slide.

5. How to loop the basic way
If you want to loop the video, simply right click on the embedded video and select Loop.

Here’s a big BUT: When your video ends, it doesn’t actually automatically loop, and you’ll have to do that yourself by clicking on the video. It’s not really useful for anyone.
Google Slides Loop Video - The Best and Easiest Way
Now, here is the right way to loop your Google Slides video with VEED’s easy-to-use free video editor.
1) Go to VEED and upload the Google Slides video you want to loop
Note: If you want to save your project and start new ones, you can sign up for free .

You can upload from:
- Your local files
- YouTube video (just enter the link)
- Your webcam
2. Click on Add Video button and upload the video to loop again

The Add video button is located above the timeline, to the left. Upload the video the same number of times that you want the clip to loop. Place it next to the other video to merge both clips seamlessly.
3a is for those who want to save the video they want to loop as an MP4 video file.
3b. leave the video file as it is.
Alternatively, you can also just save the video as a GIF . In this case, you won’t need to upload the same video clip over and over again because GIFs loop on their own.
4. Download the video you’ve just looped and put the video in Google Slides!
Hit Export, wait for the video to render, and download it as an MP4 video or as a GIF. And you’re done! Just go to Google Slides and put the looped video in.
Create And Edit Beautiful Video Presentations Using VEED!
In this tutorial, you’ve learned all that there is to know about embedding videos in Google Slides.
Of course, VEED is so much more than a video looper. You can also create short and beautiful videos for your Google Slides presentations. You can add text to your video , merge , trim and split your videos, add an audiogram , and so on.
For more tutorials and helpful guides on how to make amazing videos to engage with your audience, subscribe to us on YouTube and Instagram .

How to Make a YouTube Short (+ Best Practices to Help You Go Viral)

How To Automatically Extract Subtitles From MKV (Super Fast And Easy)

How to Record a Google Meet Call (It’s Easier Than You Think)
When it comes to amazing videos, all you need is veed.
How to Loop Animations in Google Slides?
- Jason Huang
- Last update: November 12, 2023
Introduction
In this blog post, we will explore how to loop animations in Google Slides, allowing you to create engaging and seamless visual experiences. Animation can bring your Google Slides presentations to life, captivating your audience and making your message more memorable. One powerful technique to enhance your animations is looping. To put it simple, up to now, it's impossible to make looping animations in Slides, even no chances with 3rd party applications. 🙁 I admit Google Slides is a lean solution for presentations.
Understanding Animation Loops
Animation loops refer to the repetition of a specific animation sequence. By setting up a loop, you can make your animations play continuously until you choose to stop them. This can be particularly useful when creating interactive presentations, educational materials, or eye-catching advertisements.
Loop Animation via a Hack
But there is a workaround (I like workarounds). It's simple: make a list of same animations for the same object . For instance, I want to spin endlessly for the rectangle below. Here are the steps,
- Create an object on your slide. An object can be a Shape , a Text box , or an Image etc.
- Click Insert > Animation . It brings up a right side panel Transitions in Slides.
- Select the object you created.

- Create 2nd Spin animation. Click + Add animation again. Select Spin from the drop down animation list. This time, select After previous .

- Click Play .
- Click the object you created.
- You will see the spinning rectangle.
Animation via GIF
An alternative to insert an endless animation is to insert a GIF. Slides supports GIF natively and most GIF online will loop infinitely. Inserting a GIF is no different from an image. It's in menu Insert > Image > Upload from computer .
A fast way to express your idea is to search existing animations made by others. A popular GIF site is giphy.com .
To create your own GIF, screen record your non-loop animation and create a loop GIF via numerous third party GIF Maker tools. This will cost you more time if you are new to it.
Looping animations in Google Slides offer a powerful way to engage and captivate your audience. By understanding the concept of animation loops and utilizing the right settings, you can create visually stunning presentations that leave a lasting impression. So go ahead, unleash your creativity, and master the art of animation loops in Google Slides!
Try a 14-day free trial with it. You can read other topics related to this one - Blocking Q&A In Google Slides Using Google Admin Console
Thanks for reading. Please leave any comments below.
- Development
- Google Workspace Tips
- Internet Safety Education
- Account & Billing
- Foresight Product Updates
- Get Started
- Manage Rules
- Troubleshooting
- Calendar Resources Management
- Chrome Devices Management
- Groups Management
- Licenses Management
- Mobile Devices Management
- Report Use Cases
- User Management
- Google Calendar Users
- Google Gmail/Forms/Drive
- Form Merger Support
- Safe Doc Customer Portal
- Safe Doc for Education
- Uncategorized

This site uses Akismet to reduce spam. Learn how your comment data is processed .
Unleash the power of automation and shape the future of intelligent digital workspace.
Products & Services
- Software Consulting
- Terms of Services
- Privacy Policy
© 2024 xFanatical, Inc. All rights reserved.
Privacy Overview
| Cookie | Duration | Description |
|---|---|---|
| _ga | 2 years | This cookie is installed by Google Analytics. The cookie is used to calculate visitor, session, campaign data and keep track of site usage for the site’s analytics report. The cookies store information anonymously and assigns a randomly generated number to identify unique visitors. This cookie is installed the first time a visitor enters the website through a browser. When the visitor comes back to the website through the same browser, the cookie will consider them to be the same visitor. Only in the event that the visitor changes browser, will they be deemed to be a different visitor. |
| _gat_gtag-### | 1 minute | This cookie is installed by Google Analytics. It is used to analyze visitor browsing habits, flow, source and other information. |
| _gid | 1 day | This cookie is installed by Google Analytics. The cookie is used to store information of how visitors use a website and helps in creating an analytics report of how the website is doing. The data collected includes the number of visitors, the source where they have come from, and the pages visited in an anonymous form. |
| CONSENT | 2 years | YouTube sets this cookie via embedded youtube-videos and registers anonymous statistical data. |
| Cookie | Duration | Description |
|---|---|---|
| __Secure-1PAPISID | 2 years | Used by for targeting purposes to build a profile of the website visitor's interests in order to show relevant & personalized Google advertising |
| __Secure-1PSID | 2 years | Used by for targeting purposes to build a profile of the website visitor's interests in order to show relevant & personalized Google advertising. |
| __Secure-3PAPISID | 2 years | Used by for targeting purposes to build a profile of the website visitor's interests in order to show relevant & personalized Google advertising. |
| __Secure-3PSID | 2 years | Used by for targeting purposes to build a profile of the website visitor's interests in order to show relevant & personalized Google advertising. |
| _gcl_au | 3 months | This cookie is set by Google Analytics to take information in advert clicks and store it in a 1st party cookie so that conversions can be attributed outside of the landing page. |
| 1P_JAR | 1 month | This cookie is installed by Google Ads. This cookie is used to collect site statistics and track conversion rates. |
| APISID | 2 years | This cookie is used by Google to store user preferences and information while viewing Youtube videos on this site. |
| HSID | 2 years | This cookie contains digitally signed and encrypted records of a user’s Google Account ID and most recent sign-in time. Google uses security cookies to authenticate users, prevent fraudulent use of login credentials, and protect user data from unauthorized parties. |
| LOGIN_INFO | 2 years | This cookie is used by YouTube (Google) for storing user preferences and other unspecified purposes. |
| NID | 6 months | NID cookie, set by Google, is used for advertising purposes; to limit the number of times the user sees an ad, to mute unwanted ads, and to measure the effectiveness of ads. |
| PREF | 2 years | This cookie is used by YouTube (Google) for storing user preferences and other unspecified purposes. |
| SID | 2 years | This cookie contains digitally signed and encrypted records of a user’s Google Account ID and most recent sign-in time. Google uses security cookies to authenticate users, prevent fraudulent use of login credentials, and protect user data from unauthorized parties. |
| SIDCC | 1 year | This cookie carries out information about how the end user uses the website and any advertising that the end user may have seen before visiting the said website. |
| SSID | 2 years | This cookie is used to save the user's preferences and other information. |
| test_cookie | 15 minutes | The test_cookie is set by doubleclick.net and is used to determine if the user's browser supports cookies. |
| VISITOR_INFO1_LIVE | 6 months | A cookie set by YouTube to measure bandwidth that determines whether the user gets the new or old player interface. |
| YSC | session | This cookie is used by YouTube to remember user input and associate a user’s actions. This cookie lasts for as long as the user keeps their browser open. |
| yt-remote-connected-devices | never | YouTube sets this cookie to store the video preferences of the user using embedded YouTube video. |
| yt-remote-device-id | never | YouTube sets this cookie to store the video preferences of the user using embedded YouTube video. |
| yt.innertube::nextId | never | This cookie, set by YouTube, registers a unique ID to store data on what videos from YouTube the user has seen. |
| yt.innertube::requests | never | This cookie, set by YouTube, registers a unique ID to store data on what videos from YouTube the user has seen. |
How To Loop Google Slides
Google Slides is a popular presentation software that allows users to create visually engaging slide decks. However, one limitation is that slideshows stop after the last slide by default. Fortunately, Google Slides provides options to loop slide presentations so they play continuously.
In this step-by-step guide, you’ll learn multiple methods to loop Google slide presentations, both when presenting live and when publishing your deck online.
Step 1: Enable Looping in Slideshow Mode
Step 2: loop slides when publishing online.
Follow these instructions to enable looping for published presentations:
When viewers open your published Google Slides, it will now loop automatically based on the slide duration you configured.
Step 3: Use Slide Transitions for a Seamless Loop
The transitions will blend each slide change together nicely when looping. You can preview and tweak the timings until you’re satisfied.
Step 4: Rearrange Slides to Complete the Loop
Step 5: add visual variety with templates.
Here’s how to use different templates in one file:
The audience will appreciate the variety as slides loop around over and over!
The ability to auto-advance, transition between slides, rearrange the order, and use template variety all contribute to professional looping presentations. Audiences will be impressed as your perfectly looping Google Slides engage their attention.
Implement these tips at your next trade show booth, for digital signage screens, or company meetings. Google Slides eliminates presentation interruptions so you can deliver an impactful, continuous message.
About The Author
Vegaslide staff, related posts, how to group things in google slides, how to insert a pdf into google slides, how to translate google slides to any language, the best google slides alternatives for your presentation needs.
- Help Center
- Google Docs Editors
- Privacy Policy
- Terms of Service
- Submit feedback
IMAGES
COMMENTS
You can pick from every second up to every minute. If you also want to loop the slideshow, select "Loop" at the bottom of the pop-out menu. When you finish, click "Play" to automatically play your presentation. To stop the slideshow, simply click on a slide. You can then resume AutoPlay from the Presenter Toolbar by selecting "Play" again.
Learn how to automatically play your Google Slides presentations, as well as how to loop your presentations quickly and easily. | Playlist: https://www.youtu...
With the slideshow showing, move your mouse to the bottom-left corner of the presentation screen to show the toolbar. On the toolbar, click the three-dot menu and expand the Auto-play item. Then on this menu, click the Loop option at the bottom to enable presentation looping. Also on this menu, you'll need to choose the timing for your slides ...
To make Google Slides auto-loop, click the " Slideshow " button at the top-right of your screen. Next, click the vertical three-dot icon in the bottom-left corner of the slide. Select " Auto-play " and choose your slide interval. Finally, check the " Loop " option and click " Play .". While the above method works, other ways ...
Step 1: Open Publish to the Web Option. First, open the presentation slides file into Google Slides. Once the file is open, click on "File" located on the top left corner of the screen. From the dropdown menu, select the "Publish to the web" option. Step 2: Click on Link. This will open a new dialogue box. From there, select "Link ...
Step 1: Open your completed slideshow in Google Slides. Select File in the upper left. Image used with permission by copyright holder. Step 2: Select Publish to the web. Image used with permission ...
Move the cursor to the bottom left corner, click on the ellipsis and then select 'Auto-play' from the list of options. Next, click on 'Loop' in the context menu. A tick appears before the option after it's selected. Google Docs also offers the option to change the time period the slides advance at ranging between 1 second to 60 seconds.
Elevate your Google Slides game! Learn How to Auto Play and Loop Your Presentation.Unlock the dynamic potential of your Google Slides with this step-by-step ...
Step 6: Loop the presentation. To make your Google Slides presentation run on a continuous loop, check the box next to "Loop" just underneath the autoplay settings. This will make your presentation start over from the beginning after the last slide. Step 7: Tweak additional settings (optional)
In this video I will show you one easy way how to use autoplay, autoloop, or automatic advance in Google Slides. You will learn how to make your slides swit...
Hit the Slideshow button in the top right corner of the screen. Move your cursor to the bottom left corner of the slide. Click the three-dot menu next to the slide number. Move your cursor to the ...
Maybe you want a slideshow looping during Back to School Night or in the background while students are working with directions or examples. Unlike Microsoft PowerPoint, Google Slides does not allow you to set specific time for each slide to automatically advance. But, you can still create a looping slideshow by publishing the file to the web...
Tips for Designing Looping Presentations; Benefits of Looping Google Slides. Here are some of the key benefits of setting your Google Slides presentation to loop: Hands-free presenting: Looping eliminates the need to manually advance slides during a presentation. Once started, the slideshow will run on its own.
Open your presentation and click Slideshow > Presenter View. When presenting, hover over the bottom left corner so the Presenter Toolbar appears. Click the 3-dot menu on the right side. Choose Auto-play and select an Auto-advance duration. Tick the Loop checkbox. Resume presenting and your slides will now loop automatically.
Click three (3) dots on the right of the Presenter Toolbar, then move to "Autoplay". A pop-up menu turns up, and you can select the advance timing for the slides. The choices are there, from every second to every minute. To "Loop" your Google Slides Presentation, choose "Loop" at the bottom of the pop-up menu.
To do this, open your Google Slides presentation and click on the "Present" button in the top-right corner. This will launch your presentation in full-screen mode. Step 3: Choose the Looping Option. Once your presentation is in full-screen mode, right-click anywhere on the slide and select "Presentation settings" from the drop-down menu.
Go to the slide to embed your video in. 3. In the top menu bar, go to Insert > Video. 4a. Enter the link from YouTube and select the video. 4b. Or use a video from Google Drive. Alternatively, you can also embed a video in Google Slides from your Google Drive folders. Warning: Make sure that all of your editors can access this video from Google ...
Click + Add animation again. Select Spin from the drop down animation list. This time, select After previous. Repeat the step 5, and create another N same animations. It ensures the animation runs continuously. Click Play. Click the object you created. You will see the spinning rectangle. Google Slides Loop Animation.
Learn how to loop a video in Google Slides with easy steps and tips from the Google Docs Editors Community.
Presenting in a team meeting with Google Slides, but don't want to manually change each slide when it's time? In this episode of The Suite Life, Laura Mae Ma...
Add countdown timers to your Google Slides™ presentations! 🟨 Works with Slides Timer Chrome™ Extension to display a countdown timer while presenting. Use the Extensions menu in Google Slides™ to add a properly formatted text box to any slide to create a timer that will countdown while presenting.
Create a table in Google Slides with the subjects in the top row and the scoring system in the remaining rows. In this example, to include five topics with five clues each, make a table with six ...
Free Google Slides theme, PowerPoint template, and Canva presentation template. Perfect for business professionals who want to add a touch of nature to their presentations, this multicolored, photo-centric template offers a refreshing backdrop for your content.
An education presentation is a slideshow that informs, enlightens, or shares knowledge with an audience. It communicates important or relevant information about a topic. It might also be a presentation about education, instruction, or pedagogy. The aim is to inspire minds and spark interest in a subject or idea.
The easiest way to loop Google slides is directly within the slideshow mode. Here are the steps: Open your Google Slides presentation and click "Slideshow" at the top right. You can also press the arrow icon to begin the slideshow. When the slideshow opens, hover your mouse near the bottom left corner to display the Presenter Tools bar.
As a social studies teacher in high school, you no longer have to worry about what to include in your next class. Get thie template now! #Slidesgo #FreepikCompany #freepresentation #freetemplate #presentations #themes #templates #GoogleSlides #PowerPoint #GoogleSlidesThemes #PowerPointTemplate #elegant #education #school #vintage #history #cream #highschool #society #socialstudies #gold #USA # ...
Once your slides are imported, you have the option to either add all slides to your Kahoot! or select specific slides for inclusion. ☝️ You can edit your kahoot while your presentation is importing.. To make changes to your presentation, simply click the "Edit" button located at the bottom of the screen, which will allow you to modify the content directly in Google Slides.
It's easy to make your Google Slides play on an automatic loop. Watch this video to learn how to do it. 📔 50 Tech Tuesday Tips!https://byrne-instructional-m...
This help content & information General Help Center experience. Search. Clear search
All of Google's workspace apps, such as Docs, Sheets, and Slides, provide an intuitive way to work in a team. You can add comments, use annotations, and share the presentation with limited access ...