Have a language expert improve your writing
Run a free plagiarism check in 10 minutes, generate accurate citations for free.
- Knowledge Base
- Dissertation
- Dissertation Table of Contents in Word | Instructions & Examples

Dissertation Table of Contents in Word | Instructions & Examples
Published on May 15, 2022 by Tegan George . Revised on July 18, 2023.
The table of contents is where you list the chapters and major sections of your thesis, dissertation , or research paper, alongside their page numbers. A clear and well-formatted table of contents is essential, as it demonstrates to your reader that a quality paper will follow.
The table of contents (TOC) should be placed between the abstract and the introduction . The maximum length should be two pages. Depending on the nature of your thesis , paper, or dissertation topic , there are a few formatting options you can choose from.
Download Word doc Download Google doc
Instantly correct all language mistakes in your text
Upload your document to correct all your mistakes in minutes

Table of contents
What to include in your table of contents, what not to include in your table of contents, creating a table of contents in microsoft word, table of contents examples, updating a table of contents in microsoft word, other lists in your thesis, dissertation, or research paper, other interesting articles, frequently asked questions about the table of contents.
Depending on the length of your document, you can choose between a single-level, subdivided, or multi-level table of contents.
- A single-level table of contents only includes “level 1” headings , or chapters. This is the simplest option, but it may be too broad for a long document like a dissertation.
- A subdivided table of contents includes chapters as well as “level 2” headings, or sections. These show your reader what each chapter contains.
- A multi-level table of contents also further divides sections into “level 3” headings. This option can get messy quickly, so proceed with caution. Remember your table of contents should not be longer than 2 pages. A multi-level table is often a good choice for a shorter document like a research paper .
Examples of level 1 headings are Introduction, Literature Review , Methodology , and Bibliography. Subsections of each of these would be level 2 headings, further describing the contents of each chapter or large section. Any further subsections would be level 3.
In these introductory sections, less is often more. As you decide which sections to include, narrow it down to only the most essential.
Including appendices and tables
You should include all appendices in your table of contents. Whether or not you include tables and figures depends largely on how many there are in your document.
If there are more than three figures and tables, you might consider listing them on a separate page. Otherwise, you can include each one in the table of contents.
- Theses and dissertations often have a separate list of figures and tables.
- Research papers generally don’t have a separate list of figures and tables.
The only proofreading tool specialized in correcting academic writing - try for free!
The academic proofreading tool has been trained on 1000s of academic texts and by native English editors. Making it the most accurate and reliable proofreading tool for students.

Try for free
All level 1 and level 2 headings should be included in your table of contents, with level 3 headings used very sparingly.
The following things should never be included in a table of contents:
- Your acknowledgements page
- Your abstract
- The table of contents itself
The acknowledgements and abstract always precede the table of contents, so there’s no need to include them. This goes for any sections that precede the table of contents.
To automatically insert a table of contents in Microsoft Word, be sure to first apply the correct heading styles throughout the document, as shown below.
- Choose which headings are heading 1 and which are heading 2 (or 3)!
- For example, if all level 1 headings should be Times New Roman, 12-point font, and bold, add this formatting to the first level 1 heading.
- Highlight the level 1 heading.
- Right-click the style that says “Heading 1.”
- Select “Update Heading 1 to Match Selection.”
- Allocate the formatting for each heading throughout your document by highlighting the heading in question and clicking the style you wish to apply.
Once that’s all set, follow these steps:
- Add a title to your table of contents. Be sure to check if your citation style or university has guidelines for this.
- Place your cursor where you would like your table of contents to go.
- In the “References” section at the top, locate the Table of Contents group.
- Here, you can select which levels of headings you would like to include. You can also make manual adjustments to each level by clicking the Modify button.
- When you are ready to insert the table of contents, click “OK” and it will be automatically generated, as shown below.

The key features of a table of contents are:
- Clear headings and subheadings
- Corresponding page numbers
Check with your educational institution to see if they have any specific formatting or design requirements.
Prevent plagiarism. Run a free check.
Write yourself a reminder to update your table of contents as one of your final tasks before submitting your dissertation or paper. It’s normal for your text to shift a bit as you input your final edits, and it’s crucial that your page numbers correspond correctly.
It’s easy to update your page numbers automatically in Microsoft Word. Simply right-click the table of contents and select “Update Field.” You can choose either to update page numbers only or to update all information in your table of contents.
In addition to a table of contents, you might also want to include a list of figures and tables, a list of abbreviations, and a glossary in your thesis or dissertation. You can use the following guides to do so:
- List of figures and tables
- List of abbreviations
It is less common to include these lists in a research paper.
If you want to know more about AI for academic writing, AI tools, or research bias, make sure to check out some of our other articles with explanations and examples or go directly to our tools!
Research bias
- Anchoring bias
- Halo effect
- The Baader–Meinhof phenomenon
- The placebo effect
- Nonresponse bias
- Deep learning
- Generative AI
- Machine learning
- Reinforcement learning
- Supervised vs. unsupervised learning
(AI) Tools
- Grammar Checker
- Paraphrasing Tool
- Text Summarizer
- AI Detector
- Plagiarism Checker
- Citation Generator
All level 1 and 2 headings should be included in your table of contents . That means the titles of your chapters and the main sections within them.
The contents should also include all appendices and the lists of tables and figures, if applicable, as well as your reference list .
Do not include the acknowledgements or abstract in the table of contents.
To automatically insert a table of contents in Microsoft Word, follow these steps:
- Apply heading styles throughout the document.
- In the references section in the ribbon, locate the Table of Contents group.
- Click the arrow next to the Table of Contents icon and select Custom Table of Contents.
- Select which levels of headings you would like to include in the table of contents.
Make sure to update your table of contents if you move text or change headings. To update, simply right click and select Update Field.
The table of contents in a thesis or dissertation always goes between your abstract and your introduction .
Cite this Scribbr article
If you want to cite this source, you can copy and paste the citation or click the “Cite this Scribbr article” button to automatically add the citation to our free Citation Generator.
George, T. (2023, July 18). Dissertation Table of Contents in Word | Instructions & Examples. Scribbr. Retrieved March 25, 2024, from https://www.scribbr.com/dissertation/table-of-contents/
Is this article helpful?

Tegan George
Other students also liked, how to write an abstract | steps & examples, how to write a thesis or dissertation introduction, how to write effective headings, "i thought ai proofreading was useless but..".
I've been using Scribbr for years now and I know it's a service that won't disappoint. It does a good job spotting mistakes”
How-To Geek
How to create and update a table of contents in microsoft word.
Make your Word document more easily navigable by adding a table of contents.
Quick Links
How to add a table of contents, how to update the table of contents, how to remove the table of contents.
Using a table of contents in your document makes it easier for the reader to navigate. You can insert a table of contents in Word from the headings used in your document, and then you can update it after making changes to the document. Here's how to do it.
Regardless of the size of your document, using a table of contents can direct the reader to exactly where they need to be. In addition to making the document more reader-friendly, a table of contents also makes it easier for the author to go back and add or remove content if necessary.
By default, Word generates a table of contents using the first three built-in heading styles (Heading 1, Heading 2, and Heading 3). To apply heading styles, select the particular style from the "Home" tab. If you're not happy with the types of heading styles available, you can change the default heading style .
You can manage this in two different ways. You can either apply the heading styles to each section after you've finished the document, or you can add them as you go.
Once you've applied your heading styles, it's time to insert your table of contents. The first thing you need to do is put the cursor where you want the table of contents to appear. Once ready, head over to the "References" tab and select "Table of Contents."
A drop-down menu will appear. Here, you can choose between the three different built-in tables.
The only difference between Automatic Table 1 and 2 is the title, which is "Contents" and "Table of Contents," respectively. Selecting either Automatic Table 1 or 2 will create the table of contents using the names of the headings.
If you chose the "Manual Table" option from the "Table of Contents" drop-down menu, then it will insert a template for you that you will need to edit yourself.
You may notice in this table of contents that there are sub-levels. Each level represents a heading style in your document. So if you use the automatic table and you want sub-levels in your ToC, you will need to use heading 1 for level 1, heading 2 for level 2, and heading 3 for level 3.
If you want your table of contents to go deeper than the top three heading styles, you can do that, too. On the dropdown menu when you click the "Table of Contents" button, choose the "Custom Table of Contents" option.
In the Table of Contents window that opens, click the "Options" button.
In the Table of Contents Options window, next to each available style you want to use (these are Word's built-in styles starting with Heading 4), type the TOC level you wish to use. Click "OK" when you're done.
If you ever need to add or remove a section from your document, you can easily update the table of contents to reflect those changes. To update your table of contents, select it, click "Update Table" on the pop-up menu that appears, and then choose whether you want to update only the page numbers or the entire table. Click "OK" to apply the changes.
Your table of contents will now be updated. This is very useful when you want to add or remove a heading from the table of contents.
Removing the table of contents is simple. All you need to do is select it and then click the arrow on the menu that appears.
At the bottom of the drop-down menu, select "Remove Table of Contents."
Your table of contents will now be removed from your document.
Critical PowerPoint Shortcuts – Claim Your FREE Training Module and Get Your Time Back!
How to create a table of contents in Word (step-by-step)
- Post last modified: November 10, 2023
In this article, you’ll learn how to make a Table of Contents in Word, as well as how to update and manage it inside your document.
There are 3 types of Table of Contents you can create in Microsoft Word (all with a number of different options and features):
- Automatic Table (based on your saved formatting)
- Custom Table of Contents that is 100% customizable
- Manual Table that requires you to do all of the heavy lifting
Below are examples of 3 of the many styles of Table of Contents you can quickly create in Word.

The most important thing to know about creating an automatic Table of Contents in Word is that you first need to format your document using the Heading Styles .
That’s because it’s the Heading Styles formatting (as you can see pictured below) that feeds your Table of Contents. This step is explained in detail below.

If you don’t want to use the Heading Styles, you can use a Manual Table to create your Table of Contents, as discussed below.
Note: Throughout this article, the words Table of Contents and TOC are used interchangeably. On the top, of all examples below were created using the Microsoft Office 365 subscription, which you can learn about on Microsoft’s website here .
How to create a table of contents in Word
The first critical step to creating an automatic updating TOC in Word is properly formatting the sections of your document using the :
- Heading 1 style
- Heading 2 style
- Heading 3 s tyle
If you have already formatted your document this way, you can skip to the next section.
Note: You are not limited to the default Heading Styles formatting. Below I’ll show you how you can not only change your Styles formatting, but also how you can create your own.
1. Applying Heading Style Formatting
To properly format your Word document using the Heading Styles , simply:
- Select the section Headings of your document
- Navigate to the Home tab
- Select the Heading 1 , Heading 2 or Heading 3 style, as appropriate
By default, only the Heading 1 through Heading 3 Styles will automatically populate into your Table of Contents.
You can still use the Heading 4 through Heading 9 styles in a Table of Contents, but you’ll have to do so with a Custom Table of Contents, as discussed below.
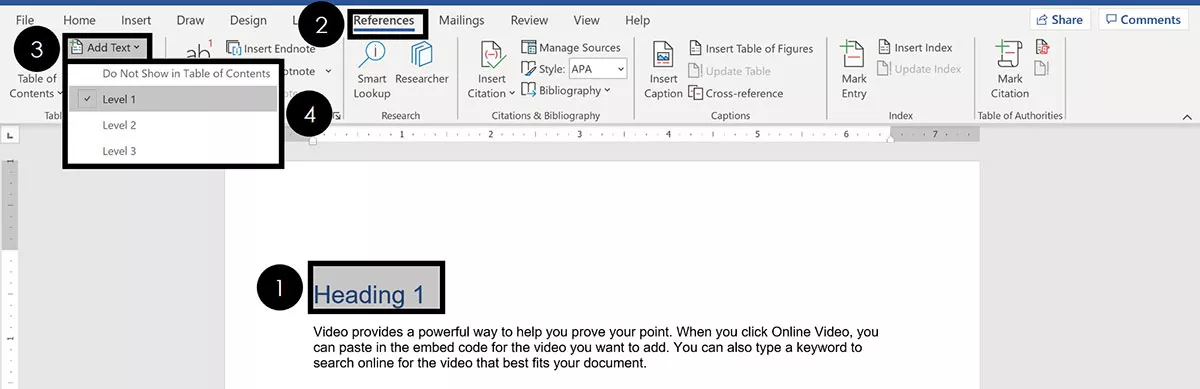
- Select your section heading text
- Navigate to the References tab
- Open the Add Text dropdown menu
- Select your Heading style
2. Heading Style Shortcuts
If you have a large Word document, you can speed up the formatting process by using Heading Style shortcuts.
Shortcuts like these are the fastest way to double your productivity.

To set up a basic Table of Contents in Word, the 3 Heading Styles shortcuts you’ll need to remember are:
- Heading Style 1 shortcut: Alt + Shift + 1
- Heading Style 2 shortcut: Alt + Shift + 2
- Heading Style 3 shortcut: Alt + Shift + 3
You can apply the Normal style to any text in your document that you don’t want to show in your TOC.

Normal Style Shortcut: Ctrl + Shift + N
When making an automatic Table of Contents in Word, only content that is properly formatted using these Heading Styles will appear in your TOC.
Furthermore, this formatting is critical if you later want to convert Word to PowerPoint .
3. Changing Your Heading Style Formatting

If you don’t like the way the default Heading Styles look, you can change them. To do that, simply:
- Navigate to the Design tab
- Choose a different Document Formatting
If you click the downward facing arrow, you will see more options, as pictured above.
Note: The Document Formatting styles change all of the formatting styles within your Word document. Therefore, you’ll want to review your entire Word document to make sure you are okay with whatever new Document Formatting you select.
4. Creating Your Own Heading Style Formatting
If you don’t like the Document Formatting options for your Heading Styles, you can create your own. To do that, simply:
- Format your Heading Style however you want it to look
- Right-Click the Heading Style you want to change
- Select Update Heading to Match Selection
Doing so will change the Heading Style to match the formatting you’d applied to that text. In addition, it will automatically update all the existing Headings of that level in your Word document.
How to Insert a Table of Contents
Once you’ve properly formatted your document using the different Heading Styles , creating your Table of Contents is pretty straightforward.
1. Insert a Table of Contents

Once your Word document is properly formatted with the Heading Styles, to make your Table of Contents, simply:
- Click into your document where you want your TOC
- Navigate to the References tab
- Open the Table of Contents dropdown menu
- Choose Automatic Table 1 or Automatic Table 2
Choosing either option inserts a TOC based on your Heading 1, Heading 2 and Heading 3 Styles.

Your TOC might look different than the one pictured above depending on whether you previously inserted and saved your TOC style.
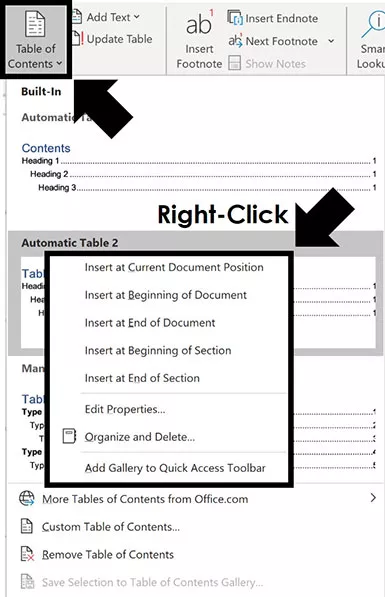
- Insert at Current Document position
- Insert at Beginning of Document
- Insert at End of Document
- Insert at Beginning of Section
- Insert at End of Section
That’s the difference between the Automatic Table 1 and Automatic Table 2 styles?
Not much. The main difference is the title – table of contents vs. contents – which you can just click into and change. If you need more formatting options beyond the Automatic Table styles, you can create your own Custom Table of Contents.

If you want more than just 3 levels in your Table of Contents, you’ll need to insert a Custom Table.
2. Format Your Table of Contents
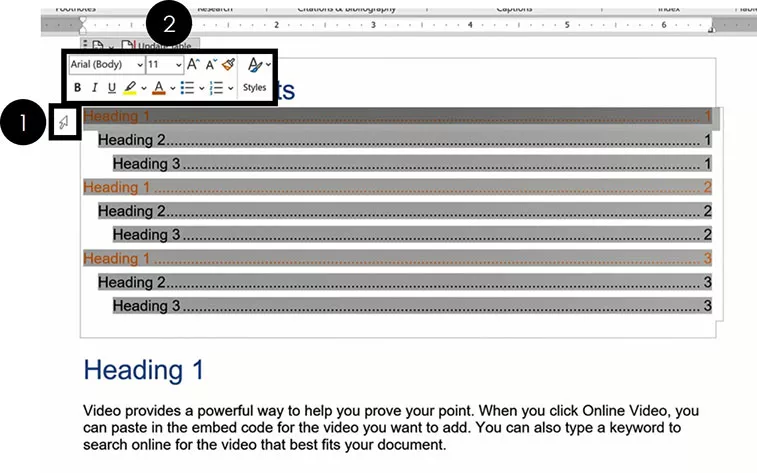
To format your Table of Contents in Word, simply:
- Hover your mouse to the left of your TOC (your arrow will look like a diagonal arrow)
- Select the Heading Style you want to change
- Format it however you wish
Sometimes this takes a few attempts to select your Heading Styles so they all properly update. If it doesn’t work the first time, just try it again.
Note: Formatting the Heading Styles of your TOC only affects the formatting styles inside your TOC. None of your document level formatting is affected.
3. How to Save Your Table of Contents formatting
After formatting the different levels of your TOC, you are given the option to save that formatting when you exit out of Microsoft Word.

If you select Save , your manual formatting adjustments are saved to Word. That means that the next time you make a Table of Contents, all of your manual adjustments will show up by default.
Once you reformat the different elements of your new Table of Contents, you will be given the option to save them again when you exit Word.
4. Updating a Table of Contents
Table of Contents in Microsoft Word DO NOT automatically update themselves.
As you add and remove content to your document, you need to manually click the Update button to have your TOC update itself.
Your TOC is just a snapshot in time of when you either inserted it or last updated it. So, don’t forget to update it when you are done making changes to your document.

To update a Table of Contents in Word, simply:
- Click Update Table
- Choose Update p age numbers o nly or Update e ntire table
If you are using one of the Automatic Table layouts, can also select the Update Table button at the top of your table, as pictured below.

The two update options are:
- Page numbers only updates the page numbers of your TOC. It does not update the structure of your TOC based on any sections you’ve added or removed. It also does not update any of the text in your Headings, or the Heading Styles.
- Entire table updates everything in your TOC including page numbers, sections added and sections removed.
If you have made many changes to your Word document, or are unsure of what you’ve changed, I recommend updating the entire table. That ensures that everything within your document is accurately reflected in your TOC.
5. Table of Contents Navigational Shortcuts
The cool thing about making an automatic Table of Contents in Word, is that you can use it to quickly jump around your document.
That’s because each of the lines of your TOC is a hyperlink to that section within your document. All you need to do is hold down the Ctrl key and click the section of your TOC

An alternative way you can quickly navigate the sections of your Table of Contents is with the Navigation Pane . In it, you can see all the different sections of your document.

To open the Navigation Pane to see your Headings in Word, simply:
- Navigate to the View tab
- Click on Navigation Pane
Within the Navigation Pane , you can see, expand, collapse and navigate all the sections within your document.
This is another benefit of using the Heading Styles to properly format your Word document.
Removing a Table of Contents

To remove a Table of Contents from a Word document, simply:
- Open the Table of Contents dropown menu
- Select Remove Table of Contents
If you are using one of the Automatic Table styles, you can also use the dropdown menu at the top of your table, as pictured below.

Creating a Custom Table of Contents
If you need more formatting options than the automatic table styles provide, you can create your own Custom Table of Contents.

To create a Custom Table of Contents in Word, simply:
- Open the Table of Content s dropdown menu
- Choose Custom Table of Contents
- Customize the elements of your TOC (see details below)
Don’t worry about getting your custom TOC right the first time through. There are a lot of options to choose from and you can always go back and make different selections
Note: A Custom Table of Contents is still based on the Heading Styles you use to format your Word document. That means that if you do not properly format your document, your TOC will be blank.
On top of that, as you add and remove content to your document, you will need to use the Update Table command to update your custom TOC.
If you do not want an automatic updating TOC, insert a Manual Table .
1. Show Page Numbers Options

Selecting or de-selecting the Show page numbers box adds or removes the page numbers from your TOC, as you can see in the picture above.
My recommendation is to always select Show page numbers , as that makes it easier to understand and navigate your document. That’s usually the point of creating a TOC in the first place
2. Right Align Page Numbers Options

Right align page numbers determines whether your page numbers are aligned on the right side of your document, or if they are just stacked up after your section Headings.
My recommendation is to always use the Right align option. This not only makes your TOC easier to read, it also also opens up all of the Tab leader options (discussed next).
3. Tab Leader Options

There are four different Tab leader options you can use to format your TOC, as pictured above.
The Tab leader dropdown menu is only available when you are using the Right align page numbers option. If you don’t like these styles of Tab leaders, you can use a Manual Table and create your own.
My recommendation is to always use a Tab leader as it makes it easier to find the section page numbers within your Word document.
4. Format Template Options

There are a variety of different Format templates you can use to change the look and feel of your TOC. For each one, you can make a number of adjustments and customizations. Here are the default formatting options for each one, as pictured above:
- Distinctive
You also have the From Template option which opens up the more manual formatting options for you if you know what you are doing (see the Options and Modify commands below).
All of these formats can be tweaked using the other formatting options in the Custom TOC dialog box. So feel free to try different combinations to find the custom TOC formatting that works best for you.
5. Show Levels Options
The Show levels setting determines how many of the Heading Style levels are included in your Table of Contents.

Just remember that to feed more content into your TOC, you first need to use the Heading Styles formatting throughout your document.
This is another example of when properly formatting your Word document can be a real lifesaver.
6. Options & Modify
If you use the From Template option to format your TOC, you can apply advanced formatting using the Options and Modify commands.

These are for advanced users and go above and beyond the scope of this tutorial (and what you’ll probably need to do). So, I’m not going into detail about these options here. But feel free to explore them if you need additional formatting options for your Table of Contents.
Creating a Manual Table of Contents
If you don’t want to use the Automatic TOC styles, you can instead use the Manual Table option.
Warning: Just so we are crystal clear before you go this route. Inserting a Manual Table means that you will be responsible for manually updating anything and everything within the table.
A Manual Table will not track or update itself based on any content you add or remove to your Word document. Therefore, if you make a lot of changes in your document, updating your TOC could take you a long time.
If you ever get tired of updating a table like this, you can insert an Automatic Updating TOC.

To insert a Manual Table for your TOC in Word, simply:
- Click into your document where you want your TOC
- Select Manual Table
Selecting Manual Table , you get a default Table of Contents that in no way reflects the content of your document.
Whether you have 1 page or 100 pages in your document, the Manual Table will come pre-loaded with two level 1, level 2 and level 3 placeholders

That means that anything you want done to your TOC, you’ll need to do yourself. There is no way to automatically update a Manual Table.
Below you’ll find some formatting tips for how to best update and edit your Manual Table .
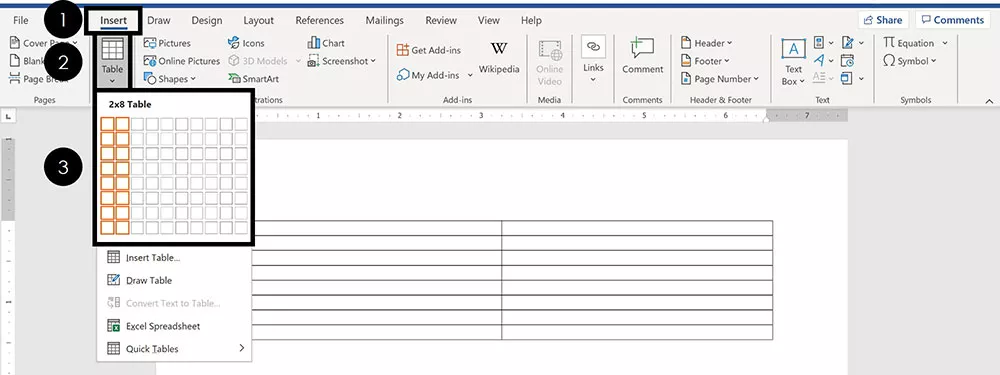
- Navigate to the Insert tab
- Open the Table dropdown menu
- Select how many Rows and Columns you want in your table
1. Add a New Section Row
To add a new section to a Manual table , first add a new blank row. The fastest way to do that is to put your cursor at the end of your page number and hit Enter.

To add a new row of formatting to your Manual Table , simply:
- Select a section row that you want to copy
- Hit Ctrl + C to copy the row
- Click into your blank row
- Hit Ctrl + V to paste your row
Once you’ve pasted in your new row, you can then type in whatever text you want for it.

Thankfully, the Tab leader dots automatically adjust as you type in your section Headings. You don’t have to add them in yourself.
2. Edit Your Page Numbers

To edit the page numbers of your Manual Table , you’ll need to:
- Click and drag to select the page number
- Type and/or format your page number
Remember: When you use a Manual Table , you are responsible for manually adding and formatting everything within it (which can be really annoying).
So that’s how to make a Table of Contents in Word, along with all the formatting, navigation and updating options.
The most important thing to remember about your TOC is to use the Heading Styles when formatting your Word document. Doing so will make inserting and editing a TOC super easy and stress-free.
If you enjoyed this tutorial and want to learn more about our training courses and other resources, visit us here .

Taylor Croonquist
We help busy professionals save hours and gain peace of mind, with corporate workshops, self-paced courses and tutorials for PowerPoint and Word.
Work With Us
- Corporate Training
- Presentation & Template Design
- Courses & Downloads
- PowerPoint Articles
- Word Articles
- Productivity Resources
Find a Tutorial
- Free Training
- For Businesses
We help busy office workers save hours and gain peace of mind, with tips, training and tutorials for Microsoft PowerPoint and Word.
Master Critical PowerPoint Shortcuts – Secure Your FREE Training Module and Save Valuable Time!
⌛ Master time-saving expert techniques.
🔥 Create powerful presentations.
🚀 Propel your career to new heights.
We value your privacy – we keep your info safe.
Discover PowerPoint Hacks Loved by Industry Giants - KKR, AmEx, HSBC!
Over 114,880 professionals in finance, marketing and sales have revolutionized their PPT skills with our proven methods.
Gain FREE access to a full module of our premium PowerPoint training program – Get started today!
We hate spam too and promise to keep your information safe.
- Change margins Article
- Create newsletter columns Article
- Change page orientation to landscape or portrait Article
- Add a border to a page Article
- Insert a header or footer Article
- Insert page numbers Article
- Insert a page break Article
- Insert a table of contents Article

Insert a table of contents
A table of contents in Word is based on the headings in your document.

Create the table of contents
Put your cursor where you want to add the table of contents.
Go to References > Table of Contents . and choose an automatic style.

If you make changes to your document that affect the table of contents, update the table of contents by right-clicking the table of contents and choosing Update Field .
To update your table of contents manually, see Update a table of contents .
If you have missing entries
Missing entries often happen because headings aren't formatted as headings.
For each heading that you want in the table of contents, select the heading text.
Go to Home > Styles , and then choose Heading 1 .

Update your table of contents.
Word uses the headings in your document to build an automatic table of contents that can be updated when you change the heading text, sequence, or level.
Click where you want to insert the table of contents – usually near the beginning of a document.
Click References > Table of Contents and then choose an Automatic Table of Contents style from the list.
Note: If you use a Manual Table of Contents style, Word won't use your headings to create a table of contents and won't be able to update it automatically. Instead, Word will use placeholder text to create the look of a table of contents so you can manually type each entry into the table of contents. To update your manual table of contents, see Update a table of contents .

If you want to Format or customize your table of contents , you can. For example, you can change the font, the number of heading levels, and whether to show dotted lines between entries and page numbers.
Click where you want to insert the table of contents—usually near the beginning of the document.
On the toolbar ribbon, select References .
Near the left end, select Insert Table of Contents . (Or select Table of Contents > Insert Table of Contents .
The table of contents is inserted, showing the headings and page numbering in your document.
If you make changes to your document that affect the table of contents, you can update it by right-clicking the table and selecting Update Table of Contents .
Get the learning guide
For a hands-on guide that steps you through the process of creating a table of contents, download our Table of Contents tutorial . Or, in desktop Word, go to File > New , and search for table of contents .
Update a table of contents

Need more help?
Want more options.
Explore subscription benefits, browse training courses, learn how to secure your device, and more.

Microsoft 365 subscription benefits

Microsoft 365 training

Microsoft security

Accessibility center
Communities help you ask and answer questions, give feedback, and hear from experts with rich knowledge.

Ask the Microsoft Community

Microsoft Tech Community

Windows Insiders
Microsoft 365 Insiders
Was this information helpful?
Thank you for your feedback.
- University of Michigan Library
- Research Guides
Microsoft Word for Dissertations
- Table of Contents
- Introduction, Template, & Resources
- Formatting for All Readers
- Applying a Style
- Modifying a Style
- Setting up a Heading 1 Example
- Images, Charts, Other Objects
- Footnotes, Endnotes, & Citations
- Cross-References
- Appendix Figures & Tables
- List of Figures/Tables
- Chapter and Section Numbering
- Page Numbers
- Landscape Pages
- Combining Chapter Files
- Commenting and Reviewing
- The Two-inch Top Margin
- Troubleshooting
- Finalizing Without Styles
- Preparing Your Final Document
Automatic Table of Contents
An automatic Table of Contents relies on Styles to keep track of page numbers and section titles for you automatically. Microsoft Word can scan your document and find everything in the Heading 1 style and put that on the first level of your table of contents, put any Heading 2’s on the second level of your table of contents, and so on.
If you want an automatic table of contents you need to apply the Heading 1 style to all of your chapter titles and front matter headings (like “Dedication” and “Acknowledgements”). All section headings within your chapters should use the Heading 2 style. All sub-section headings should use Heading 3 , etc....
If you have used Heading styles in your document, creating an automatic table of contents is easy.
- Place your cursor where you want your table of contents to be.
- On the References Ribbon, in the Table of Contents Group , click on the arrow next to the Table of Contents icon, and select Custom Table of Contents .
- We suggest that you set each level (Chapters, sections, sub-sections, aka TOC 1, TOC 2, TOC 3) to be single-spaced, with 12 points of space afterwards. This makes each item in your ToC clump together if they're long enough to wrap to a second line, with the equivalent of a double space between each item, and makes the ToC easier to read and understand than if every line were double-spaced. See the video below for details.
- If you want to change which headings appear in your Table of Contents, you can do so by changing the number in the Show levels: field. Select "1" to just include the major sections (Acknowledgements, List of Figures, Chapters, etc...). Select "4" to include Chapters, sections, sub-sections, and sub-sub-sections.
- Click OK to insert your table of contents.
The table of contents is a snapshot of the headings and page numbers in your document, and does not automatically update itself as you make changes. At any time, you can update it by right-clicking on it and selecting Update field . Notice that once the table of contents is in your document, it will turn gray if you click on it. This just reminds you that it is a special field managed by Word, and is getting information from somewhere else.
Modifying the format of your Table of Contents
The video below shows how to make your Table of Contents a little easier to read by formatting the spacing between items in your Table of Contents. You may recognize the "Modify Style" window that appears, which can serve as a reminder that you can use this window to modify more than just paragraph settings. You can modify the indent distance, or font, or tab settings for your ToC, just the same as you may have modified it for Styles.

By default, the Table of Contents tool creates the ToC by pulling in Headings 1 through 3. If you'd like to modify that -- to only show H1's, or to show Headings 1 through 4 -- then go to the References tab and select Custom Table of Contents . In the window that appears, set Show Levels to "1" to only show Heading 1's in the Table of Contents, or set it to "4" to show Headings 1 through 4.
Bonus tip for updating fields like the Table of Contents
You'll quickly realize that all of the automatic Lists and Tables need to be updated occasionally to reflect any changes you've made elsewhere in the document -- they do not dynamically update by themselves. Normally, this means going to each field, right-clicking on it and selecting "Update Field".
Alternatively, to update all fields throughout your document (Figure/Table numbers & Lists, cross-references, Table of Contents, etc...), just select "Print". This will cause Word to update everything in anticipation of printing. Once the print preview window appears, just cancel.
- Ablebits blog
- Microsoft Word
How to create / update a table of contents in Microsoft Word

If you are a document writer, this article will be very useful for you. You will learn how to insert a table of contents into your document, modify and update it just in a few clicks. Also, I'll show you how to make your document look good using Word's built-in heading styles and the multilevel list option.
I am sure that everyone who reads this article right now had to deal with a really long document in Microsoft Word at least once in their lives. It could be an academic paper or a lengthy report. Depending on the project, it might be dozens or even hundreds of pages long! When you have such a big document with chapters and subchapters it turns out to be very hard to navigate in the document searching for necessary information. Luckily, Word allows you to create a table of contents, making it easy to refer to the relevant sections of your document, and therefore it is a must-do task for document writers.
You could create a table of contents manually, but it would be a real waste of time. Let Word do it automatically for you!
In this post I will show you how to create a table of contents in Word in an automatic way and also how to update it just in a few clicks. I'll use Word 2013 , but you can use exactly the same method in Word 2010 or Word 2007 .
Make your document look good
Heading styles.
The key to creating a quick and easy contents page is to use Word's built-in heading styles ( Heading 1 , Heading 2 , etc.) for the titles (chapters) and subtitles (subchapters) of your document. Don't worry if you haven't used them yet, I will show you how it works with regular text.
- Highlight the title or the text you want to be the title of your first main section
- Go to the HOME tab in the Ribbon
- Search for the Styles group
- Choose Heading 1 from the group

So now you have assigned the first main section of your document. Keep it up! Go on scrolling through the text and selecting the primary section titles. Apply the " Heading 1 " style to these titles. They will appear in your table of contents as the main section titles.
Next, define the secondary sections within each primary chapter, and apply the " Heading 2 " style to the subtitles of these sections.

If you want to place emphasis on some paragraphs within the secondary sections, then you can select the titles for them and apply the " Heading 3 " style to these titles. You can also take advantage of the " Heading 4-9 " styles for creating additional heading levels.
Multilevel Listing
I want my table of contents to be more presentable, so I am going to add a numbering scheme to the titles and subtitles of my document.
- Highlight the first main title.
- Find the Paragraph group on the HOME tab in the Ribbon
- Click the Multilevel List button in the group
- Select the style from the List Library options

Here comes the number of my first main title!

Go round for the other main titles, but now when the number appears next to the title, click the lightning box and choose "Continue numbering". It will make the numbers go up.

As for the subtitles, highlight one, press the TAB button on your keyboard, and then choose the same Multilevel List option. It will design the subtitles of the secondary sections with the numbers like 1.1, 1.2, 1.3, etc. as in the screenshot below. You can also choose another option so that they look differently.

Keep the ball rolling throughout the document for all of your sections. :-)
Why should I use the heading styles?
On the one hand, the heading styles greatly simplify my work and present my document in a structured fashion. On the other hand, when I insert a table of contents, Word automatically searches for those headings and displays a table of contents based on the text that I marked with each style. Later I can also use these headings to update my table of contents.
Creating a basic table of contents
Now I have my document well-prepared with the titles as Heading 1 and the subtitles as Heading 2. It's time to let Microsoft Word do its magic!
- Place the cursor where you want the table of contents to appear in the document
- Navigate to the REFERENCES tab in the Ribbon
- Click the Table of Contents button in the Table of Contents group
- Choose one of the " Automatic " table of content styles listed

Here you are! My table of contents looks like this:

A Table of Contents also creates links for each section, allowing you to navigate to different parts of your document. Just hold the Ctrl key on your keyboard and click to go to any section.

Modify your table of contents
If you are not satisfied with the look of your table of contents, you can always change root and branch of it. To do so, you need to open the Table of Contents dialog box.
- Click within the table of contents.
- Go to REFERENCES -> Table of Contents .
- Select the " Custom Table of Contents... " command from the button's drop-down menu.
The dialog box appears and displays the Table of Contents tab where you can customize the style and appearance of your table of contents.

If you want to change the way the text in your table of contents looks (the font, font size, colour, etc.), you need to follow the steps below in the Table of Contents dialog box.
- Make sure that you have chosen " From Template " in the Formats box
- Click the Modify button at the bottom right to open the following window
The Modify Style dialog box displays:

- Make changes to the formatting and click OK
- Select another style to modify and repeat
- When you have completed the editing, click OK to exit
- Click OK to replace the table of contents
Update a table of contents
A Table of Contents is a field, not ordinary text. For this reason it doesn't update automatically.
Once you make any changes to your document structure, you have to update the table of contents yourself. To perform the update:
- Click anywhere in the table of contents
- Press F9 or the Update Table button in the content control (or on the REFERENCES tab)
- Use the Update Table of Contents dialog box to choose what to update
You can choose to update page numbers only , or the entire table . It is a good idea always to choose " Update entire table " in case you have made any other changes. Always update your table of contents before sending out or printing the document so that any changes are included.

No matter how big your document is, you can see there's nothing complicated about creating a table of contents. The best way to learn how to create / update a table of contents is to experiment doing it! Take some time to go through the process and create your own table of contents.
You may also be interested in
- How to convert Word to PDF - online and desktop solutions
- Convert PDF to Word using online PDF to DOC converters or manually
- Converting PDF files to Excel
- Exporting Excel files to PDF
Table of contents
44 comments
Is it a must that a table of contents to appear automatically???
Something has changed in an update apparently. Instead of getting Headings and page numbers I get { TOC \o "1-3" \h \z \u}. Please tell me how to get it to show a proper Table of Contents.
How can I add chapter-author's name to the TOC? I am editing a volume with a different author for each chapter. Many thanks.
Thank you, thank you, thank you :-) Had a deadline to make and you helped me update TOC and document headings
When I automatically create a TOC, the Update Table button does not show at the top of the TOC. How do I get this to appear? Is it an option? Thank you.
Want to add a table of contents to your Word document, one that can be easily updated if you change your doc? It's a cinch to use this helpful feature. All you have to do is format your Word document appropriately.
Thank you for all this valuable information. However, I have a problem that has not been addressed. I am working on a proposal and I updated the TOC and it pulled my entire document into the TOC and I am not sure how to get it out. Do I delete the entire thing and add another automated TOC. Very confused need help, thanks
do i need to begin manually writing down my titles and subtitles before i use wizard for table of contents
when i create a table of contents the chapter header is present on table contents as:
CHAPTER ONE 1.INTRODUCTION 1.1.
BUT want the following format CHAPTER ONE INTRODUCTION 1.1.
How do you get the author, title, and page number all showing in one line?
When I create a table of contents for multiple documents it repeats the table for the first document after every added document. Also the quick parts field codes no longer show, they did earlier today.
Hi! I am trying to create a TOC for a public domain version of the Bible that I am adding illustrations to for Kindle. I need the chapters of each "book" in the Bible to show up by just number on the same row with just a space between them. I can't seem to find info on how to do this. Help? :)
If you could send us a sample workbook with your data and the result you expect to get to [email protected] we would take a look at it and see if we could help with any Excel formula. Thanks!
I want to use the "title" type of heading for my heading 1. Is there somewhere that I can change the heading 1 type to be this "title" type so that I can generate a ToC? Thanks
Ahhh God! This was extremely helpful. I have almost spent 2 days trying to figure out how it works.
Thanks Heaps.
When i create a table of contents using word,i use calibre. to convert it to epub the table of contents levels have all been underline how do i keep it from doing that i do not want table of content to be underline please help!
List the steps you would follow to create a document based on the table of contents
I have two page document and would like to print 100 copies with 1 to 100 page numbers printing on right side of header of the document. Cannot find the solution in Word, please assist.
Hi I have a question. I wanted to include my abstract, acknowledgement, dedication and list of figures tiles in my table of content. Note that my page number begins with page number 1 in the Introduction of my thesis. That means, the above titles are numbered as a, b, c, and d separately and their inclusion into the table of content will appear before my Introduction section. How can I do that? Thanks
Hi. How can I make the page numbers in my TOC all the same size, independent of the Heading Style associated to the respective title? Thank you.
I have word 2010. I must regularly update the TOCs of 8 files as I revise them. They were created at different times, over a period of perhaps 10 years, likely in different editions of Word. Their average length is about 500 pages.
Whether I click "Update Table" under References or at the top of the TOC in a document, I seem to have no control over whether Word automatically Updates Page Numbers Only"/"Updates Entire Table" without asking which I want, or offers me the opportunity to check which I prefer.
Any idea why this happens and how to make sure I always have the option? Right now, when the program does whatever its default update is I have to try updating a 2nd time to be sure the entire table was updated (I need to be able to control/click on chapter headings to jump to them).
If you press F9 does the box pop up that gives you the option to update the whole TOC or just the page numbers?
I have a toc that works fine, but I would like to know if a toc recognises a table that has split over 2 pages, with the same header.
Is there away of on the toc the page number could say pages 3/4 automatically?
Been looking everywhere but not found anything.
I l0ok forward to your suggestions
hi i have an automatic table of contents but it is picking up on of my tables and showing it in the table of contents how do i stop this form happening thanks :) janet
You will need to remove the HEADING formatting that you have used in the table to Normal and then change the font independently and not use a saved Heading or Sub Heading
If upon reviewing your TOC, you see that in addition to the heading, the actual text is also appearing in the TOC, then you need go to the View tab, and click on the button that says outline and then in the upper left click “outline.” You are now viewing the document with little bullets that show plus signs or other indicators. To see all levels, at the top left click all levels in the drop down box after “show levels”. (You can scroll through your document and when you click on a heading or line from the body of the text, you will see what level of text that is.) So now go to your problem area in the text of the document that keeps appearing in the TOC. You will see that it is ascribed the wrong level. You can fix that by highlighting it and then at the https://www.ablebits.com/excel-suite/index.php upper left click on the correct level from the drop down box (which may in your case be body text.) You can then X out of outlining view. Check your text. You may have to fix the formatting a little but the text will be at the correct level. Now update your TOC and the heading but not the text should appear in the TOC.
I have done all the section breaks, gone to home page and indicated heading 1, 2 or 3 then placed curser where I wanted it and generated a TOC. About half of my page numbers for heading 1 (Chapters) in the TOC are not correct, even though none of the Chapters actually have any page numbers on them. I skipped the numbering over the Chapters. The first few and a few others came out just fine, but not all. I think I looked at all the section breaks and they seem correct so I'm stumped. Help!
Thank you for good instructions. However, I still have a problem of separating first pages with italics i.e. i, ii, iii... and the main text pages with arabic numbers 1,2,3 ...
Best regards
I want to use a five level TOC. However, every time I save document and reopen, in the Reference, Add Text it reverts to 1, 2 and 3. Is there a way to set the default in this document to 5 level TOC?
I am trying to create a table of contents in a 100+ page document, the first, second and third headings are as follows:
Article 1 (centered and bold) Premises (centered and underscored) 1.1 (bold) (TAB) Lease (bold and underscored). Subject to the terms, covenants and conditions set forth herein, Landlord leases to Tenant and Tenant leases from Landlord the Premises identified .... 1.2 (bold) (TAB) Common Areas (bold and underscored). Tenant shall have the nonexclusive right (in common with other tenants or occupants of the Building,.... (a) (bold) (TAB) Initial Term (bold and underscored). (b) (bold) (TAB) Extension Term (bold and underscored). (i) General (bold and underscored). (ii) Adjustment (bold and underscored).
I don't want the period after the headings bolded or underscored.
I used the multi-level list styles, formatted each paragraphs and designated my Heading 1 as Heading 2 in the Styles Gallery because I might need Heading 1 as an unnumbered heading.
Now, my understanding is that once I have right-clicked in Heading 2 and chose "Update Heading 2 to Match Selection" I should be able to click on Heading 2, Heading 3, etc. and have my paragraph numbered and formatted as chosen.
Please tell me what I am doing wrong!!!
Thank you so very much if
I must write my thesis in Times New Roman 12. My chapter names are going to another line in the ToC so it looks very messy. How can I correct that?
Thanks very much
I'm trying to do a Table of Contents in Word 2010. I have book chapters listed ion the TOC one to twenty all in Heading 1. For some reason, and I don't know why,several of the listed chapters are missing from the TOC when the procedure has finished. Can you help? Thank you.
I have a doc and I want two TOC in it. First as usual come at start up of the doc and I want to insert next TOC at mid of this doc. Is it possible? If it is possible then please guide me 20 pages I want on 1st TOC and then 10 pages I want on 2nd TOC simultaneously.
Can any one please help me
Can I move the TOC to another page? It created it on Page 01, and I still need to put some info before my TOC. I cannot find a way of inserting a page break in front of the TOC like other tables.
We place headings in table cells to create a color bar with the text in white. These headings in table cells do not appear in autogenerated TOCs. How can I get these headings to appear in the TOC without manually typing them all in?
Before this, I clicked "Update table" --> "Update entire table" many times. So once I click "Update table", the program now automatically update the whole table of contents. But now I really want to update only page numbers. Is there any way to cancel this automatic command?
I created a TOC without page numbers which allows for "Update page numbers only" - I'm not sure how I did this but I need to do it again!
I've been trying and searching but I can't figure out how I managed to do it the first time.
Does anyone know how to do that?
I've got figures in my document that include sources - e.g.
Figure 1: Interesting text here (Source: The Author)
How can I omit the (Source: The Author) from my table of contents?
when i update my table of contents, it also shows the main text in the table. How can I fix this?
make sure you main text is not marked as a heading style. alternatively, it could be because you don't have a proper carriage return after your heading *(you did a shift + enter to create a line feed - which looks like a carriage return but doesn't create the paragraph mark - thus your text looks like its different and on a new line but its of the same paragraph and style. click the paragraph mark button to see whether there is a paragraph mark behind your heading which is followed by the main text in your TOC )
Hi I have a question. I wanted to include my abstract, acknowledgement, dedication and list of figures tiles in my table of content. Note that my page number begins with page number 1 in the Introduction of my thesis. That means, the above titles are numbered as a, b, c, and d separately and their inclusion into the table of content will appear before my Introduction section. How can I do that? Thanks Liky
My table of contents is only showing pages 1 and 2, and the rest of the TOC is missing page numbers. Why would it only add page 1 and 2, and not the rest?
for reference
How to update table content and Figures in same time
Post a comment
- Skip to main content
- Skip to secondary menu
- Skip to primary sidebar
- Skip to footer
Erin Wright Writing
Writing-Related Software Tutorials
How to Create and Update a Table of Contents in Microsoft Word
By Erin Wright
There are several ways to create a table of contents in Microsoft Word. In this tutorial, we are going to look at the two most convenient ways. Plus, we are going to update a table of contents after making changes to the document. We will also delete a table of contents.
How to Create a Built-In Table of Contents
How to choose individual heading levels for a table of contents, how to update a table of contents, how to delete a table of contents.

This tutorial is available as a YouTube video showing all the steps in real time.
Watch more than 250 other writing-related software tutorials on my YouTube channel .
The images below are from Word for Microsoft 365. The steps are the same in Word 2021, Word 2019, Word 2016, Word 2013, and Word 2010. However, your interface may look slightly different in those older versions of the software.
Word’s built-in tables of contents are the easiest to create. However, they offer the fewest number of customization options.
- Place your cursor where you want to insert the table of contents.
- Select the References tab in the ribbon.

- Select the Table of Contents button.

- Select a built-in table of contents from the drop-down menu.

Your table of contents should appear in your document.

How to Create a Custom Table of Contents
Word’s custom tables of contents provide formatting options and allow you to include or exclude specific heading levels.
Pro Tip: The custom table of contents option does not automatically create a title (e.g., Table of Contents or Contents ), so be sure to leave a blank line above your cursor where you can enter a title later.
- Select the References tab in the ribbon (see figure 1).
- Select the Table of Contents button (see figure 2).
- Select Custom Table of Contents from the drop-down menu.

- Select a visual style from the Formats menu in the Table of Contents dialog box. (The From Template option is based on the styles established in your current template.)

- Select the number of levels you want to include in the Show levels menu.

- (Optional Step) Select additional options concerning page numbers and tab leaders, which are the dots, dashes, or lines that appear before the page number.

By default, Word’s tables of contents include text formatted with sequential heading styles (e.g., Heading 1, Heading 2, Heading 3, etc.). However, you can manually include or exclude individual heading levels within your custom table of contents.
- Select the Options button in the Table of Contents dialog box.

- Enter the sequence of the heading levels you want to appear in the TOC level text boxes in the Table of Contents Options dialog box.

In the example above, I entered 1 across from Heading 2 because I want my table of contents to begin with Heading 2 and exclude Heading 1.
- Select the OK button.

- Type a title (e.g., Table of Contents or Contents ) above your table of contents.
Your table of contents won’t automatically update as you add additional headings to your document. Instead, you can update your table of contents as you add headings or when the document is complete.
- Place your cursor in the table of contents.
- Right-click and select Update Field from the shortcut menu.

Pro Tip: You can also select Update Table in the Table of Contents group in the References tab.
- Select Update entire table from the Update Table of Contents dialog box.

Your table of contents should update immediately.
You don’t have to select the table of contents to delete it.
- Select Remove Table of Contents from the drop-down menu.

Your table of contents should be deleted immediately.
Related Resources
How to Create and Update a List of Tables or Figures in Microsoft Word
How to Cross-Reference Tables and Figures in Microsoft Word
How to Insert Figure Captions and Table Titles in Microsoft Word
Updated December 15, 2023
- Microsoft Word Tutorials
- Adobe Acrobat Tutorials
- PowerPoint Tutorials
- Writing Tips
- Editing Tips
- Writing-Related Resources
Want to Get your Dissertation Accepted?
Discover how we've helped doctoral students complete their dissertations and advance their academic careers!
Join 200+ Graduated Students

Get Your Dissertation Accepted On Your Next Submission
Get customized coaching for:.
- Crafting your proposal,
- Collecting and analyzing your data, or
- Preparing your defense.
Trapped in dissertation revisions?
How to create a table of contents for a dissertation (apa), published by steve tippins on june 20, 2022 june 20, 2022.
Last Updated on: 2nd February 2024, 05:06 am
APA Dissertation Table of Contents Format Guidelines
- The table of contents should be double spaced with one-inch margins on all sides.
- It should be written in the same font and size as the rest of your dissertation.
- At the top of the page, write Table of Contents , centered and in bold.
- Although in the body of the paper you can use up to five levels of headings, up to three levels are usually provided in the Table of Contents. Including lower-level headings is optional.
- Indent each subheading five spaces.
- Write all text in title case. In title case, the first letter of major words is capitalized.
- Provide the page number where the main headings and subheadings begin, and provide dotted lines between the heading and the page number.
- Page numbers for the Dedication, Acknowledgements, and Preface should be in lower case Roman Numbers (i, v, x, l, c, d and m.). The page numbers for the rest of the text should be in Arabic numerals (1,2, 3, 4, etc.).
How to Create an APA Table of Contents Using Microsoft Word
Step 1. Instead of manually trying to write and format the table of contents, you can create a generated one using Microsoft Word. To do this, first go to the Home tab. This is where you will choose the styles for the table of contents.
Step 2. The top-level headings will be your chapter titles, so on the right side of the tab, apply the Heading 1 style.
Step 3. The second-level headings will be your subheadings, so apply the Heading 2 style. This will place your subheadings underneath your main headings.

Step 4. You will now produce page links to your document. In the top ribbon, click on the References tab and select Table of Contents .
Step 5. If the style does not indicate APA, such as the one below, use the drop down arrow to select APA.
Step 6. Next, choose the number of levels that you want. In this case, you want to be able to have up to three levels, so choose Automatic Table 2 , which has the appropriate heading for a dissertation.
Step 7. Click ok , and you are all set. Microsoft word will automatically generate your dissertation’s table of contents as you write it.

List of Tables and Figures
Your list of tables and figures will be written at the end of the list of information in the body of your paper. You will create these lists the same way that you created the main table of contents.
However, the headings will be different.
Instead of the heading “Table of Contents,” the headings will be “List of Tables” and “List of Figures.” (An example is provided in the table of contents example below.)
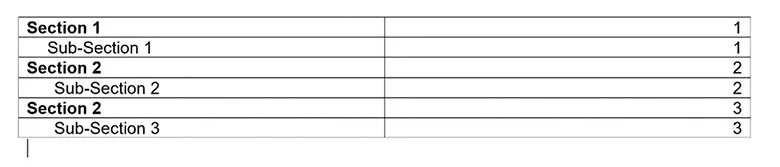
Example of Table of Contents
In the example below, there are three level headings. The list of tables and figures are provided at the bottom of the other contents. The sections in your table of contents may be different depending on your college’s requirements.

Updating the Table of Contents
As you continue working on your dissertation, you will need to update the page numbers because they may change.

To update the page numbers, right-click on the table of contents in your document and select the Update field . Then, the Update Table of Contents box will appear.
You can choose to Update page numbers only or all the information in the table of contents by clicking on Update entire table .

Note: For more information, refer to the APA Manual 7 th edition , sections 2.2-2.27.
Steve Tippins
Steve Tippins, PhD, has thrived in academia for over thirty years. He continues to love teaching in addition to coaching recent PhD graduates as well as students writing their dissertations. Learn more about his dissertation coaching and career coaching services. Book a Free Consultation with Steve Tippins
Related Posts

Dissertation
What makes a good research question.
Creating a good research question is vital to successfully completing your dissertation. Here are some tips that will help you formulate a good research question. What Makes a Good Research Question? These are the three Read more…

Dissertation Structure
When it comes to writing a dissertation, one of the most fraught questions asked by graduate students is about dissertation structure. A dissertation is the lengthiest writing project that many graduate students ever undertake, and Read more…

Choosing a Dissertation Chair
Choosing your dissertation chair is one of the most important decisions that you’ll make in graduate school. Your dissertation chair will in many ways shape your experience as you undergo the most rigorous intellectual challenge Read more…
Make This Your Last Round of Dissertation Revision.
Learn How to Get Your Dissertation Accepted .
Discover the 5-Step Process in this Free Webinar .
Almost there!
Please verify your email address by clicking the link in the email message we just sent to your address.
If you don't see the message within the next five minutes, be sure to check your spam folder :).
Hack Your Dissertation
5-Day Mini Course: How to Finish Faster With Less Stress
Interested in more helpful tips about improving your dissertation experience? Join our 5-day mini course by email!
Have a language expert improve your writing
Run a free plagiarism check in 10 minutes, automatically generate references for free.
- Knowledge Base
- Dissertation
- Dissertation Table of Contents in Word | Instructions & Examples
Dissertation Table of Contents in Word | Instructions & Examples
Published on 15 May 2022 by Tegan George .
The table of contents is where you list the chapters and major sections of your thesis, dissertation, or research paper, alongside their page numbers. A clear and well-formatted table of contents is essential, as it demonstrates to your reader that a quality paper will follow.
The table of contents (TOC) should be placed between the abstract and the introduction. The maximum length should be two pages. Depending on the nature of your thesis, dissertation, or paper, there are a few formatting options you can choose from.
Download Word doc Download Google doc
Instantly correct all language mistakes in your text
Be assured that you'll submit flawless writing. Upload your document to correct all your mistakes.
Table of contents
What to include in your table of contents, what not to include in your table of contents, creating a table of contents in microsoft word, table of contents examples, updating a table of contents in microsoft word, other lists in your thesis, dissertation, or research paper, frequently asked questions about the table of contents.
Depending on the length of your document, you can choose between a single-level, subdivided, or multi-level table of contents.
- A single-level table of contents only includes ‘level 1’ headings, or chapters. This is the simplest option, but it may be too broad for a long document like a dissertation.
- A subdivided table of contents includes chapters as well as ‘level 2’ headings, or sections. These show your reader what each chapter contains.
- A multi-level table of contents also further divides sections into ‘level 3’ headings. This option can get messy quickly, so proceed with caution. Remember your table of contents should not be longer than 2 pages. A multi-level table is often a good choice for a shorter document like a research paper.
Examples of level 1 headings are Introduction, Literature Review, Methodology, and Bibliography. Subsections of each of these would be level 2 headings, further describing the contents of each chapter or large section. Any further subsections would be level 3.
In these introductory sections, less is often more. As you decide which sections to include, narrow it down to only the most essential.
Including appendices and tables
You should include all appendices in your table of contents. Whether or not you include tables and figures depends largely on how many there are in your document.
If there are more than three figures and tables, you might consider listing them on a separate page. Otherwise, you can include each one in the table of contents.
- Theses and dissertations often have a separate list of figures and tables.
- Research papers generally don’t have a separate list of figures and tables.
The only proofreading tool specialized in correcting academic writing
The academic proofreading tool has been trained on 1000s of academic texts and by native English editors. Making it the most accurate and reliable proofreading tool for students.
Correct my document today
All level 1 and level 2 headings should be included in your table of contents, with level 3 headings used very sparingly.
The following things should never be included in a table of contents:
- Your acknowledgements page
- Your abstract
- The table of contents itself
The acknowledgements and abstract always precede the table of contents, so there’s no need to include them. This goes for any sections that precede the table of contents.
To automatically insert a table of contents in Microsoft Word, be sure to first apply the correct heading styles throughout the document, as shown below.
- Choose which headings are heading 1 and which are heading 2 (or 3!
- For example, if all level 1 headings should be Times New Roman, 12-point font, and bold, add this formatting to the first level 1 heading.
- Highlight the level 1 heading.
- Right-click the style that says ‘Heading 1’.
- Select ‘Update Heading 1 to Match Selection’.
- Allocate the formatting for each heading throughout your document by highlighting the heading in question and clicking the style you wish to apply.
Once that’s all set, follow these steps:
- Add a title to your table of contents. Be sure to check if your citation style or university has guidelines for this.
- Place your cursor where you would like your table of contents to go.
- In the ‘References’ section at the top, locate the Table of Contents group.
- Here, you can select which levels of headings you would like to include. You can also make manual adjustments to each level by clicking the Modify button.
- When you are ready to insert the table of contents, click ‘OK’ and it will be automatically generated, as shown below.
The key features of a table of contents are:
- Clear headings and subheadings
- Corresponding page numbers
Check with your educational institution to see if they have any specific formatting or design requirements.
Write yourself a reminder to update your table of contents as one of your final tasks before submitting your dissertation or paper. It’s normal for your text to shift a bit as you input your final edits, and it’s crucial that your page numbers correspond correctly.
It’s easy to update your page numbers automatically in Microsoft Word. Simply right-click the table of contents and select ‘Update Field’. You can choose either to update page numbers only or to update all information in your table of contents.
In addition to a table of contents, you might also want to include a list of figures and tables, a list of abbreviations and a glossary in your thesis or dissertation. You can use the following guides to do so:
- List of figures and tables
- List of abbreviations
It is less common to include these lists in a research paper.
All level 1 and 2 headings should be included in your table of contents . That means the titles of your chapters and the main sections within them.
The contents should also include all appendices and the lists of tables and figures, if applicable, as well as your reference list .
Do not include the acknowledgements or abstract in the table of contents.
To automatically insert a table of contents in Microsoft Word, follow these steps:
- Apply heading styles throughout the document.
- In the references section in the ribbon, locate the Table of Contents group.
- Click the arrow next to the Table of Contents icon and select Custom Table of Contents.
- Select which levels of headings you would like to include in the table of contents.
Make sure to update your table of contents if you move text or change headings. To update, simply right click and select Update Field.
The table of contents in a thesis or dissertation always goes between your abstract and your introduction.
Cite this Scribbr article
If you want to cite this source, you can copy and paste the citation or click the ‘Cite this Scribbr article’ button to automatically add the citation to our free Reference Generator.
George, T. (2022, May 15). Dissertation Table of Contents in Word | Instructions & Examples. Scribbr. Retrieved 25 March 2024, from https://www.scribbr.co.uk/thesis-dissertation/contents-page/
Is this article helpful?
Tegan George
Other students also liked, dissertation title page, how to write an abstract | steps & examples, thesis & dissertation acknowledgements | tips & examples.
How to Create a Table of Contents in Microsoft Word for Office 365
Creating a table of contents in Microsoft Word for Office 365 is a simple process that involves using the built-in heading styles and the table of contents feature. After completing these steps, you’ll have a professional-looking table of contents that can be updated as your document changes.
Once you’ve created your table of contents, any changes you make to your document, such as adding or removing sections, or changing page numbers, will be reflected in the table of contents once you update it. This ensures your table of contents remains accurate and up-to-date with the rest of your document.
Introduction
When you’re dealing with a long document, a table of contents can be a real lifesaver. Not only does it give your readers a high-level overview of what they can expect from your document, but it also allows them to jump straight to the sections that interest them most. It’s a crucial element for reports, proposals, manuals, and any document that spans several pages. If you’re working in Microsoft Word for Office 365, creating a table of contents is a breeze, thanks to its intuitive tools and features.
Whether you’re a student compiling a thesis, a professional preparing a complex report, or just someone looking to organize their work better, mastering the table of contents feature in Word is a skill that will pay dividends. So, let’s dive in and learn how to transform your chaotic document into a well-organized masterpiece.
Related: How to Insert a Square Root Symbol in Word
Step by Step Tutorial: Creating a Table of Contents in Microsoft Word for Office 365
This section will guide you through creating a clean and professional table of contents in your Word document.
Step 1: Apply Heading Styles
Apply heading styles to the headings in your document that you want to include in the table of contents.
When you apply heading styles, you’re essentially marking text to be included in your table of contents. You can find these styles in the ‘Styles’ group on the ‘Home’ tab. Use ‘Heading 1’ for main sections, ‘Heading 2’ for sub-sections, and so on. This organization will reflect in your table of contents, creating a structured and easy-to-navigate document.
Step 2: Insert the Table of Contents
Place your cursor where you want the table of contents to appear, then go to the ‘References’ tab and click on ‘Table of Contents.’
You’ll find several built-in styles to choose from. These range from classic and simple to more complex and modern designs. Pick one that suits the tone and style of your document. Remember, you can always customize it later on.
Step 3: Customize Your Table of Contents (Optional)
Click on the table of contents in your document and select ‘Custom Table of Contents’ for more customization options.
Here, you can decide how many levels of headings you want to include, whether or not to show page numbers, and if you want the page numbers to be right-aligned. This is your chance to get your table of contents looking just right.
Step 4: Update the Table of Contents
As you edit your document, update the table of contents by clicking on it and selecting ‘Update Table.’
You can choose to update only the page numbers or the entire table. This is particularly useful if you’ve added or removed content and need your table of contents to reflect those changes accurately.
Additional Information
When creating a table of contents in Microsoft Word for Office 365, there are a few extra tips and insights that can enhance your experience. First, be consistent with your heading styles throughout your document to ensure a uniform look in your table of contents. Also, consider the depth of detail you want your table of contents to display – too many levels can make it look cluttered, while too few can oversimplify your document.
Additionally, if you’re working collaboratively, it’s essential to communicate with your team about the importance of using the correct heading styles to maintain the table of contents’ integrity. Lastly, remember that a table of contents is more than a functional element; it’s a reflection of your document’s organization and can significantly impact your reader’s experience.
- Apply heading styles to your document’s headings.
- Insert the table of contents at your desired location.
- Customize the table of contents if needed.
- Update the table of contents as your document changes.
Frequently Asked Questions
Can i include additional text styles in my table of contents.
You can modify the table of contents to include any text styled as a heading, but standard text styles like ‘Normal’ won’t be included.
How do I remove a section from the table of contents?
To remove a section, change the heading style of that section to a non-heading style, like ‘Normal,’ then update the table of contents.
Can I have multiple tables of contents in a single document?
Yes, you can have multiple tables of contents, but each must be configured to include different heading levels or applied to separate sections of the document.
How do I change the appearance of the table of contents?
You can change the appearance by selecting ‘Custom Table of Contents’ and choosing different styles, fonts, and indentation options.
What should I do if my page numbers are incorrect?
Make sure all your content is correctly paginated, then update the table of contents to reflect the correct page numbers.
Creating a table of contents in Microsoft Word for Office 365 is a straightforward process, but it has a profound impact on the usability and professionalism of your document. By following the steps outlined in this article, you’ll be able to craft a functional and attractive table of contents that not only enhances your document’s appearance but also improves your readers’ experience.
Whether you’re a seasoned Word user or just getting started, the ability to create a table of contents is an essential skill that will serve you well in many writing scenarios. So, go ahead and give it a try – your documents (and your readers) will thank you for it.

Matthew Burleigh has been writing tech tutorials since 2008. His writing has appeared on dozens of different websites and been read over 50 million times.
After receiving his Bachelor’s and Master’s degrees in Computer Science he spent several years working in IT management for small businesses. However, he now works full time writing content online and creating websites.
His main writing topics include iPhones, Microsoft Office, Google Apps, Android, and Photoshop, but he has also written about many other tech topics as well.
Read his full bio here.
Share this:
Join our free newsletter.
Featured guides and deals
You may opt out at any time. Read our Privacy Policy
Related posts:
- How to Delete a Table in Google Docs (A Quick 5 Step Guide)
- How to Format a Table of Contents in Google Docs
- How to Change Font of Page Numbers in Word
- How to Center a Table in Google Docs (2023 Guide)
- How to Remove Section Breaks in Word Documents
- How to Add Page Numbers in Microsoft Word for Office 365: A Step-by-Step Guide
- How to Change Table Color in Word 2013
- How to Remove Table Borders in Word
- How to Merge Cells in Word 2016 Tables
- How to Make a Table Fit on One Page in Word 2010
- How to Remove the Page Number from the First Page in Word 2013
- How to Return to Normal View in Word 2010
- How to Get a Word Count in Microsoft Word for Office 365: A Step-by-Step Guide
- How to Center Text in Word [2023 Guide]
- How to Select All in Word for Office 365
- Remove the Page Number from a Title Page in Word 2010
- How to Print from Microsoft Word for Office 365: A Step-by-Step Guide
- How to Count Characters in Microsoft Word 2013 (A Quick 3 Step Guide)
- Can I Convert a Microsoft Word Table to Excel?
- How to Add a Row to a Table in Google Docs

- Get started with computers
- Learn Microsoft Office
- Apply for a job
- Improve my work skills
- Design nice-looking docs
- Getting Started
- Smartphones & Tablets
- Typing Tutorial
- Online Learning
- Basic Internet Skills
- Online Safety
- Social Media
- Zoom Basics
- Google Docs
- Google Sheets
- Career Planning
- Resume Writing
- Cover Letters
- Job Search and Networking
- Business Communication
- Entrepreneurship 101
- Careers without College
- Job Hunt for Today
- 3D Printing
- Freelancing 101
- Personal Finance
- Sharing Economy
- Decision-Making
- Graphic Design
- Photography
- Image Editing
- Learning WordPress
- Language Learning
- Critical Thinking
- For Educators
- Translations
- Staff Picks
- English expand_more expand_less
Word Tips - How to Create a Table of Contents in Word
Word tips -, how to create a table of contents in word, word tips how to create a table of contents in word.

Word Tips: How to Create a Table of Contents in Word
Lesson 15: how to create a table of contents in word.
/en/word-tips/modifying-page-numbers-in-word/content/
How to create a table of contents in Word
Imagine you're working with a really long document in Microsoft Word, like an academic paper or a big report. Depending on the project, it might be dozens or even hundreds of pages long! When a document is this large, it can be difficult to remember which page has what information. Fortunately, Word allows you to insert a table of contents, making it easy to organize and navigate your document.
A table of contents is just like the list of chapters at the beginning of a book. It lists each section in the document and the page number where that section begins. A really basic table of contents might look like this:

You could create a table of contents manually—typing the section names and page numbers—but it would take a lot of work. And if you ever decide to rearrange your sections or add more information, you'll have to update everything all over again. However, with the right formatting, Word can create and update a table of contents automatically.
Step 1: Apply heading styles
If you've already read our Applying and Modifying Styles lesson, you know they're an easy way to add professional text formatting to different parts of your document. Styles also serve another important purpose: adding a hidden layer of organization and structure to your document.
If you apply a heading style , you're telling Word that you've started a new part of your document. When you insert the table of contents, it will create a section for each heading. In the table of contents above, each chapter uses a heading style, so there are four sections.
To apply a heading style, select the text you want to format, then choose the desired heading in the Styles group on the Home tab.

Step 2: Insert the table of contents
Now for the easy part! Once you've applied heading styles, you can insert your table of contents in just a few clicks. Navigate to the References tab on the Ribbon, then click the Table of Contents command. Select a built-in table from the menu that appears, and the table of contents will appear in your document.

As you can see in the image below, the table of contents uses the heading styles in your document to determine where each section begins. Sections that begin with a Heading 2 or Heading 3 style will be nested within a Heading 1 style, much like a multilevel list .

A table of contents also creates links for each section, allowing you to navigate to different parts of your document. Just hold the Ctrl key on your keyboard and click to go to any section.

Step 3: Update as needed
If you edit or add to your document, it's easy to update the table of contents. Just select the table of contents, click Update Table , and choose Update Entire Table in the dialog box that appears. The table of contents will then update to reflect any changes.

No matter how large your document may be, you can see there's nothing complicated about creating a table of contents. If you want even more control over how your table of contents appears, check out this tutorial from Microsoft on Taking a Table of Contents to the Next Level .
/en/word-tips/how-to-create-a-bibliography-or-works-cited-page-in-word/content/
- Mardigian Library
- Subject Guides
Formatting Your Thesis or Dissertation with Microsoft Word
- Lists of Tables and Figures
- Introduction
- Copyright Page
- Dedication, Acknowledgements, & Preface
- Headings and Subheadings
- Citations and Bibliography
- Page Numbers
- Tables and Figures
- Rotated (Landscape) Pages
- Table of Contents
- List of Abbreviations
- Some Things to Watch For
- PDF with Embedded Fonts
Lists of tables and figures
Just like the table of contents, Microsoft Word can be used to automatically generate both a list of tables and a list of figures. Automatic generation of these lists has the same advantages as automatically generating the table of contents:
- You don't have to manually type the list of tables or the list of figures
- You don't have to go back and edit the lists if any of the figures or tables changes pages. A couple of clicks and Word will automatically update the list of tables or the list of figures for you.
Below is a tutorial demonstrating how to create the list of tables and the list of figures.
- << Previous: Table of Contents
- Next: List of Abbreviations >>
- Last Updated: Mar 21, 2024 2:35 PM
- URL: https://guides.umd.umich.edu/Word_for_Theses
Call us at 313-593-5559
Chat with us
Text us: 313-486-5399
Email us your question
- 4901 Evergreen Road Dearborn, MI 48128, USA
- Phone: 313-593-5000
- Maps & Directions
- M+Google Mail
- Emergency Information
- UM-Dearborn Connect
- Wolverine Access
Microsoft Office
11 minute read
How to Create a Table of Contents in Word in 7 Easy Steps

Saikat Basu
Twitter LinkedIn WhatsApp Pocket Email
Look at the nearest Microsoft Word document you have. There’s a good chance that it’s a document that’s just a few pages long. And without a Word table of contents.
But pick up software documentation or a research report. It wouldn’t be called a “professional document” without a pretty well-formatted Table of Contents.
You shouldn’t look at the job of making a Table of Contents (we will occasionally call it a TOC also) as a chore. Making a TOC isn’t only for dense reports or your next bestseller. It can be for something as simple as a daily journal or a school assignment. You should create a Table of Contents whenever appropriate.
Microsoft Word makes it easy. We will look into a few ways to create a Table of Contents in Word.
But first, let’s go into the benefits of a Table of Contents for a Word document.
Get your free Word shortcuts cheatsheet!
Download the print-ready shortcut cheatsheet for Word.
Why is a Table of Contents so essential?

Are TOCs relevant when we have bookmarks and advanced search features on digital devices? The short answer is -- Yes. A Table of Contents isn’t just for navigating long documents.
Here are five benefits you should immediately look at:
- It gives the reader a bird’s eye view of the document. A TOC is like an outline. At a glance, you can see how a document will flow from one topic to the next.
- It makes a document look professional. A document with a TOC looks more organized and professional than a document that lacks one.
- It is a key organizational aid for the author. Think of it like a roadmap and the first draft for a TOC can help you arrange your thoughts (and even brainstorm).
- It makes a document easier to discuss. A TOC can signal the quality of the document. Your teacher or your book agent can tell at a glance if the material is worth a read by just glancing at the table of contents.
- It gives you a learning path. A TOC is a well-ordered series of steps. Steal them from an instructional book to understand the learning path on any subject of your choice.
Check out this quick video on how to create a table of contents in Word:
How to create a Table of Contents in Word
Microsoft Word can automatically build a Table of Contents for you. You need to only outline the content and then specify the heading styles with basic formatting. Let’s take this step by step.
1. Format your document using heading styles. Select each chapter in your document and apply Heading Styles to them. Here, you are marking up the section headers so that Word can recognize them.
Go to Ribbon > Home > Styles . Select the text and apply headings for all the text you want to include in the table of contents.

Word scans the document for any text formatted as either Heading 1, 2, or 3 and then uses these to create the format for the TOC.

2. Position the Table of Contents on the page. Place the cursor on the specific position where you want the TOC to appear in your document. This is commonly somewhere at the beginning of the document.
4. Click the Table of Contents command. Go to Ribbon > References > Table of Contents . Choose from one of the two automatic types available. The only difference between the two is the heading of "Contents" or "Table of Contents" at the top.

6. Update the Table of Contents anytime. You can always update a Table of Contents that has been created automatically. Update the table if you change the heading styles, rearrange the contents, or change the text. Also, update it if you make any changes to the content that affects the page numbers.
To update a table of contents that was created automatically, click References > Update Table .

- The document is without any styles which Word can recognize.
- The document has too much of variety makes an automatic TOC difficult.
To create a manual table, go to References > Table of Contents > Click the dropdown to reveal the option for Manual Table .

Microsoft Word inserts a TOC with placeholders which you can now edit. You can modify this with your own fonts and colors. Do remember that you also have to insert the page numbers manually too.
A TOC created manually cannot be updated automatically.
You do not have to settle for the basic Table of Contents that Microsoft Word creates for you. You can modify any TOC and even create a custom Table of Contents of your own.
How to customize the Table of Contents
You can easily customize a TOC with the Table of Contents dialog box. Go to References > Table of Contents > Custom Table of Contents to launch the dialog.

Any changes you make here will be visible in the Print Preview and Web Preview windows.
Seven advanced techniques to customize the TOC
1. choose a different format for the toc.
You can change an entire table by choosing a different format. In the General section, expand the dropdown for Formats and choose an appearance.

2. Change the appearance of the items in the TOC
Remember, the appearance of your TOC is ultimately controlled by style definitions. You may want to tweak the overall look of the TOC by creating your own styles for the headings. These modified styles can be saved alongside the in-built ones and applied across the document for a consistent look. Follow these steps.
1. Click Modify . If the Modify button is grayed out, change Formats to From template .

4. Before you click OK, you can choose whether the style change applies to the current document or to all future documents. To save it for future use, click the checkbox for Add to the Styles gallery .
3. Change the levels of the style headings shown
A TOC can be itemized, or you can just include the major sections. The Show levels number allows you to change the number of levels displayed in your table of contents. The “Levels” here refers to the style headings you have applied to your sections.
For instance: H1, H2, H3… etc. If you set it on 2, then all text with the Heading 1 style or the Heading 2 style is displayed.

4. Change or add dot leaders in the TOC
Dot leaders are the lines or dots that connect the items in the index to page numbers. These leader lines are mentioned in many style guides as a necessary part of thesis documents.
In the Table of Contents dialog box, click the dropdown for the Tab leader list and select the dotted line option. Alternatively, choose the leader line you want or select “none” to remove it from the TOC.

5. Add a non-heading style
Word won’t include a non-heading style when it inserts an automatic TOC. By default, Word only includes headings 1 through 9. But it gives you a method to include any other style you create in the index. Let’s say you want to add another heading called “A Brief Guide” at the top of the content and the TOC.
In the Table of Contents dialog box, click the Options button to open this screen:

Right now, it maps the styles in use only to the TOC levels. As you can see, the three styles, Heading 1, Heading 2, and Heading 3 are mapped as levels 1. 2, and 3.
Go down the boxes until you find Title , which has no mapped TOC level. Enter 1 to map Title to the TOC top level.

Click OK twice to exit the dialogs. Word will prompt you to replace the contents. Click Yes to replace the TOC.
6. Create a clickable Table of Contents
Creating a hyperlinked Table of Contents is expected in the digital age. Navigation is faster. It is also another condition to submit a thesis or dissertation.
Click the Use hyperlinks instead of page numbers checkbox.
Also, uncheck the Show page numbers box if you just want to use the hyperlinks.

7. Place a simple border around the Table of Contents
You can use Word’s Shapes feature to insert a border around the TOC. Set Shape Fill to “No Fill” and then add Shape Style s or use Format Shape to design the look of the pseudo-border around the table.

Remember to add Table of Contents to your documents
The automatic Table of Contents feature is a time saver. But to catch the eye, you need to dive into different styles and custom tables. To sum up:
- Structure your document.
- Decide the levels you want to display.
- Change the style attributes to match your needs.
As you begin making your own, you will have your own questions. Hopefully, this guide has illustrated the basic process well enough for you to take the plunge. Are you more comfortable with Table of Contents now?
If you are looking to sharpen your Microsoft Office skills, check out our Microsoft Word course to learn time-saving tips and tricks for formatting your documents.
Ready to master Microsoft Office?
Start learning for free with GoSkills courses
Loved this? Subscribe, and join 440,874 others.
Get our latest content before everyone else. Unsubscribe whenever.

Saikat is a writer who hunts for the latest tricks in Microsoft Office and web apps. He doesn't want to get off the learning curve, so a camera and a harmonica claim an equal share of his free time.

Recommended
Should You Switch to Microsoft 365? What You Need to Know in 2024
We break down what Microsoft 365 is, and what makes it different from lifetime licenses.

28 Best Microsoft Office Add Ins in 2024
Supercharge your productivity with our picks of the best Microsoft Office add-ins for Word, Excel, PowerPoint, Outlook and OneNote.

What is Microsoft Teams? Everything You Need to Know in 2024
What is Microsoft Teams? Find out in this introductory guide.
© 2024 GoSkills Ltd. Skills for career advancement

Graduate College Formatting Guide
- Page Numbers (Microsoft Word)
- Page Numbers (Google Docs)
- Page Breaks and Section Breaks
- Headings, Subheadings, and Table of Contents (Microsoft Word)
- Headings, Subheadings, and Table of Contents (Google Docs)
- Inserting Tables and Figures
- Comments and Track Changes
- References, Bibliography, Works Cited
- Landscape Pages & Special Materials
Setting the Normal Style
Set the "normal" style of font.
Before we can set up headings, we'll need to define the format of the text that isn't a heading. The "styles" in word set some default formatting for text. Setting up the "Normal" style will create a default font setting to keep the text uniform throughout the document. The Styles pane is located under the HOME tab.

Right click on the "Normal" style to open the Modify option.

This will open a Modify Style Dialog Box. Start by changing the Paragraph formatting. This is located by selecting the Format drop down in the bottom left of the Dialog Box.

There are two things that should be set under the Paragraph settings. Under the INDENTS AND SPACING tab, check to turn on "Don't add space between paragraphs of the same style." Under the LINE AND PAGE BREAKS tab, check to turn on the "Widow/Orphan Control."

Once both of those have been set and you click "okay," you'll be returned to the Modify Style Dialog Box. Now we can set the font formatting. Select the font you wish to use throughout the document, change the font size to 12 point, ensure the line spacing is double spaced, and select the option to remove space between paragraphs (this is indicated by two lines pointing towards each other).

Adding Headings & Subheadings
Inserting headings and subheadings.
Using the same technique we can create a standard for the various types of headings and subheadings used across the thesis. The Thesis & Dissertation Manual generally follows APA style for heading levels. In order to keep headings consistently correct and link the Table of Contents, the Styles function in Word is used. This is going to show you some examples of the formatting required for the headings and how to use the various heading levels. We'll also see how to use styles and update your Table of Contents.
Modifying Heading Levels to Match Required Formatting
Level 1 headings.
Chapters will be linked to Heading Level 1. If you choose not to have chapters, you will use level 1 for your major headings (typically: Introduction, Literature Review, Methods, etc.). They should be typed in title case, center aligned, and bold. The number of the chapter can be in Arabic or Roman numerals or spelled out so long as it is consistently done throughout the document. The heading should be on one line, so if you are using chapters, it should look something like this:
Chapter 1: Introduction
Once you have formatted a chapter heading, select the text of the chapter heading then right click on Heading 1 in the Styles pane and select "Update Heading 1 to Match Selection."

Adding More Level 1 Headings
Once you have formatted the first heading and updated the style, you simply need to type the new level 1 heading in title case and then, with your cursor in line with the heading, click on the heading 1 button in the styles pane to format it and link it for your table of contents. Make sure to use this feature every time to ensure all headings are properly linked to your table of contents.

Level 2 Headings
Subsections of your major headings should be the next level down. Level 2 headings will be left aligned, bold, and title case. They should look like this:
Level 2 Heading
Once you have formatted a level 2 heading, select the text of the heading then right click on Heading 2 in the Styles pane and select "Update Heading 2 to Match Selection."

Adding More Level 2 Headings
Once you have formatted the first heading and updated the style, you simply need to type the new level 2 heading in title case and then, with your cursor in line with the heading, click on the heading 2 button in the styles pane to format it and link it for your table of contents. Make sure to use this feature every time to ensure all headings are properly linked to your table of contents.

Level 3 Headings
If you wish to further subsection your paper, you will use level 3 headings. Level 3 headings will be bold italic, left aligned, and title case. They should look like this:
Level Three Heading
Once you have formatted a level 3 heading, select the text of the heading then right click on Heading 3 in the Styles pane and select "Update Heading 3 to Match Selection."

Adding More Level 3 Headings
Once you have formatted the first heading and updated the style, you simply need to type the new level 3 heading in title case and then, with your cursor in line with the heading, click on the heading 3 button in the styles pane to format it and link it for your table of contents. Make sure to use this feature every time to ensure all headings are properly linked to your table of contents.

Level 4 & 5 Headings (and beyond)
It is common to find the first 3 heading levels in papers that are as long as a thesis or dissertation. Occasionally, you may find the need to go beyond those levels. It is important to note that for the thesis and dissertation, only the first 3 headings should be included in the table of contents. It is also recommended that you only use the styles function for the first 3 headings because they stand alone on their own line of text. The next heading levels will begin on the same line as the paragraph that starts that section which means that the style function will not work properly. If you were to link the heading, the entire paragraph will appear in your table of contents.
This means that you will need to, carefully, ensure you are formatting the headings manually. Each level should be consistently formatted the same way. APA has standards for levels 4 & 5 which are described here. For heading levels beyond level 5, you should pick a consistent formatting that clearly indicates they are a subsection of the level 5 heading. It is also recommended that you carefully evaluate if this level of heading is truly necessary for your writing.
Level 4 Heading
Level 4 headings will begin on the same line of the paragraph that makes up the section. It will be indented 0.5", much like a normal paragraph indent. The heading will be in title case and bold font with a period at the end of the heading:
Level Four Heading Here. Start the first sentence of the paragraph that follows the heading on the same line and continue typing. Lorem ipsum dolor sit amet, consectetur adipiscing elit. Nunc at pellentesque massa. Sed nec urna nec est efficitur iaculis. Etiam efficitur velit id dignissim eleifend. Duis euismod, nisi sed cursus sodales, sem nisi porttitor ante, eu dignissim justo tortor nec mauris.
Level 5 Heading
Level 5 headings will begin on the same line of the paragraph that makes up the section. It will be indented 0.5", much like a normal paragraph indent. The heading will be in title case and bold italic font with a period at the end of the heading:
Level Five Heading Here. Start the first sentence of the paragraph that follows the heading on the same line and continue typing. Lorem ipsum dolor sit amet, consectetur adipiscing elit. Nunc at pellentesque massa. Sed nec urna nec est efficitur iaculis. Etiam efficitur velit id dignissim eleifend. Duis euismod, nisi sed cursus sodales, sem nisi porttitor ante, eu dignissim justo tortor nec mauris.
Table of Contents
Once you have added headings and used the styles feature, you will be able to use the word function to "generate" a table of contents. You will need to type "Table of Contents" in bold font, centered at the top of the page you will be inserting your table of contents onto. Then, place your cursor on the next line

From the References tab, click on Table of Contents and select Custom Table of Contents...

From the pop up window, you will want to change the tab leaders to (none) rather than the default. The rest of the default settings will be fine, so click ok once you've done so.

This will populate your table of contents.

From here, you will need to open the style pane to modify some of the formatting of the table of contents.

You will need to locate TOC 1 and click on it, and select "modify" from the drop down list.

TOC 1 style should be bold. If you've properly set up your "normal style" of font (see above), this should be the only modification to your TOC styles that you need to make. If the text is not properly set up and you need to further format it, you can do so from this window.

If set up correctly, your table of contents should look like the image below.

- << Previous: Page Breaks and Section Breaks
- Next: Headings, Subheadings, and Table of Contents (Google Docs) >>
- Last Updated: Feb 9, 2024 9:42 AM
- URL: https://guides.lib.uni.edu/grad-college-format
IMAGES
VIDEO
COMMENTS
In the "References" section at the top, locate the Table of Contents group. Click the arrow next to the Table of Contents icon and select "Custom Table of Contents.". Here, you can select which levels of headings you would like to include. You can also make manual adjustments to each level by clicking the Modify button.
To update your table of contents, select it, click "Update Table" on the pop-up menu that appears, and then choose whether you want to update only the page numbers or the entire table. Click "OK" to apply the changes. Your table of contents will now be updated. This is very useful when you want to add or remove a heading from the table of contents.
Automatic generation of the table of contents has 2 advantages: You don't have to manually type the table of contents. Since the entries in the Table of Content must match exactly the headings, subheadings, and page numbers in the thesis, manually creating a table of contents can lead to unintended errors. You don't have to go back and edit the ...
In this detailed video tutorial, we'll walk you through the process of creating a professional Table of Contents (TOC) for your thesis or dissertation using ...
Insert a Table of Contents. Once your Word document is properly formatted with the Heading Styles, to make your Table of Contents, simply: Click into your document where you want your TOC. Navigate to the References tab. Open the Table of Contents dropdown menu. Choose Automatic Table 1 or Automatic Table 2.
Put your cursor where you want to add the table of contents. Go to References > Table of Contents. and choose an automatic style. If you make changes to your document that affect the table of contents, update the table of contents by right-clicking the table of contents and choosing Update Field. To update your table of contents manually, see ...
An automatic Table of Contents relies on Styles to keep track of page numbers and section titles for you automatically. Microsoft Word can scan your document and find everything in the Heading 1 style and put that on the first level of your table of contents, put any Heading 2's on the second level of your table of contents, and so on.. If you want an automatic table of contents you need to ...
It's time to let Microsoft Word do its magic! Place the cursor where you want the table of contents to appear in the document. Navigate to the REFERENCES tab in the Ribbon. Click the Table of Contents button in the Table of Contents group. Choose one of the " Automatic " table of content styles listed.
Select the References tab in the ribbon (see figure 1). Select the Table of Contents button (see figure 2). Select Custom Table of Contents from the drop-down menu. Figure 5. Custom Table of Contents option. Select a visual style from the Formats menu in the Table of Contents dialog box.
In this video I show you how to make an automatic table of contents in word. You firstly need to change the 'normal' text style so the size and font of the t...
This Microsoft Word tutorial on #Tableofcontent Word, I will show you steps by step method on how to insert a table of contents in Microsoft Word. By using t...
This is where you will choose the styles for the table of contents. Step 2. The top-level headings will be your chapter titles, so on the right side of the tab, apply the Heading 1 style. Step 3. The second-level headings will be your subheadings, so apply the Heading 2 style. This will place your subheadings underneath your main headings. Step 4.
In the 'References' section at the top, locate the Table of Contents group. Click the arrow next to the Table of Contents icon and select 'Custom Table of Contents'. Here, you can select which levels of headings you would like to include. You can also make manual adjustments to each level by clicking the Modify button.
Step 2: Insert the Table of Contents. Place your cursor where you want the table of contents to appear, then go to the 'References' tab and click on 'Table of Contents.'. You'll find several built-in styles to choose from. These range from classic and simple to more complex and modern designs.
Navigate to the References tab on the Ribbon, then click the Table of Contents command. Select a built-in table from the menu that appears, and the table of contents will appear in your document. As you can see in the image below, the table of contents uses the heading styles in your document to determine where each section begins.
Just like the table of contents, Microsoft Word can be used to automatically generate both a list of tables and a list of figures. Automatic generation of these lists has the same advantages as automatically generating the table of contents: You don't have to manually type the list of tables or the list of figures
6. Create a clickable Table of Contents. Creating a hyperlinked Table of Contents is expected in the digital age. Navigation is faster. It is also another condition to submit a thesis or dissertation. Click the Use hyperlinks instead of page numbers checkbox. Also, uncheck the Show page numbers box if you just want to use the hyperlinks. 7.
This Video Has been Include How To Add Table Of Content And Heading Using Word For Your Thesis And Assignment Easy WayThanq You For Watching This Video. Have...
This video demonstrates how to use word's TOC generator to insert a table of contents for your thesis.
Once you have added headings and used the styles feature, you will be able to use the word function to "generate" a table of contents. You will need to type "Table of Contents" in bold font, centered at the top of the page you will be inserting your table of contents onto. Then, place your cursor on the next line. From the References tab, click ...