- Slidesgo School
- PowerPoint Tutorials

How to Use the Presentation Modes and the Screen Recording Features in PowerPoint

After designing all the slides for your presentation, the next and last step is presenting in front of your audience. In this new Slidesgo School tutorial, you’ll see how the presenter view works and how you can record your presentation .
Presentation Modes
Presentation modes — set up slide show, presentation modes — record slide show.
- There are different presentation modes in PowerPoint, besides the one you can find at the bottom of the screen.
- To access the presentation modes, go to the Slide Show tab.
- The first two options allow you to start the presentation from the beginning or from the currently selected slide.

- If you choose Present Online, an URL will be generated, which you can then share with your potential online viewers. After clicking this button, a new window will open, displaying info about the Microsoft Office online presentation service and a checkbox to enable remote download for your online audience. To enjoy this service, you need an Office 365 account. When you’re ready, click Connect to generate the URL.
- If you choose Custom Slide Show, you can select which slides to display in your presentation. First, create a new custom slide show and select the slides that you want to display. Then, click Add, enter the name of the presentation and click OK. This new custom presentation will appear on the list. Select it and click Show to begin the presentation.
- In the Set Up group you’ll find options to set up the presentation, hide slides, rehearse your presentation and even record it.
- Click Set Up Slide Show to adjust several settings regarding your presentation. You’ll find more information in the next section of this tutorial .
- If you click Hide Slide, the selected slide won’t show up during your presentation. Hidden slides will appear faded out on the list and their numbers will be crossed out.
- If you click Record Slide Show, you’ll be able to record your presentation from the beginning or from the current slide. We’ll go into detail in the last section of this tutorial.
- There are several checkboxes regarding whether to play narrations, use timings and show media controls.

- In the Monitors group you can choose which screen to display your presentation.
- The last group, Captions & Subtitles, is only available in Office 365. You’ll find options to enable subtitles, which will be generated out of your speech (so you’ll need to have a mic). There are settings to change the language and the position of the subtitles.
- Open your presentation in PowerPoint.
- Go to the Slide Show tab.
- In the Set Up group, click Set Up Slide Show. A new window will open, where you’ll find several options.
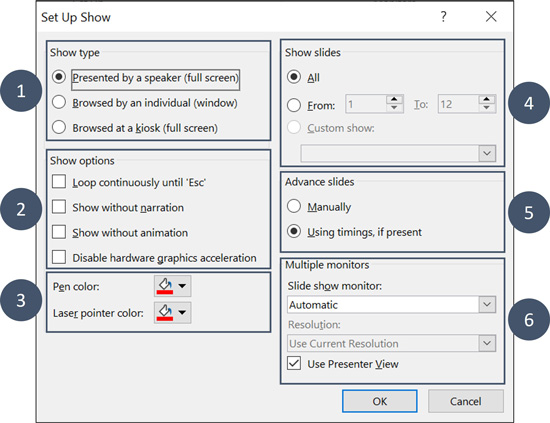
- In the top-left corner, under “Show type”, you can choose whether the presentation will be in fullscreen with speaker notes, windowed, or in fullscreen without speaker notes or the menu bar.

- Under “Show options” you can choose whether to show the presentation without narration or animations, or disable the hardware graphics acceleration (for better performance). You can also set the pen and laser pointer color.

- Under “Show slides”, you can choose which slides to show in your presentation. You can select all of them, a specific range or a custom slideshow.
- There are other settings to determine how to advance slides (manually or using timings), what the resolution will be and whether to use the presenter view.
- Click Record Slide Show. From the drop-down menu, select From the Current Slide or From the Beginning.
- A new window will open, along with the presentation in fullscreen mode. At the top-left you’ll find a button to start recording.
Do you find this article useful?
Related tutorials.

How to Use the Presenter View in Google Slides
Google Slides, like PowerPoint, has different presentation modes that can come in handy when you’re presenting and you want your slideshow to look smooth. Whether you’re looking for slides only, speaker notes or the Q&A feature, in this new Google Slides tutorial, you’ll learn about these and their respective settings. Ready? Then let’s explore the presenter view!

How to Download Google Slides Templates
When preparing a presentation, many people start panicking because they realize how much time it will take to edit each and every slide. Creating them from scratch, filling them in, looking for pictures, moving the elements...How stressful! But there is a solution that saves you a lot of time. We're sure that you've browsed the internet for templates, or basically, pre-established designs and elements, that can be downloaded for free and can be edited to your liking. Are we right? Then, we have some good news for you!

Discover our collection of printable templates
With the advance of technology, printing has become something that is no longer a necessity. Smartphones have made the paper format less and less frequent, but there are still certain cases in which having physical resources is much more convenient. Whether it's for taking notes, handing out assignments, making worksheets or handing out business cards or invitations, it's necessary to print your customized designs.From now on, in every Slidesgo printable presentation that you download, you will find the instructions for printing on the third slide. Depending on the style, colors or format of each presentation, we will tell you if you can...

How to Add Superscript and Subscript in Google Slides
Let’s take the most famous formula: E=mc^2, Einstein’s relativity equation. It wouldn’t be the same if it was E=mc2, right? Okay, yes, some people write it like that because it’s very famous and it won’t be misunderstood. But technically… It can! This is where the sophistication of superscript or subscript enters the room! Do you know how to write them in equations, copyright brands or even footnotes in your presentations? Let’s figure out how.
PowerPoint: How to Launch a Presentation Automatically as a Slide Show

What is a PowerPoint Show?
By default, PowerPoint saves your slide presentation as a PowerPoint presentation file with the .pptx file extension which, when double-clicked, launches PowerPoint. The presentation opens in whatever view was open when you saved it, such as the Normal view or Slide Sorter view. If you want your slide show to immediately launch in the Slide Show view, however, you need to save your file as a PowerPoint Show. In this article, find out how to create a PowerPoint slide show file and learn 2 bonus tips .
To Save a PowerPoint Presentation as a PowerPoint Show:
- Choose the File tab.
- Select Save As .
- Pick the Save as type as PowerPoint Show .
- Type a name for your slide show in the File name text box (you can use the same name and location as your .pptx/presentation file) and click Save . Your PowerPoint slide show file is saved with a .ppsx extension.
Now, the next time you or anyone else opens your presentation from outside of PowerPoint, your slide show immediately launches in Slide Show view. When you navigate past the last slide, the file automatically closes. To open the file for editing, launch PowerPoint first and open it as you would a standard presentation. If you have access to the original presentation, you may prefer to open the .pptx file to edit and save it again as a slide show file. Most importantly, make sure to manage your files, so you are working with the most current version.
PowerPoint Presentation Tips
BONUS TIP: When I save my presentations as a PowerPoint Show, I save the file to my desktop for easy access during speaking and training engagements. If needed, I can also quickly close and re-open the file without launching PowerPoint and without showing everyone all of my slides. Working with a PowerPoint Show also saves a number of steps because it automatically launches with a simple double-click of the mouse.
To move to a specific slide in a presentation while in the slide show view (as either a presentation or show format), just type the slide number and press [Enter] . To make these moves easier, print out a handout of your presentation, which includes slide numbers of each slide for quick navigation. Or, create a simple manual cheat sheet to reference when you want to jump to different slides.
BONUS TIP #2: In addition to saving PowerPoint shows to my desktop, I also add a generic slide to the beginning. For instance, a slide with your organization logo or simply a black slide. Although this may not apply to your presentations, I often navigate in and out of my slide show as I am also demonstrating software features and facilitating discussions within my training classes and conference sessions. With a generic or simple slide at the start, I can launch the slide show with a neutral, blank slide and then use the keyboard shortcut to type the slide number and press [Enter] to move to a specific slide within the presentation.
Were these PowerPoint tips helpful? Grab your handout of other quick and easy PowerPoint shortcuts and discover more PowerPoint techniques here .
© Dawn Bjork, MCT, MOSM, CSP®, The Software Pro® Microsoft Certified Trainer, Productivity Speaker, Certified Speaking Professional

Related Posts
SmartArt Graphics: One Picture is Worth More Than a Thousand Words in Microsoft Office March 13, 2022
Presentations: Understanding the PowerPoint Slide Master June 7, 2022
What’s the Worst Feature in PowerPoint? Hint…The Answer is AutoFit! May 12, 2022
Join Our Tips Newsletter
Receive 477+ shortcuts & more!
How to Email a PowerPoint Slideshow: A Step-by-Step Guide
Emailing a PowerPoint slideshow is as simple as attaching a file to an email. But to do it correctly, you need to save your presentation in the right format, choose the right file size, and ensure that your recipient can view it. After completing these steps, your PowerPoint slideshow will be successfully sent and accessible to your intended audience.
After you complete the action, your recipient should receive an email with your PowerPoint slideshow attached. They will be able to download and view the presentation on their own device, provided they have the necessary software or app to open PowerPoint files.
Introduction
In our digital age, sharing information has never been easier. Whether you’re a student presenting a project, a professional sharing a business proposal, or someone just looking to spread ideas, PowerPoint slideshows are a go-to method. But what good is a stunning presentation if you can’t get it in front of your audience? Emailing your PowerPoint slideshow is a quick and efficient way to do just that. This simple action is relevant to almost everyone in the digital workspace. It saves time, resources, and allows for instant sharing of information.
Emailing a PowerPoint slideshow seems straightforward, right? Well, it is, but there are a few tips and tricks that can ensure your presentation arrives just as impressively as it leaves your outbox. It’s crucial to know the ropes to avoid any hiccups, such as large file sizes causing your email to bounce back, or the recipient not being able to open the file. Let’s dive into the know-how of emailing a PowerPoint slideshow, ensuring your hard work gets seen and appreciated.
Step by Step Tutorial: Emailing a PowerPoint Slideshow
Before jumping into the steps, understand that following them will help you send a PowerPoint slideshow via email. This process is handy for sharing presentations with colleagues, friends, or anyone who needs to view your slides.
Step 1: Save Your PowerPoint Slideshow
Save your PowerPoint presentation in a format that’s suitable for email.
When saving your PowerPoint presentation, choose a format that maintains the quality of your slides while keeping the file size manageable. The standard .ppt or .pptx formats work well, but if you’re concerned about compatibility, a PDF format is a universal option.
Step 2: Compress Your Presentation
Compress your PowerPoint file if it’s too large to email.
Large files can be troublesome to send via email. If your presentation is too large, consider compressing it to reduce the size. PowerPoint has built-in tools that can help you compress images and media within your slides to make the file smaller.
Step 3: Open Your Email Client
Open your preferred email client to compose a new message.
Whether you use Gmail, Outlook, or any other email service, start by opening your email client and clicking the option to compose a new email. This will be the vehicle to deliver your PowerPoint slideshow to your recipient.
Step 4: Attach Your PowerPoint Slideshow
Attach your saved PowerPoint presentation to your email.
Look for the ‘attach file’ icon (usually represented by a paperclip) in your email client. Click on it and navigate to the location where your PowerPoint presentation is saved. Select the file and attach it to your email.
Step 5: Compose Your Email
Write a brief message to accompany your PowerPoint slideshow.
Don’t just send an email with an attachment and no context. Write a short message explaining what the presentation is and why you’re sending it. This will provide your recipient with the necessary information and entice them to open your slideshow.
Additional Information
When it’s time to share your PowerPoint slideshow, there are a few additional things to consider. First, think about the accessibility of your presentation. Will your recipient need any special software to view it? It’s always a good idea to ask ahead of time or provide options, such as saving your slideshow as a PDF, which can be opened on almost any device.
Another tip is to use file-sharing services for particularly large presentations. Platforms like Google Drive, Dropbox, or WeTransfer allow you to upload your PowerPoint slideshow to the cloud, and then send a link via email. This way, you avoid the file size limits of email services and ensure your recipient can download the presentation at their leisure.
Also, be mindful of the security of your content. If your PowerPoint slideshow contains sensitive information, consider password-protecting it before sending. You can also use encrypted email services for added security.
Remember, the goal is to make sure your PowerPoint slideshow is received and can be viewed with ease. The last thing you want is for your hard work to go unseen due to a technical hiccup.
- Save your presentation in a suitable format.
- Compress your presentation if it’s too large.
- Open your email client and compose a new message.
- Attach your PowerPoint slideshow to the email.
- Write a message to accompany your presentation and hit send.
Frequently Asked Questions
Can i email a powerpoint slideshow from my phone.
Yes, you can email a PowerPoint slideshow from your phone using your mobile email client. Just ensure that your presentation is saved on your phone or accessible through a cloud service.
How can I make my PowerPoint file smaller to email?
You can compress images within PowerPoint or use a file compression tool. Also, saving your presentation in PDF format can sometimes reduce the file size.
What’s the maximum file size I can email?
This depends on your email provider. For example, Gmail has a limit of 25MB for attachments. If your presentation is larger, you’ll need to use a file-sharing service.
Can I password-protect my PowerPoint slideshow before emailing it?
Yes, PowerPoint allows you to add a password to your presentation. This can be done in the ‘File’ menu under ‘Info’ and then ‘Protect Presentation.’
What if my recipient doesn’t have PowerPoint?
If your recipient doesn’t have PowerPoint, consider saving your presentation as a PDF. Alternatively, they can view it using free software like PowerPoint Viewer or Google Slides.
Emailing a PowerPoint slideshow is a crucial skill in the modern world of digital communication. It’s a simple yet effective way to share your ideas, projects, or proposals with anyone, anywhere. While there are some hurdles like file size limits and software compatibility, a little preparation and foresight can overcome these challenges.
Remember to save your presentation in an accessible format, keep the file size manageable, and always double-check with your recipient for any specific requirements they might have. With these tips and tricks up your sleeve, you’re ready to share your PowerPoint masterpiece with confidence and ease. So go ahead, hit that send button, and let your slideshow make the impact it deserves!

Matthew Burleigh has been writing tech tutorials since 2008. His writing has appeared on dozens of different websites and been read over 50 million times.
After receiving his Bachelor’s and Master’s degrees in Computer Science he spent several years working in IT management for small businesses. However, he now works full time writing content online and creating websites.
His main writing topics include iPhones, Microsoft Office, Google Apps, Android, and Photoshop, but he has also written about many other tech topics as well.
Read his full bio here.
Share this:
Join our free newsletter.
Featured guides and deals
You may opt out at any time. Read our Privacy Policy
Related posts:
- How to Save Powerpoint as PDF with Notes
- How to Compress Audio and Video in Powerpoint 2010
- How to Loop a Slideshow on Powerpoint 2013
- Can I Convert My Powerpoint to Google Slides?
- How to Convert PowerPoint Presentations to HTML: A Step-by-Step Guide
- Can You Save a Powerpoint as a Video in Powerpoint 2013?
- How to Make a Powerpoint Slide Vertical in Powerpoint 2013
- How to Set Time for Slides in Powerpoint
- How to Change Hyperlink Color in Powerpoint 2010 (An Easy 5 Step Guide)
- (7 Reasons) iMessage Sent as Text Message on iPhone
- How to Make a Powerpoint Into a Video
- How to Hide Background Graphics in Powerpoint 2013
- How to Copy a PowerPoint to a New PowerPoint: A Step-by-Step Guide
- How to Insert Slides from Another Presentation in Powerpoint 2010
- How to Check Word Count on Powerpoint 2010
- How to Print an Outline of the Presentation in Powerpoint
- How to Make All Columns the Same Width in Excel 2013
- How to End Powerpoint on Last Slide in Powerpoint 2010
- How to Turn a Presentation into a Video in Powerpoint 2010
- How to Turn a Powerpoint Slideshow Into a PDF
Critical PowerPoint Shortcuts – Claim Your FREE Training Module and Get Your Time Back!
How to Present a PowerPoint Slideshow (w/ Shortcuts)
- PowerPoint Tutorials
- Shortcuts & Hacks
- May 11, 2019
There are a variety of ways to start a PowerPoint presention, depending on:
- Where you start your presentation (from beginning or from current)
- Which PowerPoint view you prefer to present in (Slide Show view or Presenter view)
- How comfortable you are with keyboard shortcuts
Why would Microsoft include so many ways to present a presentation? My guess is that everyone learns PowerPoint differently, and has personal presentation styles. The more options you have, the easier your life will be as there will always be a way to start your presentation the way you want to (or jump back into it when you need to).
See all the options below and find the method that works best for you and let the slide show begin !
NOTE: If you are running two presentations side-by-side, each presentation needs to be started as it’s own slide show. To see how to set up two PowerPoint presentations to run side-by-side like this before you start your slide show, read my guide here .
Table of Contents
Start slide show from beginning.

To start a slideshow from the beginning of your presentation using the ribbon, simply.
- Navigate to the Slide Show tab
- Select From Beginning
Selecting From Beginning starts your presentation from the very first non-hidden slide in your presentation, regardless of which slide you are currently inside of your deck.

You can also start your slide from the beginning of your presentation by hitting the Slideshow From Beginning keyboard shortcut, F5 .
Regardless of which method you use, this is the classic way to start your presentation in full screen from your first title slide (regardless of where you are in your slide deck).
Let the slide show begin!
NOTE: To expand your knowledge and learn how to use PowerPoint’s FREE and HIDDEN built-in laser pointer to point things out during your presentation, read my guide here .
Take your PPT skills to the next level
Start slide show from current.

To begin your slide show from the slide you are currently on using the ribbon, simply
- Navigate to the Slide Show tab
- Select From Current Slide
Selecting From Current Slide starts your slide show from whatever slide you are currently on, even if the slide is hidden.

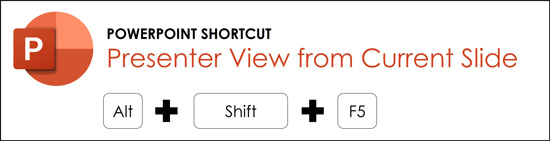
You can also start your slide from the current slide you are on by hitting the Shift+F5 keyboard shortcut.
Because it’s often easiest to catch errors when building your slides in this full screen mode, I highly recommend learning the Shift+F5 shortcut and using it frequently as you build your slides to spot them for errors.
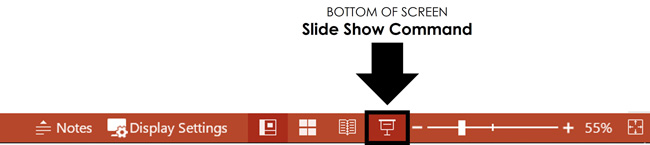
If you don’t want to bother learning the From Current Slide shortcut, you can also start your slideshow by clicking the Slide Show icon at the bottom of your screen.
This is a fantastic way to spot check your slides as you are building them. On top of that, it’s a fast and uncomplicated way to re-start your presentation from where you left off after demoing something on screen.
Start a mini-slide show in PowerPoint
You can also use the following hidden PowerPoint shortcut to run a mini slide show over the top of your current deck.

To run a mini slide show, simply:
- Hold down the Alt key on your keyboard
- With your mouse, click the Slide Show icon
Doing so starts a small slide show of your presentation that you can see below, from the current slide you are on.

Presenter View
The Presenter View is an alternate way to run your presentation in PowerPoint. In this view, your slides are projected on screen, and the details of your presentation are displayed on your computer as pictured below.

The presenter view includes your next (non-hidden) slides that is coming up, your current slide projected on screen, how long you’ve been talking and your speaker notes.

To launch the Presenter View from the beginning of your presentation using your Ribbon, simply:
- Navigate to the Slide Show tab
- Hold down the Alt key on your keyboard
- Click From Beginning
Holding down the Alt key and clicking From Beginning , the Presenter View will launch from the very first (non-hidden) slide in your presentation.
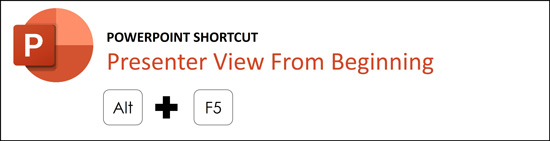
You can also launch the presenter view from the beginning of your presentation at any time by clicking Alt + F5 on your keyboard.
Start Presenter View in PowerPoint From Current Slide

Did you know that you can access different views in PowerPoint by adding keys as you click commands in the PowerPoint ribbon?
To start the Presenter view from your current slide using your Ribbon, simply:
- Hold down the Alt key on your keyboard
- Click From Current Slide
Holding the Alt key and clicking From Current Slide launches the Presenter View from your current slide. So, this is another way you can quickly practice your presentation, see your speaker notes and see what’s coming up next.
You can also launch the Presenter View from the beginning of your presentation at any time by hitting Alt+F5 on your keyboard.
Showing and Hiding Presenter View
Regardless of which view you start your PowerPoint slide show; you can switch between the two different slide show views without exiting presentation.

To switch between the two slideshow views (while giving your presentation), simply:
- Right-click your slide in whichever presentation view you are currently in
- Select either Show Presenter View or Hide Presenter View
When would you use a feature like this during a presentation? One example is if you want to view your notes without leaving the slide show mode.
NOTE: The letter r for both Show Presenter View and Hide Presenter View is underlined. This means that it is a keyboard shortcut. So, if you want to quickly flip between these two presentation views, you can simply right-click your slide and hit the letter r on your keyboard. Doing so automatically switches the view you are in.
Controlling how your presentation runs
Another way to control how your presentation runs (including the default laser pointer and pen color), is the Set Up Slide Show dialog box.

To open the Set Up Slide Show dialog box, simply:
- Select the Set Up Slide Show command
Doing so, opens all your PowerPoint slide show settings and options as pictured below.
Inside the slide show settings dialog box, you can select:
- How your presentation runs (full screen, window or in kiosk mode).
- Your default pen and laser pointer color options ( see our laser pointer article here ).
- Which slide you want start from, or which slides you want to show. You can also setup a custom show here.
- How your slides progress (manually or using slide timings).
- Which of your computer monitors (or screens) your slide show runs on.
The Set Up Slide Show dialog box is also the secret to running multiple presentations at the same time in PowerPoint. To expand your knowledge and learn how to set this up, read our guide here .
Setup Slide Show SECRET Shortcut

To use the SECRET shortcut to open the Set Up Slide Show dialog box, simply:
- Hold down the Shift key on your keyboard
- With your mouse, click the Reading View icon at the bottom of your screen
This is useful when you need to quickly cycle through lots of PowerPoint presentations and change how those presentations run. Instead of wasting time clicking through the Ribbon, simply hold the Shift key and click the Reading View icon. This is also a friendly conversation starter with a fellow PowerPoint enthusiast at Happy Hour.
NOTE: The color of your Reading View icon might be different than in the picture above, as it is dependent on the Office Theme you selected for PowerPoint.
How to exit a PowerPoint presentation early?

Regardless of how you start your full screen presentation, you can end your presentation at any time by hitting the Esc key on your keyboard.
Hitting Esc immediately takes you out of the PowerPoint presentation mode and back to the normal editing view of your slides, on whatever slide you were last presenting.
Here is how you can use a combination of all the different keyboard shortcuts to spot check and practice your presentation in full screen before you finalize your presentation.
- Hit F5 on your keyboard to start your presentation in full screen from the very first slide in your presentation. You can then use your arrow keys to advance, spot checking your slides for errors.
- When you find an error, simply hit Esc key to return to the normal PowerPoint editing view to fix your slide.
- When you are done, hit Shift + F5 to return the full screen presentation mode from the slide you just updated. You can then continue spot checking your presentation (without having to start over from the beginning).
In this way you can quickly work your way through your slides and practice your presentation, fixing and adjusting your content as you go.
Understanding how to run your presentations is CRITICAL to the success of your presentation. Not only in presenting them live, but also in knowing how to spot check your slides as you build them.
I personally find it easiest to spot check your slides and quickly fix errors by running your presentation in slide show mode (or full screen). The last place you want to discover an error is during your presentation.
Using the commands and shortcuts above, you can quickly start, exit and step back into your slide show. Once you have these commands and features down, you will also look like a whiz during your presentations.
If you enjoyed the depth of this article, you will love our other PowerPoint training courses and free resources. To learn more, visit us here .
🔒 Unlock the PowerPoint Shortcuts Trusted by Industry Leaders KKR, American Express, HSBC, and More!
Join over 114,880 professionals from diverse fields including consulting, investment banking, advertising, marketing, sales, and business development who have supercharged their PowerPoint game with our proven methods.
✅ Customize compelling presentations effortlessly.
✅ Master time-saving techniques for faster deck creation.
✅ Boost your career prospects with top-notch PowerPoint skills.
Get FREE access to the Critical PowerPoint Shortcuts module of our premium training course by entering your name and email below.
DISCLAIMER: PC Users Only!
We respect your privacy and will keep your info safe and confidential.
Related Articles
About the author.

Popular Tutorials
- How to Strikethrough Text (l̶i̶k̶e̶ ̶t̶h̶i̶s̶) in Word, Excel & PowerPoint
- How to Make Animated Fireworks in PowerPoint (Step-by-Step)
- Strikethrough Shortcut (l̶i̶k̶e̶ ̶t̶h̶i̶s̶) for Word, Excel & PowerPoint
- How to Create a Flash Card Memory Game in PowerPoint (Like Jeopardy)
- Keyboard Shortcuts Not Working: Solved
PowerPoint Tutorial Categories
- Strategies & Opinions
- Presentation Design
- Pictures, Icons, Videos, Etc.
- New Features
- Miscellaneous
- Charts & Data Viz
We help busy professionals save hours and gain peace of mind, with corporate workshops, self-paced courses and tutorials for PowerPoint and Word.
Work With Us
- Corporate Training
- Presentation & Template Design
- Courses & Downloads
- PowerPoint Articles
- Word Articles
- Productivity Resources
Find a Tutorial
- Free Training
- For Businesses
We help busy office workers save hours and gain peace of mind, with tips, training and tutorials for Microsoft PowerPoint and Word.
Master Critical PowerPoint Shortcuts – Secure Your FREE Training Module and Save Valuable Time!
⌛ Master time-saving expert techniques.
🔥 Create powerful presentations.
🚀 Propel your career to new heights.
We value your privacy – we keep your info safe.
Discover PowerPoint Hacks Loved by Industry Giants - KKR, AmEx, HSBC!
Over 114,880 professionals in finance, marketing and sales have revolutionized their PPT skills with our proven methods.
Gain FREE access to a full module of our premium PowerPoint training program – Get started today!
We hate spam too and promise to keep your information safe.
You are currently viewing a placeholder content from Facebook . To access the actual content, click the button below. Please note that doing so will share data with third-party providers.
Stack Exchange Network
Stack Exchange network consists of 183 Q&A communities including Stack Overflow , the largest, most trusted online community for developers to learn, share their knowledge, and build their careers.
Q&A for work
Connect and share knowledge within a single location that is structured and easy to search.
Automatically open Powerpoint in presenter mode, on correct screens
We have a laptop that we only use to present an induction course which is just a powerpoint presentation.
We have a second screen hooked up and when the presentation opens up someone has to navigate to and hit the start presentation button, at that point and it opens in presenter view with the notes on the laptop and the presentation on the second screen.
What I'd like to be able to do is avoid that on element of interaction.
Is it possible to launch a power point directly into presentation mode with no additional user interaction?
- microsoft-powerpoint
3 Answers 3
Save the file in PowerPoint Show (*.ppsx) format . It will open automatically in presentation mode.
From Microsoft's site :
PowerPoint Show .ppsx A presentation that always opens in Slide Show view rather than in Normal view. Tip: To open this file format in Normal view so that you can edit the presentation, open PowerPoint. On the File menu, click Open, and then choose the file.
Note: If you need macros enabled save as a .ppsm. If you're in PowerPoint 2003 the older format you need is .pps.
- it opens the presentation on screen 2 correctly but you don't get the presenters view on screen 1. Can't see an option for configuring it... – Patrick Jul 7, 2017 at 14:59
- 1 Hmmm. Seems you're right, there's no way to force visibility of the Presenter View in .ppsx files. That's annoying, and weird. So, my next method would be to save as a .pptm (macro-enabled .pptx) and use VBA to launch the slideshow, which would bring up Presenter View. But irritatingly, PowerPoint doesn't allow you to execute macros on open - so we need another workaround. You could download an auto_open PowerPoint add-in to give this functionality, or you could use something like a macro-enabled Excel file to call the .pptx on open. Bit painful but it can be done. – Andi Mohr Jul 7, 2017 at 15:51
- Frustrating, so close and yet so far. I think I'll just leave an instruction on screen 'open powerpoint, click these two buttons' and be done with it. There is only so much you can automate away :) Thanks for you help. – Patrick Jul 10, 2017 at 8:38
I achieved this by the following
I Added a macro to the Powerpoint presentation
Then start the powerpoint presentation from the command line with
I used a 2003 presentation in 2016 - so the extension for presentations containing macros is ppt not pptm.
The remaining issue I have is that when I close the presentation it prompts to save - it does not do this if I load and run it using the GUI.
I think I'm a bit late, but this might be helpful to others.
The best way I could find to start in presenter mode is by pressing Alt F5 . It will start from the first slide, though. If you want to start from the current slide, you might need to use the sequence Alt S C . But it doesn't work if you press each individually, they have to be pressed at the same time. Also, this second metho does a weird error sound and I couldn't figure out why.
Anyway, if you are ok about starting on the first slide, Alt S will do just fine.
Source: https://support.office.com/en-ie/article/use-keyboard-shortcuts-to-deliver-powerpoint-presentations-1524ffce-bd2a-45f4-9a7f-f18b992b93a0
- (1) The question says “with no additional user interaction”. It sounds like you’re just offering a different form of user interaction. (2) Or rather, three different forms. What’s the relationship between Alt+F5 and Alt+S? – Scott - Слава Україні Jun 27, 2019 at 23:38
You must log in to answer this question.
Not the answer you're looking for browse other questions tagged microsoft-powerpoint ..
- The Overflow Blog
- Climbing the GenAI decision tree sponsored post
- Diverting more backdoor disasters
- Featured on Meta
- New Focus Styles & Updated Styling for Button Groups
- Upcoming initiatives on Stack Overflow and across the Stack Exchange network
- Google Cloud will be Sponsoring Super User SE
Hot Network Questions
- Can falsehood be measured? If so, would it be continuous or discrete?
- What can we do when flights are cancelled and we're offered replacements from another airport?
- 余 with a double meaning? What is the joke here?
- Consequences of imposing conditions on the restricted Yoneda embedding of a functor
- Did Goethe say this quote praising the Prophet Muhammed?
- What is SpaceX doing differently with their Falcon 9 so that it doesn't cost as much as the Space Shuttle?
- Why is the frequency and voltage of my Colpitts oscillator lower on breadboard than LTSpice?
- Clearing certain lines in the Tabular environment
- Difference between 当て and はず
- Why does a goddess put a low limit on the number of priests?
- Are Shibolim rice cakes kosher for Pesach without special hechsher?
- Is it a common misunderstanding to claim that Kant considered time and space to be illusion?
- How to equally split college fund between 2 children going to college 5 years apart?
- How can I make this code more DRY
- FizzFizzFizzBuzz!
- "Pure Imaginary" or "Purely Imaginary"?
- Factoring through projective modules is an equivalence relation
- People who frequently travel in planes are called…?
- Why isn't there financial safety if I am arrested illegally?
- I left scented candles in a polypropylene container. How do I remove the smell?
- How can we infallibly know that the Catholic Church is infallible?
- What was the name of this story referring to 17-year cicadas?
- Automatic line break in align environment
- Dealing with stiff differential equations in NDSolve

How to make a slide show
Learn how to make a slide show with photos, videos, music, and custom settings using a slide show maker.
Learn how to make a slide show with PowerPoint
Discover how to make a slide show with photos, videos, music, and custom settings using a slide show app like PowerPoint.
What is a slide show maker?
To create a slide show, you’ll want to use a slide show maker—or slide show app—which is a software program or online service that enables you create digital slide shows with text, photos, videos, music, and other special effects. The full range of slide show features and functionality varies from program to program.
Once you’ve created a slide show, it can be published on the internet or shared with others as a video file. Additionally, you can use slide shows to create dynamic, interactive content on websites.
Slide show software can be used for a variety of purposes, such as creating presentations for work, school, and even your personal life. For instance, slide shows are often used to:

Display photos during an event
Slide shows are a great way to share photos and videos with guests at a wedding, birthday, or other special event.
Create a digital photo album
Some slide shows are created for personal reasons, such as sharing important memories with family or friends.

Highlight products or services
Businesses can use slide shows to showcase their products, promote special offers and sales, or pitch their services to potential clients.
Enhance teaching, training, and public speaking
Slide shows can also provide helpful visuals in educational settings, classroom presentations, and public speaking forums.
What you need to make a slide show
When it comes to creating a slide show, there are a few things you'll need to get started. First and foremost, you'll need a device equipped with presentation software or access to an online slide show app. Secondly, you’ll need a way to display your slide show, which usually means connecting your device to a projector or big screen TV. Beyond that, you’ll need some visual aids and other media to bring your slide show to life.
Explore each of these slide show requirements in more detail:
Devices and equipment —To create a slide show, you’ll use a computer or other device—such as a tablet or mobile phone—with PowerPoint or a similar program installed. You will also need a way to project the slides onto a screen or wall. This can be done with a projector, but if you don't have one available, you can use your TV or computer monitor. Simply connect your device to the TV or monitor using an HDMI cable and select the correct input. Your slides will now be projected onto the screen.
Media —Of course, creating a slide show requires media that adds visual and even audio elements to your presentation. This can be anything from photos and videos to music and text. You can use search engines to find copyright-free media to use in your slide show.
Another option is to purchase royalty-free stock footage, images, and audio files from online media libraries. This could be a bit more expensive, but it guarantees that you have the legal right to use the media in your presentation.
Finally, you can also use your own videos, images, and even music. While this can be a time-consuming process, it does allow you to create custom content specifically for your slide show.
Slide show creator —To bring your slide show together, you’ll need a slide show creator. The slide show software you choose will depend on your presentation requirements and preferences. There are many slide show makers on the market, with Microsoft PowerPoint being one of the most popular and widely used programs globally.
How to choose a slide show maker
When choosing slide show software, it's important to consider the features and specifications that are most important to you. Some of the questions you might ask when choosing a slide show maker include:
- How easy is the software to use?
- Is the software Mac or PC compatible?
- Can I access and edit my slide show on the cloud?
- What kind of slide shows can be created with the software?
- How many photos and/or videos can be included in a slide show?
- Can text and other elements be added to slide shows?
- Are transitions and effects available for slide shows?
- Is music accompaniment an option?
- What are the options for saving and sharing your slide show?
Building a slide show doesn't have to be difficult. With the right software, you can create an engaging presentation in no time.
Six steps for creating a slide show

1. Plan your slide show
Before getting too deep into your slide show project, it’s a good idea to select and save the photos and videos you want to use. This helps you create a slide show more efficiently and purposefully, ensuring a better outcome.
4. Import media
Start adding photos, videos, and other desired media to your slides. You can upload these from your device or online media libraries. If you planned your slide show in advance, you should have all your media saved in one place.

2. Launch your slide show app
Once you’ve decided on a slide show maker, you’ll want to launch the app from whatever device you’ll be using to create your presentation.
5. Add text, music, and transitions
After you’ve arranged the visuals in your slide show, you can provide additional information and communicate sentiment using custom text, music, and timed slide transitions.

3. Choose your theme
Most slide show software offers a variety of pre-set themes, colors, and designs. You can choose one that best suits your slide show or create a custom theme using the program’s various tools and features.
6. Record, save, and share your slide show
Now you’re ready to record your slide show, which can include a voiceover or Cameo . Once your slide show is complete, you can save it as a video to your device or to the cloud, such as OneDrive . You can access your saved slide show at any time to display at events, use in meetings, share online, or send directly to other people.
How to make a slide show with photos
Adding photos to your slide show is a great way to enliven your presentation and make it more visually interesting. Here are a few different ways you can add photos to your slide show in PowerPoint.

Add photos from your device
Whether you’re using a computer, tablet, phone, or other device, you can use photos that are saved to your device to create your slide show. In PowerPoint, simply select “Insert” then “Pictures” from the program menu, then choose “This Device.” This will open your photo library and allow you to find the photos you want to use. Once you’ve selected the photos that you want to import, just click on the "Insert" button and they will be added to your slide show. If you’re using a pre-made theme, you can also right-click the image in the slide show and select “Change Picture.” Again, you will choose “This Device” to access your photo library. After inserting your photo, you can reposition it on your slide or resize it however you like.

Use stock photos
Another way to add photos in PowerPoint is to follow the same process you would when adding photos from your device, but when prompted to choose your photo source, select “From Stock Images” instead of “This Device.” This will display a library of photos that you can use in your slide show without worrying about copyright infringement. There are thousands of stock images available in most slide show maker programs. Once the library is open, you can explore existing photo categories or use keywords to search for photos that fit your needs.

Explore online photo sources
Online photos are images you can insert into a PowerPoint slide show directly from the internet, as opposed to using those you have saved on your device. This is a convenient option if you don't have photos already prepared for your slide show, or if you can’t find the right kind of photo in the stock image library. However, there are some potential risks associated with using online photos, namely that you must be careful to use royalty-free images so not to infringe on any copyrights. In PowerPoint, there is a filtering option to ensure your search results only show royalty-free photos. Inserting photos from online sources follows the same process as the previous two methods, but this time, you’ll select “From Online Sources.”
How to add videos, music, and text

How to add videos to PowerPoint slide shows
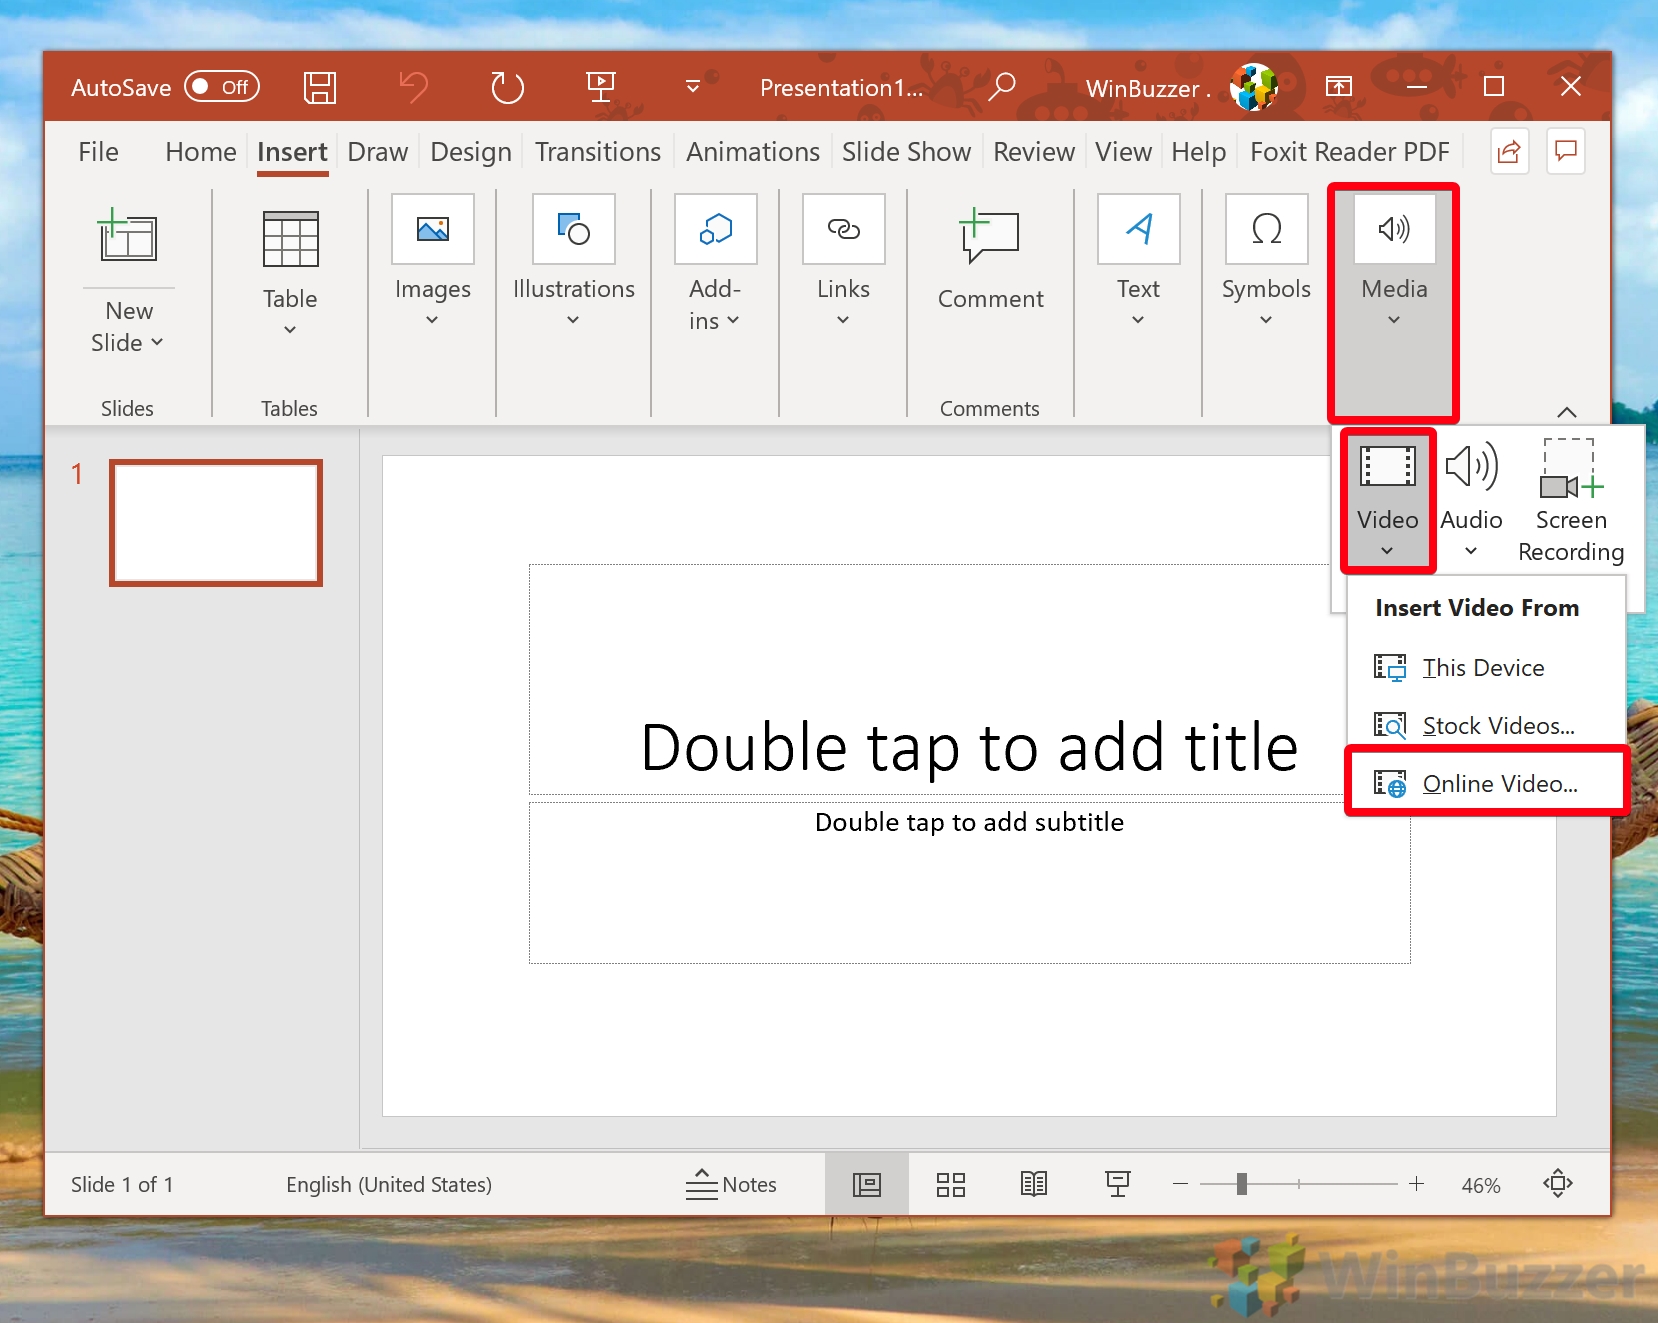
Adding videos to your slide show involves accessing videos from your device, a stock video library, or online video sources—just as you would when adding photos. In this case, however, you’ll navigate to the menu in PowerPoint and select “Insert,” followed by “Media,” then “Video.” Once your video appears on your slide, you can resize or reposition it to fit your presentation needs. You can also set your video to play automatically in the slide show by selecting “Playback” on the menu and choosing “Start Automatically.”

How to add music to PowerPoint slide shows
Much like adding videos, you can add music to individual slides in PowerPoint by navigating to “Insert” on the menu, then “Media,” and finally “Audio.” You can then import music from your device, or you can record your own audio directly in PowerPoint. However, if you want your audio to play across multiple slides in your presentation—for example, as background music for a slide show—you’ll have to take a couple of extra steps. Once you’ve imported your audio file, select “Playback” from the menu and choose the “Play in Background” option. Your music will now play across all slides. You can set one song to loop for the duration of the slide show, or you can add more songs to play continuously throughout the slide show.

How to add text to PowerPoint slide shows
Premade themes in PowerPoint make adding text slide shows easy. On slides that already have templated content, you can simply click on the text and begin editing. In addition to changing what the text says, you can resize, recolor, reposition, and add special effects to the text. Of course, you can also change the font—or style—of the text. Most of this can be done from the “Home” tab on the menu while certain effects, such as shadows, can be found on the “Shape Format” tab. If you’re designing your presentation slides from scratch, or want to create additional text, find “Insert” on the menu, then choose “Text Box” or “Word Art,” depending on your desired text effect.
Discover custom slide show settings
Add even more effects to your PowerPoint slide show with custom settings like timing, transitions, and looping.

Set slide show timing
Adding timing to your slide show is a great way to control the pacing and flow of your presentation. To add timing in PowerPoint, go to the "Transitions" tab on the menu and find the "Advance Slide" area. Make sure the box next to “After:” is checked, then input the amount of time you’d like each slide to appear on-screen. The slides will automatically advance, creating a movie-like effect that’s great for events and special occasions.

Create slide show transitions
Now that you’ve added automatic timing to your slide show, you can make it more visually appealing by creating slide transitions. Transitions are special effects that allow you to animate the way your slides change from one to the next, and there are a variety of different transitions in PowerPoint that you can choose from. You can add these transitions to your slide show from the "Transitions” tab. From there, you’ll select the transition you want to add. To preview the transition, simply click on it. You can click “Apply To All” to automatically add the same transition to every slide in your slide show, or you can manually add different transitions to different slides.

Loop your slide show
If you want your slide show to play continuously until you choose to turn it off, you can set your PowerPoint presentation to loop. This will ensure your slide show automatically starts over from the beginning once it reaches the end. To get started, navigate to the “Slide Show” tab on the menu and select “Set Up Slide Show.” When the settings window opens, check the box next to “Loop continuously until ‘ESC’” and then click “OK.” When you’re ready to turn your slide show off, simply press the Esc key on your keyboard.
Slide show template and theme tips
Search themes and templates online.
With numerous slide show themes and templates available, it’s easy to find one that fits your needs.
Customize your design
If you can’t find the perfect theme or template, you can change things like colors and fonts.
Build a custom template
If you want a blueprint to use with future slide shows, you can create your own template.
Add new slides
If you need more slides, you can choose a specific layout and your theme will be carried over.
Edit your slide layouts
Even when using a theme or template, you can rearrange slide content to highlight key information.
Add photos, videos, and text
Themes and templates make adding media easy since most slides have designated content areas.
Change or resize your fonts
If your theme’s font is too small, you can resize it or choose a new font to make it easy to read.
Reorder your slide show
Some themes and templates have a predefined sequence, but you can reorder slides to meet your needs.
Create your own slide show
Slide shows are a great way to engage your audience and present important information. Whether you're creating a slide show for personal or professional reasons, slide shows are an essential tool for anyone who wants to share information in a visually appealing manner.
Discover more ways to improve your slide show
What options are available to create a slide show?
Slide show makers come in many forms. Some slide show software can only be used on specific devices, while other slide show creators can be accessed via the cloud from any device at any time.
It’s a good idea to evaluate a variety of slide show makers to ensure that you find one with all the features you need. For instance, some slide show software skews toward business use cases and others toward personal.
Microsoft PowerPoint is a popular slide show app that allows you to save presentations to your device or the cloud, and is widely used for personal, professional, and educational purposes.
Frequently asked questions
What are slide show apps and software.
Slide show apps and software are used to create and share slide shows. Slide show programs are typically used to communicate information, diagrams, plans, or processes. They can also be used to display photos and videos at events or retail stores. Usually, slide show makers have a range of built-in features and layouts, making them easy to use, regardless of technical skill levels.
What should a slide show include?
An effective slide show should be engaging, visually appealing, and informative. To achieve this, you'll want to make sure to include the following elements:
- A catchy headline or title. This will help grab your audience's attention and set the tone for the rest of your presentation.
- A variety of images. Don't just rely on text—incorporate photos, illustrations, or even video to maximize viewership.
- Bullet points or short blocks of text. Keep your slide content concise and easy to digest; too much information will only overwhelm your viewers.
How do I make a picture slide show?
There are a few different ways to make picture slide shows. You can use online programs, or you can create a slide show directly on your computer, phone, tablet, or other device using slide show software. Some programs, such as Microsoft PowerPoint, can be accessed on your personal device and on the cloud.
How long should a slide show be?
The length of your slide show will depend on several factors, such as the topic of your presentation, the audience you're presenting to, and the amount of time you have. That said, slide shows are generally between five and ten minutes long.
How can I make a slide show better?
Here are a few tips to make your slide show more engaging:
- Add images, videos, and music to bring your slide show to life.
- Use a font that is easy to read from a distance.
- Try not to use too many words on each slide.
- Use custom transitions and timing to make your slide show flow.
- Ensure a cohesive slide show by using a theme or template.
- For live presentations, practice with the Speaker Coach feature .
Follow Microsoft 365
Contribute to the Microsoft 365 and Office forum! Click here to learn more 💡
April 9, 2024
Contribute to the Microsoft 365 and Office forum!
Click here to learn more 💡
- Search the community and support articles
- Microsoft 365 and Office
- Search Community member
Ask a new question
Share PowerPoint link in email that opens in Presentation Mode
I need to share a PowerPoint link via organizational email and want the PP to open in presentation mode rather than edit mode. I followed instructions on this site to save as .ppsx file, but the presentation continues to open in edit mode.
Report abuse
Replies (1) .
- Microsoft Agent |
Dear Bonnie_111,
Good day! Thank you for posting to Microsoft Community. We are happy to help you.
As per your description, please don’t worry, we can work together to narrow down and resolve the situation.
It seems that you tried to share a PowerPoint presentation as a slide show via save as .ppsx file, but the presentation continues to open in edit mode.
Based on my test result, I can confirm it seems that I also get the same result as like you described above.
With the share links, it seems cannot create a link to a PPSX which will directly open the presentation in slide show mode. Getting a link and creates a link which opens the the presentation in normal mode by default. And it forces the user into edit mode even if it is PPSX. Here is my test screenshot for your reference:

Share link of created PPSX file format :

However, I created PPSX work in desktop client app (not a share link)
Since I also got the same behaviour and regarding to your concern, I request you, please send/provided feedback to related PowerPoint development team via PowerPoint app (for your reference: How do I give feedback on Microsoft Office? ) or via Microsoft PowerPoint feedback portal, so that they can get notice about it, and we are sure it will speed up this process. Your advice is very important to us.
Your understanding and patience will be highly appreciated. I hope that you are keeping safe and well!
Waqas Muhammad
Was this reply helpful? Yes No
Sorry this didn't help.
Great! Thanks for your feedback.
How satisfied are you with this reply?
Thanks for your feedback, it helps us improve the site.
Thanks for your feedback.
Question Info
- For business
- Norsk Bokmål
- Ελληνικά
- Русский
- עברית
- العربية
- ไทย
- 한국어
- 中文(简体)
- 中文(繁體)
- 日本語
How to Present PowerPoint Slides in Microsoft Teams
Ready to elevate your virtual presentations in Microsoft Teams? Discover three distinct methods to deliver flawless PowerPoint presentations.
A successful PowerPoint presentation extends beyond just the content—its delivery is just as important, especially in a virtual space like Microsoft Teams.
In Microsoft Teams, you can choose to present your slide deck by sharing your entire screen, PowerPoint window, or using the Microsoft Teams' PowerPoint Live feature. Let's explore how you can use each of these three methods and discuss their pros and cons.
Method 1: Share Screen
Sharing your screen in Microsoft Teams is pretty easy and straightforward. It's best to minimize or close unnecessary tabs before joining the Microsoft Teams meeting to avoid exposing sensitive information. Once you're confident in your screen's content, follow the steps below:
- A red border appears around your desktop, indicating you're sharing your screen.
- Present your PowerPoint slideshow.
Sharing your screen is a straightforward method, especially when you want to present other documents besides your PowerPoint slideshow. However, the downside is that you may accidentally reveal sensitive information.
Method 2: Share PowerPoint Window
If you want only to present your PowerPoint slide deck, it's best to share just that window. Here's how:
- A red border will appear around your PowerPoint window, indicating you're sharing just that window.
- Launch your slides in slideshow mode and start presenting.
- Open the Microsoft Teams window and click Stop sharing when you're done presenting.
Sharing just your PowerPoint window prevents accidental display of sensitive desktop content. Even if you switch windows, viewers only see the PowerPoint presentation.
However, this method also has its limitations. One of the main limits is that you can't view your PowerPoint speaker notes without the audience seeing them as well. You also can't access Microsoft Teams features like the chat and reactions during your presentation.
Additionally, If your network connection has low bandwidth or slow upload speed , sharing your screen can result in a blurry and stuttering presentation for the audience. Thankfully, the PowerPoint Live feature provides the solution to these issues.
Method 3: Use PowerPoint Live
Presenting with the PowerPoint Live feature is easy and provides additional benefits. Your audience only sees the slides, while you get to see all the extra controls that come with the presenter view. When using the presenter view in your presentation, you have a few helpful tools at your disposal:
- You can easily adjust the font size of your slide notes to make them more readable.
- To navigate between slides, simply click on the corresponding thumbnail.
- You can use the laser pointer, pen, or highlighter tools to draw attention to specific areas of a slide.
- Use the Standout layout to place your camera feed on the slide without the background.
- Use the Cameo layout to insert yourself into the slide, provided you've set up Cameo to record customized camera feeds .
Here's how you can use PowerPoint Live to share your presentation:
- When it's your turn to present, click Share .
- When you're done presenting, click Stop sharing in the top toolbar.
The PowerPoint Live feature tackles the limitations of sharing your entire screen or PowerPoint window. It also comes with really cool features like co-presenting and allowing attendees to click on links in the presentation.
Your Audience's View When Using PowerPoint Live
In addition to the main slide view, your audience also has access to the slide navigation, grid, and more options controls (the three dots icon below the slides).
This means they can navigate the slides at their own pace and change specific slide settings to suit their preference without affecting your view and that of others. If you find this non-ideal for delivering an engaging presentation , you can disable the audience's navigation control. To do so, enable Private view in the top toolbar.
By default, each meeting attendee joins as a presenter. This means they can share their own content or control someone else's presentation. If that's not what you want, you can change each person's meeting roles in Microsoft Teams to prevent it.
Deliver a Seamless Presentation Experience in Microsoft Teams
Presenting your PowerPoint slides in Microsoft Teams might seem tricky at first, but once you get the hang of it, it's a piece of cake. Practice makes perfect. So before your next Teams presentation, familiarize yourself with your chosen method to ensure an effective delivery.
How to Go Into Presentation Mode in PowerPoint

Presenting your idea, content or report to an audience can be a daunting task. However, with the right preparation, practice and knowledge of PowerPoint, you can deliver a captivating presentation with ease. One of the most important aspects of presenting with PowerPoint is to know how to go into presentation mode. In this article, we will show you step-by-step how to access presentation mode and how to use it effectively.
Table of Contents
Preparing your PowerPoint Presentation for Presentation Mode
Before you can present your PowerPoint presentation, it is important to prepare your slides for presentation mode. Here are some important tips to follow:
- Make sure your presentation has a clear structure with a logical flow of ideas
- Use eye-catching and relevant visuals to support your points
- Practice your presentation and time yourself to ensure it is within the allotted time frame
- Make sure all hyperlinks and multimedia elements are working properly
- Ensure your text is legible and easily readable by audience members in the back of the room
Another important aspect to consider when preparing your PowerPoint presentation for presentation mode is to engage your audience. You can do this by asking questions, encouraging participation, and using humor where appropriate. Additionally, it is important to be confident and enthusiastic when presenting, as this will help to keep your audience engaged and interested in your presentation.
Understanding the Different Views in PowerPoint
PowerPoint offers different views to help you create and edit your presentation. These include the Normal view, Slide Sorter view, and the Slide Show view. When in Normal view, you can edit and create your presentation, while in the Slide Sorter view, you can rearrange and organize your slides. The Slide Show view is where you can present your PowerPoint presentation.
In addition to these three main views, PowerPoint also offers a Notes Page view and a Reading view. The Notes Page view allows you to add speaker notes to your slides, which can be helpful during a presentation. The Reading view is designed for reviewing your presentation, and it displays your slides in a full-screen format without any editing tools.
Another useful feature in PowerPoint is the ability to switch between views seamlessly. For example, you can switch from Normal view to Slide Sorter view to get an overview of your presentation, and then switch back to Normal view to make edits. This flexibility allows you to work more efficiently and effectively when creating your PowerPoint presentation.
How to Access Presentation Mode in PowerPoint
To access presentation mode in PowerPoint, simply click on the Slide Show tab and then click on the From Beginning or From Current Slide buttons, depending on where you want to start your presentation from. Alternatively, you can press F5 on your keyboard to start presentation mode.
It is important to note that before entering presentation mode, you should ensure that your presentation is fully prepared and that all necessary edits have been made. You can also preview your presentation in presentation mode by clicking on the Preview button, which will allow you to see how your slides will appear to your audience.
Navigation Tips for Effective Presentations
During your presentation, you may need to navigate between slides to emphasize your points or answer questions. Use the following navigation tips to effectively control your presentation:
- Use the arrow keys on your keyboard to move forward and backward between slides
- Press the Esc key to end your presentation
- Use the spacebar or Enter key to move to the next slide
- Press the B key to darken the screen
- Press the W key to white out the screen
Another useful navigation tip is to use the mouse to click on the slide you want to go to. This can be helpful if you need to quickly jump to a specific slide during your presentation.
It’s also important to practice your navigation before your presentation to ensure that you are comfortable with the controls. This can help you avoid any technical difficulties or awkward pauses during your presentation.
Using Presenter View to Enhance Your Presentation
If you have a second monitor or projector, you can enable Presenter View in PowerPoint to help you deliver a professional and engaging presentation. With Presenter View, you can see your slides, notes, and the next slide in your sequence, while the audience only sees the presentation. To enable Presenter View, go to the Slide Show tab and click on the Use Presenter View option.
Presenter View also allows you to zoom in and out of slides, highlight important points, and draw on your slides in real-time. This can be especially useful when presenting complex data or diagrams. Additionally, you can use Presenter View to keep track of time and stay on schedule by setting up a timer that will display on your screen. Overall, Presenter View is a powerful tool that can help you deliver a more polished and professional presentation.
Customizing Your Slide Show Settings
Customizing your slide show settings can greatly enhance the delivery of your presentation. Here are some ways to customize your slide show settings:
- Set up automatic timings for your slides to progress without manual intervention
- Choose to show or hide your pointer during the presentation
- Change the animation settings of your slides to make your points more engaging
Another way to customize your slide show settings is to add background music or sound effects to your presentation. This can help set the tone and create a more immersive experience for your audience. You can also adjust the resolution and aspect ratio of your slides to ensure they display properly on different devices and screens. Experimenting with different customization options can help you create a more polished and professional presentation.
Keyboard Shortcuts to Control Your Presentation
Keyboard shortcuts can be a real time-saver when presenting with PowerPoint. Here are some of the most useful keyboard shortcuts to control your presentation:
- Press B to make the screen go black
- Press W to make the screen white
- Press Ctrl+P to go to the previous slide
- Press Ctrl+N to go to the next slide
- Press Ctrl+S to stop the slide show
It’s important to note that not all keyboard shortcuts work on all versions of PowerPoint or on all operating systems. Be sure to check the keyboard shortcut options for your specific version of PowerPoint and operating system before your presentation to ensure that the shortcuts you plan to use will work.
Troubleshooting Common Issues with Presentation Mode
In some instances, you may encounter common issues when presenting in PowerPoint. Here are some of the most common issues with presentation mode in PowerPoint:
- Presentation is in a different resolution than the monitor
- Multimedia elements not playing or displaying properly
- Slides appearing blurry or pixelated
- Presenter view not displaying properly or at all
If you encounter any of these issues, there are a few troubleshooting steps you can take. First, try adjusting the resolution of your presentation to match the resolution of the monitor you are presenting on. If multimedia elements are not playing or displaying properly, make sure they are properly embedded in your presentation and that you have the necessary software or plugins installed. If your slides appear blurry or pixelated, try adjusting the image quality settings in PowerPoint. Finally, if presenter view is not displaying properly or at all, make sure your computer is properly connected to the display and that you have selected the correct display settings in PowerPoint.
Tips for Delivering a Captivating Presentation
Aside from knowing how to go into presentation mode and utilizing the various features of PowerPoint, there are other tips to help make your presentation captivate and engage the audience:
- Use stories or personal anecdotes to humanize and add interest to your presentation
- Maintain eye contact with your audience
- Use humor where appropriate
- Speak clearly and confidently
- Use body language effectively to emphasize your points
Another important tip for delivering a captivating presentation is to tailor your content to your audience. Consider their interests, knowledge level, and what they hope to gain from your presentation. By doing so, you can ensure that your presentation is relevant and valuable to your audience, which will help keep them engaged and interested throughout.
Recording and Sharing Your PowerPoint Presentation
If you want to share your presentation with a wider audience or review your presentation for performance improvement, you can record your presentation in PowerPoint. Simply go to the Slide Show tab and click on the Record Slide Show option. Once you have recorded your presentation, you can save it and share it with your audience.
By following the steps and tips outlined in this article, you will be well-equipped to go into presentation mode in PowerPoint and deliver an engaging, informative, and memorable presentation.
Another way to share your PowerPoint presentation is by uploading it to a cloud-based storage service, such as Google Drive or Dropbox. This allows you to easily share the presentation with others, without having to send large files via email. You can also control who has access to the presentation and make changes to it in real-time.
It’s important to keep in mind that when sharing your presentation, you should consider the file size and compatibility with different devices and software. To ensure that your presentation looks the same on different devices, you can save it as a PDF or use PowerPoint’s compatibility checker to identify any issues before sharing it.
By humans, for humans - Best rated articles:
Excel report templates: build better reports faster, top 9 power bi dashboard examples, excel waterfall charts: how to create one that doesn't suck, beyond ai - discover our handpicked bi resources.
Explore Zebra BI's expert-selected resources combining technology and insight for practical, in-depth BI strategies.

We’ve been experimenting with AI-generated content, and sometimes it gets carried away. Give us a feedback and help us learn and improve! 🤍
Note: This is an experimental AI-generated article. Your help is welcome. Share your feedback with us and help us improve.

How-To Geek
How to make a microsoft powerpoint presentation read-only.
You can set your PowerPoint presentation to "read-only" to discourage others from making edits to your content. Here's how.
If you want to discourage others from making edits to your Microsoft PowerPoint presentation or let them know the file you sent is the final version, you can do so by making it read-only. Here's how it's done.
While making your PowerPoint presentation read-only is a good deterrent from having others edit your content, it's easy to unlock a read-only presentation . It's by no means un-editable.
Open the presentation that you want to make read-only, then click the "File" tab.
Next, in the left-hand pane, select "Info."
You'll now see a "Protect Presentation" section, which lets you (to an extent) protect against any editing of your presentation. Click "Protect Presentation."
Once selected, a drop-down menu will appear with these four options:
- Always Open Read-Only: This asks the reader to opt-in to edit the presentation. This prevents accidental edits.
- Encrypt with Password: This password protects your presentation.
- Add a Digital Signature: This adds an invisible digital signature to your presentation.
- Mark as Final: This lets the reader know that this is the final version of the presentation.
All of these options are good for protecting the integrity of your Microsoft PowerPoint, but the two we'll need here to make the presentation read-only are (1) Always Open Read-Only and (2) Mark as Final.
Selecting either option will prevent the reader from editing the presentation--unless they opt-in to do so.
If you chose the Always Open Read-Only option, the reader will see this message when opening the presentation:
"To prevent accidental changes, the author has set this file to open as read-only."
If you chose the Mark as Final option, the reader will see this message:
"An author has marked this presentation as final to discourage editing."
In either case, your Microsoft PowerPoint presentation is now set to read-only. However, in both cases, all the reader has to do to edit the presentation is click the "Edit Anyway" button.
- All about AI
- Google Bard
- Inflection AI Pi Chatbot
- Anthropic Claude
- Generative AI
- AI Image Generation
- AI Regulation
- AI Research
- Large Language Models (LLM)
- Surface Pro
- Surface Laptop
- Surface Book
- Surface Duo
- Surface Neo
- Surface Studio
- Surface Hub
- Surface Pen
- Surface Headphones
- Surface Earbuds
- About WinBuzzer
- Follow Us: PUSH, Feeds, Social
- Write for Us
- Cookie Policy and Privacy Policy
- Terms of Service
How to Embed a YouTube Video in PowerPoint
We show you how to embed a YouTube video in PowerPoint so that you can spice up your presentations and impress colleagues.

Table of Contents:
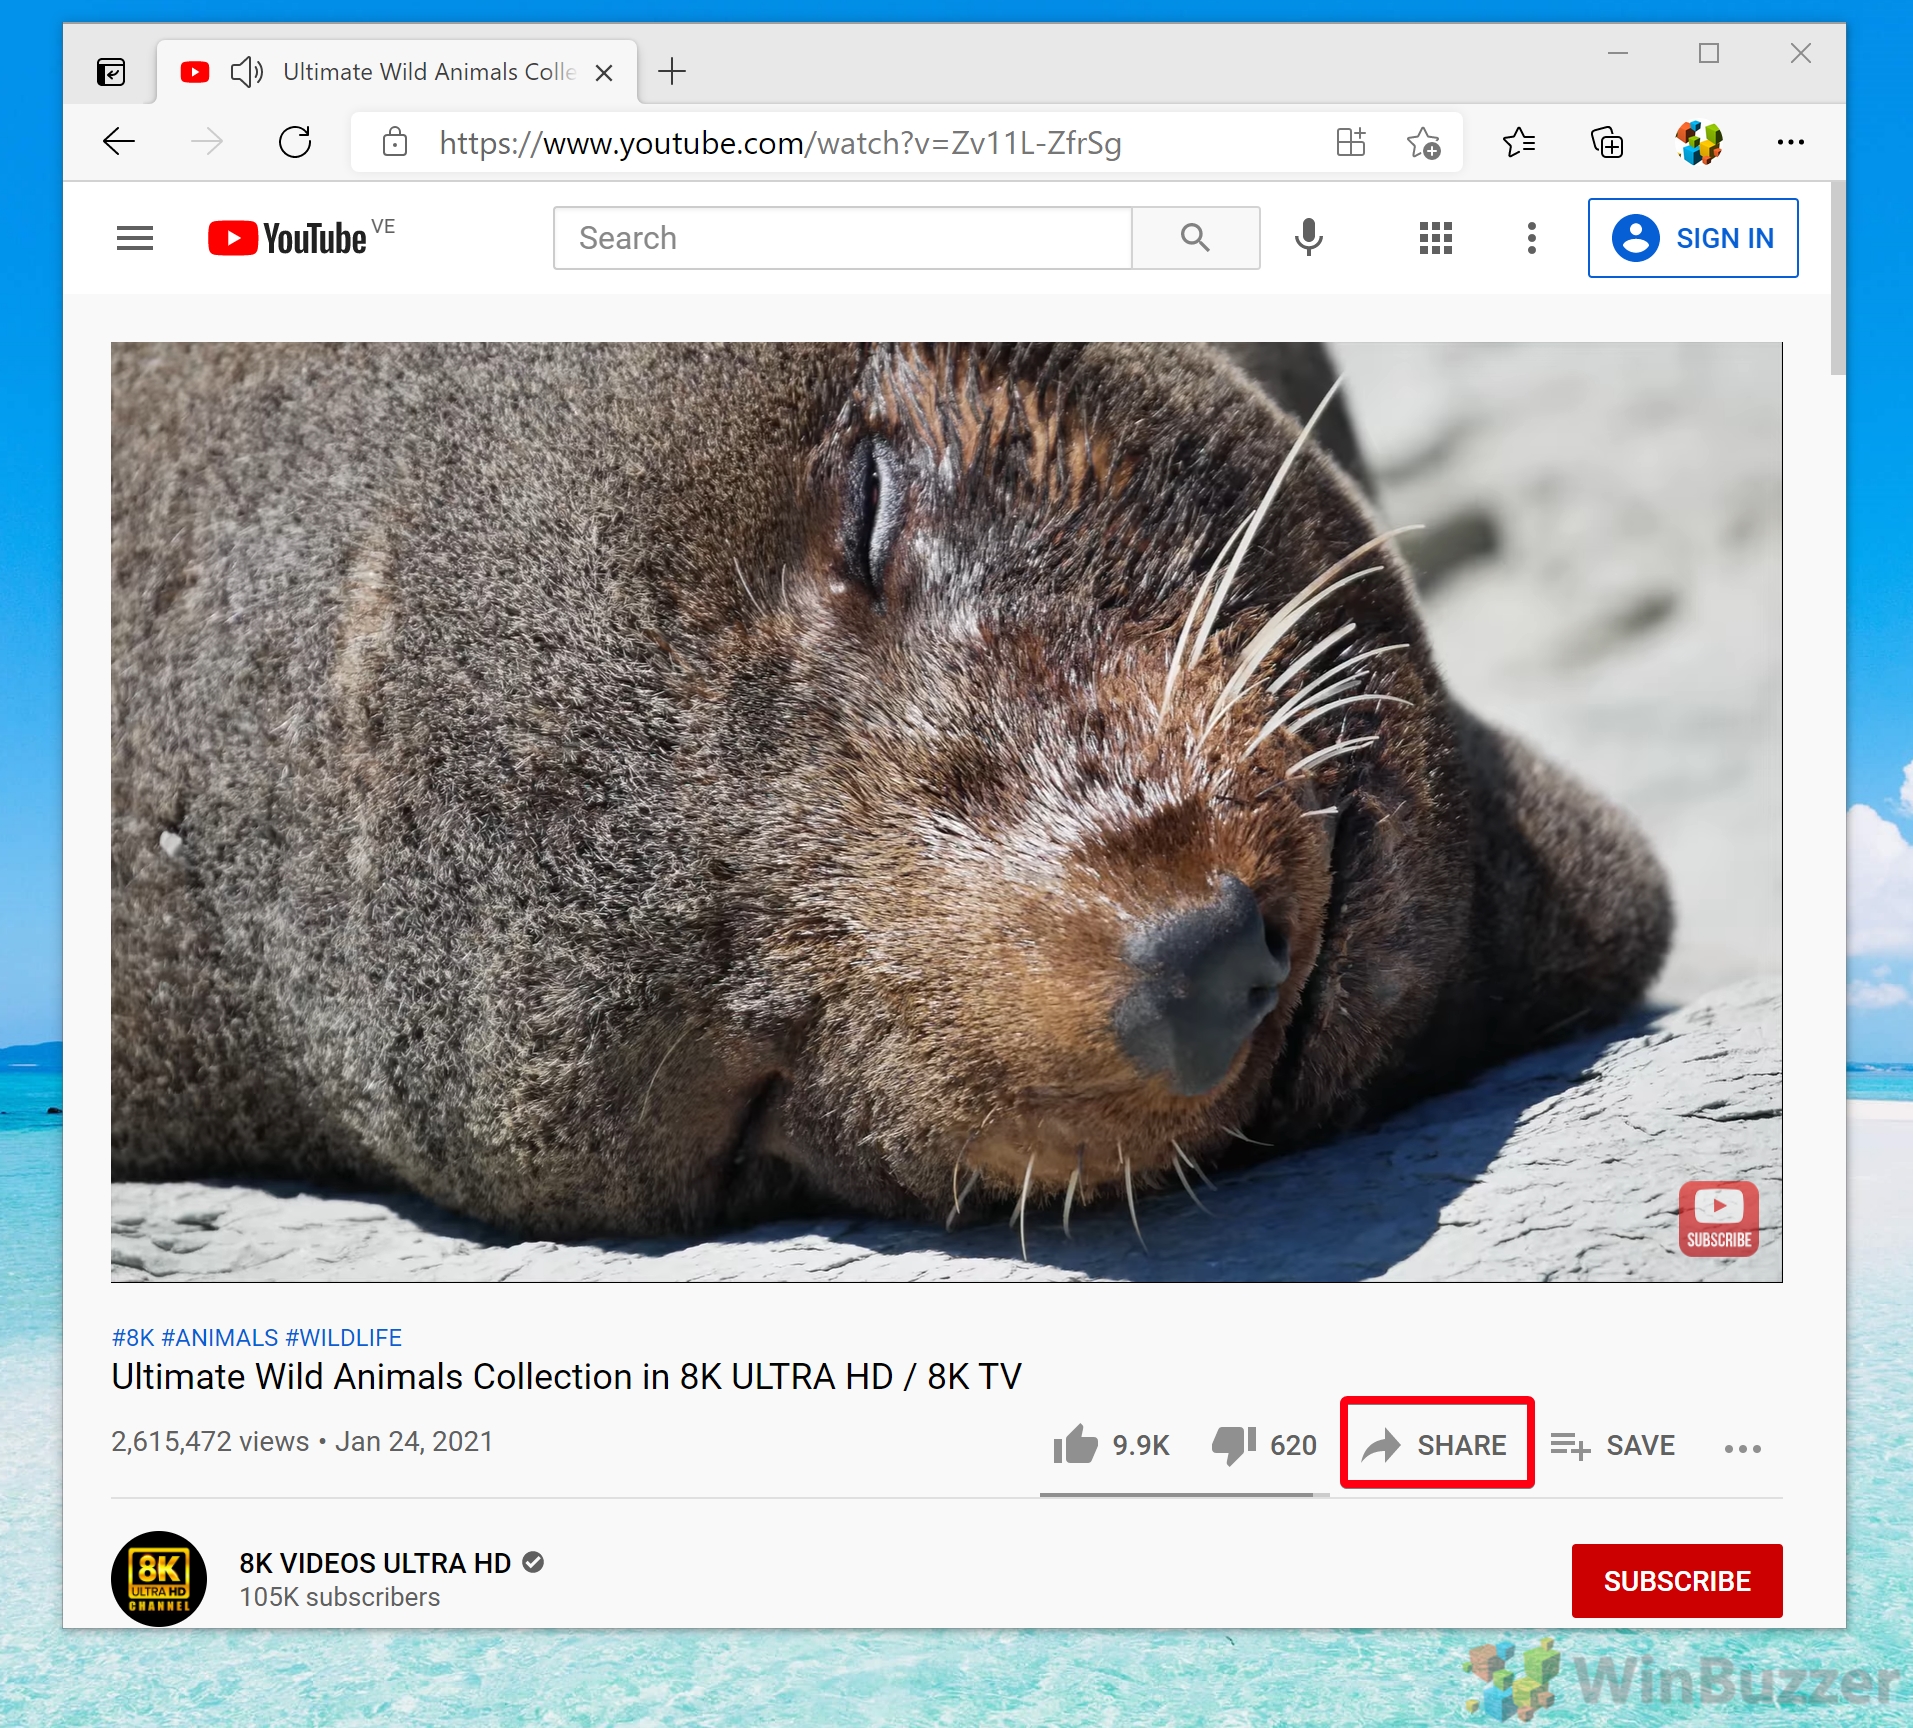
It can be difficult to keep an audience’s attention during a lengthy presentation. In fact, 4 out of 5 professionals admit to shifting their focus away from the presenter during the last presentation they attended. One way to combat this is interactive elements. You can embed a YouTube video in PowerPoint to break up long stints of talking and create a more fun environment. Though you can add a plain hyperlink to your presentation to open in the browser, that doesn’t look particularly professional. Instead, it makes sense to embed your video in PowerPoint so you can play it directly from the application. As an added benefit, the video’s thumbnail will appear for a more beautiful design. In this guide we show you how to embed a YouTube video in PowerPoint using two methods: its embed code and a URL. Both will give more or less the same results, so we recommend the latter unless you have a specific reason.
How to Embed a YouTube Video in PowerPoint Using Code
Embedding a YouTube video using its embed code is slightly more technical but offers additional customization options. This method is especially useful for those working with older versions of PowerPoint.
How to Insert a YouTube Video in PowerPoint Using a URL
You can speed up the process to embed video in PowerPoint from YouTube by using just its URL rather than the embed code. This should work so long as you have a modern version of PowerPoint.
FAQ – Frequently Asked Questions About Videos in PowerPoint
Will embedded youtube videos in powerpoint work without an internet connection.
Embedded YouTube videos require an active internet connection to stream content from YouTube’s servers. If you plan to present in a location without internet, consider downloading the video (if permitted by copyright) and embedding the file directly into your PowerPoint presentation.
Can I embed a private YouTube video into my PowerPoint presentation?
Private YouTube videos cannot be embedded directly. For a video to be embeddable in PowerPoint, it must be either public or unlisted. If you are the owner of the video, you can change its privacy settings on YouTube to ‘Unlisted’ , which allows embedding while not making the video publicly searchable.
How can I make an embedded video autoplay when its slide comes up during the presentation?
To make an embedded YouTube video autoplay in PowerPoint, first embed the video into your slide. Then, right-click on the video, select ‘Playback’ , and then choose ‘Automatically’ under ‘Start’ . This setting ensures the video begins playing as soon as the slide is displayed without requiring a manual play action.
Is there a way to loop an embedded YouTube video in PowerPoint?
Direct looping of embedded YouTube videos within PowerPoint is not supported. An alternative would be to set the video to loop on YouTube’s platform before embedding, but this requires the loop setting to be available and set on YouTube. Another approach is to edit your video to include the repeat content and upload it as a new video for embedding.
What versions of PowerPoint support embedding YouTube videos?
Embedding YouTube videos is supported from PowerPoint 2010 onwards. Newer versions, such as PowerPoint 2019 and PowerPoint for Microsoft 365, provide enhanced support and a more user-friendly experience for embedding videos from YouTube using both the URL and embed code methods.
How can I embed videos from Vimeo or other services into PowerPoint?
For services like Vimeo, you can use the embed code provided by the video platform. Go to ‘Insert’ > ‘Video’ > ‘Online Video…’ in PowerPoint and paste the embed code. Compatibility and support can vary, so it’s recommended to test the embedded video before the presentation.
Can I insert videos from sources other than YouTube using these methods?
The URL method described in the tutorial is tailored for YouTube. However, PowerPoint allows embedding videos from other services through their embed codes. Always check the specific platform’s guidelines for embedding content and test the video in PowerPoint to ensure compatibility.
If I embed a YouTube video, will viewers of the presentation need a YouTube account to watch it?
Viewers do not need a YouTube account to watch an embedded YouTube video within PowerPoint. The requirement is for the video to be publicly accessible or unlisted. Private videos cannot be viewed without logging into the account that has access.
Can I control the playback volume of an embedded YouTube video in PowerPoint?
The embedded YouTube video’s volume controls are managed through YouTube’s built-in player controls during playback. PowerPoint does not offer separate volume control for embedded YouTube videos, so adjustments must be made using the video player’s volume slider or the computer’s volume settings.
What should I do if the ‘Online Video’ option is not available in my PowerPoint?
If the ‘Online Video’ option is missing, it’s likely that you are using an older version of PowerPoint that doesn’t support this feature. Consider updating to a newer version. As an alternative, you can download the video and insert it into your presentation as a local file through ‘Insert’ > ‘Media’ > ‘Video’ > ‘This Device’ .
Is it possible to embed a YouTube video so it plays in fullscreen automatically in PowerPoint?
PowerPoint doesn’t support automatic fullscreen playback for embedded videos. You would have to set the video to fullscreen manually during presentation mode or adjust the video frame size to fill the slide as a workaround.
Can I customize the playback quality of an embedded YouTube video?
The playback quality of an embedded YouTube video in PowerPoint is determined automatically by YouTube based on factors like internet speed. It’s not possible to preset a specific playback quality within PowerPoint. Viewers can manually adjust the quality during playback using the YouTube player controls if needed.
What happens if the YouTube video I embedded is removed from YouTube?
If an embedded YouTube video is removed from the platform or if the video’s URL changes, it will no longer be accessible in your PowerPoint presentation. You’ll see a blank frame or an error message in place of the video. It’s advised to regularly check embedded videos for availability, especially before important presentations.
How can I add annotations or comments to an embedded video in PowerPoint?
PowerPoint doesn’t support adding annotations directly to embedded online videos. As a workaround, you can overlay shapes, text boxes, or comments on or around the video frame on your slide. These can serve as annotations and are helpful for providing additional context or notes related to the video content.
Can an embedded video in PowerPoint be used as a clickable link to open a webpage?
While the video itself cannot be directly used as a hyperlink in PowerPoint, you can overlay a transparent shape or icon over the video frame and add a hyperlink to that shape. This setup can then direct users to a webpage or another slide within the presentation when clicked, effectively making the video or its part act as a clickable link.
Related: How to Insert an Animated GIF in PowerPoint

Related: How to Add Music / Audio to PowerPoint Slides

Related: How to Add Speaker Notes in PowerPoint

- Embed YouTube video
- Microsoft PowerPoint
- Video in PowerPoint
Recent News

Google’s Find My Device Now Locates Powered-Off Phones and Bluetooth-Tagged Items
Naver Unveils HyperCLOVA X: A Leap Forward in Multilingual AI Capabilities
Subscribe to WinBuzzer on Google News

Search for: Search Button
- Share a link to a specific PowerPoint slide
There’s a way to link someone to view a specific slide in a PowerPoint presentaion which is a lot faster than hunting through a big slide deck.
Requirements
Link to this slide, check the share permissions, sharing settings, edit / view only / no download, or there’s another way ….
Providing a direct link to a specific part of your slideshow not only streamlines the process of receiving feedback but also enables them to locate the content you want them to review more efficiently.
PowerPoint simplifies the process with its “Link to This Slide” feature, generating a direct link that opens the file at the specific slide in your presentation.
The presentation has to be saved in cloud storage that the receiver/s can also access it. If the presentation isn’t already saved online, modern Office will help you do that.
Launch PowerPoint presentation stored on your local drive. Next, navigate to the specific slide you wish to share. Then, right-click on the desired slide and a shortcut menu pops up. From this menu, select the option “Link To This Slide” to generate a direct link to the chosen slide within your presentation.

Selecting “Share Link To This Slide,” will prompt you to upload your presentation to OneDrive to allow sharing.

Office just dumps the file into your OneDrive account, you’ll probably want to choose a specific folder instead.
Once the presentation is saved in a cloud location, you can share it or a slide. Do that from PowerPoint on the web or modern PowerPoint for Windows/Mac. Click on the slide in the slide navigator and select the “Link To This Slide” option.

The system generates a direct link that is ready to be shared but before you copy , check what permissions you’re giving to access the presentation and to whom.
Under the link is a short note to indicate the sharing settings for the current link. Click on Settings to change or verify the sharing. Or select the copy option, and you’ll receive a notification confirming that the link has been copied.

For more specific access privileges, go to the Settings option to customize permissions for reviewers or audience. You can choose with whom you want to share your files. This typically involves setting access permissions or sharing settings with user or user groups.
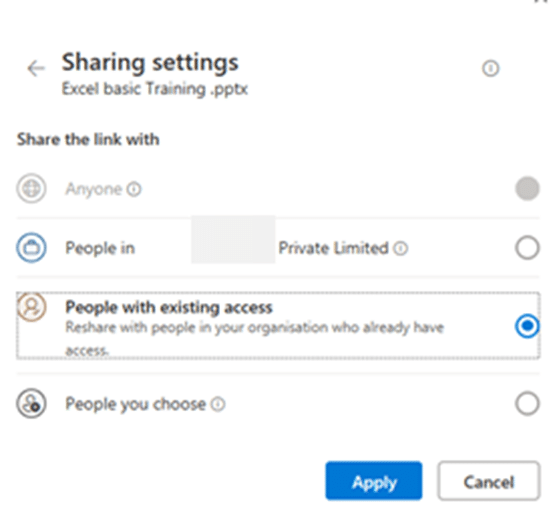
The sharing settings can include any of the following options, depending on the type of account (personal, business etc).
“Anyone With The Link Can Edit.” – permits anyone with access to the link to edit the slide’s content. This functionality facilitates effective collaboration and sharing among teams or groups. Opting for this setting grants editing privileges to anyone possessing the link.
“People in the Organization – accessible by the organization with the privileges to access the link.
“People you choose – selectively available.
Customize the access privileges more from the More Settings option, where you can define specific permissions, such as editing, viewing, and downloading for reviewers or audience.
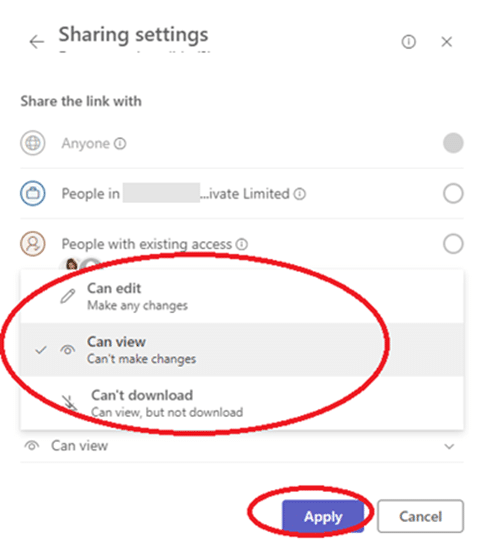
Finalize the process by clicking on the “Apply” button ensuring that the changes take effect according to your preferences.
Once you’ve configured the access privileges and applied the changes, you can proceed to share the link via email to the intended audience. Simply copy the link generated by the sharing feature and paste it into your email or other message.

At risk of stating the obvious, there’s another way to share a single slide with ‘read only’ access.

Take a screen shot of the slide and paste it into an email or message.
Using Designer for more eye-catching PowerPoint slides PowerPoint Cameo puts your video selfie into a slide Reuse slides in PowerPoint, the good and the annoying
About this author

Mayurakshi Mohapatra
Office 2021 - all you need to know . Facts & prices for the new Microsoft Office. Do you need it? Office LTSC is the enterprise licence version of Office 2021.
Office 2024 what's known so far plus educated guesses. Microsoft Office upcoming support end date checklist.
Latest from Office Watch
- Coin 🪙 emoji in Word, Excel, PowerPoint and Outlook
- Translate automatic or manual in Outlook
- Microsoft Mesh makes “magical” online meetings
- Why are Teams and Office divorcing?
- Pivotby – Excel’s new faster PivotTables
- More Excel on the web improvements
- All about editing an incoming Outlook message
- What “Update License” means on Microsoft 365 menus
- Excel’s warning about dates and centuries
- Write Excel formulas fast with free Copilot
- Easter images and icons in Microsoft Office
- Credit Card 💳 symbol in Word, Excel, PowerPoint and Outlook
- Yes, there will be a new version of Microsoft Office
- All about Office 2024 for Windows and Mac (so far)
- In person vs virtual event option coming to Outlook
- Checklists now in Microsoft Word
- Start Grouping in Excel for better looking sheets
- Three more Word features reach the web version
- Web link previews in Word for web
- Use Presenter View Video
- Add speaker notes Video
- Practice and time your presentation Video
- Record a presentation Video
- Print a presentation Video
Use Presenter View

PowerPoint Presenter View shows you the current slide, the next slide, and your speaker notes, to help you focus while presenting and connect with your audience.
Select the Slide Show tab.
Select the Use Presenter View checkbox.

Select which monitor to display Presenter View on.

In Presenter View , you can:
See your current slide, next slide, and speaker notes.
Select the arrows next to the slide number to go between slides.
Select the pause button or reset button to pause or reset the slide timer in the upper left.
See the current time to help you pace your presentation.
Select the font icons to make the speaker notes larger or smaller.
Select the annotations pen icon to draw on the screen in real time, or select a laser pointer.
Select the thumbnail icon to see all the slides in your presentation and quickly jump to another slide.
Select the magnifying glass icon to zoom in on a particular part of a slide.
The screen icon let's you make the screen temporarily black to focus the attention on you.
Select END SLIDESHOW when you're done presenting.
Start the presentation and see your notes in Presenter view

Need more help?
Want more options.
Explore subscription benefits, browse training courses, learn how to secure your device, and more.

Microsoft 365 subscription benefits

Microsoft 365 training

Microsoft security

Accessibility center
Communities help you ask and answer questions, give feedback, and hear from experts with rich knowledge.

Ask the Microsoft Community

Microsoft Tech Community

Windows Insiders
Microsoft 365 Insiders
Was this information helpful?
Thank you for your feedback.

- SUGGESTED TOPICS
- The Magazine
- Newsletters
- Managing Yourself
- Managing Teams
- Work-life Balance
- The Big Idea
- Data & Visuals
- Reading Lists
- Case Selections
- HBR Learning
- Topic Feeds
- Account Settings
- Email Preferences
How to Make a “Good” Presentation “Great”
- Guy Kawasaki

Remember: Less is more.
A strong presentation is so much more than information pasted onto a series of slides with fancy backgrounds. Whether you’re pitching an idea, reporting market research, or sharing something else, a great presentation can give you a competitive advantage, and be a powerful tool when aiming to persuade, educate, or inspire others. Here are some unique elements that make a presentation stand out.
- Fonts: Sans Serif fonts such as Helvetica or Arial are preferred for their clean lines, which make them easy to digest at various sizes and distances. Limit the number of font styles to two: one for headings and another for body text, to avoid visual confusion or distractions.
- Colors: Colors can evoke emotions and highlight critical points, but their overuse can lead to a cluttered and confusing presentation. A limited palette of two to three main colors, complemented by a simple background, can help you draw attention to key elements without overwhelming the audience.
- Pictures: Pictures can communicate complex ideas quickly and memorably but choosing the right images is key. Images or pictures should be big (perhaps 20-25% of the page), bold, and have a clear purpose that complements the slide’s text.
- Layout: Don’t overcrowd your slides with too much information. When in doubt, adhere to the principle of simplicity, and aim for a clean and uncluttered layout with plenty of white space around text and images. Think phrases and bullets, not sentences.
As an intern or early career professional, chances are that you’ll be tasked with making or giving a presentation in the near future. Whether you’re pitching an idea, reporting market research, or sharing something else, a great presentation can give you a competitive advantage, and be a powerful tool when aiming to persuade, educate, or inspire others.
- Guy Kawasaki is the chief evangelist at Canva and was the former chief evangelist at Apple. Guy is the author of 16 books including Think Remarkable : 9 Paths to Transform Your Life and Make a Difference.
Partner Center
PowerPoint: How to Add Audio to Powerpoint on Windows 10 and Mac
Last Updated Thursday, August 31, 2023, at 5:00 am
Known Issue (August 14, 2023):
Some Windows 11 users are experiencing issues with PowerPoint exports when they are turned into .mp4 files. Visuals within the exported PowerPoint are appearing as flipped, or upside down. We are working with Microsoft to find a solution.
As a workaround, please convert the file as a .WMV file option and save it in My Media. The following are directions on how to convert a PowerPoint Presentation with audio to a .WMV file . For more support or to help troubleshoot issues, please reach out to the LTS Help Desk at [email protected] .
Microsoft PowerPoint offers features to record audio narration and export it as a video. PowerPoint records audio slide-by-slide rather than in one continuous file, allowing creators to easily re-record a slide if they make a mistake or need to change something later. Exporting as a video and uploading to Kaltura or Canvas for streaming is advantageous since it standardizes file types, doesn't require a download to view, is in a format that can be captioned, and allows viewers to navigate more efficiently.
A recent update has made the process comparable on a Mac, but the specifics vary. Windows 10 instructions follow; Mac users can click the link below to jump to the appropriate instructions.
- Instructions for Mac users
Windows 10 Instructions:
The following instructions explain how to add audio to your PowerPoint presentation on Windows 10 and export that PowerPoint as an MP4. The text instructions cover the same information as the embedded video below.
NOTE: If you have an older version of PowerPoint, you may need to update it to access the features described below. If you do not have PowerPoint, you can download it and other Microsoft Office products for free by going to office365.uwec.edu. If you have questions about updating or installing PowerPoint, contact the LTS Help Desk at [email protected] or 715-836-5711.
- Design your PowerPoint TIP: Use images and limit text to better engage viewers/listeners.
- Click Record Slide Show NOTE: Audio may start recording automatically if you have an older version of PowerPoint. It will still work, but this version offers reduced functionality.
- Record narration and avoid reading text on the slide out loud to viewers. Click the blue Replay button to listen to the recorded audio and ensure it was recording.
- Press [Escape] or the ‘X’ button located in the top right of the screen when the audio recordings are finished. You will see a speaker icon on slides that have audio.
- Select Export (steps 10-14 are shown in screenshot below).
- Select Create a Video .
- Optional: Select Full HD (1080p) for the video quality; it is unlikely a higher quality is needed.
- Select Use Recorded Timings and Narrations.
- Follow prompt/pop-up window to save the video in a memorable location.
- How to upload and share with Kaltura (Instructors should use Kaltura. Students will need to use it if the file is over 500 MB, which a PowerPoint probably won't be and they can use Canvas.)
- How to upload and share in a Canvas assignment (students)
- How to upload and share in a Canvas discussion (students) - the instructions refer to the "rich content editor" which is just the features in the top of the discussion post reply.
Elaboration on the Recording Features:
- Timing Feature – there is a rolling time feature for the individual slide and the overall presentation. Allows the speaker/presenter to monitor how long they are talking.
- Microphone Feature - Click on Settings and select Microphone and then the specific device to set up before recording.
- Replay Feature - Use to check that the audio is recording properly before starting additional slides.
- Clear Feature - Select Clear to delete/re-record audio.
- Don’t set the camera to record - Make sure this button has a diagonal slash through it to avoid the problem.
Mac Instructions:
The following instructions will teach you how to add audio to your PowerPoint presentation on a Mac and export that PowerPoint as an MP4. The text instructions cover the same information as the video embedded below.
NOTE: It is essential to have the Office 365 version of PowerPoint or you will not be able to save your PowerPoint as a video. If necessary, you can download it and other Microsoft Office products for free by going to office365.uwec.edu. If you have questions about updating or installing PowerPoint, contact the LTS Help Desk at [email protected] or 715-836-5711.
- TIP: Use images and limit text to better engage viewers/listeners.
- Click Record Slide Show
- TIP: Before you begin recording your full presentation, do a practice recording to verify your microphone and other settings are correct.
- NOTE: Avoid reading the text written directly on the slide; use the slide to elaborate on the material being presented.
- Stop speaking for a second to prevent the audio from cutting out as slides change. Resume speaking when the time starts moving again under the Current slide timing feature to the left of the recording button.
- Click Stop or Pause at the top of the screen and then End Show in the top left corner when all the audio recordings have been finished.
- Check the audio by clicking on Play from Start under the Slide Show tab or the presenter mode icon at the bottom of the screen.
- Edit the name of the file and where you would like to save the video following PowerPoint's prompts.
- Click Export
- Upload your mp4 video to Kaltura or Canvas to share it:
- How to upload and share to My Media (Instructors should use My Media. Students will need to use it if the file is over 500 MB, which a PowerPoint probably won't be and they can use Canvas.)
- How to upload and share in a Canvas discussion (students) - the instructions refer to the "rich content editor" which is the tool at the top of the discussion post reply.
Additional Video Tool Options
For more information about recording options available, click here to view a comparison of each tool's features.
IMAGES
VIDEO
COMMENTS
Make a slide show that starts automatically when opened. Select File > Save as (or Save a Copy ). Click More options. Browse to the folder where you want to save your presentation. In the File name box, type a name for your presentation. Under Save as type, select PowerPoint Show. The file is saved as a .ppsx file.
If so, we'd suggest you save presentation file as .ppsx type file, if you are using PowerPoint in Windows, we'd suggest you go to PowerPoint File > Save as > Click More Options > select PowerPoint Show under Save as type, the file is saved as a .ppsx file. When the file is double-clicked, it opens as a slide show.
Learn how to send Microsoft PowerPoint in Presentation ModeFollow our presenters/host on Twitter: https://twitter.com/educatoralexHIT THE RED SUBSCRIBE BUTTO...
Then don't forget to hit Send later on. Option 2 (Send as an email attachment): Your second option is to send your PPT file as an attachment. You can choose to either keep the PPT format or save it as PDF instead. If you're using Outlook as your default email client, then Outlook is going to automatically open and attach your file for you. 2.
First, create a new custom slide show and select the slides that you want to display. Then, click Add, enter the name of the presentation and click OK. This new custom presentation will appear on the list. Select it and click Show to begin the presentation. Defining a custom slide show.
To send your presentation as a copy or a PDF, select Share. Select Attach a Copy Instead in the Share dialog box. Select either PowerPoint Presentation or PDF. PowerPoint will open the email application and attach the file to a new message. Enter the recipients details and a short message, and click Send.
Choose the File tab. Select Save As. Pick the Save as type as PowerPoint Show. Type a name for your slide show in the File name text box (you can use the same name and location as your .pptx/presentation file) and click Save. Your PowerPoint slide show file is saved with a .ppsx extension. Now, the next time you or anyone else opens your ...
This video will show the three ways to put your PowerPoint presentation into Presentation mode, for displaying to a kiosk or meeting.The purpose of this vide...
Turn On PowerPoint Presenter View. In PowerPoint for macOS, simply click on Presenter View on the Slide Show tab to kick off the presentation in Presenter view. Turn on Presenter View by clicking on Presenter View on the Slide Show tab. You'll see the Presenter View interface on one screen.
Select File > Share > Email. Under Email, click one of the following: Send as Attachment to attach your presentation to an email message. Send a Link to create an email that contains a link to your presentation. Note: To Send a Link, you must save your presentation in a shared location, such as a SharePoint document library that your recipients ...
Step 4: Attach Your PowerPoint Slideshow. Attach your saved PowerPoint presentation to your email. Look for the 'attach file' icon (usually represented by a paperclip) in your email client. Click on it and navigate to the location where your PowerPoint presentation is saved. Select the file and attach it to your email.
Navigate to the Slide Show tab. Hold down the Alt key on your keyboard. Click From Beginning. Holding down the Alt key and clicking From Beginning, the Presenter View will launch from the very first (non-hidden) slide in your presentation.
In today's tech tip, we share some Microsoft PowerPoint presentation tips. Including how to get into presentation mode, how to annotate the screen while pres...
It will open automatically in presentation mode. From Microsoft's site: PowerPoint Show .ppsx. A presentation that always opens in Slide Show view rather than in Normal view. Tip: To open this file format in Normal view so that you can edit the presentation, open PowerPoint. On the File menu, click Open, and then choose the file.
Thank you for choosing Microsoft Community. To share a presentation online as a slide show, you need to create a view-only copy of it. To do that, Right click on the Presentation and click on Share. Click on Get Link. In the Choose an option drop down select View Only and then click on Create Link. Now copy the link and share it with your friends.
First, open the PowerPoint presentation that you'd like to share. At the top-right corner of the window, you'll see a "Share" button. Go ahead and select it. Once selected, the "Share" window will appear. You have a few different options here. In the "Attach a copy instead" group, you can choose to send your presentation as a ...
Six steps for creating a slide show. 1. Plan your slide show. Before getting too deep into your slide show project, it's a good idea to select and save the photos and videos you want to use. This helps you create a slide show more efficiently and purposefully, ensuring a better outcome. 4.
With the share links, it seems cannot create a link to a PPSX which will directly open the presentation in slide show mode. Getting a link and creates a link which opens the the presentation in normal mode by default. And it forces the user into edit mode even if it is PPSX. Share link of created PPSX file format: However, I created PPSX work ...
Start presenting. On the Slide Show tab, in the Start Slide Show group, select From Beginning. Now, if you are working with PowerPoint on a single monitor and you want to display Presenter view, in Slide Show view, on the control bar at the bottom left, select , and then Show Presenter View.
Method 2: Share PowerPoint Window. If you want only to present your PowerPoint slide deck, it's best to share just that window. Here's how: Click Share and select Window when it's your turn to present. Enable Include computer sound if you have a video or to share and select your presentation from the list. A red border will appear around your ...
To access presentation mode in PowerPoint, simply click on the Slide Show tab and then click on the From Beginning or From Current Slide buttons, depending on where you want to start your presentation from. ... This allows you to easily share the presentation with others, without having to send large files via email. You can also control who ...
It's by no means un-editable. Open the presentation that you want to make read-only, then click the "File" tab. Next, in the left-hand pane, select "Info." You'll now see a "Protect Presentation" section, which lets you (to an extent) protect against any editing of your presentation. Click "Protect Presentation."
Click the "Share" Button. Navigate to the YouTube video you wish to embed in your PowerPoint presentation and click on the " Share " button below the video. This is the initial step to ...
Next, navigate to the specific slide you wish to share. Then, right-click on the desired slide and a shortcut menu pops up. From this menu, select the option "Link To This Slide" to generate a direct link to the chosen slide within your presentation. Selecting "Share Link To This Slide," will prompt you to upload your presentation to ...
Select the Slide Show tab. Select the Use Presenter View checkbox. Select which monitor to display Presenter View on. Select From Beginning or press F5. In Presenter View, you can: See your current slide, next slide, and speaker notes. Select the arrows next to the slide number to go between slides. Select the pause button or reset button to ...
When in doubt, adhere to the principle of simplicity, and aim for a clean and uncluttered layout with plenty of white space around text and images. Think phrases and bullets, not sentences. As an ...
Click the Slide Show tab. NOTE: Do not add audio under Insert and Record Audio; this method will not allow you to save your PowerPoint as a video since it does not synchronize timings to automatically move the slides with the audio. Click Record Slide Show. Review the narration setup and navigation before recording.