Book a complimentary consultation
What type of service are you looking for, thanks we will contact you soon.
+1 (617) 982-3329

Effective Presentation Handouts: A Step-by-Step Guide
Discover how to create handouts that captivate and educate your audience. From layout to content, learn easy-to-follow techniques to make your presentation handouts stand out. Start now and make a lasting impression

What’s a Rich Text element?
The rich text element allows you to create and format headings, paragraphs, blockquotes, images, and video all in one place instead of having to add and format them individually. Just double-click and easily create content.
- Nostrum non voluptas alias sit ut corporis perspiciatis nihil molestiae. Vitae quidem aut aut quia quia porro explicabo. Similique occaecati sit quo. Enim enim dolor ut. Et error alias nam fuga voluptas inventore placeat et. Eligendi similique officia provident magni aut quasi soluta qui.
- Deleniti totam eius similique repellendus.
- Deleniti totam eius similique repellendus. Doloremque sunt nihil et. Tenetur delectus velit ut. Pariatur velit ipsa.
3 Static and dynamic content editing
4 static and dynamic content editing.
A rich text element can be used with static or dynamic content. For static content, just drop it into any page and begin editing. For dynamic content, add a rich text field to any collection and then connect a rich text element to that field in the settings panel. Voila!
5 Static and dynamic content editing
6 static and dynamic content editing.
A rich text element can be used with static or dynamic content. For static content, just drop it into any pa ge and begin editing. For dynamic content, add a rich text field to any collection and then connect a rich text element to that field in the settings panel. Voila!
How to customize formatting for each rich text
Headings, paragraphs, blockquotes, figures, images, and figure captions can all be styled after a class is added to the rich text element using the "When inside of" nested selector system.
"Headings, paragraphs, blockquotes, figures, images, and figure captions can all be styled after a class is added to the rich text element using the "When inside of" nested selector system."
Presentation handouts can play a significant role in the process of effective presentation delivery if you know how to use them to your benefit. These supplementary means can back up your main message and make sure that your presentation creates a lasting impression.
Many people think that handouts for a presentation are something they used to work on while in college. However, these additional materials, if they are well-thought-out and relevant, can assist business professionals, educators, and students equally well.
Today, we'd like to discuss the main purpose of presentation handouts. We'll show you how to plan and design effective handout material. Moreover, we will also share a few handy tips and useful tools to amplify the effect of your supplementary means.
Does that sound like a plan?
Understanding Presentation Handouts
Jerry Weissman , the author of 'Presenting to Win: The Art of Telling Your Story," compares the notion of a presentation handout to a bridge between your presentation and the long-term memory of your audience. We want to simplify the definition a little. Presentation handouts are additional materials that you share with the audience to support the central message of your presentation and improve the level of comprehension.
If you put a handout and a presentation face to face, the first one will remain the static source of additional information that the viewer can refer to at any time. At the same time, presentations are a dynamic source of information, and a viewer does not have any control over its pace.
Usually, a presentation contains multiple vital aspects for the audience to focus on and digest. The main aim of handouts for presentations is to enhance viewer engagement and ensure a lasting impact even when the presentation is over. You can refer to the handouts at any time during the presentation or after it, so the materials improve retention and help to recall specific essential details.
The handouts mustn't replicate the presentation. They should complement it.
Planning Your Handouts

A great example of a handout for a presentation is a well-planned one. It means that you shouldn't treat your handouts as a last-minute task.
Key information
As you brood upon the data to include, you can start with additional statistics, relevant details, and facts that support and strengthen the core message of your presentation. Choose information that helps the audience understand some field-specific or overly complex notions.
Highlight the main aspects that you want the audience to remember in your handouts.
Audience needs
Another critical part of the handout planning is the audience you will interact with. You should consider the level of expertise, needs, and preferences when working on supplementary materials. There will be little use of handouts that are irrelevant, overly simplified, or too complicated.
Format and structure
Even the best handouts will lose their impact if they are unappealing, illogical, and unorganized. A neat structure topped with relevant visuals will enhance user perception and trigger their productivity. That is why you may want to play around with different headings, supporting images, graphs, bullet points, colors, and fonts.
Designing Effective Handouts
A quality presentation handout template relies on effective design as much as it depends on the informative component. There are a few principles to stick to when you design your handouts.
Basic design
Whitepage pitch deck design agency outlines three principles that may assist you in creating a successful handout for presentation.
Use these practical tips to move in the right direction:
- Present different types of content in complementary but distinguishable fonts
- Section information with the help of headings and subheadings
- Outline the main aspects through bullet points
- Ensure that all the data is easy to read, avoid unclear and small fonts
- Use the same color palette and theme throughout the presentation and the supplementary materials
- Add brand logos to stress consistency

The right visuals make any information twice as easy to remember and digest. Whitepage professionals share the following advice:
- Use charts, tables, graphs, and other visuals to deliver complex notions concisely and more comprehensively.
- Intertwine text content with images that complement the core narrative
- Symbols and icons aid in better understanding

Appeal and informativeness
It is not enough to design visually appealing presentation handout templates. They should carry out an informative purpose as well. You can do the following to achieve the desired effect through your presentation handouts:
- Use different colors to highlight vital points and trigger the reader's interest
- Use whitespaces to define the structure of your handouts
- Use contrast to attract user attention to critical aspects of the presentation

Content Creation for Handouts
We may be stating the obvious, but your handouts should contain clear and concise content. You don't want to distract the audience from the presentation as they are trying to make out some complex notions written in the supplementary materials.
A professional handout sample for presentation should:
- Deliver the main message without unnecessary details mentioned
- Steer clear of tech-savvy language and slang and preserve an accessible tone
- Present essential data through lists and bullet points

On top of that, you can complement your handouts with relevant and appealing, not to mention appropriate visuals. Different charts and images can improve information perception and enhance retention.
Lastly, handout ideas for presentations prove to generate better results when spiced up with well-thought and strategic CTAs(Call-to-Action elements):
- Give the audience clear instructions if any action is requested
- Use questions and activities to promote engagement
- Provide contact information in case someone decides to contact you later
Utilizing Technology in Handout Creation

After you come up with a desired design and content, you will naturally start to wonder how to make a handout for a presentation. Luckily, many tools and software solutions come of use.
Platforms like Microsoft PowerPoint, Adobe InDesign, Canva, Venngage, and Inkscape present multiple features to create and enhance handouts. Some of them are free. Others include paid options. You can work on text, visuals, and charts using these tools.
However, if you want to make your presentation handout example a little more interactive, you should implement such interactive elements as QR codes and online resource links. You can find free QR code generators online to succeed with the task effectively.
QR codes can serve as a linking piece between physical and digital supplements. As the audience exploits their devices during the presentation, they will find additional facts and details that intensify the primary message. The same applies to online resource links if you use digital handouts only.
We would like to stress the fact that a balance of printed information and digital addition will add more dynamics to the learning process. Such an approach ensures that you cater to every user's needs and provide a better and more memorable experience.
Printing and Distribution
You can present your handout examples for presentation in two formats – either physical or digital. Each comes with a set of perks and downsides.
Physical handouts
The physical template for the presentation handout is a good old sheet of paper that contains all the information you want to share with the audience. It is material, you can touch it, and you don't require additional devices to interact with it. On a slightly less bright side, print paper has a negative environmental impact, which is a concern for many. You can try to decrease that impact by using recycled paper, vegetable ink, and double-sided printing.
Digital handouts
Digital examples of handouts for presentations that do not pose an environmental threat can be shared within seconds through email and other online platforms. They can be enhanced with all sorts of multimedia and interactive elements. However, digital handouts can't be accessed without electronic devices that support the format. While that isn't much of a challenge in today's world, the use of various devices can distract the audience from the presentation.
Distribution timing

There's an ongoing debate as to when you should plan to distribute a presentation handout: before, during, or after the presentation. Different timing can have a diverse effect on the audience.
Before . Some of the viewers may get curious and leaf through the material before you start. This means they will know what to expect from the presentation. It isn't entirely a bad thing, but it may have a distractive effect.
During . You can share your handouts to support the presented message and help the audience understand some points or learn more about the subject.
After . If you want to ensure that the message sets in, you can share the handouts after the presentation is over. In this case, you should include your contact information in the handout to make sure that the audience can reach out to you in case of any questions.
Examples and Templates
If you still feel a bit uncertain about how to make a handout that is well-structured and appealing, you can make use of downloadable templates.
Education handouts
A good teaching plan will have a positive effect on the students. You can enhance their interest and involvement with an elegant and straightforward handout template.
Business handouts
Any business plan presentation highlights a fair share of statistics and analytical information. With a template like this, you can coat complex notions into simple visuals and improve user experience, which leads to better understanding and positive actions.
All-purpose handouts
Some templates can be suited for any purpose. While they are subtle and non-specific, they remain well-structured and appealing.
If you need more presentation handout ideas to inspire from, our experts suggest you check these sources out:
- Template.net
- WPSTemplate
Common Mistakes to Avoid

As you try to keep away from making presentation design mistakes , you should try to minimize handout errors as well. There are a few common pitfalls to stay clear of:
- Information overload – use white spaces to avoid clutter and hand-pick information you want to add to the template.
- Poor readability – choose clear and legible fonts, and don't try to overdecorate the handout.
- Color distraction – try to use complementing and subtle colors so that the color palette doesn't hurt the eye and make the viewer's mind wander.
- Absent interactivity – while static content is necessary, you should combine it with such interactive elements as QR codes and links to relative resources.
- Low content quality – you must proofread your handouts before sharing them with the audience to avoid any typos and errors that can put your professionalism under question.
Advanced Tips for Professionals
Is there any professional advice on how to make handouts that promote successful presentations? Professional presentation design services point out a few advanced tips you can benefit from:
- You can use more than a single QR code and place them strategically so that one complements the other and boosts user engagement.
- Make your infographics interactive if you are using digital handouts. Implement additional details that the audience can find by hovering over certain icons. Make sure you highlight those interactive parts.
- Leave blank spaces for the users to write down critical points and make notes.
- Modern design is all about minimalism. Consider the trend when designing your template.
- Consider investing in responsive design when using digital handouts.
- Make sure that your digital handouts work across multiple devices.
- Create collaborative templates that allow different members to interact and discuss some crucial points.
What is a handout for a presentation? It is a practical link between your presentation and the audience. A quality presentation handout can enhance subject perception, improve understanding, and promote desired impact.
If you consider your audience's needs, keep up with modern presentation trends, and create concise and well-structured supplementary materials, you can count on projecting a lasting impression and succeeding with your project goals.
Wonder how to hire a presentation design agency to help you achieve the desired result and get ahead of the competition? Whitepage team is only a phone call away!
Download "What Should Be in a Pitch Deck Presentation" for free!

Thank you, we have sent you the material to your mail
Talk to a presentation design expert now.

Expand Your Presentation: Make Them Longer & Stronger

The Ultimate Guide to Body Language in Public Speaking

The Ultimate Guide for Using Fonts in Decks & Presentations
Presentation Design
Presentation
Design tips
Presentation hacks

8 Transformative Tips to Speak Eloquently | Master Presentation Eloquence

How to Write an Effective Presentation Outline

Master Slide Deck Presentations: Expert Tips to Captivate Your Presentations

Common Presentation Design Mistakes
Case Studies
2024 © Whitepage. All rights reserved.

Microsoft 365 Life Hacks > Presentations > How to create effective presentation handouts
How to create effective presentation handouts
Whether you create presentations for school, work, or clubs, distributing handouts makes an impression and amplifies your message. The benefits are twofold: putting together a handout prepares you for your speech and allows your audience to retain the information better.
You can put together handouts easily. Learn what to include to ace your next presentation.

Why are presentation handouts important?
Creating handouts help you prepare what you want to say . They also set expectations for your audience members and allow them to focus more on your speech because they don’t have to take such thorough notes.

Tell your story with captivating presentations
Powerpoint empowers you to develop well-designed content across all your devices
If you want to create an effective presentation handout, here’s what you should include.
1. List the key points of your presentation
To create a strong presentation handout, list the key facts from your speech. Keep it simple—you don’t need to rewrite your entire presentation. Remember, you’ll discuss a lot of the material in your slides as well. Listing out your presentation’s key points help your listeners reflect on the information later. By reading your presentation’s key points, your audience may also come up with or remember the questions they want to ask you at the end of your talk.
2. Include your sources
Effective presenters back up their information with sources, especially in science and history-related fields. Providing sources encourages your audience do more research on their own time. You can also provide further reading in your handout, like books or article links, if you aren’t able to cover everything in a single lecture.
3. Make your presentation handout professional
A professional-looking presentation handout establishes your credibility and authority with your audience. When presenting for work or an organization, include your logo on your handout.
You don’t have to be a graphic designer to create an attractive presentation handout—explore dozens of free Microsoft Word templates you can use to polish your handout.
4. Include white space
Not everyone comes prepared for a presentation. Leave white space in your handout so your audience can take notes on what you say. They can also use this space to write down questions they want to ask you, so they don’t forget them by the end of the presentation.
5. Include your contact information
Audience members may want to ask you questions about your presentation later. Include information like your name, job title, website, and email so your audience can contact you in the future.
6. Proofread your handout
Before you print out or email your presentation handouts, make sure to thoroughly proofread everything first. Are your sources spelled correctly? Are there any typos in your email address or links? Do the key points correspond with your presentation? Taking the time to review your handout before finalizing it will ensure it’s a quality handout.
Creating a presentation handout will make your presentation stronger and the information easier to digest. Are you feeling nervous about an upcoming presentation? Learn how to calm presentation anxiety .
Get started with Microsoft 365
It’s the Office you know, plus the tools to help you work better together, so you can get more done—anytime, anywhere.
Topics in this article
More articles like this one.

How to introduce yourself in a presentation
Gain your audience’s attention at the onset of a presentation. Craft an impressionable introduction to establish tone, presentation topic, and more.

How to add citations to your presentation
Conduct research and appropriately credit work for your presentation. Understand the importance of citing sources and how to add them to your presentation.

How to work on a group presentation
Group presentations can go smoothly with these essential tips on how to deliver a compelling one.

How to create a sales presentation
Engage your audience and get them interested in your product with this guide to creating a sales presentation.
Everything you need to achieve more in less time
Get powerful productivity and security apps with Microsoft 365

Explore Other Categories
Home Blog Design How to Create the Perfect Handouts for a Presentation
How to Create the Perfect Handouts for a Presentation

As we presenters know, aiming for a flawless presentation experience involves not only top-notch presentation skills but also graphics, a well-thought-out presentation structure, and articulating both how to start a presentation and how to conclude a presentation. Yet, very little is said about presentation handouts and their role in large-scale meetings, or their value when securing business deals.
Seasoned presenters acknowledge the impact of a presentation handout, and today we’ll guide you in the process of creating these printed-format assets to make your presentation more memorable.
Table of Contents
What is a Presentation Handout?
The role of presentation handouts, why create handouts for large scale presentations, examples of effective handouts for presentations, how to create presentation handouts in powerpoint, how to create presentation handouts in google slides, best practices for presentation handouts, final words.
A presentation handout is a supplementary document provided to the audience by the presenter or the event’s organization during or before a presentation. The core purpose is to enhance the understanding and retention rate of the information shared or to provide contact points with the presenter via email, LinkedIn, website, or social media profiles.

Handouts in presentations allow attendees to follow along more easily, take notes on specific parts, and have a further reference – ideal in large corporation events. The talk may not fully cover information, like detailed metrics, supplementary graphs, etc.; thus, they can be featured inside the handout to provide additional background on the presentation topic. In short, think of handouts as deliverable presentation aids .

Picture yourself attending a series of presentations at a large-scale event, like a medical conference. How many research presentations can you retain in your head? 3-4 top, whereas perhaps you attended over 12 in the past 8 hours. Handouts for presentations simplify attendees’ efforts, as they have a palpable reference about the presentations they attended, who delivered the talk, the conference presentation slides , etc.
Another interesting point of view for handouts is when we position ourselves in the shoes of an attendee with a physical impairment, like lessened hearing capacity. In this situation, we can picture a handout example, as the presenter integrates the audience, even those who cannot fully participate, by delivering information in a physical format.
When covering examples of handouts for presentations, we can position ourselves in generalistic situations as follows.
Helping people with physical impairments
Handouts don’t necessarily have to be printed in text format. Braille handouts can be used to assist people with low visual acuity to understand the missing gaps between the speech and the visuals shown in the slides. Electronic devices with screen readers can assist, as well as an audible format of the handout.
For people with hearing impairments, printed handouts summarizing the presentation’s key points are valid, but another creative method is to insert a QR code in PowerPoint and link to a PDF document with the transcript of the presentation, plus the slides.
Illustrations and Diagrams
Think about hard-to-understand topics involving a series of charts or graphs to comprehend the disclosed information. Those same graphics can be given to the audience in the format of handouts, with callouts or visual aids that remind the attendees of the importance of those concepts.
Summarize Key Information
Suppose you attended a chef conference, where new technologies, methodologies, or recipes are shared in presentations. You can refer to the handouts for detailed instructions and focus on the training presentation in real time rather than taking notes.
Contact Data
Finally, we can consider a handout format for people who want to get in touch for business partnerships, academic collaborations, etc. Rather than delivering a business card, provide additional information about your work and deliver a handout.
Follow these steps to create handouts in PowerPoint.
Open your presentation in PowerPoint. Go to the View tab and find Handout Master .

You can customize the appearance of your handout by adding a header, date, logo, contact details, etc. This works exactly the same as Slide Master in PowerPoint , so all changes will be reflected on all pages in your handout.

Now, go to File > Export and select Create Handouts .

Click on the Create Handouts button, and you will be prompted with a context menu with the following options:
- Notes next to slides
- Blank lines next to slides
- Notes below slides
- Blank lines below slides
- Outline only
Select the option you prefer. We highly recommend selecting Paste to add a tiny version of the slides to your new handouts document.

Once that’s done, a new Microsoft Word document will open with your presentation handouts, which can also be customized from Word.

For Google Slides, the instructions are much simpler. Select your desired presentation in Google Slides and go to File > Print Preview . All options for how to print slides in Google Slides are now available.

The option we’re interested in is the menu below the top bar that says 1 slide without notes .

Open that and select Handout , with the number of slides per page you prefer.

Then click on Print, and a new PDF document will be generated. Unlike PowerPoint, you have to edit everything beforehand or opt for a PDF editor like Adobe Acrobat.
Handouts should be concise. The idea is to summarize information, not to confuse the audience with an overwhelming amount of data. Although these recommendations are valid for all handouts created with PowerPoint templates and Google Slides, the same rules apply to handouts created in Graphic Design Software (Adobe Illustrator, Corel Draw, etc.), as it’s tempting to keep adding unnecessary data or complex illustration effects.
Sharing your handout before the presentation starts is advisable, as it’s the moment most attendees will gather and where the expectation about what the talk will be about is at its highest. In our experience, the audience tends to grow restless toward the last 5 minutes of your presentation, with some attendees leaving if they have to attend another conference with a very limited timeframe between both. Distributing a handout during the presentation is distracting and will negatively impact your presentation’s performance.
Finally, as you would do with poster presentations , focus on readability. Avoid using heavily contrasting colors or text that looks too small to read for the sake of adding more data. The handout is a tool to complement your presentation, not to summarize countless words.
Handouts for presentations are not an optional add-in. They are a vital element of effective academic and business presentations. By providing a clear structure to your handout or using digital mediums to help people with impairments, you are taking into account accessibility, one of the best practices you can engage early on in your path to becoming a professional presenter.
Like this article? Please share
Presentation Ideas, Presentation Tips Filed under Design
Related Articles

Filed under Presentation Ideas • August 29th, 2024
How to Make a Presentation Longer: 7 Strategies to Master
Extend your talk in style. Join us to discover how to make a presentation longer while providing a high-end experience to your audience.

Filed under Google Slides Tutorials • August 29th, 2024
How to Insert an Equation in Google Slides
Make your math-related slides stand out by learning the different methods for how to insert an equation in Google Slides.

Filed under Google Slides Tutorials • August 6th, 2024
How to Use Google Slides Strikethrough Text
Customize your presentation slides by using Google Slides strikethrough and add a factor of humor, emphasize, or track changes in a truly visual method.
Leave a Reply
Handout Essentials: A Guide To Creating Memorable Presentation Handouts
Hrideep barot.
- Presentation

Creating effective presentation handouts is a crucial aspect of enhancing audience engagement and understanding during and after a presentation. The choice of tools plays a vital role in shaping the quality and visual appeal of these handouts. Various tools, from traditional word processors like Microsoft Word to design-focused platforms like Canva and Adobe InDesign, offer unique features and functionalities. Each tool caters to different user preferences, design needs, and collaboration requirements. In this context, exploring the pros and cons of popular tools becomes
- What Are Presentation Handouts?
- What Is The Importance Of Presentation Handouts?
- Ways To Create Memorable Presentation Handouts.
Tools One Could Use For Creating A Presentation Handout.
- Conclusion.
What Are Presentation Handouts?
Presentation handouts serve as valuable tools to complement and reinforce information shared during a presentation. These materials are typically distributed to the audience before, during, or after the presentation , offering a more comprehensive understanding of the subject matter.
In printed form, handouts may include outlines, summaries, charts, or key visuals, providing tangible references that attendees can follow along with during the presentation and keep for future reference . By offering this supplementary material, presenters aim to enhance the learning experience and ensure that the audience retains essential information.
Whether in print or digital form, presentation handouts play a crucial role in knowledge transfer and retention. They serve as valuable reference materials, offering the audience a roadmap to navigate complex information. Additionally, well-crafted handouts can facilitate post-event reflection and encourage further exploration of the presented topic, transforming a one-time presentation into an ongoing learning experience for the audience.

What Is The Importance Of Presentation Handouts?
The importance of presentation handouts lies in their ability to enhance the overall effectiveness of a presentation and contribute to the audience’s learning experience. Here are several key reasons why presentation handouts are valuable:
1. Comprehensive Reference:
Presentation handouts provide the audience with a tangible and comprehensive reference to the information presented . Attendees can follow along with the speaker, refer back to key points, and have a structured outline of the content, aiding in better understanding and retention.
2. Reinforcement of Key Concepts:
Handouts reinforce the key concepts and messages of the presentation. By combining visual and written elements, handouts can emphasize important information , making it more likely that the audience will grasp and remember key takeaways.
3. Post-Presentation Review:
Handouts serve as a post-presentation review tool. Attendees can revisit the material after the event, reinforcing their understanding and allowing for a deeper exploration of the topic . This supports long-term retention of the information.
4. Customization and Personalization:
Presenters can customize handouts to suit the specific needs of their audience. This might include additional resources, references, or supplemental material that can further engage participants and cater to diverse learning styles.
5. Audience Engagement:
Handouts encourage audience engagement during the presentation. Attendees can annotate, take notes, and actively participate in discussions. Interactive elements in digital handouts can further enhance engagement.
6. Accessibility:
Digital handouts, especially in formats like PDFs or PowerPoint presentations , are easily accessible. Attendees can access them on various devices, fostering convenience and ensuring that the information remains available long after the presentation concludes.
7. Sustainability:
In the context of environmental sustainability, digital handouts offer an eco-friendly alternative to printed materials . This aligns with modern trends toward reducing paper usage and promoting greener practices.
8. Continued Learning:
Well-crafted handouts can serve as a starting point for continued learning. They can include additional resources, recommended readings, or links to relevant websites , encouraging the audience to explore the topic further.
Check this out to also know how to ace group presentations:
In summary, presentation handouts play a crucial role in supporting the presenter’s message, engaging the audience, and facilitating a more thorough understanding and retention of the presented material. Whether in print or digital form, these materials extend the impact of a presentation beyond the event itself.
Ways To Create Memorable Presentation Handouts

Creating memorable presentation handouts involves thoughtful planning, visual appeal, and alignment with the presentation’s goals. Here are strategies to make handouts more memorable:
1. Visual Design:
Consistent Theme: A cohesive theme reinforces the brand and aids in recognition. Ensure that fonts, colors, and imagery align with the overall aesthetic of the presentation, creating a seamless visual experience for the audience.
Graphics and Images : Thoughtfully chosen visuals enhance understanding. Infographics, charts, and relevant images break down complex information, making it more digestible for the audience.
2. Clear Structure:
Logical Flow: Arrange information in a sequence that mirrors the presentation. A logical flow allows the audience to follow along effortlessly, enhancing comprehension.
White Space: Purposeful use of white space prevents visual overload. It provides a visual break between elements, making the content more digestible.
3. Engaging Content:
Concise Text: Brevity is key. Each point should be succinct, conveying essential information without overwhelming the audience. This facilitates better retention.
Use of Examples: Real-world examples bring concepts to life. They provide context and relevance, making the content more memorable for participants.
4. Interactivity:
Spaces for Notes: Dedicated areas for notes encourage active engagement. Participants can jot down thoughts, questions, or personal reflections, fostering a sense of involvement.
QR Codes or Links: Incorporate QR codes or links to additional resources. This not only enhances interactivity but also allows participants to delve deeper into topics of interest.
5. Incorporate Branding:
Logo and Brand Elements : Prominently display the logo and relevant branding elements. Consistent branding across materials reinforces the presenter’s identity and message.
Quality Printing (for Physical Handouts):
High-Quality Paper: Opt for a paper that feels substantial and professional. The tactile experience of quality paper can contribute to a positive perception of the handouts.
Readable Fonts: Choose fonts that are easy to read, even from a distance. The goal is to make the content accessible to all participants.
6. Digital Enhancements:
Hyperlinks and Multimedia: Hyperlink relevant sections for easy navigation in digital formats. Including multimedia elements, such as videos or interactive content, adds dynamism to the handouts.
Responsive Design: Ensure that digital handouts are responsive to various devices. A user-friendly design accommodates different screen sizes and devices.
7. Highlight Key Points:
Emphasis Techniques: Utilize formatting tools to emphasize crucial information. Whether through bolding, italics, or color, draw attention to key points for better focus.
Post-Presentation Resources:
Additional Reading: Provide a curated list of readings or resources for further exploration. This demonstrates a commitment to ongoing learning and offers participants avenues for continued engagement.
Contact Information: Include clear contact details for presenters or subject matter experts. This facilitates post-presentation communication, encouraging participants to reach out with questions or feedback.
8. Feedback Section:
Survey or Feedback Form: Design a concise survey or feedback form. Collecting participant feedback is invaluable for refining future presentations and tailoring content to the audience’s needs.
9. Call-to-Action (CTA):
Pro: End with a clear call to action for the audience to take the next steps. A well-crafted CTA guides the audience on what actions to consider after reviewing the handout.
Con: Unclear or demanding CTAs may lead to inaction . If the call-to-action is ambiguous or if it requires too much effort from the audience, it may result in a lack of follow-through. Ensure that your CTA is straightforward, feasible, and aligns with the goals of your presentation.
Check this out to know how to research for a presentation:
By meticulously implementing these strategies , presenters can create handouts that not only serve as supportive materials but also elevate the overall presentation experience for participants.
Creating a presentation handout involves selecting tools that offer flexibility, design capabilities, and ease of use. Here are some tools you can consider for crafting effective presentation handouts:
Microsoft Word:
Pros: Familiar interface for most users, extensive font and formatting options, compatibility with various file formats, ability to track changes and collaborate through Microsoft 365.
Cons: Limited design features compared to dedicated design tools, potential formatting challenges when collaborating with users of other word processors.
Google Docs:
Pros: Excellent real-time collaboration features, cloud-based accessibility from any device, auto-save functionality, and integration with other Google Workspace apps.
Cons: Basic design options, may lack advanced formatting features needed for complex layouts.
Pros: User-friendly with a drag-and-drop interface, extensive template library for quick design, and a diverse range of visual elements and icons, suitable for both beginners and professionals.
Cons: While many features are free, some advanced elements and templates are paid, and may not be suitable for intricate designs.
Adobe InDesign:
Pros: Industry-standard design tools, precise control over layout, advanced typography options, and support for complex document structures.
Cons: Steeper learning curve, may be overwhelming for beginners, subscription cost for full access.
Microsoft PowerPoint:
Pros: Familiar interface for creating presentations, easy integration of multimedia elements, ability to convert presentations to printable handouts.
Cons: Primarily designed for presentations, not as feature-rich as design-specific tools for complex layouts.
Google Slides:
Pros: Seamless collaboration features, integration with other Google Workspace apps, cloud-based accessibility.
Cons: Limited design options compared to PowerPoint, may not support intricate formatting needs.
Lucidpress:
Pros: Online collaboration, templates available for various document types, professional-grade design tools.
Cons: Some features may require a subscription, and may not be as widely known or used as other tools.
Piktochart:
Pros: User-friendly interface, suitable for beginners, focuses on infographics and visual storytelling.
Cons: Free version limitations, may not be as versatile for general document creation.
Conclusion .
Selecting the right tool for crafting presentation handouts depends on factors such as design complexity, collaboration needs, and personal familiarity. Microsoft Word and Google Docs provide straightforward solutions with collaborative features, while design-specific tools like Canva, Adobe InDesign, and Visme offer advanced creative options. The choice between PowerPoint, Google Slides, Lucidpress, Piktochart, Venngage, and design software like Adobe Illustrator depends on the balance between user proficiency, required features, and budget considerations. By weighing the pros and cons, presenters can make a strategic choice that aligns with their presentation objectives and enhances the overall impact on their audience.
Click here to embark on an enlightening adventure.

Enroll in our transformative 1:1 Coaching Program
Schedule a call with our expert communication coach to know if this program would be the right fit for you

How to Brag Like a Pro as a Speaker

Less is More! Tips to Avoid Overwhelming Your Audience

What does it mean to Resonate with the Audience- Agreement, Acceptance, Approval
- [email protected]
- +91 98203 57888
Get our latest tips and tricks in your inbox always
Copyright © 2023 Frantically Speaking All rights reserved
13 Best Practice Tips for Effective Presentation Handouts
by Olivia Mitchell | 75 comments

Your presentation handout is the lasting concrete manifestation of your presentation. It’s an important part of the total experience for the audience:
But most of us focus on preparing what happens during the presentation, not what happens afterwards . Here are the benefits of having handouts:
Benefits for the presenter
- They allow you to cut down on the amount of material you cover in your presentation and so not commit information overload .
- They allow you to stop worrying about forgetting what you want to say .
- Audience members will have a concrete reminder making your presentation more memorable.
- Audience members can easily contact you later.
Benefits for audience members
- They allow audience members to relax about having to note down what you’re saying.
- If they like taking notes, they’ve got a place to do it.
- If they’re inspired by your topic, they’ve got more information on it.
- If they want to refresh themselves later on what you covered they’ve got a place to go.
Tips for Presentation Handouts
1. prepare your handouts in plenty of time.
Don’t leave it till the last moment to create your handout. I’ve been guilty of this. We’re most concerned about the actual presentation and not making a fool of ourselves up on the stage so you work on what you’re going to say and the slides, and then 30 mins before your presentation you realise you should have a handout and hurriedly put something together. Handouts are much too important to be relegated to an afterthought.
2. Don’t just print out your slides
This is lazy and not effective. If your slides are bullet-point slides (not recommended) then they will often be cut-down sentences which will no longer make sense to the reader a week later. And if they are visual slides (recommended) then they’re also unlikely to make sense without additional text. If you’re presenting with visual PowerPoint slides, one of the easiest ways of creating a handout is to type the text of the handout in the “Notes” pane of the PowerPoint edit screen. Then print your slides as “Notes”. You’ll have an effective handout.
3. Ensure your handout reflects your presentation
An audience member should be able to relate the handout to the presentation they’ve just attended. If you use the Notes pane of PowerPoint as I’ve suggested above this will happen naturally as you’ll be guided by the visuals you’re using in the presentation. You handout should have the same title as your presentation and should follow the same structure so that audience members can easily find the information they want.
4. Add more information
Presentations are not a good format for transferring a lot of information . However, they are good for inspiring people to find out more about a topic. That extra information can be in the handout. And if you’re the sort of person who wants to tell the audience everything you know about the topic… you can put it in the handout.
5. Include references
If you’re citing research do include the references in the handout. For most presentations (scientific presentations to a scientific audience would be an exception), don’t clutter up your presentation or your slides with references. But do be able to say: “The reference for this research is in your handout.” Let your audience know where they can find out more: books, websites, blogs etc.
6. Consider creating an action sheet
Handouts are a great place to help people put ideas from your presentation into action. You could either list a series of actions that people can take, or provide a worksheet that people fill in on what actions they will take as a result of your presentation. Have people fill in the action sheet near the end of your presentation.
7. Make your handout stand-alone
The handout may be passed onto people who were not at your presentation. Or an audience member may look at it a year from now when they’ve forgotten most of your presentation. Make sure that it will make sense to them. For people who weren’t present include brief credibility-establishing information about you.
8. Provide white space
Some people like to take notes during a presentation. Provide plenty of white space (or even some blank pages at the back) so that they can take notes on the handout and so keep all the information related to your presentation in one place.
9. Make your handout look professional
The handout is the concrete reminder of your presentation. It may also get passed onto other people who were not at your presentation. So it should enhance the perception people have of you:
- Have someone proofread it
- Create a consistent look and feel with your brand (this may include a logo and colors)
10. Consider what additional resources you can provide for your audience
You’re not limited to paper. My bioethics teacher friend who presents at bioethics and education conferences across the globe provides each of her attendees with a DVD with lesson plans and resources.
11. Consider creating a webpage
Cliff Atkinson suggests creating a “home page” for your presentation in his book The Backchannel . If you don’t have a website, you could create a squidoo lens or a Facebook Fan page . Or if you’d like to do more than that, create a wiki website (try pbworks or wikispaces ) or use blog software. Both of these can be done for free and just a little technical courage (techphobics shouldn’t try this). All of these options allow readers to comment on what you’ve written, so it’s a great way of continuing the conversation with audience members. For instance, audience members can ask you questions they weren’t able to ask at the time.
If you decide to go the web way, you can cut down the hard copy handout to one page with the most important points from your presentation, your contact details and the web address.
12. Distribute the handout at the beginning of your presentation
This is a perennial topic of debate amongst presenters. Some people are concerned that if they distribute the handout first, people will stop listening and start leafing through it. The problem here is not the handout, it’s that your presentation is not engaging enough.
Not distributing it till after the presentation suggests that you think you know best how people should pay attention to your information. Let your audience decide for themselves.
Recent research suggests that providing handouts to university students before the lecture does not harm their learning.
Update: In the comments to this post, Cathy Moore , Mike Slater and Adam Lawrence have identified three good reasons for distributing your handout after your presentation. I’ve highlighted these reasons in a new post: Three good reasons to distribute your handout after your presentation .
13. Do tell people if it’s not in the handout
Finally, if you go off on a tangent in reply to a question, do let them know that the answer is not in the handout.
Free Course
How to tame your fear of public speaking.
In this video-training series (plus workbook with transcripts) you’ll learn:
- The three things you must know BEFORE you begin to tackle your fear of public speaking
- Why the positive-negative thought classification doesn’t work for fear of public speaking
- The two powerful self-talk tweaks that can make an immediate difference.
You have Successfully Subscribed!
I ask for your email address to deliver the course to you and so that I can keep on supporting and encouraging you with tips, ideas and inspiration. I will also let you know when my group program is open for enrolment. I will keep your email safe and you can unsubscribe at any time.
75 Comments

Excellent article.I would like to introduce a website Slidebazaar with thousands of professional PowerPoint templates which can be easily customizable with high quality

This is very interesting, Thank you for sharing your article. I really appreciate your efforts and I will be waiting for your further post thanks once again

I really enjoyed this site. This is such a Great resource that you are providing and you give it away for free.

Very interesting. Thank you for all the information on the topic.

Suitable for Investment Company HYIP Investment Website hyip templates Templates Professional modern and contemporary design

I have a project and I am going to make a presentation in the next week. I hope this post will be helpful for other like me who want to present something.

Very interesting. Thank you for all the information on the topic

Thanks for the advice! It’s really helpful! At some point, everyone will need your advice. It’s nice when you can find really useful information on the Internet. Unfortunately, not all information is reliable. But I trust you

Your content is nothing short of brilliant in many ways. I think this is engaging and eye-opening material. Thank you so much for caring about your content and your readers.

Thanks for the post! This is a great guide and help for creating presentations. I think that help is always needed, even with difficulties it is easier to cope together. What to say about grants

This is a great thing, I think everyone feels this information is very valuable, thank you usps tracking

Thank you so much for such a wonderfully and well presented subjective view of all that a presentation entails! Very much appreciated! It always good to get a second opinion when making sure you’ve dotted your “I’s” and crossed your “T’s”.

“Thanks for sharing such an informative article! I found your insights that s are so particularly interesting. In fact, I wrote a related post on my blog unique hyip templates that expands on some of the points you mentioned. I’d love to hear your thoughts on it and feel free to share it with your article too. Keep up the great work!”

“Thanks for sharing an informative article! I found your insights that are so particularly most effective and interesting. In fact, I wrote a related post on my blog and website unique hyip templates that expands on some of the points you mentioned. I’d love to hear your thoughts on it and feel free to share it with your article too. Keep up the great work.

SocialWave is the ultimate SMM Panel that empowers businesses and influencers to boost their social media presence like never before. With an intuitive and user-friendly interface, SocialWave offers a comprehensive suite of tools to manage and optimize all major social media platforms.

I’ve tried my fair share of smm panel before, but none measure up to Follower SMM in my experience. Their services are simply unparalleled in helping businesses expand their social media reach and gain valuable insights into their audience. The growth I’ve seen since using Follower SMM has been incredible!

Drifting techniques not only require excellent driving skills but also require understanding and creating a difference in drifting phases. Drift Boss

Drifting techniques not only require excellent driving skills but also require understanding and creating a difference in drifting phases
Recent posts
- Why striving to be authentic can be a trap
- The first time is never the best
- The Need to be Knowledgeable
- Would you wear clothes that clash?
- An unconventional approach to overcoming the fear of public speaking
Connect With Me

Recommended Books
Click here to see my favorite presentation books.
I earn a small commission when you buy a book from this page. Thank you!
- Audience (22)
- Content (62)
- Delivery (31)
- Nervousness (30)
- Powerpoint (37)
- Presentation blogs (2)
- Presentation books (4)
- Presentation critiques (9)
- Presentation myths (6)
- Presentation philosophy (5)
- Presentation research (11)
- Presentation skills (23)
- Presenting with Twitter (10)
- Visual thinking (3)
How to Tame your Fear of Public Speaking
- Do you have to perform perfectly?
- Do you beat yourself up if you don't?
- Would you talk to a friend the way you talk to yourself?
- Does it make sense that if you changed the way you talked to yourself, you could reduce your fear of public speaking?
I will show you exactly how in this free video training series and workbook.
Discover more from Speaking about Presenting
Subscribe now to keep reading and get access to the full archive.
Type your email…
Continue reading
We use essential cookies to make Venngage work. By clicking “Accept All Cookies”, you agree to the storing of cookies on your device to enhance site navigation, analyze site usage, and assist in our marketing efforts.
Manage Cookies
Cookies and similar technologies collect certain information about how you’re using our website. Some of them are essential, and without them you wouldn’t be able to use Venngage. But others are optional, and you get to choose whether we use them or not.
Strictly Necessary Cookies
These cookies are always on, as they’re essential for making Venngage work, and making it safe. Without these cookies, services you’ve asked for can’t be provided.
Show cookie providers
- Google Login
Functionality Cookies
These cookies help us provide enhanced functionality and personalisation, and remember your settings. They may be set by us or by third party providers.
Performance Cookies
These cookies help us analyze how many people are using Venngage, where they come from and how they're using it. If you opt out of these cookies, we can’t get feedback to make Venngage better for you and all our users.
- Google Analytics
Targeting Cookies
These cookies are set by our advertising partners to track your activity and show you relevant Venngage ads on other sites as you browse the internet.
- Google Tag Manager
- Infographics
- Daily Infographics
- Popular Templates
- Accessibility
- Graphic Design
- Graphs and Charts
- Data Visualization
- Human Resources
- Beginner Guides
Blog Beginner Guides How To Make a Good Presentation [A Complete Guide]
How To Make a Good Presentation [A Complete Guide]
Written by: Krystle Wong Jul 20, 2023

A top-notch presentation possesses the power to drive action. From winning stakeholders over and conveying a powerful message to securing funding — your secret weapon lies within the realm of creating an effective presentation .
Being an excellent presenter isn’t confined to the boardroom. Whether you’re delivering a presentation at work, pursuing an academic career, involved in a non-profit organization or even a student, nailing the presentation game is a game-changer.
In this article, I’ll cover the top qualities of compelling presentations and walk you through a step-by-step guide on how to give a good presentation. Here’s a little tip to kick things off: for a headstart, check out Venngage’s collection of free presentation templates . They are fully customizable, and the best part is you don’t need professional design skills to make them shine!
These valuable presentation tips cater to individuals from diverse professional backgrounds, encompassing business professionals, sales and marketing teams, educators, trainers, students, researchers, non-profit organizations, public speakers and presenters.
No matter your field or role, these tips for presenting will equip you with the skills to deliver effective presentations that leave a lasting impression on any audience.
Click to jump ahead:
What are the 10 qualities of a good presentation?
Step-by-step guide on how to prepare an effective presentation, 9 effective techniques to deliver a memorable presentation, faqs on making a good presentation, how to create a presentation with venngage in 5 steps.
When it comes to giving an engaging presentation that leaves a lasting impression, it’s not just about the content — it’s also about how you deliver it. Wondering what makes a good presentation? Well, the best presentations I’ve seen consistently exhibit these 10 qualities:
1. Clear structure
No one likes to get lost in a maze of information. Organize your thoughts into a logical flow, complete with an introduction, main points and a solid conclusion. A structured presentation helps your audience follow along effortlessly, leaving them with a sense of satisfaction at the end.
Regardless of your presentation style , a quality presentation starts with a clear roadmap. Browse through Venngage’s template library and select a presentation template that aligns with your content and presentation goals. Here’s a good presentation example template with a logical layout that includes sections for the introduction, main points, supporting information and a conclusion:

2. Engaging opening
Hook your audience right from the start with an attention-grabbing statement, a fascinating question or maybe even a captivating anecdote. Set the stage for a killer presentation!
The opening moments of your presentation hold immense power – check out these 15 ways to start a presentation to set the stage and captivate your audience.
3. Relevant content
Make sure your content aligns with their interests and needs. Your audience is there for a reason, and that’s to get valuable insights. Avoid fluff and get straight to the point, your audience will be genuinely excited.
4. Effective visual aids
Picture this: a slide with walls of text and tiny charts, yawn! Visual aids should be just that—aiding your presentation. Opt for clear and visually appealing slides, engaging images and informative charts that add value and help reinforce your message.
With Venngage, visualizing data takes no effort at all. You can import data from CSV or Google Sheets seamlessly and create stunning charts, graphs and icon stories effortlessly to showcase your data in a captivating and impactful way.

5. Clear and concise communication
Keep your language simple, and avoid jargon or complicated terms. Communicate your ideas clearly, so your audience can easily grasp and retain the information being conveyed. This can prevent confusion and enhance the overall effectiveness of the message.
6. Engaging delivery
Spice up your presentation with a sprinkle of enthusiasm! Maintain eye contact, use expressive gestures and vary your tone of voice to keep your audience glued to the edge of their seats. A touch of charisma goes a long way!
7. Interaction and audience engagement
Turn your presentation into an interactive experience — encourage questions, foster discussions and maybe even throw in a fun activity. Engaged audiences are more likely to remember and embrace your message.
Transform your slides into an interactive presentation with Venngage’s dynamic features like pop-ups, clickable icons and animated elements. Engage your audience with interactive content that lets them explore and interact with your presentation for a truly immersive experience.

8. Effective storytelling
Who doesn’t love a good story? Weaving relevant anecdotes, case studies or even a personal story into your presentation can captivate your audience and create a lasting impact. Stories build connections and make your message memorable.
A great presentation background is also essential as it sets the tone, creates visual interest and reinforces your message. Enhance the overall aesthetics of your presentation with these 15 presentation background examples and captivate your audience’s attention.
9. Well-timed pacing
Pace your presentation thoughtfully with well-designed presentation slides, neither rushing through nor dragging it out. Respect your audience’s time and ensure you cover all the essential points without losing their interest.
10. Strong conclusion
Last impressions linger! Summarize your main points and leave your audience with a clear takeaway. End your presentation with a bang , a call to action or an inspiring thought that resonates long after the conclusion.
In-person presentations aside, acing a virtual presentation is of paramount importance in today’s digital world. Check out this guide to learn how you can adapt your in-person presentations into virtual presentations .

Preparing an effective presentation starts with laying a strong foundation that goes beyond just creating slides and notes. One of the quickest and best ways to make a presentation would be with the help of a good presentation software .
Otherwise, let me walk you to how to prepare for a presentation step by step and unlock the secrets of crafting a professional presentation that sets you apart.
1. Understand the audience and their needs
Before you dive into preparing your masterpiece, take a moment to get to know your target audience. Tailor your presentation to meet their needs and expectations , and you’ll have them hooked from the start!
2. Conduct thorough research on the topic
Time to hit the books (or the internet)! Don’t skimp on the research with your presentation materials — dive deep into the subject matter and gather valuable insights . The more you know, the more confident you’ll feel in delivering your presentation.
3. Organize the content with a clear structure
No one wants to stumble through a chaotic mess of information. Outline your presentation with a clear and logical flow. Start with a captivating introduction, follow up with main points that build on each other and wrap it up with a powerful conclusion that leaves a lasting impression.
Delivering an effective business presentation hinges on captivating your audience, and Venngage’s professionally designed business presentation templates are tailor-made for this purpose. With thoughtfully structured layouts, these templates enhance your message’s clarity and coherence, ensuring a memorable and engaging experience for your audience members.
Don’t want to build your presentation layout from scratch? pick from these 5 foolproof presentation layout ideas that won’t go wrong.

4. Develop visually appealing and supportive visual aids
Spice up your presentation with eye-catching visuals! Create slides that complement your message, not overshadow it. Remember, a picture is worth a thousand words, but that doesn’t mean you need to overload your slides with text.
Well-chosen designs create a cohesive and professional look, capturing your audience’s attention and enhancing the overall effectiveness of your message. Here’s a list of carefully curated PowerPoint presentation templates and great background graphics that will significantly influence the visual appeal and engagement of your presentation.
5. Practice, practice and practice
Practice makes perfect — rehearse your presentation and arrive early to your presentation to help overcome stage fright. Familiarity with your material will boost your presentation skills and help you handle curveballs with ease.
6. Seek feedback and make necessary adjustments
Don’t be afraid to ask for help and seek feedback from friends and colleagues. Constructive criticism can help you identify blind spots and fine-tune your presentation to perfection.
With Venngage’s real-time collaboration feature , receiving feedback and editing your presentation is a seamless process. Group members can access and work on the presentation simultaneously and edit content side by side in real-time. Changes will be reflected immediately to the entire team, promoting seamless teamwork.

7. Prepare for potential technical or logistical issues
Prepare for the unexpected by checking your equipment, internet connection and any other potential hiccups. If you’re worried that you’ll miss out on any important points, you could always have note cards prepared. Remember to remain focused and rehearse potential answers to anticipated questions.
8. Fine-tune and polish your presentation
As the big day approaches, give your presentation one last shine. Review your talking points, practice how to present a presentation and make any final tweaks. Deep breaths — you’re on the brink of delivering a successful presentation!
In competitive environments, persuasive presentations set individuals and organizations apart. To brush up on your presentation skills, read these guides on how to make a persuasive presentation and tips to presenting effectively .

Whether you’re an experienced presenter or a novice, the right techniques will let your presentation skills soar to new heights!
From public speaking hacks to interactive elements and storytelling prowess, these 9 effective presentation techniques will empower you to leave a lasting impression on your audience and make your presentations unforgettable.
1. Confidence and positive body language
Positive body language instantly captivates your audience, making them believe in your message as much as you do. Strengthen your stage presence and own that stage like it’s your second home! Stand tall, shoulders back and exude confidence.
2. Eye contact with the audience
Break down that invisible barrier and connect with your audience through their eyes. Maintaining eye contact when giving a presentation builds trust and shows that you’re present and engaged with them.
3. Effective use of hand gestures and movement
A little movement goes a long way! Emphasize key points with purposeful gestures and don’t be afraid to walk around the stage. Your energy will be contagious!
4. Utilize storytelling techniques
Weave the magic of storytelling into your presentation. Share relatable anecdotes, inspiring success stories or even personal experiences that tug at the heartstrings of your audience. Adjust your pitch, pace and volume to match the emotions and intensity of the story. Varying your speaking voice adds depth and enhances your stage presence.

5. Incorporate multimedia elements
Spice up your presentation with a dash of visual pizzazz! Use slides, images and video clips to add depth and clarity to your message. Just remember, less is more—don’t overwhelm them with information overload.
Turn your presentations into an interactive party! Involve your audience with questions, polls or group activities. When they actively participate, they become invested in your presentation’s success. Bring your design to life with animated elements. Venngage allows you to apply animations to icons, images and text to create dynamic and engaging visual content.
6. Utilize humor strategically
Laughter is the best medicine—and a fantastic presentation enhancer! A well-placed joke or lighthearted moment can break the ice and create a warm atmosphere , making your audience more receptive to your message.
7. Practice active listening and respond to feedback
Be attentive to your audience’s reactions and feedback. If they have questions or concerns, address them with genuine interest and respect. Your responsiveness builds rapport and shows that you genuinely care about their experience.

8. Apply the 10-20-30 rule
Apply the 10-20-30 presentation rule and keep it short, sweet and impactful! Stick to ten slides, deliver your presentation within 20 minutes and use a 30-point font to ensure clarity and focus. Less is more, and your audience will thank you for it!
9. Implement the 5-5-5 rule
Simplicity is key. Limit each slide to five bullet points, with only five words per bullet point and allow each slide to remain visible for about five seconds. This rule keeps your presentation concise and prevents information overload.
Simple presentations are more engaging because they are easier to follow. Summarize your presentations and keep them simple with Venngage’s gallery of simple presentation templates and ensure that your message is delivered effectively across your audience.

1. How to start a presentation?
To kick off your presentation effectively, begin with an attention-grabbing statement or a powerful quote. Introduce yourself, establish credibility and clearly state the purpose and relevance of your presentation.
2. How to end a presentation?
For a strong conclusion, summarize your talking points and key takeaways. End with a compelling call to action or a thought-provoking question and remember to thank your audience and invite any final questions or interactions.
3. How to make a presentation interactive?
To make your presentation interactive, encourage questions and discussion throughout your talk. Utilize multimedia elements like videos or images and consider including polls, quizzes or group activities to actively involve your audience.
In need of inspiration for your next presentation? I’ve got your back! Pick from these 120+ presentation ideas, topics and examples to get started.
Creating a stunning presentation with Venngage is a breeze with our user-friendly drag-and-drop editor and professionally designed templates for all your communication needs.
Here’s how to make a presentation in just 5 simple steps with the help of Venngage:
Step 1: Sign up for Venngage for free using your email, Gmail or Facebook account or simply log in to access your account.
Step 2: Pick a design from our selection of free presentation templates (they’re all created by our expert in-house designers).
Step 3: Make the template your own by customizing it to fit your content and branding. With Venngage’s intuitive drag-and-drop editor, you can easily modify text, change colors and adjust the layout to create a unique and eye-catching design.
Step 4: Elevate your presentation by incorporating captivating visuals. You can upload your images or choose from Venngage’s vast library of high-quality photos, icons and illustrations.
Step 5: Upgrade to a premium or business account to export your presentation in PDF and print it for in-person presentations or share it digitally for free!
By following these five simple steps, you’ll have a professionally designed and visually engaging presentation ready in no time. With Venngage’s user-friendly platform, your presentation is sure to make a lasting impression. So, let your creativity flow and get ready to shine in your next presentation!
Discover popular designs

Infographic maker

Brochure maker

White paper online

Newsletter creator

Flyer maker

Timeline maker

Letterhead maker

Mind map maker

Ebook maker
How it works
Transform your enterprise with the scalable mindsets, skills, & behavior change that drive performance.
Explore how BetterUp connects to your core business systems.
We pair AI with the latest in human-centered coaching to drive powerful, lasting learning and behavior change.
Build leaders that accelerate team performance and engagement.
Unlock performance potential at scale with AI-powered curated growth journeys.
Build resilience, well-being and agility to drive performance across your entire enterprise.
Transform your business, starting with your sales leaders.
Unlock business impact from the top with executive coaching.
Foster a culture of inclusion and belonging.
Accelerate the performance and potential of your agencies and employees.
See how innovative organizations use BetterUp to build a thriving workforce.
Discover how BetterUp measurably impacts key business outcomes for organizations like yours.
Daring Leadership Institute: a groundbreaking partnership that amplifies Brené Brown's empirically based, courage-building curriculum with BetterUp’s human transformation platform.

- What is coaching?
Learn how 1:1 coaching works, who its for, and if it's right for you.
Accelerate your personal and professional growth with the expert guidance of a BetterUp Coach.
Types of Coaching
Navigate career transitions, accelerate your professional growth, and achieve your career goals with expert coaching.
Enhance your communication skills for better personal and professional relationships, with tailored coaching that focuses on your needs.
Find balance, resilience, and well-being in all areas of your life with holistic coaching designed to empower you.
Discover your perfect match : Take our 5-minute assessment and let us pair you with one of our top Coaches tailored just for you.
Find your coach
-1.png "good presentation handout")
Research, expert insights, and resources to develop courageous leaders within your organization.
Best practices, research, and tools to fuel individual and business growth.
View on-demand BetterUp events and learn about upcoming live discussions.
The latest insights and ideas for building a high-performing workplace.
- BetterUp Briefing
The online magazine that helps you understand tomorrow's workforce trends, today.
Innovative research featured in peer-reviewed journals, press, and more.
Founded in 2022 to deepen the understanding of the intersection of well-being, purpose, and performance
We're on a mission to help everyone live with clarity, purpose, and passion.
Join us and create impactful change.
Read the buzz about BetterUp.
Meet the leadership that's passionate about empowering your workforce.

For Business
For Individuals
How to give a good presentation that captivates any audience

Jump to section
What are the main difficulties when giving presentations?
How to create an effective presentation, after that, how do i give a memorable presentation, how to connect with the audience when presenting.
If you’ve ever heard someone give a powerful presentation, you probably remember how it made you feel. Much like a composer, a good speaker knows precisely when each note should strike to captivate their audience’s attention and leave them with a lasting impression.
No one becomes a great public speaker or presenter without practice. And almost everyone can recall a time one of their presentations went badly — that’s a painful part of the learning process.
Whether you’re working within a small creative team or a large organization, public speaking and presentation skills are vital to communicating your ideas. Knowing how to present your vision can help you pitch concepts to clients, present ideas to your team, and develop the confidence to participate in team meetings.
If you have an upcoming presentation on the horizon and feel nervous, that’s normal. Around 15-30% of the general population experience a fear of public speaking . And, unfortunately, social anxiety is on the rise, with a 12% increase in adults over the last 20 years .
Learning how to give a good presentation can dismantle your fears and break down these barriers, ensuring you’re ready to confidently share your point of view.
It’s the week before your presentation, and you’re already feeling nervous . Maybe there’ll be an important mentor in the room you need to impress, or you’re looking for an opportunity to show your boss your value. Regardless of your countless past presentations, you still feel nervous.
Sharing your vision and ideas with any sized group is intimidating. You’re likely worrying about how you’ll perform as a presenter and whether the audience will be interested in what you offer. But nerves aren’t inherently negative — you can actually use this feeling to fuel your preparation.

It’s helpful to identify where your worries are coming from and address your fears. Here are some common concerns when preparing for an upcoming presentation:
Fear of public speaking: When you share your ideas in front of a group, you’re placing yourself in a vulnerable position to be critiqued on your knowledge and communication skills . Maybe you feel confident in your content, but when you think about standing in front of an audience, you feel anxious and your mind goes blank.
It’s also not uncommon to have physical symptoms when presenting . Some people experience nausea and dizziness as the brain releases adrenaline to cope with the potentially stressful situation . Remember to take deep breaths to recenter yourself and be patient, even if you make a mistake.
Losing the audience’s attention: As a presenter, your main focus is to keep your audience engaged. They should feel like they’re learning valuable information or following a story that will improve them in life or business.
Highlight the most exciting pieces of knowledge and ensure you emphasize those points in your presentation. If you feel passionate about your content, it’s more likely that your audience will experience this excitement for themselves and become invested in what you have to say.
Not knowing what content to place on presentation slides: Overloading presentation slides is a fast way to lose your audience’s attention. Your slides should contain only the main talking points and limited text to ensure your audience focuses on what you have to say rather than becoming distracted by the content on your slides.
Discomfort incorporating nonverbal communication: It’s natural to feel stiff and frozen when you’re nervous. But maintaining effective body language helps your audience stay focused on you as you speak and encourages you to relax.
If you struggle to incorporate body language into your presentations, try starting small by making hand gestures toward your slides. If you’re working with a large audience, use different parts of the stage to ensure everyone feels included.
Each presenter has their own personal brand and style. Some may use humor to break the ice, while others might appeal to the audience’s emotional side through inspiring storytelling.
Watching online presentations, such as TED talks, is an excellent way to expose yourself to various presentation styles and develop your own. While observing others, you can note how they carry themselves on stage and learn new ways to keep your audience engaged.
Once you’ve addressed what’s causing your fears, it’s time to prepare for a great presentation. Use your past experience as inspiration and aim to outshine your former self by learning from your mistakes and employing new techniques. Here are five presentation tips to help you create a strong presentation and wow your audience:
1. Keep it simple
Simple means something different to everyone.
Before creating your presentation, take note of your intended audience and their knowledge level of your subject. You’ll want your content to be easy for your intended audience to follow.
Say you’re giving a presentation on improving your company’s operational structure. Entry-level workers will likely need a more straightforward overview of the content than C-suite leaders, who have significantly more experience.
Ask yourself what you want your audience to take away from your presentation and emphasize those important points. Doing this ensures they remember the most vital information rather than less important supporting ideas. Try organizing these concepts into bullet points so viewers can quickly identify critical takeaways.
2. Create a compelling structure
Put yourself in your audience member’s shoes and determine the most compelling way to organize your information. Your presentation should be articulate , cohesive, and logical, and you must be sure to include all necessary supporting evidence to strengthen your main points.
If you give away all of your answers too quickly, your audience could lose interest. And if there isn’t enough supporting information, they could hit a roadblock of confusion. Try developing a compelling story that leads your audience through your thought processes so they can experience the ups and downs alongside you.
By structuring your presentation to lead up to a final conclusion, you’re more likely to keep listeners’ attention. Once you’ve reached that conclusion, you can offer a Q&A period to put any of their questions or concerns to rest.
3. Use visual aids
Appealing to various learning styles is a great way to keep everyone on the same page and ensure they absorb your content. Visual aids are necessary for visual learners and make it easier for people to picture your ideas.
Aim to incorporate a mixture of photos, videos, and props to engage your audience and convey your key points. For instance, if you’re giving a presentation on anthropology subject matter, you could show your audience an artifact to help them understand how exciting a discovery must have been.
If your presentation is long, including a video for your audience to watch is an excellent way to give yourself a break and create new jumping-off points for your speech.
4. Be aware of design techniques and trends
Thanks to cutting-edge technology and tools, you have numerous platforms at your disposal to create a good presentation. But keep in mind that although color, images, and graphics liven things up, they can cause distraction when misused.
Here are a few standard pointers for incorporating visuals on your slides:
- Don’t place blocks of small text on a single slide
- Use a minimalistic background instead of a busy one
- Ensure text stands out against the background color
- Only use high-resolution photos
- Maintain a consistent font style and size throughout the presentation
- Don’t overuse transitions and effects
5. Try the 10-20-30 rule
Guy Kawasaki, a prominent venture capitalist and one of the original marketing specialists for Apple, said that the best slideshow presentations are less than 10 slides , last at most 20 minutes, and use a font size of 30. Following this strategy can help you condense your information, eliminate unnecessary ideas, and maintain your audience’s focus more efficiently.
Once you’re confident in creating a memorable presentation, it’s time to learn how to give one. Here are some valuable tips for keeping your audience invested during your talk:
Tip #1: Tell stories
Sharing an anecdote from your life can improve your credibility and increase your relatability. And when an audience relates to you, they’re more likely to feel connected to who you are as a person and encouraged to give you their full attention, as they would want others to do the same.
Gill Hicks utilized this strategy well when she shared her powerful story, “ I survived a terrorist attack. Here’s what I learned .” In her harrowing tale, Hicks highlights the importance of compassion, unconditional love , and helping those in need.
If you feel uncomfortable sharing personal stories, that’s okay. You can use examples from famous individuals or create a fictional account to demonstrate your ideas.
Tip #2: Make eye contact with the audience
Maintaining eye contact is less intimidating than it sounds. In fact, you don’t have to look your audience members directly in their eyes — you can focus on their foreheads or noses if that’s easier.
Try making eye contact with as many people as possible for 3–5 seconds each. This timing ensures you don’t look away too quickly, making the audience member feel unimportant, or linger too long, making them feel uncomfortable.
If you’re presenting to a large group, direct your focus to each part of the room to ensure no section of the audience feels ignored.

Tip #3: Work on your stage presence
Although your tone and words are the most impactful part of your presentation, recall that body language keeps your audience engaged. Use these tips to master a professional stage presence:
- Speak with open arms and avoid crossing them
- Keep a reasonable pace and try not to stand still
- Use hand gestures to highlight important information
Tip #4: Start strong
Like watching a movie trailer, the first seconds of your talk are critical for capturing your audience’s attention. How you start your speech sets the tone for the rest of your presentation and tells your audience whether or not they should pay attention. Here are some ways to start your presentation to leave a lasting impression:
- Use a quote from a well-known and likable influential person
- Ask a rhetorical question to create intrigue
- Start with an anecdote to add context to your talk
- Spark your audience’s curiosity by involving them in an interactive problem-solving puzzle or riddle
Tip #5: Show your passion
Don’t be afraid of being too enthusiastic. Everyone appreciates a speaker who’s genuinely excited about their field of expertise.
In “ Grit: The Power of Passion and Perseverance ,” Angela Lee Duckworth discusses the importance of passion in research and delivery. She delivers her presentation excitedly to show the audience how excitement piques interest.
Tip #6: Plan your delivery
How you decide to deliver your speech will shape your presentation. Will you be preparing a PowerPoint presentation and using a teleprompter? Or are you working within the constraints of the digital world and presenting over Zoom?
The best presentations are conducted by speakers who know their stuff and memorize their content. However, if you find this challenging, try creating notes to use as a safety net in case you lose track.
If you’re presenting online, you can keep notes beside your computer for each slide, highlighting your key points. This ensures you include all the necessary information and follow a logical order.

Tip #7: Practice
Practice doesn’t make perfect — it makes progress. There’s no way of preparing for unforeseen circumstances, but thorough practice means you’ve done everything you can to succeed.
Rehearse your speech in front of a mirror or to a trusted friend or family member. Take any feedback and use it as an opportunity to fine-tune your speech. But remember: who you practice your presentation in front of may differ from your intended audience. Consider their opinions through the lens of them occupying this different position.
Tip #8: Read the room
Whether you’re a keynote speaker at an event or presenting to a small group of clients, knowing how to read the room is vital for keeping your audience happy. Stay flexible and be willing to move on from topics quickly if your listeners are uninterested or displeased with a particular part of your speech.
Tip #9: Breathe
Try taking deep breaths before your presentation to calm your nerves. If you feel rushed, you’re more likely to feel nervous and stumble on your words.
The most important thing to consider when presenting is your audience’s feelings. When you approach your next presentation calmly, you’ll put your audience at ease and encourage them to feel comfortable in your presence.
Tip #10: Provide a call-to-action
When you end your presentation, your audience should feel compelled to take a specific action, whether that’s changing their habits or contacting you for your services.
If you’re presenting to clients, create a handout with key points and contact information so they can get in touch. You should provide your LinkedIn information, email address, and phone number so they have a variety of ways to reach you.
There’s no one-size-fits-all template for an effective presentation, as your unique audience and subject matter play a role in shaping your speech. As a general rule, though, you should aim to connect with your audience through passion and excitement. Use strong eye contact and body language. Capture their interest through storytelling and their trust through relatability.
Learning how to give a good presentation can feel overwhelming — but remember, practice makes progress. Rehearse your presentation for someone you trust, collect their feedback , and revise. Practicing your presentation skills is helpful for any job, and every challenge is a chance to grow.
Understand Yourself Better:
Big 5 Personality Test
Elizabeth Perry, ACC
Elizabeth Perry is a Coach Community Manager at BetterUp. She uses strategic engagement strategies to cultivate a learning community across a global network of Coaches through in-person and virtual experiences, technology-enabled platforms, and strategic coaching industry partnerships. With over 3 years of coaching experience and a certification in transformative leadership and life coaching from Sofia University, Elizabeth leverages transpersonal psychology expertise to help coaches and clients gain awareness of their behavioral and thought patterns, discover their purpose and passions, and elevate their potential. She is a lifelong student of psychology, personal growth, and human potential as well as an ICF-certified ACC transpersonal life and leadership Coach.
How to write a speech that your audience remembers
6 presentation skills and how to improve them, 3 stand-out professional bio examples to inspire your own, tell a story they can't ignore these 10 tips will teach you how, how to make a presentation interactive and exciting, your guide to what storytelling is and how to be a good storyteller, reading the room gives you an edge — no matter who you're talking to, 18 effective strategies to improve your communication skills, writing an elevator pitch about yourself: a how-to plus tips, how to disagree at work without being obnoxious, the importance of good speech: 5 tips to be more articulate, the 11 tips that will improve your public speaking skills, 30 presentation feedback examples, fear of public speaking overcome it with these 7 tips, how to not be nervous for a presentation — 13 tips that work (really), 8 clever hooks for presentations (with tips), stay connected with betterup, get our newsletter, event invites, plus product insights and research..
3100 E 5th Street, Suite 350 Austin, TX 78702
- Platform Overview
- Integrations
- Powered by AI
- BetterUp Lead™
- BetterUp Manage™
- BetterUp Care®
- Sales Performance
- Diversity & Inclusion
- Case Studies
- Why BetterUp?
- About Coaching
- Find your Coach
- Career Coaching
- Communication Coaching
- Personal Coaching
- News and Press
- Leadership Team
- Become a BetterUp Coach
- BetterUp Labs
- Center for Purpose & Performance
- Leadership Training
- Business Coaching
- Contact Support
- Contact Sales
- Privacy Policy
- Acceptable Use Policy
- Trust & Security
- Cookie Preferences
12 Tips to Prepare Handouts in a Presentation
- By Judhajit Sen
- May 14, 2024
A presentation handout is a presentation aid given to people attending a lecture, conference presentation, or talk. It helps them understand the main points and remember what was said. It’s not just an executive summary of the slides; it can include more details about each topic. This makes it easier for the audience to grasp the essential ideas and refer back to them later.
A good handout adds extra value to a PowerPoint presentation by expanding on what was discussed and keeping the slides tidy. It can include dense facts and figures that might clutter the slides, making the presentation look clean and professional.
Creating a presentation handout make it easier for the audience to follow along and remember the key points. They’re also handy for people who couldn’t attend the presentation but still want to know what was discussed. So, an effective presentation handout isn’t just helpful for the presenter, it’s useful for everyone involved.
Key Takeaways
- Reinforce Memory: Creating a handout helps people remember key points from your presentation by allowing them to review the information later.
- Detailed Information: Handouts enable you to delve deeper into topics without overwhelming your audience during the presentation, especially useful for complex subjects.
- Enhanced Calls to Action: Including contact information or action prompts in handouts can facilitate follow-up actions, particularly beneficial in sales pitches or business presentations .
- Potential Distractions: Handouts might distract attendees, draw attention away from your verbal presentation, and potentially spoil surprises if read ahead.
- Information Security: Distributing sensitive information via handouts carries risks of unauthorized dissemination, potentially compromising confidentiality.
- Strategic Distribution: Deciding when to distribute handouts depends on factors such as presentation style and audience dynamics, with options including before, during, or at the end of your presentation. Sharing beforehand can enhance focus and convenience for note-taking, while delaying distribution may seem punitive.
Pros and Cons of Using Presentation Handouts

Handouts in a presentation have advantages and disadvantages. Here’s a breakdown of the arguments for and against them.
Arguments for using handouts –
Helps remember and reinforces points: Handouts are handy because they help people remember what you talked about. After your presentation, folks can take the papers home, review them again, and remember the important stuff. It keeps your presentation alive in their minds even after you’re done talking.
Allows more details: You can’t cover every tiny detail during presentations. You want to keep it lively and engaging. Handouts come to the rescue here. They let you go into more depth without overwhelming your audience. You can explain technical stuff, timelines, and numbers better. This can be helpful, especially for internal company presentations where you must cover all bases.
Strengthens the call to action: A good call to action make it easy for people to do what you want them to do. Handouts can make this happen. For example, in sales presentations , you can leave behind papers with all the info prospects need to contact you later. It simplifies things, especially if they need to talk it over with others first.
Arguments against using handouts –
Can be distracting: Some folks argue that handouts steal the show. Instead of paying attention to you, people might end up reading what’s on paper. It’s like having a side attraction that detracts from your central performance. Some even say it’s like shooting yourself in the foot because you’re giving people something else to focus on before you start.
Audience might read ahead: Presentations are all about building suspense and excitement. But if people read ahead, it spoils the surprise. Imagine you’re about to reveal a big secret, but everyone already knows what it is. It’s like the plot twist in a movie being spoiled before you even watch it. That’s not cool.
Loses control over information: Your information is precious, especially sensitive company information. Handing out papers with essential data can be risky. What if they get copied or end up in the wrong hands? It’s like giving away the keys to the kingdom. You want to keep your information safe and sound, not let it wander off where it shouldn’t.
Tips for Creating Effective Handouts in a Presentation

Creating a presentation with handouts is as crucial as planning your speech and slides. These tangible takeaways can reinforce your message, provide additional information, and serve as a lasting reference for your audience. Here are some key considerations to keep in mind when you create effective presentation handouts –
1. Plan Ahead: Don’t leave handout creation as a last-minute task. Allocate enough time to make your handout alongside your speech and slides. Rushing to put something together moments before your presentation can result in an ineffective and hastily made handout.
2. Avoid Printing Slides: Resist the temptation to simply go to print option with your slides. This approach lacks effectiveness and may only make sense to readers with additional context. Instead, create your handout by typing out the content in the Notes pane of your ppt software to create more informative handouts.
3. Reflect Your Presentation: Ensure that your handout mirrors the structure and content of your presentation. This cohesion allows audience members to easily connect them with the key information presented during the talk, enhancing comprehension and retention.
4. Add Extra Information: Use handouts to provide supplementary information your presentation couldn’t cover. This additional content can inspire further exploration of the topic and cater to audiences seeking more in-depth knowledge.
5. Include References: Include citations in your handout if you reference research or external sources during your presentation. This enables interested individuals to delve deeper into the subject matter and validates your claims.
6. Create Action Sheets: Consider including action-oriented content in your handouts to encourage audience members to apply the insights gained from your presentation. Action sheets or worksheets engage your audience and help reinforce critical takeaways.
7. Ensure Stand-Alone Clarity: Your handout should be understandable even to those who didn’t attend your presentation or revisit it later. Provide brief background information about yourself for context, ensuring that the content can stand alone as a valuable resource.
8. Provide White Space: Leave ample white space for notes pages on your presentation handout design so attendees can take notes. This encourages active engagement during the presentation and consolidates all relevant information in one accessible document.
9. Maintain Professionalism: Your handout represents you and your presentation slides, so it should reflect professionalism. Proofread diligently, maintain a consistent brand identity, and ensure the layout is visually appealing.
10. Offer Additional Resources: Explore alternative handout templates for sharing supplementary materials, such as DVDs, websites, or online platforms. Providing diverse resources caters to different preferences and extends the conversation beyond the confines of the presentation.
11. Consider Digital Options: Consider creating digital alternatives like webpages or social media pages besides Microsoft Word printed handouts. These platforms facilitate ongoing engagement, allowing audience members to comment, ask questions, and access additional resources.
12. Communicate Limitations: If certain information discussed during the presentation is not included in the handout, clarify it to your audience. This transparency prevents confusion and encourages direct engagement for further clarification.
Adhering to these guidelines ensures that your presentation handouts serve as valuable assets that complement your verbal delivery and contribute to a memorable and informative audience experience.
The Best Time to Distribute Handouts in a Presentation
Deciding when to distribute your handout isn’t about finding a perfect moment. To help you figure out what’s best for your situation, it’s good to know how timing can affect your audience –
Handout before the presentation: If you share your handout beforehand, some of your audience might peek ahead, which could split their attention during your talk. Think carefully if this suits your presentation style.
Handout during the presentation: Give out handouts when they can support what you’re saying visually or emphasize your points.
Handout after the presentation: If you choose this option, your handout should include your contact information. If you’re sending it electronically, PDF works well. Adding a copyright notice might be smart, depending on who’s getting it.
Tip – Sharing the reading material before the actual presentation can be helpful. Some worry it might make the audience fidgety or distract them, but experience often shows it doesn’t hurt their focus. Many appreciate not having to jot down everything, allowing them to focus better on your words. Plus, they can make their own notes right on the handout. Waiting until the end of the presentation to give it out might make it seem like a punishment.
Crafting Effective Handouts in a Presentation
Handouts serve as invaluable presentation aids in reinforcing key messages, offering additional insights, and providing lasting references for your audience. They extend the reach of your engaging presentations beyond the confines of the spoken word, offering tangible takeaways that enhance understanding and retention.
Planning ahead is essential when preparing handouts, avoiding last-minute rushes that can result in ineffective materials. Resist the urge to simply print out your slides; instead, craft reading material that reflect the structure and content of your presentation while providing supplementary information and references for further exploration.
Consider incorporating action-oriented content to encourage audience engagement and maintain professionalism through diligent proofreading and consistent branding. Offering diverse resources and digital alternatives ensures accessibility and caters to various preferences.
Deciding when to distribute handouts depends on your presentation style and audience dynamics. While sharing them beforehand may seem counterintuitive, it enhances focus and allows for note-taking convenience. Adhering to these guidelines ensures that the distributed content effectively complement your verbal delivery, contributing to a memorable and informative audience experience.
Frequently Asked Questions (FAQs)
1. Why are handouts necessary in a presentation?
Handouts help people remember key points and provide extra details not covered in slides, making it easy for the audience to grasp information.
2. How do handouts benefit both the speaker and the audience?
Handouts reinforce the speaker’s message and serve as a lasting reference for the audience. They allow them to review the material at their own pace, even if they can’t attend the presentation.
3. What are the advantages of using handouts during a presentation?
Handouts aid in memory retention, allow for more in-depth explanations and strengthen calls to action, such as providing contact information for follow-up purposes.
4. What are the possible drawbacks of using handouts in a presentation?
Handouts may distract from the speaker, spoil surprises in the presentation, and pose risks of information leakage, especially with sensitive data.
5. How should handouts be prepared effectively?
Handouts should be planned alongside the presentation, reflect its structure and content, include supplementary information and references, and encourage audience engagement through action-oriented content.
6. When is the best time to distribute handouts during a presentation?
The timing of handout distribution depends on the entire presentation style and audience dynamics. However, sharing them beforehand can enhance focus and convenience for note-taking, while distributing them afterward ensures accessibility for further reference.
Craft Stellar Handouts with Prezentium: Your Key to Memorable Presentations!
Are you looking to make better presentations? Prezentium offers expert assistance in crafting stellar handouts that reinforce your message and captivate your audience. With our AI-powered services, we ensure that the reading material are not just summaries of slides but comprehensive documents that add value to your presentation.
Our overnight presentation service guarantees timely delivery, providing you with meticulously designed handouts by the next business day. Need help transforming ideas into exquisite presentations? Our team of specialists is here to assist, offering header design and template creation expertise.
But that’s not all – our Zenith Learning program comprising presentation trainers combine structured problem-solving with interactive communication training workshops, ensuring that your handouts engage and resonate with your audience.
Don’t settle for ordinary handouts. Elevate your presentations with Prezentium and leave a lasting impression on your clients. Contact us today to learn more about how we can help you craft exceptional handouts that amplify the impact of your presentations.
Why wait? Avail a complimentary 1-on-1 session with our presentation expert. See how other enterprise leaders are creating impactful presentations with us.
Communication Methods: 5 Ways to Communicate at the Workplace
Corporate communication functions and its importance, barriers to effective communication: 14 common communication barriers.
- Delivery Techniques →
How to Create Engaging Presentation Handouts

So you want to create engaging handouts for your presentations, huh? You’re probably expecting this blog post to tell you exactly how to create amazing handouts in a few simple steps. Well, sorry to disappoint, but that’s not what this post is about. What I’m here to do is to give you the best tips and tricks to transform your ordinary handouts into something your audience will find exciting and inspiring. Creating engaging handouts is more than just picking a font and any old text to fill up the page. It’s about strategizing what content to include and how to make it visually appealing. While the exact form each handout takes will differ from presentation to presentation, the goal should always remain the same: to create something that people will enjoy reading. So let’s dive into exactly how to make your handouts attractive, informative, and truly engaging!
What Are Handouts in Presentations?
Handouts are material given to an audience of a presentation, typically including supplementary information and visuals which compliment the speaker’s discussion. Handouts can be distributed physically, or shared electronically through the internet. Regardless of their form, handouts are effective tools that help capture the interest of your audience and support the message of your core presentation. When creating handouts for a presentation, there is a debate as to whether or not you should include all content discussed in the presentation, or simply key points and takeaways. On one hand, providing handouts with too much detail can lead to audiences relying on them as a crutch and losing focus during important points in the presentation. On the other hand, by limiting what is included in handouts it can leave audiences feeling under-informed once they leave your presentation and lose some of the impact of your talk. It is important to find balance and decide which approach works best for particular presentations based on who your target audience is going to be and what you’re hoping attendees will gain from participating in your talk. In the next section we will examine more closely what the purpose of having handouts in presentations may be so that you can make an informed decision based on selecting the right materials for your specific needs.
What Is the Purpose of Handouts in Presentations?
Handouts can be an effective tool for reinforcing key points and engaging your audience , but it is important to consider their purpose when designing your presentation. Handouts can have both positive and negative impacts on a presenter’s objectives. On one hand, handouts can provide an opportunity for the audience to connect and interact with the presentation, aiding comprehension. They can also help to increase engagement from listeners, as well as acting as a visual reinforcement of key concepts. On the other hand, if not properly designed or used, handouts can detract from a presentation. A cluttered slideshow or distracting graphics can cause confusion or create excessive distraction and boredom in an audience. Poorly tailored handouts such as translations of slideshows into paragraphs or too much material packed into limited space could leave listeners feeling overwhelmed and unable to focus. Overall, it is important for presenters to carefully consider the purpose of their handouts before incorporating them into their presentations. The goal should always be creating an engaging experience that further aids audience understanding. With careful attention to design, thoughtfully chosen materials and allotted time for participation, presenters can leverage handouts as a powerful resource to maximize the success of their talks. Now that you understand the role of handouts in presentations, let’s dive into ways you can improve your audience’s understanding with them.
Improving Audience’s Understanding
Understanding your targeted audience is key for creating engaging handouts that are well received. When preparing a handout, it is important to consider the Age, Gender, Educational background and other relevant factors of those in attendance. Presenters should strive to provide enough information on the topic while also adapting their presentation to meet their audience’s needs. This helps ensure that presentations are meaningful and beneficial for participants. When available, it is beneficial to add data visualizations, such as graphs and charts, to further explain concepts and ideas. Visual representations of data can help viewers comprehend complex topics quickly and easily. Also, providing helpful resources and references in materials distributed during or after the presentation can help deepen participants’ understanding of the presented information. Nonetheless, excessive visual aids may not be necessary; visuals should only be used if they improve understanding of the material and increase comprehension. To reinforce audience’s understanding of main points throughout the presentation, speakers should summarize their message several times during various intervals. Summarizing key points allows viewers to connect core content with the overall message of the handout. Additionally, lecturers should include information on how participants can apply what they have learned in their own lives or work environment for greater comprehension and engagement with the material. Demonstrating understanding of different learning styles is another effective way to engage learners. Differentiating delivery methods – such as transitioning from lecture format to interactive activities like discussion or debate – can be effective for diverse audiences. By becoming aware of a variety of knowledge retention tools, presenters are more likely to create engaging handouts that better meet their attendees’ needs. Once you’ve created an engaging handout that appeals to your audience and improves understanding, it is important to reinforce and summarize these main points throughout the presentation. In our next section, we will discuss strategies presenters can adopt when reinforcing information during their presentations.
Reinforcing and Summarizing
When you’re preparing handouts for your presentations, it is important to remember that their purpose is to reinforce and summarize the content of your presentation. Handouts should be concise and easy to read; an effective handout should include no more than two pages of material that highlights the most important points from your talk. They should also provide supplemental visuals, such as graphs and charts, to help illustrate key concepts. When designing a handout, it is helpful to use the same font and color scheme that you plan on using in your presentation so that they can work together seamlessly. You should also provide enough detail so that viewers can continue their exploration or review content from your presentation if needed. Additionally, consider adding a quote from the speaker or additional text as a reference on the handout for attendees to use in writing about the event online. Some argue that limiting handouts to two pages reduces the amount of material attendees can take with them, but this ensures that only the most important details are present for viewers to access. Without proper reinforcement and summarization included within your handouts, there will be less reinforcement of the content within viewers’ minds and they may potentially forget some of what was discussed during the presentation. It is essential to create handouts that succinctly yet accurately summarize what was discussed in order to enhance understanding of the topics and improve retention of information. To further engage audiences while reinforcing key messaging, handouts can come in multiple forms: physical printed materials as well as digital platforms such as tablets and slide shows. The next section will explore how utilizing both physical and digital materials effectively create engaging handouts for presentations.
Essential Points
When preparing a presentation handout, it is important to make sure that the content is concise and easy to read and that it reinforces the main points from the talk. Fonts and colors should be consistent with those in the presentation and additional visuals, such as graphs and charts, should be included. Handouts can also include a quote from the speaker or additional material for attendees to use when writing about the event online. The handout should not exceed two pages and should provide enough detail so that viewers can review the content of your presentation. Finally, physical and digital materials should both be utilized to create engaging handouts for presentations.
Handouts as Physical and Digital Materials
Handouts are one of the most effective tools for engaging an audience during a presentation. They serve as standalone reminders of what was discussed, making them invaluable as educational and reference materials. Handouts can be physical documents given at the presentation, or digital copies to be distributed via email or online. In either form, handouts should be concise and focused on helping reinforce the message in your presentation. When it comes to physical handouts, there are pros and cons to consider. On one hand, physical documents might not always be the most cost-effective or environmentally friendly option if you’re distributing them to a large audience. However, handing out physical materials helps to make presentations more interactive by ensuring that each attendee has something tangible they can refer back to at a later date. Furthermore, physical documents provide a sense of authentic communication, versus just reading text on a screen. These benefits may be worth the extra expense and resources required for production. On the other hand, when considering digital handouts, there may be advantages over traditional physical materials. For example, digital documents can save time and money by reducing the burden of having to produce physical copies for everyone in the room. Also, digital files may provide more flexibility in terms of design capabilities and customizability when compared to static print material. Additionally, digital copies can easily be shared with more people beyond just those in attendance at a presentation—they can be sent to any interested party with access to email or the web. Whether using physical or digital materials for handouts is best for any particular situation depends largely on audience size and type of content being presented. In either case, it’s important that these resources are easy to use and understand so that attendees retain what they learn after leaving the presentation. The next section will explore how to create effective types of physical handouts that meet these needs while engaging your audience before and after your presentation.
Types of Physical Handouts
Physical handouts are a powerful and essential tool for enhancing audience engagement with your presentation. They provide people with something tangible to refer back to as they revisit the concepts, ideas, and data discussed during your presentation. Furthermore, physical handouts allow you to capture an audience’s attention and draw them into the material in order to have greater impact. The types of physical handouts you choose to provide, however, will depend largely on what kind of material is included in your presentation and the amount of time you have for distribution. Generally speaking, physical handouts can be further divided into three categories: reference materials, visual aids , and discussion prompts. Reference materials are collections of facts or data related to the presentation’s topic that provide a reference point for audiences to review after your presentation. Examples could include pre-packaged binders full of information on a particular topic area or white papers summarizing research findings relevant to the subject. Visual aids consist of graphical displays or images related to your presentation topic that will help increase audience understanding and enhance their experience while viewing. Examples including infographics or charts that map out different elements of the presentation in a visually appealing manner and provide context for understanding the main points of your talk. Discussion prompts are written questions or statements that apply directly to the subject matter presented during your talk but can evoke further thought from the audience through encouraging open dialogue during group activities or roundtable discussions following the talk. This allows for more interactive conversations about your topic by introducing questions and ideas not discussed in depth during your presentation itself. Overall, there are numerous types of physical handouts that can be distributed before, during, or after presentations depending on the type of content being presented. While these include reference materials, visual aids, and discussion prompts, experimentation with various options can reveal which works best for any given situation. With this in mind though it’s important to take into account logistics related to gathering and disseminating physical handouts when planning presentations. Now that we’ve examined the types of physical handouts available let’s move onto looking at how digital ones can shape engaging presentations—the focus of our next section.
Types of Digital Handouts
When it comes to creating engaging handouts for your presentations, one popular way to deliver information is through digital formats. Digital handouts offer the convenience of being able to easily be shared electronically, which can be beneficial in cases where physical copies are not necessary. They can also be highly customizable and interactive, allowing you to quickly tailor your message to the audience. The most popular types of digital handouts are PDF files, PowerPoint slides, and multimedia tools such as videos and podcasts . PDFs allow you to easily share important documents or forms with large groups of people without having to print out hundreds of copies. PowerPoint slides are a great way to add visuals and animation to engage your audience; visual content has been found to be appealing to viewers and can help keep their attention. Multimedia tools provide further opportunities for interaction with audience members by giving them a chance to listen and watch rather than read, enabling increased engagement with your material. Although digital handouts have obvious advantages over physical copies, there are still some potential risks in using them for presentations. For example, if your presentation relies heavily on visuals, complex graphics may not always appear correctly when displayed on different devices or platforms. Additionally, if you’re relying on an internet connection for your presentation then any problems with signal strength or load times can cause disruption. Finally, data privacy is always a consideration when sharing materials electronically; you will need to take the necessary measures to ensure the personal data collected from attendees is kept safe and secure. Despite these potential issues, digital handouts are generally popular among presenters because they provide convenience and flexibility when sharing information. When used properly, digital handouts can help make presentations engaging and impactful for even a large audience. Now that we have discussed the types of digital handouts available, let’s move on to the next section which will explore “When to Use Handouts During Your Presentations”.
When to Use Handouts During Presentations
Whether or not to use handouts during a presentation is an age-old debate that has gone on for decades. Some speakers may feel that passing out handouts detracts from their presentation, while others believe they are a necessary tool to keep an audience engaged. Ultimately, it comes down to what type of content and audience the presenter is dealing with when deciding if handouts are appropriate. On one side, many presenters will claim that handouts should only be used sparingly in order to maintain audience engagement. This can be particularly effective when presenting to small groups or information-packed content that requires focus and concentration. Handouts can be easily misused by providing too much unnecessary information which can cause the audience to lose interest and quickly become overwhelmed. On the other side, handouts can also be a valuable asset when presenting longer lectures or more complex issues that offer an abundance of facts and figures. Handouts are often much easier for an audience to follow along with and can act as a great supplement for topics that require further explanation. Additionally, handing out material ahead of time gives the presenter an opportunity to gauge audience interest before getting started and make adjustments accordingly. In summary, the decision whether or not to utilize handouts depends greatly on the type of presentation and its intended content – being mindful not to overwhelm the audience by introducing too many material at once. With this in mind, let’s look at some tips presenters can use when preparing their handouts for their presentations.
Tips for Presenters for Using Handouts
Using handouts as a part of your presentation can help ensure that members of your audience are engaged and leave with the necessary materials to further their knowledge and understanding. To ensure that you make the most out of using handouts, there are several tips for presenters to keep in mind throughout their presentation. First, no matter how engaging the presentation may be, it’s important to provide handouts which summarize the points of your presentation. By allowing members of your audience to have a physical document of the topics discussed, they’ll be able to quickly refer back to information given or determine additional resources they need to seek out after the presentation has ended . As such, investing time into creating effective handouts can further engage and inform everyone in attendance. Second, it’s beneficial to give each member of your audience a copy of the handout so that they don’t have to rely on someone else’s copy if they miss something. Additionally, by giving each member their own copy your audience will be able to take notes directly on their paper and even make summaries that are most relevant for them. Moreover, if presenting virtually it’s essential you consider how the attendees will access the handouts; whether via email attachment prior to or during the beginning of the session. Some may find that giving handouts throughout a presentation may overpower and even distract from what is actually being said in real-time. This perspective may be valid and should certainly be taken into consideration when deciding when and how often one distributes handouts within their presentation. Ultimately, it should come down to what style works best within a unique setting and situation so that participants remain actively engaged in your information while simultaneously having access to any additional resources they may benefit from during or after the event concludes.
Responses to Frequently Asked Questions
What type of information should be included in a handout for a presentation.
When it comes to creating engaging handouts for a presentation, it’s important to include information that will help make the presentation more digestible and easier to remember after the fact. This could include key slides from the presentation, with accompanying notes and bullet points, highlighted quotes, summaries of key topics addressed in the presentation, as well as useful visuals like infographics and graphs so that participants can easily recall the most important details. Additionally, it’s a good idea to include contact information of the presenter or company, so that participants have an easy way to follow up or reach out for further discussion. Finally, adding applicable tips or tricks related to the topic being discussed can help keep participants engaged and give them something practical to take away from the experience.
How can handouts be used effectively during a presentation?
Handouts can be a very effective tool for aiding presenters during their presentations. Handouts provide audience members with a tangible item to refer back to and review after the presentation. They can also serve as a valuable reminder of key points made during the presentation and help to visually reinforce concepts or evidence that the presenter is attempting to convey. Handouts often have more detailed information than what is given in the presentation, making them an excellent means of providing follow-up materials to attendees who are interested in understanding the topic better. Additionally, since handouts can serve as concrete reminders of what was taught in the presentation, they are sometimes used after a presentation as a follow-up review tool. Finally, handouts can be used to provide insights into topics which may not be suitable for verbal presentation, such as data analysis or complex diagrams. When used effectively and thoughtfully, handouts can be an invaluable resource during any learning experience.
What are the pros and cons of using handouts in a presentation?
Using handouts in presentations can be very beneficial, but there are also some drawbacks that should be considered. One of the main advantages of using handouts is that it allows your audience to refer back to the materials you’re presenting for further study and reference. They can take notes in the margins, re-read information, and review topics they didn’t quite understand during the presentation. Additionally, by choosing handouts with illustrations, captivating images, or attractive designs, you can add an extra layer of engagement for your audience. On the other hand, one of the biggest disadvantages of using handouts is that it does take time away from the actual presentation. You may have to allocate time during your speech for people to get their hands on the material you’re providing or wait as they go through a particular section. Moreover, if your audience isn’t given enough time to review the information before they leave the talk, they likely won’t remember what they read once they get home. Overall, while using handouts in presentations can be beneficial when done correctly, taking note of the time constraints during a presentation and giving adequate time for your audience to review any information provided is essential.
How to make presentation handouts
- Written by: Kieran Chadha
- Categories: Presentation skills , Visual communication
- Comments: 1

Presentation handouts and leave-behinds are a great resource, giving your audience a tangible reminder of you and the company you represent. The problem is that they’re oft-neglected and oft-ignored. So how can you create presentation handouts that not only accurately represent your content, but look great and don’t take a fortnight to make?
How to make presentation handouts in PowerPoint: Basic method
If all you want to know is how to print your slides and speaker notes together, you came to the right place!
- Save a new copy of your presentation.
- Delete any overlapping visuals or anything that won’t print well.
- Go to File then Export and select PDF .
- In the window that opens there is an Options button – click it.
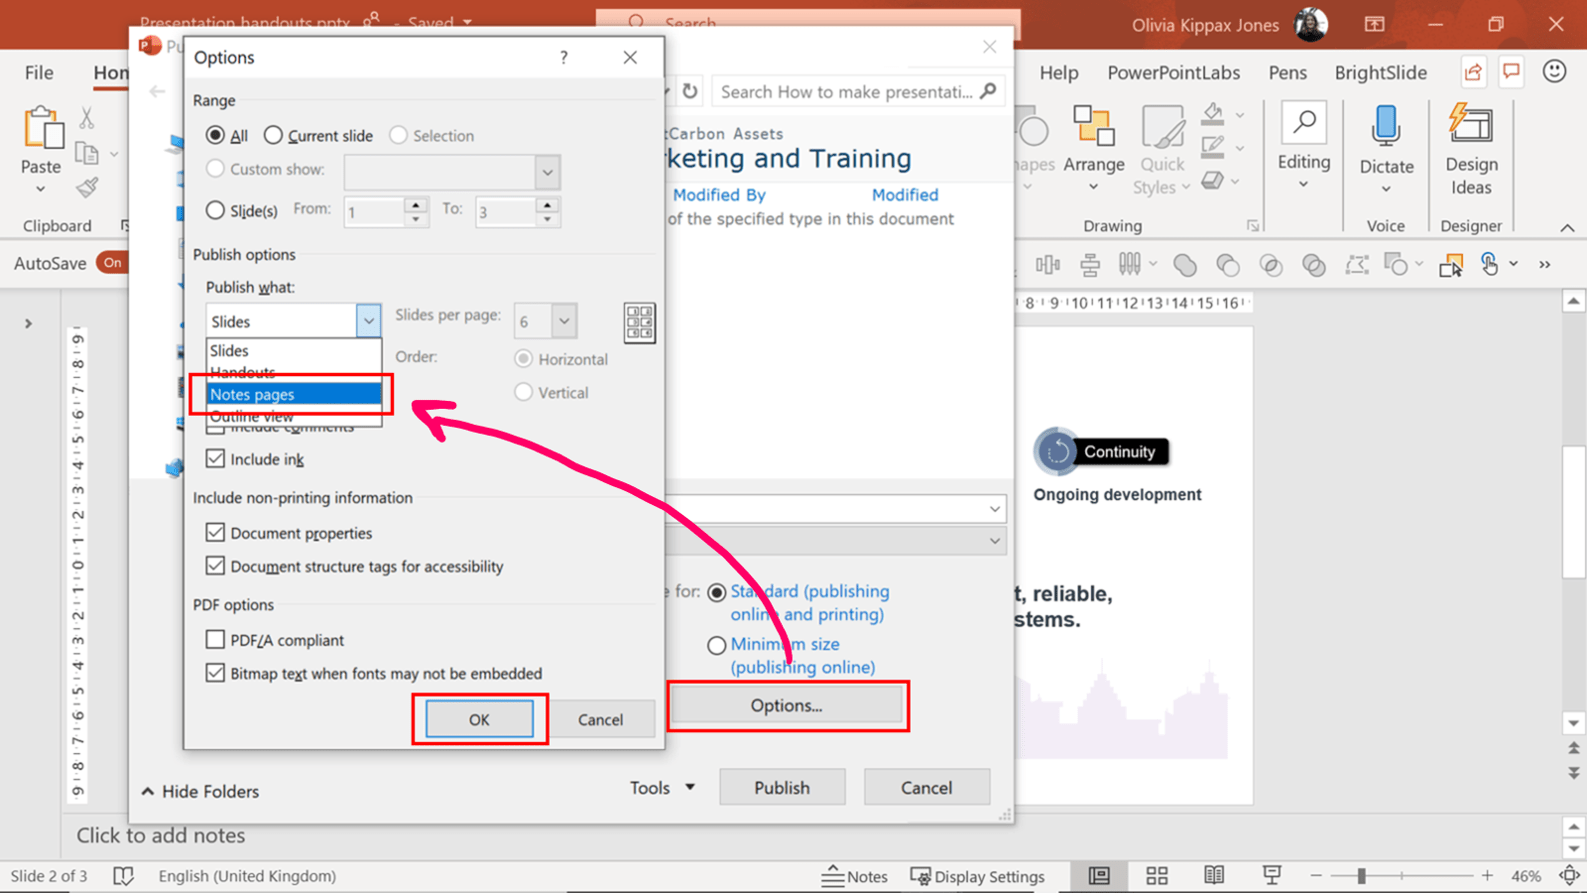
- Click OK then Save .
Your PDF will feature an image of each slide with the accompanying speaker notes underneath. Needless to say, make sure your presenter notes are ‘audience safe’ first. You can send the PDF file as an email or print it. The finished result is cheap ‘n’ cheerful – a great option if you’re in a rush.
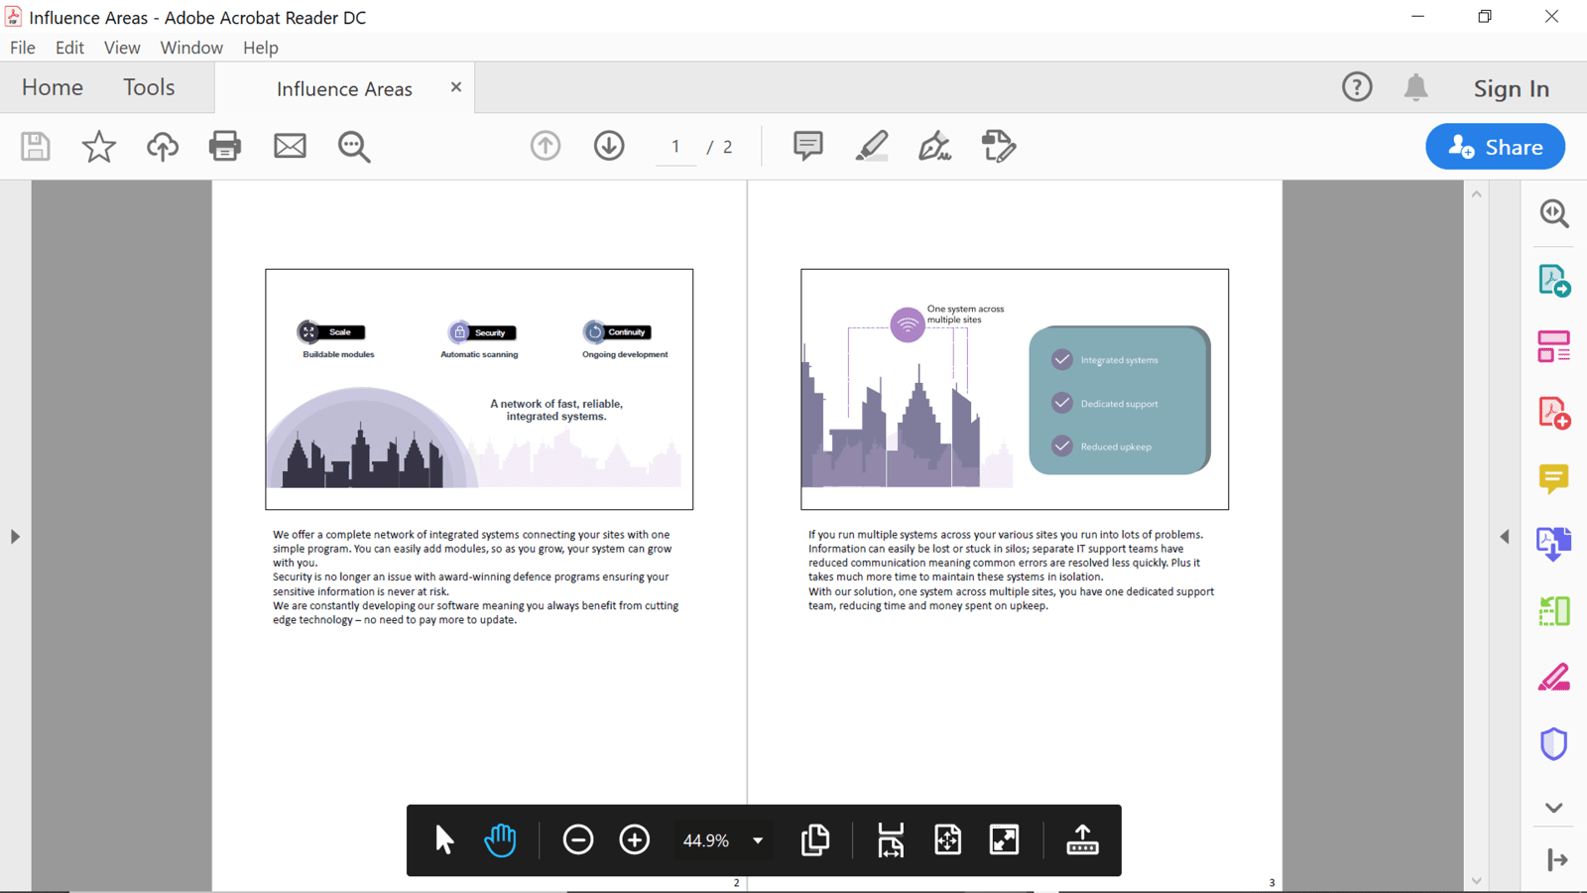
The problem with simply using your slides and notes is that presenter notes often aren’t written with the audience in mind – they’re there to jog the presenter’s memory, not inform the audience. Any materials you leave with your audience should be just as thought-through and polished as your presentation. So, let’s go back to square one and think about what should be in a presentation handout.
What should a presentation handout include?
Begin by pinning down what you want your presentation handout to achieve. Do you want your audience to remember the benefits of choosing you as a supplier? Do you want them to understand a specific process? Do you want to remind them of your pricing options? Or do you want to provide a place for them to make notes whilst you present?
Only the last aim actually calls for a presentation handout. Anything you give to your audience during or before your presentation will inevitably be a distraction; they will read the information, rustle the paper and generally pay less attention to you. Any presentation handout – that is, any material you give out before or during your presentation – should include a simplified version of your slides and plenty of blank space for notes. And that’s it.
However, if you want to provide your audience with a tool to refer back to, to remind them of what makes you unique or how they should carry out a certain process, what you need is a leave-behind.
What is a presentation leave-behind?
A presentation leave-behind can pack a punch, covering less material than the presentation, or more. It’s a piece of content you can either leave behind you when you’ve finished your presentation, or send to your audience a couple of days later to jog their memories. A good way to get started is to think about how you want the piece to be used. Here are a few less traditional leave-behind options to get you thinking:
- A 1- or 2-page summary of the most critical points

- A one-slide-per-page recap of the content you covered
- A process diagram

- An in-depth exploration of all the content plus much more
- A reference guide covering technical specifications, pricing etc.
Once you free yourself from the idea that a presentation handout or leave-behind has to be an exact replica of your slides and notes, the sky is the limit. When you’ve decided on the format for your leave-behind you can start to create it. A cut-and-paste job might not be the best solution; you may well have to rework some of your material to make it accessible for an audience revisiting it a week or two down the line.
How to create effective presentation leave-behinds
If you don’t want to create something from scratch, then a good approach is to use what you can from your slides, and write new notes to accompany them. We all have a dire recall rate when it comes to new information (see Ebbinghaus’ 1885 research for just how bad), and audiences are no different. Don’t overestimate how much they’ll remember; make your hand-out self-explanatory, accessible and informative. Cut out all the extraneous data (e.g. the history of your company) and focus on your key points.
There are two main formats to choose from when you’re ready to share your leave-behind.
Method one: PDF
- Save a copy of your presentation and create a simplified version of your slides
Be brutal and delete all the slides that don’t contain need-to-know information. Good content to include is your value proposition and main benefit points as these remind your audience of what differentiates you from the competition. You may also want to include any useful technical information or processes.
- Copy your slides into a word document and add text
In your PowerPoint file, right click on the slide you want to copy and select Copy . Then, in your Word document go to Home , Paste , Paste as Picture .
To create appropriate text pull from your presentation notes but also make use of any other collateral you have, like brochures, your website, promotional videos etc. To avoid overwhelming your audience with too much information add hyperlinks to relevant sections of your website or other resources. If you publish the document as a PDF, your audience will be able to click these hyperlinks and access the information they need.
And finally, it’s a good idea to add a call to action to encourage on-going communication.
- Save the document as a PDF
To save a Word document as a PDF go to File , click Export , then Create PDF . A benefit of doing this in word rather than exporting directly from PowerPoint, is that you have more control over the formatting so can keep it on-brand and looking good. If you want to add more design elements, you could also build the leave-behind in PowerPoint. Change the slide size by going to Design > Slide Size > Custom Slide Size .
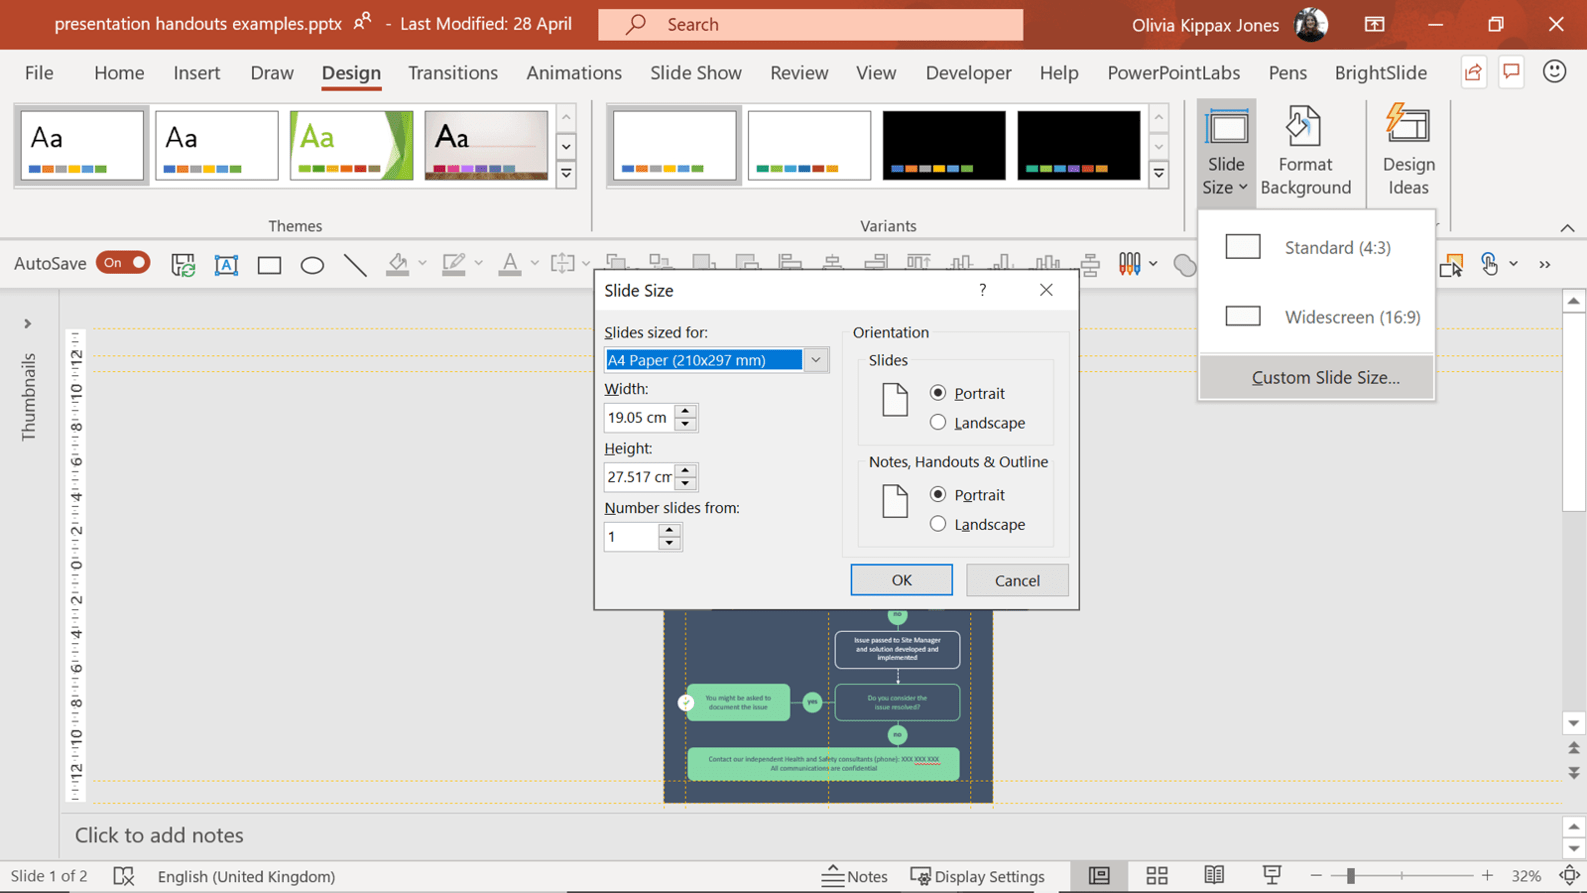
Of course, you could print the document but, putting aside poor print quality and environmental concerns, with paper handouts you have no way to track how many people have looked at the document or whether it has been ignored. However, with a PDF you can…
- Distribute using an email marketing service
Instead of printing and handing out your material, save the trees and save it as a PDF, then use an Email Marketing System like MailChimp to distribute it. You might not be able to see super detailed analytics, but you’ll still get useful data on who opened your message, and who showed interest in the material – all helpful stuff.
Method two: Video
There’s a sort of unwritten assumption that handouts have to be a document, particularly a document with slides. That’s not the case, and it’s often not the best method of delivery for follow-up content. Paper or a PDF has its advantages – it’s simple, easy to distribute and reasonably effective. However, it is limiting. It is less personal and might be ignored if it’s too dense. A powerful alternative to the conventional paper hand-out is to use PowerPoint to record narration and to output as narrated video. It’s a much more engaging, effective way of refreshing your audience’s memories.
- Make a simplified version of your PowerPoint deck
Again, you don’t want to send your audience your full twenty-five-minute presentation. Go through your content and trim it down to the essentials. Keep the key visuals and key benefit points.
- Write a script
A video with you um-ing and ah-ing over your slides isn’t particularly engaging or professional. You need to write a script so you can say precisely what you want to with no irrelevant detail or mistakes.
You audience won’t want to take much time out of their day, so aim for 3 – 5 minutes of content. We have some useful resources for script writing on our blog – start here .
- Record yourself presenting the new version
Once you’re happy with your script, you need to record yourself presenting the deck. Again, we’ve got a few stellar recourses to help:
- How to record narration in PowerPoint
- Recording voiceover for a narrated presentation
- Preparing for a presentation voiceover
- Export the video
To save your video go to File > Export > Create a Video . Make sure Use timings and narrations is selected on the drop-down menu.
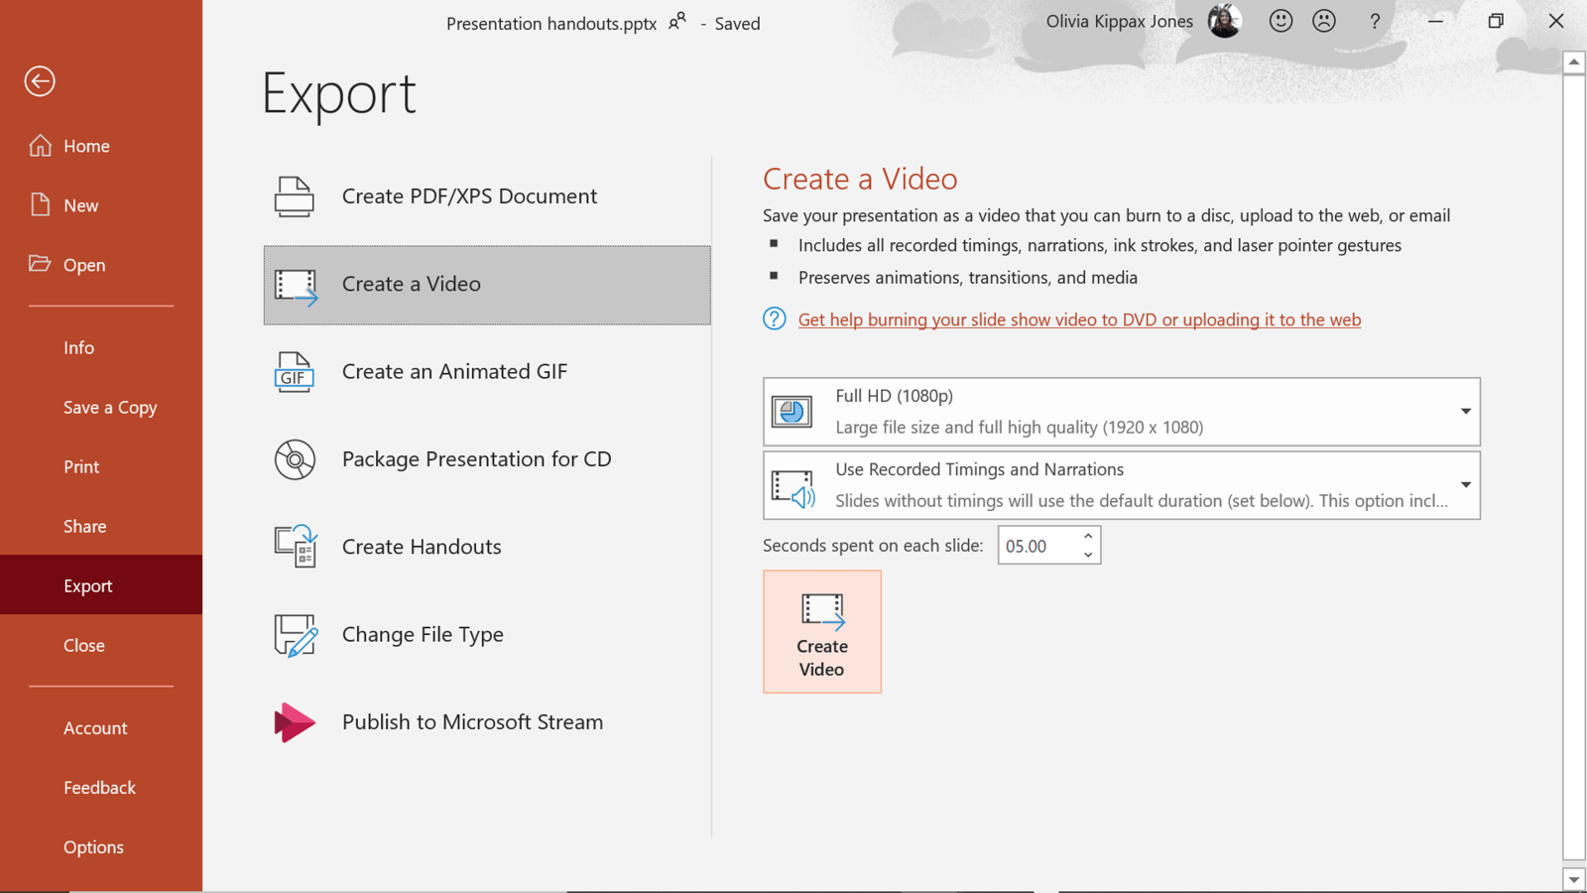
- Host the video online
Finally, make your video accessible to your audience. The beauty of using a platform like Vimeo is that it sits in the cloud so can easily be updated with new material. Viewing figures can be tracked, there are integration possibilities with other platforms, and reminders can be sent out for those that haven’t yet watched it. Vimeo is one option – but any trackable multimedia platform is a good method for delivering your content.
To see some example of short, narrated videos, visit our YouTube page .
Conclusions
Digital, custom-made leave-behinds are a change. And you’ll want to address this change when your audience sits down, eager to take home a couple of sheets of A4. However, the benefits are great: they get a more engaging, helpful resource, and you can track its reach, easily refresh the content and measure its success.
If you decide to use the good old-fashioned paper method – there’s one thing I’d encourage you to avoid: don’t distribute your presentation hand-out before you start speaking. It’s one of the most common mistakes we see, and it can really negatively impact the audience’s attention level. If you give your audience something to read, they will naturally start to read it. And from that point on, it’s a struggle for even the best presenter to command the room’s full attention.
Hold off until the end of the session but let everyone know that a handout will be available, so they don’t spend the entire session making their own notes. You want them attentive and engaged throughout and a little reassurance at the start goes a long way to help ensure that.
However, choosing a less traditional route can help you stand out from the crowd, so consider ditching the standard presentation handout for something a bit more creative.
Ready to transform your sales presentation too? Read our ultimate guide !

Kieran Chadha
Principal consultant; head of brightcarbon academy, related articles, review: glisser online interactive presentations.
- Presentation skills / Sales presentations / Presentation technology
Glisser is an online platform that allows you to create interactive presentations that can be used for marketing, training or any other type of events. The site has different functions available for presenters, attendees at events and event planners which all focus on allowing for increased presenter-audience interaction. Since creating engaging visual presentations is what we do, I decided to take a closer look at Glisser and see what it’s all about and how the various functionalities work.

The ULTIMATE guide to presentation skills
- Presentation skills
- Comments: 39
Presentation skills is a daunting area for many, but being a good presenter isn't something you're just born with. Even the most nervous, or clueless of presenters can learn how to present like professionals just by following some key advice.

5 ways to make your presentation more visual and effective
- PowerPoint design / Visual communication
Looking for some quick tips on how to create a more effective presentation? Know you want to make your PowerPoint slides more visual but not sure how?

Kieran, surprise surprise, someone’s commenting on a three year old article! I agree with all of your comments in relation to a live presentation but do you think they apply equally to an eLearning presentation (not a webinar)? For instance, I have sometimes used an on-line workbook/journal to encourage audience reflection/journaling/note-taking which some individuals don’t like. It seems that an ‘off-line’ paper version would benefit those who prefer not to leave the current screen or who distrust digital privacy. Do you think this would be distracting or does the fact that the individual could pause (be advised) to pause on-line content whilst writing make the difference?
Leave a Reply Cancel reply
Save my name and email in this browser for the next time I comment.
Join the BrightCarbon mailing list for monthly invites and resources
I wanted to make sure I send you both a HUGE thank you for making this story come to life and creating amazing graphics to help. We really appreciate BrightCarbon for stepping up our presentation game massively! Sarah Walker Softchoice

- Presentations
- Most Recent
- Infographics
- Data Visualizations
- Forms and Surveys
- Video & Animation
- Case Studies
- Design for Business
- Digital Marketing
- Design Inspiration
- Visual Thinking
- Product Updates
- Visme Webinars
- Artificial Intelligence
How to Give a Good Presentation: 11 Top Tips for Killer Presentations

Written by: Orana Velarde
Giving a good presentation takes practice. Not everyone is born a natural public speaker, which is why we’re here today.
In this article, we’ll give you some of the best tips for killer presentations. These are techniques used by all the best public speakers, and yes – even they had to practice to get this good.
If you need to give a presentation for work, be it a pitch about a new project or product idea, a quarterly marketing report, a product launch or as an industry expert in a summit, we’ve got you covered.
How to Give a Good Presentation [Presentation]
To learn more about our top 11 tips for giving a killer presentation, keep reading throughout this article. But for those of you who are skimmers, feel free to browse through this presentation rounding up our top tips.
How to Give a Good Presentation
Here’s a quick look at the 11 tips on how to give a good presentation. Plus, you’ll find a bonus resource you won’t want to miss, The Visme Presentation Guru Course.
- Rehearse What You’re Planning to Say
- Prepare Mentally, Emotionally and Technically
- Start Strong
- Follow the Outline You Practiced With
- Finish With Confidence
- Use a Storytelling Technique on Your Slides
- Keep Your Slides Short
- Use Templates
- Learn From Your Mistakes
- Keep Yourself Inspired for the Future
Let’s dive in.
1 Rehearse What You’re Planning To Say
Before you even give a good presentation, you need to prepare.
This part has two steps – to rehearse what you’re going to say and to prepare yourself mentally and emotionally. These two tips go hand in hand, but we’ll explain what each one is about individually.
Notice that we didn’t say “memorize your presentation.” There’s a big difference between memorizing a speech and practicing telling a story. The difference is that a memorized speech can end up sounding robot-like and practiced storytelling sounds effortless.
You’ll be better off if you have at least a rough outline of your slides before you start rehearsing.
Section 1, Pause, Section 2, Pause, Repeat
Rehearse what you’re planning to say during your presentation by using a written outline, index cards, printed out versions of your presentation slides or whatever works for you.
Practicing the spoken part of your Visme presentation is easy when you use the presentation notes feature .
Separate your presentations into sections. The best way to do this is by topic. Try and keep all the sections about the same length, that way you can plan your pauses.
Presenter’s Notes
Add presenter’s notes to your slides to help you along as you present. Visme makes this easy for you. As you go through each slide, you’re able to see the notes, what slide you’re on and what slide is next. There’s also a timer to help you pace each slide switch.
This tool will help if you can have a computer close by as you give the presentation. But if you are giving a presentation on a stage without a screen to help you, you’ll have to practice without notes.
Create a stunning presentation in less time
- Hundreds of premade slides available
- Add animation and interactivity to your slides
- Choose from various presentation options
Sign up. It’s free.

How to Give A Good Presentation With Mnemonic Tools
Create some mnemonic tools into your presentation to help you remember what comes next. For some people, this comes as second nature and is easy. For others, it can become convoluted and cause you to overthink things.
Try out a variety of different techniques until you find the one you feel the most comfortable and confident with.
Ask For Feedback
For better results and to know if you’re improving, record yourself or ask someone to watch you. Ask them to give you honest feedback. Don’t accept feedback like “that was great.” Insist they go into the details. Offer them a pen and paper to take notes as you present.
You’ll notice as you practice and rehearse, that when you follow an outline, all the information you want to share is easier to remember. The TED talk below by Dr. Bolte Taylor was rehearsed 200 times and it’s one of the most famous TED Talks ever.
You don’t need to practice that many times – just enough so it feels effortless. Needless to say, rehearsing is key to learning how to give a good presentation.
2 Prepare Mentally, Emotionally and Technically
It’s highly likely that you’ve already had to give presentations before, most probably at school. But let’s be honest, a classroom and a TED stage are a little different. So is an online summit via Zoom, which as you know are even more common now!
Let’s get one thing straight, though. We’re not talking about just any presentation here – we’re talking high stakes, high-quality presentations.
Preparing yourself mentally and emotionally for a weekly sales report meeting is not as important as doing so for one that will be in front of thousands of people and recorded for posterity.
This tip includes mental, emotional and technical preparation. Let’s focus on each one.
Ready to create your own presentation in minutes?
- Add your own text, images and more
- Customize colors, fonts and everything else
- Choose from hundreds of slide designs and templates
- Add interactive buttons and animations
Mental Preparation
While you’re rehearsing the outline and general speech for your presentation, notice the times when you feel like things flow and when they don’t.
Why do you think that’s happening?
If it flows well it’s because you feel comfortable with the content. You know what you’re talking about. You might even be passionate about it!
On the other hand, if you’re having trouble, maybe the content is still new to you. You might need to do a little more research to feel more knowledgeable about that topic. If you are unsure, you might completely forget what you had to say next during the presentation.
That’s why rehearsing, adjusting and creating mnemonic cues will help.
Emotional Preparation
Not everyone needs to get emotionally prepared before a presentation. Conscientious rehearsing can usually be enough. But not everyone is the same.
Many people that suffer from glossophobia or the fear of public speaking. Some have anxiety or social anxiety and just being close to that many people is difficult for them. Many successful speakers used to be riddled by fear before their first few presentations.
Some of them still are, every single time. The difference is that they have learned how to manage their fear and lean into it. As soon as they step on the stage, the fear and anxiety melt away and all the rehearsing and practicing take over.
To get emotionally prepared, you can try some mindfulness exercises and relaxation techniques.
Wear clothes that make you feel powerful and confident. Try doing the power pose and high five some people before you go on stage. Sing your favorite song and have a little quick uplifting dance.
Technical Preparation
You might be wondering what technical things you need to give a good presentation. It’s all in the details.
Regardless if you’ll be speaking in a venue or an online summit, you have to test all technicalities.
If you’ll be speaking in a venue, visit the space and stand in the place where you’ll speak. Have a look around and pinpoint some elements or aspects that make you comfortable.
If there’s anything that bothers you, like a weird smell or a column in the middle of the room, think of ways to overcome that.
Always ask to test the technical aspects in the room. Connect your computer or tablet to their system to check if your slides will look good with their setup. Also, test the audio. These detailed checks might not always be possible but it doesn’t hurt to ask.
If your presentation will be online, test all your tech beforehand. Locate a spot with the strongest wifi or hardwire your computer to the router.
Check your background and the lighting. Organize with housemates or family for some quiet time during the time of your presentation.
3 Start Strong
The day and time of your presentation have arrived! Now it’s time to shine.
Starting strong is a huge factor in achieving a good presentation. The first few seconds and minutes that you’re on stage will make a first impression on your audience . And yes, you can leverage that to your advantage!
How To Give A Good Presentation Through Impactful Body Language
The first thing people will notice is your body language. The way you carry yourself says a lot about how confident you are at that specific moment. If you prepared emotionally and mentally before your turn, then you’re as ready as you’ll ever be.
Watch the video below to learn about the power pose and how body language affects both you and your audience.
Make An Impressionable Statement
Starting a presentation with a joke, for example, can make the audience relate or feel more familiar with you. Letting them laugh a little will clear the air in the room and it’ll be easier to continue.
Other opening techniques include:
- Be Provocative
- Incite Curiosity
- Shock the Audience
- Ask a Question
- Tell A Story
Use your first slide as a visual and impactful complement to start your presentation.
We have an article all about starting strong with plenty of inspiration. Check it out here – it’ll inspire you to think of new ideas for your presentation.
4 Follow The Outline You Practiced With
If you followed our tip above, you used an outline or a ‘section, pause, section’ technique to practice with. Maybe you even used some mnemonic tools or presenters’ notes.
It’s time to put them all to use.
As long as you follow what you practiced you’re gold. This tip, as you can see, is a short one. It’s more of a reminder that the rehearsing step is more important than you might think at first.
Only when you practice and rehearse a lot will you feel more comfortable when you present.
5 Use Props
Are you wondering how to give a good presentation with props? Good, that means you’re thinking creatively. Using props is a technique that not many consider when preparing for a presentation.
Props can help not only to get the message across but also to serve as emotional support for the speaker! Just make sure it’s obviously a prop and not an emotional crutch.
A prop can be as small as a book, as big as a washing machine, or as weird as a preserved human brain.
Of course, the prop must make sense with your presentation and topic. Not only that, but you must also practice with it. It’s important to be comfortable with your prop or props as you talk and switch slides.
Actually, if you use props you might not need slides at all!
To get you inspired, watch this TED talk where Hans Rosling uses a washing machine as his prop.
6 Finish With Confidence
The end of the presentation is just as important as the beginning. You have to bring it all full circle. Knowing how to give a good presentation is like knowing how to structure a story, essay or article. The beginning and end are connected and must be relevant to each other.
For example, if you made a joke at the beginning, make the same joke but with a fun twist. If you made a provocative statement, close it up with a similar statement or question about it.
Closing Statement
Your presentation’s closing statement is a section in itself. Even if you do as we suggest above, the entire closing statement must be a conclusion of what you talked about during the entire presentation.
The last sentence you say will stay in your audience’s memory. At least until the next speaker takes the stage. If someone in your audience noted down your last sentence, you’ve hit the mark 100%.
Q and A Session – Yes or No?
Ending a presentation with a Q and A session is a bit iffy. If you ended your presentation with impact, a Q and A section can fizzle that out.
What you can do is ask the host to let the audience know that if they have questions, they can find you in the lobby for a conversation. For a digital summit, offer your Twitter handle where people can get in touch.
In the case of webinars or instructional lectures though, Questions and Answers is a great idea. These can help familiarize you with the audience and make them more confident to work with you in the future.
Consider the purpose of your presentation and make a decision according to what impact you’re looking to make.
Here's a great example of the chat section from Visme's webinars , where viewers make comments and ask questions throughout. In our webinars, we have someone help the presenter by gathering questions and ensuring everyone gets answers.

7 Use A Storytelling Structure
Moving on to the tips for the creation of your slides. It’s important to remember the role your slides will play in your presentation. The audience’s attention should be on you, not your slides. These are meant to be complementary, not a crutch, nor even a text to follow.
With that said, this tip is the most important. It applies to your slides AND your spoken speech. They should both follow a storytelling structure that you and the audience will follow together.
Some of the most common storytelling structures are:
- Fact and Story – Go back and forth between facts and stories, or “what is” and “what could be.”
- The Explanation – Inform about a process or plan to fix something or to learn something new.
- The Pitch – Take your audience uphill over a hurdle and onto a positive resolution.
- The Drama – AKA “The Hero’s Journey,” this follows the plight of a main character from beginning to end.
You can also check out our quick video on how to structure a presentation like the experts to learn even more.

8 Keep Your Slides Short and Visually Balanced
There are two ways to design slides for a good presentation:
- As a standalone presentation
- As visual support, while you speak
Either way, you need to keep your slides short in text and visually impactful. For a visual support deck, the slides need even less text than a standalone presentation.
If that idea worries you, and you have tons of information to share, you can always create a full-fledged informative PDF version of your deck to give your audience, investors or guests.
Here are some important things to remember when designing the slides for your presentation:
- The flow from start to finish
- Visual hierarchy
- Keeping the words to around 6 per slide
- Visual impact
- Balanced compositions
The 29 Best Presentation Layout Templates for 2020 [Plus Design Ideas]
9 Use Presentation Templates
Creating presentation slides doesn’t need to be difficult or a stressful affair. When you use a Visme presentation as a foundation, you’re on your way to being an expert on how to give a good presentation.
To select a presentation template, you can either go for a topic-based template or a style based template. Both have their merits, you just need to figure out what’s easier for you.
Topic-based templates are fully designed templates with color themes, graphics, images, icons, etc. You’d only have to adjust the content and maybe the colors and graphics.
Style-based templates are better for those of you that need more freedom in terms of colors and visuals. The Visme slide library is full of layouts organized into categories that you can choose from.
Presentation Templates

Ecommerce Webinar Presentation

Buyer Presentation
PixelGo Marketing Plan Presentation

Technology Presentation

Product Training Interactive Presentation

Work+Biz Pitch Deck - Presentation
Create your presentation View more templates
10 Learn From Your Mistakes
When the presentation is over and you feel like you just conquered the world, it’s not the end just yet. Celebrate the moment but remember, there will be more presentations in the future.
If your presentation was filmed, watch the recording. If there was anyone in the audience that you can fully trust to be honest with their feedback, ask them for it. Take mental notes and the next time you’ll be even more prepared.
The secret sauce to know how to give a good presentation is to always keep learning the ways to improve.
11 Keep Yourself Inspired for Future Presentations
When you keep learning, you keep growing. This also applies to the art of giving good presentations. Follow well-known presentation experts like Nancy Duarte and Carmine Gallo. Read their book, their stories and their theories about giving good presentations.
Watch famous speeches or TED talks to get inspired. Take notes of what you notice in those speeches that you think would suit your personality. You don’t want to copy how other people speak, but you can definitely be inspired!
Bonus: The Visme Presentation Guru Course
To top off your knowledge base for giving good presentations with killer slides, we present you with the Visme Presentation Guru Course .
How to Give a Good Presentation Every Time
As long as you’re prepared, your slides are well-balanced and your speech is rehearsed, you’re ready to give an impactful presentation.
Plus, never underestimate the power of templates! Check out the Visme slide library to visualize the possibilities. Take our presentation course and improve your abilities as a public speaker and slide creator.
Learn how to give a good presentation with all the resources Visme has in store for you. Sign up for a free Visme account today to get started.
Create beautiful presentations faster with Visme.

Trusted by leading brands
Recommended content for you:

Create Stunning Content!
Design visual brand experiences for your business whether you are a seasoned designer or a total novice.
About the Author
Orana is a multi-faceted creative. She is a content writer, artist, and designer. She travels the world with her family and is currently in Istanbul. Find out more about her work at oranavelarde.com
Like what you're reading?
14 effective presentation tips to impress your audience
Get your team on prezi – watch this on demand video.

Anete Ezera July 15, 2022
An effective presentation can communicate key ideas and opinions, save time, and contribute to your overall success as a business, but good presentation skills don’t come naturally to everyone. In this blog post, you’ll find 14 effective presentation tips you can implement in your next presentation to make it a success.
Whether you’re preparing for an important presentation at work or school, or you’re looking for ways to generally improve your presentation skills, you’ll find these presentation tips useful. We’ve gathered a list to help you impress your audience from the get-go. You’ll find tips for creating and presenting your slides, talking in front of an audience, and other effective presentation techniques to help you stand out.

Most common presentation mistakes
Before we list our top effective presentation tips, let’s explore the most common presentation mistakes. If you’ve made one or more mistakes in this list, you’re not alone. Most people have made at least one mistake. However, what’s important is to be aware of these errors and try avoiding them next time.
#1 A poor start
One of the most common mistakes people make is undermining the importance of the first few minutes or seconds of their presentation.
Let’s say you’ve practiced your key talking points meticulously and gone over your slides a million times, but when you’re in the spotlight and need to say your first line, do you know exactly what to say to wow the audience?
The start of your presentation is crucial. Not only because how you start sets the tone for the rest of your presentation, but also because people generally require around 8 seconds to decide whether they find the subject interesting enough to keep listening. Starting your presentation with a captivating intro is even more important than you think. To ensure you start off right, read our guide on how to start your presentation .
#2 Lack of preparation
Yes, even though it’s clear that you should prepare before giving a presentation, it’s still a common mistake amongst presenters. Preparing content and talking points is an obvious start, but there are other steps that you might be overlooking.
Before you even join a meeting or walk into a room where you’re going to present, consider the technical requirements and get familiar with the equipment. If you’re presenting online, make sure to test-run your presentation and the visual aids you’re going to use. The last thing you want is a broken video link, poor audio, or a weak connection when you’re presenting.
Also, consider the questions your audience might want to ask you about the topic. Think about how you’d answer those questions, or do even further research to really impress the audience with your answers.
Explore other ways to prepare for a presentation to feel even more confident when presenting.

#3 Losing track of time
It’s great to feel passionate about your topic. However, you’ll have to consider your audience’s level of interest and knowledge. Some details might seem fascinating to you, and you’d like to talk about them for hours, but for your audience, too much information will drain their energy and lose their attention.
Therefore, make sure to keep track of time. Also, consider your audience’s interests. A concise presentation is always better than a long one with a ton of information. Plus, you’ll have a higher chance of keeping your audience’s attention throughout the presentation.
Effective presentation tips
Now that we’ve looked at some of the most common presentation mistakes – let’s dive into effective presentation tips that’ll help you excel in future presentations.
#1 Tell a story
Stories connect, inspire, and empower people. Telling a story can entice action, help understand an idea, and make people feel connected to the storyteller. It’s also one of the most effective presentation tips. A study by organizational psychologist Peg Neuhauser found that a well-told story is easier to remember than facts, which makes it a highly effective learning technique.
With that in mind, telling a story when you’re presenting can engage your audience and make it a more memorable experience. You can either share a personal story or a historical event, just make sure to have a clear connection between the story and the topic you’re presenting.

#2 Work on your body language
Body language can make a huge difference in how your presentation is perceived. It’s one of the presentation tips you definitely shouldn’t overlook.
Body language says a lot about a person’s confidence level, emotions, state of mind, and even credibility. For the audience, it’s a way to understand what the person is saying and how interested they are in the topic.
Therefore, work on your body language to better convey the message you’re trying to communicate. Practice in front of a mirror before your presentation and be conscious of your hand gestures and facial expressions.
#3 Understand your audience
Before crafting your presentation, you must know who you’re speaking to. Understanding the interests, demographics, professional background, and other valuable information of your audience is crucial in making your speech successful.

If you’re speaking at an event, contact the organizers to get more information about other speakers and the audience. If you’re presenting at work, you may already know your audience fairly well. Use this information to your advantage and create content you know they’ll resonate with.
#4 Use high-quality visuals
What’s one of the most effective presentation techniques? Use of visuals. They play a crucial role in your presentation. However, only high-quality visuals will make a good impression and effectively communicate your message. Use high-quality visuals like images, videos, graphs, maps, and others to really land your point.
Using visuals is a great way to convey your ideas as they’re easier to process than text. If you’re not sure where to find great visuals, check out our blog post on presentation visuals for five free resources.
P.S. the Prezi library holds a variety of images, videos, GIFs, stickers, and other visuals, including different charts and maps to spice up your presentation. It’s all available in your dashboard .
#5 Use data visualizations
Do you want to showcase statistics or other datasets in your presentation? Use data visualizations to make your data stand out and impress your audience.
There’s nothing more boring than a bunch of data presented in a flat way. If you want to tell a story with your data, use interactive infographics or slides enriched with eye-catching visuals. Showcasing data will make your ideas appear more trustworthy and credible.
Prezi Design offers a range of templates to choose from. You can start creating data visualizations from scratch or choose a template and edit the data there.
#6 Make it engaging with interactive elements
It’s not easy to deliver an engaging presentation. People can easily get distracted or try to multitask, especially in the virtual environment. Sometimes, it’s difficult to focus on the speaker and the written text. Other times, the content just isn’t impressive enough to hold the audience’s attention. But it doesn’t have to be this way.
You can make your presentation more engaging for everyone by including interactive content like graphs and charts. With interactive data visualizations, you’ll make the data discovery process more engaging and exciting for your audience.
Your audience will be able to hover over data points and click on certain icons or datasets to discover information on their own. Interactive visualizations will make the presentation more memorable and impressive.
As you can see in the example below, you can discover different data by engaging with the infographic.
#7 Stay consistent with fonts and color styles
You want your presentation to look visually appealing and highlight essential information. To make that happen, stay consistent with font styles and color schemes throughout your presentation.
Use one or two fonts max to make the text easy to read and understand. Also, use a carefully selected color scheme that’s not too distracting. If you’re using Prezi Design, you can easily copy and paste styles by right-clicking on your data visualizations and selecting “copy styles.” This makes it easier to stay consistent and saves time when picking matching colors.
#8 Structure your presentation properly
Before creating your presentation, think about its structure. What’s the main idea you want to convey? Use that as your starting point, and only include information that adds value to the narrative.
Plan out the first topics carefully to properly introduce your argument. Add the essential information in the middle part of your presentation. Lastly, close your presentation with a summary of the main points and leave your audience with an afterthought. Also, plan when you’re taking questions and for how long.
For more insight, watch this tutorial on how to structure your presentation:
#9 Practice your public speaking skills
Public speaking may not be your forte, but you can get better with practice. Don’t decline a great opportunity to share your ideas with a larger audience just because you feel nervous speaking in front of a group of people.
One of the best ways to improve your public speaking skills is to practice in front of your family or friends – people you feel comfortable with. Also, focus on the topic you’re presenting and get excited about the idea you want to convey. This way you’ll appear more confident and feel less nervous about public speaking.
Explore other public speaking tips from Jessica Chen, the founder, and CEO of Soulcast Media:
#10 Show your slides next to you on-screen
If you’re presenting on Zoom or in a virtual meeting , think twice before you share your screen. The days of hiding behind slides are over. People want to see and connect with other people, not sit through another run-of-the-mill screen share. To do that, use Prezi Video to showcase all your content right next to you in your video feed.
As a result, your presentation will look more engaging than a traditional virtual presentation . Also, your audience will have the chance to read your body language and follow along with what you’re saying even better.
If you already have your slides prepared, don’t worry – you can easily integrate them into Prezi.
See Prezi Video in action and check out our video templates to get started.
#11 Calm down before presenting
Being in front of an audience can feel nerve-racking. However, there are ways to calm down before presenting that will make you feel more centered and confident. The last thing you want is all your hard work to go to waste just because of stress.
Try breathing exercises or a five-minute guided meditation before presenting. The trick is to remove all distractions and focus on the present moment so you’re not overthinking right before starting your presentation. Also, be fully prepared and know exactly what to say and when which will help you feel more collected. If you want to discover other ways to feel and look more confident, read how not to be nervous before a presentation .
#12 Use transitions and animations
Add movement to your slides with transitions and animations. You’ll make your presentation more visually appealing and engaging. However, be careful not to overwhelm your audience with your choice of transitions and animations.
Choose a transition that matches your presentation visually and use it throughout your presentation. Consider what animations will be relevant to your audience and select a few to add to your slides. Don’t overdo it. Keep the focus on the message you’re trying to convey, and use animations to only support that message.
#13 Be enthusiastic
When you’re in a room with a positive and enthusiastic person, you can’t help but feel uplifted as well. High-energy people have this effect on others. Most importantly, a lot of people tend to mimic people’s behavior and mirror their energy when they feel a connection or relate to them. That’s called the chameleon effect .

When you’re presenting, you want your audience to feel curious about what you’re presenting. You may also want to leave your audience feeling uplifted, interested to know more, or inspired. To have that effect on others, try to convey those emotions when presenting. Practice your speech, slow down your narration at times, or take a pause after you’ve delivered a statement, and use different presentation techniques to present your project and really drive your points home.
#14 End your presentation in a memorable way
The first few minutes of your presentation are crucial for captivating your audience’s attention. However, don’t underestimate the importance of ending your presentation as powerfully as you started it.
The way you end your presentation will play a crucial part in how your audience will remember it. You want to make a memorable impression by closing your presentation with a summarizing statement, a rhetorical question, a call to action, or another impactful way. Discover 10 ways you can end your presentation in our guide.

There are a lot of factors to consider when creating and delivering a presentation. You want your slides to look professional and visually appealing while conveying your main points. You also want to look and sound confident even if you’re nervous about public speaking. Whatever your concerns may be, remember that preparation is essential. Practice and dedication are the keys to giving a successful presentation . Make sure to follow these effective presentation tips to excel in your future presentations. If you’re interested in creating a captivating presentation with Prezi, contact us to learn more or try it for free .
Elevating presentations with Prezi AI
Embrace the innovation of Prezi to bring your presentations to life. With its unique platform, Prezi AI offers more than just visually appealing templates; it provides an immersive narrative experience, engaging your audience with a story-driven approach. By integrating Prezi AI , our platform’s capabilities are further enhanced, offering intelligent design suggestions and optimizing content layouts to ensure your presentations are not only beautiful but impactful. This integration is a perfect example of effective presentation techniques in action, using technology to create a more engaging presentation.
Interactive elements: transforming passive listening into active engagement
Prezi revolutionizes the way information is presented by incorporating interactive elements that invite audience participation. With Prezi AI, these features become even more accessible, suggesting ways to make your presentation more engaging through clickable areas, zoomable images, and dynamic visualizations. This level of interaction encourages exploration, making your message more memorable and transforming a standard presentation into an effective presentation.
Adding a personal touch in digital presentation with video
Prezi Video stands out by seamlessly integrating your content alongside your video feed, bridging the gap between traditional presentations and personal engagement. This feature is crucial for those looking to follow presentation tips that emphasize the importance of connecting with your audience on a more personal level. Prezi AI enhances this experience, ensuring your content is displayed in the most effective way possible, making your virtual presentations feel as though you’re directly conversing with your audience.
Mastering presentation artistry with Prezi
The journey to becoming a skilled presenter involves continuously refining your approach and embracing tools that elevate your ability to communicate effectively. Prezi, enriched with Prezi AI, is one such tool that transforms ordinary presentations into captivating experiences. By leveraging these advanced features, you can deliver presentations that are successful, memorable, and truly unforgettable, embodying the essence of tips for presentation mastery.
Whether you’re an experienced speaker or preparing for your first presentation, Prezi equips you with the tools to succeed. Engage your audience, tell compelling stories, and deliver your message with confidence and creativity. Following effective presentation tips and exploring how Prezi AI can transform your next presentation is a step towards mastering the art of impactful communication. Delve into the features and begin your journey to presentation mastery today.

Give your team the tools they need to engage
Like what you’re reading join the mailing list..
- Prezi for Teams
- Top Presentations
Presentation Handouts – 10 Top Tips

There are few feelings worse than leaving the projection room in decent spirits, only to find a dishevelled copy of your handout lying dejectedly at the bottom of the nearest wastepaper basket. Ensure your pamphlets ooze excellence with these 10 great tips.
1. Innovative Layout
Since the eye has a natural tendency to examine a page’s charts and illustrations before moving on to the wording itself, any images you use should be placed above the passages they correspond to; this will minimise the chances of the text at the top of the page going unread.
And, bearing in mind that the first paragraphs of a page tend to be absorbed far more readily than the last, it would be sensible to order your points in order of decreasing importance. [Also known as the Inverted Pyramid method -Editor]. These tactics, coupled with the use of carefully placed italics and large white spaces (to aid the viewer in locating specific information), will contribute to the creation of a sophisticated, easy-to-read handout that your audience will love.
2. Visual Aesthetics
To ensure a long, happy and meaningful life for your papery acquaintances, fill their pages with large, lively lines of text and a stylish colour scheme. Then, add simplified tables/ figure charts and, since nobody in your audience is likely to dispose of something that looks both attractive and valuable, have each leaf sheeted with a layer of lamination – tinted to a colour of your choice, of course.
Failing that, print your material onto thick, good-quality paper so that it can be read over time and again; given that, where at all possible, your handout should not exceed fifteen pages, this last should not prove costly at all.
3. Original Imagery
As clichéd as the old mantra may be, a picture really is worth a thousand words. So, what better way to grab the attention of a post-presentation audience than to include a series of original, thought-provoking images into your handout?
Such an image will not only prove extremely memorable, it will also leave your audience astounded by your sheer creativity.
4. Cater to Absentees
Since your handout is likely to be copied and distributed to the people who couldn’t make it to your presentation, your notes should be constructed in such a way as to make sense to anybody, regardless of their knowledge of your subject matter or the content of your talk.
Begin your handout with a detailed introduction to the presentation before moving onto a brief outline of the topics that were covered – and remember that, as your handout may merely be flicked through rather than exhaustively studied, you should boil your points down to the essentials, omitting anything that isn’t completely relevant to the topic at hand.
5. Feedback Slips
If you’re in the habit of distributing your handouts during the opening stages of your presentations, you’d do well to devote a small section of each page to your viewers’ notes and adding a tear-off feedback slip to the final sheet. This will act as a miniature survey consisting of a scoring scale for each aspect of your talk – delivery, content, intensity and so on. Do be sure, though, to insist that your audience submit their slips anonymously – this will ensure honesty and, in turn, maximum accuracy when it comes your self-analysis of the weaker sections of the presentation. You’ll then be in a good position to improve upon them next time round.
6. Expanded Notes
Be mindful of the fact that the meaning of notes read without the context of your verbal discussion will very often be lost. Rather than just copying a series of nonsensical bullet points from your slides to the handout, therefore, you should write your notes under the assumption that much of your verbal elucidations will have been forgotten by the time your audience gets round to inspecting their pamphlets.
Don’t use jargon, abbreviations or broken sentences; instead, compose your notes as if you had never given a presentation in the first place. Then test your work for clarity by allowing a friend or non-professional acquaintance to read over the notes; if they still aren’t completely clear, you’ll likely need to expand upon them further.
7. Corporate Values and Brand Identity
Remembering again that those who read your handout will not necessarily have attended your presentation in person, it is particularly important to ensure that the recipients of your pamphlet are given a strong sense of your corporate values or those of the organisation you represent. This doesn’t mean plastering your slogan onto every page of the handout, but rather finding original, stimulating and memorable ways of affirming your brand identity.
8. Figurative Lingo
While the use of formal, literal language is all well and good when it comes to conveying statistical information in your handout, detailed concepts and ideas can be better expressed using similes, metaphors and analogies. These often prove invaluable in jerking readers from autopilot mode and allowing them to absorb and remember your points by virtue of symbolic association.
9. Potential Queries
Never forget that some of your audience members may have attended your presentation on behalf of colleagues. If they’re not able to ask questions then, ultimately, your skills as a professional speaker may be brought into question.
Remembering that your responsibilities as an orator do not necessarily end with the presentation itself, you should open yourself completely to any questions or clarifications your extended audience may wish to raise. That means including a business card with the handout pack, displaying your contact details prominently on both the first and last pages, and inviting prospective clients to follow any social media accounts you may hold.
10. Bonus Features
In this age of effortless, inexpensive multimedia, the idea that presentation handouts should be confined to the traditional booklet form just doesn’t hold water. And since most presenters persist in offering up orthodox handouts at the end of each discussion, you can win valuable brownie points by disseminating some tasty extras as your demonstration draws to a close.
From audio books covering your previous presentations to video discs full of background research, these added extras will prove an invaluable resource for your assembly – and do wonders for your reputation as a speaker who’s absolutely committed to the audience’s education.
George Dixon
What tips have you found can help to improve your handouts? Please leave your thoughts in the comments box below.
Recommended Pages

- All Templates
- Persuasive Speech Topics
- Informative
- Architecture
- Celebration
- Educational
- Engineering
- Food and Drink
- Subtle Waves Template
- Business world map
- Filmstrip with Countdown
- Blue Bubbles
- Corporate 2
- Vector flowers template
- Editable PowerPoint newspapers
- Hands Template
- Red blood cells slide
- Circles Template on white
- Maps of America
- Light Streaks Business Template
- Zen stones template
- Heartbeat Template
- Web icons template
Creating a Handout to Support and Enhance Your Presentation!
Got a presentation coming up and need to create a useful handout to complement it? Great idea – but how do you go about it? Many people think handouts are just used in college, but in the business world they can be really useful to reinforce the content of your presentation.
Whether it’s a business meeting or a training course, a handout will underscore your points and support your presentation when done right. It can be tricky, though, to decide on what to include, the format, how to structure a handout and at what point of the presentation to distribute it.
Before starting to create your handout, you need to think about such things as structure, content and timing . This blog covers everything you need to know!
What is a Handout?
As the name suggests, a handout is any type of document that a speaker hands out to participants during a lecture, presentation, conference or meeting. It allows your audience to get a clear overview of the main points, or to sum up what they have heard afterwards.
A handout isn’t just a summary of slide titles; it can be much more detailed, summing up each individual topic and serving as a reference for core concepts and central insights.
What is a Handout actually for?
Your handout must provide added value . It contains information either covered or referred to in your presentation, allowing you to expand upon what might have only been touched on, and free your slides from clutter.
It can not only summarise your arguments, but can relieve pressure on your slides: dense facts and figures can be sidelined to the handout, allowing your PowerPoint presentation to be slick and professional.
Handouts offer three main advantages to your audience, depending on when they’re given out:
- The audience can follow what is said during the presentation
- The audience can make their own notes to supplement or clarify for themselves what you have presented
- It consists of an overview of what you have presented, which can then be read by interested parties

A handout not only means that you can create a clean and uncluttered presentation, but allows your audience to understand your points better and remember them afterwards . It’s also very useful for conveying your arguments to anyone who may have missed the actual presentation.
Tip: So why not just Start with the Handout?
There are obvious advantages both to your audience and yourself to having of a clearly structured handout. Once you know what to do, they can be relatively straightforward to produce. Of course, this still takes time, and you need to allow for this.
Cobbling together a handout at the last moment is not only stressful, it can be counterproductive, as it undermines your professionalism and never goes unnoticed.
TIP: For a change, why not start your presentation with a handout ? By getting the essentials out of the way first, you can then develop your presentation step by step using the handout as a basis.
The great advantage here is that you not only end up with a detailed handout, but you find a s trong common thread , allowing you to create an equally “crisp” presentation and navigate your way through it.
Creating a Handout: How to Structure it
As with most things concerning design, the motto “ less is more ” applies very effectively to handouts. In concrete terms, this means: do without whole sentences and make use of key points, abbreviations, arrows and symbols. Ideally, your handout should not consist of more than two A4 pages.
In addition to important information from your presentation, a handout needs to include the following :
- Basic information, probably in the upper left corner of the handout, such as the location of the presentation and the speaker’s name and title
- The date, probably in the upper right corner
- A concise heading – preferably the title of your presentation – centered
- Page numbers in the footer
- A clear structure, based on the individual headings of the presentation
- A consistent page layout using standard, unembellished fonts such as Arial or Times New Roman

The structure of your handout should follow the structure of your presentation, especially if you give out the handout during your presentation. It is best to limit your points to those which support your main argument. Keep the sub-items on the handout as simple as possible and don’t go into too much detail.
To make your handout visually appealing, it helps to think about the font. In addition to using clear, standard fonts , as mentioned above, try to keep the font size in the headers and footers uniform and smaller than in the main part.
TIP: Create an area for the audience to make their own notes on your handout. Either make the right margin wider or leave a few lines of space under your last point.
Handout Content – Short and to the Point
You’ve decided the layout of your handout, entered the key points and created a rough outline. Now it’s time to expand on individual points and create the main content of your handout.
Before doing so, focus on your target audience : how much background knowledge can you assume they have on the topic of your presentation? Keeping your audience in mind means you tailor the handout to their level, avoiding technical terms where they would distract from your point, including them when you are faced with an audience knowledgeable in a particular discipline.
It is very important to condense the core statements of your presentation into key points, rather than including a distracting stream of text. This way, you retain your audience’s full attention.
TIP: To arouse your audience’s curiosity right at the beginning of your presentation, you could include an upbeat quote, a proverb or a question. Choose a slightly provocative question to get your audience thinking from the start. You can repeat this verbatim on your presentation handout.
Although the main thing about handouts is that they should be short and concise , they should still be understandable when read outside the context of your presentation. If this is forgotten, they can’t act as an aid to your audience’s memory afterwards.
Nice-to-have: Additional Information on Your Handout
The main elements of a handout, as covered above, can be supplemented by additional information as you choose. This can even include pictures or graphics. Depending on the topic, a visual element can really clarify and supplement your main argument and tie things together.
As a rule, however, it pays to keep pictures and graphics on your presentation slides because they take up too much space on the handout. The costs and benefits need to be weighed up in each individual case.
It is also a good idea to include contact information on the handout; an e-mail address is the minimum. Depending on the type and purpose of the presentation, you can also provide your business address and telephone number.
If your handout consists of several pages, it helps to put your contact details in the header so that they appear on every page. It can be useful to include a short bibliography in your handout if you’re using quotes or information from other sources. This way you can also link to relevant websites or further reading on your topic that may be interesting for your audience.

TIP : At the end of your handouts you can include questions or food for thought to stimulate discussion. This is particularly useful if you wish to conduct a question and answer session after your presentation.
Tutorial: Creating a Handout with PowerPoint
When time is of the essence, PowerPoint has a feature that allows you to create a handout in minutes. Using the “Create handout” function, you can transfer a PowerPoint presentation to Microsoft Word, adapt it there and optimize it for printing.
With just a few clicks you can choose which presentation slides should appear on the handout. The number of slides can also be easily adjusted and you can cut text or expand it as necessary. You can also decide whether the handout should include a note margin, a header and/or a footer.
Your PowerPoint presentation remains untouched during this whole process. In addition to the option of printing the handout, you can also save it directly in Word as a Word or PDF document – a simple way to make the handout digitally available to your audience.
- Open your presentation in PowerPoint.
- To find the handout master, open the View tab in the top taskbar.

3. In the Master Views submenu you will find, among other things, the Handout Master.
The practical thing about this is that with just a few clicks, you can choose slides from your presentation to form a basis for your handout. It’s also easy to customize headers and footers – to insert your contact details or page numbers, for example.

It’s really easy to choose the size, number and design of your pages here; and PowerPoint also offers the option of exporting the handout you have just created to Microsoft Word. This makes it simple to print out or offer to your audience as a file.
- To do this, click on “File” in the upper task bar and then on “Export” .

2. Select Create handout .
3. In the context menu that opens, you can decide whether your handout should have a margin for adding notes, for example, or other useful options.

When is the Best Time to Distribute Your Handout?
There is no such thing as the perfect time. To help you decide the timing for your particular presentation, it helps to understand how timings influence your audience:
- Handout before presentation : In this case, you have to expect at least some of your audience to have leafed through the handout and read ahead, meaning that at any point they know what’s next. This can sometimes mean that your audience’s concentration is divided, so you need to consider carefully whether this option is appropriate.
- Handout during presentation : Distribute your handout at the point when it is useful as support, either in terms of visual illustration or as a means to emphasize your argument.

Our tip: Share your handout prior to the presentation . It is often the same arguments that are used when it comes to giving out the handout before the presentation: ‘Too restless, the audience rustles with the papers and does not concentrate on the lecture’ and many more. You probably know the arguments.
Nevertheless, our 25 years of experience with PowerPoint shows that these arguments should not be believed. Experience shows that it does not negatively affect the concentration of the audience, but even has positive effects for many to know that they do not have to take notes and that a protocol is available so that they can fully concentrate on the presentation.
In addition, listeners can add other relevant notes directly to the handout. If you withhold the handout until the end of the presentation, you also run the risk of having carried out a kind of unspoken “disciplinary action.”
Conclusion: Don’t go without a handout!
Whichever timing you decide upon, a well-prepared handout can be an effective tool to support your presentation , acting as a guide and memory aid for both you and your audience. Used properly, they can increase the interest and attention of your audience, and allow you to give a clear and professional presentation.
Need help with creating a presentation and a great handout to go with it? We have years of experience in the field of PowerPoint presentations. Just get in touch, and our team can help you create exactly what you need ► presentation agency
If you have any further questions about handouts, or anything to do with PowerPoint, feel free to get in touch at [email protected] . We’re always happy to help!
You might also be interested in the following articles:
- PowerPoint Presenter View
- Insert Notes in PowerPoint
Share this post
- share
- save

Design Thinking: Problem Solving with a Difference

Why Corporate Mission Statements Are So Important

7 Tips & Learnings from the Apple Keynote
- Partners: Bloggers
- Partners: Podasters
- Partners: Virtual Event Hosts
- Partners: Toastmasters Clubs
- Partners: Bookstores & Live Venues
- Partners: Sponsors
- Digital Press Kit
- What people are saying …
- Interior Art
- Acknowledgements
- Other Books by Carma
- Featured Speakers
- The Public Speaking Superhero’s Journey
- Individual Speaker Coaching
- Public Speaking Super Powers for Live Video
- Persuasive Speaking with Confidence
- Developing Your Leadership Skills
- Video Marketing Super Pack
- Wedding Speech Templates
- Creating Your Ideal Audience Avatar
- Public Speaking Superhero’s Journey
- Training & Mastermind Program
- Boost Your Self-Confidence 7-Day Challenge
- Speaking Palooza! 2019
- Recommended Reading
- For Book Clubs
- - ORDER NOW!
- - Partners: Bloggers
- - Partners: Podasters
- - Partners: Virtual Event Hosts
- - Partners: Toastmasters Clubs
- - Partners: Bookstores & Live Venues
- - Partners: Sponsors
- - Digital Press Kit
- - What people are saying …
- - Cover Art
- - Interior Art
- - Acknowledgements
- - Other Books by Carma
- - Contact
- - Excerpt
- - The Public Speaking Superhero’s Journey
- - Speaker
- - Individual Speaker Coaching
- - Public Speaking Super Powers for Live Video
- - Persuasive Speaking with Confidence
- - Developing Your Leadership Skills
- - Video Marketing Super Pack
- - Wedding Speech Templates
- - Creating Your Ideal Audience Avatar
- - Public Speaking Superhero’s Journey
- - Training & Mastermind Program
- - Boost Your Self-Confidence 7-Day Challenge
- - Speaking Palooza! 2019
- - Podcast
- - Recommended Reading
- - For Book Clubs
Best Practices for Handouts [Ultimate Guide]
To provide handouts, or not to provide handouts? That truly is a good question. Some people are adamant that a good presentation doesn’t need them. However, some presentations serve the audience better if you do provide them. So, what are the best practices for handouts?
In this post, I’ll share the best practice tips for using handouts effectively.
![Best Practices for Handouts [Ultimate Guide]](https://publicspeakingsuperpowers.com/wp-content/uploads/2019/08/best-practices-handouts-1024x659.jpg "good presentation handout")
What Is a Handout?
Why use handouts, what should be included in a handout, when to deliver before a presentation, when to deliver after a presentation, when to deliver during a presentation, additional delivery best practices for handouts, make your handout look professional, typography basics, what you need to know about graphical elements and white space, the pros and cons of powerpoint handouts, bonus handout tip: how to supercharge your handouts.
- Before and After Presentation Handout Examples
Merriam Webster defines a handout as a folder or circular of information for free distribution. However, in the public speaking world, it is so much more than that. What is the purpose of handouts? First, you need to understand why they are useful.
Handouts provide benefits to you as a speaker and to the members of your audience. When you provide a handout, you don’t need to pack so much information into your presentation that you overload your audience. More detailed information can be provided in the handout. They also help your message last longer with your audience, because they are able to take a reminder of you and your presentation home, making it easier for them to contact you later.
Your audience benefits because they can worry less about note-taking because they both have space to jot quick notes and they don’t need to write down your every word. If they want to know more about your topic, you’ve saved them some research time. And, if they want to refresh their memory about your presentation, more than likely your handout will be much easier to understand than their notes!
How Do You Use Handouts Effectively?

Here are some tips on how to structure a handout:
- Effective handouts reflect the storyline and information of your presentation. When your audience peruses your handout, it should be clear that it is related to your presentation. The information should expand upon what you said, not be tangential.
- Useful handouts provide additional information. They highlight points in greater detail than you were able to cover during your speech. They may also include additional references and further reading, helping your listeners deepen their understanding of your topic.
- The best handouts can stand alone. If you provide the handout to people who missed your presentation, they will also gain value from it.
Just like your slide deck , your handout should contain only the information that is necessary to help your audience interact with or understand your content. The fewer pages you have the better. In most circumstances, one page is sufficient, but there are cases when you’ll need more. Here are some common handout ideas:
- Information from the slides—but expanded upon. Your slides need to be simple and clean. Data Storytelling Evangelist Lea Pica suggests that “The better you’ve designed your live slides, the less sense they will make to an offline audience.” This may mean that not all the information you want to impart will be on them. Therefore, your handouts can include deeper information.
- Guided space for taking notes. Your handouts can include prompts for where to take the best notes. For example, you can include questions that you’ll answer in the presentation. Or you can include sentences with words missing, cueing them to pay special attention at those spots in your presentation.

- Additional resources and further reading. Perhaps your presentation will inspire your audience to explore the topic further. You can help them by citing resources you’ve mentioned and suggest further reading they can do.
- An action sheet. Your handout can guide your audience in their next steps after your presentation. You can suggest actions they can take, provide journal prompts, or even leave space for them to jot down their aha moments. Some workshop presenters even allow time at the end of the workshop for audience members to prioritize their action notes and select one or more that they will take action on immediately.
When Should You Distribute Your Handouts?

However, the truth lies somewhere in between.
The type of presentation you are giving greatly affects when you should distribute handouts. For most presentations, it is better for you to distribute at the end of your speech. Here are some rules of thumb to help you decide when to deliver your handouts.
- If your presentation is very long, such as a full-day or half-day workshop
- If your presentation is highly technical and you need your audience to review something specific
- If you need to share information that is too dense for a slide, such as a large data table or complex graphic
- If you have participatory exercises that are better handled by a worksheet than a blank piece of paper
- If you need to facilitate note-taking by providing a pre-printed guide
- Your handout would distract from, more than enhance, your presentation – rustling papers, reading ahead, etc.
- You need the elements of suspense or surprise in your presentation (you don’t want to handout spoilers!)
- The handout is more of a thank you gift than something that will help them absorb your information in real time
Sometimes your handout meets criteria for both cases above. In that case, you might want to break up your handout and dole the pieces out at the appropriate points.

- When you need to distribute your handout at the beginning of the presentation, give your audience a moment to peruse it and become familiar with its contents. That way they won’t be leafing through it during your presentation and ignoring you.
- If you will deliver your handout at the end , let your audience know and give them a heads up of what it will include so they don’t take notes they don’t need to. For example, if you are going to give the information from your slides, they can relax and not feel pressured to write it all down or, nowadays, take pictures, which can obstruct the view of fellow audience members.
- If what you are talking about is not mentioned in the handout , let your audience know that too . This will encourage them to pay attention so they can take good notes.
How To Design an Effective Handout
How your handout looks—its design—affects how your audience members will react to it. Research has shown that visual design can affect a reader’s:
- Motivation to engage with the content (J. Smiley, 2004; E. Misanchuk, 1992; and R. Bell and J. Sullivan, 1981)
- Comprehension of the content (M. Gasser et al, 2006; J. Smiley, 2004; S. Walker, 2001; A. Hoener et al, 1997; K. Garofalo, 1998; C. Lewis and P. Walker, 1989)
- Recollection of the content (M. Gasser et al, 2006; J. Smiley, 2004; C. Lewis and P. Walker, 1989)
- Efficiency and speed in consuming the content (Smiley, 2004; A. Hoener et al, 1997)
Therefore, if you wish your handout to have legs—to be kept longer and make a strong impact on your audience—you will need to be mindful of these best practices for handouts design.
Give your handouts as much time and care as you would your slide deck and your content. Allow plenty of time to design, proofread and make appropriate changes to the handout. If working with a designer, allow time for the back and forth approval process.
In addition, be sure the look and feel of your handout match your branding fonts, colors and imagery style. And, of course, be sure to include your contact information on every page!

When selecting the fonts you will use, keep in mind these typography best practices for handouts:
- Use a font your audience is familiar with. According to Hoener et al, “people most easily read material printed in the typefaces with which they are most familiar.” This could mean use standard fonts like the ones mentioned above, or one that matches your branding. For example, the sans-serif font used on this webpage is Open Sans.
- Be sure the font you choose is legible. Some serif fonts are hard to read. If you must use a challenging font, do so sparingly. For example, the serif font used on this webpage is Bangers and is only used for headlines.
- Make sure the font size is large enough for your audience. According to R. Carter et al (2006), 9 to 12 point is standard for adults. However, if you have an older or younger audience, you’ll want the font size to be larger than that.
- Use no more than two fonts, one serif, and one sans-serif. In print design, serif fonts are considered more readable, however, the reverse is true online. Therefore, your printed handout would be best served by a serif font for the body and a sans-serif font for the headlines—unless you are trying to match your branding. Using different fonts for the body and headlines helps signal the beginning of different sections of your content.
- When using two fonts, don’t combine serif with serif fonts, nor sans-serif with sans-serif fonts. This can look bland, undifferentiated and less professional.

Research shows that graphics can distract from the content of your handout, so make sure that those you use are purposeful and enhance the text content. You can also use lines and shapes, such as bullets, squared-off sections, and lines between columns, to organize your page.
In addition to text and images, your handout design needs to have sufficient white space—the “negative” space where no text or images are. White space is the area between the different layout elements, the lines within and between paragraphs, and so on. White space does not necessarily need to be white, either. It can be a block of color, texture, patterns or even a faded background image.
The reason white space is so important is that it makes your handout more accessible and manageable. And research suggests that white space can deepen processing of the content and increase recall. One study indicated that the proper use of white space can increase comprehension by as much as 20 percent.
Think of white space as being like silence within a presentation. The silence helps structure your speech and gives your audience time to process what you’ve said. White space does the same thing for the readers of your handout.

Slides serve a different function from handouts. Communication expert Garr Reynolds says, “Attempting to have slides serve as both projected visuals and as stand-alone handouts makes for bad visuals and bad documentation.” Slides are visual aids specifically created to make your presentation more dynamic and engaging—they are not the content of your presentation. Handouts are supplemental and serve a supportive role—they need to be more detailed than your slides.

If you are dead set on using your slide deck as your handout, keep in mind these PowerPoint best practices for handouts:
- Only print those slides that are necessary to convey information. You don’t need to include slides with only an image or quote on them, nor the title slide.
- Use the handout format of three slides per page . This makes them more legible and allows plenty of space for taking notes.
- Go beyond the slide handout. Create a useful summary or additional references sheet to go with it.
An excellent way to increase the value of your handouts is to create an associated webpage. If you use this strategy, distribute a simple one- or two-page handout and indicate that even more information can be found on a specific webpage. This is especially useful if you are going to provide links to additional reading and resources online.
Added-value items you can include on this page are:
- Clickable links to resources mentioned in your presentation and/or your handout
- Recommended books with links to them on Amazon
- Downloadable worksheets, cheat sheets or action sheets.
Want to take this one step further? Create an opt-in incentive related to your presentation (perhaps the downloadable documents?). You can mention where to get it in the close of your speech or list it on your handout. Depending on the incentive you create, it can have the double benefit of increasing perceived value and growing your email list.
Before and After Presentation Handout Example
Here is an example of how a handout can be transformed from a plain document using MS Word’s standard styles into something more readable and professional. These before and after images were created using functions available in MS Word and applying the tips presented in this post. Of course, if you have your handout professionally designed, it will look even better. This is merely presented as an example of how you can do this yourself using a commonly used word processing application.

I hope this post inspires you to create outstanding, valuable and effective handouts for your next presentation.
Let’s talk about best practices for handouts!

Did you like this post? Please share!

About the author
Carma Spence, is author of Public Speaking Super Powers. She is fiercely committed to guiding women to Owning their Superpowers and turning their knowledge and interests into a profitable business. She is masterful at helping her clients see what is possible for them and supporting them on the journey from where they are to where they want to be, releasing the Mind Goblins of self-doubt, self-sabotage and second-guessing that keep them stuck.
With 20+ years experience in marketing communications and public relations, natural intuitive skills and certification in using some of the most effective transformational coaching tools available, Carma’s mission and commitment is to unleash the inner power every woman entrepreneur possesses so they can boldly go out into the world, transforming the fabric of people’s lives in meaningful and positive ways.
You can find her on Facebook , Twitter , Google+ and LinkedIn . Her website is CarmaSpence.com .
Presentation Guru
How to produce booklet handouts that complement your presentation.

Handouts are a hotly debated topic in the presentation world. What kind to give out, what you should include in them, when to distribute them, and even if you should have them at all are all major points of discussion. While the catchall answer to these questions is “it depends on the nature and subject of your presentation”, that doesn’t provide you with much guidance when planning your handout.
Not only will I make the case for handouts in your presentation, but I’ll also argue for a specific type of handouts. Booklets are underused as presentation handouts, but they can have a significant impact on your audience. I’ll explain why and then provide tips on producing the perfect booklet handouts to complement your presentation.
Why Include Handouts in Your Presentation?
Before tackling printed booklet handouts specifically, let’s understand why handouts are key to engaging your audience.
Handouts make it more memorable
Chances are, your audience won’t remember the details of your presentation a year later. With a handout, they have all the important information you covered as well as a reminder of you or your brand.
Reinforce key thoughts and ideas from your presentation
Your slide deck is one way to visualise the information you’re presenting, your handout is a second way. Take this extra opportunity to emphasise your main points and provide your info in another compelling format.
Handouts are useful marketing material
If you’re presenting on behalf of your company or brand, think of your handouts as marketing material. They’re informative, yes, but they’re also a chance to express your core messaging and make it stick.
Indeed, handouts are a necessity for an engaging – and memorable – presentation. And the specific type of material that can make the most impact is a booklet.
Why should brands use booklets handouts?
Booklets are versatile.
Booklets are used everywhere, across industries. Retailers use booklets for their catalogues, tech companies use booklets to explain their complex services, and travel companies use booklets to show off their vacation packages. You can adapt booklets easily for your needs because they come in such a wide variety.
Booklets allow for more information
Flyers and brochures can only contain so much info. With booklets, you can include all the pertinent points from your presentation without sacrificing on design.
People read high-quality booklets
Booklets that are printed on quality paper with a clean design are perceived as more authoritative. When you hand out a booklet at an event or presentation, it makes a bigger impression than a flyer or card. People are likely to at least flip through your booklet, if not read it in more detail.
Tips for Producing Good Booklet Handouts
Now that you understand why booklet handouts are so efficient, we can discuss how to produce the best booklet for your presentation.
Add Supplemental Information
Booklets are the perfect way to add supporting information to your presentation. Any visual data that you didn’t put in your slide deck or any extra points that didn’t make it into your presentation should go into your handout. With additional material, audience members feel like they’ve received value from your booklet handout.
Synchronise the Design
Make the design of your slides harmonious with your booklet design. Ideally, this would incorporate some of your branding, like colours, logos, etc. If the presentation design differs from your booklet handout, your listeners won’t connect the two and may have difficulty remembering your presentation.
Make It a Standalone Document
While your slide deck and handout should resemble each other in design, your booklet should also function as a standalone document. Create it in such a way that people who didn’t attend your talk will still have all the information from reading the booklet.
Use a Professional Quality
Print your booklet on high-quality paper and in colour. Whether you choose matte or glossy finish will depend on your specific branding, but the safest bet for professional presentations is usually matte. It might cost a bit extra to produce your printed booklets, but the impression they leave with your audience and the potential for higher engagement is worth the expense.
Add a List of Resources
Since booklets provide ample space, take the time to gather a list of resources or references. People who read your booklet in detail are interested in learning as much as they can about your brand, services, or industry, so give them the information they’re looking for.
How a Booklet Handout is Useful to Your Audience
I discussed why booklet handouts are important and how to create them. Now, here are a couple of examples illustrating how to effectively use booklets for your presentation.
Presentation Workbooks
A booklet isn’t limited to glossy magazines and catalogues. One creative way to use a booklet is to make it a workbook with fill-in-the-blanks. The public speaker and self-help guru Tony Robbins – who came under controversy last year – sometimes uses the workbook approach in his talks. He asks audience members to fill in the missing information during the presentation, pausing to give them time to write things down.
The key to the workbook booklet is giving the audience time to take notes. If you continue to speak and expect them to write, it defeats the purpose of engaging their attention more fully. Bound workbooks are also great reminders of your talk for your audience members to hold on to.
Professional Event Booklets
Printed booklets work well as handouts at tradeshows or exhibition events too. You may not be a keynote speaker delivering a formal talk to a seated audience, but that doesn’t mean you won’t have engagement with listeners.
Our e-commerce printing company Mixam used booklets to our advantage at our conference booth. After giving small demonstrations to and speaking with people who stopped by, we gave out our printed booklets, among other materials. The booklets were by far the most effective handouts, being packed with info and able to answer follow-up questions people would have later.
These are just two examples of how booklets have a big impact on your presentation audience. Like I mentioned before, there are many ways to produce and hand out booklets that make them essential to any good presentation.
Final Thoughts on Booklet Handouts
Handouts are essential for an engaging presentation. When done right, they can hold audience attention and help listeners remember your speech afterwards. Printed booklets are one of the best formats for handouts. They can contain a wealth of information and their higher quality can make your brand stand out. For your next presentation, consider taking the time to design and produce booklets. It might well be worth it.
- Latest Posts
Latest posts by Adam Smith ( see all )
- How to Produce Booklet Handouts That Complement Your Presentation - 13th March 2020
Your email address will not be published. Required fields are marked *
Follow The Guru

Join our Mailing List
Join our mailing list to get monthly updates and your FREE copy of A Guide for Everyday Business Presentations

The Only PowerPoint Templates You’ll Ever Need
Anyone who has a story to tell follows the same three-act story structure to...
PHILADELPHIA SEPTEMBER 12-13 PUBLIC SPEAKING CLASS IS ALMOST FULL! RESERVE YOUR SPOT NOW
- Public Speaking Classes
- Corporate Presentation Training
- Online Public Speaking Course
- Northeast Region
- Midwest Region
- Southeast Region
- Central Region
- Western Region
- Presentation Skills
- 101 Public Speaking Tips
- Fear of Public Speaking
Make Your Handouts Look Great Without a Graphic Designer
Make your presentation handouts look professional without a graphic designer.

Step #1: Use a Canva Template to Create a Great Presentation Handout.
Canva ( https://www.canva.com ) is one of those online resources where the more that you use it, the more that you can’t do without it. It is graphic design software, similar to Photoshop, but made for the amateur designer. The software is so easy to use, that you can be designing and editing professional graphics in minutes. The major difference between Canva and Photoshop though, (other than being really easy to operate) is that it is loaded with thousands of templates for just about anything that you want to create.
I was first introduced to Canva when I was looking for a way to create eye-catching social media images. I knew that if I wanted to post images that would get the attention of the casual Facebook or Twitter reader, that I had to create my own. (Stock photos just wouldn’t do.) I had invested in Photoshop, but since I didn’t have a lot of experience with it, the software was very frustrating. Then I was listening to a podcast by Michael Stelzner and Social Media Marketing, and they mentioned Canva. I tried it out for about 15 minutes, and I was hooked. In fact, most of the images that you see on my websites and social media accounts are created using Canva, now.
Create Your Background from Scratch or Start with a Template.
Because I’ve been using Canva for a while, I now publish most of my backgrounds from scratch. But when I first started using the website, I often used the pre-installed templates. If you decide to use a template, for a handout background, you might want to start with the “Letterhead” templates. Most of these letterhead templates have white backgrounds and really nice and colored borders, so they are ideal if you will be adding a lot of text. The great thing about the software is that if you find a design that you like, but you need to customize the colors, just click on the template, and it will load onto your design. Next just select the border or shape item that you want to alter, and a colored square will pop up in the top-left corner of the toolbar. Click the square, and you can change the color to any that you like.
If you decide to create the background from scratch, just click the “Use Custom Dimensions” button in the top-right corner of the Canva homepage, and enter 8.5 in X 11 in. You’ll start with a blank white page, but you can quickly add shapes, colors, images, and icons at will. You are only limited by your creativity. When I create a custom template or background, I usually use either a custom border or a half-page image.

For a small monthly fee, Canva will allow you to use royalty-free images that are fantastic. If however, you want to kick your images up a notch…
Download Professional Stock Photos on a Budget.
There are a lot of stock photo companies out there, and many are really good, but my favorite is ShutterStock . The reason I like this service so much is that the images are very economical, and they have just about any type of image that you’d ever want. In the past, I was using stock images so much for social media and my blogs that I had a monthly plan where I could download up to 50 different images per month for just $100. Now, though, I purchase five images for $49, and I have an entire year to choose which five images that I want to download. So, the images are only $9.80 each. Once you purchase the license for the picture, you can use it (and re-download it if needed) forever. This is a fantastic deal compared to companies like Getty that charge $500 per image, and you have to buy different licenses for each type of use.
ShutterStock actually has a built-in editor that you can use before you download the image. However, I have never been able to use it effectively. However, once you find the perfect image that you want to use, download it, and then upload it to Canva. You can then insert it into your half-page photo background, or you can edit it and alter it as needed. For examples of what you can do when you combine Canva and Shutterstock, go to my Instagram page at https://www.instagram.com/leadersinstitute/ .
Once you have the background just like you like it, you can either download it as a PNG from Canva, or you can save your Canva background, copy it, and create your handout right in Canva itself.
If You Are Not Technical, Here is a Tip After Downloading Your Background.
To download your background from Canva, just click the Download button and select PNG. An image will be saved on your computer in your download folder. Open up Microsoft Word, Google Docs, or any other word processor. Insert the PNG that you created. Click the image and drag the corners to the edge of the page, so that the image takes up the whole page. In the top toolbar, you will see a new option called Format. Click that button, and select Wrap Text. Now, select the option to Send Behind Text. One last thing. Right-click the image, and select Size and Position. Select Position. De-select Move Object with Text and Select Lock Anchor Position. These little technical tricks will push the image to the background of the page so that you can type whatever you want on top of the photo without moving it. If you don’t do this, when you start typing your content for your handout, the image will move around and look strange. If you need a second page for your handout, just click anywhere on the image and Copy. Then on the new page, hit Paste. Viola, a professional handout without any technical or graphic design skills needed!

Podcasts , presentation skills
View More Posts By Category: Free Public Speaking Tips | leadership tips | Online Courses | Past Fearless Presentations ® Classes | Podcasts | presentation skills | Uncategorized
How good are you at public speaking?
See how you score on our 2-minute public speaking assessment. In return, we’ll send you everything you need to beat stage fright , deliver presentations people love , and land career and business opportunities… for free!
Ready to get started?
- Inspiration
23 presentation examples that really work (plus templates!)

- 30 Mar 2023
To help you in your quest for presentation greatness, we’ve gathered 23 of the best business presentation examples out there. These hand-picked ideas range from business PowerPoint presentations, to recruitment presentations, and everything in between.
As a bonus, several of our examples include editable video presentation templates from Biteable .
Biteable allows anyone to create great video presentations — no previous video-making skills required. The easy-to-use platform has hundreds of brandable templates and video scenes designed with a business audience in mind. A video made with Biteable is just what you need to add that wow factor and make an impact on your audience.
Create videos that drive action
Activate your audience with impactful, on-brand videos. Create them simply and collaboratively with Biteable.
Video presentation examples
Video presentations are our specialty at Biteable. We love them because they’re the most visually appealing and memorable way to communicate.
1. Animated characters
Our first presentation example is a business explainer video from Biteable that uses animated characters. The friendly and modern style makes this the perfect presentation for engaging your audience.
Bonus template: Need a business video presentation that reflects the beautiful diversity of your customers or team? Use Biteable’s workplace scenes . You can change the skin tone and hair color for any of the animated characters.
2. Conference video
Videos are also ideal solutions for events (e.g. trade shows) where they can be looped to play constantly while you attend to more important things like talking to people and handing out free cheese samples.
For this event presentation sample below, we used bright colours, stock footage, and messaging that reflects the brand and values of the company. All these elements work together to draw the attention of passers-by.
For a huge selection of video presentation templates, take a look at our template gallery .
Business PowerPoint presentation examples
Striking fear into the hearts of the workplace since 1987, PowerPoint is synonymous with bland, boring presentations that feel more like an endurance test than a learning opportunity. But it doesn’t have to be that way. Check out these anything-but-boring business PowerPoint presentation examples.
3. Design pointers
This PowerPoint presentation takes a tongue-in-cheek look at how the speakers and users of PowerPoint are the problem, not the software itself.
Even at a hefty 61 slides, the vintage theme, appealing colors, and engaging content keep the viewer interested. It delivers useful and actionable tips on creating a better experience for your audience.
Pixar, as you’d expect, redefines the meaning of PowerPoint in their “22 Rules for Phenomenal Storytelling”. The character silhouettes are instantly recognizable and tie firmly to the Pixar brand. The bright colour palettes are carefully chosen to highlight the content of each slide.
This presentation is a good length, delivering one message per slide, making it easy for an audience to take notes and retain the information.
Google slides examples
If you’re in business, chances are you’ll have come across slide decks . Much like a deck of cards, each slide plays a key part in the overall ‘deck’, creating a well-rounded presentation.
If you need to inform your team, present findings, or outline a new strategy, slides are one of the most effective ways to do this.
Google Slides is one of the best ways to create a slide deck right now. It’s easy to use and has built-in design tools that integrate with Adobe, Lucidchart, and more. The best part — it’s free!
5. Teacher education
Here’s a slide deck that was created to educate teachers on how to use Google Slides effectively in a classroom. At first glance it seems stuffy and businessy, but if you look closer it’s apparent the creator knows his audience well, throwing in some teacher-friendly content that’s bound to get a smile.
The slides give walkthrough screenshots and practical advice on the different ways teachers can use the software to make their lives that little bit easier and educate their students at the same time.
6. Charity awareness raiser
This next Google slide deck is designed to raise awareness for an animal shelter. It has simple, clear messaging, and makes use of the furry friends it rescues to tug on heartstrings and encourage donations and adoptions from its audience.
Pro tip: Creating a presentation is exciting but also a little daunting. It’s easy to feel overwhelmed — especially if the success of your business or nonprofit depends on it.
Prezi presentation examples
If you haven’t come across Prezi , it’s a great alternative to using static slides. Sitting somewhere between slides and a video presentation, it allows you to import other content and add motion to create a more engaging viewer experience.
7. Red Bull event recap
This Prezi was created to document the Red Bull stratosphere freefall stunt a few years ago. It neatly captures all the things that Prezi is capable of, including video inserts and the zoom effect, which gives an animated, almost 3D effect to what would otherwise be still images.
Prezi has annual awards for the best examples of presentations over the year. This next example is one of the 2018 winners. It was made to highlight a new Logitech tool.
8. Logitech Spotlight launch
What stands out here are the juicy colors, bold imagery, and the way the designer has used Prezi to its full extent, including rotations, panning, fades, and a full zoom out to finish the presentation.

Sales presentation examples
If you’re stuck for ideas for your sales presentation, step right this way and check out this video template we made for you.
9. Sales enablement video presentation
In today’s fast-paced sales environment, you need a way to make your sales enablement presentations memorable and engaging for busy reps. Sales enablement videos are just the ticket. Use this video presentation template the next time you need to present on your metrics.
10. Zuroa sales deck
If you’re after a sales deck, you can’t go past this example from Zuora. What makes it great? It begins by introducing the worldwide shift in the way consumers are shopping. It’s a global phenomenon, and something we can all relate to.
It then weaves a compelling story about how the subscription model is changing the face of daily life for everyone. Metrics and testimonials from well-known CEOs and executives are included for some slamming social proof to boost the sales message.
Pitch presentation examples
Pitch decks are used to give an overview of business plans, and are usually presented during meetings with customers, investors, or potential partners.
11. Uber pitch deck
This is Uber’s original pitch deck, which (apart from looking a teensy bit dated) gives an excellent overview of their business model and clearly shows how they intended to disrupt a traditional industry and provide a better service to people. Right now, you’re probably very grateful that this pitch presentation was a winner.
You can make your own pitch deck with Biteable, or start with one of our video templates to make something a little more memorable.
12. Video pitch template
This video pitch presentation clearly speaks to the pains of everyone who needs to commute and find parking. It then provides the solution with its app that makes parking a breeze.
The video also introduces the key team members, their business strategy, and what they’re hoping to raise in funding. It’s a simple, clear pitch that positions the company as a key solution to a growing, worldwide problem. It’s compelling and convincing, as a good presentation should be.
13. Fyre Festival pitch deck
The most epic example of a recent pitch deck is this one for Fyre Festival – the greatest event that never happened. Marvel at its persuasion, gasp at the opportunity of being part of the cultural experience of the decade, cringe as everything goes from bad to worse.
Despite the very public outcome, this is a masterclass in how to create hype and get funding with your pitch deck using beautiful imagery, beautiful people, and beautiful promises of riches and fame.
Business presentation examples
Need to get the right message out to the right people? Business presentations can do a lot of the heavy lifting for you.
Simply press play and let your video do the talking. No fumbling your words and sweating buckets in front of those potential clients, just you being cool as a cucumber while your presentation does the talking.
Check out two of our popular templates that you can use as a starting point for your own presentations. While they’re business-minded, they’re definitely not boring.
14. Business intro template
Modern graphics, animations, and upbeat soundtracks keep your prospects engaged as they learn about your business, your team, your values, and how you can help them.
15. Business explainer template
Research presentation examples.
When you’re giving a more technical presentation such as research findings, you need to strike the perfect balance between informing your audience and making sure they stay awake.
As a rule, slides are more effective for research presentations, as they are used to support the speaker’s knowledge rather can capture every small detail on screen.
With often dry, complex, and technical subject matter, there can be a temptation for presentations to follow suit. Use images instead of walls of text, and keep things as easy to follow as possible.
16. TrackMaven research deck
TrackMaven uses their endearing mascot to lighten up this data-heavy slide deck. The graphs help to bring life to their findings, and they ensure to only have one bite-size takeaway per slide so that viewers can easily take notes.
17. Wearable tech research report
Obviously, research can get very researchy and there’s not a lot to be done about it. This slide deck below lays out a ton of in-depth information but breaks it up well with quotes, diagrams, and interesting facts to keep viewers engaged while it delivers its findings on wearable technology.
Team presentation examples
Motivating your team can be a challenge at the best of times, especially when you need to gather them together for….another presentation!
18. Team update template
We created this presentation template as an example of how to engage your team. In this case, it’s for an internal product launch. Using colorful animation and engaging pacing, this video presentation is much better than a static PowerPoint, right?
19. Officevibe collaboration explainer
This short slide deck is a presentation designed to increase awareness of the problems of a disengaged team. Bright colors and relevant images combine with facts and figures that compel viewers to click through to a download to learn more about helping their teams succeed.
Recruitment presentation examples
Recruiting the right people can be a challenge. Presentations can help display your team and your business by painting a dynamic picture of what it’s like to work with you.
Videos and animated slides let you capture the essence of your brand and workplace so the right employees can find you.
20. Company culture explainer
If you’re a recruitment agency, your challenge is to stand out from the hundreds of other agencies in the marketplace.
21. Kaizen culture
Showcasing your agency using a slide deck can give employers and employees a feel for doing business with you. Kaizen clearly displays its credentials and highlights its brand values and personality here (and also its appreciation of the coffee bean).
Explainer presentation examples
Got some explaining to do? Using an explainer video is the ideal way to showcase products that are technical, digital, or otherwise too difficult to explain with still images and text.
Explainer videos help you present the features and values of your product in an engaging way that speaks to your ideal audience and promotes your brand at the same time.
22. Product explainer template
23. lucidchart explainer.
Lucidchart does a stellar job of using explainer videos for their software. Their series of explainers-within-explainers entertains the viewer with cute imagery and an endearing brand voice. At the same time, the video is educating its audience on how to use the actual product. We (almost) guarantee you’ll have more love for spiders after watching this one.
Make a winning video presentation with Biteable
Creating a winning presentation doesn’t need to be difficult or expensive. Modern slide decks and video software make it easy for you to give compelling presentations that sell, explain, and educate without sending your audience to snooze town.
For the best online video presentation software around, check out Biteable. The intuitive platform does all the heavy lifting for you, so making a video presentation is as easy as making a PowerPoint.
Use Biteable’s brand builder to automatically fetch your company colors and logo from your website and apply them to your entire video with the click of a button. Even add a clickable call-to-action button to your video.
Share your business presentation anywhere with a single, trackable URL and watch your message turn into gold.
Make stunning videos with ease.
Take the struggle out of team communication.
Try Biteable now.
- No credit card required
- No complicated design decisions
- No experience necessary
Create or change a presentation’s handout
You can use the Handout Master tab to edit the appearance of presentation handouts, including the layout, headers and footers, and background. Changes made to the handout master appear on all pages of the printed handout.
To see the handout options, click the View tab, and then click Handout Master in the Master Views group.

This opens the Handout Master view.

Change the layout
In the Page Setup group, you can specify the number and layout of slides to print on each page, change the orientation of handouts, and set the slide size. You can use settings on all three menus— Handout Orientation , Slide Size , and Slides Per Page —to customize your layout exactly how you want it.

Set the slides per page
Click Slides Per Page .

Choose a layout option from the thumbnail images.
Tip: The 3 Slides option includes lines that your audience can use to take notes.
Set the orientation
Click Handout Orientation , and then choose Portrait or Landscape .

Set the slide size
Click Slide Size , and then choose one of the options.

When PowerPoint is unable to automatically scale your content, it will prompt you with a message. Select Maximize to increase the size of your slide content when you are scaling to a larger slide size. (Choosing this option could result in your content not fitting on the slide. ) Select Ensure Fit to decrease the size of your content. (This could make your content appear smaller, but you’ll be able to see all content on your slide.)

To set a custom size, including width, height, slide numbering, and orientation of slides and notes, click Custom Slide Size on the Slide Size menu.
To make sure your slides will print the way you want, preview your handouts before printing.
Change headers and footers
You can adjust headers and footers in the Placeholders group. By default, the placeholders appear in the top and bottom corners of the Handout Master page.

Click in a text placeholder (Header, Footer, Date, or Page Number) to make changes to it. You can do things like:
Edit or add content in the text placeholders : In addition to text changes, you can use commands on the Insert tab to add graphics or other content types.
Format text shape and appearance : Select the text and use the options on the Format tab to make changes.
Change text placeholders : Drag a text placeholder to move it, and use the text box sizing handles to change its size.
Turn placeholders on or off : Clear the check box of the placeholder (Header, Date, Footer, or Page Number) that you want to turn off.
Change the background
You can change the background of your handouts (but not the background of your slides) in the Background group. You can also quickly change the font for all for your handout text at once, and you can apply special borders and visual effects.

Colors : Choose a color theme for your handout background. You may have to click Background Styles and choose an option to see it applied.
Background Styles : Choose a style option from the list. The colors displayed depend on your choice in the Colors list.
Tip: Click Format Background at the bottom of the Background Styles list to open the Format pane and choose from more background options, such as advanced fill settings, artistic effects, and color and image settings.
Fonts : Choose a font from the list to quickly apply it to all headers and footers.
Effects : Choose an effect from the list to apply a theme effects, with features including shadows, reflections, lines, fills, and more.
Preview your handouts
To preview the way your handout will look when printed:
Click File > Print .
Go to Settings > Full Page Slides , and then under Handouts , select the layout you want and look at the preview pane. Click the File tab again to return to your previous view.
For more information about working with PowerPoint handouts, see:
Work with handout masters
Print your handouts, notes, or slides
Create your own theme in PowerPoint

Need more help?
Want more options.
Explore subscription benefits, browse training courses, learn how to secure your device, and more.

Microsoft 365 subscription benefits

Microsoft 365 training

Microsoft security

Accessibility center
Communities help you ask and answer questions, give feedback, and hear from experts with rich knowledge.

Ask the Microsoft Community

Microsoft Tech Community

Windows Insiders
Microsoft 365 Insiders
Was this information helpful?
Thank you for your feedback.
COMMENTS
Presentation Handout Example #1: Just Use Slide Notes in PowerPoint as a Presentation Handout. I have to admit, this technique is just a small step above the "printing out your slide-deck" option. However, sometimes, time is short, and you want to make sure that your audience has a good takeaway.
You can present your handout examples for presentation in two formats - either physical or digital. Each comes with a set of perks and downsides. Physical handouts. The physical template for the presentation handout is a good old sheet of paper that contains all the information you want to share with the audience.
If you want to create an effective presentation handout, here's what you should include. 1. List the key points of your presentation. To create a strong presentation handout, list the key facts from your speech. Keep it simple—you don't need to rewrite your entire presentation. Remember, you'll discuss a lot of the material in your ...
Follow these steps to create handouts in PowerPoint. Open your presentation in PowerPoint. Go to the View tab and find Handout Master. Accessing Handout Master in PowerPoint. You can customize the appearance of your handout by adding a header, date, logo, contact details, etc. This works exactly the same as Slide Master in PowerPoint, so all ...
Here are strategies to make handouts more memorable: 1. Visual Design: Consistent Theme: A cohesive theme reinforces the brand and aids in recognition. Ensure that fonts, colors, and imagery align with the overall aesthetic of the presentation, creating a seamless visual experience for the audience.
In this post, presentation trainer, Dr. Echo Rivera shares how to create effective presentation handouts for class lectures, conferences, and training workshops! ... But a good handout also does things like providing the audience with structure and space to take notes that are helpful for their learning. 💡 ...
If you're presenting with visual PowerPoint slides, one of the easiest ways of creating a handout is to type the text of the handout in the "Notes" pane of the PowerPoint edit screen. Then print your slides as "Notes". You'll have an effective handout. 3. Ensure your handout reflects your presentation.
Apply the 10-20-30 rule. Apply the 10-20-30 presentation rule and keep it short, sweet and impactful! Stick to ten slides, deliver your presentation within 20 minutes and use a 30-point font to ensure clarity and focus. Less is more, and your audience will thank you for it! 9. Implement the 5-5-5 rule. Simplicity is key.
If your presentation is long, including a video for your audience to watch is an excellent way to give yourself a break and create new jumping-off points for your speech. 4. Be aware of design techniques and trends. Thanks to cutting-edge technology and tools, you have numerous platforms at your disposal to create a good presentation.
1. Plan Ahead: Don't leave handout creation as a last-minute task. Allocate enough time to make your handout alongside your speech and slides. Rushing to put something together moments before your presentation can result in an ineffective and hastily made handout. 2.
When preparing a presentation handout, it is important to make sure that the content is concise and easy to read and that it reinforces the main points from the talk. Fonts and colors should be consistent with those in the presentation and additional visuals, such as graphs and charts, should be included.
Recording voiceover for a narrated presentation. Preparing for a presentation voiceover. Export the video. To save your video go to File > Export > Create a Video. Make sure Use timings and narrations is selected on the drop-down menu. Host the video online. Finally, make your video accessible to your audience.
How to Give a Good Presentation. Here's a quick look at the 11 tips on how to give a good presentation. Plus, you'll find a bonus resource you won't want to miss, The Visme Presentation Guru Course. Rehearse What You're Planning to Say. Prepare Mentally, Emotionally and Technically. Start Strong.
Plan out the first topics carefully to properly introduce your argument. Add the essential information in the middle part of your presentation. Lastly, close your presentation with a summary of the main points and leave your audience with an afterthought. Also, plan when you're taking questions and for how long.
Ensure your pamphlets ooze excellence with these 10 great tips. 1. Innovative Layout. Since the eye has a natural tendency to examine a page's charts and illustrations before moving on to the wording itself, any images you use should be placed above the passages they correspond to; this will minimise the chances of the text at the top of the ...
Handout during presentation: Distribute your handout at the point when it is useful as support, either in terms of visual illustration or as a means to emphasize your argument. Handout after presentation: If you choose this option, don't forget to include your contact details. If you're sending a handout electronically, PDF is a good choice.
To provide handouts, or not to provide handouts? That truly is a good question. Some people are adamant that a good presentation doesn't need them. However, some presentations serve the audience better if you do provide them. So, what are the best practices for handouts? In this post, I'll share the best practice tips for using handouts ...
Synchronise the Design. Make the design of your slides harmonious with your booklet design. Ideally, this would incorporate some of your branding, like colours, logos, etc. If the presentation design differs from your booklet handout, your listeners won't connect the two and may have difficulty remembering your presentation.
Here are some tips on how to structure a handout: Effective handouts reflect the storyline and information of your presentation. When your audience peruses your handout, it should be clear that it ...
Step #1: Use a Canva Template to Create a Great Presentation Handout. Canva ( https://www.canva.com) is one of those online resources where the more that you use it, the more that you can't do without it. It is graphic design software, similar to Photoshop, but made for the amateur designer. The software is so easy to use, that you can be ...
This presentation is a good length, delivering one message per slide, making it easy for an audience to take notes and retain the information. Pixar's 22 Rules to Phenomenal Storytelling from Gavin McMahon. Google slides examples. If you're in business, chances are you'll have come across slide decks. Much like a deck of cards, each slide ...
You can use the Handout Master tab to edit the appearance of presentation handouts, including the layout, headers and footers, and background. Changes made to the handout master appear on all pages of the printed handout. To see the handout options, click the View tab, and then click Handout Master in the Master Views group.. This opens the Handout Master view.
2. Keep presentation on track. Handouts can also benefit the presenter by providing a road map for the presentation. Many presenters follow their own handout as a guide to stay on message and not ...